> ## Documentation Index
> Fetch the complete documentation index at: https://launchdarkly.com/docs/llms.txt
> Use this file to discover all available pages before exploring further.
# Getting started with OpenAI and AgentControl configs
This guide shows how to connect an OpenAI-powered application to LaunchDarkly AgentControl. OpenAI models are widely adopted for chat completions, function calling, and structured outputs. By the end, you will be able to manage your model configuration and prompts outside of your application code, and track metrics automatically.
AgentControl supports two modes:
* **Completion mode** returns messages and roles (system, user, assistant). Use it for chat-style interactions and message-oriented workflows. Completion mode supports online evaluations with judges attached in the LaunchDarkly UI.
* **Agent mode** returns a single `instructions` string. Use it when your runtime or framework expects a goal/instructions input for a structured workflow. Agent mode changes the configuration shape from messages to instructions. Your application maps these instructions into your provider or framework's native input.
Both modes support tool calling. This guide walks through completion mode as the main path, with an optional agent config section. To learn more about when to use each mode, read [When to use completion mode vs agent mode](/docs/guides/agentcontrol/agent-vs-completion).
This guide provides examples in both Python and Node.js (TypeScript).
**New to AgentControl?**
If you're new to AgentControl, start with the [Quickstart](/docs/home/agentcontrol/quickstart) and return to this guide when you are ready for a more detailed example.
To learn more about AgentControl-specific SDKs, read [AI SDKs](/docs/sdk/ai). For Python-specific details, read the [Python AI SDK reference](/docs/sdk/ai/python).
## Prerequisites
To complete this guide, you need the following:
* A [LaunchDarkly account](https://app.launchdarkly.com/) with an [SDK key](/docs/home/account/environment/keys#view-or-copy-sdk-credentials) for your environment and a member role that allows [AgentControl actions](/docs/home/account/roles/role-actions#agentcontrol-config-actions). To learn more about LaunchDarkly roles, read [Roles](/docs/home/account/roles).
* An OpenAI API key. Create one at [platform.openai.com](https://platform.openai.com/).
* A development environment:
* **Python**: Python 3.10 or higher
* **Node.js**: Node.js 20 or higher
* Familiarity with LaunchDarkly contexts. To learn more, read [Contexts and segments](/docs/home/flags/contexts).
## Concepts
Before you begin, review these key concepts.
### AgentControl configs
An AgentControl config is a LaunchDarkly resource that controls how your application uses large language models. Each AgentControl config contains one or more variations. Each variation specifies:
* A model configuration, including the model name and parameters
* Messages that define the prompt
You can update these settings in LaunchDarkly at any time without changing your application code.
### Contexts
A context represents the end user interacting with your application. LaunchDarkly uses context attributes to:
* Determine which variation to serve based on targeting rules
* Populate `{{ ldctx.* }}` placeholders in your prompts with context attribute values
Other placeholders, such as `{{ topic }}`, are populated from the `variables` argument you pass at runtime.
### The tracker
When you retrieve an AgentControl config, call `createTracker()` (Node.js) or `create_tracker()` (Python) on the returned object to mint a tracker. The tracker records metrics from your OpenAI calls, including:
* Generation count
* Input and output tokens
* Latency
* Success and error rates
These metrics appear on the **AI Insights** dashboard in LaunchDarkly.
## Step 1: Install the SDK
Install the LaunchDarkly AI SDK and the OpenAI SDK in your application. AgentControl is supported by LaunchDarkly server-side SDKs only. The Node.js examples in this guide use the [server-side Node.js AI SDK](https://github.com/launchdarkly/js-core/tree/main/packages/sdk/server-ai).
Here is how to install the required packages:
```bash title="Python" lines wrap theme={null}
pip install "launchdarkly-server-sdk-ai>=0.20.0"
pip install "launchdarkly-server-sdk-ai-openai>=0.6.0"
pip install openai
pip install python-dotenv
```
```bash title="Node.js" lines wrap theme={null}
npm install @launchdarkly/node-server-sdk
npm install "@launchdarkly/server-sdk-ai@^0.20.0"
npm install "@launchdarkly/server-sdk-ai-openai@^0.6.0"
npm install openai
npm install dotenv
```
Create a `.env` file in your project root to store your API keys:
```bash lines wrap theme={null}
# .env
LAUNCHDARKLY_SDK_KEY=
OPENAI_API_KEY=
```
Add `.env` to your `.gitignore` to keep credentials out of version control.
## Step 2: Initialize the clients
Initialize both the LaunchDarkly client and the OpenAI client. Store your API keys in environment variables.
Here is the initialization code:
```python title="Python" expandable lines wrap theme={null}
import os
import json
import ldclient
from ldclient import Context
from ldclient.config import Config
from ldai import LDAIClient, AICompletionConfigDefault, AIAgentConfigDefault
from ldai.providers.types import LDAIMetrics
from ldai.tracker import TokenUsage
from ldai_openai import get_ai_metrics_from_response
from openai import OpenAI
from dotenv import load_dotenv
load_dotenv()
OPENAI_API_KEY = os.environ.get("OPENAI_API_KEY")
SDK_KEY = os.environ.get("LAUNCHDARKLY_SDK_KEY_OPENAI")
CONFIG_KEY = "openai-assistant"
AGENT_CONFIG_KEY = "openai-agent"
openai_client = OpenAI(api_key=OPENAI_API_KEY)
ldclient.set_config(Config(SDK_KEY))
if not ldclient.get().is_initialized():
exit(1)
ai_client = LDAIClient(ldclient.get())
```
```typescript title="Node.js (TypeScript)" expandable lines wrap theme={null}
import dotenv from 'dotenv';
dotenv.config();
import { init, LDClient, LDContext } from '@launchdarkly/node-server-sdk';
import {
initAi,
type LDAIClient,
type LDAICompletionConfig,
type LDAIAgentConfig,
type LDAIMetrics,
} from '@launchdarkly/server-sdk-ai';
import { getAIMetricsFromResponse } from '@launchdarkly/server-sdk-ai-openai';
import OpenAI from 'openai';
const OPENAI_API_KEY = process.env.OPENAI_API_KEY as string;
const SDK_KEY = process.env.LAUNCHDARKLY_SDK_KEY_OPENAI as string;
const CONFIG_KEY = 'openai-assistant';
const AGENT_CONFIG_KEY = 'openai-agent';
const openaiClient = new OpenAI({ apiKey: OPENAI_API_KEY });
const ldClient: LDClient = init(SDK_KEY);
await ldClient.waitForInitialization({ timeout: 10 });
const aiClient: LDAIClient = initAi(ldClient);
```
## Step 3: Create an AgentControl config in LaunchDarkly
Create an AgentControl config in the LaunchDarkly UI to store your OpenAI model settings and prompts.
**Using the MCP server or agent skills**
If you have the [LaunchDarkly MCP server](https://github.com/launchdarkly/mcp-server) or [agent skills](https://github.com/launchdarkly/agent-skills) configured, prompt your coding assistant to create the AgentControl config for you. For example:
"Create a completion mode AgentControl config called 'OpenAI assistant' with a 'GPT-4o' variation using the gpt-4o model, temperature 0.7, max\_tokens 1024, and the system message: 'You are a helpful assistant. Answer questions about \{\{topic}}.' Enable targeting."
To create the AgentControl config:
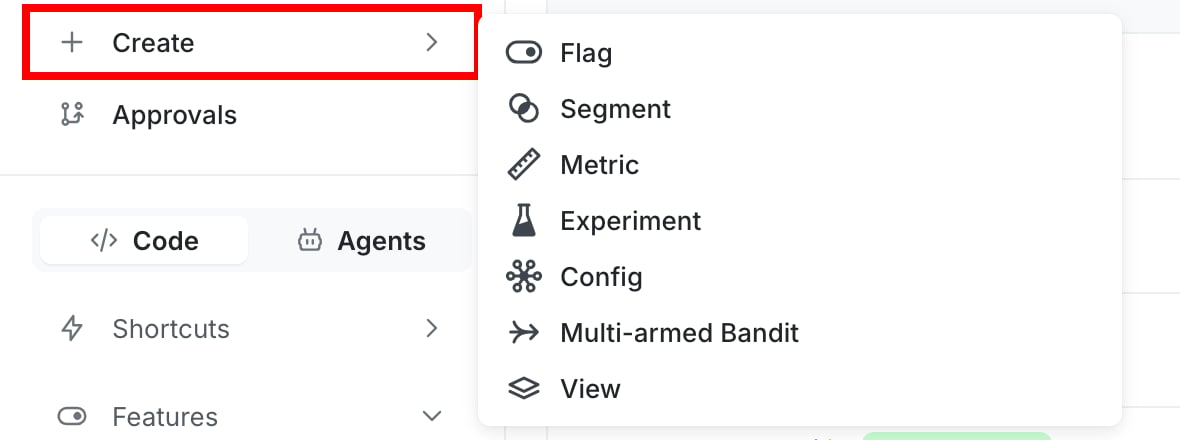
1. Click **Create** and select **Config**.
2. In the "Create config" dialog, select **Completion**.
3. Enter a name, such as "OpenAI assistant".
4. Click **Create**.
 To create a variation:
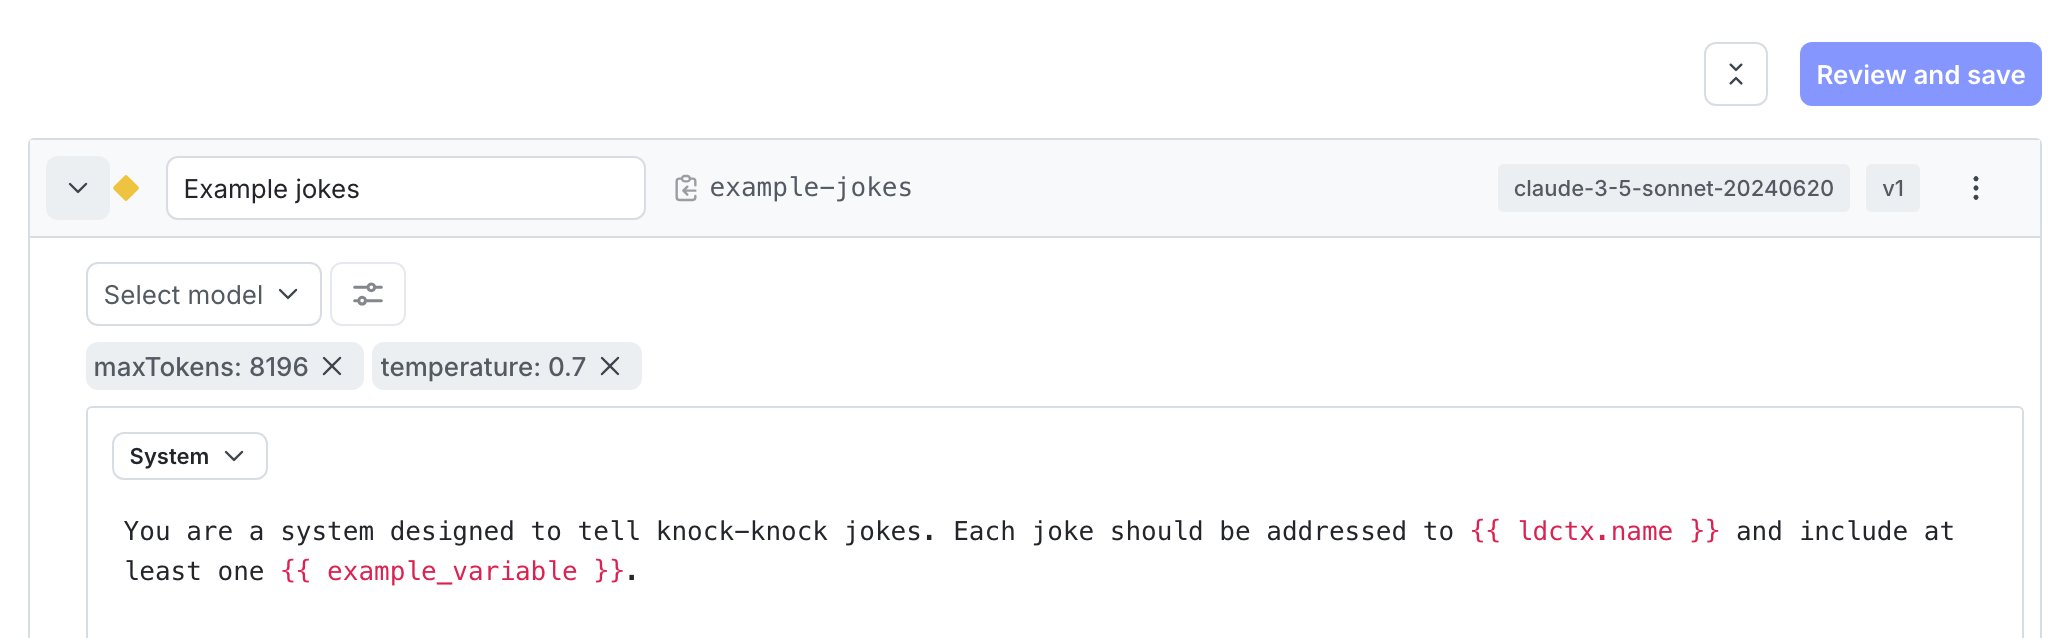
1. On the **Variations** tab, replace "Untitled variation" with a name, such as "GPT-4o".
2. Click **Select a model** and choose the `gpt-4o` OpenAI model.
3. Click **Parameters** and set `temperature` to `0.7` and `max_tokens` to `1024`.
4. Add a **system** message to define your assistant's behavior:
```text title="System message" lines wrap theme={null}
You are a helpful assistant. Answer questions about {{topic}}.
```
5. Click **Review and save**.
To create a variation:
1. On the **Variations** tab, replace "Untitled variation" with a name, such as "GPT-4o".
2. Click **Select a model** and choose the `gpt-4o` OpenAI model.
3. Click **Parameters** and set `temperature` to `0.7` and `max_tokens` to `1024`.
4. Add a **system** message to define your assistant's behavior:
```text title="System message" lines wrap theme={null}
You are a helpful assistant. Answer questions about {{topic}}.
```
5. Click **Review and save**.
 To enable targeting:
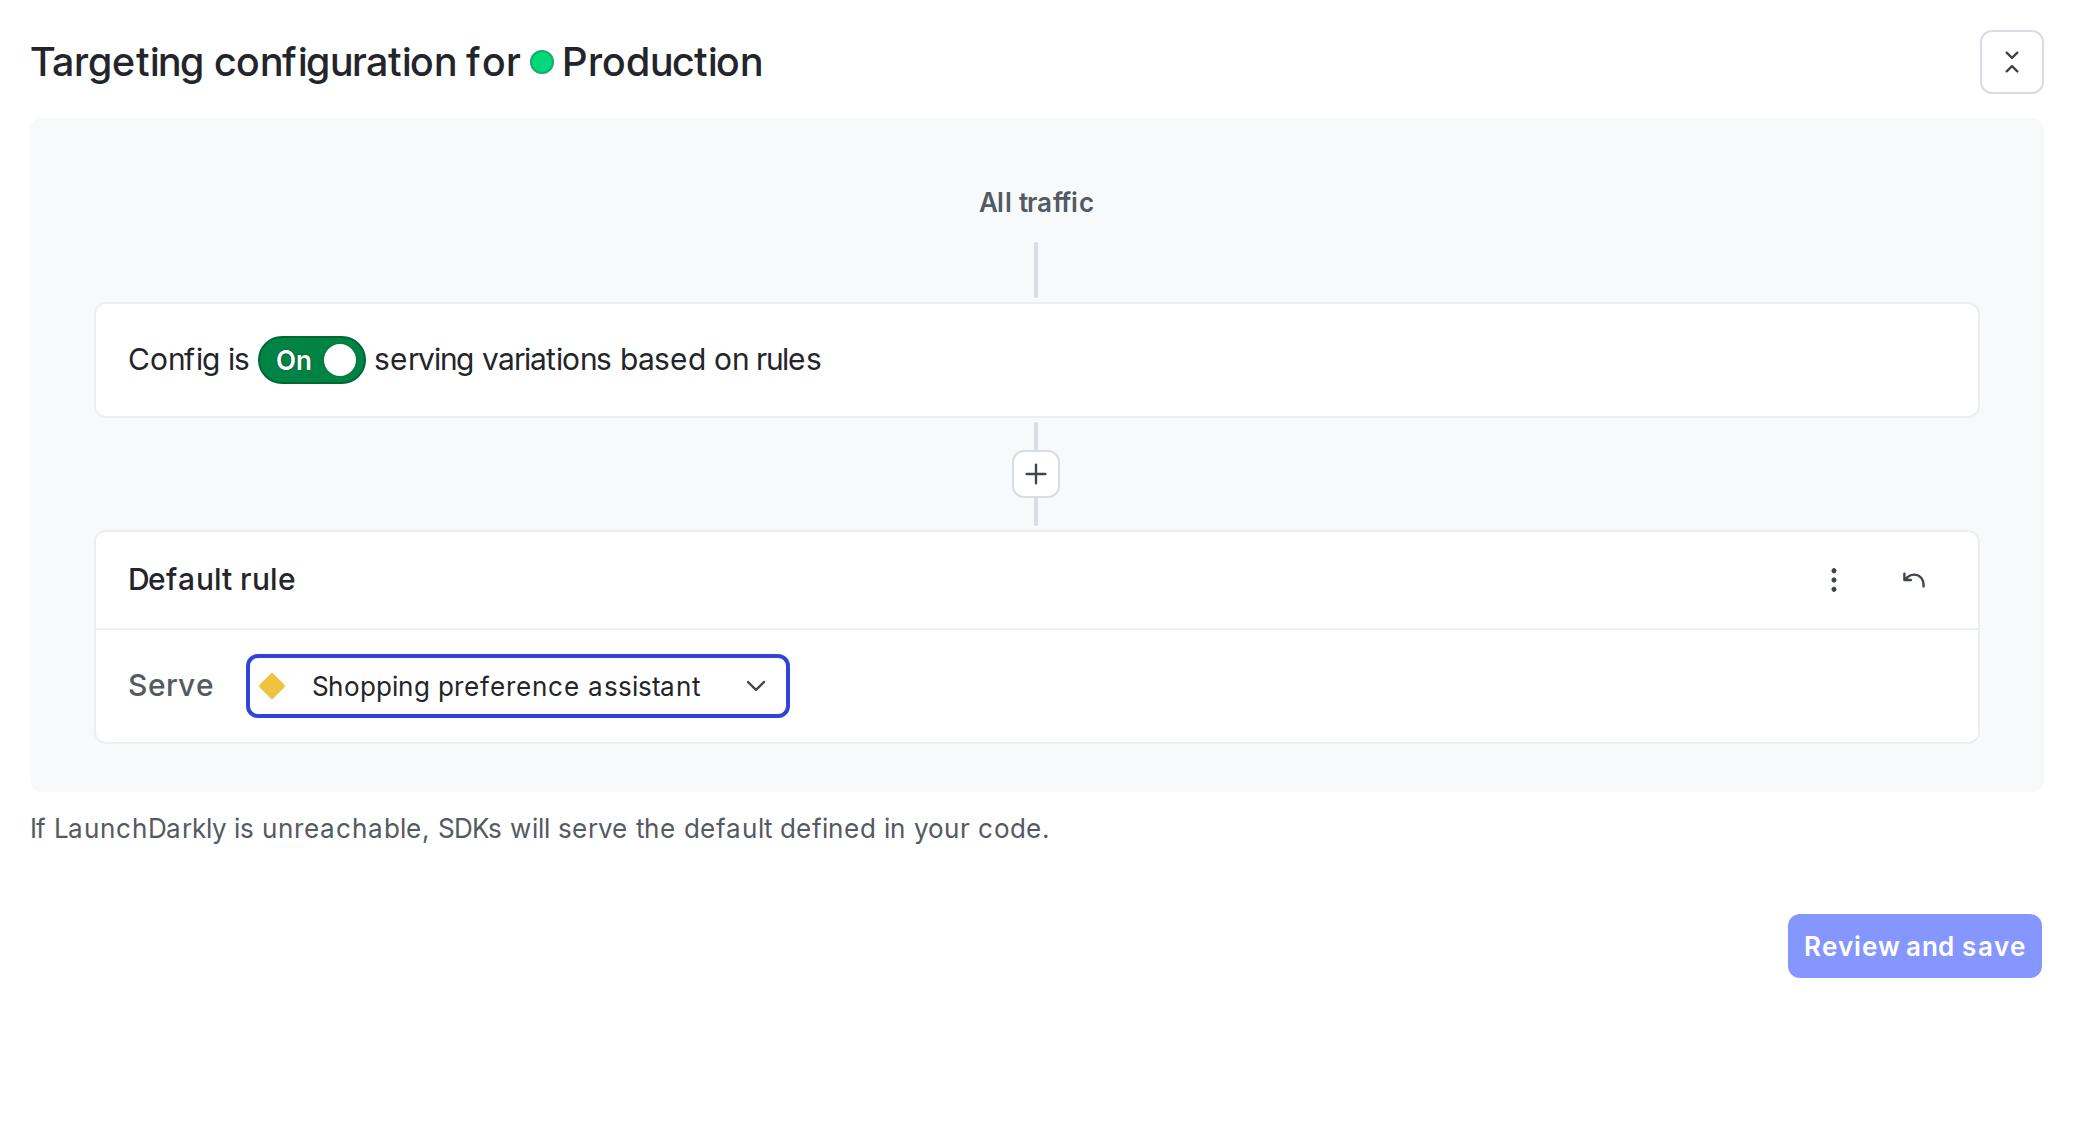
1. Select the **Targeting** tab.
2. In the "Default rule" section, click **Edit**.
3. Set the default rule to serve your variation.
4. Click **Review and save**.
To enable targeting:
1. Select the **Targeting** tab.
2. In the "Default rule" section, click **Edit**.
3. Set the default rule to serve your variation.
4. Click **Review and save**.
 ## Step 4: Get the AgentControl config in your application
Retrieve the AgentControl config from LaunchDarkly by calling the completion config function. Pass a context that represents the current user. A fallback configuration is optional — if LaunchDarkly is unreachable and no fallback is provided, the config returns with `enabled: false`.
Here is how to get the AgentControl config:
```python title="Python" expandable lines wrap theme={null}
# Define the context for the current user
context = Context.builder("user-123") \
.kind("user") \
.name("Sandy") \
.build()
# Pass a default for improved resiliency when the AgentControl config is unavailable
# or LaunchDarkly is unreachable; omit for a disabled default.
# Example:
# from ldai import AICompletionConfigDefault
# default = AICompletionConfigDefault(
# enabled=True,
# model={"name": "gpt-5"},
# provider={"name": "openai"},
# messages=[{"role": "system", "content": "You are a helpful assistant."}],
# )
# config = ai_client.completion_config(CONFIG_KEY, context, default, variables={"topic": "Python"})
# Get the AgentControl config
config = ai_client.completion_config(CONFIG_KEY, context, variables={"topic": "Python"})
tracker = config.create_tracker()
```
```typescript title="Node.js (TypeScript)" expandable lines wrap theme={null}
// Define the context for the current user
const context: LDContext = {
kind: 'user',
key: 'user-123',
name: 'Sandy',
};
// Pass a default for improved resiliency when the AgentControl config is unavailable
// or LaunchDarkly is unreachable; omit for a disabled default.
// Example:
// const fallback = {
// enabled: true,
// model: { name: 'gpt-5' },
// provider: { name: 'openai' },
// messages: [{ role: 'system', content: 'You are a helpful assistant.' }],
// };
// const aiConfig = await aiClient.completionConfig(CONFIG_KEY, context, fallback, { topic: 'Python' });
// Get the AgentControl config
const aiConfig: LDAICompletionConfig = await aiClient.completionConfig(
CONFIG_KEY,
context,
undefined,
{ topic: 'Python' },
);
```
Check the `enabled` property and handle the disabled case in your application. If you want your application to serve a specific model and prompt when LaunchDarkly is unreachable, pass an `AICompletionConfigDefault` (Python) or a plain config object (TypeScript) as the third argument — see the commented fallback example above.
**Best practices**
For production use:
* Retrieve the AgentControl config each time you generate content so LaunchDarkly can evaluate the latest targeting rules and prompt changes.
* Provide a fallback configuration when possible so your application can fail gracefully if LaunchDarkly is unavailable.
* Avoid sending personally identifiable information in contexts unless you have a specific need and an approved handling pattern. To learn more, read [Privacy in AgentControl](/docs/home/agentcontrol/privacy).
## Step 5: Call OpenAI and track metrics
OpenAI's Chat Completions API expects messages in an array, including system-role messages. Unlike Anthropic, there is no separate top-level `system` parameter. Instead, the system prompt is a message with `role: "system"` in the messages array. Use the generic `track_metrics_of` (Python) or `trackMetricsOf` (Node.js) helper with `get_ai_metrics_from_response` (Python) or `getAIMetricsFromResponse` (Node.js) from the `launchdarkly-server-sdk-ai-openai` / `@launchdarkly/server-sdk-ai-openai` package. The helper records duration, success/error, and token usage automatically.
**Chat Completions vs. Responses API**
This guide uses OpenAI's **Chat Completions** API for completion mode (this step) and the **Responses** API for agent mode (Step 6). The `track_metrics_of` / `trackMetricsOf` tracker takes a response-to-metrics converter: `get_ai_metrics_from_response` / `getAIMetricsFromResponse` for Chat Completions, and a custom `responses_metrics` / `responsesMetrics` converter for the Responses API shape (`response.output[]` / `response.usage.*_tokens`).
LaunchDarkly variations store OpenAI-native parameter names (`max_completion_tokens`, `temperature`, `top_p`, and so on), so they pass directly to the SDK. You do need to drop `tools` from params before spreading them — attached tools pass through on the top-level `tools` argument, and leaving them in params would duplicate the argument. Define a small helper for that:
```python title="Python" lines wrap theme={null}
def drop_tools(params):
"""Drop `tools` from params — attached tools are passed via the top-level
`tools=` argument, so leaving them in params would duplicate the argument."""
return {k: v for k, v in (params or {}).items() if k != "tools"}
```
```typescript title="Node.js (TypeScript)" lines wrap theme={null}
// Drop `tools` from params — we pass attached tools via the top-level `tools:`
// field, so leaving them in params would duplicate the argument. The variation
// stores OpenAI-native parameter names, so no renaming is needed.
function openaiParams(params: Record): Record {
return Object.fromEntries(Object.entries(params || {}).filter(([k]) => k !== 'tools'));
}
```
Then call OpenAI with the config:
```python title="Python" expandable lines wrap theme={null}
if config.enabled:
tracker = config.create_tracker()
messages = config.messages or []
chat_messages = [m.to_dict() for m in messages]
chat_messages.append({"role": "user", "content": "How do I read a file in Python?"})
ld_params = (config.model.to_dict().get("parameters") if config.model else None) or {}
# The helper lives in the launchdarkly-server-sdk-ai-openai package.
completion = tracker.track_metrics_of(
get_ai_metrics_from_response,
lambda: openai_client.chat.completions.create(
model=config.model.name,
messages=chat_messages,
**drop_tools(ld_params),
),
)
```
```typescript title="Node.js (TypeScript)" expandable lines wrap theme={null}
if (aiConfig.enabled) {
const tracker = aiConfig.createTracker();
const chatMessages = (aiConfig.messages || []).map(m => ({ role: m.role, content: m.content }));
chatMessages.push({ role: 'user', content: 'How do I read a file in Python?' });
// Helper from @launchdarkly/server-sdk-ai-openai.
const completion = await tracker.trackMetricsOf(
getAIMetricsFromResponse,
async () =>
openaiClient.chat.completions.create({
model: aiConfig.model!.name,
messages: chatMessages as any,
...openaiParams(aiConfig.model?.parameters ?? {}),
}),
);
}
```
**Streaming**
The `track_metrics_of` (Python) and `trackMetricsOf` (Node.js) helpers expect a complete response object. If your application uses streaming responses, use the lower-level `track_duration`, `track_tokens`, `track_success`, and `track_error` methods to record metrics manually. To learn more, read [Monitor AgentControl configs](/docs/home/agentcontrol/monitor).
## Step 6: Optional: Use agent mode with tool calling
Agent-mode AgentControl configs return a single `instructions` string instead of a message list, and they let you attach reusable tools from the LaunchDarkly tools library. This step uses OpenAI's **Responses API** for agent mode. The Responses API is OpenAI's agent-oriented surface and accepts LaunchDarkly's flat `{type, name, description, parameters}` tool shape directly — no per-call conversion. It also manages conversation state server-side through `previous_response_id`, so each turn only sends the new input (the initial user message, or the tool outputs from the previous turn).
### Create the tool in the tools library
First, define the tool in LaunchDarkly so the AgentControl config variation can reference it:
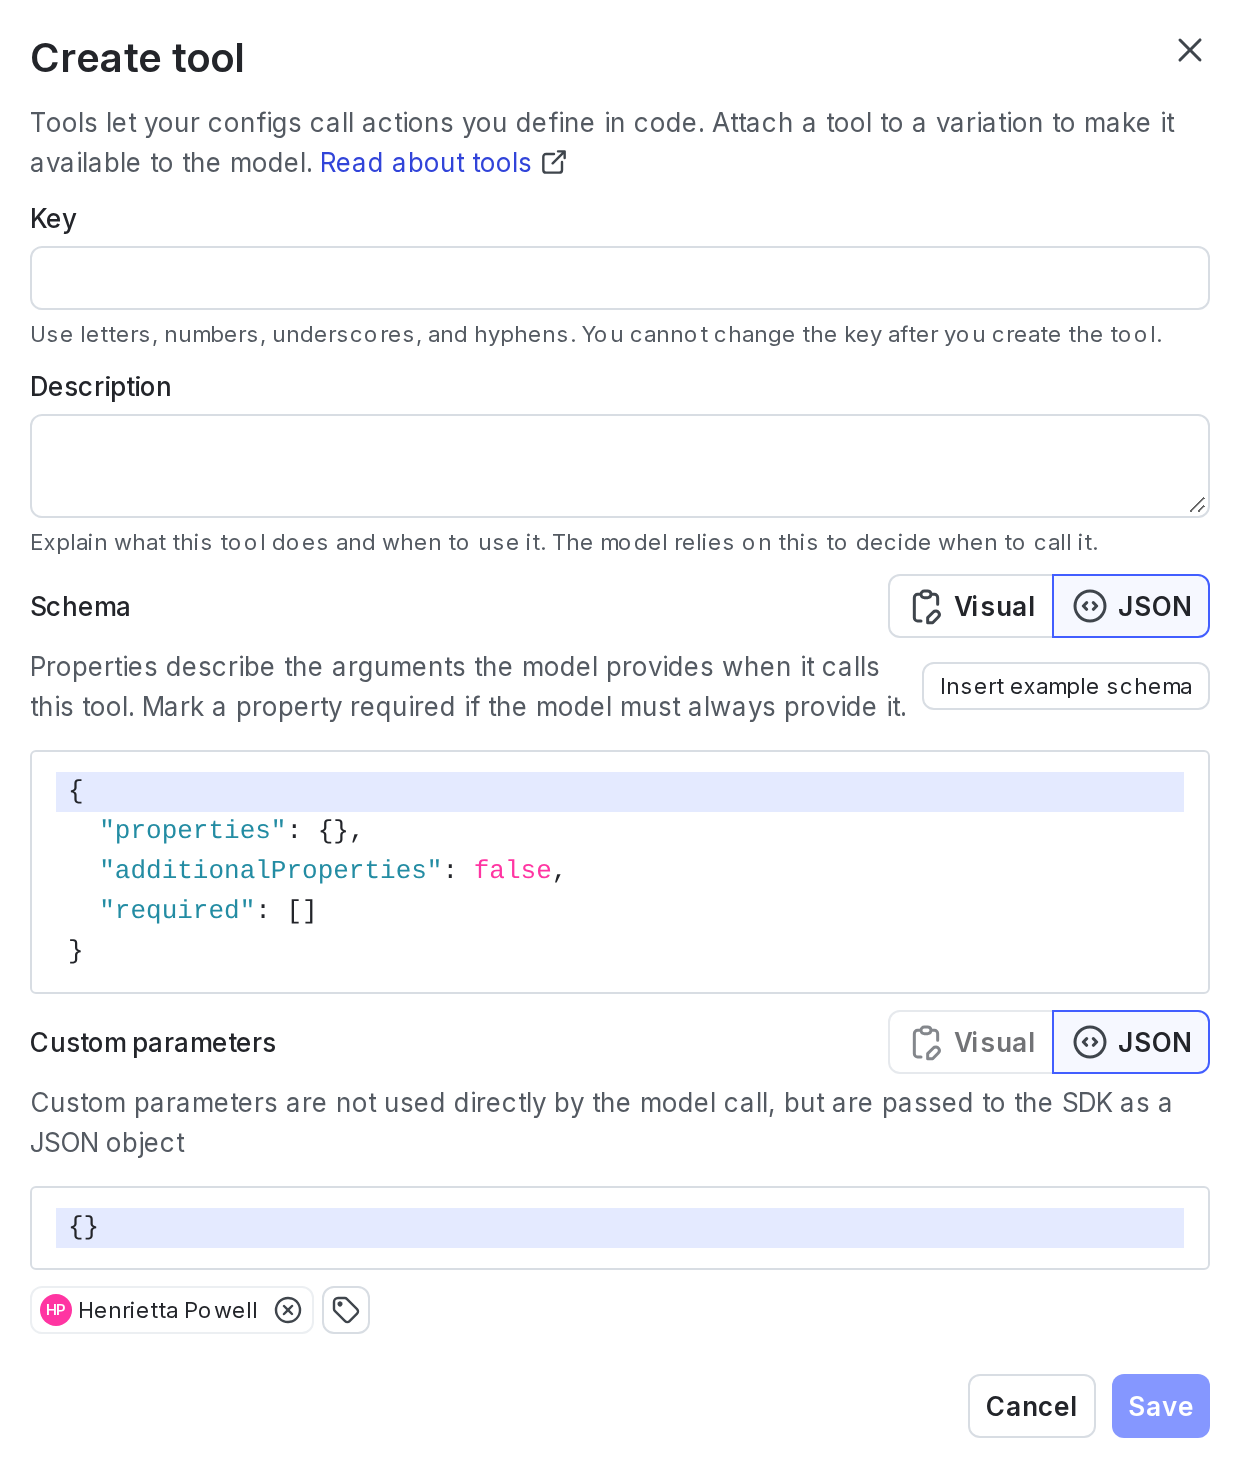
1. In the left sidebar, click **Library**, then select the **Tools** tab.
2. Click **Add tool**.
3. Enter `get_order_status` as the key.
4. Enter "Look up the status of a customer order by order ID" as the description.
5. Define the schema using the JSON editor:
```json lines wrap theme={null}
{
"type": "object",
"properties": {
"order_id": {
"type": "string",
"description": "The order ID to look up"
}
},
"required": ["order_id"]
}
```
6. Click **Save**.
## Step 4: Get the AgentControl config in your application
Retrieve the AgentControl config from LaunchDarkly by calling the completion config function. Pass a context that represents the current user. A fallback configuration is optional — if LaunchDarkly is unreachable and no fallback is provided, the config returns with `enabled: false`.
Here is how to get the AgentControl config:
```python title="Python" expandable lines wrap theme={null}
# Define the context for the current user
context = Context.builder("user-123") \
.kind("user") \
.name("Sandy") \
.build()
# Pass a default for improved resiliency when the AgentControl config is unavailable
# or LaunchDarkly is unreachable; omit for a disabled default.
# Example:
# from ldai import AICompletionConfigDefault
# default = AICompletionConfigDefault(
# enabled=True,
# model={"name": "gpt-5"},
# provider={"name": "openai"},
# messages=[{"role": "system", "content": "You are a helpful assistant."}],
# )
# config = ai_client.completion_config(CONFIG_KEY, context, default, variables={"topic": "Python"})
# Get the AgentControl config
config = ai_client.completion_config(CONFIG_KEY, context, variables={"topic": "Python"})
tracker = config.create_tracker()
```
```typescript title="Node.js (TypeScript)" expandable lines wrap theme={null}
// Define the context for the current user
const context: LDContext = {
kind: 'user',
key: 'user-123',
name: 'Sandy',
};
// Pass a default for improved resiliency when the AgentControl config is unavailable
// or LaunchDarkly is unreachable; omit for a disabled default.
// Example:
// const fallback = {
// enabled: true,
// model: { name: 'gpt-5' },
// provider: { name: 'openai' },
// messages: [{ role: 'system', content: 'You are a helpful assistant.' }],
// };
// const aiConfig = await aiClient.completionConfig(CONFIG_KEY, context, fallback, { topic: 'Python' });
// Get the AgentControl config
const aiConfig: LDAICompletionConfig = await aiClient.completionConfig(
CONFIG_KEY,
context,
undefined,
{ topic: 'Python' },
);
```
Check the `enabled` property and handle the disabled case in your application. If you want your application to serve a specific model and prompt when LaunchDarkly is unreachable, pass an `AICompletionConfigDefault` (Python) or a plain config object (TypeScript) as the third argument — see the commented fallback example above.
**Best practices**
For production use:
* Retrieve the AgentControl config each time you generate content so LaunchDarkly can evaluate the latest targeting rules and prompt changes.
* Provide a fallback configuration when possible so your application can fail gracefully if LaunchDarkly is unavailable.
* Avoid sending personally identifiable information in contexts unless you have a specific need and an approved handling pattern. To learn more, read [Privacy in AgentControl](/docs/home/agentcontrol/privacy).
## Step 5: Call OpenAI and track metrics
OpenAI's Chat Completions API expects messages in an array, including system-role messages. Unlike Anthropic, there is no separate top-level `system` parameter. Instead, the system prompt is a message with `role: "system"` in the messages array. Use the generic `track_metrics_of` (Python) or `trackMetricsOf` (Node.js) helper with `get_ai_metrics_from_response` (Python) or `getAIMetricsFromResponse` (Node.js) from the `launchdarkly-server-sdk-ai-openai` / `@launchdarkly/server-sdk-ai-openai` package. The helper records duration, success/error, and token usage automatically.
**Chat Completions vs. Responses API**
This guide uses OpenAI's **Chat Completions** API for completion mode (this step) and the **Responses** API for agent mode (Step 6). The `track_metrics_of` / `trackMetricsOf` tracker takes a response-to-metrics converter: `get_ai_metrics_from_response` / `getAIMetricsFromResponse` for Chat Completions, and a custom `responses_metrics` / `responsesMetrics` converter for the Responses API shape (`response.output[]` / `response.usage.*_tokens`).
LaunchDarkly variations store OpenAI-native parameter names (`max_completion_tokens`, `temperature`, `top_p`, and so on), so they pass directly to the SDK. You do need to drop `tools` from params before spreading them — attached tools pass through on the top-level `tools` argument, and leaving them in params would duplicate the argument. Define a small helper for that:
```python title="Python" lines wrap theme={null}
def drop_tools(params):
"""Drop `tools` from params — attached tools are passed via the top-level
`tools=` argument, so leaving them in params would duplicate the argument."""
return {k: v for k, v in (params or {}).items() if k != "tools"}
```
```typescript title="Node.js (TypeScript)" lines wrap theme={null}
// Drop `tools` from params — we pass attached tools via the top-level `tools:`
// field, so leaving them in params would duplicate the argument. The variation
// stores OpenAI-native parameter names, so no renaming is needed.
function openaiParams(params: Record): Record {
return Object.fromEntries(Object.entries(params || {}).filter(([k]) => k !== 'tools'));
}
```
Then call OpenAI with the config:
```python title="Python" expandable lines wrap theme={null}
if config.enabled:
tracker = config.create_tracker()
messages = config.messages or []
chat_messages = [m.to_dict() for m in messages]
chat_messages.append({"role": "user", "content": "How do I read a file in Python?"})
ld_params = (config.model.to_dict().get("parameters") if config.model else None) or {}
# The helper lives in the launchdarkly-server-sdk-ai-openai package.
completion = tracker.track_metrics_of(
get_ai_metrics_from_response,
lambda: openai_client.chat.completions.create(
model=config.model.name,
messages=chat_messages,
**drop_tools(ld_params),
),
)
```
```typescript title="Node.js (TypeScript)" expandable lines wrap theme={null}
if (aiConfig.enabled) {
const tracker = aiConfig.createTracker();
const chatMessages = (aiConfig.messages || []).map(m => ({ role: m.role, content: m.content }));
chatMessages.push({ role: 'user', content: 'How do I read a file in Python?' });
// Helper from @launchdarkly/server-sdk-ai-openai.
const completion = await tracker.trackMetricsOf(
getAIMetricsFromResponse,
async () =>
openaiClient.chat.completions.create({
model: aiConfig.model!.name,
messages: chatMessages as any,
...openaiParams(aiConfig.model?.parameters ?? {}),
}),
);
}
```
**Streaming**
The `track_metrics_of` (Python) and `trackMetricsOf` (Node.js) helpers expect a complete response object. If your application uses streaming responses, use the lower-level `track_duration`, `track_tokens`, `track_success`, and `track_error` methods to record metrics manually. To learn more, read [Monitor AgentControl configs](/docs/home/agentcontrol/monitor).
## Step 6: Optional: Use agent mode with tool calling
Agent-mode AgentControl configs return a single `instructions` string instead of a message list, and they let you attach reusable tools from the LaunchDarkly tools library. This step uses OpenAI's **Responses API** for agent mode. The Responses API is OpenAI's agent-oriented surface and accepts LaunchDarkly's flat `{type, name, description, parameters}` tool shape directly — no per-call conversion. It also manages conversation state server-side through `previous_response_id`, so each turn only sends the new input (the initial user message, or the tool outputs from the previous turn).
### Create the tool in the tools library
First, define the tool in LaunchDarkly so the AgentControl config variation can reference it:
1. In the left sidebar, click **Library**, then select the **Tools** tab.
2. Click **Add tool**.
3. Enter `get_order_status` as the key.
4. Enter "Look up the status of a customer order by order ID" as the description.
5. Define the schema using the JSON editor:
```json lines wrap theme={null}
{
"type": "object",
"properties": {
"order_id": {
"type": "string",
"description": "The order ID to look up"
}
},
"required": ["order_id"]
}
```
6. Click **Save**.
 ### Create the agent AgentControl config
1. Click **Create** and select **Config**.
2. Select **Agent** mode.
### Create the agent AgentControl config
1. Click **Create** and select **Config**.
2. Select **Agent** mode.
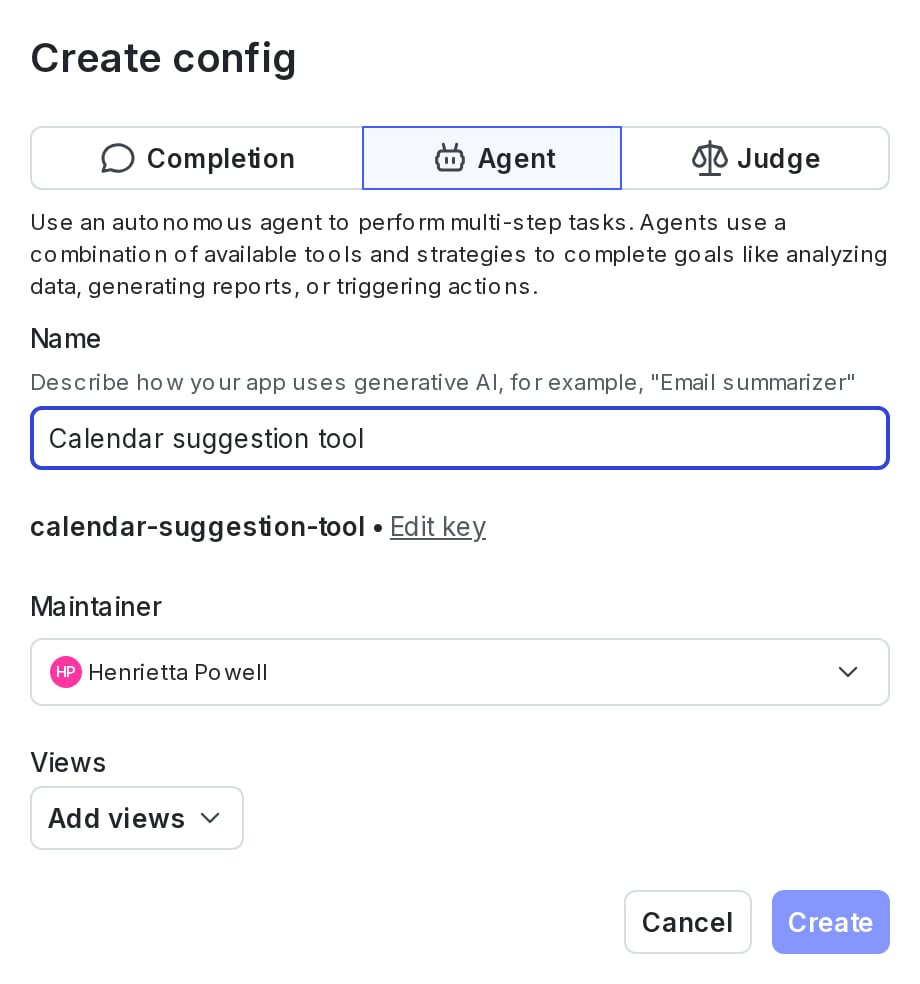 3. Enter a name:
```text title="AgentControl config name" lines wrap theme={null}
OpenAI agent
```
4. Click **Create**.
5. On the **Variations** tab, name the variation (for example, "GPT-4o agent").
6. Click **Select a model** and choose `gpt-4o`.
7. Click **Parameters** and set `max_tokens` to `1024`.
8. Add the agent **instructions**:
```text title="Agent instructions" lines wrap theme={null}
You are an order status assistant. Use the get_order_status tool to look up customer orders by ID. Only call the tool when the user asks about an order.
```
9. Click **+ Attach tools** and select `get_order_status`.
3. Enter a name:
```text title="AgentControl config name" lines wrap theme={null}
OpenAI agent
```
4. Click **Create**.
5. On the **Variations** tab, name the variation (for example, "GPT-4o agent").
6. Click **Select a model** and choose `gpt-4o`.
7. Click **Parameters** and set `max_tokens` to `1024`.
8. Add the agent **instructions**:
```text title="Agent instructions" lines wrap theme={null}
You are an order status assistant. Use the get_order_status tool to look up customer orders by ID. Only call the tool when the user asks about an order.
```
9. Click **+ Attach tools** and select `get_order_status`.
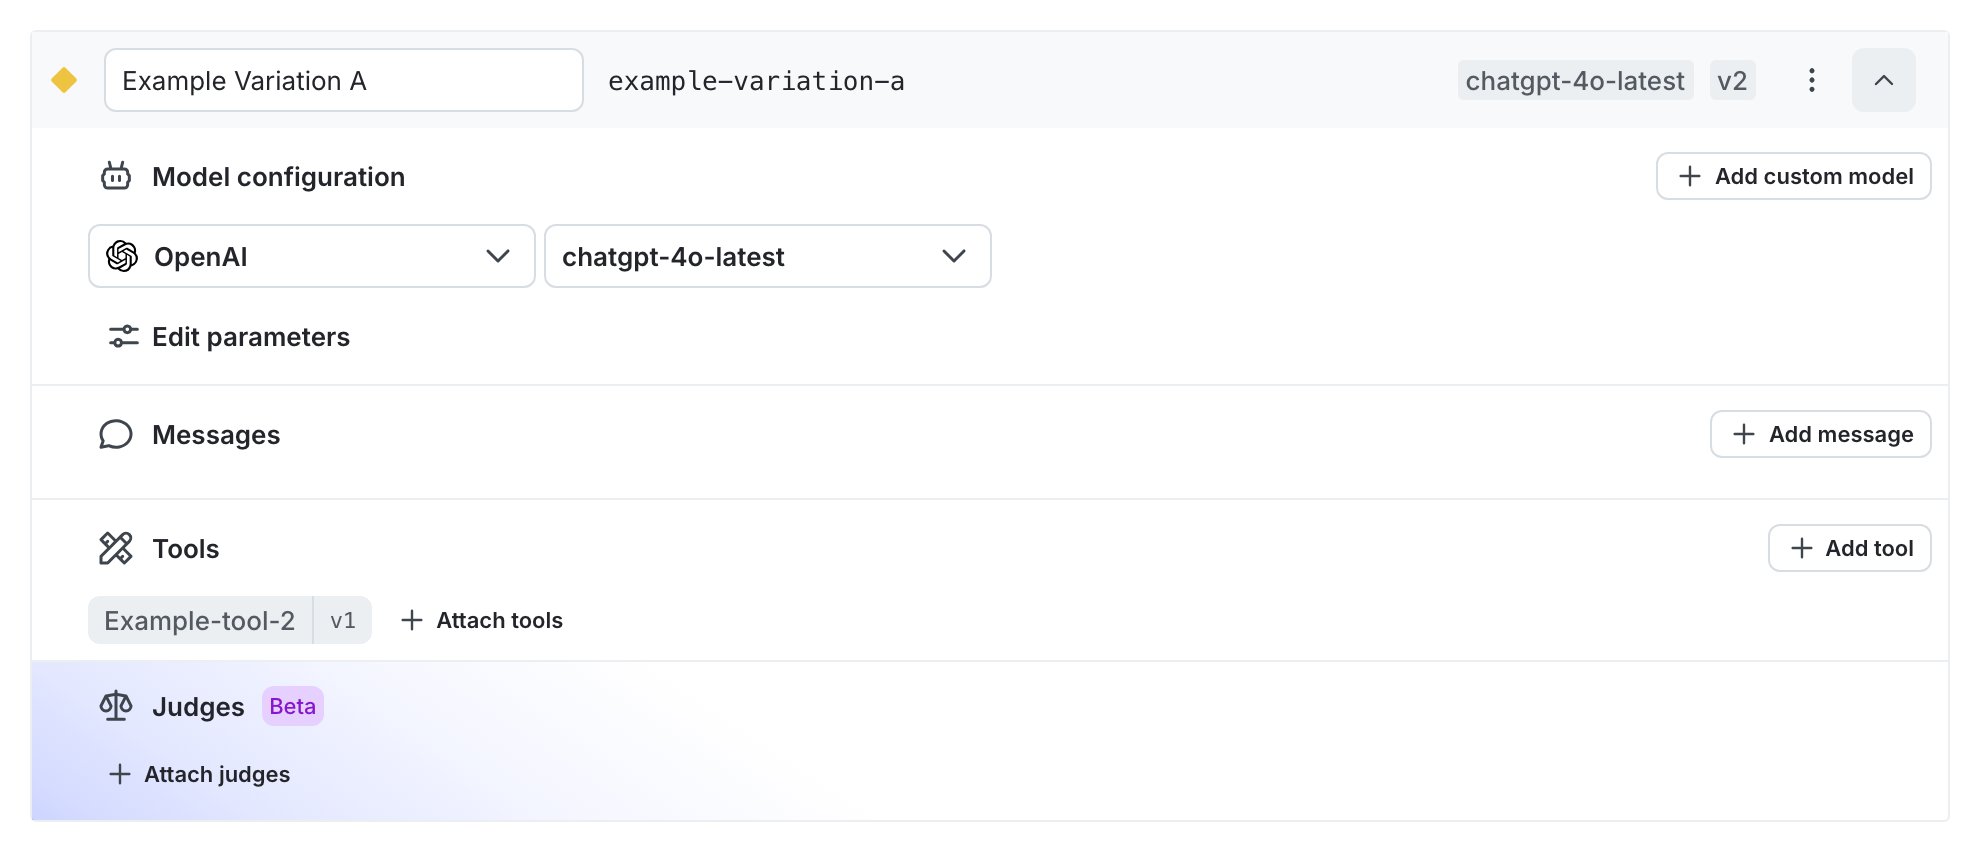 10. Click **Review and save**.
11. On the **Targeting** tab, set the default rule to serve your variation and save.
To learn more about managing tools, read [Tools in AgentControl](/docs/home/agentcontrol/tools).
### Retrieve the agent config and run the tool loop
Use `agent_config()` instead of `completion_config()`. The SDK returns attached tools under `parameters.tools` in LaunchDarkly's flat shape, so convert them to OpenAI's nested `{type: 'function', function: {name, description, parameters}}` shape before passing them on the `tools=` argument. Tool handler functions stay in your application code. LaunchDarkly stores the schema, while your application owns the behavior.
Because the Responses API has a different response shape than Chat Completions, use `tracker.track_metrics_of` (Python) / `tracker.trackMetricsOf` (TypeScript) with a provider-specific converter function. The converter receives the raw API response and returns an `LDAIMetrics` object; the tracker handles duration and success/error itself.
```python title="Python" expandable lines wrap theme={null}
def responses_metrics(response) -> LDAIMetrics:
"""Convert an OpenAI Responses API result into LDAIMetrics. Passed to
tracker.track_metrics_of — which handles duration + success/error itself.
Parses the Responses output shape: response.output[] and response.usage.*_tokens."""
usage = getattr(response, "usage", None)
tokens = None
if usage:
tokens = TokenUsage(
total=usage.total_tokens or 0,
input=usage.input_tokens or 0,
output=usage.output_tokens or 0,
)
return LDAIMetrics(success=True, tokens=tokens)
# Same fallback pattern as completion — omit the default for a disabled fallback.
agent = ai_client.agent_config(AGENT_CONFIG_KEY, context)
if agent.enabled:
tracker = agent.create_tracker()
ld_params = (agent.model.to_dict().get("parameters") if agent.model else None) or {}
# Tools attached to the variation in LaunchDarkly are already in the Responses API's
# flat shape — pass them straight through.
tools = ld_params.get("tools", []) or []
# Handler stays in app code; LaunchDarkly governs the schema.
def get_order_status(order_id: str) -> str:
orders = {
"ORD-123": "Shipped — arrives Thursday",
"ORD-456": "Processing — estimated ship date: tomorrow",
"ORD-789": "Delivered on Monday",
}
return orders.get(order_id, f"No order found with ID {order_id}")
tool_handlers = {"get_order_status": get_order_status}
# Responses API agent loop: chain turns via previous_response_id so OpenAI
# keeps track of conversation state for us — each turn we only send the
# new input (the initial user message, or the function_call_outputs for
# the previous turn's tool calls).
next_input = [{"role": "user", "content": "What's the status of order ORD-123?"}]
previous_response_id = None
MAX_STEPS = 5
for _ in range(MAX_STEPS):
response = tracker.track_metrics_of(
responses_metrics,
lambda: openai_client.responses.create(
model=agent.model.name,
instructions=agent.instructions,
input=next_input,
tools=tools,
previous_response_id=previous_response_id,
**drop_tools(ld_params),
),
)
previous_response_id = response.id
function_calls = [item for item in response.output if item.type == "function_call"]
if not function_calls:
break
next_input = []
for call in function_calls:
args = json.loads(call.arguments)
if call.name not in tool_handlers:
raise ValueError(f"Unknown tool: {call.name}")
result = tool_handlers[call.name](**args)
tracker.track_tool_call(call.name)
next_input.append({
"type": "function_call_output",
"call_id": call.call_id,
"output": result,
})
```
```typescript title="Node.js (TypeScript)" expandable lines wrap theme={null}
// Convert an OpenAI Responses API result into LDAIMetrics. Passed to
// tracker.trackMetricsOf — which handles duration + success/error itself.
// Parses the Responses output shape: response.output[] and response.usage.*_tokens.
function responsesMetrics(response: any): LDAIMetrics {
const usage = response.usage;
return {
success: true,
tokens: usage
? {
input: usage.input_tokens ?? 0,
output: usage.output_tokens ?? 0,
total: usage.total_tokens ?? 0,
}
: undefined,
};
}
// Same fallback pattern as completion — omit the default for a disabled fallback.
const agentConfig: LDAIAgentConfig = await aiClient.agentConfig(AGENT_CONFIG_KEY, context);
if (agentConfig.enabled && agentConfig.instructions) {
const tracker = agentConfig.createTracker();
// Responses API accepts the LaunchDarkly flat tool shape directly — no conversion.
const ldParams = (agentConfig.model?.parameters || {}) as Record;
const tools = (ldParams.tools as any[] | undefined) ?? [];
// Handlers stay in application code — LaunchDarkly governs the schema, the app owns execution.
function getOrderStatus(orderId: string): string {
const orders: Record = {
'ORD-123': 'Shipped — arrives Thursday',
'ORD-456': 'Processing — estimated ship date: tomorrow',
'ORD-789': 'Delivered on Monday',
};
return orders[orderId] || `No order found with ID ${orderId}`;
}
const toolHandlers: Record string> = {
get_order_status: (args) => getOrderStatus(args.order_id),
};
// Chain turns via previous_response_id so OpenAI keeps conversation state.
let nextInput: any[] = [{ role: 'user', content: "What's the status of order ORD-123?" }];
let previousResponseId: string | undefined;
const MAX_STEPS = 5;
for (let i = 0; i < MAX_STEPS; i++) {
const response = await tracker.trackMetricsOf(responsesMetrics, () =>
(openaiClient as any).responses.create({
model: agentConfig.model!.name,
instructions: agentConfig.instructions,
input: nextInput,
tools,
previous_response_id: previousResponseId,
...openaiParams(ldParams),
}),
);
previousResponseId = response.id;
const functionCalls = (response.output ?? []).filter((o: any) => o.type === 'function_call');
if (functionCalls.length === 0) {
break;
}
nextInput = [];
for (const call of functionCalls) {
const args = JSON.parse(call.arguments);
const handler = toolHandlers[call.name];
if (!handler) throw new Error(`Unknown tool: ${call.name}`);
const result = handler(args);
nextInput.push({ type: 'function_call_output', call_id: call.call_id, output: result });
}
}
}
```
In completion mode, you can attach judges to variations in the LaunchDarkly UI for automatic evaluation. In agent mode, invoke judges programmatically through the AI SDK.
To learn more, read [When to use completion mode vs agent mode](/docs/guides/agentcontrol/agent-vs-completion) and [Agents](/docs/home/agentcontrol/agents).
## Step 7: Monitor your AgentControl config
Use the LaunchDarkly UI to monitor how your applications are performing across all AgentControl configs and for individual configs.
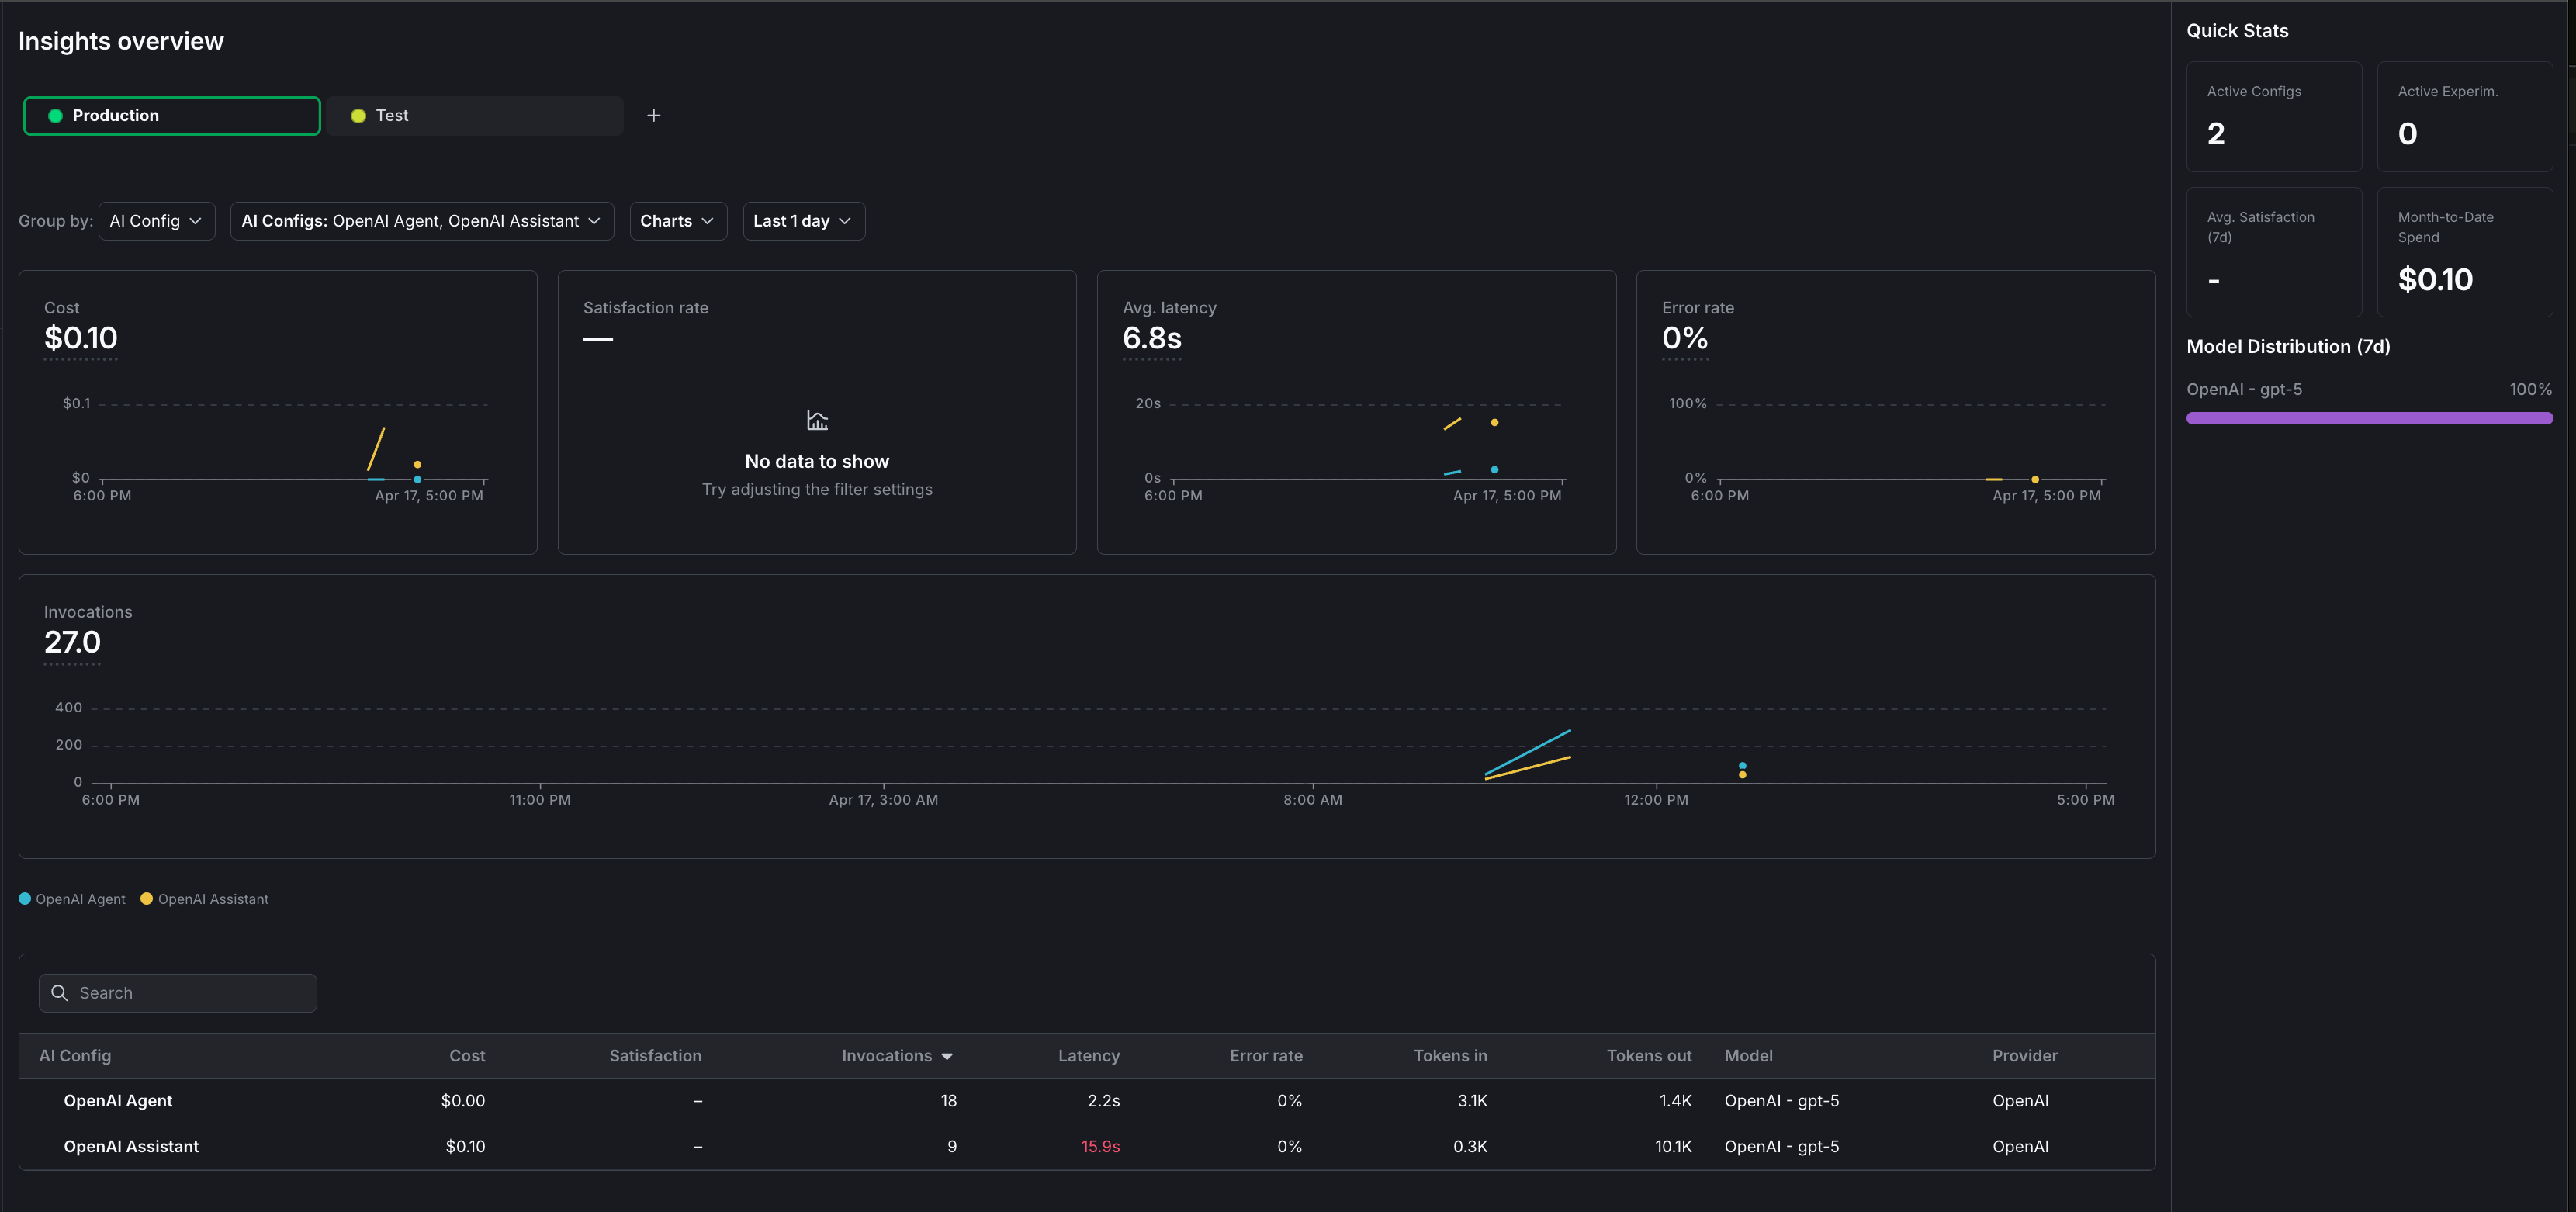
To view aggregated metrics across all your AgentControl configs, navigate to **Insights** in the left sidebar under the **AI** section. The Insights overview page displays cost, latency, error rate, invocation counts, and model distribution across your organization. To learn more, read [AI Insights](/docs/home/agentcontrol/insights).
To view metrics for a specific AgentControl config:
1. Navigate to your AgentControl config.
2. Select the **Monitoring** tab.
The dashboard displays the following metrics:
* **Generation count**: The total number of AI generation calls tracked for this config.
* **Input and output tokens**: Token consumption broken down by prompt tokens sent and completion tokens received.
* **Latency**: The time taken for each generation call, shown as percentiles (p50, p95).
* **Success and error rates**: The proportion of successful versus failed generation calls.
Metrics update approximately every minute. Use these metrics to compare variations and optimize your prompts. To learn more, read [Monitor AgentControl configs](/docs/home/agentcontrol/monitor).
10. Click **Review and save**.
11. On the **Targeting** tab, set the default rule to serve your variation and save.
To learn more about managing tools, read [Tools in AgentControl](/docs/home/agentcontrol/tools).
### Retrieve the agent config and run the tool loop
Use `agent_config()` instead of `completion_config()`. The SDK returns attached tools under `parameters.tools` in LaunchDarkly's flat shape, so convert them to OpenAI's nested `{type: 'function', function: {name, description, parameters}}` shape before passing them on the `tools=` argument. Tool handler functions stay in your application code. LaunchDarkly stores the schema, while your application owns the behavior.
Because the Responses API has a different response shape than Chat Completions, use `tracker.track_metrics_of` (Python) / `tracker.trackMetricsOf` (TypeScript) with a provider-specific converter function. The converter receives the raw API response and returns an `LDAIMetrics` object; the tracker handles duration and success/error itself.
```python title="Python" expandable lines wrap theme={null}
def responses_metrics(response) -> LDAIMetrics:
"""Convert an OpenAI Responses API result into LDAIMetrics. Passed to
tracker.track_metrics_of — which handles duration + success/error itself.
Parses the Responses output shape: response.output[] and response.usage.*_tokens."""
usage = getattr(response, "usage", None)
tokens = None
if usage:
tokens = TokenUsage(
total=usage.total_tokens or 0,
input=usage.input_tokens or 0,
output=usage.output_tokens or 0,
)
return LDAIMetrics(success=True, tokens=tokens)
# Same fallback pattern as completion — omit the default for a disabled fallback.
agent = ai_client.agent_config(AGENT_CONFIG_KEY, context)
if agent.enabled:
tracker = agent.create_tracker()
ld_params = (agent.model.to_dict().get("parameters") if agent.model else None) or {}
# Tools attached to the variation in LaunchDarkly are already in the Responses API's
# flat shape — pass them straight through.
tools = ld_params.get("tools", []) or []
# Handler stays in app code; LaunchDarkly governs the schema.
def get_order_status(order_id: str) -> str:
orders = {
"ORD-123": "Shipped — arrives Thursday",
"ORD-456": "Processing — estimated ship date: tomorrow",
"ORD-789": "Delivered on Monday",
}
return orders.get(order_id, f"No order found with ID {order_id}")
tool_handlers = {"get_order_status": get_order_status}
# Responses API agent loop: chain turns via previous_response_id so OpenAI
# keeps track of conversation state for us — each turn we only send the
# new input (the initial user message, or the function_call_outputs for
# the previous turn's tool calls).
next_input = [{"role": "user", "content": "What's the status of order ORD-123?"}]
previous_response_id = None
MAX_STEPS = 5
for _ in range(MAX_STEPS):
response = tracker.track_metrics_of(
responses_metrics,
lambda: openai_client.responses.create(
model=agent.model.name,
instructions=agent.instructions,
input=next_input,
tools=tools,
previous_response_id=previous_response_id,
**drop_tools(ld_params),
),
)
previous_response_id = response.id
function_calls = [item for item in response.output if item.type == "function_call"]
if not function_calls:
break
next_input = []
for call in function_calls:
args = json.loads(call.arguments)
if call.name not in tool_handlers:
raise ValueError(f"Unknown tool: {call.name}")
result = tool_handlers[call.name](**args)
tracker.track_tool_call(call.name)
next_input.append({
"type": "function_call_output",
"call_id": call.call_id,
"output": result,
})
```
```typescript title="Node.js (TypeScript)" expandable lines wrap theme={null}
// Convert an OpenAI Responses API result into LDAIMetrics. Passed to
// tracker.trackMetricsOf — which handles duration + success/error itself.
// Parses the Responses output shape: response.output[] and response.usage.*_tokens.
function responsesMetrics(response: any): LDAIMetrics {
const usage = response.usage;
return {
success: true,
tokens: usage
? {
input: usage.input_tokens ?? 0,
output: usage.output_tokens ?? 0,
total: usage.total_tokens ?? 0,
}
: undefined,
};
}
// Same fallback pattern as completion — omit the default for a disabled fallback.
const agentConfig: LDAIAgentConfig = await aiClient.agentConfig(AGENT_CONFIG_KEY, context);
if (agentConfig.enabled && agentConfig.instructions) {
const tracker = agentConfig.createTracker();
// Responses API accepts the LaunchDarkly flat tool shape directly — no conversion.
const ldParams = (agentConfig.model?.parameters || {}) as Record;
const tools = (ldParams.tools as any[] | undefined) ?? [];
// Handlers stay in application code — LaunchDarkly governs the schema, the app owns execution.
function getOrderStatus(orderId: string): string {
const orders: Record = {
'ORD-123': 'Shipped — arrives Thursday',
'ORD-456': 'Processing — estimated ship date: tomorrow',
'ORD-789': 'Delivered on Monday',
};
return orders[orderId] || `No order found with ID ${orderId}`;
}
const toolHandlers: Record string> = {
get_order_status: (args) => getOrderStatus(args.order_id),
};
// Chain turns via previous_response_id so OpenAI keeps conversation state.
let nextInput: any[] = [{ role: 'user', content: "What's the status of order ORD-123?" }];
let previousResponseId: string | undefined;
const MAX_STEPS = 5;
for (let i = 0; i < MAX_STEPS; i++) {
const response = await tracker.trackMetricsOf(responsesMetrics, () =>
(openaiClient as any).responses.create({
model: agentConfig.model!.name,
instructions: agentConfig.instructions,
input: nextInput,
tools,
previous_response_id: previousResponseId,
...openaiParams(ldParams),
}),
);
previousResponseId = response.id;
const functionCalls = (response.output ?? []).filter((o: any) => o.type === 'function_call');
if (functionCalls.length === 0) {
break;
}
nextInput = [];
for (const call of functionCalls) {
const args = JSON.parse(call.arguments);
const handler = toolHandlers[call.name];
if (!handler) throw new Error(`Unknown tool: ${call.name}`);
const result = handler(args);
nextInput.push({ type: 'function_call_output', call_id: call.call_id, output: result });
}
}
}
```
In completion mode, you can attach judges to variations in the LaunchDarkly UI for automatic evaluation. In agent mode, invoke judges programmatically through the AI SDK.
To learn more, read [When to use completion mode vs agent mode](/docs/guides/agentcontrol/agent-vs-completion) and [Agents](/docs/home/agentcontrol/agents).
## Step 7: Monitor your AgentControl config
Use the LaunchDarkly UI to monitor how your applications are performing across all AgentControl configs and for individual configs.
To view aggregated metrics across all your AgentControl configs, navigate to **Insights** in the left sidebar under the **AI** section. The Insights overview page displays cost, latency, error rate, invocation counts, and model distribution across your organization. To learn more, read [AI Insights](/docs/home/agentcontrol/insights).
To view metrics for a specific AgentControl config:
1. Navigate to your AgentControl config.
2. Select the **Monitoring** tab.
The dashboard displays the following metrics:
* **Generation count**: The total number of AI generation calls tracked for this config.
* **Input and output tokens**: Token consumption broken down by prompt tokens sent and completion tokens received.
* **Latency**: The time taken for each generation call, shown as percentiles (p50, p95).
* **Success and error rates**: The proportion of successful versus failed generation calls.
Metrics update approximately every minute. Use these metrics to compare variations and optimize your prompts. To learn more, read [Monitor AgentControl configs](/docs/home/agentcontrol/monitor).
 **Observability**
The AI SDKs emit OpenTelemetry-compatible spans for each generation call. You can forward these spans to your existing observability stack for deeper analysis. To learn more, read [Observability](/docs/home/observability) and [LLM observability](/docs/home/observability/llm-observability).
## Step 8: Flush events and close the client
Always flush events before closing the LaunchDarkly client when your application shuts down — trailing events are at risk of being lost otherwise, in short-lived scripts and long-running services alike.
Here is how to flush events and close the client:
```python title="Python" lines wrap theme={null}
# Always flush events before closing — trailing events are at risk of being
# lost otherwise, in short-lived scripts and long-running services alike.
ldclient.get().flush()
ldclient.get().close()
```
```typescript title="Node.js (TypeScript)" lines wrap theme={null}
// Always flush events before closing — trailing events are at risk of being
// lost otherwise, in short-lived scripts and long-running services alike.
await ldClient.flush();
await ldClient.close();
```
## Complete example
Here is a complete working example that combines all the steps.
```python title="Python" expandable lines wrap theme={null}
import os
import json
import ldclient
from ldclient import Context
from ldclient.config import Config
from ldai import LDAIClient, AICompletionConfigDefault, AIAgentConfigDefault
from ldai.providers.types import LDAIMetrics
from ldai.tracker import TokenUsage
from ldai_openai import get_ai_metrics_from_response
from openai import OpenAI
from dotenv import load_dotenv
load_dotenv()
OPENAI_API_KEY = os.environ.get("OPENAI_API_KEY")
SDK_KEY = os.environ.get("LAUNCHDARKLY_SDK_KEY_OPENAI")
CONFIG_KEY = "openai-assistant"
AGENT_CONFIG_KEY = "openai-agent"
def drop_tools(params):
"""Drop `tools` from params — attached tools are passed via the top-level
`tools=` argument, so leaving them in params would duplicate the argument."""
return {k: v for k, v in (params or {}).items() if k != "tools"}
def responses_metrics(response) -> LDAIMetrics:
"""Convert an OpenAI Responses API result into LDAIMetrics. Passed to
tracker.track_metrics_of — which handles duration + success/error itself.
Parses the Responses output shape: response.output[] and response.usage.*_tokens."""
usage = getattr(response, "usage", None)
tokens = None
if usage:
tokens = TokenUsage(
total=usage.total_tokens or 0,
input=usage.input_tokens or 0,
output=usage.output_tokens or 0,
)
return LDAIMetrics(success=True, tokens=tokens)
def main():
openai_client = OpenAI(api_key=OPENAI_API_KEY)
ldclient.set_config(Config(SDK_KEY))
if not ldclient.get().is_initialized():
return
ai_client = LDAIClient(ldclient.get())
context = Context.builder("user-123").kind("user").name("Sandy").build()
# ===================
# COMPLETION MODE — Chat Completions API
# ===================
# Pass a default for improved resiliency when the AgentControl config is unavailable
# or LaunchDarkly is unreachable; omit for a disabled default.
# Example:
# default = AICompletionConfigDefault(
# enabled=True,
# model={"name": "gpt-5"},
# provider={"name": "openai"},
# messages=[{"role": "system", "content": "You are a helpful assistant."}],
# )
# config = ai_client.completion_config(CONFIG_KEY, context, default, variables={"topic": "Python"})
config = ai_client.completion_config(CONFIG_KEY, context, variables={"topic": "Python"})
if config.enabled:
tracker = config.create_tracker()
chat_messages = [m.to_dict() for m in (config.messages or [])]
chat_messages.append({"role": "user", "content": "How do I read a file in Python?"})
ld_params = (config.model.to_dict().get("parameters") if config.model else None) or {}
# The helper lives in the launchdarkly-server-sdk-ai-openai package.
tracker.track_metrics_of(
get_ai_metrics_from_response,
lambda: openai_client.chat.completions.create(
model=config.model.name,
messages=chat_messages,
**drop_tools(ld_params),
),
)
# ===================
# AGENT MODE — Responses API (OpenAI's preferred agent surface;
# flat tool shape matches the LaunchDarkly native tool format, no conversion needed)
# ===================
# Same fallback pattern as completion — omit the default for a disabled fallback.
agent = ai_client.agent_config(AGENT_CONFIG_KEY, context)
if agent.enabled:
tracker = agent.create_tracker()
ld_params = (agent.model.to_dict().get("parameters") if agent.model else None) or {}
# Tools attached to the variation in LaunchDarkly are already in the Responses API's
# flat shape — pass them straight through.
tools = ld_params.get("tools", []) or []
def get_order_status(order_id: str) -> str:
orders = {
"ORD-123": "Shipped — arrives Thursday",
"ORD-456": "Processing — estimated ship date: tomorrow",
"ORD-789": "Delivered on Monday",
}
return orders.get(order_id, f"No order found with ID {order_id}")
tool_handlers = {"get_order_status": get_order_status}
# Responses API agent loop: chain turns via previous_response_id so OpenAI
# keeps track of conversation state for us.
next_input = [{"role": "user", "content": "What's the status of order ORD-123?"}]
previous_response_id = None
MAX_STEPS = 5
for _ in range(MAX_STEPS):
response = tracker.track_metrics_of(
responses_metrics,
lambda: openai_client.responses.create(
model=agent.model.name,
instructions=agent.instructions,
input=next_input,
tools=tools,
previous_response_id=previous_response_id,
**drop_tools(ld_params),
),
)
previous_response_id = response.id
function_calls = [item for item in response.output if item.type == "function_call"]
if not function_calls:
break
next_input = []
for call in function_calls:
args = json.loads(call.arguments)
if call.name not in tool_handlers:
raise ValueError(f"Unknown tool: {call.name}")
result = tool_handlers[call.name](**args)
tracker.track_tool_call(call.name)
next_input.append({
"type": "function_call_output",
"call_id": call.call_id,
"output": result,
})
# Always flush events before closing — trailing events are at risk of being
# lost otherwise, in short-lived scripts and long-running services alike.
ldclient.get().flush()
ldclient.get().close()
if __name__ == "__main__":
main()
```
```typescript title="Node.js (TypeScript)" expandable lines wrap theme={null}
import dotenv from 'dotenv';
dotenv.config();
import { init, LDClient, LDContext } from '@launchdarkly/node-server-sdk';
import {
initAi,
type LDAIClient,
type LDAICompletionConfig,
type LDAIAgentConfig,
type LDAIMetrics,
} from '@launchdarkly/server-sdk-ai';
import { getAIMetricsFromResponse } from '@launchdarkly/server-sdk-ai-openai';
import OpenAI from 'openai';
const OPENAI_API_KEY = process.env.OPENAI_API_KEY as string;
const SDK_KEY = process.env.LAUNCHDARKLY_SDK_KEY_OPENAI as string;
const CONFIG_KEY = 'openai-assistant';
const AGENT_CONFIG_KEY = 'openai-agent';
// Drop `tools` from params — we pass attached tools via the top-level `tools:`
// field, so leaving them in params would duplicate the argument. The variation
// stores OpenAI-native parameter names, so no renaming is needed.
function openaiParams(params: Record): Record {
return Object.fromEntries(Object.entries(params || {}).filter(([k]) => k !== 'tools'));
}
// Convert an OpenAI Responses API result into LDAIMetrics. Passed to
// tracker.trackMetricsOf — which handles duration + success/error itself.
// Parses the Responses output shape: response.output[] and response.usage.*_tokens.
function responsesMetrics(response: any): LDAIMetrics {
const usage = response.usage;
return {
success: true,
tokens: usage
? {
input: usage.input_tokens ?? 0,
output: usage.output_tokens ?? 0,
total: usage.total_tokens ?? 0,
}
: undefined,
};
}
async function main() {
const openaiClient = new OpenAI({ apiKey: OPENAI_API_KEY });
const ldClient: LDClient = init(SDK_KEY);
await ldClient.waitForInitialization({ timeout: 10 });
const aiClient: LDAIClient = initAi(ldClient);
const context: LDContext = {
kind: 'user',
key: 'user-123',
name: 'Sandy',
};
// ===================
// COMPLETION MODE — Chat Completions API
// ===================
// Pass a default for improved resiliency when the AgentControl config is unavailable
// or LaunchDarkly is unreachable; omit for a disabled default.
// Example:
// const fallback = {
// enabled: true,
// model: { name: 'gpt-5' },
// provider: { name: 'openai' },
// messages: [{ role: 'system', content: 'You are a helpful assistant.' }],
// };
// const aiConfig = await aiClient.completionConfig(CONFIG_KEY, context, fallback, { topic: 'Python' });
const aiConfig: LDAICompletionConfig = await aiClient.completionConfig(
CONFIG_KEY,
context,
undefined,
{ topic: 'Python' },
);
if (aiConfig.enabled) {
const tracker = aiConfig.createTracker();
const chatMessages = (aiConfig.messages || []).map(m => ({ role: m.role, content: m.content }));
chatMessages.push({ role: 'user', content: 'How do I read a file in Python?' });
// Helper from @launchdarkly/server-sdk-ai-openai.
await tracker.trackMetricsOf(
getAIMetricsFromResponse,
async () =>
openaiClient.chat.completions.create({
model: aiConfig.model!.name,
messages: chatMessages as any,
...openaiParams(aiConfig.model?.parameters ?? {}),
}),
);
}
// ===================
// AGENT MODE — Responses API
// ===================
// Same fallback pattern as completion — omit the default for a disabled fallback.
const agentConfig: LDAIAgentConfig = await aiClient.agentConfig(AGENT_CONFIG_KEY, context);
if (agentConfig.enabled && agentConfig.instructions) {
const tracker = agentConfig.createTracker();
// Responses API accepts the LaunchDarkly flat tool shape directly — no conversion.
const ldParams = (agentConfig.model?.parameters || {}) as Record;
const tools = (ldParams.tools as any[] | undefined) ?? [];
// Handlers stay in application code — LaunchDarkly governs the schema, the app owns execution.
function getOrderStatus(orderId: string): string {
const orders: Record = {
'ORD-123': 'Shipped — arrives Thursday',
'ORD-456': 'Processing — estimated ship date: tomorrow',
'ORD-789': 'Delivered on Monday',
};
return orders[orderId] || `No order found with ID ${orderId}`;
}
const toolHandlers: Record string> = {
get_order_status: (args) => getOrderStatus(args.order_id),
};
// Chain turns via previous_response_id so OpenAI keeps conversation state.
let nextInput: any[] = [{ role: 'user', content: "What's the status of order ORD-123?" }];
let previousResponseId: string | undefined;
const MAX_STEPS = 5;
for (let i = 0; i < MAX_STEPS; i++) {
const response = await tracker.trackMetricsOf(responsesMetrics, () =>
(openaiClient as any).responses.create({
model: agentConfig.model!.name,
instructions: agentConfig.instructions,
input: nextInput,
tools,
previous_response_id: previousResponseId,
...openaiParams(ldParams),
}),
);
previousResponseId = response.id;
const functionCalls = (response.output ?? []).filter((o: any) => o.type === 'function_call');
if (functionCalls.length === 0) {
break;
}
nextInput = [];
for (const call of functionCalls) {
const args = JSON.parse(call.arguments);
const handler = toolHandlers[call.name];
if (!handler) throw new Error(`Unknown tool: ${call.name}`);
const result = handler(args);
nextInput.push({ type: 'function_call_output', call_id: call.call_id, output: result });
}
}
}
// Always flush events before closing — trailing events are at risk of being
// lost otherwise, in short-lived scripts and long-running services alike.
await ldClient.flush();
await ldClient.close();
}
main();
```
## What to explore next
After you have the basic integration working, you can extend it with:
* [Tools](/docs/home/agentcontrol/tools) for calling external functions from your workflows
* [Online evaluations](/docs/home/agentcontrol/online-evaluations) to score response quality automatically
* [Experiments](/docs/home/agentcontrol/experimentation) to compare AgentControl config variations statistically
* [Agents](/docs/home/agentcontrol/agents) for multi-step workflows
For more AgentControl guides, read the other guides in the [AgentControl guides](/docs/guides/agentcontrol) section.
## Troubleshooting
### Metrics not appearing
If metrics do not appear on the **AI Insights** dashboard:
* Verify that you are calling `tracker.track_metrics_of()` (Python) or `tracker.trackMetricsOf()` (Node.js) with the correct metrics converter.
* Ensure you call `flush()` before closing the client, especially for short-lived scripts.
* Wait at least one minute for metrics to process.
### SDK initialization failures
If the LaunchDarkly SDK fails to initialize:
* Verify your SDK key is correct and matches the environment you are targeting.
* Check that your network can reach LaunchDarkly servers.
* Review the SDK logs for specific error messages.
### Config returns fallback value
If you always receive the fallback configuration:
* Verify targeting is enabled for your AgentControl config.
* Check that the AgentControl config key in your code matches the key in LaunchDarkly.
* Ensure your context matches the targeting rules.
### OpenAI API errors
If you receive OpenAI API errors:
* Verify your OPENAI\_API\_KEY is set correctly.
* Check that your API key has sufficient permissions.
* Ensure the model name in your AgentControl config matches an available OpenAI model.
## Conclusion
In this guide, you connected an OpenAI-powered application to LaunchDarkly AgentControl. You can now:
* Manage prompts and model settings in LaunchDarkly without code changes
* Track token usage, latency, and success rates automatically
* Use template variables to customize prompts per user
**Want to know more? Start a trial.**
Your 14-day trial begins as soon as you sign up. Get started in minutes using the in-app Quickstart. You'll discover how easy it is to release, monitor, and optimize your software.
**Observability**
The AI SDKs emit OpenTelemetry-compatible spans for each generation call. You can forward these spans to your existing observability stack for deeper analysis. To learn more, read [Observability](/docs/home/observability) and [LLM observability](/docs/home/observability/llm-observability).
## Step 8: Flush events and close the client
Always flush events before closing the LaunchDarkly client when your application shuts down — trailing events are at risk of being lost otherwise, in short-lived scripts and long-running services alike.
Here is how to flush events and close the client:
```python title="Python" lines wrap theme={null}
# Always flush events before closing — trailing events are at risk of being
# lost otherwise, in short-lived scripts and long-running services alike.
ldclient.get().flush()
ldclient.get().close()
```
```typescript title="Node.js (TypeScript)" lines wrap theme={null}
// Always flush events before closing — trailing events are at risk of being
// lost otherwise, in short-lived scripts and long-running services alike.
await ldClient.flush();
await ldClient.close();
```
## Complete example
Here is a complete working example that combines all the steps.
```python title="Python" expandable lines wrap theme={null}
import os
import json
import ldclient
from ldclient import Context
from ldclient.config import Config
from ldai import LDAIClient, AICompletionConfigDefault, AIAgentConfigDefault
from ldai.providers.types import LDAIMetrics
from ldai.tracker import TokenUsage
from ldai_openai import get_ai_metrics_from_response
from openai import OpenAI
from dotenv import load_dotenv
load_dotenv()
OPENAI_API_KEY = os.environ.get("OPENAI_API_KEY")
SDK_KEY = os.environ.get("LAUNCHDARKLY_SDK_KEY_OPENAI")
CONFIG_KEY = "openai-assistant"
AGENT_CONFIG_KEY = "openai-agent"
def drop_tools(params):
"""Drop `tools` from params — attached tools are passed via the top-level
`tools=` argument, so leaving them in params would duplicate the argument."""
return {k: v for k, v in (params or {}).items() if k != "tools"}
def responses_metrics(response) -> LDAIMetrics:
"""Convert an OpenAI Responses API result into LDAIMetrics. Passed to
tracker.track_metrics_of — which handles duration + success/error itself.
Parses the Responses output shape: response.output[] and response.usage.*_tokens."""
usage = getattr(response, "usage", None)
tokens = None
if usage:
tokens = TokenUsage(
total=usage.total_tokens or 0,
input=usage.input_tokens or 0,
output=usage.output_tokens or 0,
)
return LDAIMetrics(success=True, tokens=tokens)
def main():
openai_client = OpenAI(api_key=OPENAI_API_KEY)
ldclient.set_config(Config(SDK_KEY))
if not ldclient.get().is_initialized():
return
ai_client = LDAIClient(ldclient.get())
context = Context.builder("user-123").kind("user").name("Sandy").build()
# ===================
# COMPLETION MODE — Chat Completions API
# ===================
# Pass a default for improved resiliency when the AgentControl config is unavailable
# or LaunchDarkly is unreachable; omit for a disabled default.
# Example:
# default = AICompletionConfigDefault(
# enabled=True,
# model={"name": "gpt-5"},
# provider={"name": "openai"},
# messages=[{"role": "system", "content": "You are a helpful assistant."}],
# )
# config = ai_client.completion_config(CONFIG_KEY, context, default, variables={"topic": "Python"})
config = ai_client.completion_config(CONFIG_KEY, context, variables={"topic": "Python"})
if config.enabled:
tracker = config.create_tracker()
chat_messages = [m.to_dict() for m in (config.messages or [])]
chat_messages.append({"role": "user", "content": "How do I read a file in Python?"})
ld_params = (config.model.to_dict().get("parameters") if config.model else None) or {}
# The helper lives in the launchdarkly-server-sdk-ai-openai package.
tracker.track_metrics_of(
get_ai_metrics_from_response,
lambda: openai_client.chat.completions.create(
model=config.model.name,
messages=chat_messages,
**drop_tools(ld_params),
),
)
# ===================
# AGENT MODE — Responses API (OpenAI's preferred agent surface;
# flat tool shape matches the LaunchDarkly native tool format, no conversion needed)
# ===================
# Same fallback pattern as completion — omit the default for a disabled fallback.
agent = ai_client.agent_config(AGENT_CONFIG_KEY, context)
if agent.enabled:
tracker = agent.create_tracker()
ld_params = (agent.model.to_dict().get("parameters") if agent.model else None) or {}
# Tools attached to the variation in LaunchDarkly are already in the Responses API's
# flat shape — pass them straight through.
tools = ld_params.get("tools", []) or []
def get_order_status(order_id: str) -> str:
orders = {
"ORD-123": "Shipped — arrives Thursday",
"ORD-456": "Processing — estimated ship date: tomorrow",
"ORD-789": "Delivered on Monday",
}
return orders.get(order_id, f"No order found with ID {order_id}")
tool_handlers = {"get_order_status": get_order_status}
# Responses API agent loop: chain turns via previous_response_id so OpenAI
# keeps track of conversation state for us.
next_input = [{"role": "user", "content": "What's the status of order ORD-123?"}]
previous_response_id = None
MAX_STEPS = 5
for _ in range(MAX_STEPS):
response = tracker.track_metrics_of(
responses_metrics,
lambda: openai_client.responses.create(
model=agent.model.name,
instructions=agent.instructions,
input=next_input,
tools=tools,
previous_response_id=previous_response_id,
**drop_tools(ld_params),
),
)
previous_response_id = response.id
function_calls = [item for item in response.output if item.type == "function_call"]
if not function_calls:
break
next_input = []
for call in function_calls:
args = json.loads(call.arguments)
if call.name not in tool_handlers:
raise ValueError(f"Unknown tool: {call.name}")
result = tool_handlers[call.name](**args)
tracker.track_tool_call(call.name)
next_input.append({
"type": "function_call_output",
"call_id": call.call_id,
"output": result,
})
# Always flush events before closing — trailing events are at risk of being
# lost otherwise, in short-lived scripts and long-running services alike.
ldclient.get().flush()
ldclient.get().close()
if __name__ == "__main__":
main()
```
```typescript title="Node.js (TypeScript)" expandable lines wrap theme={null}
import dotenv from 'dotenv';
dotenv.config();
import { init, LDClient, LDContext } from '@launchdarkly/node-server-sdk';
import {
initAi,
type LDAIClient,
type LDAICompletionConfig,
type LDAIAgentConfig,
type LDAIMetrics,
} from '@launchdarkly/server-sdk-ai';
import { getAIMetricsFromResponse } from '@launchdarkly/server-sdk-ai-openai';
import OpenAI from 'openai';
const OPENAI_API_KEY = process.env.OPENAI_API_KEY as string;
const SDK_KEY = process.env.LAUNCHDARKLY_SDK_KEY_OPENAI as string;
const CONFIG_KEY = 'openai-assistant';
const AGENT_CONFIG_KEY = 'openai-agent';
// Drop `tools` from params — we pass attached tools via the top-level `tools:`
// field, so leaving them in params would duplicate the argument. The variation
// stores OpenAI-native parameter names, so no renaming is needed.
function openaiParams(params: Record): Record {
return Object.fromEntries(Object.entries(params || {}).filter(([k]) => k !== 'tools'));
}
// Convert an OpenAI Responses API result into LDAIMetrics. Passed to
// tracker.trackMetricsOf — which handles duration + success/error itself.
// Parses the Responses output shape: response.output[] and response.usage.*_tokens.
function responsesMetrics(response: any): LDAIMetrics {
const usage = response.usage;
return {
success: true,
tokens: usage
? {
input: usage.input_tokens ?? 0,
output: usage.output_tokens ?? 0,
total: usage.total_tokens ?? 0,
}
: undefined,
};
}
async function main() {
const openaiClient = new OpenAI({ apiKey: OPENAI_API_KEY });
const ldClient: LDClient = init(SDK_KEY);
await ldClient.waitForInitialization({ timeout: 10 });
const aiClient: LDAIClient = initAi(ldClient);
const context: LDContext = {
kind: 'user',
key: 'user-123',
name: 'Sandy',
};
// ===================
// COMPLETION MODE — Chat Completions API
// ===================
// Pass a default for improved resiliency when the AgentControl config is unavailable
// or LaunchDarkly is unreachable; omit for a disabled default.
// Example:
// const fallback = {
// enabled: true,
// model: { name: 'gpt-5' },
// provider: { name: 'openai' },
// messages: [{ role: 'system', content: 'You are a helpful assistant.' }],
// };
// const aiConfig = await aiClient.completionConfig(CONFIG_KEY, context, fallback, { topic: 'Python' });
const aiConfig: LDAICompletionConfig = await aiClient.completionConfig(
CONFIG_KEY,
context,
undefined,
{ topic: 'Python' },
);
if (aiConfig.enabled) {
const tracker = aiConfig.createTracker();
const chatMessages = (aiConfig.messages || []).map(m => ({ role: m.role, content: m.content }));
chatMessages.push({ role: 'user', content: 'How do I read a file in Python?' });
// Helper from @launchdarkly/server-sdk-ai-openai.
await tracker.trackMetricsOf(
getAIMetricsFromResponse,
async () =>
openaiClient.chat.completions.create({
model: aiConfig.model!.name,
messages: chatMessages as any,
...openaiParams(aiConfig.model?.parameters ?? {}),
}),
);
}
// ===================
// AGENT MODE — Responses API
// ===================
// Same fallback pattern as completion — omit the default for a disabled fallback.
const agentConfig: LDAIAgentConfig = await aiClient.agentConfig(AGENT_CONFIG_KEY, context);
if (agentConfig.enabled && agentConfig.instructions) {
const tracker = agentConfig.createTracker();
// Responses API accepts the LaunchDarkly flat tool shape directly — no conversion.
const ldParams = (agentConfig.model?.parameters || {}) as Record;
const tools = (ldParams.tools as any[] | undefined) ?? [];
// Handlers stay in application code — LaunchDarkly governs the schema, the app owns execution.
function getOrderStatus(orderId: string): string {
const orders: Record = {
'ORD-123': 'Shipped — arrives Thursday',
'ORD-456': 'Processing — estimated ship date: tomorrow',
'ORD-789': 'Delivered on Monday',
};
return orders[orderId] || `No order found with ID ${orderId}`;
}
const toolHandlers: Record string> = {
get_order_status: (args) => getOrderStatus(args.order_id),
};
// Chain turns via previous_response_id so OpenAI keeps conversation state.
let nextInput: any[] = [{ role: 'user', content: "What's the status of order ORD-123?" }];
let previousResponseId: string | undefined;
const MAX_STEPS = 5;
for (let i = 0; i < MAX_STEPS; i++) {
const response = await tracker.trackMetricsOf(responsesMetrics, () =>
(openaiClient as any).responses.create({
model: agentConfig.model!.name,
instructions: agentConfig.instructions,
input: nextInput,
tools,
previous_response_id: previousResponseId,
...openaiParams(ldParams),
}),
);
previousResponseId = response.id;
const functionCalls = (response.output ?? []).filter((o: any) => o.type === 'function_call');
if (functionCalls.length === 0) {
break;
}
nextInput = [];
for (const call of functionCalls) {
const args = JSON.parse(call.arguments);
const handler = toolHandlers[call.name];
if (!handler) throw new Error(`Unknown tool: ${call.name}`);
const result = handler(args);
nextInput.push({ type: 'function_call_output', call_id: call.call_id, output: result });
}
}
}
// Always flush events before closing — trailing events are at risk of being
// lost otherwise, in short-lived scripts and long-running services alike.
await ldClient.flush();
await ldClient.close();
}
main();
```
## What to explore next
After you have the basic integration working, you can extend it with:
* [Tools](/docs/home/agentcontrol/tools) for calling external functions from your workflows
* [Online evaluations](/docs/home/agentcontrol/online-evaluations) to score response quality automatically
* [Experiments](/docs/home/agentcontrol/experimentation) to compare AgentControl config variations statistically
* [Agents](/docs/home/agentcontrol/agents) for multi-step workflows
For more AgentControl guides, read the other guides in the [AgentControl guides](/docs/guides/agentcontrol) section.
## Troubleshooting
### Metrics not appearing
If metrics do not appear on the **AI Insights** dashboard:
* Verify that you are calling `tracker.track_metrics_of()` (Python) or `tracker.trackMetricsOf()` (Node.js) with the correct metrics converter.
* Ensure you call `flush()` before closing the client, especially for short-lived scripts.
* Wait at least one minute for metrics to process.
### SDK initialization failures
If the LaunchDarkly SDK fails to initialize:
* Verify your SDK key is correct and matches the environment you are targeting.
* Check that your network can reach LaunchDarkly servers.
* Review the SDK logs for specific error messages.
### Config returns fallback value
If you always receive the fallback configuration:
* Verify targeting is enabled for your AgentControl config.
* Check that the AgentControl config key in your code matches the key in LaunchDarkly.
* Ensure your context matches the targeting rules.
### OpenAI API errors
If you receive OpenAI API errors:
* Verify your OPENAI\_API\_KEY is set correctly.
* Check that your API key has sufficient permissions.
* Ensure the model name in your AgentControl config matches an available OpenAI model.
## Conclusion
In this guide, you connected an OpenAI-powered application to LaunchDarkly AgentControl. You can now:
* Manage prompts and model settings in LaunchDarkly without code changes
* Track token usage, latency, and success rates automatically
* Use template variables to customize prompts per user
**Want to know more? Start a trial.**
Your 14-day trial begins as soon as you sign up. Get started in minutes using the in-app Quickstart. You'll discover how easy it is to release, monitor, and optimize your software.
Want to try it out? Start a trial.