> ## Documentation Index
> Fetch the complete documentation index at: https://launchdarkly.com/docs/llms.txt
> Use this file to discover all available pages before exploring further.
# Getting started with LangChain and AgentControl configs
This guide shows how to use a LangChain chat model with LaunchDarkly AgentControl. LangChain is a framework for building LLM-powered applications that abstracts away provider differences — choose it when you want to swap between OpenAI, Anthropic, Gemini, and other providers without changing your application code. By the end, you will have a working integration that retrieves model configuration and prompts from LaunchDarkly, invokes a LangChain model, and reports metrics back automatically.
This guide uses the official LaunchDarkly LangChain provider packages, which handle model creation, provider mapping, and metrics extraction. This guide uses the low-level model-creation flow so you can see how the pieces fit together. For higher-level helper methods such as direct provider creation and structured-output support, read the [Python](https://github.com/launchdarkly/python-server-sdk-ai/tree/main/packages/ai-providers/server-ai-langchain) or [Node.js](https://github.com/launchdarkly/js-core/tree/main/packages/ai-providers/server-ai-langchain) LangChain provider package documentation.
AgentControl supports two modes:
* **Completion mode** returns messages and roles (such as "system," "user," "assistant"). Use it for chat-style interactions and message-oriented workflows. Completion mode supports online evaluations with judges attached in the LaunchDarkly user interface (UI).
* **Agent mode** returns a single `instructions` string. Use it when your runtime or framework expects a goal/instructions input for a structured workflow. Agent mode changes the configuration shape from messages to instructions. Your application maps these instructions into your provider or framework's native input.
Both modes support tool calling. LangChain's provider abstraction works with both modes, letting you swap models without changing your application code. This guide walks through completion mode as the main path, with an optional agent config section. To learn more about when to use each mode, read [When to use completion mode vs agent mode](/docs/guides/agentcontrol/agent-vs-completion).
This guide provides examples in both Python and Node.js (TypeScript).
**New to AgentControl?**
If you're new to AgentControl, start with the [Quickstart](/docs/home/agentcontrol/quickstart) and return to this guide when you are ready for a LangChain-specific example.
To learn more about AgentControl-specific SDKs, read [AI SDKs](/docs/sdk/ai). For Python-specific details, read the [Python AI SDK reference](/docs/sdk/ai/python).
## Prerequisites
To complete this guide, you need the following:
* A [LaunchDarkly account](https://app.launchdarkly.com/) with an [SDK key](/docs/home/account/environment/keys#view-or-copy-sdk-credentials) for your environment and a member role that allows [AgentControl actions](/docs/home/account/roles/role-actions#agentcontrol-config-actions). To learn more about LaunchDarkly roles, read [Roles](/docs/home/account/roles).
* An API key for your chosen model provider (OpenAI, Anthropic, or another supported provider).
* A development environment:
* **Python**: Python 3.10 or higher
* **Node.js**: Node.js 20 or higher
* The LangChain integration package for your model provider installed locally. For example, `langchain-openai` for OpenAI models, `langchain-anthropic` for Anthropic models, or `langchain-google-genai` for Gemini. LangChain raises an `ImportError` if the provider package is not installed when the model is created.
* Familiarity with LaunchDarkly contexts. To learn more, read [Contexts and segments](/docs/home/flags/contexts).
## Concepts
Before you begin, review these key concepts.
### AgentControl configs
An AgentControl config is a LaunchDarkly resource that controls how your application uses large language models. Each AgentControl config contains one or more variations. Each variation specifies:
* A model configuration, including the model name and parameters
* Messages that define the prompt
You can update these settings in LaunchDarkly at any time without changing your application code.
### The LaunchDarkly LangChain provider
LaunchDarkly publishes official LangChain provider packages for [Python](https://github.com/launchdarkly/python-server-sdk-ai/tree/main/packages/ai-providers/server-ai-langchain) and [Node.js](https://github.com/launchdarkly/js-core/tree/main/packages/ai-providers/server-ai-langchain). These packages handle model creation, message conversion, and metrics extraction so you do not need to write custom integration code.
The provider creates a LangChain chat model directly from an AgentControl config, passing through all model parameters and mapping provider names automatically. It also extracts token usage from LangChain responses for tracking in LaunchDarkly.
### Contexts
A context represents the end user interacting with your application. LaunchDarkly uses context attributes to:
* Determine which variation to serve based on targeting rules
* Populate `{{ ldctx.* }}` placeholders in your prompts with context attribute values
Other placeholders, such as `{{ topic }}`, are populated from the `variables` argument you pass at runtime.
### The tracker
When you retrieve an AgentControl config, the SDK returns a config object with a `createTracker()` (Node.js) or `create_tracker()` (Python) factory method. Call it to get a tracker instance that records metrics from your LangChain calls, including:
* Generation count
* Input and output tokens
* Latency
* Success and error rates
These metrics appear on the **Monitoring** tab in LaunchDarkly.
## Step 1: Install the SDK
Install the LaunchDarkly AI SDK and the official LangChain provider package. AgentControl is supported by LaunchDarkly server-side SDKs only. The Node.js examples in this guide use the [server-side Node.js AI SDK](https://github.com/launchdarkly/js-core/tree/main/packages/sdk/server-ai).
Here is how to install the required packages:
```bash title="Python" lines wrap theme={null}
pip install launchdarkly-server-sdk>=9.4.0
pip install launchdarkly-server-sdk-ai>=0.20.0
pip install launchdarkly-server-sdk-ai-langchain>=0.7.0
pip install langchain>=1.0.0
pip install langchain-openai>=0.1.0
pip install python-dotenv>=1.0.0
```
```bash title="Node.js" lines wrap theme={null}
npm install @launchdarkly/node-server-sdk@^9.0.0
npm install @launchdarkly/server-sdk-ai@^0.20.0
npm install @launchdarkly/server-sdk-ai-langchain@^0.5.5
npm install langchain@^0.3.0 @langchain/core@^0.3.0 @langchain/openai@^0.3.0
npm install dotenv@^16.0.0
```
If your AgentControl config targets a provider whose LangChain package is not installed, the model creation step raises an error at runtime. For Anthropic models, also install `langchain-anthropic` (Python) or `@langchain/anthropic` (Node.js). For Gemini models, install `langchain-google-genai` (Python) or `@langchain/google-genai` (Node.js).
Create a `.env` file in your project root with your credentials:
```bash lines wrap theme={null}
# .env
LAUNCHDARKLY_SDK_KEY=
OPENAI_API_KEY=
```
## Step 2: Initialize the clients
Initialize the LaunchDarkly client and the AI client. Store your SDK key in an environment variable.
Here is the initialization code:
```python title="Python" lines wrap theme={null}
import os
import ldclient
from ldclient import Context
from ldclient.config import Config
from ldai import LDAIClient
from ldai_langchain import create_langchain_model, convert_messages_to_langchain, get_ai_metrics_from_response
from langchain_core.messages import HumanMessage
from dotenv import load_dotenv
load_dotenv()
SDK_KEY = os.environ.get("LAUNCHDARKLY_SDK_KEY")
ldclient.set_config(Config(SDK_KEY))
ai_client = LDAIClient(ldclient.get())
```
```typescript title="Node.js (TypeScript)" expandable lines wrap theme={null}
import dotenv from 'dotenv';
dotenv.config();
import { init, LDClient, LDContext } from '@launchdarkly/node-server-sdk';
import { initAi, type LDAIClient, type LDAICompletionConfig } from '@launchdarkly/server-sdk-ai';
import {
createLangChainModel,
convertMessagesToLangChain,
getAIMetricsFromResponse,
LangChainRunnerFactory,
} from '@launchdarkly/server-sdk-ai-langchain';
import { HumanMessage } from '@langchain/core/messages';
const SDK_KEY = process.env.LAUNCHDARKLY_SDK_KEY as string;
const CONFIG_KEY = 'langchain-assistant';
const ldClient: LDClient = init(SDK_KEY);
await ldClient.waitForInitialization({ timeout: 10 });
const aiClient: LDAIClient = initAi(ldClient);
```
Replace `LAUNCHDARKLY_SDK_KEY` with an active LaunchDarkly SDK key. You can find your SDK keys by navigating to the SDK Keys page and selecting the correct project and environment from the dropdown at the top. To learn how, read [SDK credentials](/docs/home/account/environment/keys#view-or-copy-sdk-credentials).
## Step 3: Create an AgentControl config in LaunchDarkly
Create an AgentControl config to store your model settings and prompts. You can do this through the LaunchDarkly UI, or programmatically using the [LaunchDarkly MCP server](/docs/home/getting-started/mcp) from an AI coding assistant such as Claude Code or Cursor.
**Using the MCP server or agent skills**
If you have the [LaunchDarkly MCP server](https://github.com/launchdarkly/mcp-server) or [agent skills](https://github.com/launchdarkly/agent-skills) configured, prompt your coding assistant to create the AgentControl config for you. For example:
"Create a completion mode AgentControl config called 'LangChain assistant' with a 'GPT-4o Detailed' variation using the gpt-4o model, temperature 0.7, max\_tokens 2000, and the system message: 'You are an expert assistant for \{\{topic}}. Provide detailed answers with examples.' Enable targeting."
To create the AgentControl config in the UI:
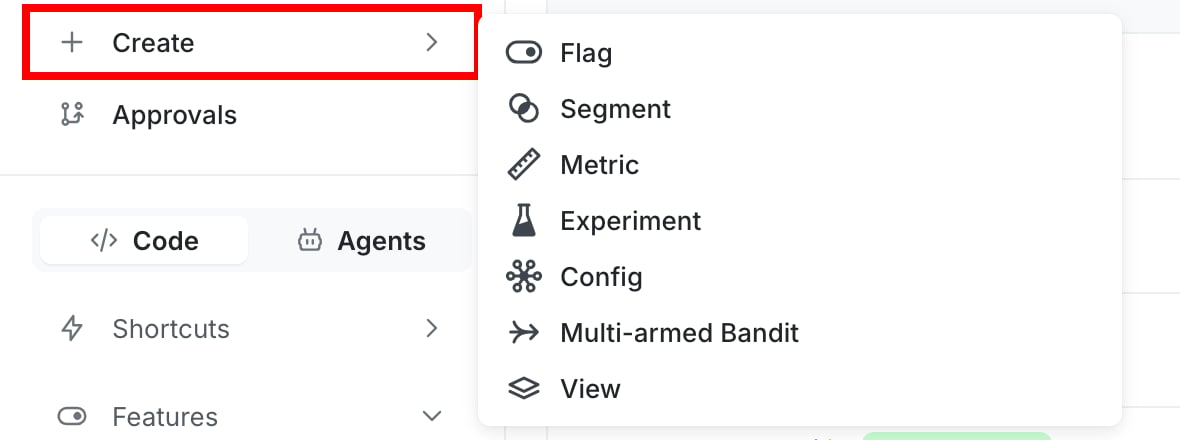
1. Click **Create** and select **Config**.
2. In the "Create config" dialog, select **Completion**.
3. Enter a name, such as "LangChain assistant".
4. Click **Create**.
 To create a variation:
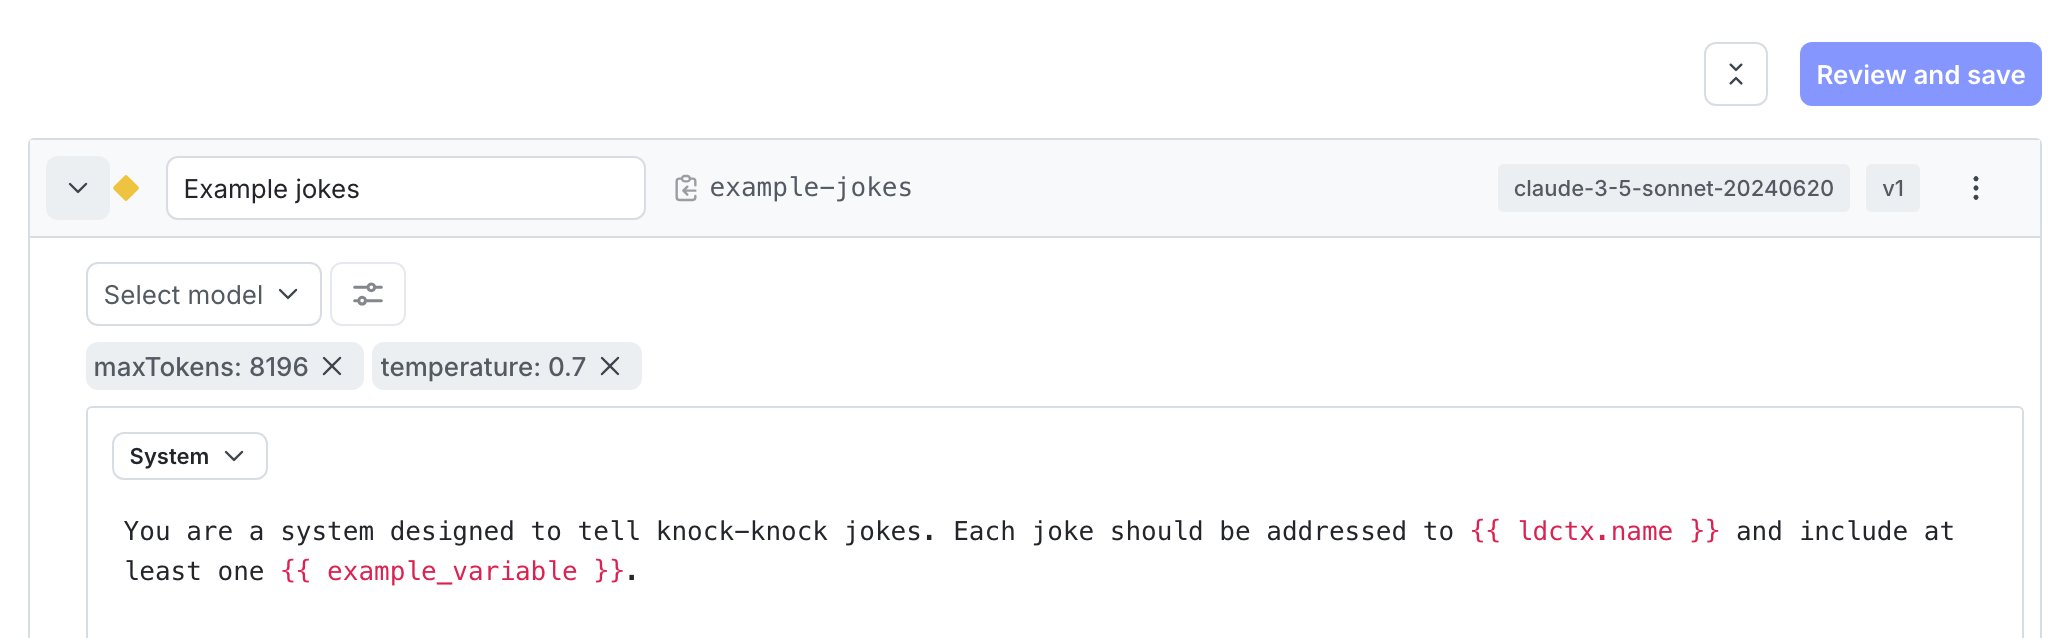
1. On the **Variations** tab, replace "Untitled variation" with a name, such as "GPT-4o Detailed".
2. Click **Select a model** and choose the `gpt-4o` OpenAI model.
3. Click **Parameters** and set `temperature` to `0.7` and `max_tokens` to `2000`.
4. Add a **system** message to define your assistant's behavior:
```text title="System message" lines wrap theme={null}
You are an expert assistant for {{topic}}. Provide detailed answers with examples.
```
5. Click **Review and save**.
To create a variation:
1. On the **Variations** tab, replace "Untitled variation" with a name, such as "GPT-4o Detailed".
2. Click **Select a model** and choose the `gpt-4o` OpenAI model.
3. Click **Parameters** and set `temperature` to `0.7` and `max_tokens` to `2000`.
4. Add a **system** message to define your assistant's behavior:
```text title="System message" lines wrap theme={null}
You are an expert assistant for {{topic}}. Provide detailed answers with examples.
```
5. Click **Review and save**.
 To enable targeting:
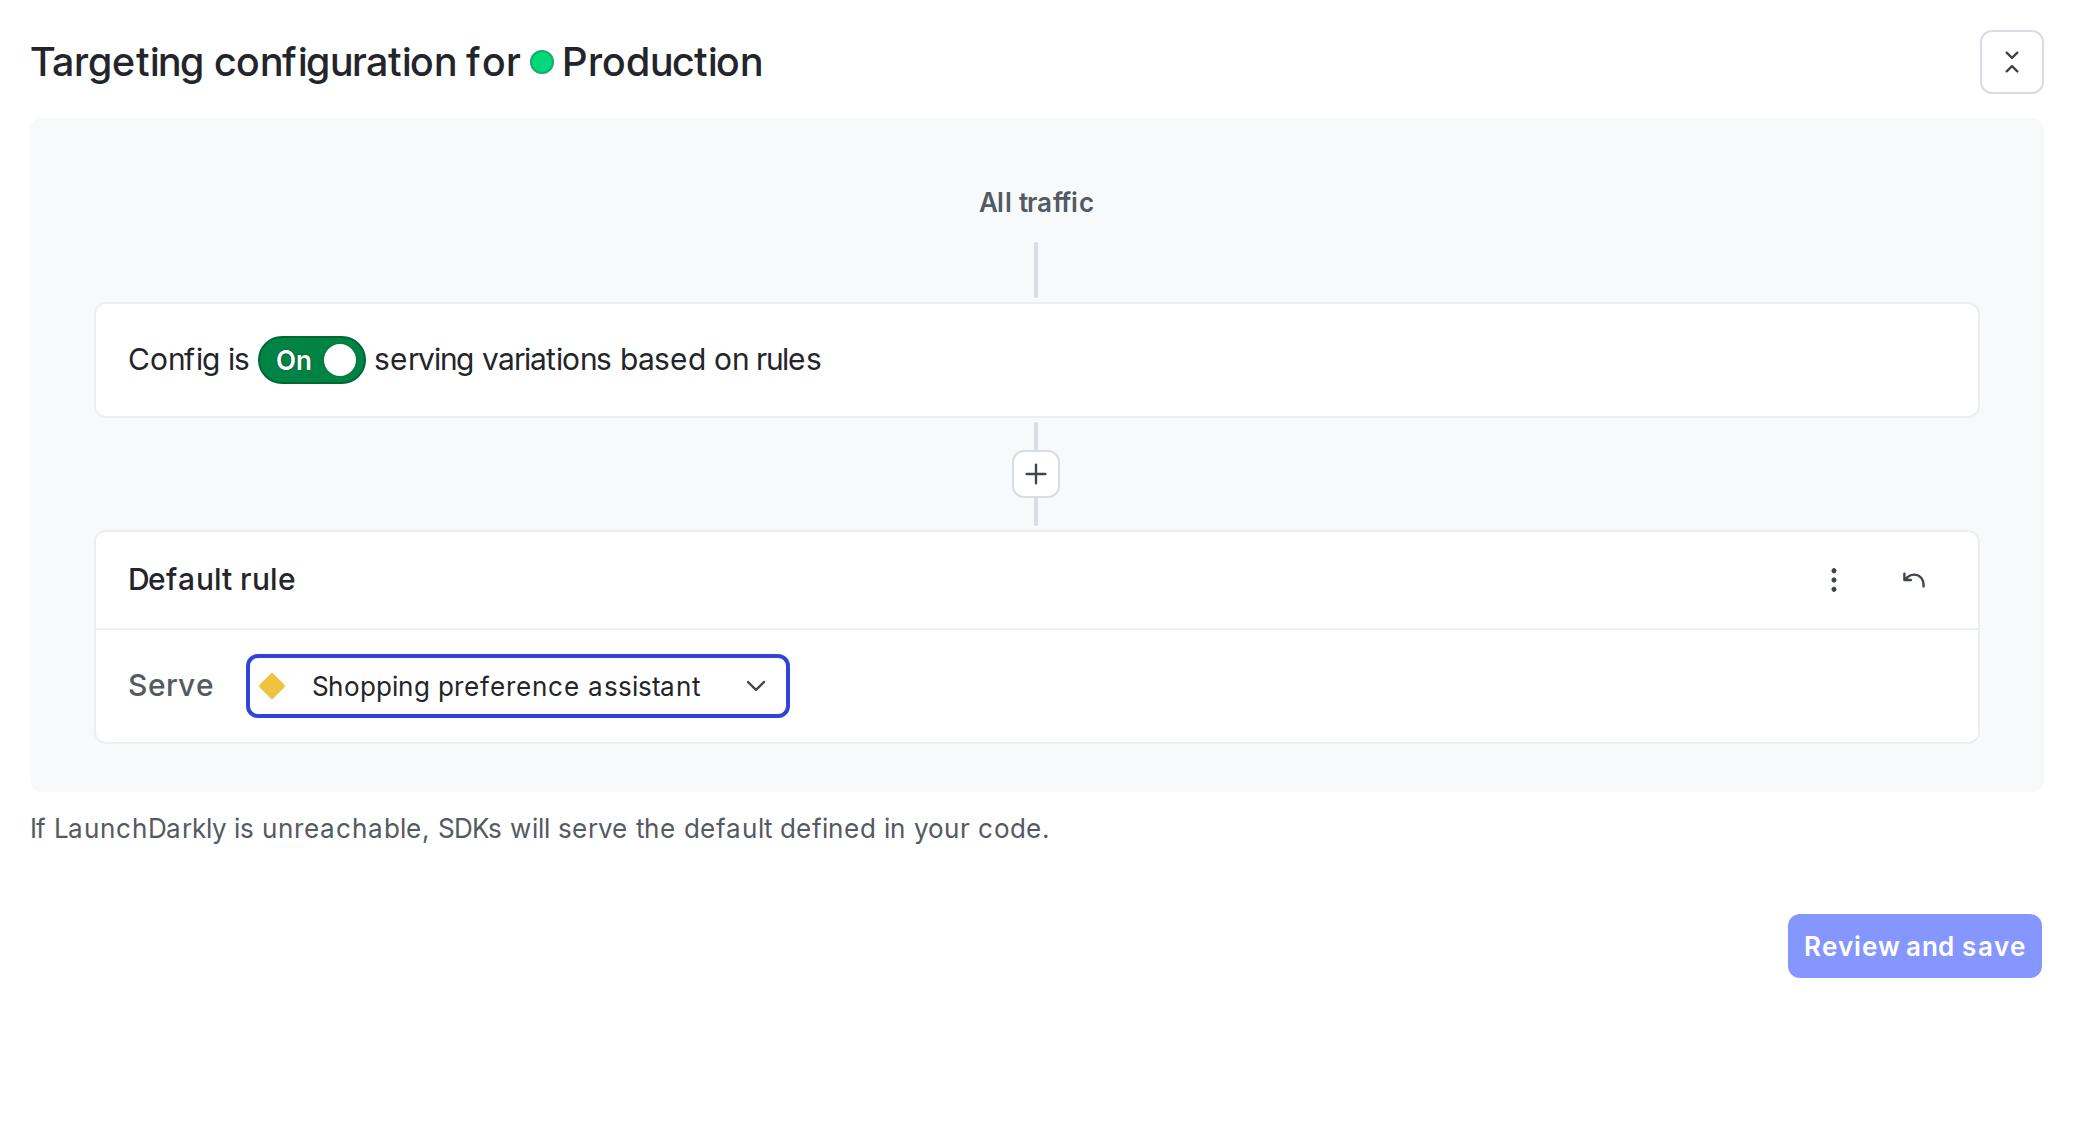
1. Select the **Targeting** tab.
2. In the "Default rule" section, click **Edit**.
3. Set the default rule to serve your variation.
4. Click **Review and save**.
To enable targeting:
1. Select the **Targeting** tab.
2. In the "Default rule" section, click **Edit**.
3. Set the default rule to serve your variation.
4. Click **Review and save**.
 ## Step 4: Get the AgentControl config in your application
Retrieve the AgentControl config from LaunchDarkly by calling the completion config function. Pass a context that represents the current user.
Here is how to get the AgentControl config:
```python title="Python" expandable lines wrap theme={null}
# Get AgentControl config
context = Context.builder("user-123").kind("user").name("Sandy").build()
# Pass a default for improved resiliency when the AgentControl config is unavailable
# or LaunchDarkly is unreachable. Omit for a disabled default.
# Example:
# from ldai import AICompletionConfigDefault
# default = AICompletionConfigDefault(
# enabled=True,
# model={"name": "gpt-5"},
# provider={"name": "openai"},
# messages=[{"role": "system", "content": "You are a helpful assistant."}],
# )
# config = ai_client.completion_config(CONFIG_KEY, context, default, variables={"topic": "Python"})
config = ai_client.completion_config(CONFIG_KEY, context, variables={"topic": "Python"})
if not config.enabled:
raise RuntimeError("AgentControl config is disabled")
```
```typescript title="Node.js (TypeScript)" expandable lines wrap theme={null}
// Define context
const context: LDContext = {
kind: 'user',
key: 'user-123',
name: 'Sandy',
};
// Pass a default for improved resiliency when the AgentControl config is unavailable
// or LaunchDarkly is unreachable; omit for a disabled default.
// Example:
// const fallback = {
// enabled: true,
// model: { name: 'gpt-5' },
// provider: { name: 'openai' },
// messages: [{ role: 'system', content: 'You are a helpful assistant.' }],
// };
// const config = await aiClient.completionConfig(CONFIG_KEY, context, fallback, { topic: 'Python' });
const config: LDAICompletionConfig = await aiClient.completionConfig(
CONFIG_KEY,
context,
undefined,
{ topic: 'Python' },
);
```
The fallback argument is optional. If omitted (Python) or passed as `undefined` (Node.js), the SDK returns a disabled config as the fallback. Check the `enabled` property and handle the disabled case in your application.
**Best practices**
For production use:
* Retrieve the AgentControl config each time you generate content so LaunchDarkly can evaluate the latest targeting rules and prompt changes.
* Provide a fallback configuration when possible so your application can fail gracefully if LaunchDarkly is unavailable.
* Avoid sending personally identifiable information in contexts unless you have a specific need and an approved handling pattern. To learn more, read [Privacy in AgentControl](/docs/home/agentcontrol/privacy).
## Step 5: Create a LangChain model from the AgentControl config
Use the LaunchDarkly LangChain provider to create a chat model from the AgentControl config. The provider reads the model name, provider, and all parameters (temperature, max tokens, and others) from the variation, maps LaunchDarkly provider names to LangChain equivalents, and returns a configured chat model.
Here is how to create the model:
```python title="Python" lines wrap theme={null}
# create_langchain_model reads config.model.name / .parameters and picks the
# right chat model class (OpenAI, Anthropic, …) with no per-provider branching.
llm = create_langchain_model(config)
# Convert AgentControl config messages to LangChain format and add the user turn
messages = convert_messages_to_langchain(config.messages or [])
messages.append(HumanMessage(content="How do I read a file in Python?"))
```
```typescript title="Node.js (TypeScript)" lines wrap theme={null}
if (config.enabled) {
const tracker = config.createTracker();
// createLangChainModel reads config.model.name / .parameters
// and picks the right chat model class (OpenAI, Anthropic, …) with no per-provider branching.
const llm = await createLangChainModel(config);
// Convert AgentControl config messages to LangChain format and add the user turn
const messages = convertMessagesToLangChain(config.messages || []);
messages.push(new HumanMessage('How do I read a file in Python?'));
}
```
The provider maps LaunchDarkly provider names to LangChain equivalents — for example, `"gemini"` maps to `"google_genai"`. All other provider names pass through lowercased. LangChain raises an `ImportError` (Python) or `Error` (Node.js) at model creation time if the corresponding provider package is not installed.
## Step 6: Call the model and track metrics
Combine the messages from your AgentControl config with user input, then use the tracker to call the model and record metrics automatically.
Here is how to make the API call:
```python title="Python" lines wrap theme={null}
# Track metrics automatically with track_metrics_of_async
tracker = config.create_tracker()
completion = await tracker.track_metrics_of_async(
get_ai_metrics_from_response,
lambda: llm.ainvoke(messages),
)
print(completion.content)
```
```typescript title="Node.js (TypeScript)" lines wrap theme={null}
try {
const completion = await tracker.trackMetricsOf(
getAIMetricsFromResponse,
() => llm.invoke(messages),
);
const content = typeof completion.content === 'string' ? completion.content : JSON.stringify(completion.content);
console.log(content);
} catch (error) {
console.error('Error:', error);
}
```
The tracker wraps the model call and automatically records duration, token usage, and success or error status.
**Adding tools to a completion mode AgentControl config**
You can attach reusable tools from the LaunchDarkly tools library to a completion mode AgentControl config variation, even though this guide does not use agent mode. LaunchDarkly stores the tool schema in your AgentControl config, and your application code owns the handler implementation and dispatches tool calls returned by the model. To learn how to define and attach tools, read [Tools in AgentControl](/docs/home/agentcontrol/tools).
## Step 7: Monitor your AgentControl config
View metrics for your AgentControl configs in the LaunchDarkly UI.
To view aggregated metrics across all your AgentControl configs, navigate to **Insights** in the left sidebar under the **AI** section. The Insights overview page displays cost, latency, error rate, invocation counts, and model distribution across your organization. To learn more, read about [AI insights](/docs/home/agentcontrol/insights).
To view metrics for a specific AgentControl config:
1. Navigate to your AgentControl config.
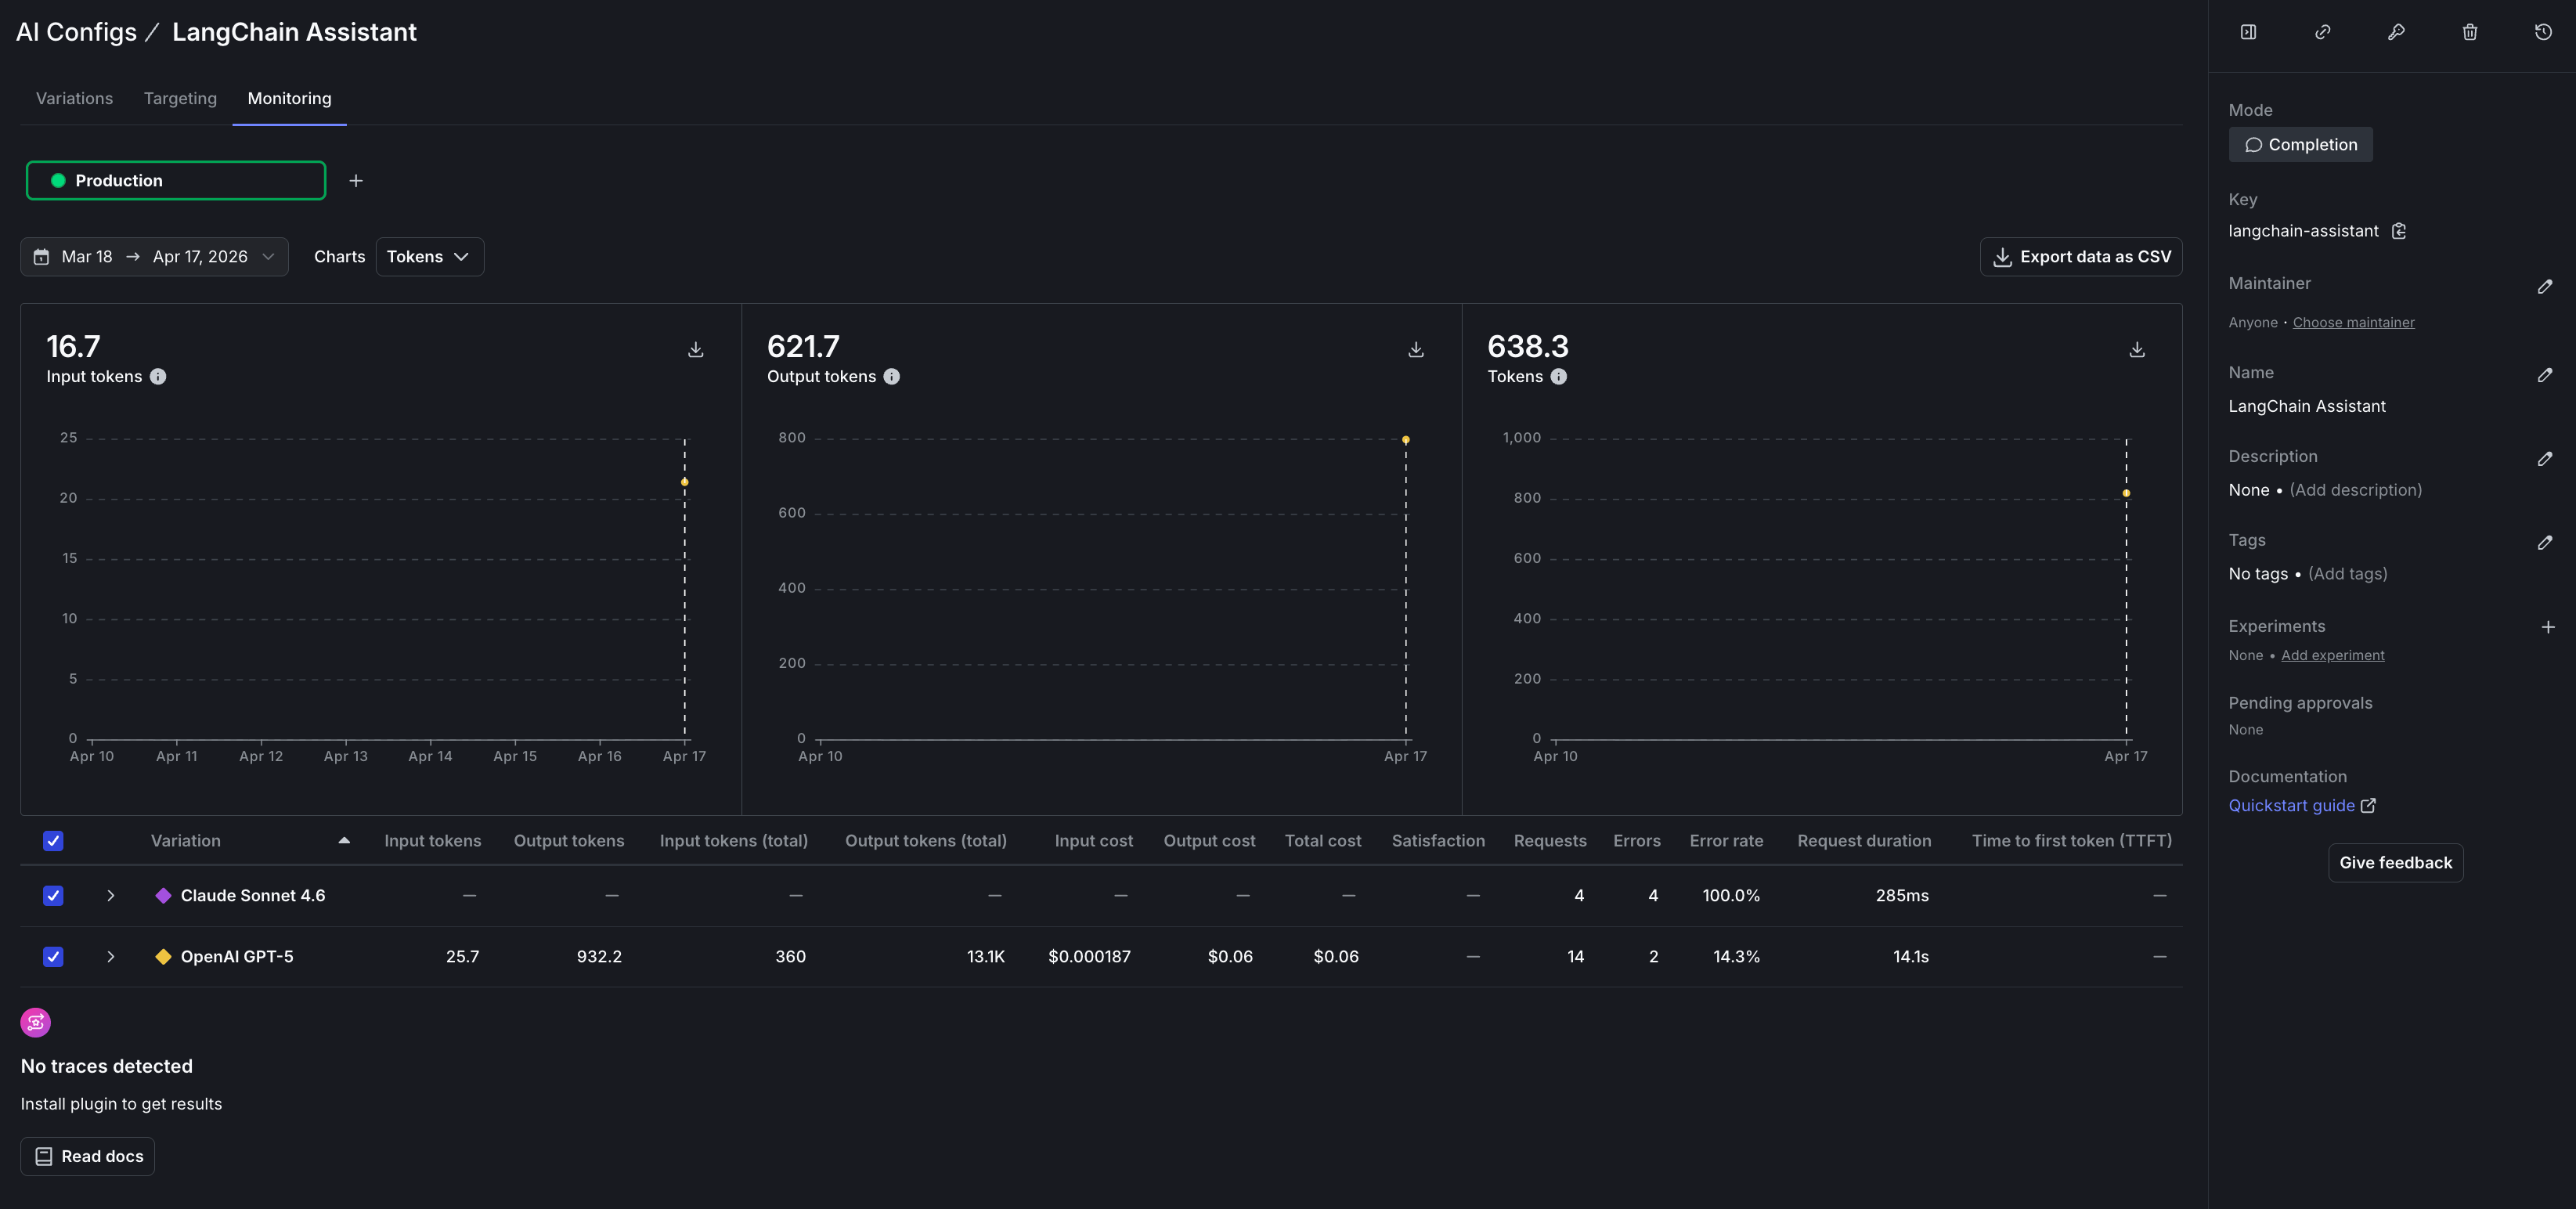
2. Select the **Monitoring** tab.
The **Monitoring** tab displays:
* **Generation count**: number of successful model invocations
* **Token usage**: input and output tokens per variation
* **Time to generate**: average latency per generation
* **Error rate**: percentage of failed invocations
* **Costs**: estimated spend based on token usage and model pricing
Metrics update approximately every minute. Use these metrics to compare variations and optimize your prompts. To learn more, read [Monitor AgentControl configs](/docs/home/agentcontrol/monitor).
## Step 4: Get the AgentControl config in your application
Retrieve the AgentControl config from LaunchDarkly by calling the completion config function. Pass a context that represents the current user.
Here is how to get the AgentControl config:
```python title="Python" expandable lines wrap theme={null}
# Get AgentControl config
context = Context.builder("user-123").kind("user").name("Sandy").build()
# Pass a default for improved resiliency when the AgentControl config is unavailable
# or LaunchDarkly is unreachable. Omit for a disabled default.
# Example:
# from ldai import AICompletionConfigDefault
# default = AICompletionConfigDefault(
# enabled=True,
# model={"name": "gpt-5"},
# provider={"name": "openai"},
# messages=[{"role": "system", "content": "You are a helpful assistant."}],
# )
# config = ai_client.completion_config(CONFIG_KEY, context, default, variables={"topic": "Python"})
config = ai_client.completion_config(CONFIG_KEY, context, variables={"topic": "Python"})
if not config.enabled:
raise RuntimeError("AgentControl config is disabled")
```
```typescript title="Node.js (TypeScript)" expandable lines wrap theme={null}
// Define context
const context: LDContext = {
kind: 'user',
key: 'user-123',
name: 'Sandy',
};
// Pass a default for improved resiliency when the AgentControl config is unavailable
// or LaunchDarkly is unreachable; omit for a disabled default.
// Example:
// const fallback = {
// enabled: true,
// model: { name: 'gpt-5' },
// provider: { name: 'openai' },
// messages: [{ role: 'system', content: 'You are a helpful assistant.' }],
// };
// const config = await aiClient.completionConfig(CONFIG_KEY, context, fallback, { topic: 'Python' });
const config: LDAICompletionConfig = await aiClient.completionConfig(
CONFIG_KEY,
context,
undefined,
{ topic: 'Python' },
);
```
The fallback argument is optional. If omitted (Python) or passed as `undefined` (Node.js), the SDK returns a disabled config as the fallback. Check the `enabled` property and handle the disabled case in your application.
**Best practices**
For production use:
* Retrieve the AgentControl config each time you generate content so LaunchDarkly can evaluate the latest targeting rules and prompt changes.
* Provide a fallback configuration when possible so your application can fail gracefully if LaunchDarkly is unavailable.
* Avoid sending personally identifiable information in contexts unless you have a specific need and an approved handling pattern. To learn more, read [Privacy in AgentControl](/docs/home/agentcontrol/privacy).
## Step 5: Create a LangChain model from the AgentControl config
Use the LaunchDarkly LangChain provider to create a chat model from the AgentControl config. The provider reads the model name, provider, and all parameters (temperature, max tokens, and others) from the variation, maps LaunchDarkly provider names to LangChain equivalents, and returns a configured chat model.
Here is how to create the model:
```python title="Python" lines wrap theme={null}
# create_langchain_model reads config.model.name / .parameters and picks the
# right chat model class (OpenAI, Anthropic, …) with no per-provider branching.
llm = create_langchain_model(config)
# Convert AgentControl config messages to LangChain format and add the user turn
messages = convert_messages_to_langchain(config.messages or [])
messages.append(HumanMessage(content="How do I read a file in Python?"))
```
```typescript title="Node.js (TypeScript)" lines wrap theme={null}
if (config.enabled) {
const tracker = config.createTracker();
// createLangChainModel reads config.model.name / .parameters
// and picks the right chat model class (OpenAI, Anthropic, …) with no per-provider branching.
const llm = await createLangChainModel(config);
// Convert AgentControl config messages to LangChain format and add the user turn
const messages = convertMessagesToLangChain(config.messages || []);
messages.push(new HumanMessage('How do I read a file in Python?'));
}
```
The provider maps LaunchDarkly provider names to LangChain equivalents — for example, `"gemini"` maps to `"google_genai"`. All other provider names pass through lowercased. LangChain raises an `ImportError` (Python) or `Error` (Node.js) at model creation time if the corresponding provider package is not installed.
## Step 6: Call the model and track metrics
Combine the messages from your AgentControl config with user input, then use the tracker to call the model and record metrics automatically.
Here is how to make the API call:
```python title="Python" lines wrap theme={null}
# Track metrics automatically with track_metrics_of_async
tracker = config.create_tracker()
completion = await tracker.track_metrics_of_async(
get_ai_metrics_from_response,
lambda: llm.ainvoke(messages),
)
print(completion.content)
```
```typescript title="Node.js (TypeScript)" lines wrap theme={null}
try {
const completion = await tracker.trackMetricsOf(
getAIMetricsFromResponse,
() => llm.invoke(messages),
);
const content = typeof completion.content === 'string' ? completion.content : JSON.stringify(completion.content);
console.log(content);
} catch (error) {
console.error('Error:', error);
}
```
The tracker wraps the model call and automatically records duration, token usage, and success or error status.
**Adding tools to a completion mode AgentControl config**
You can attach reusable tools from the LaunchDarkly tools library to a completion mode AgentControl config variation, even though this guide does not use agent mode. LaunchDarkly stores the tool schema in your AgentControl config, and your application code owns the handler implementation and dispatches tool calls returned by the model. To learn how to define and attach tools, read [Tools in AgentControl](/docs/home/agentcontrol/tools).
## Step 7: Monitor your AgentControl config
View metrics for your AgentControl configs in the LaunchDarkly UI.
To view aggregated metrics across all your AgentControl configs, navigate to **Insights** in the left sidebar under the **AI** section. The Insights overview page displays cost, latency, error rate, invocation counts, and model distribution across your organization. To learn more, read about [AI insights](/docs/home/agentcontrol/insights).
To view metrics for a specific AgentControl config:
1. Navigate to your AgentControl config.
2. Select the **Monitoring** tab.
The **Monitoring** tab displays:
* **Generation count**: number of successful model invocations
* **Token usage**: input and output tokens per variation
* **Time to generate**: average latency per generation
* **Error rate**: percentage of failed invocations
* **Costs**: estimated spend based on token usage and model pricing
Metrics update approximately every minute. Use these metrics to compare variations and optimize your prompts. To learn more, read [Monitor AgentControl configs](/docs/home/agentcontrol/monitor).
 To run statistical comparisons between variations, read [Run experiments with AgentControl](/docs/home/agentcontrol/experimentation). To score response quality automatically using judges, read [Online evaluations in AgentControl](/docs/home/agentcontrol/online-evaluations).
**Observability**
LaunchDarkly provides metrics for AgentControl config invocations, including latency, token usage, costs, and error rates. If you also want traces associated with an evaluated AgentControl config, run the model request inside an active OpenTelemetry parent span. To learn more, read [Observability](/docs/home/observability) and [LLM observability](/docs/home/observability/llm-observability).
For multi-agent workflows, the LangChain-based LangGraph framework handles agent orchestration natively. To learn more, read [Compare AI orchestrators](/docs/tutorials/ai-orchestrators).
## Step 8: Close the client
Close the LaunchDarkly client when your application shuts down to flush pending events. Always flush before closing. Trailing events are at risk of being lost otherwise, in short-lived scripts and long-running services alike.
Here is how to close the client:
```python title="Python" lines wrap theme={null}
# Always flush events before closing. Trailing events are at risk of being
# lost otherwise, in short-lived scripts and long-running services alike.
ldclient.get().flush()
ldclient.get().close()
```
```typescript title="Node.js (TypeScript)" lines wrap theme={null}
// Always flush events before closing. Trailing events are at risk of being
// lost otherwise, in short-lived scripts and long-running services alike.
await ldClient.flush();
await ldClient.close();
```
## Complete example
Here is a complete working example that combines all the steps.
```python title="Python" expandable lines wrap theme={null}
import os
import asyncio
import ldclient
from ldclient import Context
from ldclient.config import Config
from ldai import LDAIClient
from ldai_langchain import create_langchain_model, convert_messages_to_langchain, get_ai_metrics_from_response
from langchain_core.messages import HumanMessage
from dotenv import load_dotenv
load_dotenv()
SDK_KEY = os.environ.get("LAUNCHDARKLY_SDK_KEY")
CONFIG_KEY = "langchain-assistant"
async def async_main():
ldclient.set_config(Config(SDK_KEY))
if not ldclient.get().is_initialized():
return
ai_client = LDAIClient(ldclient.get())
context = Context.builder("user-123").kind("user").name("Sandy").build()
# LangChain's value: one AgentControl config key can serve OpenAI, Anthropic, or any
# other provider-backed variation. create_langchain_model picks the right
# chat model class and applies all parameters from the variation automatically.
#
# Pass a default for improved resiliency when the AgentControl config is unavailable
# or LaunchDarkly is unreachable. Omit for a disabled default.
# Example:
# from ldai import AICompletionConfigDefault
# default = AICompletionConfigDefault(
# enabled=True,
# model={"name": "gpt-5"},
# provider={"name": "openai"},
# messages=[{"role": "system", "content": "You are a helpful assistant."}],
# )
# config = ai_client.completion_config(CONFIG_KEY, context, default, variables={"topic": "Python"})
config = ai_client.completion_config(CONFIG_KEY, context, variables={"topic": "Python"})
if not config.enabled:
return
tracker = config.create_tracker()
llm = create_langchain_model(config)
messages = convert_messages_to_langchain(config.messages or [])
messages.append(HumanMessage(content="How do I read a file in Python?"))
try:
completion = await tracker.track_metrics_of_async(
get_ai_metrics_from_response,
lambda: llm.ainvoke(messages),
)
print(completion.content)
except Exception as e:
print(f"Error: {e}")
# Always flush events before closing. Trailing events are at risk of being
# lost otherwise, in short-lived scripts and long-running services alike.
ldclient.get().flush()
ldclient.get().close()
def main():
asyncio.run(async_main())
if __name__ == "__main__":
main()
```
```typescript title="Node.js (TypeScript)" expandable lines wrap theme={null}
/**
* LangChain + LaunchDarkly AgentControl Example
*
* LangChain's value is that one config key can serve OpenAI, Anthropic, or any
* other provider-backed variation. The LangChain provider exports pick the right
* chat model and apply parameters automatically.
*/
import dotenv from 'dotenv';
dotenv.config();
import { init, LDClient, LDContext } from '@launchdarkly/node-server-sdk';
import { initAi, type LDAIClient, type LDAICompletionConfig } from '@launchdarkly/server-sdk-ai';
import {
createLangChainModel,
convertMessagesToLangChain,
getAIMetricsFromResponse,
LangChainRunnerFactory,
} from '@launchdarkly/server-sdk-ai-langchain';
import { HumanMessage } from '@langchain/core/messages';
const SDK_KEY = process.env.LAUNCHDARKLY_SDK_KEY as string;
const CONFIG_KEY = 'langchain-assistant';
async function main(): Promise {
const ldClient: LDClient = init(SDK_KEY);
await ldClient.waitForInitialization({ timeout: 10 });
const aiClient: LDAIClient = initAi(ldClient);
const context: LDContext = { kind: 'user', key: 'user-123', name: 'Sandy' };
// Pass a default for improved resiliency when the AgentControl config is unavailable
// or LaunchDarkly is unreachable. Omit for a disabled default.
// Example:
// const fallback = {
// enabled: true,
// model: { name: 'gpt-5' },
// provider: { name: 'openai' },
// messages: [{ role: 'system', content: 'You are a helpful assistant.' }],
// };
// const config = await aiClient.completionConfig(CONFIG_KEY, context, fallback, { topic: 'Python' });
const config: LDAICompletionConfig = await aiClient.completionConfig(
CONFIG_KEY,
context,
undefined,
{ topic: 'Python' },
);
if (!config.enabled) {
await ldClient.close();
return;
}
const tracker = config.createTracker();
const llm = await createLangChainModel(config);
const messages = convertMessagesToLangChain(config.messages || []);
messages.push(new HumanMessage('How do I read a file in Python?'));
try {
const completion = await tracker.trackMetricsOf(
getAIMetricsFromResponse,
() => llm.invoke(messages),
);
const content =
typeof completion.content === 'string' ? completion.content : JSON.stringify(completion.content);
console.log(content);
} catch (error) {
console.error('Error:', error);
}
// Always flush events before closing. Trailing events are at risk of being
// lost otherwise, in short-lived scripts and long-running services alike.
await ldClient.flush();
await ldClient.close();
}
main().catch((err) => {
console.error('Fatal error:', err);
process.exit(1);
});
```
## What to explore next
After you have the basic integration working, you can extend it with:
* [Tools](/docs/home/agentcontrol/tools) for calling external functions from your workflows
* [Online evaluations](/docs/home/agentcontrol/online-evaluations) to score response quality automatically
* [Experiments](/docs/home/agentcontrol/experimentation) to compare AgentControl config variations statistically
* [Agents](/docs/home/agentcontrol/agents) for multi-step workflows with LangChain or LangGraph
For structured outputs and higher-level helper methods, read the [Python](https://github.com/launchdarkly/python-server-sdk-ai/tree/main/packages/ai-providers/server-ai-langchain) or [Node.js](https://github.com/launchdarkly/js-core/tree/main/packages/ai-providers/server-ai-langchain) LangChain provider package documentation.
## Troubleshooting
Some solutions for common problems are outlined below.
### Provider package not installed
If you receive `ImportError` (Python) or `Error` (Node.js) when creating the model, verify that the LangChain integration package for your provider is installed. For example, if your AgentControl config uses an OpenAI model, install `langchain-openai` (Python) or `@langchain/openai` (Node.js). The LaunchDarkly LangChain provider creates models using LangChain's `init_chat_model`, which requires the correct provider package at runtime.
### Metrics not appearing
If metrics do not appear on the **Monitoring** tab:
* Verify that you are calling `tracker.track_metrics_of_async()` (Python) or `tracker.trackMetricsOf()` (Node.js) with the LangChain metrics extractor.
* Ensure you call `flush()` before closing the client, especially for short-lived scripts.
* Wait at least one minute for metrics to process.
### SDK initialization failures
If the LaunchDarkly SDK fails to initialize:
* Verify your SDK key is correct and matches the environment you are targeting.
* Check that your network can reach LaunchDarkly servers.
* Review the SDK logs for specific error messages.
### Config returns fallback value
If you always receive the fallback configuration:
* Verify targeting is enabled for your AgentControl config.
* Check that the AgentControl config key in your code matches the key in LaunchDarkly.
* Ensure your context matches the targeting rules.
### Package import errors
If you receive `ModuleNotFoundError` (Python) or `Cannot find module` (Node.js) for the LaunchDarkly packages:
* Verify the LangChain provider package is installed. The Python package is `launchdarkly-server-sdk-ai-langchain` (imported as `ldai_langchain`). The Node.js package is `@launchdarkly/server-sdk-ai-langchain`.
* Ensure you are using compatible current versions of `launchdarkly-server-sdk-ai`, `launchdarkly-server-sdk-ai-langchain`, and your LangChain provider package. Check the package documentation or release notes if you encounter import or runtime errors.
## Conclusion
In this guide, you connected a LangChain chat model to LaunchDarkly AgentControl using the official LangChain provider packages. You can now:
* Manage prompts and model settings in LaunchDarkly without code changes
* Track token usage, latency, and success rates automatically
* Swap providers and models without changing application code
**Want to know more? Start a trial.**
Your 14-day trial begins as soon as you sign up. Get started in minutes using the in-app Quickstart. You'll discover how easy it is to release, monitor, and optimize your software.
To run statistical comparisons between variations, read [Run experiments with AgentControl](/docs/home/agentcontrol/experimentation). To score response quality automatically using judges, read [Online evaluations in AgentControl](/docs/home/agentcontrol/online-evaluations).
**Observability**
LaunchDarkly provides metrics for AgentControl config invocations, including latency, token usage, costs, and error rates. If you also want traces associated with an evaluated AgentControl config, run the model request inside an active OpenTelemetry parent span. To learn more, read [Observability](/docs/home/observability) and [LLM observability](/docs/home/observability/llm-observability).
For multi-agent workflows, the LangChain-based LangGraph framework handles agent orchestration natively. To learn more, read [Compare AI orchestrators](/docs/tutorials/ai-orchestrators).
## Step 8: Close the client
Close the LaunchDarkly client when your application shuts down to flush pending events. Always flush before closing. Trailing events are at risk of being lost otherwise, in short-lived scripts and long-running services alike.
Here is how to close the client:
```python title="Python" lines wrap theme={null}
# Always flush events before closing. Trailing events are at risk of being
# lost otherwise, in short-lived scripts and long-running services alike.
ldclient.get().flush()
ldclient.get().close()
```
```typescript title="Node.js (TypeScript)" lines wrap theme={null}
// Always flush events before closing. Trailing events are at risk of being
// lost otherwise, in short-lived scripts and long-running services alike.
await ldClient.flush();
await ldClient.close();
```
## Complete example
Here is a complete working example that combines all the steps.
```python title="Python" expandable lines wrap theme={null}
import os
import asyncio
import ldclient
from ldclient import Context
from ldclient.config import Config
from ldai import LDAIClient
from ldai_langchain import create_langchain_model, convert_messages_to_langchain, get_ai_metrics_from_response
from langchain_core.messages import HumanMessage
from dotenv import load_dotenv
load_dotenv()
SDK_KEY = os.environ.get("LAUNCHDARKLY_SDK_KEY")
CONFIG_KEY = "langchain-assistant"
async def async_main():
ldclient.set_config(Config(SDK_KEY))
if not ldclient.get().is_initialized():
return
ai_client = LDAIClient(ldclient.get())
context = Context.builder("user-123").kind("user").name("Sandy").build()
# LangChain's value: one AgentControl config key can serve OpenAI, Anthropic, or any
# other provider-backed variation. create_langchain_model picks the right
# chat model class and applies all parameters from the variation automatically.
#
# Pass a default for improved resiliency when the AgentControl config is unavailable
# or LaunchDarkly is unreachable. Omit for a disabled default.
# Example:
# from ldai import AICompletionConfigDefault
# default = AICompletionConfigDefault(
# enabled=True,
# model={"name": "gpt-5"},
# provider={"name": "openai"},
# messages=[{"role": "system", "content": "You are a helpful assistant."}],
# )
# config = ai_client.completion_config(CONFIG_KEY, context, default, variables={"topic": "Python"})
config = ai_client.completion_config(CONFIG_KEY, context, variables={"topic": "Python"})
if not config.enabled:
return
tracker = config.create_tracker()
llm = create_langchain_model(config)
messages = convert_messages_to_langchain(config.messages or [])
messages.append(HumanMessage(content="How do I read a file in Python?"))
try:
completion = await tracker.track_metrics_of_async(
get_ai_metrics_from_response,
lambda: llm.ainvoke(messages),
)
print(completion.content)
except Exception as e:
print(f"Error: {e}")
# Always flush events before closing. Trailing events are at risk of being
# lost otherwise, in short-lived scripts and long-running services alike.
ldclient.get().flush()
ldclient.get().close()
def main():
asyncio.run(async_main())
if __name__ == "__main__":
main()
```
```typescript title="Node.js (TypeScript)" expandable lines wrap theme={null}
/**
* LangChain + LaunchDarkly AgentControl Example
*
* LangChain's value is that one config key can serve OpenAI, Anthropic, or any
* other provider-backed variation. The LangChain provider exports pick the right
* chat model and apply parameters automatically.
*/
import dotenv from 'dotenv';
dotenv.config();
import { init, LDClient, LDContext } from '@launchdarkly/node-server-sdk';
import { initAi, type LDAIClient, type LDAICompletionConfig } from '@launchdarkly/server-sdk-ai';
import {
createLangChainModel,
convertMessagesToLangChain,
getAIMetricsFromResponse,
LangChainRunnerFactory,
} from '@launchdarkly/server-sdk-ai-langchain';
import { HumanMessage } from '@langchain/core/messages';
const SDK_KEY = process.env.LAUNCHDARKLY_SDK_KEY as string;
const CONFIG_KEY = 'langchain-assistant';
async function main(): Promise {
const ldClient: LDClient = init(SDK_KEY);
await ldClient.waitForInitialization({ timeout: 10 });
const aiClient: LDAIClient = initAi(ldClient);
const context: LDContext = { kind: 'user', key: 'user-123', name: 'Sandy' };
// Pass a default for improved resiliency when the AgentControl config is unavailable
// or LaunchDarkly is unreachable. Omit for a disabled default.
// Example:
// const fallback = {
// enabled: true,
// model: { name: 'gpt-5' },
// provider: { name: 'openai' },
// messages: [{ role: 'system', content: 'You are a helpful assistant.' }],
// };
// const config = await aiClient.completionConfig(CONFIG_KEY, context, fallback, { topic: 'Python' });
const config: LDAICompletionConfig = await aiClient.completionConfig(
CONFIG_KEY,
context,
undefined,
{ topic: 'Python' },
);
if (!config.enabled) {
await ldClient.close();
return;
}
const tracker = config.createTracker();
const llm = await createLangChainModel(config);
const messages = convertMessagesToLangChain(config.messages || []);
messages.push(new HumanMessage('How do I read a file in Python?'));
try {
const completion = await tracker.trackMetricsOf(
getAIMetricsFromResponse,
() => llm.invoke(messages),
);
const content =
typeof completion.content === 'string' ? completion.content : JSON.stringify(completion.content);
console.log(content);
} catch (error) {
console.error('Error:', error);
}
// Always flush events before closing. Trailing events are at risk of being
// lost otherwise, in short-lived scripts and long-running services alike.
await ldClient.flush();
await ldClient.close();
}
main().catch((err) => {
console.error('Fatal error:', err);
process.exit(1);
});
```
## What to explore next
After you have the basic integration working, you can extend it with:
* [Tools](/docs/home/agentcontrol/tools) for calling external functions from your workflows
* [Online evaluations](/docs/home/agentcontrol/online-evaluations) to score response quality automatically
* [Experiments](/docs/home/agentcontrol/experimentation) to compare AgentControl config variations statistically
* [Agents](/docs/home/agentcontrol/agents) for multi-step workflows with LangChain or LangGraph
For structured outputs and higher-level helper methods, read the [Python](https://github.com/launchdarkly/python-server-sdk-ai/tree/main/packages/ai-providers/server-ai-langchain) or [Node.js](https://github.com/launchdarkly/js-core/tree/main/packages/ai-providers/server-ai-langchain) LangChain provider package documentation.
## Troubleshooting
Some solutions for common problems are outlined below.
### Provider package not installed
If you receive `ImportError` (Python) or `Error` (Node.js) when creating the model, verify that the LangChain integration package for your provider is installed. For example, if your AgentControl config uses an OpenAI model, install `langchain-openai` (Python) or `@langchain/openai` (Node.js). The LaunchDarkly LangChain provider creates models using LangChain's `init_chat_model`, which requires the correct provider package at runtime.
### Metrics not appearing
If metrics do not appear on the **Monitoring** tab:
* Verify that you are calling `tracker.track_metrics_of_async()` (Python) or `tracker.trackMetricsOf()` (Node.js) with the LangChain metrics extractor.
* Ensure you call `flush()` before closing the client, especially for short-lived scripts.
* Wait at least one minute for metrics to process.
### SDK initialization failures
If the LaunchDarkly SDK fails to initialize:
* Verify your SDK key is correct and matches the environment you are targeting.
* Check that your network can reach LaunchDarkly servers.
* Review the SDK logs for specific error messages.
### Config returns fallback value
If you always receive the fallback configuration:
* Verify targeting is enabled for your AgentControl config.
* Check that the AgentControl config key in your code matches the key in LaunchDarkly.
* Ensure your context matches the targeting rules.
### Package import errors
If you receive `ModuleNotFoundError` (Python) or `Cannot find module` (Node.js) for the LaunchDarkly packages:
* Verify the LangChain provider package is installed. The Python package is `launchdarkly-server-sdk-ai-langchain` (imported as `ldai_langchain`). The Node.js package is `@launchdarkly/server-sdk-ai-langchain`.
* Ensure you are using compatible current versions of `launchdarkly-server-sdk-ai`, `launchdarkly-server-sdk-ai-langchain`, and your LangChain provider package. Check the package documentation or release notes if you encounter import or runtime errors.
## Conclusion
In this guide, you connected a LangChain chat model to LaunchDarkly AgentControl using the official LangChain provider packages. You can now:
* Manage prompts and model settings in LaunchDarkly without code changes
* Track token usage, latency, and success rates automatically
* Swap providers and models without changing application code
**Want to know more? Start a trial.**
Your 14-day trial begins as soon as you sign up. Get started in minutes using the in-app Quickstart. You'll discover how easy it is to release, monitor, and optimize your software.
Want to try it out? Start a trial.