| LaunchDarkly field | Notes |
|---|---|
| Sign-on URL |
Default value: [https://YOUR-DOMAIN/adfs/ls/](https://YOUR-DOMAIN/adfs/ls/). If the default value fails, confirm that the endpoint is enabled and the URL path is correct. Find the endpoint in Service, then Endpoints. Search for an endpoint with the SAML 2.0/WS-Federation type.
|
| X.509 Certificate | Copy the Token Signing certificate to a Base-64 encoded X.509 file and import it into LaunchDarkly |
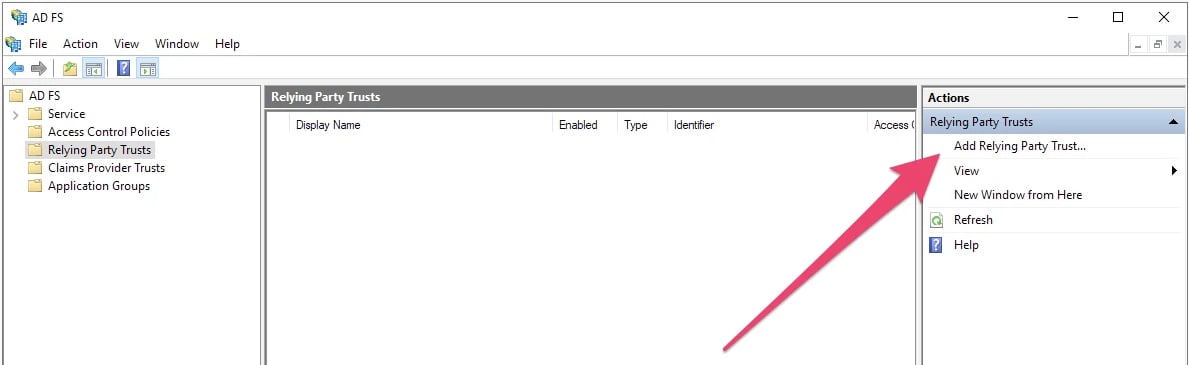 3. Click **Start**. Keep the default value, which is **Claims aware**:
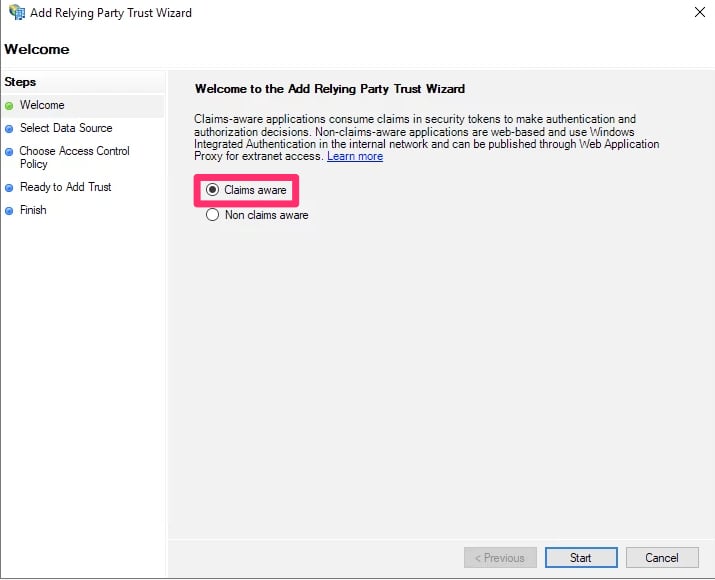 4. Choose **Enter data about the relying party manually**:
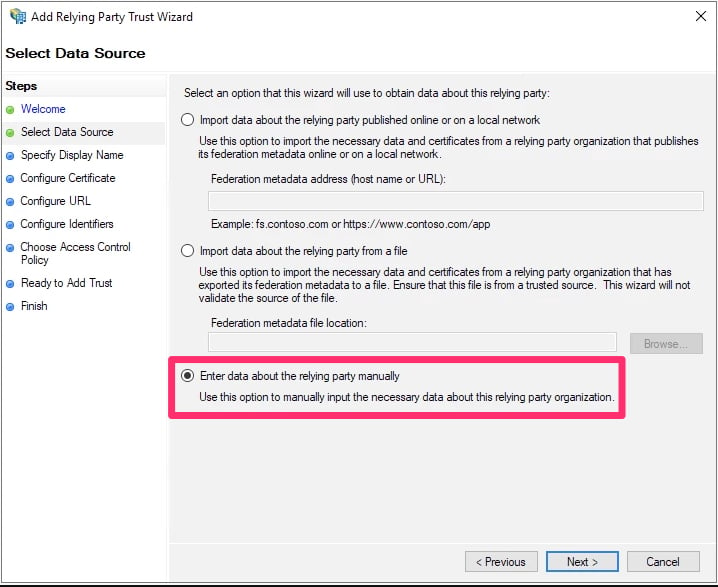 5. Click **Next**. The "Specify Display Name" screen appears.
6. Set a display name of your choosing.
7. Click **Next**. The "Configure Certificate" screen appears.
8. You do not need to choose a certificate. Click **Next**.
9. Select **Enable support for the SAML 2.0 WebSSO protocol**.
10. Enter the **Assertion consumer service URL** from the SSO section of LaunchDarkly into the **Relying party SAML 2.0 SSO service URL** field.
11. Click **Next**.
12. In the **Relying party trust identifier** field, enter `app.launchdarkly.com`.
13. Click **Add**.
14. Click **Next**. The "Choose Access control Policy" screen appears.
15. You do not need to change any access control policies. Click **Next**.
16. Review your changes and click **Next**.
17. If you are satisfied with the configuration, click **Close**.
After you have successfully completed this procedure, a new LaunchDarkly trust will appear in the ADFS Management tool.
## Set up claim issuance policies
To set up a claim issuance policy:
1. Log into the ADFS Management tool.
2. Select the **LaunchDarkly Trust**.
3. Click **Edit Claim Issuance Policy...** in the menu. The "Edit Claim Issuance Policy" window appears.
4. Click **Add Rule**.
5. Set **Claim rule template** to "Transform an Incoming Claim."
6. Click **Next**:
5. Click **Next**. The "Specify Display Name" screen appears.
6. Set a display name of your choosing.
7. Click **Next**. The "Configure Certificate" screen appears.
8. You do not need to choose a certificate. Click **Next**.
9. Select **Enable support for the SAML 2.0 WebSSO protocol**.
10. Enter the **Assertion consumer service URL** from the SSO section of LaunchDarkly into the **Relying party SAML 2.0 SSO service URL** field.
11. Click **Next**.
12. In the **Relying party trust identifier** field, enter `app.launchdarkly.com`.
13. Click **Add**.
14. Click **Next**. The "Choose Access control Policy" screen appears.
15. You do not need to change any access control policies. Click **Next**.
16. Review your changes and click **Next**.
17. If you are satisfied with the configuration, click **Close**.
After you have successfully completed this procedure, a new LaunchDarkly trust will appear in the ADFS Management tool.
## Set up claim issuance policies
To set up a claim issuance policy:
1. Log into the ADFS Management tool.
2. Select the **LaunchDarkly Trust**.
3. Click **Edit Claim Issuance Policy...** in the menu. The "Edit Claim Issuance Policy" window appears.
4. Click **Add Rule**.
5. Set **Claim rule template** to "Transform an Incoming Claim."
6. Click **Next**:
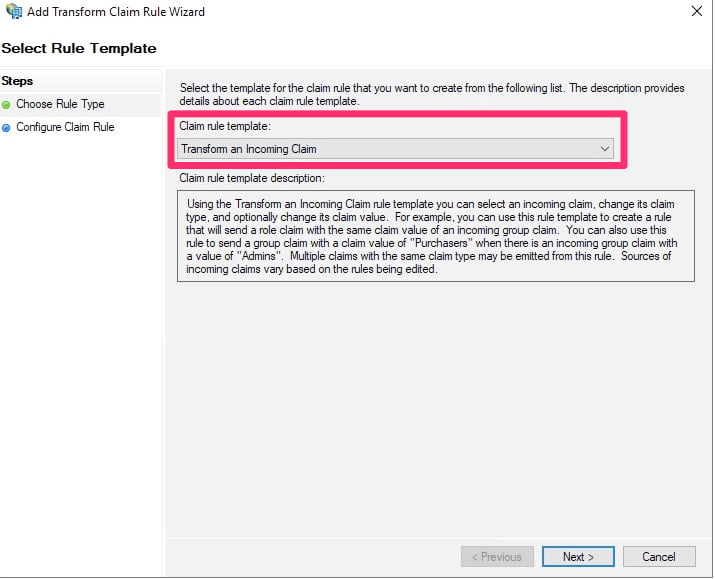 7. Set the following options:
* Claim rule name: Enter a human-readable name, such as "Email to NameID."
* Incoming claim type: **E-Mail Address**
* Outgoing claim type: **Name ID**
* Outgoing name ID format: **Email**
8. Select **Pass through all claim values**.
9. Click **Finish**.
ADFS is now configured with LaunchDarkly.
For more information on claim rules, read Microsoft's [Create a Rule to Transform an Incoming Claim](https://learn.microsoft.com/en-us/windows-server/identity/ad-fs/operations/create-a-rule-to-transform-an-incoming-claim).
### Configure custom roles
You can map LaunchDarkly custom role attributes to ADFS using a claim issuance policy. To learn more about SSO provisioning for roles, read [Roles](/docs/home/account/roles).
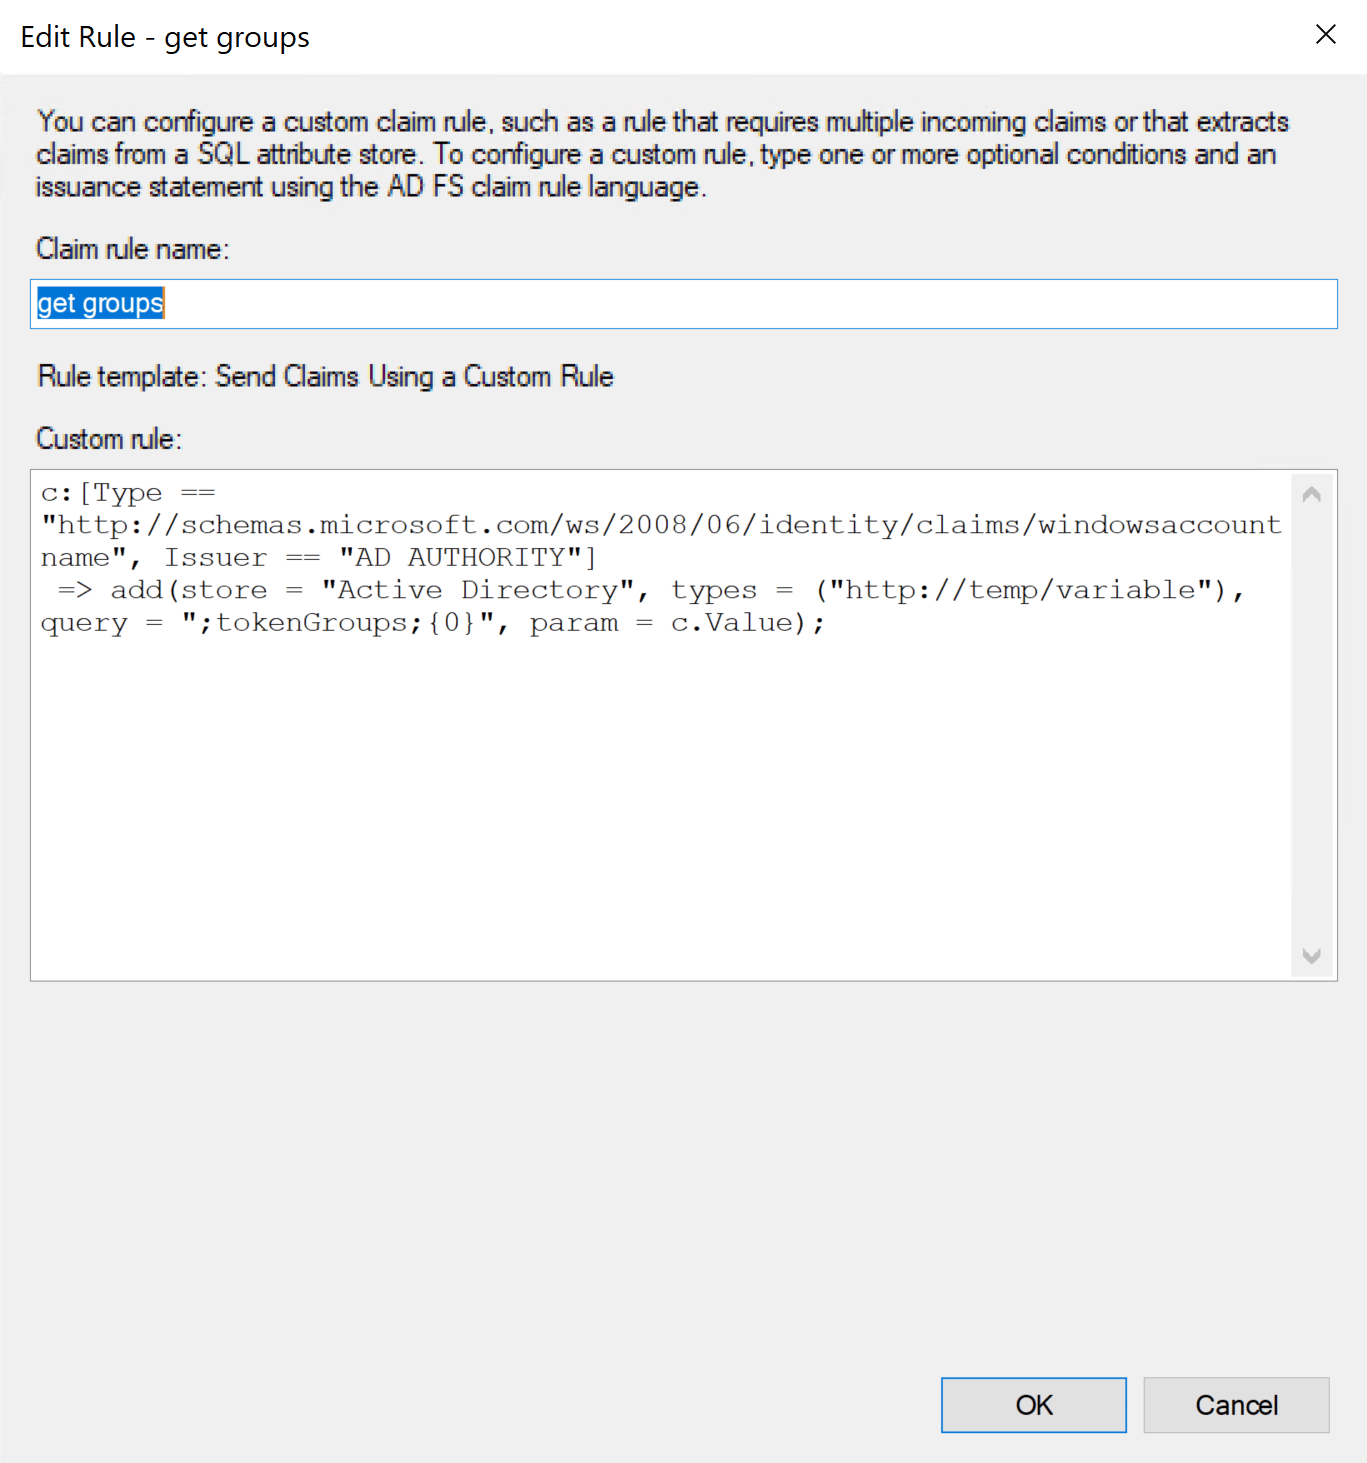
Before you can map custom role attributes, you must get your ADFS groups. To learn how, read Microsoft's [Create a Rule to Send Claims Using a Custom Rule](https://learn.microsoft.com/en-us/windows-server/identity/ad-fs/operations/create-a-rule-to-send-claims-using-a-custom-rule).
Your rule will look something like this:
7. Set the following options:
* Claim rule name: Enter a human-readable name, such as "Email to NameID."
* Incoming claim type: **E-Mail Address**
* Outgoing claim type: **Name ID**
* Outgoing name ID format: **Email**
8. Select **Pass through all claim values**.
9. Click **Finish**.
ADFS is now configured with LaunchDarkly.
For more information on claim rules, read Microsoft's [Create a Rule to Transform an Incoming Claim](https://learn.microsoft.com/en-us/windows-server/identity/ad-fs/operations/create-a-rule-to-transform-an-incoming-claim).
### Configure custom roles
You can map LaunchDarkly custom role attributes to ADFS using a claim issuance policy. To learn more about SSO provisioning for roles, read [Roles](/docs/home/account/roles).
Before you can map custom role attributes, you must get your ADFS groups. To learn how, read Microsoft's [Create a Rule to Send Claims Using a Custom Rule](https://learn.microsoft.com/en-us/windows-server/identity/ad-fs/operations/create-a-rule-to-send-claims-using-a-custom-rule).
Your rule will look something like this:
 To send claims using a custom rule:
1. Log into the ADFS Management tool.
2. Select **LaunchDarkly Trust**.
3. Click **Edit Claim Issuance Policy...** in the menu. The "Edit Claim Issuance Policy" window appears.
4. Click **Add Rule**.
5. Set **Claim rule template** to **Send Claims using a custom rule**.
6. Click **Next**.
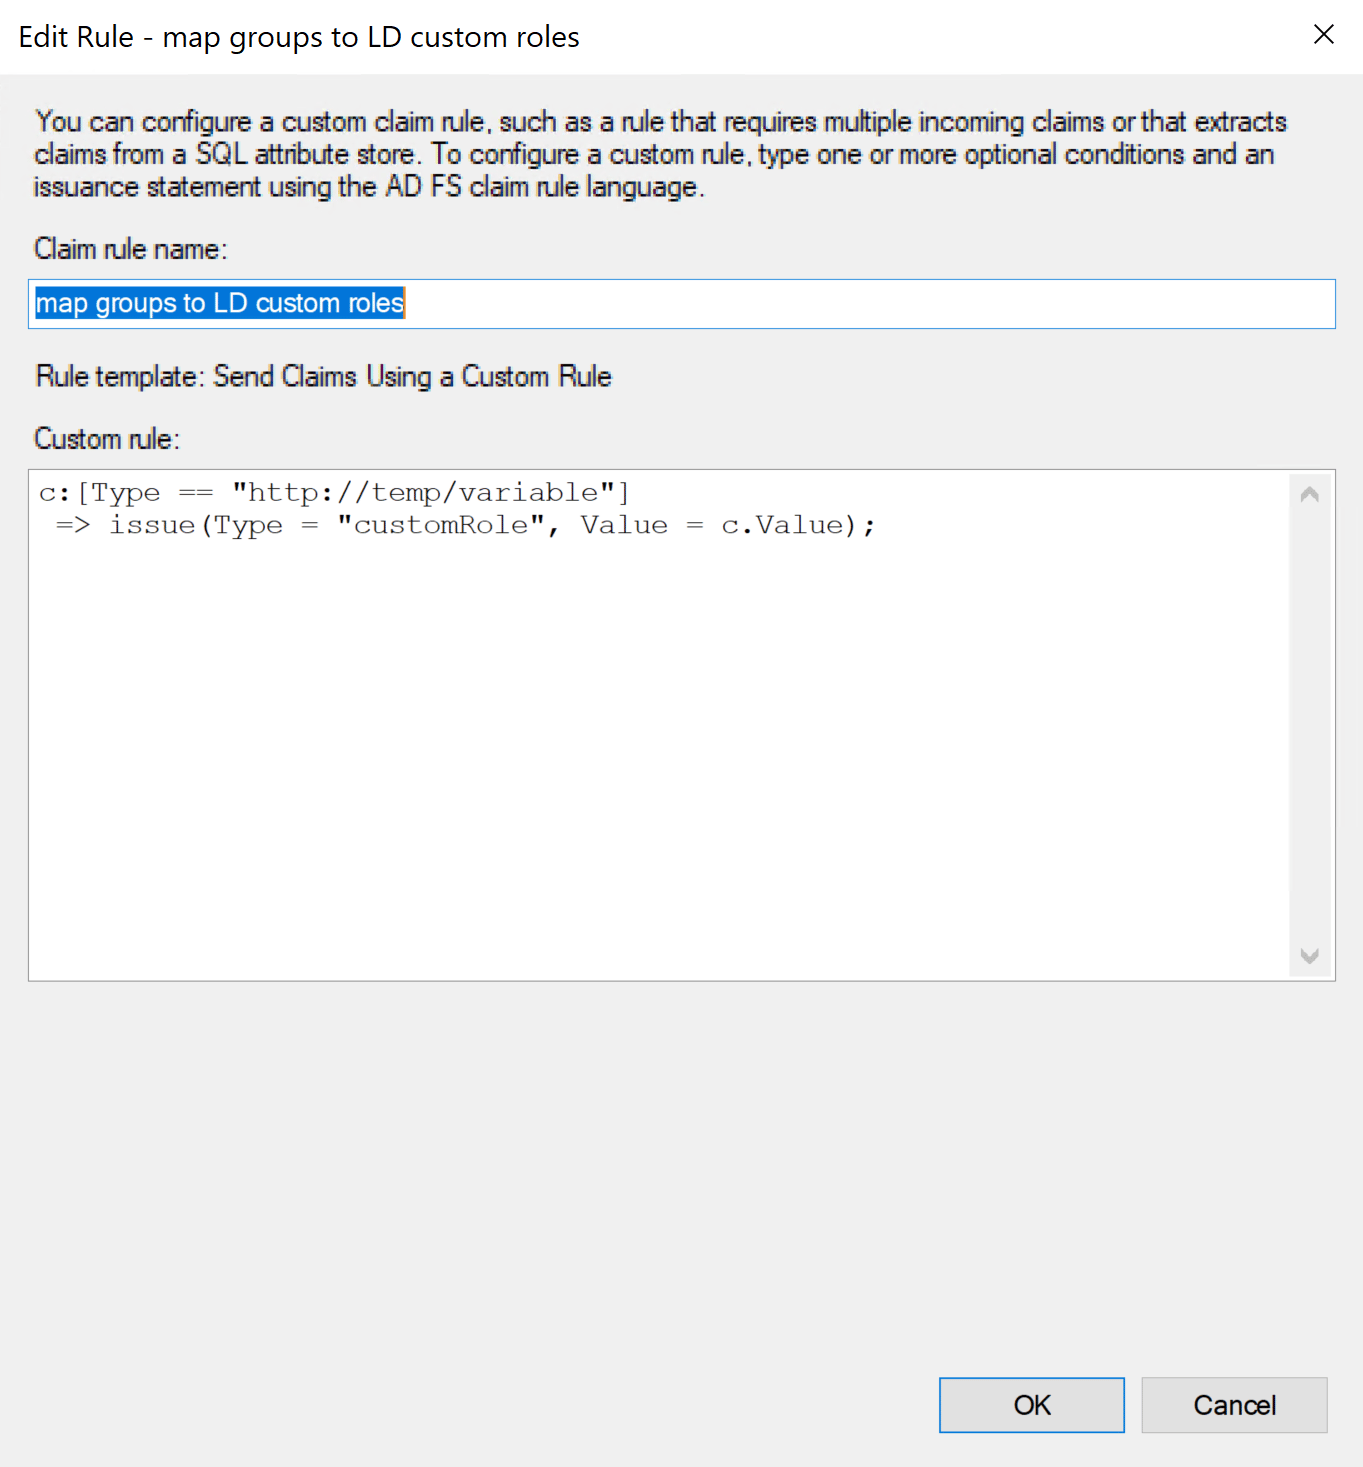
7. Enter a human-readable name, such as "Map groups to LaunchDarkly custom roles."
8. In the Custom rule window, enter the following:
To send claims using a custom rule:
1. Log into the ADFS Management tool.
2. Select **LaunchDarkly Trust**.
3. Click **Edit Claim Issuance Policy...** in the menu. The "Edit Claim Issuance Policy" window appears.
4. Click **Add Rule**.
5. Set **Claim rule template** to **Send Claims using a custom rule**.
6. Click **Next**.
7. Enter a human-readable name, such as "Map groups to LaunchDarkly custom roles."
8. In the Custom rule window, enter the following:
 9. Click **OK**.
You can now assign ADFS members to custom role groups using the "Member of" tab within user properties.
9. Click **OK**.
You can now assign ADFS members to custom role groups using the "Member of" tab within user properties.