> ## Documentation Index
> Fetch the complete documentation index at: https://launchdarkly.com/docs/llms.txt
> Use this file to discover all available pages before exploring further.
# Entra ID
This topic explains how to integrate LaunchDarkly with Microsoft Entra ID (formerly Azure Active Directory). The Entra ID App Gallery includes LaunchDarkly and provides a LaunchDarkly application template that facilitates configuration.
If you want to set up SCIM provisioning with Entra ID, read [Configure SCIM](/docs/home/account/scim#configure-scim).
**You cannot manage teams using the UI after enabling SCIM**
If you configure SCIM to provision resources from identity providers, you can no longer manage teams using the LaunchDarkly user interface.
## Integrate LaunchDarkly with Entra ID
To integrate LaunchDarkly with Entra ID:
1. Log in to Entra ID.
2. Navigate to "Enterprise applications."
3. Click **New application**:
 4. Search for the LaunchDarkly application.
5. After you add it, follow the [Microsoft Entra integration with LaunchDarkly tutorial](https://learn.microsoft.com/en-us/entra/identity/saas-apps/launchdarkly-tutorial).
If your instance of Entra ID manages multiple LaunchDarkly accounts, [start a Support ticket](https://support.launchdarkly.com/hc/en-us/requests/new).
**Entra ID user identifier guidelines**
During configuration, we recommend using the identifier `user.mail`, provided that every user has their email address attribute set. If you haven't set attributes for every user, use the identifier `user.userprincipalname`.
After you set up the integration, log in to LaunchDarkly by clicking the LaunchDarkly app in Entra or through Microsoft's [My App portal](https://myapplications.microsoft.com/). To learn more, read Microsoft's [Sign in and start apps from the My Apps portal](https://support.microsoft.com/en-us/account-billing/sign-in-and-start-apps-from-the-my-apps-portal-2f3b1bae-0e5a-4a86-a33e-876fbd2a4510).
If members cannot log in after you set up SSO, read the troubleshooting article [New users are unable to log in with Entra (formerly Azure AD) once SSO is configured](https://support.launchdarkly.com/hc/en-us/articles/17256877142683-New-users-are-unable-to-log-in-with-Azure-AD-once-SSO-is-configured).
To learn how to display member names in LaunchDarkly, read the help center article [How to populate firstName and lastName claims in the LaunchDarkly UI with Entra ID](https://support.launchdarkly.com/hc/en-us/articles/37980051672987-How-to-populate-firstName-and-lastName-claims-in-the-LaunchDarkly-UI-with-Entra-ID).
## Configure team-based or role-based access
After you integrate LaunchDarkly with Entra ID, you can configure LaunchDarkly teams or LaunchDarkly roles to map with Entra ID resources. Configuring team-based access is the most common solution, because it enables you to use Just-In-Time (JIT) user provisioning with your LaunchDarkly teams and keeps team members in sync with an Entra ID group. To learn more, read [Map LaunchDarkly teams to Entra ID Security Groups](#map-launchdarkly-teams-to-entra-id-security-groups).
You can optionally configure role-based access to map LaunchDarkly custom roles to Entra ID user attributes or to Entra ID security groups. To learn more, read either [Map custom roles to Entra User Attributes](#map-custom-roles-to-entra-user-attributes) or [Map custom roles to Entra Security Groups](#map-custom-roles-to-entra-security-groups).
**Removing existing roles**
SAML ignores empty fields if used in **Roles** or **customRoles**. This only applies to role-based access configured with `role` or `customRole` claims. It does not affect team-based access mapping.
To clear all existing roles, enter an empty string in the field.
If you are uncertain about which configuration to choose, contact your LaunchDarkly account team.
## Map LaunchDarkly teams to Entra ID Security Groups
After you integrate LaunchDarkly with Entra ID, you can map LaunchDarkly teams to Entra Security Groups. This keeps the members of your LaunchDarkly teams in sync with your Entra ID groups and enables you to use JIT user provisioning with Entra ID groups to automatically map users to LaunchDarkly teams.
There are four steps to this process:
1. [Create Security Groups in Entra ID](#create-groups-in-entra-id)
2. [Create teams in LaunchDarkly](#create-teams-in-launchdarkly)
3. [Assign Entra ID Security Groups to the LaunchDarkly Enterprise Application](#assign-entra-id-security-groups-to-the-launchdarkly-enterprise-application)
4. [Create a new Entra ID claim](#create-a-new-entra-id-claim)
### Create Security Groups in Entra ID
First, set up a Security Group in Entra ID:
1. In Entra ID, navigate to "Groups," then click **New group**.
2. Select the "Security" group type and enter a group name.
3. Click **Create**. You are returned to the groups list.
4. Copy the object ID of the group you want to link to a LaunchDarkly team:
4. Search for the LaunchDarkly application.
5. After you add it, follow the [Microsoft Entra integration with LaunchDarkly tutorial](https://learn.microsoft.com/en-us/entra/identity/saas-apps/launchdarkly-tutorial).
If your instance of Entra ID manages multiple LaunchDarkly accounts, [start a Support ticket](https://support.launchdarkly.com/hc/en-us/requests/new).
**Entra ID user identifier guidelines**
During configuration, we recommend using the identifier `user.mail`, provided that every user has their email address attribute set. If you haven't set attributes for every user, use the identifier `user.userprincipalname`.
After you set up the integration, log in to LaunchDarkly by clicking the LaunchDarkly app in Entra or through Microsoft's [My App portal](https://myapplications.microsoft.com/). To learn more, read Microsoft's [Sign in and start apps from the My Apps portal](https://support.microsoft.com/en-us/account-billing/sign-in-and-start-apps-from-the-my-apps-portal-2f3b1bae-0e5a-4a86-a33e-876fbd2a4510).
If members cannot log in after you set up SSO, read the troubleshooting article [New users are unable to log in with Entra (formerly Azure AD) once SSO is configured](https://support.launchdarkly.com/hc/en-us/articles/17256877142683-New-users-are-unable-to-log-in-with-Azure-AD-once-SSO-is-configured).
To learn how to display member names in LaunchDarkly, read the help center article [How to populate firstName and lastName claims in the LaunchDarkly UI with Entra ID](https://support.launchdarkly.com/hc/en-us/articles/37980051672987-How-to-populate-firstName-and-lastName-claims-in-the-LaunchDarkly-UI-with-Entra-ID).
## Configure team-based or role-based access
After you integrate LaunchDarkly with Entra ID, you can configure LaunchDarkly teams or LaunchDarkly roles to map with Entra ID resources. Configuring team-based access is the most common solution, because it enables you to use Just-In-Time (JIT) user provisioning with your LaunchDarkly teams and keeps team members in sync with an Entra ID group. To learn more, read [Map LaunchDarkly teams to Entra ID Security Groups](#map-launchdarkly-teams-to-entra-id-security-groups).
You can optionally configure role-based access to map LaunchDarkly custom roles to Entra ID user attributes or to Entra ID security groups. To learn more, read either [Map custom roles to Entra User Attributes](#map-custom-roles-to-entra-user-attributes) or [Map custom roles to Entra Security Groups](#map-custom-roles-to-entra-security-groups).
**Removing existing roles**
SAML ignores empty fields if used in **Roles** or **customRoles**. This only applies to role-based access configured with `role` or `customRole` claims. It does not affect team-based access mapping.
To clear all existing roles, enter an empty string in the field.
If you are uncertain about which configuration to choose, contact your LaunchDarkly account team.
## Map LaunchDarkly teams to Entra ID Security Groups
After you integrate LaunchDarkly with Entra ID, you can map LaunchDarkly teams to Entra Security Groups. This keeps the members of your LaunchDarkly teams in sync with your Entra ID groups and enables you to use JIT user provisioning with Entra ID groups to automatically map users to LaunchDarkly teams.
There are four steps to this process:
1. [Create Security Groups in Entra ID](#create-groups-in-entra-id)
2. [Create teams in LaunchDarkly](#create-teams-in-launchdarkly)
3. [Assign Entra ID Security Groups to the LaunchDarkly Enterprise Application](#assign-entra-id-security-groups-to-the-launchdarkly-enterprise-application)
4. [Create a new Entra ID claim](#create-a-new-entra-id-claim)
### Create Security Groups in Entra ID
First, set up a Security Group in Entra ID:
1. In Entra ID, navigate to "Groups," then click **New group**.
2. Select the "Security" group type and enter a group name.
3. Click **Create**. You are returned to the groups list.
4. Copy the object ID of the group you want to link to a LaunchDarkly team:
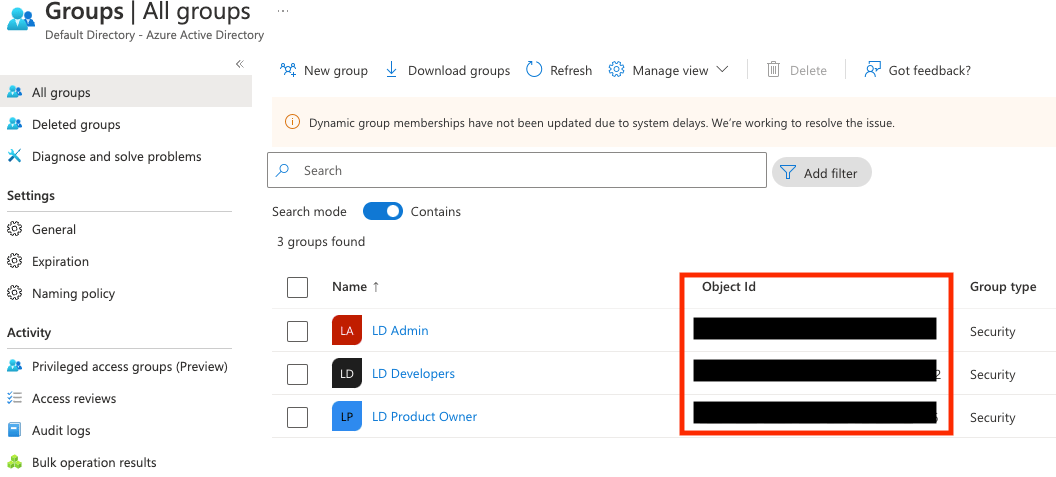 You will use this group's name and object ID in the next section.
Repeat this procedure for as many groups you want to assign to LaunchDarkly teams.
### Create teams in LaunchDarkly
**Map the group name and object ID to a team before proceeding**
You must map the Entra ID group name and object ID to a LaunchDarkly team before you continue. Failing to complete this step will prevent you from creating new Entra ID claims later in the procedure.
Next, create a team in LaunchDarkly using your Entra ID group name and the object ID you copied from the previous step:
1. Click the **gear** icon in the left sidebar to view Organization settings.
2. Click **Teams**.
3. Click **Create team**. The "Create team" dialog appears.
4. In the **Name** field, enter the Entra ID group name you created in the previous step.
5. In the **Key** field, paste the Entra ID object ID for the group that you copied the previous section.
6. Click **Create team**.
Repeat this procedure for as many teams as you want to sync with Entra ID Security Groups.
### Assign Entra ID Security Groups to the LaunchDarkly Enterprise Application
Then, assign Entra ID Security Groups to the LaunchDarkly Enterprise Application:
1. In Entra ID, open the LaunchDarkly Enterprise Application.
2. Click **Users and groups**. The "Users and groups" screen appears:
You will use this group's name and object ID in the next section.
Repeat this procedure for as many groups you want to assign to LaunchDarkly teams.
### Create teams in LaunchDarkly
**Map the group name and object ID to a team before proceeding**
You must map the Entra ID group name and object ID to a LaunchDarkly team before you continue. Failing to complete this step will prevent you from creating new Entra ID claims later in the procedure.
Next, create a team in LaunchDarkly using your Entra ID group name and the object ID you copied from the previous step:
1. Click the **gear** icon in the left sidebar to view Organization settings.
2. Click **Teams**.
3. Click **Create team**. The "Create team" dialog appears.
4. In the **Name** field, enter the Entra ID group name you created in the previous step.
5. In the **Key** field, paste the Entra ID object ID for the group that you copied the previous section.
6. Click **Create team**.
Repeat this procedure for as many teams as you want to sync with Entra ID Security Groups.
### Assign Entra ID Security Groups to the LaunchDarkly Enterprise Application
Then, assign Entra ID Security Groups to the LaunchDarkly Enterprise Application:
1. In Entra ID, open the LaunchDarkly Enterprise Application.
2. Click **Users and groups**. The "Users and groups" screen appears:
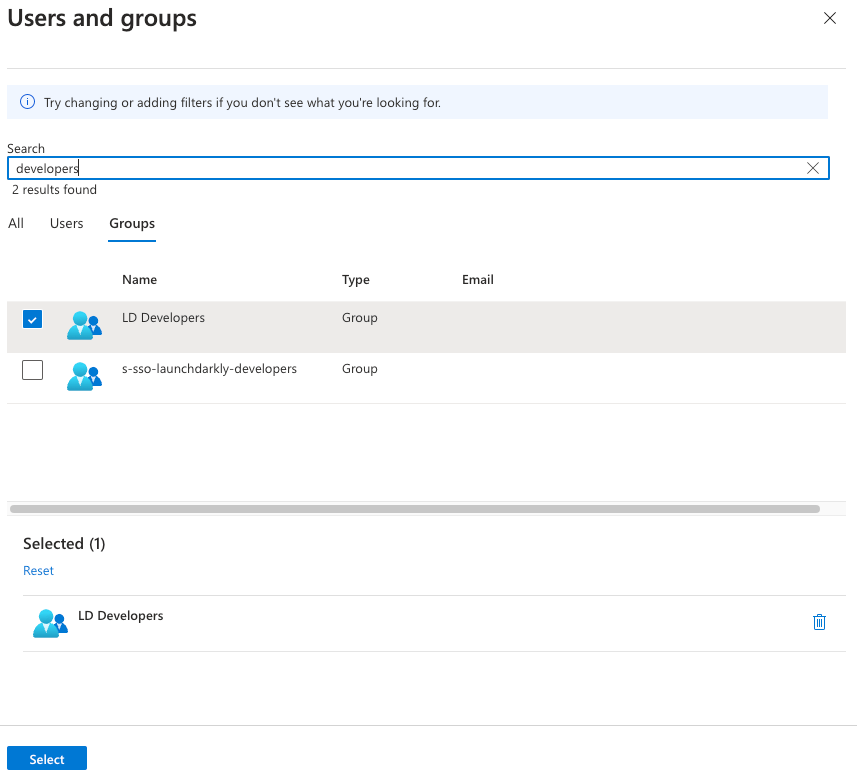 3. On the "Groups" tab, choose the group you want to edit and click **Select**. The "Add Assignment" screen appears.
4. Click **None Selected** under "Users and groups" to add a new group. The "Users and groups" screen appears.
3. On the "Groups" tab, choose the group you want to edit and click **Select**. The "Add Assignment" screen appears.
4. Click **None Selected** under "Users and groups" to add a new group. The "Users and groups" screen appears.
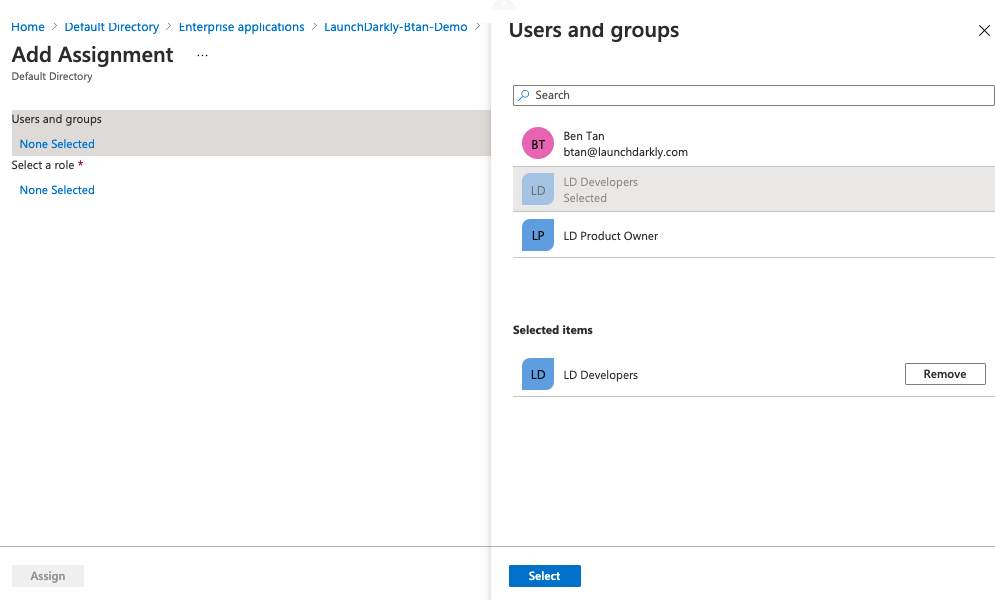 5. Choose the group you created in the [Create Security Groups in Entra ID](#create-security-groups-in-entra-id) step.
6. Click **Select**. You are returned to the "Add Assignment" screen.
7. Click **Assign**.
Repeat this procedure for each Entra ID Security Group you created.
### Create a new Entra ID claim
Finally, create a new Entra ID claim:
1. In Entra ID, open the LaunchDarkly Enterprise Application.
2. Click **Single sign-on**.
3. Scroll to the "Attributes & Claims" section.
4. Click **Edit**. The "Manage claims" form appears.
5. Choose the group you created in the [Create Security Groups in Entra ID](#create-security-groups-in-entra-id) step.
6. Click **Select**. You are returned to the "Add Assignment" screen.
7. Click **Assign**.
Repeat this procedure for each Entra ID Security Group you created.
### Create a new Entra ID claim
Finally, create a new Entra ID claim:
1. In Entra ID, open the LaunchDarkly Enterprise Application.
2. Click **Single sign-on**.
3. Scroll to the "Attributes & Claims" section.
4. Click **Edit**. The "Manage claims" form appears.
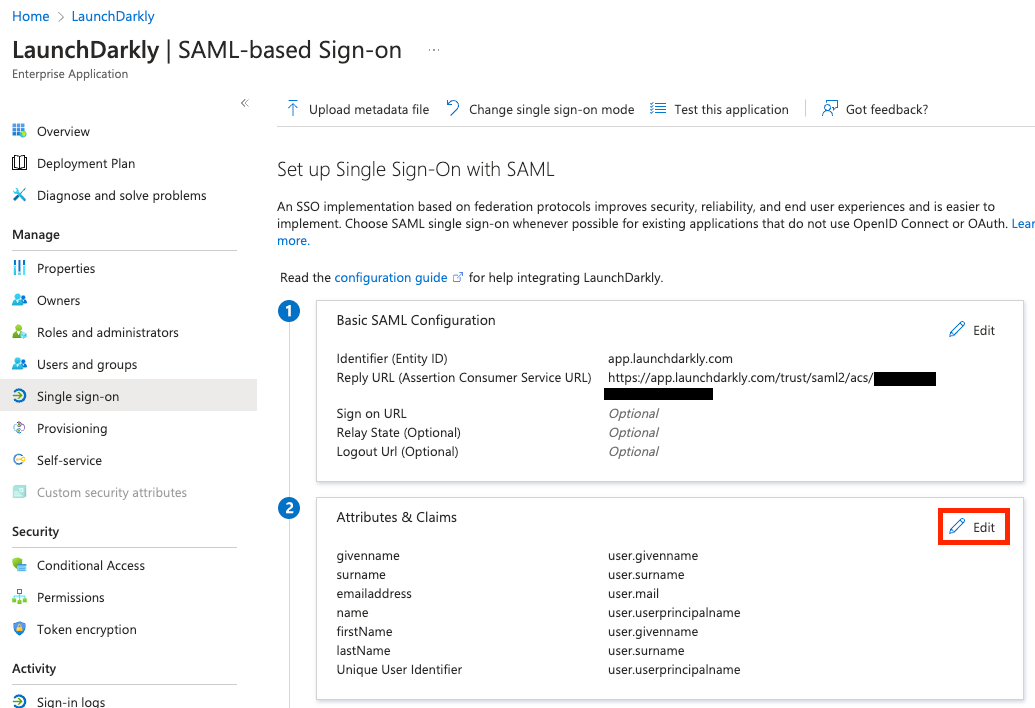 5. Click "+ Add a group claim." A "Group Claims" dialog appears.
6. Select "Groups assigned to the application" under "Which groups associated with the user should be returned in the claim?"
7. Select "Group ID" as the source attribute.
8. Open the **Advanced options** section.
9. Check the "Customize the name of the group claim" box.
10. Enter `teamKey` into the **Name** field:
5. Click "+ Add a group claim." A "Group Claims" dialog appears.
6. Select "Groups assigned to the application" under "Which groups associated with the user should be returned in the claim?"
7. Select "Group ID" as the source attribute.
8. Open the **Advanced options** section.
9. Check the "Customize the name of the group claim" box.
10. Enter `teamKey` into the **Name** field:
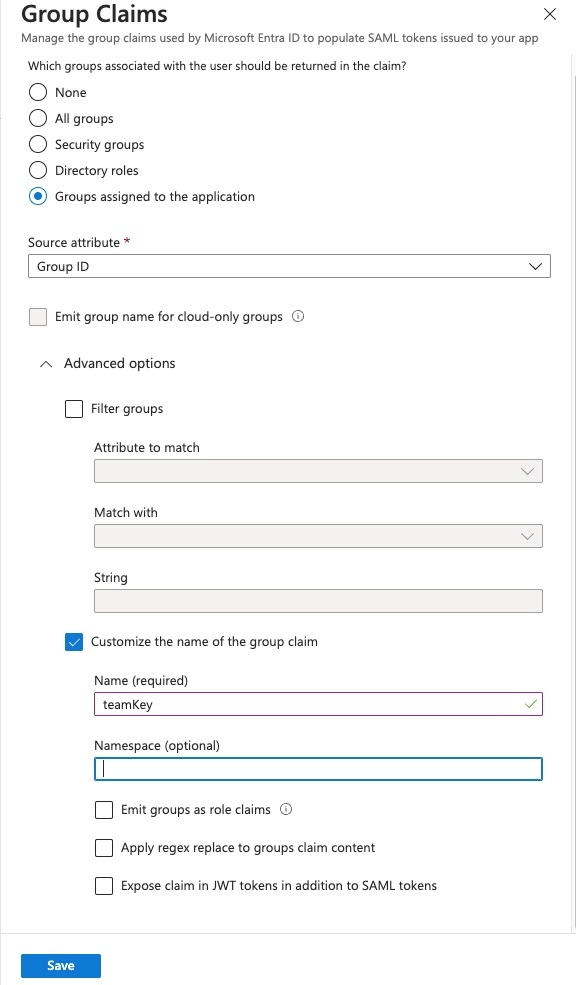 11. Click **Save**. You are returned to the "Attributes & Claims" screen.
Close the "Attributes & Claims" screen to return to the "Single sign-on" page. To test your SSO configuration, click **Test** at the bottom of the page.
## Map custom roles to Entra User Attributes
After you integrate LaunchDarkly with Entra ID, you can map LaunchDarkly role and custom role attributes to Entra User Attributes using Entra claims. The LaunchDarkly Entra SSO integration provides JIT user provisioning for IdP-Initiated SSO.
To learn more about SSO provisioning for roles, read [Roles](/docs/home/account/roles).
To set up `role` and `customRole` claims in Entra ID:
1. In Entra ID, open the LaunchDarkly Enterprise Application.
2. Click **Single sign-on**.
3. Scroll to the "Attributes & Claims" section.
4. Click **Edit**.
5. Click **Add new claim**. The "Manage claim" screen appears:
11. Click **Save**. You are returned to the "Attributes & Claims" screen.
Close the "Attributes & Claims" screen to return to the "Single sign-on" page. To test your SSO configuration, click **Test** at the bottom of the page.
## Map custom roles to Entra User Attributes
After you integrate LaunchDarkly with Entra ID, you can map LaunchDarkly role and custom role attributes to Entra User Attributes using Entra claims. The LaunchDarkly Entra SSO integration provides JIT user provisioning for IdP-Initiated SSO.
To learn more about SSO provisioning for roles, read [Roles](/docs/home/account/roles).
To set up `role` and `customRole` claims in Entra ID:
1. In Entra ID, open the LaunchDarkly Enterprise Application.
2. Click **Single sign-on**.
3. Scroll to the "Attributes & Claims" section.
4. Click **Edit**.
5. Click **Add new claim**. The "Manage claim" screen appears:
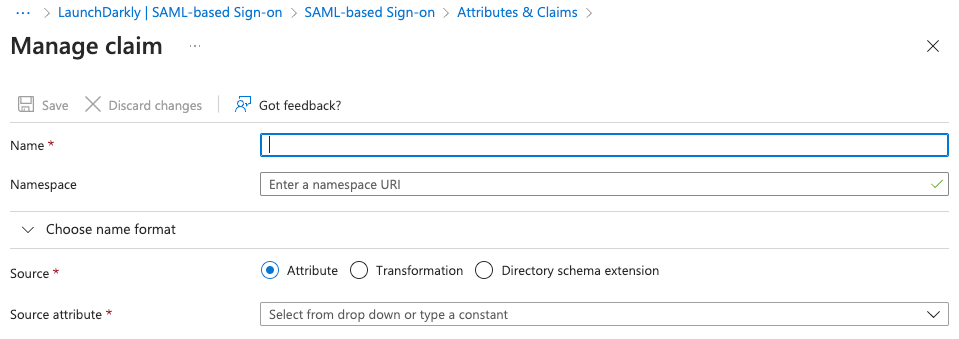 6. Enter "role" in the **Name** field.
7. Leave the source as "Attribute."
8. Choose a source attribute from the menu that is not currently mapped, such as `user.country`.
9. Click **Save**.
10. Repeat steps 5-9 with "customRole," mapping to a different unused source attribute.
## Map custom roles to Entra Security Groups
In addition to Entra User Attributes, you can also assign LaunchDarkly custom roles to Entra Security Groups.
There are five steps to this process:
1. [Create roles in LaunchDarkly](#create-roles-in-launchdarkly)
2. [Create groups in Entra ID](#create-groups-in-entra-id)
3. [Create roles for the Entra LaunchDarkly Enterprise Application](#create-roles-for-the-entra-launchdarkly-enterprise-application)
4. [Set up groups and roles in the Entra LaunchDarkly Enterprise Application](#set-up-groups-and-roles-in-the-entra-launchdarkly-enterprise-application)
5. [Update the Entra LaunchDarkly Enterprise Application SSO configuration](#update-the-entra-launchdarkly-enterprise-application-sso-configuration)
Each of these steps is outlined below.
### Create roles in LaunchDarkly
To begin, create the roles in LaunchDarkly that you want to use with the Entra LaunchDarkly Enterprise Application. Make note of each role's key, as you will need the key when you set up your Entra ID app role.
To learn how, read [Roles](/docs/home/account/roles).
### Create groups in Entra ID
After you have created your custom roles in LaunchDarkly, set up your groups in Entra ID:
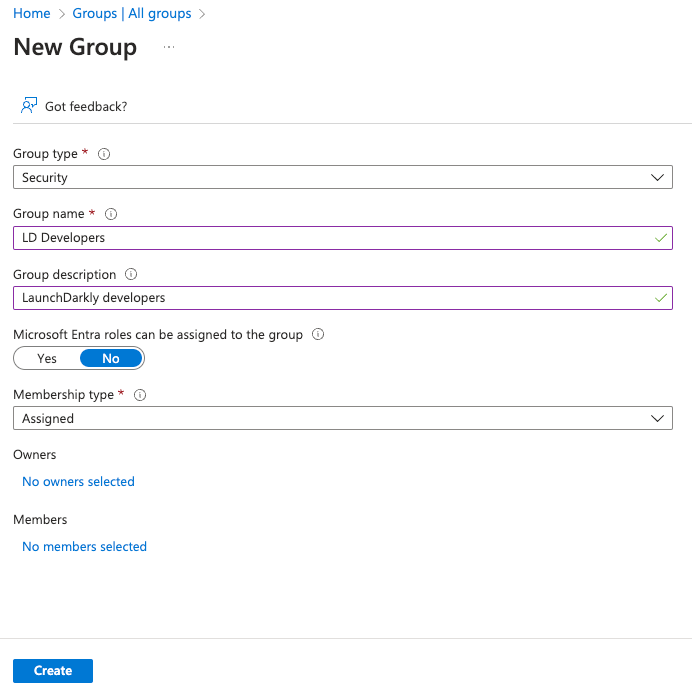
1. In Entra ID, navigate to "Groups," then click **New group**.
2. Select a group type and enter a group name.
3. Click "No members selected" to add new members:
6. Enter "role" in the **Name** field.
7. Leave the source as "Attribute."
8. Choose a source attribute from the menu that is not currently mapped, such as `user.country`.
9. Click **Save**.
10. Repeat steps 5-9 with "customRole," mapping to a different unused source attribute.
## Map custom roles to Entra Security Groups
In addition to Entra User Attributes, you can also assign LaunchDarkly custom roles to Entra Security Groups.
There are five steps to this process:
1. [Create roles in LaunchDarkly](#create-roles-in-launchdarkly)
2. [Create groups in Entra ID](#create-groups-in-entra-id)
3. [Create roles for the Entra LaunchDarkly Enterprise Application](#create-roles-for-the-entra-launchdarkly-enterprise-application)
4. [Set up groups and roles in the Entra LaunchDarkly Enterprise Application](#set-up-groups-and-roles-in-the-entra-launchdarkly-enterprise-application)
5. [Update the Entra LaunchDarkly Enterprise Application SSO configuration](#update-the-entra-launchdarkly-enterprise-application-sso-configuration)
Each of these steps is outlined below.
### Create roles in LaunchDarkly
To begin, create the roles in LaunchDarkly that you want to use with the Entra LaunchDarkly Enterprise Application. Make note of each role's key, as you will need the key when you set up your Entra ID app role.
To learn how, read [Roles](/docs/home/account/roles).
### Create groups in Entra ID
After you have created your custom roles in LaunchDarkly, set up your groups in Entra ID:
1. In Entra ID, navigate to "Groups," then click **New group**.
2. Select a group type and enter a group name.
3. Click "No members selected" to add new members:
 4. Select members from the list to add to the group, then click **Select**:
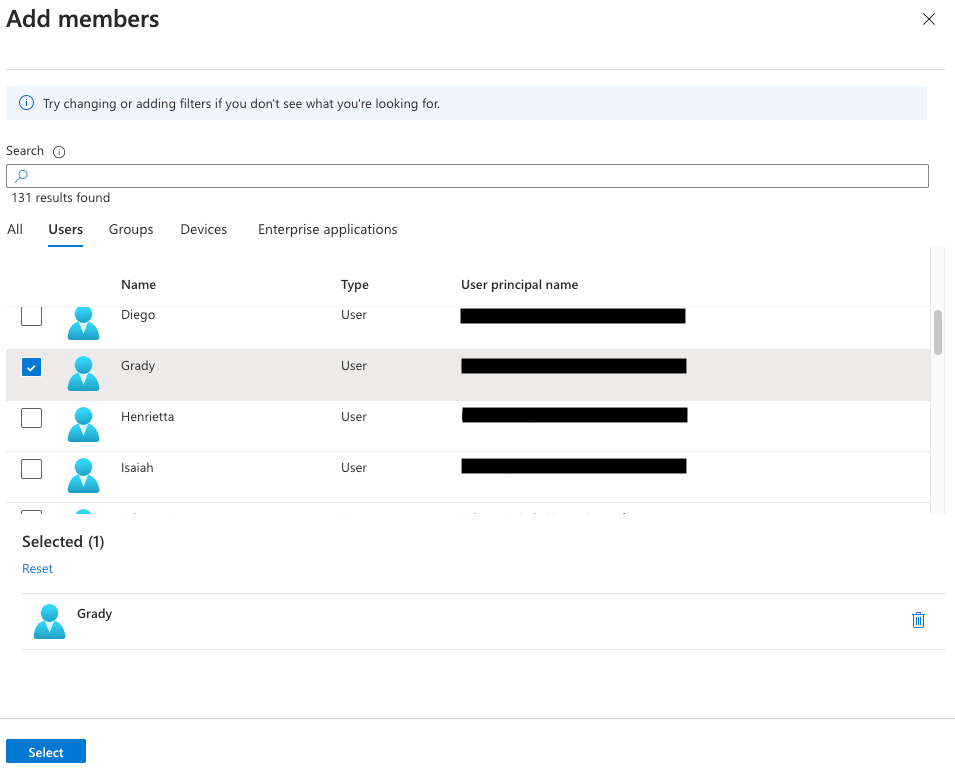 Your Entra ID members are now in the group.
### Create roles for the Entra LaunchDarkly Enterprise Application
Next, create roles within Entra ID:
1. In Entra ID, navigate to **Applications**.
2. Click **App registrations** in the left sidebar.
3. Click the **All applications** tab:
Your Entra ID members are now in the group.
### Create roles for the Entra LaunchDarkly Enterprise Application
Next, create roles within Entra ID:
1. In Entra ID, navigate to **Applications**.
2. Click **App registrations** in the left sidebar.
3. Click the **All applications** tab:
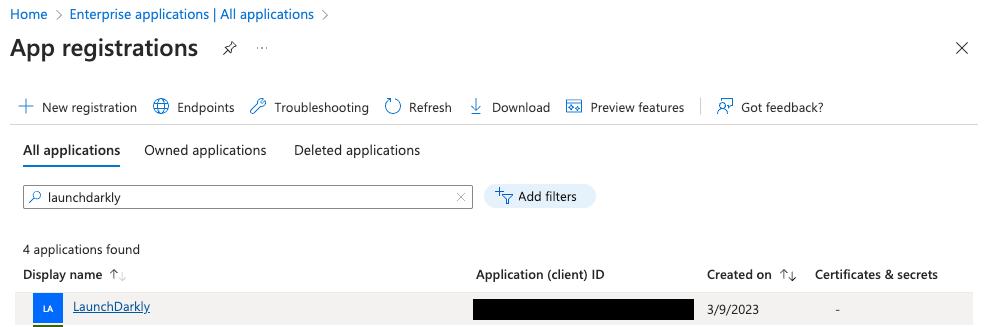 4. Click **LaunchDarkly** to open the application.
5. Navigate to "App roles" and click **Create app role**.
6. Enter the role information. The **value** must be the key of the custom role you created during the [Create custom roles in LaunchDarkly](#create-roles-in-launchdarkly) step:
4. Click **LaunchDarkly** to open the application.
5. Navigate to "App roles" and click **Create app role**.
6. Enter the role information. The **value** must be the key of the custom role you created during the [Create custom roles in LaunchDarkly](#create-roles-in-launchdarkly) step:
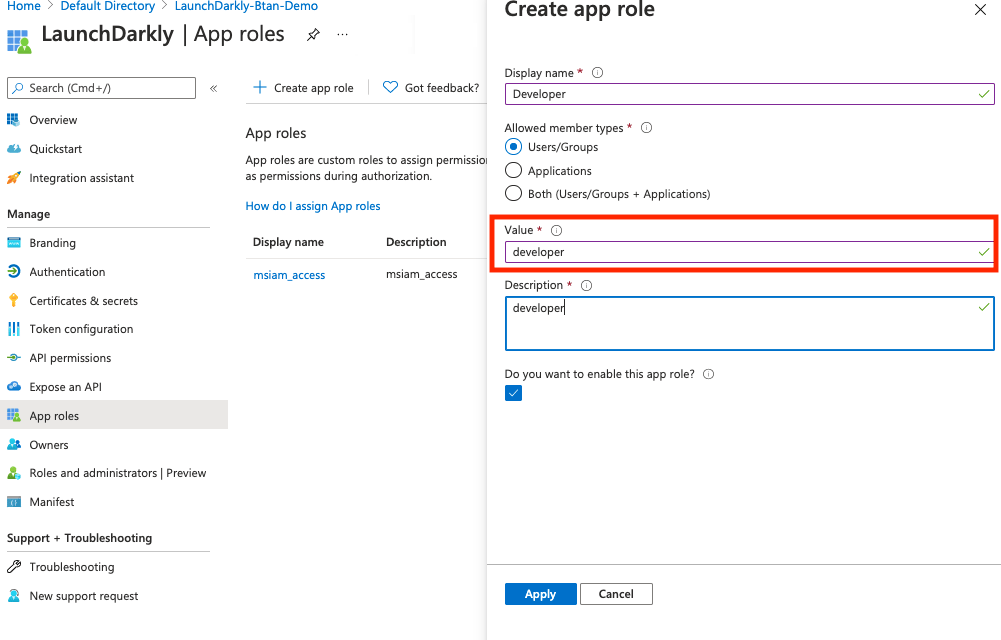 7. Click **Apply**.
Repeat this procedure for each new Entra app role.
### Set up groups and roles in the Entra LaunchDarkly Enterprise Application
Then, set up groups and roles in Entra ID:
1. In Entra ID, open the LaunchDarkly Enterprise Application.
2. Click **Users and groups**. The "Users and groups" screen appears:
3. On the "Groups" tab, choose the group you want to edit and click **Select**. The "Add Assignment" screen appears.
4. Click **None Selected** under "Users and groups" to add a new group. The "Users and groups" screen appears:
5. Choose the group you created in the [Create groups in Entra ID](#create-groups-in-entra-id) step.
6. Click **Select**. You are returned to the "Add Assignment" screen.
7. Click **None Selected** under "Select a new role" to add a new role:
7. Click **Apply**.
Repeat this procedure for each new Entra app role.
### Set up groups and roles in the Entra LaunchDarkly Enterprise Application
Then, set up groups and roles in Entra ID:
1. In Entra ID, open the LaunchDarkly Enterprise Application.
2. Click **Users and groups**. The "Users and groups" screen appears:
3. On the "Groups" tab, choose the group you want to edit and click **Select**. The "Add Assignment" screen appears.
4. Click **None Selected** under "Users and groups" to add a new group. The "Users and groups" screen appears:
5. Choose the group you created in the [Create groups in Entra ID](#create-groups-in-entra-id) step.
6. Click **Select**. You are returned to the "Add Assignment" screen.
7. Click **None Selected** under "Select a new role" to add a new role:
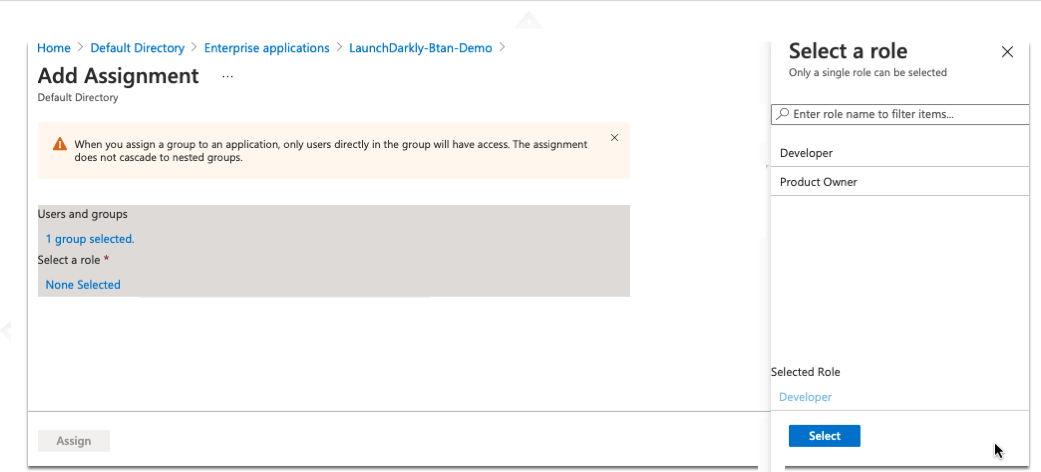 8. Choose the role you created in the [Create roles for the Entra LaunchDarkly Enterprise Application](#create-roles-for-the-entra-launchdarkly-enterprise-application) step.
9. Click **Select**. You are returned to the "Add Assignment" screen.
10. Click **Assign**.
Repeat this procedure for each group and role you want to set up.
### Update the Entra LaunchDarkly Enterprise Application SSO configuration
Finally, update Entra's SSO configuration:
1. In Entra ID, open the LaunchDarkly Enterprise Application.
2. Click **Single sign-on**.
3. Scroll to the "Attributes & Claims" section.
4. Click **Edit**. The "Manage claims" form appears.
5. Enter `customRole` in the **Name** field.
6. Leave the **Namespace** field empty.
7. Select "Attribute" as the source.
8) Enter `user.assignedroles` in the **Source attribute** field.
9. Click **Save**. You are returned to the "Attributes & Claims" screen.
Close the "Attributes & Claims" screen to return to the "Single sign-on" page. To test your SSO configuration, click **Test**.
For another example of this setup process, read [How to setup LaunchDarkly custom roles from Entra (formerly Azure AD) Security Groups](https://support.launchdarkly.com/hc/en-us/articles/17058194555291-How-to-setup-LaunchDarkly-custom-roles-from-Azure-AD-Security-Groups).
8. Choose the role you created in the [Create roles for the Entra LaunchDarkly Enterprise Application](#create-roles-for-the-entra-launchdarkly-enterprise-application) step.
9. Click **Select**. You are returned to the "Add Assignment" screen.
10. Click **Assign**.
Repeat this procedure for each group and role you want to set up.
### Update the Entra LaunchDarkly Enterprise Application SSO configuration
Finally, update Entra's SSO configuration:
1. In Entra ID, open the LaunchDarkly Enterprise Application.
2. Click **Single sign-on**.
3. Scroll to the "Attributes & Claims" section.
4. Click **Edit**. The "Manage claims" form appears.
5. Enter `customRole` in the **Name** field.
6. Leave the **Namespace** field empty.
7. Select "Attribute" as the source.
8) Enter `user.assignedroles` in the **Source attribute** field.
9. Click **Save**. You are returned to the "Attributes & Claims" screen.
Close the "Attributes & Claims" screen to return to the "Single sign-on" page. To test your SSO configuration, click **Test**.
For another example of this setup process, read [How to setup LaunchDarkly custom roles from Entra (formerly Azure AD) Security Groups](https://support.launchdarkly.com/hc/en-us/articles/17058194555291-How-to-setup-LaunchDarkly-custom-roles-from-Azure-AD-Security-Groups).