> ## Documentation Index
> Fetch the complete documentation index at: https://launchdarkly.com/docs/llms.txt
> Use this file to discover all available pages before exploring further.
# Members
This category introduces the concept of account members in LaunchDarkly and shows you how to use the **Members** list.
LaunchDarkly supports user object management with OAuth, SAML, and SCIM. To learn more, read [Enabling single sign-on](/docs/home/account/sso).
## About members in LaunchDarkly
Account members are people who work at your organization or have access rights to your organization's LaunchDarkly environment for another reason, such as contractors or part-time employees.
**LaunchDarkly account members are not LaunchDarkly users**
LaunchDarkly users are people who encounter feature flags in your app. In many cases, they are customers or people accessing your product. Users are represented by user "contexts." Contexts can also represent other entities encountering feature flags, such as devices, organizations, and more. To learn more about contexts, read [The Contexts list](/docs/home/flags/contexts-list).
Use the **Members** list to invite new account members to LaunchDarkly, remove old account members, or manage access for existing account members.
To access the **Members** list, click the **gear** icon in the left sidebar to view Organization settings. Then choose **Members** from the left sidebar.
You can search for a specific member using the search bar. You can also filter members by **Team**, **Role**, or **Last seen** using the filters at the top of the "Members" list:
 In addition to filtering, you can also sort by the "Name" column.
The "Last seen" column displays how long it has been since members logged in to your LaunchDarkly account. Possible "Last seen" statuses include:
* N minutes/hours/days/months/years ago: The amount of time since a member last logged in. If a member logged in using the API, the status also displays the name of the personal access token they used.
* No data: The member has never logged in.
To learn more about teams in LaunchDarkly, read [Teams](/docs/home/account/teams). To learn more about roles, read [About member roles](#about-member-roles), below.
## Add members to LaunchDarkly
**The Members list is an Admin-only feature**
The **Members** list is only accessible if you have a LaunchDarkly Admin organization role, or an Admin or Owner base role, or another role that allows a member action. To learn more, read [About member roles](#about-member-roles), below, and [Member actions](/docs/home/account/roles/role-actions#member-actions).
Use the **Members** list to access a list of all the members in your organization with LaunchDarkly access.
From this list, you can invite new account members to LaunchDarkly, remove old account members, or manage access for existing account members.
To add new members:
1. Click the **gear** icon in the left sidebar to view Organization settings.
2. Click **Members**. The **Members** list appears.
3. Click **Invite members**.
4. Enter one or more email addresses. If you are inviting multiple members, separate email addresses with a comma or new line.
5. Choose an initial **Member role** from the dropdown.
* Select No access, Reader, Writer, or Admin if you want to use a base role.
* Select Custom to choose another role, either one you've created or one provided by LaunchDarkly.
6. (Optional) If the role you selected includes a [role attribute](/docs/home/getting-started/vocabulary#role-attribute), enter a value for the attribute and click **Enter**. For example, if the role includes a [role scope](/docs/home/getting-started/vocabulary#role-scope) with a role attribute of `developerProjectKeys`, enter a project key in the **Resources** field.
7. (Optional) Select teams to add these members to.
In addition to filtering, you can also sort by the "Name" column.
The "Last seen" column displays how long it has been since members logged in to your LaunchDarkly account. Possible "Last seen" statuses include:
* N minutes/hours/days/months/years ago: The amount of time since a member last logged in. If a member logged in using the API, the status also displays the name of the personal access token they used.
* No data: The member has never logged in.
To learn more about teams in LaunchDarkly, read [Teams](/docs/home/account/teams). To learn more about roles, read [About member roles](#about-member-roles), below.
## Add members to LaunchDarkly
**The Members list is an Admin-only feature**
The **Members** list is only accessible if you have a LaunchDarkly Admin organization role, or an Admin or Owner base role, or another role that allows a member action. To learn more, read [About member roles](#about-member-roles), below, and [Member actions](/docs/home/account/roles/role-actions#member-actions).
Use the **Members** list to access a list of all the members in your organization with LaunchDarkly access.
From this list, you can invite new account members to LaunchDarkly, remove old account members, or manage access for existing account members.
To add new members:
1. Click the **gear** icon in the left sidebar to view Organization settings.
2. Click **Members**. The **Members** list appears.
3. Click **Invite members**.
4. Enter one or more email addresses. If you are inviting multiple members, separate email addresses with a comma or new line.
5. Choose an initial **Member role** from the dropdown.
* Select No access, Reader, Writer, or Admin if you want to use a base role.
* Select Custom to choose another role, either one you've created or one provided by LaunchDarkly.
6. (Optional) If the role you selected includes a [role attribute](/docs/home/getting-started/vocabulary#role-attribute), enter a value for the attribute and click **Enter**. For example, if the role includes a [role scope](/docs/home/getting-started/vocabulary#role-scope) with a role attribute of `developerProjectKeys`, enter a project key in the **Resources** field.
7. (Optional) Select teams to add these members to.
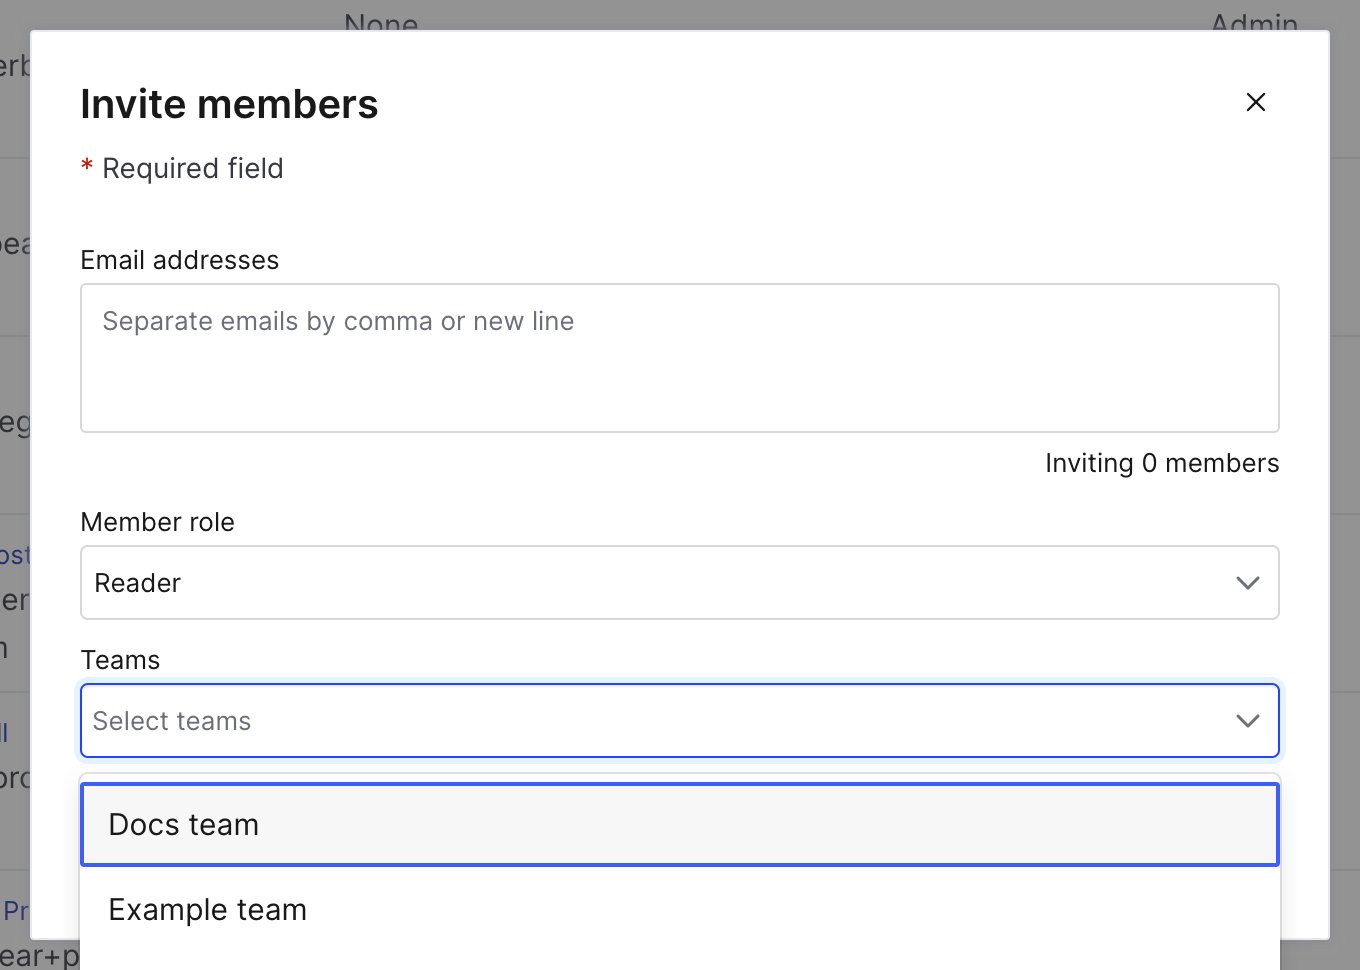 8. Click **Invite members**.
New members now receive an email inviting them to your LaunchDarkly account. You can resend the invitation or manage a member's roles and team membership by clicking on the member's name in the **Members** list.
You can also use the REST API: [Invite new members](/docs/api/account-members/invite-new-members)
### Accept pending requests
You can also allow people in your organization to find and request to join your LaunchDarkly account themselves. To learn how, read [Organization access settings](/docs/home/account/org-settings).
When someone in your organization requests to join your LaunchDarkly account, the LaunchDarkly Admins and Owner receive the request in an email, and the pending request is available for approval on the **Members** page.
To accept a pending request:
1. Click the **gear** icon in the left sidebar to view Organization settings.
2. Click **Members**. The **Members** list appears.
3. Click **Pending requests**. The "Manage pending requests" dialog appears.
4. Check the checkbox next to the members you wish to add to your LaunchDarkly account.
5. In the "Role" column, select the role that each member should have.
6. In the "Request status" column, click **Accept**.
To reject a request from a prospective member, click **Decline**.
## Export a list of members
You can export a list of your account members to a CSV file. The file includes their IDs, email addresses, first and last names, and roles.
Here's how:
1. Click the **gear** icon in the left sidebar to view Organization settings.
2. Click **Members**. The **Members** list appears.
3. (Optional) Filter by **Team**, **Role**, or **Last seen** if you want to export a subset of your account members.
4. Click **Export CSV**. A CSV file of account members downloads to your machine.
You can also use the REST API: [List account members](/docs/api/account-members/list-account-members)
## About member roles
You can assign different roles to LaunchDarkly account members. LaunchDarkly provides several roles which include access to common sets of features. To learn more, read [Managing roles](/docs/home/account/roles/manage-roles) and [Managing roles assignments](/docs/home/account/roles/manage-role-assignments).
Customers on select plans can create additional roles to more specifically define the actions members can and can't take. You can give an account member a role you've created in two ways: by giving the role to the member, or by giving the role to a team and adding the member to that team.
To learn more, read [Roles](/docs/home/account/roles) and [Managing roles](/docs/home/account/roles/manage-roles).
## Enable multi-factor authentication
For additional security, you can require multi-factor authentication (MFA) for your LaunchDarkly account. When MFA is enabled, account members won't be able to log in to the LaunchDarkly user interface without verifying their identity with a second method.
We strongly recommend that all LaunchDarkly members enable MFA for their individual accounts, and that administrators enforce MFA for their entire organization. In the event of a credential leak or device theft, MFA can prevent malicious third parties from accessing a LaunchDarkly account they should not be able to access.
To learn more, read [Multi-factor authentication](/docs/home/account/mfa).
## Remove members from LaunchDarkly
To remove a member from your account:
1. Click the **gear** icon in the left sidebar to view Organization settings.
2. Click **Members**. The **Members** list appears.
3. Find the member in the list of account members.
4. Click the member's name.
5. Navigate to the **Settings** tab for that member.
6. Click **Delete member**.
Removing a member from your account has the following consequences:
* They are removed from being a flag maintainer.
* Their personal access tokens are deactivated. Any service tokens that they created remain active.
You can also use the REST API: [Delete account member](/docs/api/account-members/delete-account-member)
8. Click **Invite members**.
New members now receive an email inviting them to your LaunchDarkly account. You can resend the invitation or manage a member's roles and team membership by clicking on the member's name in the **Members** list.
You can also use the REST API: [Invite new members](/docs/api/account-members/invite-new-members)
### Accept pending requests
You can also allow people in your organization to find and request to join your LaunchDarkly account themselves. To learn how, read [Organization access settings](/docs/home/account/org-settings).
When someone in your organization requests to join your LaunchDarkly account, the LaunchDarkly Admins and Owner receive the request in an email, and the pending request is available for approval on the **Members** page.
To accept a pending request:
1. Click the **gear** icon in the left sidebar to view Organization settings.
2. Click **Members**. The **Members** list appears.
3. Click **Pending requests**. The "Manage pending requests" dialog appears.
4. Check the checkbox next to the members you wish to add to your LaunchDarkly account.
5. In the "Role" column, select the role that each member should have.
6. In the "Request status" column, click **Accept**.
To reject a request from a prospective member, click **Decline**.
## Export a list of members
You can export a list of your account members to a CSV file. The file includes their IDs, email addresses, first and last names, and roles.
Here's how:
1. Click the **gear** icon in the left sidebar to view Organization settings.
2. Click **Members**. The **Members** list appears.
3. (Optional) Filter by **Team**, **Role**, or **Last seen** if you want to export a subset of your account members.
4. Click **Export CSV**. A CSV file of account members downloads to your machine.
You can also use the REST API: [List account members](/docs/api/account-members/list-account-members)
## About member roles
You can assign different roles to LaunchDarkly account members. LaunchDarkly provides several roles which include access to common sets of features. To learn more, read [Managing roles](/docs/home/account/roles/manage-roles) and [Managing roles assignments](/docs/home/account/roles/manage-role-assignments).
Customers on select plans can create additional roles to more specifically define the actions members can and can't take. You can give an account member a role you've created in two ways: by giving the role to the member, or by giving the role to a team and adding the member to that team.
To learn more, read [Roles](/docs/home/account/roles) and [Managing roles](/docs/home/account/roles/manage-roles).
## Enable multi-factor authentication
For additional security, you can require multi-factor authentication (MFA) for your LaunchDarkly account. When MFA is enabled, account members won't be able to log in to the LaunchDarkly user interface without verifying their identity with a second method.
We strongly recommend that all LaunchDarkly members enable MFA for their individual accounts, and that administrators enforce MFA for their entire organization. In the event of a credential leak or device theft, MFA can prevent malicious third parties from accessing a LaunchDarkly account they should not be able to access.
To learn more, read [Multi-factor authentication](/docs/home/account/mfa).
## Remove members from LaunchDarkly
To remove a member from your account:
1. Click the **gear** icon in the left sidebar to view Organization settings.
2. Click **Members**. The **Members** list appears.
3. Find the member in the list of account members.
4. Click the member's name.
5. Navigate to the **Settings** tab for that member.
6. Click **Delete member**.
Removing a member from your account has the following consequences:
* They are removed from being a flag maintainer.
* Their personal access tokens are deactivated. Any service tokens that they created remain active.
You can also use the REST API: [Delete account member](/docs/api/account-members/delete-account-member)