> ## Documentation Index
> Fetch the complete documentation index at: https://launchdarkly.com/docs/llms.txt
> Use this file to discover all available pages before exploring further.
# Create and manage AI model configurations
This topic explains how to create and manage custom models to use in [AgentControl](/docs/home/agentcontrol).
An AgentControl config is a resource that you create in LaunchDarkly. You can use AgentControl to customize, test, and roll out new large language models (LLMs) within your generative AI applications. Within each config, you define one or more variations. Each variation includes a model configuration and uses messages in completion mode or instructions in agent mode.
When you [create a variation](/docs/home/agentcontrol/create-variation), you have the option to use a standard model, also called a "global" model, from the list provided by LaunchDarkly.
You can also add your own model and set up its parameters. This is called an AI model configuration. After you create an AI model configuration, you can use it in any variation for any config in your project.
Editing a custom model creates a new version instead of overwriting the existing one. This enables you to update it without disrupting configs already using it. To learn more, read [Edit an AI model configuration](#edit-an-ai-model-configuration), below.
**Scope of custom model versioning**
Custom model versioning applies only to the AI model configurations you create. Global models, the standard models LaunchDarkly provides, are managed by LaunchDarkly and do not have versions. A config variation using a global model always uses the current definition of that model.
You can manage AI model configurations in the following ways:
* [Create an AI model configuration](#create-an-ai-model-configuration)
* [View AI model configurations](#view-ai-model-configurations)
* [Edit an AI model configuration](#edit-an-ai-model-configuration)
* [Restrict an AI model configuration](#restrict-an-ai-model-configuration)
* [Delete an AI model configuration](#delete-an-ai-model-configuration)
## Create an AI model configuration
To create an AI model configuration from a config variation:
1. Navigate to the **Variations** tab of the config and select a variation. Some sections in the interface may be collapsed. Expand the section you want to edit before continuing.
2. Open the **Select a model** menu.
3. Choose **+ Add a model**.
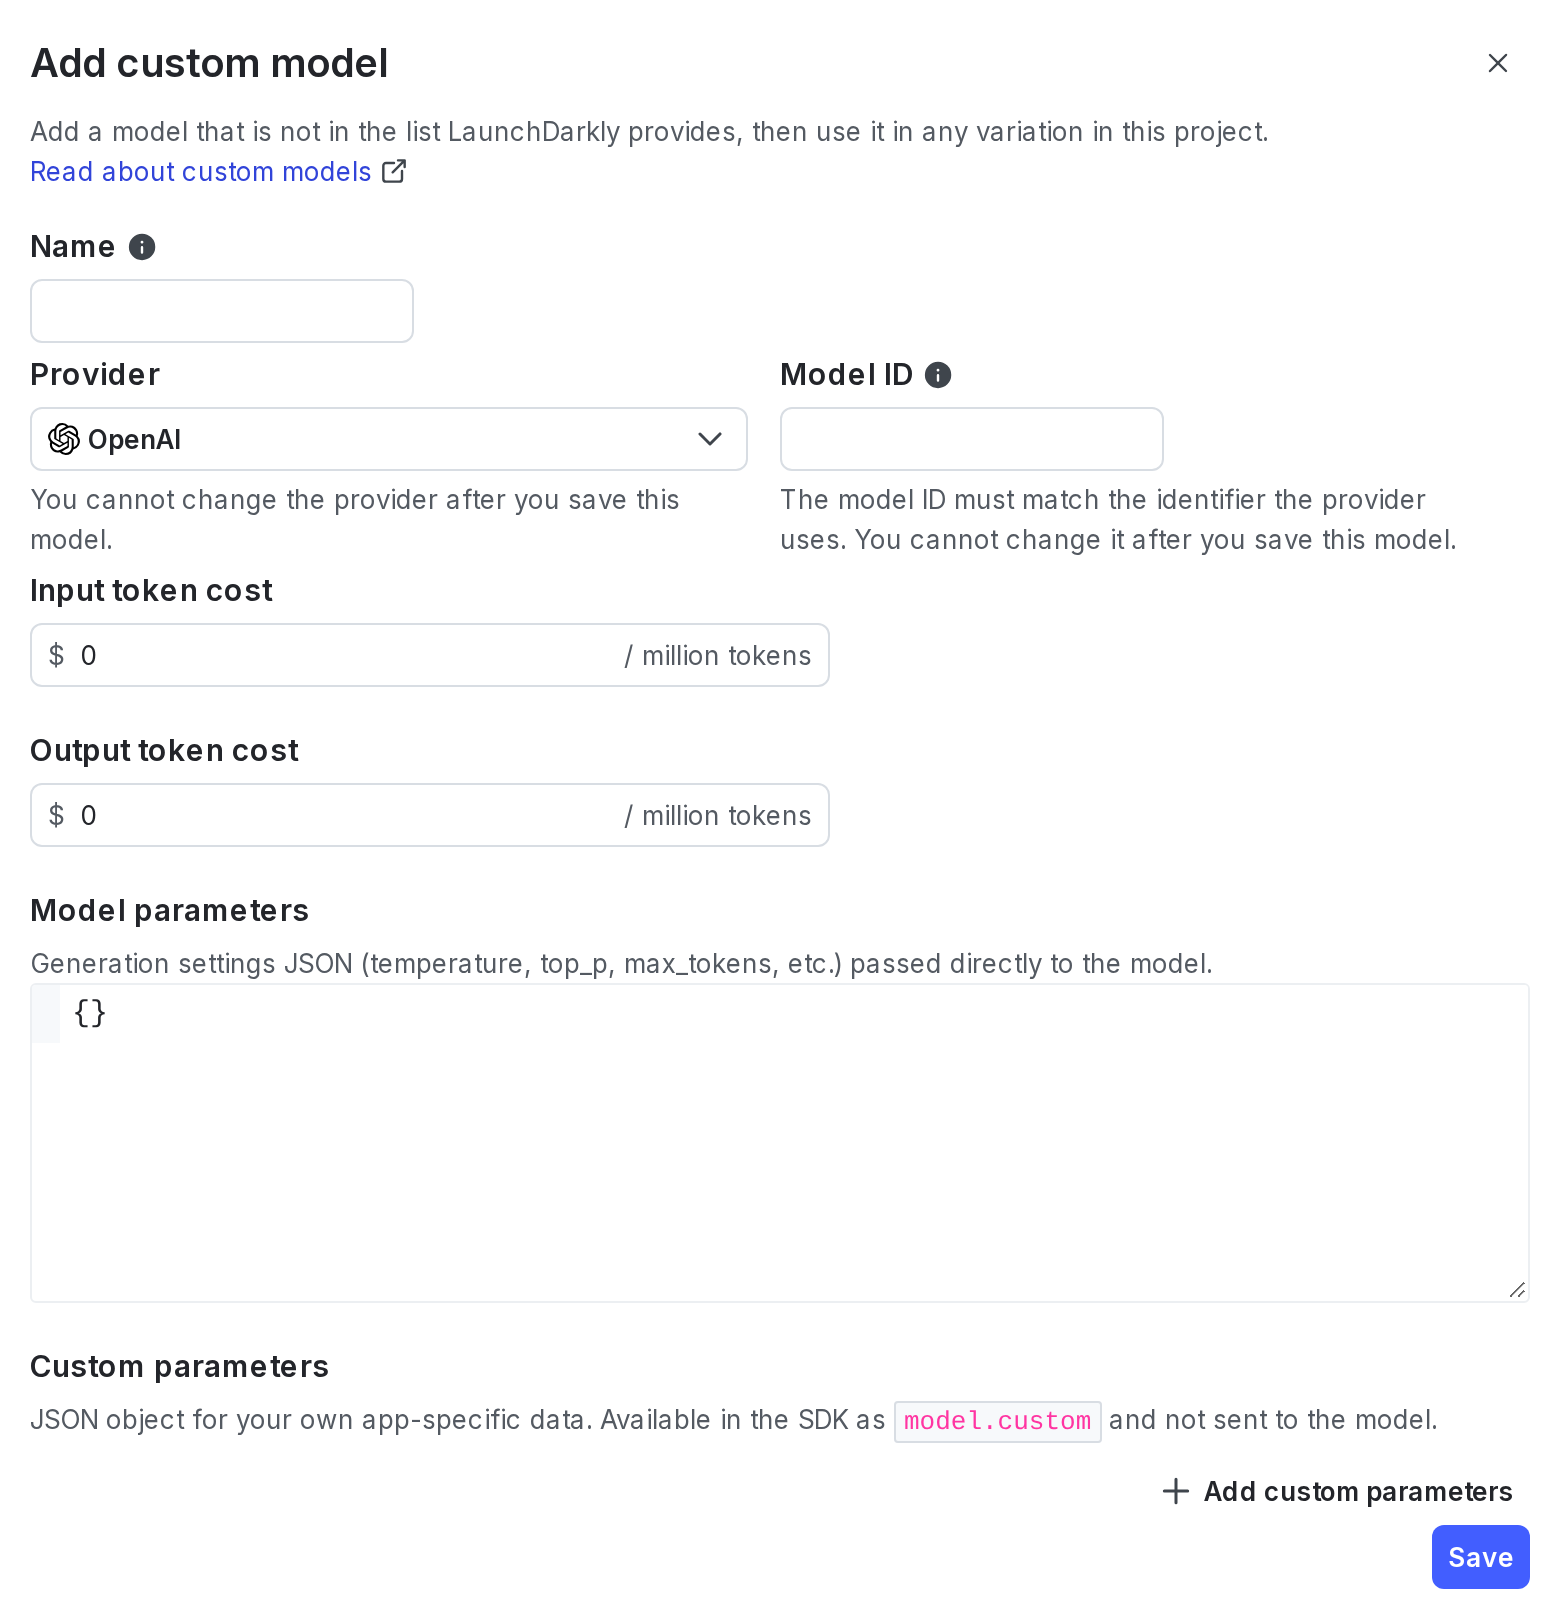
4. Follow the steps for [completing the "Add custom model" dialog](#complete-the-add-custom-model-dialog), below.
### Complete the "Add custom model" dialog
To complete the "Add custom model" dialog:
1. Enter a **Name** for your AI model configuration.
* The name appears in the **Select a model** menu when you [create a variation](/docs/home/agentcontrol/create-variation) for a config.
* You also need the name if you want to create a [role](/docs/home/account/roles) that allows or denies access to this AI model configuration.
2. Select a **Provider**.
3. Enter a **Model ID**.
* The model ID is the identifier for the model that the LLM provider uses. **This must exactly match the identifier from the provider**.
* You also need the model ID if you want to create a [role](/docs/home/account/roles) that allows or denies access to this AI model configuration.
4. Enter the token costs:
* Enter the **Input token cost** per million tokens.
* Enter the **Output token cost** per million tokens.
5. (Optional) Click **+ Add suggested parameters**. The menu displays model parameters, their types, and their default values.
* Select a model parameter from the list.
* Set its value in the dialog. This will be the default value when you choose this model in a config variation. You can set a different value in the config variation if needed.
* When you [customize a config in your SDK](/docs/sdk/features/agentcontrol-config), you can access these parameters in the `model` section of the `LDAIConfig`.
6. (Optional) Click **+ Add custom parameters**.
* Enter any additional parameters you want to include as a valid JSON object.
* LaunchDarkly always applies these parameters and their values when you select this model in a config variation.
* When you [customize a config in your SDK](/docs/sdk/features/agentcontrol-config), you can access these parameters in the `model.custom` section of the `LDAIConfig`.
7. Click **Save**.
**You cannot change the provider and model ID**
The provider and model ID identify which underlying model you are configuring. You cannot change them after creation. To use a different provider or model ID, create a new model configuration.
Here is an example:
 ## View AI model configurations
To view all of the AI model configurations in a project:
1. Open the project menu.
2. Select **Project settings**.
3. Select **AI model configs** to open the AI model configs list.
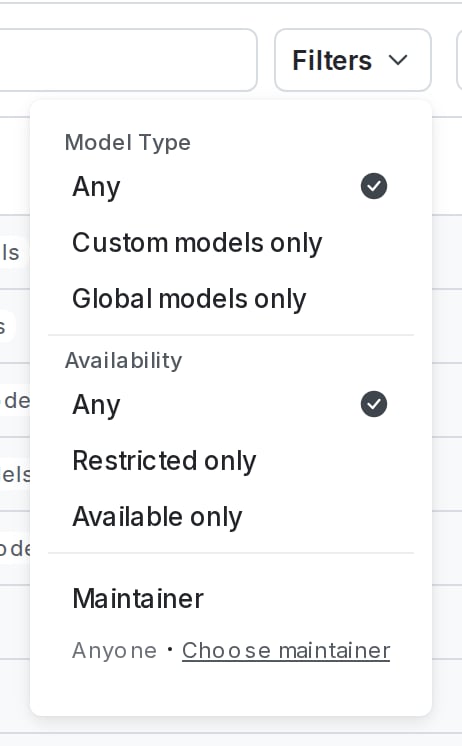
You can filter the list by model type and availability:
## View AI model configurations
To view all of the AI model configurations in a project:
1. Open the project menu.
2. Select **Project settings**.
3. Select **AI model configs** to open the AI model configs list.
You can filter the list by model type and availability:
 You can use the search box to find models by entering all or part of the model name or ID.
## Edit an AI model configuration
You can edit a custom AI model configuration from the **Models** tab in the library.
To edit an AI model configuration:
1. In the left sidebar, click **Agents**. The AgentControl menu appears.
2. Click **Library**. The **Models** tab appears.
3. Click the name of the custom model you want to edit.
4. Update any of the following fields:
* Name
* Input token cost
* Output token cost
* Model parameters
* Custom parameters
* Tags
* Maintainers
5. Click **Save**.
Saving your changes creates a new version of the model instead of overwriting the existing one. For example, saving changes to version 1 produces version 2. The previous version remains intact, and any config variation that references the model continues to use the version it is pinned to until you update it.
This lets you update a model's pricing, name, or other details without immediately affecting configs already running in production. This keeps historical usage and cost data accurate because LaunchDarkly attributes each request's cost to the version that served it. To learn more, read [Update custom model versions for config variations](#update-custom-model-versions-for-config-variations), below.
### Editable fields
Some fields on a custom model can change from version to version. Others are set permanently when you first create the model.
This table lists which fields you can change and which stay fixed:
You can use the search box to find models by entering all or part of the model name or ID.
## Edit an AI model configuration
You can edit a custom AI model configuration from the **Models** tab in the library.
To edit an AI model configuration:
1. In the left sidebar, click **Agents**. The AgentControl menu appears.
2. Click **Library**. The **Models** tab appears.
3. Click the name of the custom model you want to edit.
4. Update any of the following fields:
* Name
* Input token cost
* Output token cost
* Model parameters
* Custom parameters
* Tags
* Maintainers
5. Click **Save**.
Saving your changes creates a new version of the model instead of overwriting the existing one. For example, saving changes to version 1 produces version 2. The previous version remains intact, and any config variation that references the model continues to use the version it is pinned to until you update it.
This lets you update a model's pricing, name, or other details without immediately affecting configs already running in production. This keeps historical usage and cost data accurate because LaunchDarkly attributes each request's cost to the version that served it. To learn more, read [Update custom model versions for config variations](#update-custom-model-versions-for-config-variations), below.
### Editable fields
Some fields on a custom model can change from version to version. Others are set permanently when you first create the model.
This table lists which fields you can change and which stay fixed:
| Field |
Can change between versions |
| Name |
Yes |
| Input token cost |
Yes |
| Output token cost |
Yes |
| Model parameters |
Yes |
| Custom parameters |
Yes |
| Tags |
Yes |
| Maintainers |
Yes |
| Provider |
No |
| Model ID |
No |
The provider and model ID identify which underlying model you are configuring. LaunchDarkly treats them as immutable after creation. If you need to point a config variation at a different provider or model ID, create a new custom model instead of editing the existing one.
To learn more about why the provider and model ID can't change, read the steps for [completing the "Add custom model" dialog](#complete-the-add-custom-model-dialog), above.
### Update custom model versions for config variations
The "Used in" column in the **Models** tab shows how many config variations reference each custom model. Click the number to open a side panel showing which variations reference the model and which version each uses. You can update a single config variation to a new version, or apply it across every referencing variation at the same time.
When a more recent version of a custom model is available, a warning icon appears in the "Used in" column.
To update config variations to a more recent custom model version:
1. In the **Models** tab, click the number in the "Used in" column for the custom model you want to update. A side panel appears listing all configs currently using that model.
2. Next to each config, use the menu to select the version you want to apply.
3. Click **Apply to configs**.
### View version history
To review the version history of a custom model, click the version number in the **Models** tab. The "Version history" dialog appears and displays all versions of the model.
To compare two versions:
1. Open the "Version history" dialog.
2. Click **Compare**.
3. Select the two versions you want to compare to review the differences.
### Version limit
Each custom model key supports up to 100 versions. If a model reaches this limit, you cannot create additional versions, and you cannot delete existing versions to make room for new ones.
### Restore a previous version
Restoring a previous version does not delete or overwrite later versions. Instead, it creates a new version containing the restored values.
To restore a previous version:
1. Open the "Version history" dialog.
2. Click the backward arrow button next to the version you want to restore. A confirmation dialog appears.
3. Click **Restore**.
## Restrict an AI model configuration
You can mark any AI model configuration as restricted, which prevents anyone in your organization from using it in any config variations. This lets you effectively limit the models that are available in each LaunchDarkly project.
To restrict an AI model configuration:
1. Open the project menu.
2. Select **Project settings**.
3. Select **AI model configs** to open the AI model configs list.
4. Click the **three-dot** overflow menu and select **Restrict**.
To make an AI model configuration available again, click the **three-dot** overflow menu and select **Make available**.
## Delete an AI model configuration
To delete an AI model configuration:
1. Open the project menu.
2. Select **Project settings**.
3. Select **AI model configs** to open the AI model configs list.
4. Click the **three-dot** overflow menu for the model you want to delete and select **Delete**.
* Alternatively, click the name of the AI model config you want to delete, then click **Delete AI model config** from the detail page.
You can only delete custom AI model configurations. You cannot delete the global AI model configs provided by LaunchDarkly.
You cannot delete an AI model configuration if it is currently used in a variation for a config.
## How cost attribution works across model versions
LaunchDarkly attributes usage and cost to the specific model version that served each request, not to whichever version of the model is current when you open the data.
When an SDK evaluates a config variation that references a custom model, it records the model's key and the pinned version alongside the usage event. When LaunchDarkly calculates cost for that event, it uses the input and output token cost that were in effect on that version, regardless of any pricing changes you have made since.
This gives you an accurate historical record even when your model configurations evolve. For example, if you lower a custom model's output token cost this month, requests served last month continue to reflect last month's cost when you review cost data on the [Monitoring](/docs/home/agentcontrol/monitor) tab or the [Insights](/docs/home/agentcontrol/insights) page. You do not need to track pricing changes separately to keep your cost reporting accurate. LaunchDarkly handles this by attributing cost to the version.
**You must use the latest SDK version to attribute cost by model version**
To attribute usage and cost by model version, your application must use the latest version of the LaunchDarkly SDK. Applications using older SDK versions continue to work, but LaunchDarkly attributes their usage to the model's first version.