> ## Documentation Index
> Fetch the complete documentation index at: https://launchdarkly.com/docs/llms.txt
> Use this file to discover all available pages before exploring further.
# Quickstart for AgentControl
AgentControl lets you manage model configuration and instructions for your AI agents outside of your application code. With AgentControl, you can update prompts and models without redeploying.
By the end of this quickstart, you will have:
* Created your first agent-based config
* Deployed your config and called it from your application
* Made a change to your prompt or model without redeploying
**Scope of this quickstart**
This quickstart focuses on AgentControl configs in completion mode, which lets you configure prompts with messages and roles for single-step model responses. Completion mode supports multi-message prompts, including chat-style prompts. Completion mode does not map to a specific provider API, so you can use it with any provider LaunchDarkly supports.
AgentControl configs can also be created in agent mode, which uses instructions to define multi-step workflows. Agent mode is documented separately in [Agents](/docs/home/agentcontrol/agents).
Follow the steps below to incorporate AgentControl configs into your app, or use the [in-app onboarding](https://app.launchdarkly.com/projects/default/onboarding) to set up your first config directly in the LaunchDarkly UI.
## Prerequisites
To complete this quickstart, you need the following:
* A [LaunchDarkly account](https://app.launchdarkly.com/) and a server-side SDK key for your environment. To find your SDK key, read [SDK credentials](/docs/home/account/environment/keys). If you haven't installed a LaunchDarkly SDK yet, continue reading. This topic explains how to install a supported SDK.
* A LaunchDarkly role that allows [AgentControl config actions](/docs/home/account/roles/role-actions#agentcontrol-config-actions). The LaunchDarkly Project Admin, Maintainer, and Developer project roles, as well as the Admin and Owner base roles, include this permission.
* An API key for your model provider, such as OpenAI or Anthropic, made available to your application as an environment variable.
## Complete the in-app quickstart
There are several options for completing the in-app quickstart. You can set up with an AI coding assistant, install the SDK manually with your own app, or install it manually using a sample app we provide.
This procedure documents the process of installation through the [built-in onboarding experience](https://app.launchdarkly.com/projects/default/onboarding).
**Using an AI coding assistant?**
You can set up AgentControl by giving a prompt to your coding assistant. In the quickstart workflow, select **Install with AI**, choose your LLM provider, and give it the [Markdown prompt](/docs/home/agentcontrol/agentcontrol-prompt) available in the UI.
You can connect your app to LaunchDarkly with an AI agent or with a manual installation process. The procedure below explains how to connect to LaunchDarkly manually.
## Step 1: Install the SDK
First, install the LaunchDarkly server-side SDK and AI SDK, as well as the agent framework you want to use.
### Installing manually
1. In the in-app quickstart, click **Install manually** to reveal the SDK configuration instructions.
2. Choose between using your existing app or a sample app.
3. Click to select your SDK language. The instructions for installation update based on which language you choose. In this example, we use Python and LangChain.
```python title="Python" lines wrap theme={null}
pip install launchdarkly-server-sdk
pip install launchdarkly-server-sdk-ai
pip install langchain langchain-anthropic
```
To get started with other frameworks or model providers, read the [AgentControl guides](/docs/guides/agentcontrol).
## Step 2: Initialize the client
Initialize the client to connect LaunchDarkly to your app. To do this, you must have your LaunchDarkly SDK key. To find your SDK key, read [SDK credentials](/docs/home/account/environment/keys).
```python title="Python" expandable lines wrap theme={null}
import ldclient
from ldclient.config import Config
from ldai.client import LDAIClient
from ldai import AIAgentConfig, AIAgentConfigDefault
from langchain.agents import create_agent
from langchain.messages import HumanMessage
ldclient.set_config(Config("YOUR-SDK-KEY"))
aiclient = LDAIClient(ldclient.get())
context = ldclient.Context.create("user-123")
config = aiclient.agent_config('YOUR-CONFIG-NAME', context, AIAgentConfigDefault())
tracker = config.tracker
def handle_agent_call_langchain(
config: AIAgentConfig,
user_input: str,
) -> str:
model = config.model.get_parameter("name") if config.model else "anthropic:claude-sonnet-4-6"
agent = create_agent(
model=model,
system_prompt=config.instructions,
)
response = agent.invoke({"messages": [HumanMessage(user_input)]})
return response["messages"][-1].content
```
## Step 3: Create an agent-based config in LaunchDarkly
Create an agent-based config to store your model settings and instructions. You can do this through the LaunchDarkly UI, or agentically using the [LaunchDarkly MCP server](/docs/home/getting-started/mcp) from your AI coding assistant. For example, Claude Code and Cursor can both perform this task.
To create the config in the UI:
1. In the left sidebar, click **Agents**. The AgentControl menu appears.
2. Click **Configs**.
3. Click **Create config**. The "Create config" dialog opens, with **Completion** selected by default.
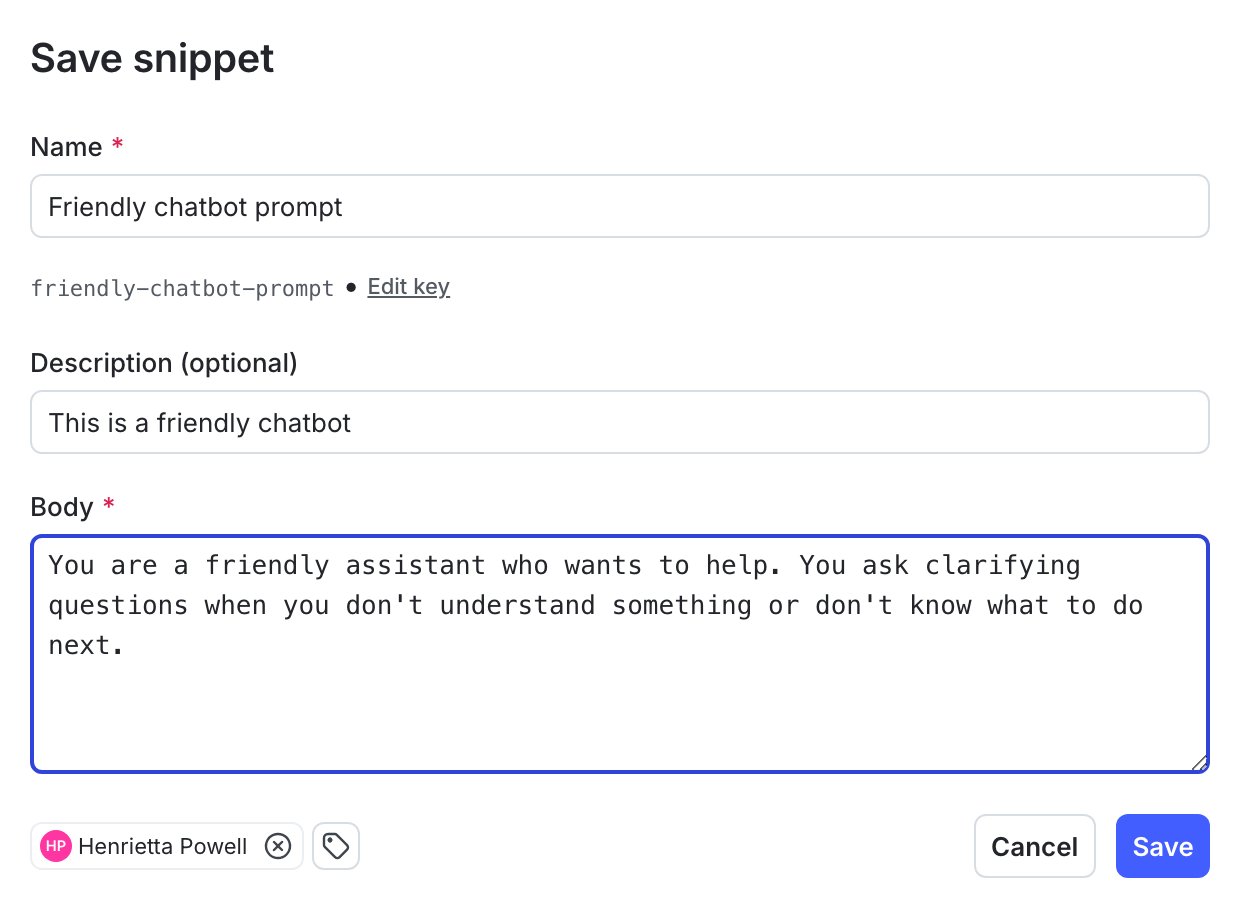 4. Enter a name for your config, and optionally assign a maintainer.
**Save the config key**
When you name your config, a **key** generates automatically. Copy and save this key now. You'll use it in [Step 5](#step-5-use-the-agent-based-config-with-your-agent-framework).
5. (Optional) If you use flags and segments, you can click **Add views** to create a view of this config.
6. Click **Create**.
After you create the config, the **Variations** tab appears.
Then, create a variation. Every completion-based config has one or more variations. Each variation includes a model configuration and, optionally, one or more messages.
Here's how:
1. In the **Variations** tab, replace "Untitled variation" with a variation **Name**. You'll use this to refer to the variations when you set up targeting rules below.
2. Click **Select a model** and choose the model to use.
* LaunchDarkly provides a list of common models, and updates it regularly.
* You can also choose **+ Add a model** and create your own. To learn more, read [Create and manage AI model configurations](/docs/home/agentcontrol/create-model-config).
3. (Optional) Select a **message role** and enter the message for the variation. If you'd like to customize the message at runtime, use `{{ example_variable }}` or `{{ ldctx.example_context_attribute }}` within the message. The LaunchDarkly AI SDK will substitute the correct values when you customize the config from within your app.
* To learn more about how variables and context attributes are inserted into messages at runtime, read [Customizing AgentControl configs](/docs/sdk/features/agentcontrol-config).
4. Click **Review and save**.
Here's an example of a completed variation:
4. Enter a name for your config, and optionally assign a maintainer.
**Save the config key**
When you name your config, a **key** generates automatically. Copy and save this key now. You'll use it in [Step 5](#step-5-use-the-agent-based-config-with-your-agent-framework).
5. (Optional) If you use flags and segments, you can click **Add views** to create a view of this config.
6. Click **Create**.
After you create the config, the **Variations** tab appears.
Then, create a variation. Every completion-based config has one or more variations. Each variation includes a model configuration and, optionally, one or more messages.
Here's how:
1. In the **Variations** tab, replace "Untitled variation" with a variation **Name**. You'll use this to refer to the variations when you set up targeting rules below.
2. Click **Select a model** and choose the model to use.
* LaunchDarkly provides a list of common models, and updates it regularly.
* You can also choose **+ Add a model** and create your own. To learn more, read [Create and manage AI model configurations](/docs/home/agentcontrol/create-model-config).
3. (Optional) Select a **message role** and enter the message for the variation. If you'd like to customize the message at runtime, use `{{ example_variable }}` or `{{ ldctx.example_context_attribute }}` within the message. The LaunchDarkly AI SDK will substitute the correct values when you customize the config from within your app.
* To learn more about how variables and context attributes are inserted into messages at runtime, read [Customizing AgentControl configs](/docs/sdk/features/agentcontrol-config).
4. Click **Review and save**.
Here's an example of a completed variation:
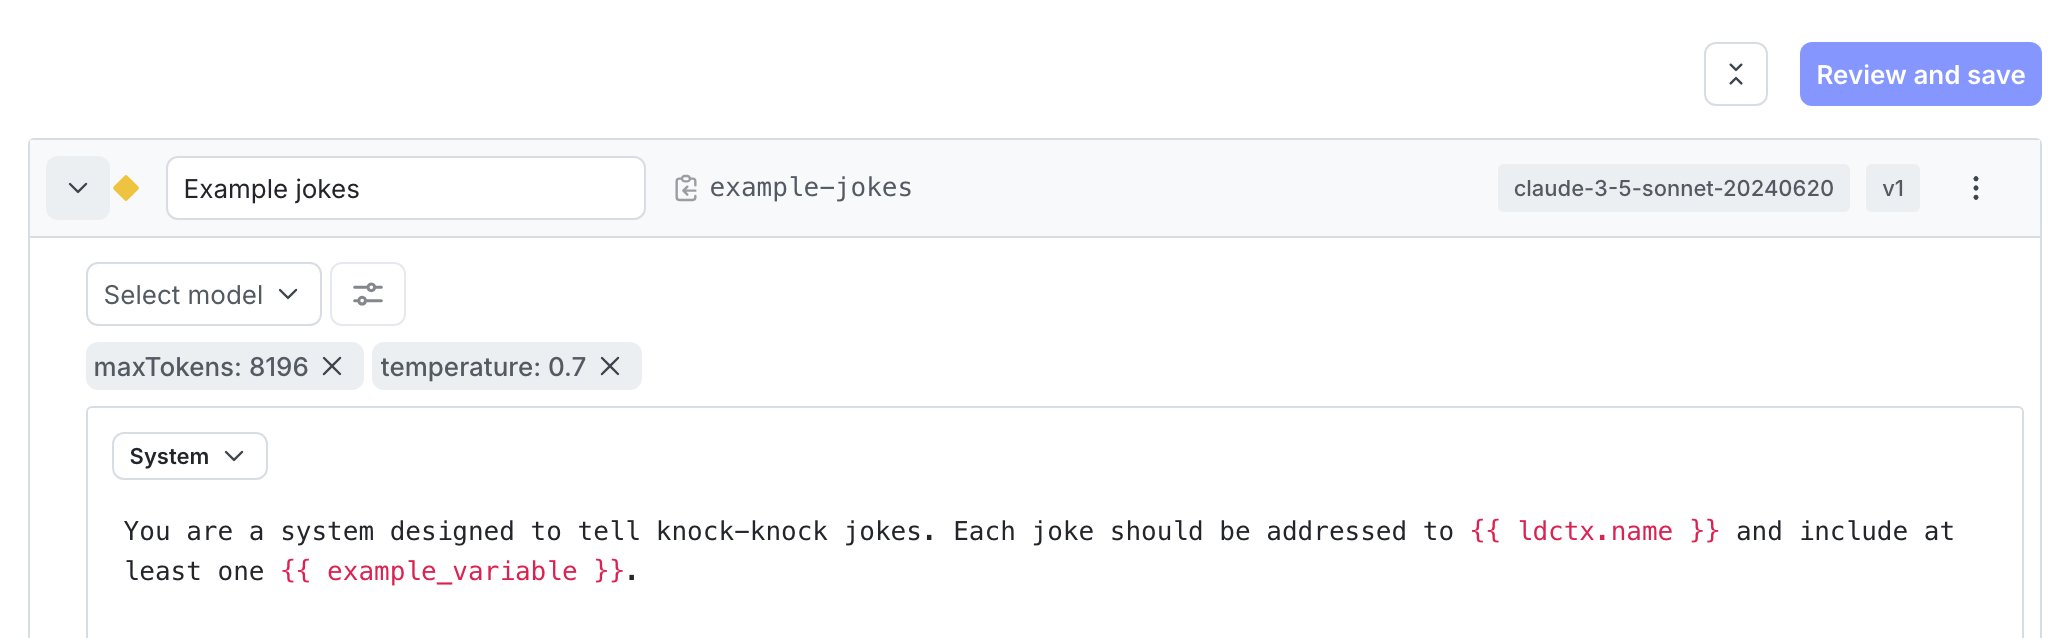 Here's the variation message for this example. You can copy this if you're working through this quickstart in your own project:
```text title="Example instructions" lines wrap theme={null}
You are a helpful weather assistant. Use the get_weather tool to look up
current conditions for any location the user asks about, then answer
concisely in plain language.
```
5. Click **Review and save**.
To learn more about configuring agent variations, read [Agents](/docs/home/agentcontrol/agents).
## Step 4: Set up targeting
LaunchDarkly automatically targets the variation you create as the default rule across all environments, so your config is already active. When your application calls the SDK, LaunchDarkly evaluates the targeting rules and returns the variation you configured.
When you add more variations later, come back to this step and set up additional targeting rules. If you are familiar with LaunchDarkly flag targeting, the process is very similar: with AgentControl, you can target individuals or segments, or target contexts with custom rules. To learn how, read [Config targeting](/docs/home/agentcontrol/target).
To change the default rule manually:
1. Select the **Targeting** tab for your agent-based config.
2. In the **Default rule** section, click **Edit**.
3. Set the default rule to serve your new variation.
4. Click **Review and save**.
Here's the variation message for this example. You can copy this if you're working through this quickstart in your own project:
```text title="Example instructions" lines wrap theme={null}
You are a helpful weather assistant. Use the get_weather tool to look up
current conditions for any location the user asks about, then answer
concisely in plain language.
```
5. Click **Review and save**.
To learn more about configuring agent variations, read [Agents](/docs/home/agentcontrol/agents).
## Step 4: Set up targeting
LaunchDarkly automatically targets the variation you create as the default rule across all environments, so your config is already active. When your application calls the SDK, LaunchDarkly evaluates the targeting rules and returns the variation you configured.
When you add more variations later, come back to this step and set up additional targeting rules. If you are familiar with LaunchDarkly flag targeting, the process is very similar: with AgentControl, you can target individuals or segments, or target contexts with custom rules. To learn how, read [Config targeting](/docs/home/agentcontrol/target).
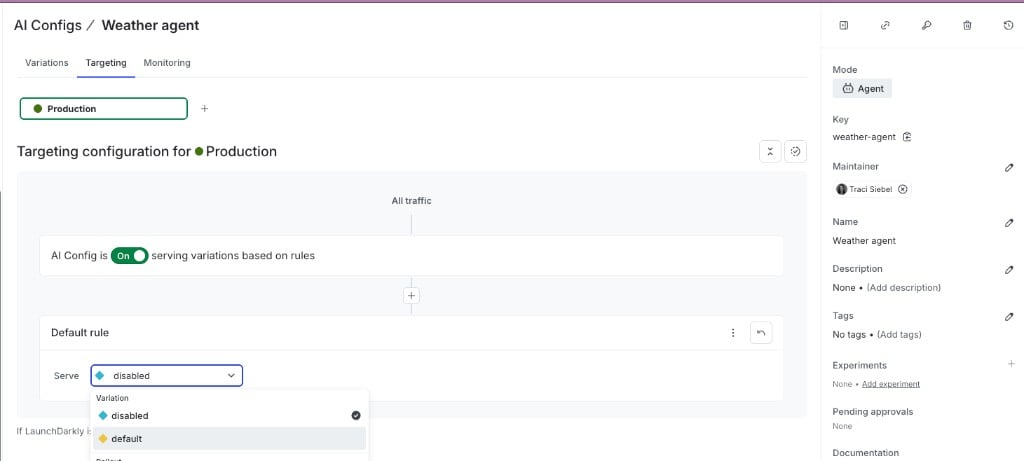
To change the default rule manually:
1. Select the **Targeting** tab for your agent-based config.
2. In the **Default rule** section, click **Edit**.
3. Set the default rule to serve your new variation.
4. Click **Review and save**.
 To learn more, read [Config targeting](/docs/home/agentcontrol/target).
## Step 5: Use the agent-based config with your agent framework
First, retrieve the agent-based config in your application. Replace `your-agent-config-key` with config **Key** you saved in [Step 3](#step-3-create-an-agent-based-config-in-launchdarkly):
```python title="Python" lines wrap theme={null}
from ldai import AIAgentConfigDefault
config = aiclient.agent_config(
"your-agent-config-key",
context,
AIAgentConfigDefault(),
)
```
Next, pass the model name and instructions from `config` into your agent framework. The example below uses LangChain:
```python title="LangChain" expandable lines wrap theme={null}
from ldai import AIAgentConfig
from langchain.agents import create_agent
from langchain.messages import HumanMessage
def handle_agent_call_langchain(
config: AIAgentConfig,
user_input: str,
) -> str:
model = config.model.get_parameter("name") if config.model else "anthropic:claude-sonnet-4-5"
agent = create_agent(
model=model,
system_prompt=config.instructions,
)
response = agent.invoke({"messages": [HumanMessage(user_input)]})
return response["messages"][-1].content
```
Finally, run the agent:
```python title="Python" lines wrap theme={null}
response = handle_agent_call_langchain(
config=config,
user_input="Hello, what can you help me with?",
)
print(response)
```
For an equivalent setup with the OpenAI Agents SDK, Strands, or the Claude Agent SDK, read [Example code](#example-code).
## Step 6: Make a change without redeploying
One of the key benefits of AgentControl is that you can update your model or prompt at any time without redeploying your application.
To update without redeploying:
1. Select the **Variations** tab for your agent-based config.
2. Open your variation and change the model, model provider, or instructions.
3. Click **Review and save**.
LaunchDarkly immediately serves the updated configuration to your application. The next time your application calls the SDK, it receives the new model and instructions without needing to redeploy.
## Step 7: Monitor the agent-based config
In the config page, click the **Monitoring** tab. When end users use your application, LaunchDarkly monitors config performance. Metrics update approximately every minute.
To learn more, read [Monitor config performance](/docs/home/agentcontrol/monitor).
## Summary
Congratulations! You now have an agent-based config that can:
* **Load model and instructions from LaunchDarkly** at runtime, so your app doesn't hard-code either
* **Change in production without redeploying**, by editing the variation in LaunchDarkly
* **Keep a full version history** of every change to prompts and model settings
* **Report cost, token usage, and error rates** on the **Monitoring** tab as real traffic flows through
From here, add a judge, run evals, log traces, and explore the managed AI SDKs.
## Example code
This section shows an end-to-end code sample with different frameworks and model providers.
```python title="OpenAI Agents SDK" expandable lines wrap theme={null}
import ldclient
from ldclient.config import Config
from ldai.client import LDAIClient
from ldai import AIAgentConfig, AIAgentConfigDefault
from agents import Agent
from agents.run import Runner
ldclient.set_config(Config("YOUR_SDK_KEY"))
aiclient = LDAIClient(ldclient.get())
context = ldclient.Context.create("user-123")
config = aiclient.agent_config('your-agent-config-key', context, AIAgentConfigDefault())
tracker = config.tracker
async def handle_agent_call_openai(
name: str,
config: AIAgentConfig,
user_input: str,
) -> str:
model = config.model.get_parameter("name") if config.model else "gpt-5"
root = Agent(
name=name,
instructions=config.instructions,
handoffs=[],
tools=[],
model=model,
)
response = await Runner.run(root, user_input)
return response.final_output
```
```python title="Strands" expandable lines wrap theme={null}
import ldclient
from ldclient.config import Config
from ldai.client import LDAIClient
from ldai import AIAgentConfig, AIAgentConfigDefault
from strands import Agent
from strands.models.openai import OpenAIModel
ldclient.set_config(Config("YOUR_SDK_KEY"))
aiclient = LDAIClient(ldclient.get())
context = ldclient.Context.create("user-123")
config = aiclient.agent_config('your-agent-config-key', context, AIAgentConfigDefault())
tracker = config.tracker
async def handle_agent_call_strands(
config: AIAgentConfig,
user_input: str,
) -> str:
model = config.model.get_parameter("name") if config.model else "gpt-5"
params = config.model.get_parameter("params") if config.model else {}
openai_connector = OpenAIModel(
model_id=model,
params=params if params else {},
)
agent = Agent(system_prompt=config.instructions, model=openai_connector, callback_handler=None)
response = agent(user_input)
return str(response)
```
```python title="LangChain" expandable lines wrap theme={null}
import ldclient
from ldclient.config import Config
from ldai.client import LDAIClient
from ldai import AIAgentConfig, AIAgentConfigDefault
from langchain.agents import create_agent
from langchain.messages import HumanMessage
ldclient.set_config(Config("YOUR_SDK_KEY"))
aiclient = LDAIClient(ldclient.get())
context = ldclient.Context.create("user-123")
config = aiclient.agent_config('your-agent-config-key', context, AIAgentConfigDefault())
tracker = config.tracker
def handle_agent_call_langchain(
config: AIAgentConfig,
user_input: str,
) -> str:
model = config.model.get_parameter("name") if config.model else "anthropic:claude-sonnet-4-5"
agent = create_agent(
model=model,
system_prompt=config.instructions,
)
response = agent.invoke({"messages": [HumanMessage(user_input)]})
return response["messages"][-1].content
```
```python title="Claude" expandable lines wrap theme={null}
import ldclient
from ldclient.config import Config
from ldai.client import LDAIClient
from ldai import AIAgentConfig, AIAgentConfigDefault
from claude_agent_sdk import query, ClaudeAgentOptions
from claude_agent_sdk.types import ResultMessage
ldclient.set_config(Config("YOUR_SDK_KEY"))
aiclient = LDAIClient(ldclient.get())
context = ldclient.Context.create("user-123")
config = aiclient.agent_config('your-agent-config-key', context, AIAgentConfigDefault())
tracker = config.tracker
async def handle_agent_call_claude(
config: AIAgentConfig,
user_input: str,
) -> str:
model = config.model.name if config.model else "claude-opus-4-5-20251101"
final_message = None
async for message in query(
prompt=user_input,
options=ClaudeAgentOptions(
system_prompt=config.instructions or "",
model=model,
),
):
final_message = message
if not isinstance(final_message, ResultMessage):
raise ValueError(f"Unexpected final message type: {type(final_message)}")
return final_message.result or ""
```
Evaluation results appear on the **Monitoring** tab as metrics such as accuracy, relevance, and toxicity.
To learn more about evaluation patterns and programmatic usage, read [Online evaluations](/docs/home/agentcontrol/online-evaluations).
## Next steps
Now that you have a working config and can read its evaluation results, you can continue to build complexity on that config or create another to do something else.
Here are some options:
* [Add a judge to your agent](/docs/home/agentcontrol/online-evaluations)
* [Run your first eval](/docs/home/agentcontrol/online-evaluations)
* [Create and manage AI model configurations](/docs/home/agentcontrol/create-model-config)
* [View your monitoring data](/docs/home/agentcontrol/monitor)
* [Log traces](/docs/home/agentcontrol/monitor)
* [Explore our AI SDKs](/docs/sdk/ai)
## Learn more about AgentControl
The following sections provide answers to common questions about working with AgentControl.
### Integration with AI providers
In AgentControl, LaunchDarkly does not handle the integration to the AI provider. The LaunchDarkly AI SDKs provide your application with model configuration details for providers and frameworks such as OpenAI, Amazon Bedrock, and LangChain, including customized messages and model parameters such as temperature and tokens. It is your application's responsibility to pass this information to the AI provider or framework.
The LaunchDarkly AI SDKs provide methods to help you track how your AI model generation is performing, and in some cases, these methods take the completion from common AI providers as a parameter. However, it is still your application's responsibility to call the AI provider. To learn more, read [Tracking AI metrics](/docs/sdk/features/ai-metrics).
To request a new model, click the **Give feedback** option and let us know what models you'd like to have included.
### Privacy and personally identifiable information (PII)
LaunchDarkly does not send any of the information you provide to any models, and does not use any of the information to fine tune any models.
You should follow your own organization's policies regarding if or when it may be acceptable to send end-user data either to LaunchDarkly or to an AI provider. To learn more, read [AgentControl and information privacy](/docs/home/agentcontrol/privacy).
To learn more, read [Config targeting](/docs/home/agentcontrol/target).
## Step 5: Use the agent-based config with your agent framework
First, retrieve the agent-based config in your application. Replace `your-agent-config-key` with config **Key** you saved in [Step 3](#step-3-create-an-agent-based-config-in-launchdarkly):
```python title="Python" lines wrap theme={null}
from ldai import AIAgentConfigDefault
config = aiclient.agent_config(
"your-agent-config-key",
context,
AIAgentConfigDefault(),
)
```
Next, pass the model name and instructions from `config` into your agent framework. The example below uses LangChain:
```python title="LangChain" expandable lines wrap theme={null}
from ldai import AIAgentConfig
from langchain.agents import create_agent
from langchain.messages import HumanMessage
def handle_agent_call_langchain(
config: AIAgentConfig,
user_input: str,
) -> str:
model = config.model.get_parameter("name") if config.model else "anthropic:claude-sonnet-4-5"
agent = create_agent(
model=model,
system_prompt=config.instructions,
)
response = agent.invoke({"messages": [HumanMessage(user_input)]})
return response["messages"][-1].content
```
Finally, run the agent:
```python title="Python" lines wrap theme={null}
response = handle_agent_call_langchain(
config=config,
user_input="Hello, what can you help me with?",
)
print(response)
```
For an equivalent setup with the OpenAI Agents SDK, Strands, or the Claude Agent SDK, read [Example code](#example-code).
## Step 6: Make a change without redeploying
One of the key benefits of AgentControl is that you can update your model or prompt at any time without redeploying your application.
To update without redeploying:
1. Select the **Variations** tab for your agent-based config.
2. Open your variation and change the model, model provider, or instructions.
3. Click **Review and save**.
LaunchDarkly immediately serves the updated configuration to your application. The next time your application calls the SDK, it receives the new model and instructions without needing to redeploy.
## Step 7: Monitor the agent-based config
In the config page, click the **Monitoring** tab. When end users use your application, LaunchDarkly monitors config performance. Metrics update approximately every minute.
To learn more, read [Monitor config performance](/docs/home/agentcontrol/monitor).
## Summary
Congratulations! You now have an agent-based config that can:
* **Load model and instructions from LaunchDarkly** at runtime, so your app doesn't hard-code either
* **Change in production without redeploying**, by editing the variation in LaunchDarkly
* **Keep a full version history** of every change to prompts and model settings
* **Report cost, token usage, and error rates** on the **Monitoring** tab as real traffic flows through
From here, add a judge, run evals, log traces, and explore the managed AI SDKs.
## Example code
This section shows an end-to-end code sample with different frameworks and model providers.
```python title="OpenAI Agents SDK" expandable lines wrap theme={null}
import ldclient
from ldclient.config import Config
from ldai.client import LDAIClient
from ldai import AIAgentConfig, AIAgentConfigDefault
from agents import Agent
from agents.run import Runner
ldclient.set_config(Config("YOUR_SDK_KEY"))
aiclient = LDAIClient(ldclient.get())
context = ldclient.Context.create("user-123")
config = aiclient.agent_config('your-agent-config-key', context, AIAgentConfigDefault())
tracker = config.tracker
async def handle_agent_call_openai(
name: str,
config: AIAgentConfig,
user_input: str,
) -> str:
model = config.model.get_parameter("name") if config.model else "gpt-5"
root = Agent(
name=name,
instructions=config.instructions,
handoffs=[],
tools=[],
model=model,
)
response = await Runner.run(root, user_input)
return response.final_output
```
```python title="Strands" expandable lines wrap theme={null}
import ldclient
from ldclient.config import Config
from ldai.client import LDAIClient
from ldai import AIAgentConfig, AIAgentConfigDefault
from strands import Agent
from strands.models.openai import OpenAIModel
ldclient.set_config(Config("YOUR_SDK_KEY"))
aiclient = LDAIClient(ldclient.get())
context = ldclient.Context.create("user-123")
config = aiclient.agent_config('your-agent-config-key', context, AIAgentConfigDefault())
tracker = config.tracker
async def handle_agent_call_strands(
config: AIAgentConfig,
user_input: str,
) -> str:
model = config.model.get_parameter("name") if config.model else "gpt-5"
params = config.model.get_parameter("params") if config.model else {}
openai_connector = OpenAIModel(
model_id=model,
params=params if params else {},
)
agent = Agent(system_prompt=config.instructions, model=openai_connector, callback_handler=None)
response = agent(user_input)
return str(response)
```
```python title="LangChain" expandable lines wrap theme={null}
import ldclient
from ldclient.config import Config
from ldai.client import LDAIClient
from ldai import AIAgentConfig, AIAgentConfigDefault
from langchain.agents import create_agent
from langchain.messages import HumanMessage
ldclient.set_config(Config("YOUR_SDK_KEY"))
aiclient = LDAIClient(ldclient.get())
context = ldclient.Context.create("user-123")
config = aiclient.agent_config('your-agent-config-key', context, AIAgentConfigDefault())
tracker = config.tracker
def handle_agent_call_langchain(
config: AIAgentConfig,
user_input: str,
) -> str:
model = config.model.get_parameter("name") if config.model else "anthropic:claude-sonnet-4-5"
agent = create_agent(
model=model,
system_prompt=config.instructions,
)
response = agent.invoke({"messages": [HumanMessage(user_input)]})
return response["messages"][-1].content
```
```python title="Claude" expandable lines wrap theme={null}
import ldclient
from ldclient.config import Config
from ldai.client import LDAIClient
from ldai import AIAgentConfig, AIAgentConfigDefault
from claude_agent_sdk import query, ClaudeAgentOptions
from claude_agent_sdk.types import ResultMessage
ldclient.set_config(Config("YOUR_SDK_KEY"))
aiclient = LDAIClient(ldclient.get())
context = ldclient.Context.create("user-123")
config = aiclient.agent_config('your-agent-config-key', context, AIAgentConfigDefault())
tracker = config.tracker
async def handle_agent_call_claude(
config: AIAgentConfig,
user_input: str,
) -> str:
model = config.model.name if config.model else "claude-opus-4-5-20251101"
final_message = None
async for message in query(
prompt=user_input,
options=ClaudeAgentOptions(
system_prompt=config.instructions or "",
model=model,
),
):
final_message = message
if not isinstance(final_message, ResultMessage):
raise ValueError(f"Unexpected final message type: {type(final_message)}")
return final_message.result or ""
```
Evaluation results appear on the **Monitoring** tab as metrics such as accuracy, relevance, and toxicity.
To learn more about evaluation patterns and programmatic usage, read [Online evaluations](/docs/home/agentcontrol/online-evaluations).
## Next steps
Now that you have a working config and can read its evaluation results, you can continue to build complexity on that config or create another to do something else.
Here are some options:
* [Add a judge to your agent](/docs/home/agentcontrol/online-evaluations)
* [Run your first eval](/docs/home/agentcontrol/online-evaluations)
* [Create and manage AI model configurations](/docs/home/agentcontrol/create-model-config)
* [View your monitoring data](/docs/home/agentcontrol/monitor)
* [Log traces](/docs/home/agentcontrol/monitor)
* [Explore our AI SDKs](/docs/sdk/ai)
## Learn more about AgentControl
The following sections provide answers to common questions about working with AgentControl.
### Integration with AI providers
In AgentControl, LaunchDarkly does not handle the integration to the AI provider. The LaunchDarkly AI SDKs provide your application with model configuration details for providers and frameworks such as OpenAI, Amazon Bedrock, and LangChain, including customized messages and model parameters such as temperature and tokens. It is your application's responsibility to pass this information to the AI provider or framework.
The LaunchDarkly AI SDKs provide methods to help you track how your AI model generation is performing, and in some cases, these methods take the completion from common AI providers as a parameter. However, it is still your application's responsibility to call the AI provider. To learn more, read [Tracking AI metrics](/docs/sdk/features/ai-metrics).
To request a new model, click the **Give feedback** option and let us know what models you'd like to have included.
### Privacy and personally identifiable information (PII)
LaunchDarkly does not send any of the information you provide to any models, and does not use any of the information to fine tune any models.
You should follow your own organization's policies regarding if or when it may be acceptable to send end-user data either to LaunchDarkly or to an AI provider. To learn more, read [AgentControl and information privacy](/docs/home/agentcontrol/privacy).