> ## Documentation Index
> Fetch the complete documentation index at: https://launchdarkly.com/docs/llms.txt
> Use this file to discover all available pages before exploring further.
# JSON targeting
This topic explains how to create and edit flag targeting rules using JSON.
Editing flag rules using JSON follows the same model as the JSON response from the [Get feature flag](/docs/api/feature-flags/get-feature-flag) endpoint in the REST API.
**Looking for information about how to validate flag variations using JSON?**
To learn how to use a JSON schema to validate flag variations, read [JSON schema for multivariate flag variations](/docs/home/flags/variations#json-schema-for-multivariate-flag-variations).
## View JSON targeting rules
To view a flag's targeting rules in JSON, navigate to the **Targeting** tab and click the **{ }** icon in the "Targeting configuration" section:
 When viewing JSON targeting rules, click the **magic wand** icon to automatically format the JSON structure.
## Basic JSON structure
Below is an example of the basic JSON structure for a boolean feature flag:
```json title="Boolean feature flag" lines wrap theme={null}
{
"on": false, // the flag is toggled off
"prerequisites": [], // the flag has no prerequisites
"contextTargets": [], // the flag has no individual targeting rules
"rules": [], // the flag has no custom targeting rules
"fallthrough": {
"variation": 0 // the fallthrough, or default, variation is true
},
"offVariation": 1 // the off variation is false
}
```
This example flag:
* is toggled off
* has no prerequisites
* has no targeting rules besides the [default rule](/docs/home/flags/default-rule)
* has true (`0`) as the default rule
* has false (`1`) as the [off variation](/docs/home/flags/off-variation)
### Variation IDs
For boolean flags, the ID of the `true` variation is always `0`, and the ID of the `false` variation is always `1`.
For multivariate flags, the ID of the first variation is `0`, the ID of the second variation is `1`, and so on.
## Flag on/off status
To toggle a flag on or off, set `on` to `true` or `false`.
Here is what a flag toggle looks like in the user interface (UI):
When viewing JSON targeting rules, click the **magic wand** icon to automatically format the JSON structure.
## Basic JSON structure
Below is an example of the basic JSON structure for a boolean feature flag:
```json title="Boolean feature flag" lines wrap theme={null}
{
"on": false, // the flag is toggled off
"prerequisites": [], // the flag has no prerequisites
"contextTargets": [], // the flag has no individual targeting rules
"rules": [], // the flag has no custom targeting rules
"fallthrough": {
"variation": 0 // the fallthrough, or default, variation is true
},
"offVariation": 1 // the off variation is false
}
```
This example flag:
* is toggled off
* has no prerequisites
* has no targeting rules besides the [default rule](/docs/home/flags/default-rule)
* has true (`0`) as the default rule
* has false (`1`) as the [off variation](/docs/home/flags/off-variation)
### Variation IDs
For boolean flags, the ID of the `true` variation is always `0`, and the ID of the `false` variation is always `1`.
For multivariate flags, the ID of the first variation is `0`, the ID of the second variation is `1`, and so on.
## Flag on/off status
To toggle a flag on or off, set `on` to `true` or `false`.
Here is what a flag toggle looks like in the user interface (UI):
 Here is an example of how to toggle a flag `on`:
```json title="Flag on/off status" lines wrap theme={null}
{
"on": true
}
```
To learn about toggling flags on and off in the UI, read [Turning flags on and off](/docs/home/flags/toggle).
## Off variation
The off variation is the variation served to all contexts when a flag is off.
Here is an example of how to set the off variation:
```json title="Off variation" lines wrap theme={null}
{
"offVariation": 1 // the off variation is false
}
```
To learn how to set the off variation in the UI, read [The off variation](/docs/home/flags/off-variation).
## Default rule or variation
The [default](/docs/home/flags/default-rule), or fallthrough, rule is the rollout or variation that a flag serves when a context doesn't match any other targeting rules on the flag.
Here is what a default rule looks like in the UI:
Here is an example of how to toggle a flag `on`:
```json title="Flag on/off status" lines wrap theme={null}
{
"on": true
}
```
To learn about toggling flags on and off in the UI, read [Turning flags on and off](/docs/home/flags/toggle).
## Off variation
The off variation is the variation served to all contexts when a flag is off.
Here is an example of how to set the off variation:
```json title="Off variation" lines wrap theme={null}
{
"offVariation": 1 // the off variation is false
}
```
To learn how to set the off variation in the UI, read [The off variation](/docs/home/flags/off-variation).
## Default rule or variation
The [default](/docs/home/flags/default-rule), or fallthrough, rule is the rollout or variation that a flag serves when a context doesn't match any other targeting rules on the flag.
Here is what a default rule looks like in the UI:
 To set a default variation, use `fallthrough` and set `variation` to the ID of the flag variation you want to use as the default variation.
Here is an example of setting the default variation on a boolean flag:
```json title="Default variation" lines wrap theme={null}
{
"fallthrough": {
"variation": 1 // the default variation is false
}
}
```
You can also set a rollout, instead of a single variation, as the default rule. To learn how, read [Rollouts](#rollouts).
To learn how to set the default rule in the UI, read [The default rule](/docs/home/flags/default-rule).
## Prerequisites
To set a prerequisite, use `prerequisites` with the following key/value pairs:
* `key`: the prerequisite flag key.
* `variation`: the ID of the prerequisite flag's variation you want to require.
Here is what a prerequisite rule looks like in the UI:
To set a default variation, use `fallthrough` and set `variation` to the ID of the flag variation you want to use as the default variation.
Here is an example of setting the default variation on a boolean flag:
```json title="Default variation" lines wrap theme={null}
{
"fallthrough": {
"variation": 1 // the default variation is false
}
}
```
You can also set a rollout, instead of a single variation, as the default rule. To learn how, read [Rollouts](#rollouts).
To learn how to set the default rule in the UI, read [The default rule](/docs/home/flags/default-rule).
## Prerequisites
To set a prerequisite, use `prerequisites` with the following key/value pairs:
* `key`: the prerequisite flag key.
* `variation`: the ID of the prerequisite flag's variation you want to require.
Here is what a prerequisite rule looks like in the UI:
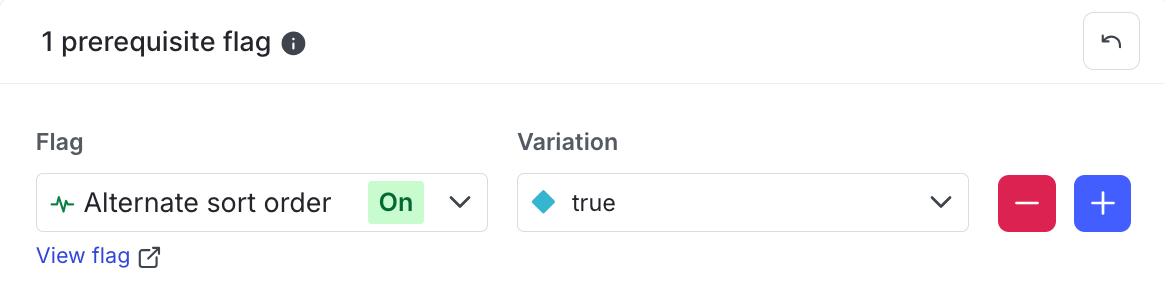 Here is an example prerequisite rule requiring the prerequisite variation for the flag `alt-sort-order` to be `true`:
```json title="Prerequisites" lines wrap theme={null}
{
"prerequisites": [
{
"key": "alt-sort-order", // the prerequisite flag key
"variation": 0 // the prerequisite flag variation must be true
}
]
}
```
In the above example, if the prerequisite flag is `on: true`, and a context encountering this flag is receiving the true (`0`) variation of the prerequisite flag, then the context is subject to this flag's targeting rules.
If the prerequisite flag is `on: false`, or the context is receiving a variation other than true (`0`), then the context will receive this flag's `offVariation` of false (`1`).
To learn how to use prerequisite flags in the UI, read [Flag prerequisites](/docs/home/flags/prereqs).
## Individual targeting
Individual targeting lets you serve chosen variations to specific contexts.
Here is what an individual targeting rule looks like in the UI:
Here is an example prerequisite rule requiring the prerequisite variation for the flag `alt-sort-order` to be `true`:
```json title="Prerequisites" lines wrap theme={null}
{
"prerequisites": [
{
"key": "alt-sort-order", // the prerequisite flag key
"variation": 0 // the prerequisite flag variation must be true
}
]
}
```
In the above example, if the prerequisite flag is `on: true`, and a context encountering this flag is receiving the true (`0`) variation of the prerequisite flag, then the context is subject to this flag's targeting rules.
If the prerequisite flag is `on: false`, or the context is receiving a variation other than true (`0`), then the context will receive this flag's `offVariation` of false (`1`).
To learn how to use prerequisite flags in the UI, read [Flag prerequisites](/docs/home/flags/prereqs).
## Individual targeting
Individual targeting lets you serve chosen variations to specific contexts.
Here is what an individual targeting rule looks like in the UI:
 To individually target a context, use `contextTargets` with the following key/value pairs:
* `variation`: the ID of the variation you want to serve.
* `values`: the context keys you want to target.
* `contextKind`: the context kind of the contexts you want to target.
Here is an example individual targeting rule for a user context:
```json title="Individual targeting" lines wrap theme={null}
{
"contextTargets": [{
"variation": 0, // this individual targeting rule serves the true variation
"values": [
"example-user-key" // the context key
],
"contextKind": "user" // the context kind is user
}]
}
```
To learn how to target individual contexts in the UI, read [Individual targeting](/docs/home/flags/individual-targeting).
### Target multiple context kinds
You can use multiple rules if you need to target multiple context kinds.
This example flag targets both user and organization contexts:
```json title="Individual targeting multiple context kinds" expandable lines wrap theme={null}
{
"contextTargets": [{
"variation": 0, // this individual targeting rule serves the true variation
"values": [
"example-user-key", // the first user context key
"user-key-456def" // the second user context key
],
"contextKind": "user" // the context kind is user for both contexts
},
{
"variation": 0, // this individual targeting rule serves the true variation
"values": [
"example-organization-key", // the first organization context key
"org-key-456def" // the second organization context key
],
"contextKind": "organization" // the context kind is organization for both contexts
}]
}
```
### Target different variations
You can use multiple rules if some individually targeted contexts should receive different variations than others.
This example flag serves true to some contexts and false to others:
```json title="Individual targeting multiple context kinds" expandable lines wrap theme={null}
{
"contextTargets": [{
"variation": 0, // this individual targeting rule serves the true variation
"values": [
"example-user-key", // the first user context key
],
"contextKind": "user" // the context kind is user
},
{
"variation": 1, // this individual targeting rule serves the false variation
"values": [
"user-key-456def" // the second user context key
],
"contextKind": "user" // the context kind is user
}]
}
```
## Segment targeting
Segment targeting rules let you serve chosen variations to specific LaunchDarkly [segments](/docs/home/flags/segments).
Here is what a segment targeting rule looks like in the UI:
To individually target a context, use `contextTargets` with the following key/value pairs:
* `variation`: the ID of the variation you want to serve.
* `values`: the context keys you want to target.
* `contextKind`: the context kind of the contexts you want to target.
Here is an example individual targeting rule for a user context:
```json title="Individual targeting" lines wrap theme={null}
{
"contextTargets": [{
"variation": 0, // this individual targeting rule serves the true variation
"values": [
"example-user-key" // the context key
],
"contextKind": "user" // the context kind is user
}]
}
```
To learn how to target individual contexts in the UI, read [Individual targeting](/docs/home/flags/individual-targeting).
### Target multiple context kinds
You can use multiple rules if you need to target multiple context kinds.
This example flag targets both user and organization contexts:
```json title="Individual targeting multiple context kinds" expandable lines wrap theme={null}
{
"contextTargets": [{
"variation": 0, // this individual targeting rule serves the true variation
"values": [
"example-user-key", // the first user context key
"user-key-456def" // the second user context key
],
"contextKind": "user" // the context kind is user for both contexts
},
{
"variation": 0, // this individual targeting rule serves the true variation
"values": [
"example-organization-key", // the first organization context key
"org-key-456def" // the second organization context key
],
"contextKind": "organization" // the context kind is organization for both contexts
}]
}
```
### Target different variations
You can use multiple rules if some individually targeted contexts should receive different variations than others.
This example flag serves true to some contexts and false to others:
```json title="Individual targeting multiple context kinds" expandable lines wrap theme={null}
{
"contextTargets": [{
"variation": 0, // this individual targeting rule serves the true variation
"values": [
"example-user-key", // the first user context key
],
"contextKind": "user" // the context kind is user
},
{
"variation": 1, // this individual targeting rule serves the false variation
"values": [
"user-key-456def" // the second user context key
],
"contextKind": "user" // the context kind is user
}]
}
```
## Segment targeting
Segment targeting rules let you serve chosen variations to specific LaunchDarkly [segments](/docs/home/flags/segments).
Here is what a segment targeting rule looks like in the UI:
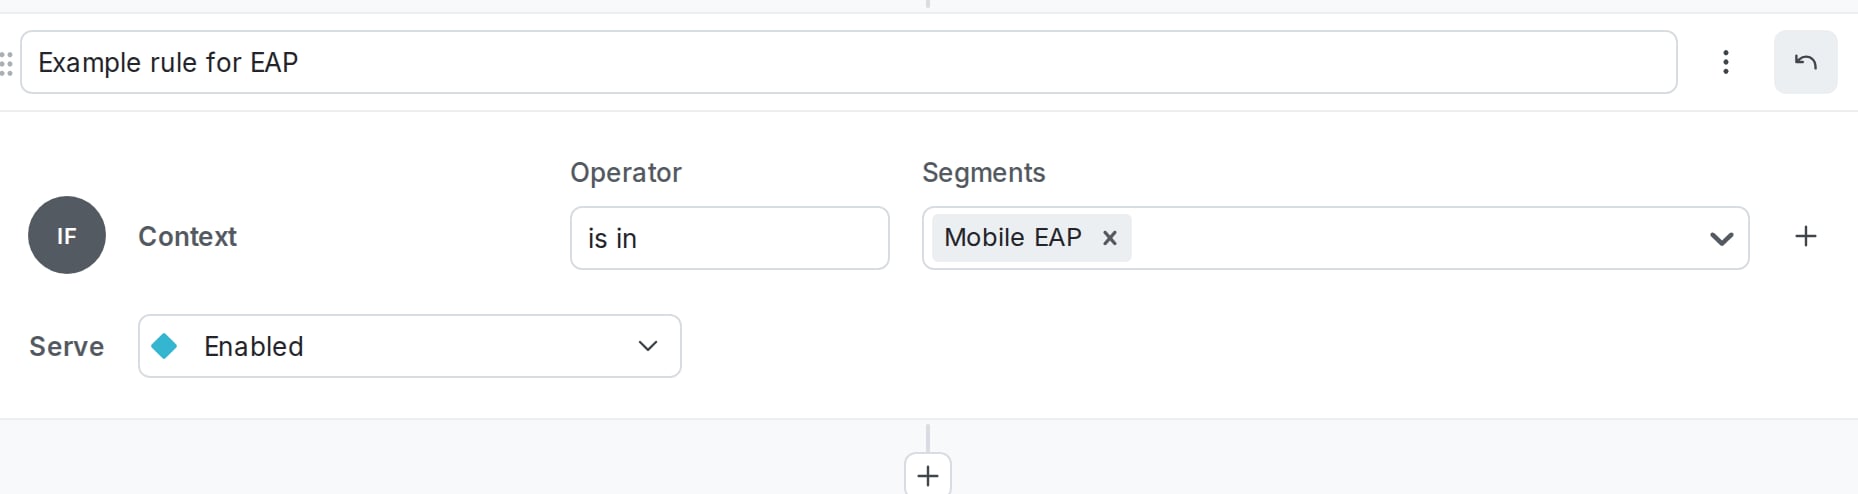 To target a segment, use `clauses` with the following key/value pairs:
* `attribute`: `segmentMatch` or `not-SegmentMatch`, depending on whether or not you want the rule to target contexts in the chosen segment, or not in the chosen segment
* `op`: `segmentMatch`
* `negate`: set to `false` if you set `attribute` to `segmentMatch`. Set to `true` if you set `attribute` to `not-segmentMatch`.
* `values`: the segment keys you want to target in the rule
```json title="Segment targeting" expandable lines wrap theme={null}
{
"rules": [
{
"clauses": [
{
"attribute": "segmentMatch", // this rule will target contexts in the segment
"contextKind": "", // leave the contextKind blank for segment targeting
"negate": false, // the attribute is segmentMatch, so this is set to false
"op": "segmentMatch", // op is always segmentMatch
"values": [
"internal-testers", // the segment key of the segment you want to target
]
}
],
"description": "Include internal testers", // the rule description, optional
"variation": 0 // this rule is serving true
}
]
}
```
After you save a segment targeting rule, LaunchDarkly automatically assigns a read-only `_id` value to each rule clause. You do not need to supply this ID yourself, and you cannot edit the ID after it has been assigned.
To learn how to build segment targeting rules in the UI, read [Targeting segments](/docs/home/flags/segment-targeting).
## Mobile targeting
Mobile targeting rules let you control which mobile apps and devices receive a variation of a feature flag.
Here is an example of a mobile targeting rule in the UI:
To target a segment, use `clauses` with the following key/value pairs:
* `attribute`: `segmentMatch` or `not-SegmentMatch`, depending on whether or not you want the rule to target contexts in the chosen segment, or not in the chosen segment
* `op`: `segmentMatch`
* `negate`: set to `false` if you set `attribute` to `segmentMatch`. Set to `true` if you set `attribute` to `not-segmentMatch`.
* `values`: the segment keys you want to target in the rule
```json title="Segment targeting" expandable lines wrap theme={null}
{
"rules": [
{
"clauses": [
{
"attribute": "segmentMatch", // this rule will target contexts in the segment
"contextKind": "", // leave the contextKind blank for segment targeting
"negate": false, // the attribute is segmentMatch, so this is set to false
"op": "segmentMatch", // op is always segmentMatch
"values": [
"internal-testers", // the segment key of the segment you want to target
]
}
],
"description": "Include internal testers", // the rule description, optional
"variation": 0 // this rule is serving true
}
]
}
```
After you save a segment targeting rule, LaunchDarkly automatically assigns a read-only `_id` value to each rule clause. You do not need to supply this ID yourself, and you cannot edit the ID after it has been assigned.
To learn how to build segment targeting rules in the UI, read [Targeting segments](/docs/home/flags/segment-targeting).
## Mobile targeting
Mobile targeting rules let you control which mobile apps and devices receive a variation of a feature flag.
Here is an example of a mobile targeting rule in the UI:
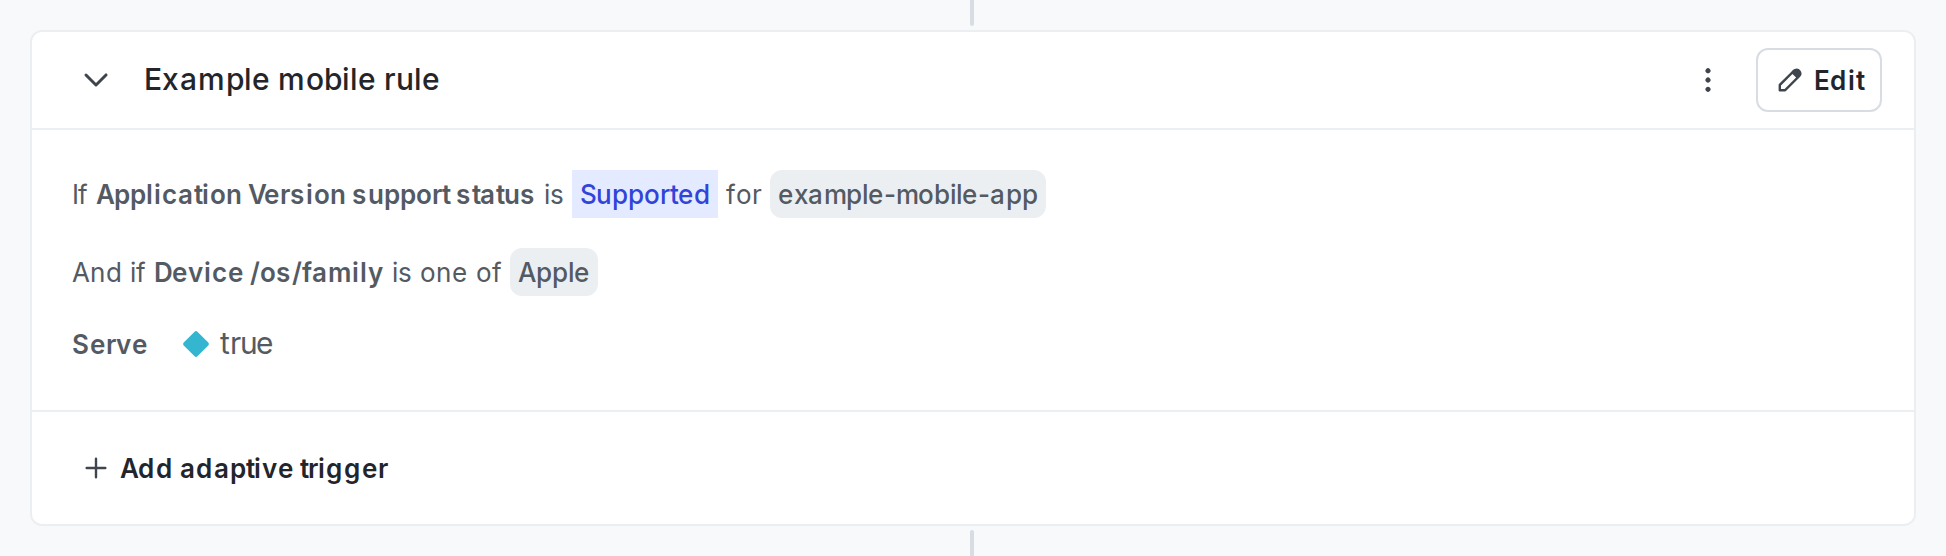 To target mobile devices, use `rules` with the following key/value pairs:
* `description` (optional): the description of the rule.
* `variation`: the ID of the variation you want to serve.
* `clauses` with the following key/value pairs:
* `contextKind`: either `ld_application` or `ld_device`, depending on if you want to target mobile applications or mobile devices in this rule.
* `attribute`: the [context attribute](/docs/home/flags/target-rules#attributes) you want to use in the rule.
* `op`: the operators available depend on your context kind and attribute:
* if your `contextKind` is `ld_application`, and your `attribute` is `version support status`, then `applicationVersionSupported` is the only available operator.
* otherwise, use the standard [operator](/docs/home/flags/target-rules#operators) you want to use in the rule.
* `negate`: set to `true` to use the inverse of the operator. For example, if `op` is set to `in`, use `"negate": true` to use "is not in" as the operator. Otherwise, set to `false`.
* `values`: the [attribute values](/docs/home/flags/context-attributes) you want to use in the rule.
```json title="Mobile targeting" expandable lines wrap theme={null}
{
"rules": [
{
"description": "Support for versions 12.5 and higher", // the rule description, optional
"variation": 0, // this mobile rule serves the true variation
"clauses": [
{"contextKind": "ld_application",
"attribute": "version_support_status",
"op": "applicationVersionSupported",
"negate": false,
"attribute": "version_support_status", // the application attribute is "version support status"
"contextKind": "device", // the context kind is device
"negate": false,
"op": "applicationVersionSupported", // the operator is "is supported for"
"values": [
"12.5" // the application version number is 12.5
]
}
]
}
]
}
```
After you save a mobile targeting rule, LaunchDarkly automatically assigns a read-only `_id` value to each rule clause. You do not need to supply this ID yourself, and you cannot edit the ID after it has been assigned.
To learn how to build mobile targeting rules in the UI, read [Mobile targeting](/docs/home/flags/mobile-targeting).
## Custom targeting rules
Custom targeting rules let you target contexts based on their context kind and attributes.
Here is an example of a custom targeting rule in the UI:
To target mobile devices, use `rules` with the following key/value pairs:
* `description` (optional): the description of the rule.
* `variation`: the ID of the variation you want to serve.
* `clauses` with the following key/value pairs:
* `contextKind`: either `ld_application` or `ld_device`, depending on if you want to target mobile applications or mobile devices in this rule.
* `attribute`: the [context attribute](/docs/home/flags/target-rules#attributes) you want to use in the rule.
* `op`: the operators available depend on your context kind and attribute:
* if your `contextKind` is `ld_application`, and your `attribute` is `version support status`, then `applicationVersionSupported` is the only available operator.
* otherwise, use the standard [operator](/docs/home/flags/target-rules#operators) you want to use in the rule.
* `negate`: set to `true` to use the inverse of the operator. For example, if `op` is set to `in`, use `"negate": true` to use "is not in" as the operator. Otherwise, set to `false`.
* `values`: the [attribute values](/docs/home/flags/context-attributes) you want to use in the rule.
```json title="Mobile targeting" expandable lines wrap theme={null}
{
"rules": [
{
"description": "Support for versions 12.5 and higher", // the rule description, optional
"variation": 0, // this mobile rule serves the true variation
"clauses": [
{"contextKind": "ld_application",
"attribute": "version_support_status",
"op": "applicationVersionSupported",
"negate": false,
"attribute": "version_support_status", // the application attribute is "version support status"
"contextKind": "device", // the context kind is device
"negate": false,
"op": "applicationVersionSupported", // the operator is "is supported for"
"values": [
"12.5" // the application version number is 12.5
]
}
]
}
]
}
```
After you save a mobile targeting rule, LaunchDarkly automatically assigns a read-only `_id` value to each rule clause. You do not need to supply this ID yourself, and you cannot edit the ID after it has been assigned.
To learn how to build mobile targeting rules in the UI, read [Mobile targeting](/docs/home/flags/mobile-targeting).
## Custom targeting rules
Custom targeting rules let you target contexts based on their context kind and attributes.
Here is an example of a custom targeting rule in the UI:
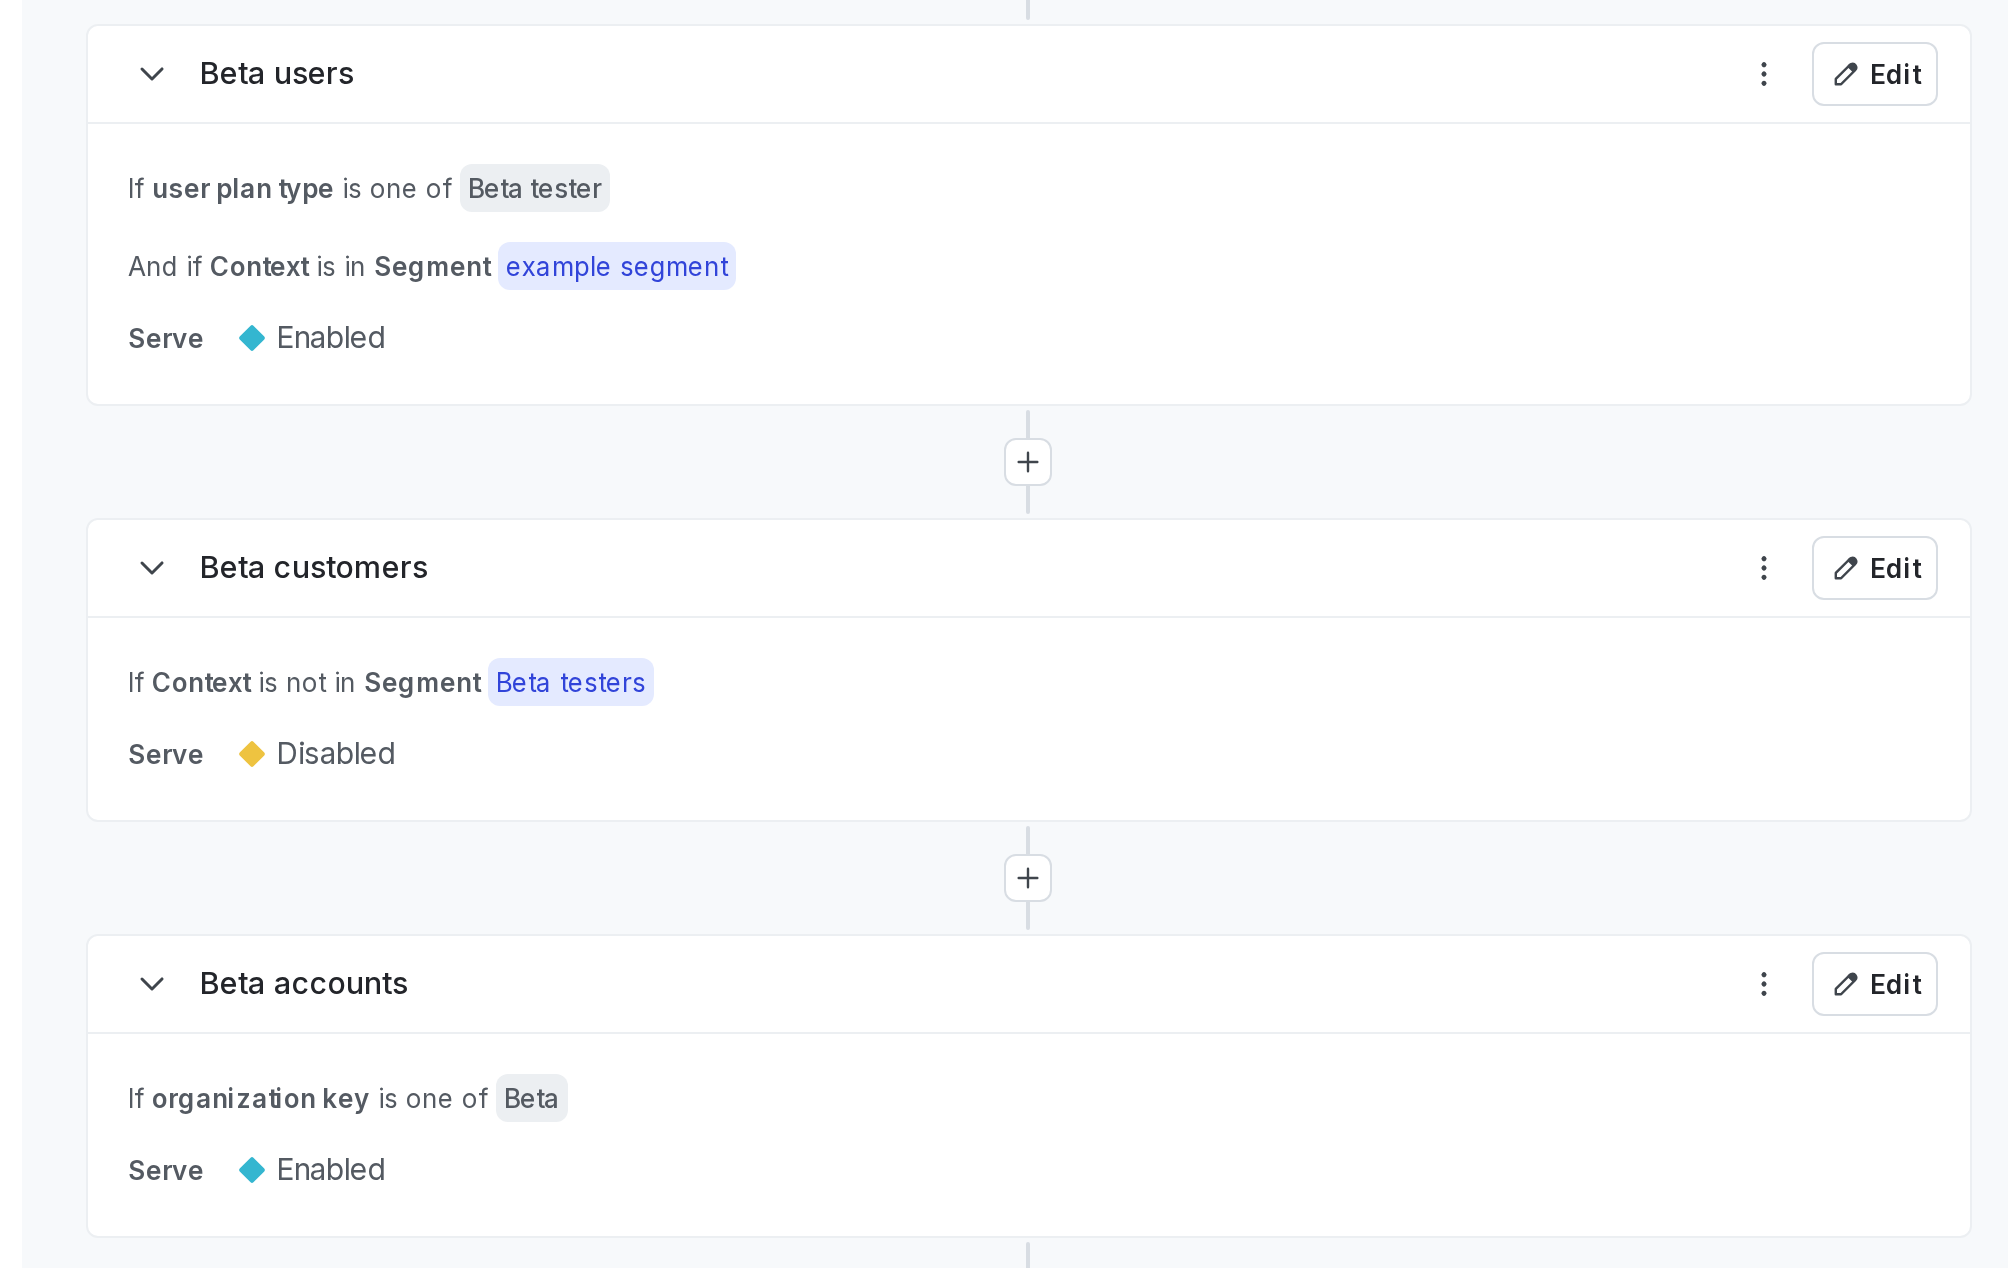 To target custom context kinds and attributes, use `rules` with the following key/value pairs:
* `description` (optional): the description of the rule.
* `variation`: the ID of the variation you want to serve.
* `values`: the context keys you want to target.
* `clauses`, with the following key/value pairs:
* `contextKind`: the context kind of the contexts you want to target.
* `attribute`: the [context attribute](/docs/home/flags/target-rules#attributes) you want to use in the rule.
* `op`: the standard [operator](/docs/home/flags/target-rules#operators) you want to use in the rule.
* `negate`: leave set to `true`, or set to `false` to use the inverse of the operator. For example, if `op` is set to `in`, use `"negate": true` to use "is not in" as the operator.
* `values`: the [attribute values](/docs/home/flags/context-attributes) you want to use in the rule.
* `trackEvents` (optional): `true` or `false` depending on whether or not you want to send [feature events](/docs/integrations/data-export/schema-reference#feature-events) to LaunchDarkly.
Here is an example custom targeting rule that targets customers with an email address that ends in `.edu`:
```json title="Custom targeting rule for students" expandable lines wrap theme={null}
{
"rules": [{
"description": "Student customers", // the rule description, optional
"variation": 0, // this custom rule serves the true variation
"clauses": [{
"contextKind": "user", // the context kind is user
"attribute": "email", // the context attribute is "email"
"op": "endsWith", // the rule operator is "ends with"
"negate": false, // the operator is not negated
"values": [
".edu" // the attribute value
]
}],
"trackEvents": false // the flag is not sending feature events to LaunchDarkly, optional
}]
}
```
Here is an example targeting rule that targets accounts for an Early Access Program (EAP):
```json title="Custom targeting rule for an EAP" expandable lines wrap theme={null}
{
"rules": [{
"description": "Early access accounts", // the rule description, optional
"variation": 0, // this custom rule serves the true variation
"clauses": [{
"contextKind": "account", // the context kind is account
"attribute": "eap-account", // the context attribute is "eap-account"
"op": "in", // the rule operator is "is one of"
"negate": false, // the operator is not negated
"values": [
"true" // the attribute value is true
]
}],
"trackEvents": true // the flag is sending feature events to LaunchDarkly, optional
}]
}
```
After you save a custom targeting rule, LaunchDarkly automatically assigns a read-only `_id` value to each rule clause. You do not need to supply this ID yourself, and you cannot edit the ID after it has been assigned.
To learn how to build custom targeting rules in the UI, read [Custom rules](/docs/home/flags/custom-rules).
## Rollouts
When you create a custom rule or default rule, you can choose to serve a rollout instead of a single variation.
There are three kinds of rollouts:
* Manual percentage rollout
* Progressive rollout
* Guarded rollout
### Manual percentage rollout
Percentage rollouts let you roll out your feature to a small percentage of contexts and, as you become more confident your feature is working as intended, manually increase the percentage over time.
Here is what a percentage rollout looks like in the UI:
To target custom context kinds and attributes, use `rules` with the following key/value pairs:
* `description` (optional): the description of the rule.
* `variation`: the ID of the variation you want to serve.
* `values`: the context keys you want to target.
* `clauses`, with the following key/value pairs:
* `contextKind`: the context kind of the contexts you want to target.
* `attribute`: the [context attribute](/docs/home/flags/target-rules#attributes) you want to use in the rule.
* `op`: the standard [operator](/docs/home/flags/target-rules#operators) you want to use in the rule.
* `negate`: leave set to `true`, or set to `false` to use the inverse of the operator. For example, if `op` is set to `in`, use `"negate": true` to use "is not in" as the operator.
* `values`: the [attribute values](/docs/home/flags/context-attributes) you want to use in the rule.
* `trackEvents` (optional): `true` or `false` depending on whether or not you want to send [feature events](/docs/integrations/data-export/schema-reference#feature-events) to LaunchDarkly.
Here is an example custom targeting rule that targets customers with an email address that ends in `.edu`:
```json title="Custom targeting rule for students" expandable lines wrap theme={null}
{
"rules": [{
"description": "Student customers", // the rule description, optional
"variation": 0, // this custom rule serves the true variation
"clauses": [{
"contextKind": "user", // the context kind is user
"attribute": "email", // the context attribute is "email"
"op": "endsWith", // the rule operator is "ends with"
"negate": false, // the operator is not negated
"values": [
".edu" // the attribute value
]
}],
"trackEvents": false // the flag is not sending feature events to LaunchDarkly, optional
}]
}
```
Here is an example targeting rule that targets accounts for an Early Access Program (EAP):
```json title="Custom targeting rule for an EAP" expandable lines wrap theme={null}
{
"rules": [{
"description": "Early access accounts", // the rule description, optional
"variation": 0, // this custom rule serves the true variation
"clauses": [{
"contextKind": "account", // the context kind is account
"attribute": "eap-account", // the context attribute is "eap-account"
"op": "in", // the rule operator is "is one of"
"negate": false, // the operator is not negated
"values": [
"true" // the attribute value is true
]
}],
"trackEvents": true // the flag is sending feature events to LaunchDarkly, optional
}]
}
```
After you save a custom targeting rule, LaunchDarkly automatically assigns a read-only `_id` value to each rule clause. You do not need to supply this ID yourself, and you cannot edit the ID after it has been assigned.
To learn how to build custom targeting rules in the UI, read [Custom rules](/docs/home/flags/custom-rules).
## Rollouts
When you create a custom rule or default rule, you can choose to serve a rollout instead of a single variation.
There are three kinds of rollouts:
* Manual percentage rollout
* Progressive rollout
* Guarded rollout
### Manual percentage rollout
Percentage rollouts let you roll out your feature to a small percentage of contexts and, as you become more confident your feature is working as intended, manually increase the percentage over time.
Here is what a percentage rollout looks like in the UI:
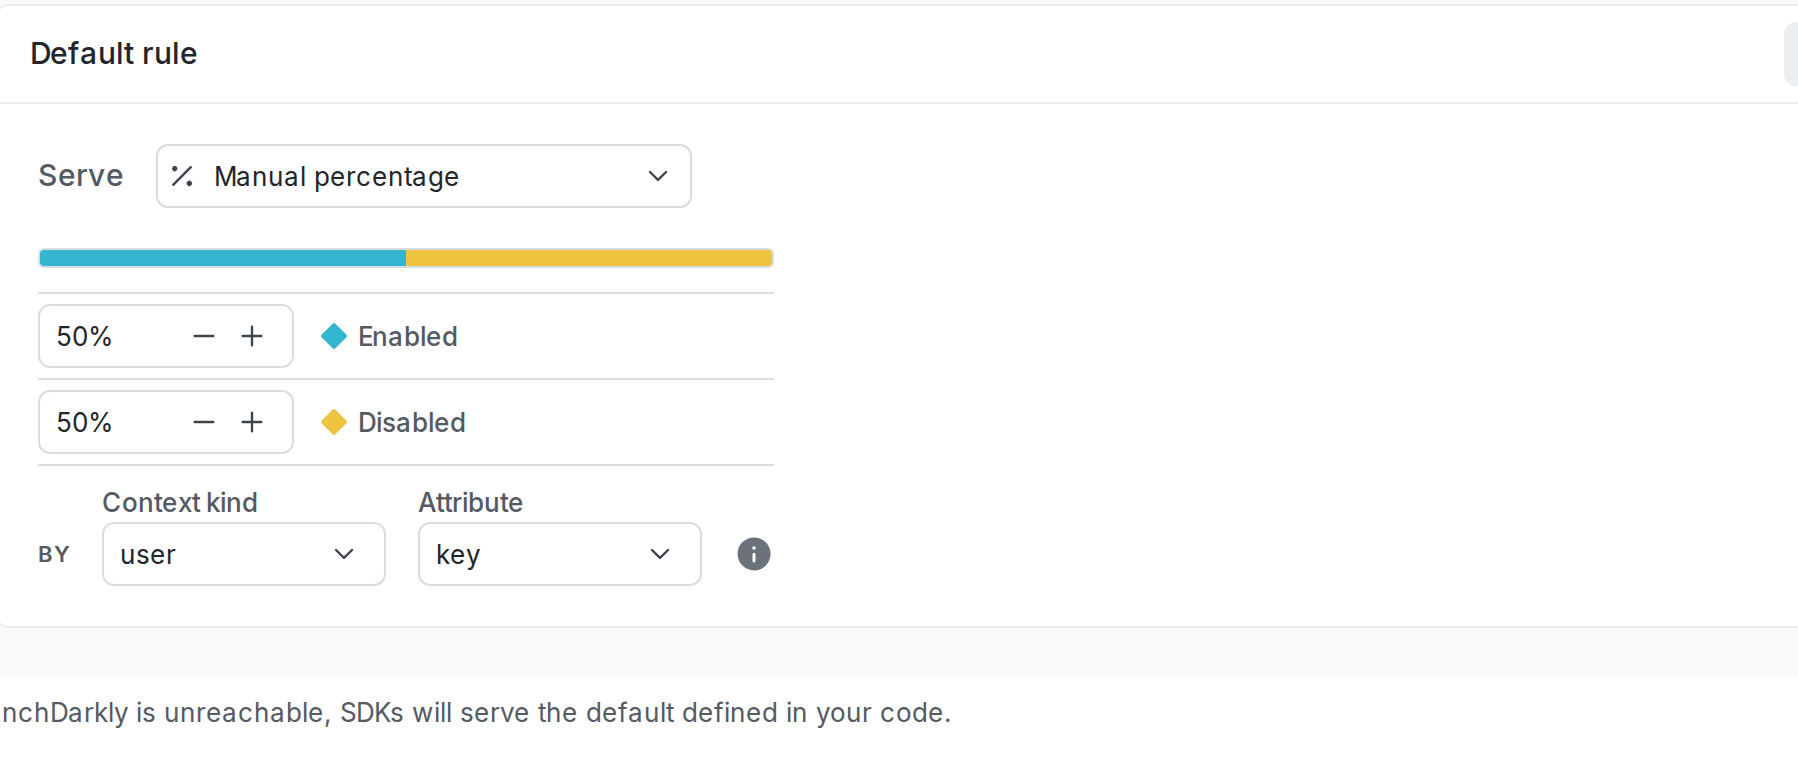 To create a manual percentage rollout, use `percentageRolloutConfig` with the following key/value pairs:
* `contextKind` (optional): the context kind you want to roll out by. Defaults to your [default context kind](/docs/home/flags/context-kinds#built-in-context-kinds).
* `bucketBy` (optional): the attribute value you want to roll out by. Defaults to `key`.
* `variations`, with the following key/value pairs:
* `variation`: the ID of the variation you want to serve.
* `weight`: the percentage of contexts you want to include in that variation. Include three decimal places in the percentage, with no `.` or `,`. Do not include leading `0`s. For example:
* to include 5.5% of contexts in a variation, set the `weight` to `5500`.
* to include 75.5% of contexts in a variation, set the `weight` to `75500`. The weight must add up to 100% between all of the variations.
The below example shows how to rollout the `true` variation to 50% of contexts and the `false` variation to 50% of contexts on the default rule of a flag.
Here is how to set the rollout using JSON:
```json title="Default percentage rollout" expandable lines wrap theme={null}
{
"percentageRolloutConfig": {
"contextKind": "user", // rolling out to user contexts,
"bucketBy": "key", // by user key
"variations": [
{
"variation": 0, // this part of the rollout serves the true variation
"weight": 50000 // 50% of contexts will be served this variation
},
{
"variation": 1, // this part of the rollout serves the false variation
"weight": 50000 // 50% of contexts will be served this variation
}
]
}
}
```
To learn how to create percentage rollouts in the UI, read [Percentage rollouts](/docs/home/releases/percentage-rollouts).
### Progressive rollout
A progressive rollout lets you serve a given flag variation to a specified percentage of contexts, and gradually increases that percentage over a specified time.
Here is what a progressive rollout looks like in the UI:
To create a manual percentage rollout, use `percentageRolloutConfig` with the following key/value pairs:
* `contextKind` (optional): the context kind you want to roll out by. Defaults to your [default context kind](/docs/home/flags/context-kinds#built-in-context-kinds).
* `bucketBy` (optional): the attribute value you want to roll out by. Defaults to `key`.
* `variations`, with the following key/value pairs:
* `variation`: the ID of the variation you want to serve.
* `weight`: the percentage of contexts you want to include in that variation. Include three decimal places in the percentage, with no `.` or `,`. Do not include leading `0`s. For example:
* to include 5.5% of contexts in a variation, set the `weight` to `5500`.
* to include 75.5% of contexts in a variation, set the `weight` to `75500`. The weight must add up to 100% between all of the variations.
The below example shows how to rollout the `true` variation to 50% of contexts and the `false` variation to 50% of contexts on the default rule of a flag.
Here is how to set the rollout using JSON:
```json title="Default percentage rollout" expandable lines wrap theme={null}
{
"percentageRolloutConfig": {
"contextKind": "user", // rolling out to user contexts,
"bucketBy": "key", // by user key
"variations": [
{
"variation": 0, // this part of the rollout serves the true variation
"weight": 50000 // 50% of contexts will be served this variation
},
{
"variation": 1, // this part of the rollout serves the false variation
"weight": 50000 // 50% of contexts will be served this variation
}
]
}
}
```
To learn how to create percentage rollouts in the UI, read [Percentage rollouts](/docs/home/releases/percentage-rollouts).
### Progressive rollout
A progressive rollout lets you serve a given flag variation to a specified percentage of contexts, and gradually increases that percentage over a specified time.
Here is what a progressive rollout looks like in the UI:
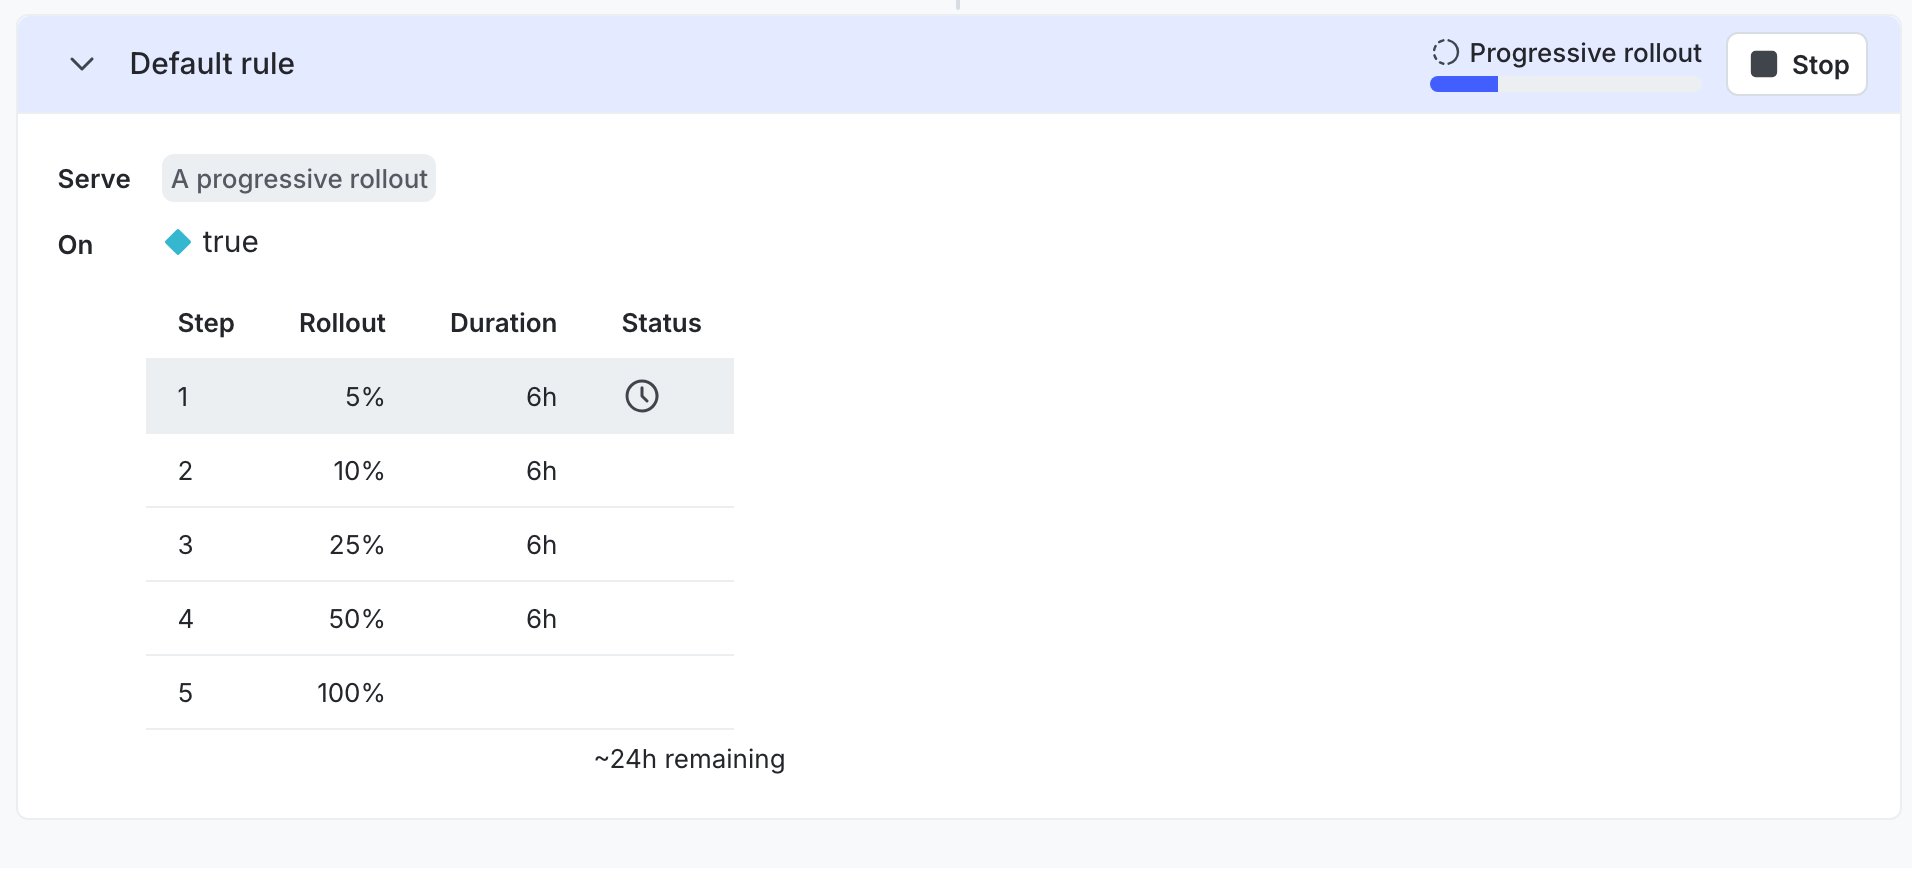 To create a progressive rollout, use `progressiveRolloutConfig` with the following key/value pairs:
* `contextKind`: the context kind you want to roll out by. Defaults to your [default context kind](/docs/home/flags/context-kinds#built-in-context-kinds).
* `controlVariation`: the variation ID of the variation you want to serve at the beginning of the rollout. For boolean flags, this variation is automatically set based on the value the flag is currently serving, usually the [off variation](/docs/home/flags/off-variation) or the [default variation](/docs/home/flags/default-rule).
* `endVariation`: the variation ID of the variation you want to roll out over time. For boolean flags, this variation is automatically set based on the variation not currently being served.
* `steps`, with the following key/value pairs:
* `rolloutWeight`: the percentage of contexts you want to include in that rollout step. Include three decimal places in the percentage, with no `.` or `,`. Do not include leading `0`s. For example, to include 5.5% of contexts in a rollout step, set the `rolloutWeight` to `5500`. To include 10.5% of contexts in a variation, set the `rolloutWeight` to `10500`. The weight must add up to 100% between all of the rollout steps.
* `duration` with the following key/value pairs:
* `quantity`: the length of time you want that step in the rollout to last, in the units specified in `unit`.
* `unit`: the unit of time you want to use in the rollout. Options include:
* `day`
* `hour`
* `minute`
The below example shows a progressive rollout over 20 hours on the default rule of a flag.
Here is how to set the rollout using JSON:
```json title="Default progressive rollout" expandable lines wrap theme={null}
{
"fallthrough": {
"progressiveRolloutConfig": {
"contextKind": "user", // rolling out by user context kind
"controlVariation": 1, // the starting variation is false. Not required for boolean flags
"endVariation": 0, // the flag is rolling out to true. Not required for boolean flags
"steps": [
{
"rolloutWeight": 1000, // 1% of contexts are in the first step
"duration": {
"quantity": 4,
"unit": "hour" // each step will take four hours
}
},
{
"rolloutWeight": 5000, // 5% of contexts are in the second step
"duration": {
"quantity": 4,
"unit": "hour"
}
},
{
"rolloutWeight": 10000, // 10% of contexts are in the third step
"duration": {
"quantity": 4,
"unit": "hour"
}
},
{
"rolloutWeight": 25000, // 25% of contexts are in the fourth step
"duration": {
"quantity": 4,
"unit": "hour"
}
},
{
"rolloutWeight": 50000, // 50% of contexts are in the fourth step
"duration": {
"quantity": 4,
"unit": "hour"
}
}
]
}
}
}
```
To learn how to build progressive rollouts in the UI, read [Progressive rollouts](/docs/home/releases/progressive-rollouts).
### Guarded rollout
Guarded rollouts let you attach a metric to a rollout to monitor the performance of a flag over time, and to take action on the results.
Here is what a guarded rollout setup looks like in the UI:
To create a progressive rollout, use `progressiveRolloutConfig` with the following key/value pairs:
* `contextKind`: the context kind you want to roll out by. Defaults to your [default context kind](/docs/home/flags/context-kinds#built-in-context-kinds).
* `controlVariation`: the variation ID of the variation you want to serve at the beginning of the rollout. For boolean flags, this variation is automatically set based on the value the flag is currently serving, usually the [off variation](/docs/home/flags/off-variation) or the [default variation](/docs/home/flags/default-rule).
* `endVariation`: the variation ID of the variation you want to roll out over time. For boolean flags, this variation is automatically set based on the variation not currently being served.
* `steps`, with the following key/value pairs:
* `rolloutWeight`: the percentage of contexts you want to include in that rollout step. Include three decimal places in the percentage, with no `.` or `,`. Do not include leading `0`s. For example, to include 5.5% of contexts in a rollout step, set the `rolloutWeight` to `5500`. To include 10.5% of contexts in a variation, set the `rolloutWeight` to `10500`. The weight must add up to 100% between all of the rollout steps.
* `duration` with the following key/value pairs:
* `quantity`: the length of time you want that step in the rollout to last, in the units specified in `unit`.
* `unit`: the unit of time you want to use in the rollout. Options include:
* `day`
* `hour`
* `minute`
The below example shows a progressive rollout over 20 hours on the default rule of a flag.
Here is how to set the rollout using JSON:
```json title="Default progressive rollout" expandable lines wrap theme={null}
{
"fallthrough": {
"progressiveRolloutConfig": {
"contextKind": "user", // rolling out by user context kind
"controlVariation": 1, // the starting variation is false. Not required for boolean flags
"endVariation": 0, // the flag is rolling out to true. Not required for boolean flags
"steps": [
{
"rolloutWeight": 1000, // 1% of contexts are in the first step
"duration": {
"quantity": 4,
"unit": "hour" // each step will take four hours
}
},
{
"rolloutWeight": 5000, // 5% of contexts are in the second step
"duration": {
"quantity": 4,
"unit": "hour"
}
},
{
"rolloutWeight": 10000, // 10% of contexts are in the third step
"duration": {
"quantity": 4,
"unit": "hour"
}
},
{
"rolloutWeight": 25000, // 25% of contexts are in the fourth step
"duration": {
"quantity": 4,
"unit": "hour"
}
},
{
"rolloutWeight": 50000, // 50% of contexts are in the fourth step
"duration": {
"quantity": 4,
"unit": "hour"
}
}
]
}
}
}
```
To learn how to build progressive rollouts in the UI, read [Progressive rollouts](/docs/home/releases/progressive-rollouts).
### Guarded rollout
Guarded rollouts let you attach a metric to a rollout to monitor the performance of a flag over time, and to take action on the results.
Here is what a guarded rollout setup looks like in the UI:
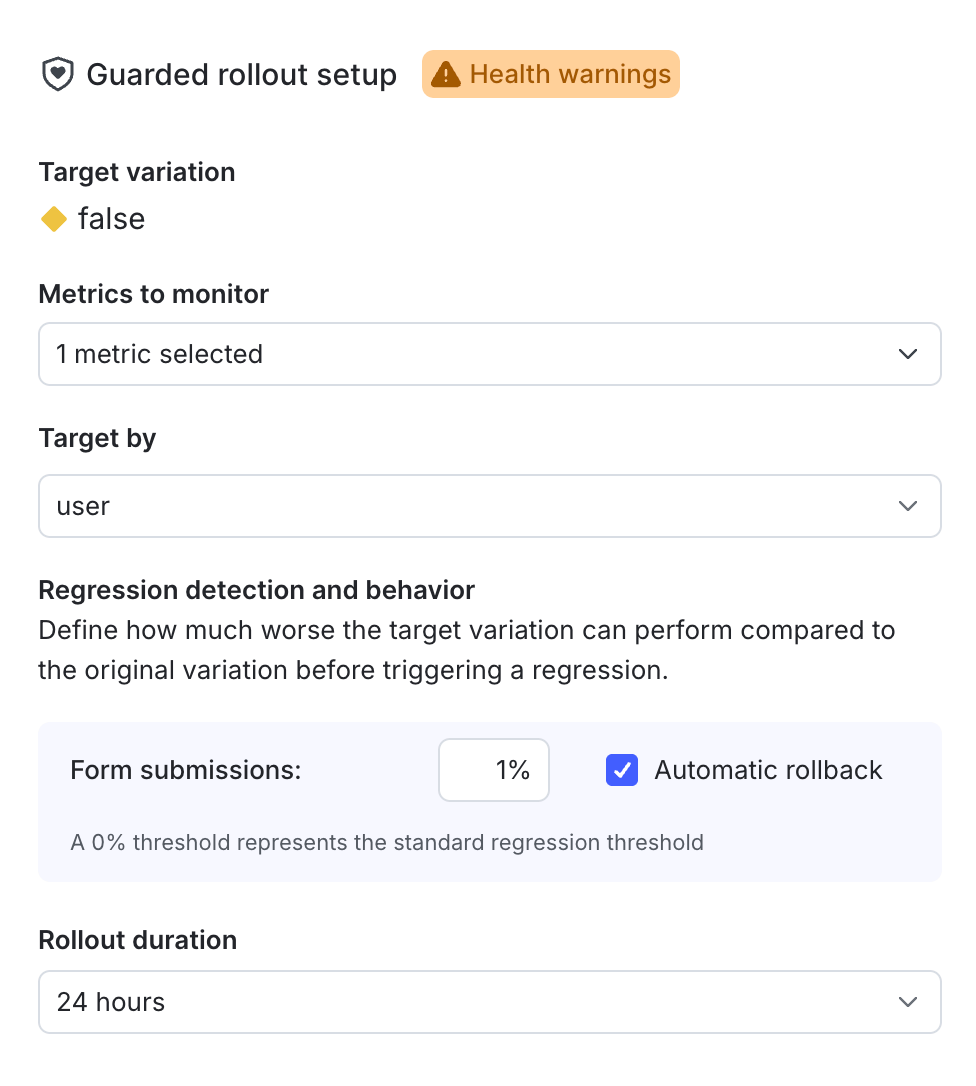 To create a guarded rollout, use `guardedRolloutConfig` with the following key/value pairs:
* `randomizationUnit`: the context kind you want to target by.
* `stages` with the following key/value pairs:
* `monitoringWindowMilliseconds`: the length of time you want that step in the rollout to last, in milliseconds.
* `rolloutWeight`: the percentage of contexts you want to include in that rollout step. Include three decimal places in the percentage, with no `.` or `,`. Do not include leading `0`s. For example, to include 5.5% of contexts in a rollout step, set the `rolloutWeight` to `5500`. To include 10.5% of contexts in a variation, set the `rolloutWeight` to `10500`. The weight must add up to 100% between all of the rollout steps.
* `metrics` with the following key/value pairs:
* `metricKey`: the key of the metric you want to monitor.
* `onRegression` with the following key/value pair:
* `rollback`: whether or not you want LaunchDarkly to automatically roll back the release in the event of a regression. Options include `true` or `false`.
The below example shows a guarded rollout over 24 hours on the default rule of a flag, using a metric called `Form submissions`.
Here is how to set the guarded rollout using JSON:
```json title="Guarded rollout" expandable lines wrap theme={null}
{
"guardedRolloutConfig": {
"randomizationUnit": "request", // the context kind to target by
"controlVariation": 1, // the starting variation is false. Not required for boolean flags
"endVariation": 0, // the flag is rolling out to true. Not required for boolean flags
"stages": [
{
"monitoringWindowMilliseconds": 17280000, // this stage lasts 4.8 hours
"rolloutWeight": 1000 // 1% of contexts are in the first stage
},
{
"monitoringWindowMilliseconds": 17280000, // this stage lasts 4.8 hours
"rolloutWeight": 5000 // 5% of contexts are in the second stage
},
{
"monitoringWindowMilliseconds": 17280000, // this stage lasts 4.8 hours
"rolloutWeight": 10000 // 10% of contexts are in the third stage
},
{
"monitoringWindowMilliseconds": 17280000, // this stage lasts 4.8 hours
"rolloutWeight": 25000 // 25% of contexts are in the fourth stage
},
{
"monitoringWindowMilliseconds": 17280000, // this stage lasts 4.8 hours
"rolloutWeight": 50000 // 50% of contexts are in the fifth stage
}
],
"metrics": [
{
"metricKey": "sentry-errors", // the metric key
"onRegression": { // if a regression is detected, then
"rollback": true, // LaunchDarkly will automatically roll back the release
},
}
]
}
}
```
To learn how to build guarded rollouts in the UI, read [Guarded rollouts](/docs/home/releases/guarded-rollouts).
## Example JSON targeting
This section includes an example of a flag with several targeting rules.
This flag:
* is toggled on
* has one prerequisite flag
* is targeting two individuals
* is targeting a segment
* has an active guarded rollout
Here is what the targeting rules look like in the UI:
To create a guarded rollout, use `guardedRolloutConfig` with the following key/value pairs:
* `randomizationUnit`: the context kind you want to target by.
* `stages` with the following key/value pairs:
* `monitoringWindowMilliseconds`: the length of time you want that step in the rollout to last, in milliseconds.
* `rolloutWeight`: the percentage of contexts you want to include in that rollout step. Include three decimal places in the percentage, with no `.` or `,`. Do not include leading `0`s. For example, to include 5.5% of contexts in a rollout step, set the `rolloutWeight` to `5500`. To include 10.5% of contexts in a variation, set the `rolloutWeight` to `10500`. The weight must add up to 100% between all of the rollout steps.
* `metrics` with the following key/value pairs:
* `metricKey`: the key of the metric you want to monitor.
* `onRegression` with the following key/value pair:
* `rollback`: whether or not you want LaunchDarkly to automatically roll back the release in the event of a regression. Options include `true` or `false`.
The below example shows a guarded rollout over 24 hours on the default rule of a flag, using a metric called `Form submissions`.
Here is how to set the guarded rollout using JSON:
```json title="Guarded rollout" expandable lines wrap theme={null}
{
"guardedRolloutConfig": {
"randomizationUnit": "request", // the context kind to target by
"controlVariation": 1, // the starting variation is false. Not required for boolean flags
"endVariation": 0, // the flag is rolling out to true. Not required for boolean flags
"stages": [
{
"monitoringWindowMilliseconds": 17280000, // this stage lasts 4.8 hours
"rolloutWeight": 1000 // 1% of contexts are in the first stage
},
{
"monitoringWindowMilliseconds": 17280000, // this stage lasts 4.8 hours
"rolloutWeight": 5000 // 5% of contexts are in the second stage
},
{
"monitoringWindowMilliseconds": 17280000, // this stage lasts 4.8 hours
"rolloutWeight": 10000 // 10% of contexts are in the third stage
},
{
"monitoringWindowMilliseconds": 17280000, // this stage lasts 4.8 hours
"rolloutWeight": 25000 // 25% of contexts are in the fourth stage
},
{
"monitoringWindowMilliseconds": 17280000, // this stage lasts 4.8 hours
"rolloutWeight": 50000 // 50% of contexts are in the fifth stage
}
],
"metrics": [
{
"metricKey": "sentry-errors", // the metric key
"onRegression": { // if a regression is detected, then
"rollback": true, // LaunchDarkly will automatically roll back the release
},
}
]
}
}
```
To learn how to build guarded rollouts in the UI, read [Guarded rollouts](/docs/home/releases/guarded-rollouts).
## Example JSON targeting
This section includes an example of a flag with several targeting rules.
This flag:
* is toggled on
* has one prerequisite flag
* is targeting two individuals
* is targeting a segment
* has an active guarded rollout
Here is what the targeting rules look like in the UI:
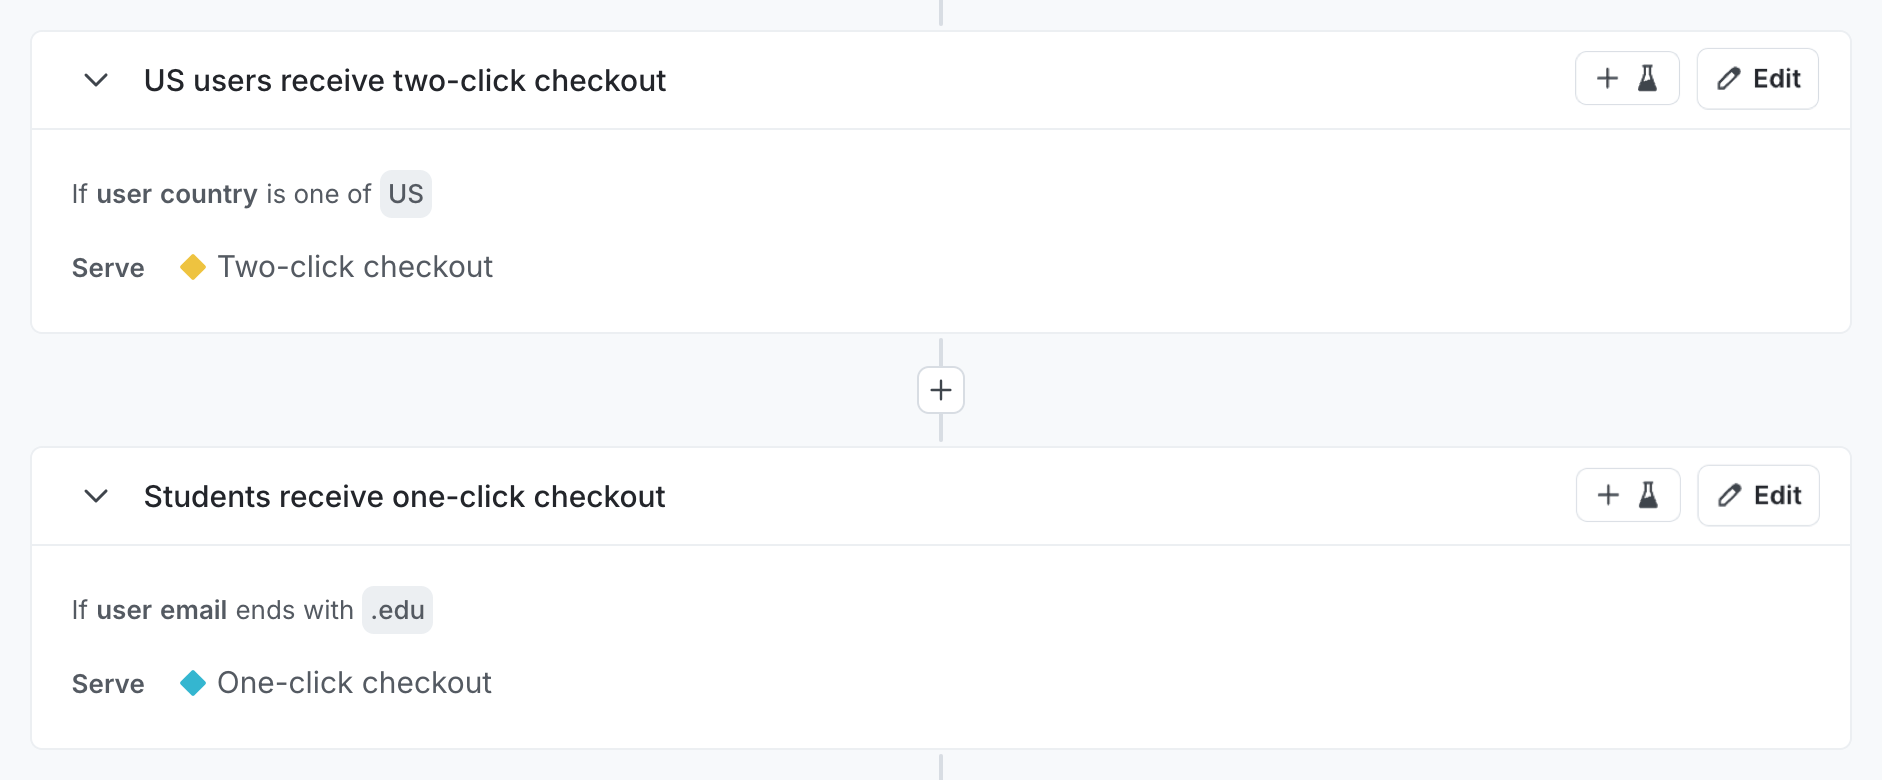 Here are the flag targeting rules in JSON:
```json title="Example flag targeting" expandable lines wrap theme={null}
{
"offVariation": 1, // the off variation is false
"on": true, // the flag is on
"prerequisites": [ // requires a prerequisite flag that must serve true
{
"key": "enable-cloud-database",
"variation": 1
}
],
"contextTargets": [ // individually targets two user contexts
{
"values": [
"example-context-key",
"context-key-456def"
],
"contextKind": "user",
"variation": 0
}
],
"rules": [
{
"clauses": [ // targets a segment
{
"attribute": "segmentMatch",
"contextKind": "user",
"negate": false,
"op": "segmentMatch",
"values": [
"internal-testers-on-production"
]
}
],
"description": "",
"variation": 0
}
],
"fallthrough": { // the default rule is a guarded rollout
"guardedRolloutConfig": {
"stages": [
{
"rolloutWeight": 1000, // rolling out to 1%
"monitoringWindowMilliseconds": 17280000
},
{
"rolloutWeight": 5000, // rolling out to 5%
"monitoringWindowMilliseconds": 17280000
},
{
"rolloutWeight": 10000, // rolling out to 10%
"monitoringWindowMilliseconds": 17280000
},
{
"rolloutWeight": 25000, // rolling out to 25%
"monitoringWindowMilliseconds": 17280000
},
{
"rolloutWeight": 50000, // rolling out to 50%
"monitoringWindowMilliseconds": 17280000
}
],
"metrics": [
{
"metricKey": "cart-purchases",
"onRegression": {
"rollback": false
}
}
],
"randomizationUnit": "user"
}
}
}
```
Here are the flag targeting rules in JSON:
```json title="Example flag targeting" expandable lines wrap theme={null}
{
"offVariation": 1, // the off variation is false
"on": true, // the flag is on
"prerequisites": [ // requires a prerequisite flag that must serve true
{
"key": "enable-cloud-database",
"variation": 1
}
],
"contextTargets": [ // individually targets two user contexts
{
"values": [
"example-context-key",
"context-key-456def"
],
"contextKind": "user",
"variation": 0
}
],
"rules": [
{
"clauses": [ // targets a segment
{
"attribute": "segmentMatch",
"contextKind": "user",
"negate": false,
"op": "segmentMatch",
"values": [
"internal-testers-on-production"
]
}
],
"description": "",
"variation": 0
}
],
"fallthrough": { // the default rule is a guarded rollout
"guardedRolloutConfig": {
"stages": [
{
"rolloutWeight": 1000, // rolling out to 1%
"monitoringWindowMilliseconds": 17280000
},
{
"rolloutWeight": 5000, // rolling out to 5%
"monitoringWindowMilliseconds": 17280000
},
{
"rolloutWeight": 10000, // rolling out to 10%
"monitoringWindowMilliseconds": 17280000
},
{
"rolloutWeight": 25000, // rolling out to 25%
"monitoringWindowMilliseconds": 17280000
},
{
"rolloutWeight": 50000, // rolling out to 50%
"monitoringWindowMilliseconds": 17280000
}
],
"metrics": [
{
"metricKey": "cart-purchases",
"onRegression": {
"rollback": false
}
}
],
"randomizationUnit": "user"
}
}
}
```