> ## Documentation Index
> Fetch the complete documentation index at: https://launchdarkly.com/docs/llms.txt
> Use this file to discover all available pages before exploring further.
# Visual Studio Code (VSCode)
**This extension is not available in federal environments**
To learn more, read LaunchDarkly in federal environments.
**This extension is not available in LaunchDarkly's European Union (EU) instance**
To learn more, read LaunchDarkly in the European Union (EU).
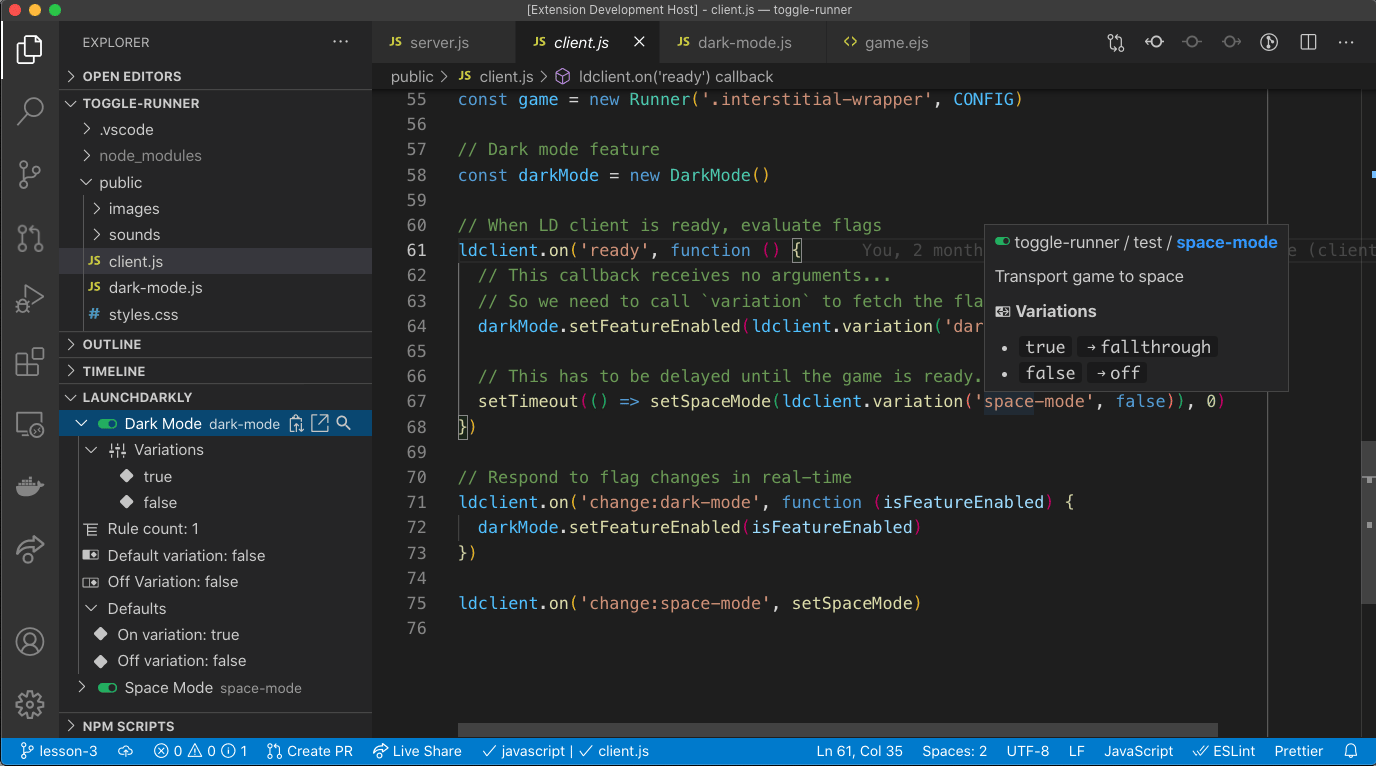
This topic explains how to use the LaunchDarkly VSCode extension to interact with feature flags from within Visual Studio Code (VSCode).
With the extension, you have the ability to:
* Use a set of `@LaunchDarkly` commands in GitHub Copilot to interact with your flags
* Display a tooltip with feature flag details when you hover over a feature flag key in your source code
* Autocomplete feature flag keys
* Open feature flags in LaunchDarkly (default keybinding: `ctrl+alt+g`/`⌘+alt+g`)
* View a list of feature flags and their settings in the Explorer view
* Flag actions: Toggle flags on or off, add flag targeting rules, update a flag's state, set default on and default off variations, and more
* Enable codelens for flags in your source code
* Click links to go directly into the LaunchDarkly UI
 ## Prerequisites
To complete this procedure, you must have the following prerequisites:
* The VSCode extension from the [Visual Studio Marketplace](https://marketplace.visualstudio.com/items?itemName=LaunchDarklyOfficial.launchdarkly).
* A personal API access token. To learn more, read [API access tokens](/docs/home/account/api).
## Set up the VSCode extension
To set up the VSCode extension, you must complete the following steps:
1. Give your API access token the required permissions:
* You can [create a role with appropriate permissions, then add the role to a personal access token](#create-a-role-and-add-it-to-an-api-access-token), or
* you can [add the Writer base role to your personal access token](#add-the-writer-role-to-your-personal-access-token).
2. [Configure the VSCode extension](#set-up-the-vscode-extension) with the API access token.
### Create a role and add it to an API access token
To give your API access token the required permissions, one option is to create a custom role and add that role to the API access token.
**Creating your own roles is available to customers on select plans**
Creating your own roles is only available to customers on select plans. To learn more, [read about our pricing](https://launchdarkly.com/pricing/). To upgrade your plan, [contact Sales](https://launchdarkly.com/contact-sales/).
To configure the VSCode extension, you must have an access token that targets version `20210729` or later of the LaunchDarkly REST API.
The following role allows Reader access to all projects and Writer access to the minimal set of fields the extension is able to update.
To create a role for the API access token:
1. Click the **gear** icon in the left sidebar to view Organization settings. The General settings page appears.
2. Click **Roles**.
3. Click **New role**. The "New role" page appears.
4. Enter a human-readable **Name** for the role.
5. Enter a **Key** for the role.
6. (Optional) Enter a **Description** to explain what the role does.
7. In the "Edit policy" panel, click **View JSON** to open the advanced editor.
8. Enter this policy in the "Editor" field:
```json title="Example policy" lines wrap theme={null}
[
{
"effect": "allow",
"actions": ["viewProject"],
"resources": ["proj/*"]
},
{
"effect": "allow",
"actions": ["updateOn", "updateFallthrough", "updateOffVariation", "createFlag", "updateTargets", "updateRules"],
"resources": ["proj/*:env/*:flag/*"]
}
]
```
9. Click **Create role**.
### Add the Writer role to your personal access token
To give your API access token the required permissions, another option is to add the Writer base role to your access token.
To configure the VSCode extension, you must have an access token that targets version `20210729` or later of the LaunchDarkly REST API.
To add the Writer base role to a personal access token:
1. Click the **gear** icon in the left sidebar to view Organization settings. The General settings page appears.
2. Click **Authorization**.
3. Find the personal access token you want to add permissions to and select "Edit token" from its **overflow menu**. The "Edit" dialog appears.
4. In the **Role** menu, select "Writer."
5. Click **Save token**.
Your personal token now has the Writer base role.
## Configure the VSCode extension
After you install the LaunchDarkly extension, VSCode prompts you to sign in to your LaunchDarkly account:
1. Select the LaunchDarkly instance. Most members should select `Commercial`, but FedRAMP members should select `Federal`.
2. Provide an **access token** for your LaunchDarkly account. This access token must have sufficient permission as described above.
After you complete step 2, continue configuring the extension. If the configuration menu does not appear, run the command: `LaunchDarkly: Configure settings`.
3. Select your corresponding **LaunchDarkly project**.
4. Select your corresponding **LaunchDarkly environment**.
5. Select whether you want the extension to work with all VSCode workspaces or just the current workspace.
You can reconfigure the extension at any time by running the "LaunchDarkly: Configure settings" command from the command palette (`ctrl+shift+p`/`⌘+shift+p`).
## LaunchDarkly extension for GitHub Copilot
**The LaunchDarkly extension for GitHub Copilot is not available in federal environments**
To learn more, read LaunchDarkly in federal environments.
If you use GitHub Copilot and install the LaunchDarkly VSCode extension, you can use a set of `@LaunchDarkly` commands in GitHub Copilot to interact with your flags.
To learn how to install and use LaunchDarkly's GitHub Copilot commands, read [LaunchDarkly extension for GitHub Copilot](/docs/home/getting-started/github-copilot-extension).
## Prerequisites
To complete this procedure, you must have the following prerequisites:
* The VSCode extension from the [Visual Studio Marketplace](https://marketplace.visualstudio.com/items?itemName=LaunchDarklyOfficial.launchdarkly).
* A personal API access token. To learn more, read [API access tokens](/docs/home/account/api).
## Set up the VSCode extension
To set up the VSCode extension, you must complete the following steps:
1. Give your API access token the required permissions:
* You can [create a role with appropriate permissions, then add the role to a personal access token](#create-a-role-and-add-it-to-an-api-access-token), or
* you can [add the Writer base role to your personal access token](#add-the-writer-role-to-your-personal-access-token).
2. [Configure the VSCode extension](#set-up-the-vscode-extension) with the API access token.
### Create a role and add it to an API access token
To give your API access token the required permissions, one option is to create a custom role and add that role to the API access token.
**Creating your own roles is available to customers on select plans**
Creating your own roles is only available to customers on select plans. To learn more, [read about our pricing](https://launchdarkly.com/pricing/). To upgrade your plan, [contact Sales](https://launchdarkly.com/contact-sales/).
To configure the VSCode extension, you must have an access token that targets version `20210729` or later of the LaunchDarkly REST API.
The following role allows Reader access to all projects and Writer access to the minimal set of fields the extension is able to update.
To create a role for the API access token:
1. Click the **gear** icon in the left sidebar to view Organization settings. The General settings page appears.
2. Click **Roles**.
3. Click **New role**. The "New role" page appears.
4. Enter a human-readable **Name** for the role.
5. Enter a **Key** for the role.
6. (Optional) Enter a **Description** to explain what the role does.
7. In the "Edit policy" panel, click **View JSON** to open the advanced editor.
8. Enter this policy in the "Editor" field:
```json title="Example policy" lines wrap theme={null}
[
{
"effect": "allow",
"actions": ["viewProject"],
"resources": ["proj/*"]
},
{
"effect": "allow",
"actions": ["updateOn", "updateFallthrough", "updateOffVariation", "createFlag", "updateTargets", "updateRules"],
"resources": ["proj/*:env/*:flag/*"]
}
]
```
9. Click **Create role**.
### Add the Writer role to your personal access token
To give your API access token the required permissions, another option is to add the Writer base role to your access token.
To configure the VSCode extension, you must have an access token that targets version `20210729` or later of the LaunchDarkly REST API.
To add the Writer base role to a personal access token:
1. Click the **gear** icon in the left sidebar to view Organization settings. The General settings page appears.
2. Click **Authorization**.
3. Find the personal access token you want to add permissions to and select "Edit token" from its **overflow menu**. The "Edit" dialog appears.
4. In the **Role** menu, select "Writer."
5. Click **Save token**.
Your personal token now has the Writer base role.
## Configure the VSCode extension
After you install the LaunchDarkly extension, VSCode prompts you to sign in to your LaunchDarkly account:
1. Select the LaunchDarkly instance. Most members should select `Commercial`, but FedRAMP members should select `Federal`.
2. Provide an **access token** for your LaunchDarkly account. This access token must have sufficient permission as described above.
After you complete step 2, continue configuring the extension. If the configuration menu does not appear, run the command: `LaunchDarkly: Configure settings`.
3. Select your corresponding **LaunchDarkly project**.
4. Select your corresponding **LaunchDarkly environment**.
5. Select whether you want the extension to work with all VSCode workspaces or just the current workspace.
You can reconfigure the extension at any time by running the "LaunchDarkly: Configure settings" command from the command palette (`ctrl+shift+p`/`⌘+shift+p`).
## LaunchDarkly extension for GitHub Copilot
**The LaunchDarkly extension for GitHub Copilot is not available in federal environments**
To learn more, read LaunchDarkly in federal environments.
If you use GitHub Copilot and install the LaunchDarkly VSCode extension, you can use a set of `@LaunchDarkly` commands in GitHub Copilot to interact with your flags.
To learn how to install and use LaunchDarkly's GitHub Copilot commands, read [LaunchDarkly extension for GitHub Copilot](/docs/home/getting-started/github-copilot-extension).