> ## Documentation Index
> Fetch the complete documentation index at: https://launchdarkly.com/docs/llms.txt
> Use this file to discover all available pages before exploring further.
# Compass
**This integration is not available in federal environments**
To learn more, read LaunchDarkly in federal environments.
**This integration is not available in LaunchDarkly's European Union (EU) instance**
To learn more, read LaunchDarkly in the European Union (EU).
**The Compass integration is available to customers on select plans**
The Compass integration is only available to customers on select plans. To learn more, [read about our pricing](https://launchdarkly.com/pricing/). To upgrade your plan, [contact Sales](https://launchdarkly.com/contact-sales/).
This topic explains how to use the Compass integration for LaunchDarkly.
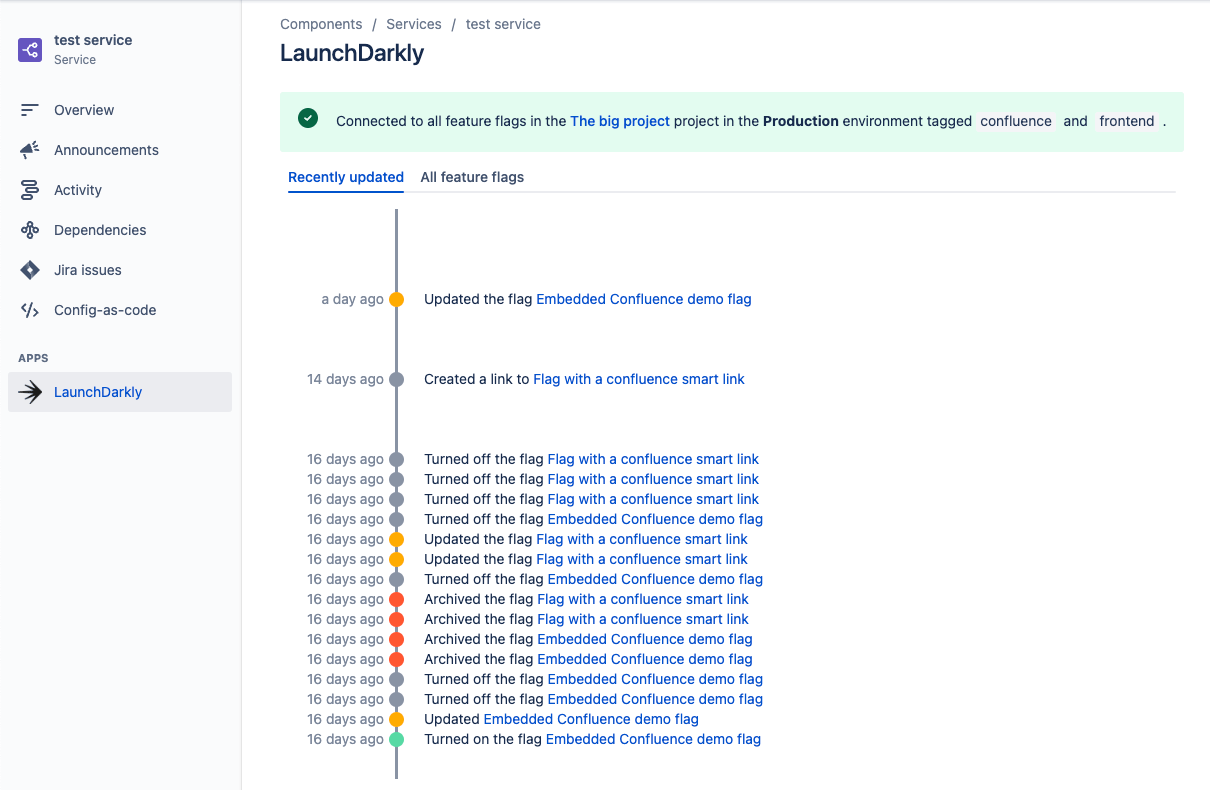
The Compass integration for LaunchDarkly pushes relevant feature flag change events to Compass' component activity timeline. This lets your team better understand how recent changes to feature flags may be impacting component health by viewing feature flag change events alongside other component events, such as deployments and incidents. Additionally, the integration provides a new Compass component tab that contains a complete list of relevant feature flags and their current states.
 **Additional Atlassian integrations are also available**
If you use Compass, you may use other Atlassian products. You can also set up integrations for those. To learn more, read about the LaunchDarkly integrations with [Confluence](/docs/integrations/confluence), [Jira Cloud](/docs/integrations/jira), and [Trello](/docs/integrations/trello).
## Prerequisites
To complete this procedure, you must have the following prerequisites:
* Be a Compass administrator on your Atlassian site.
* Have a personal or service API access token. To learn more, read [API access tokens](/docs/home/account/api).
## Generate a new LaunchDarkly access token
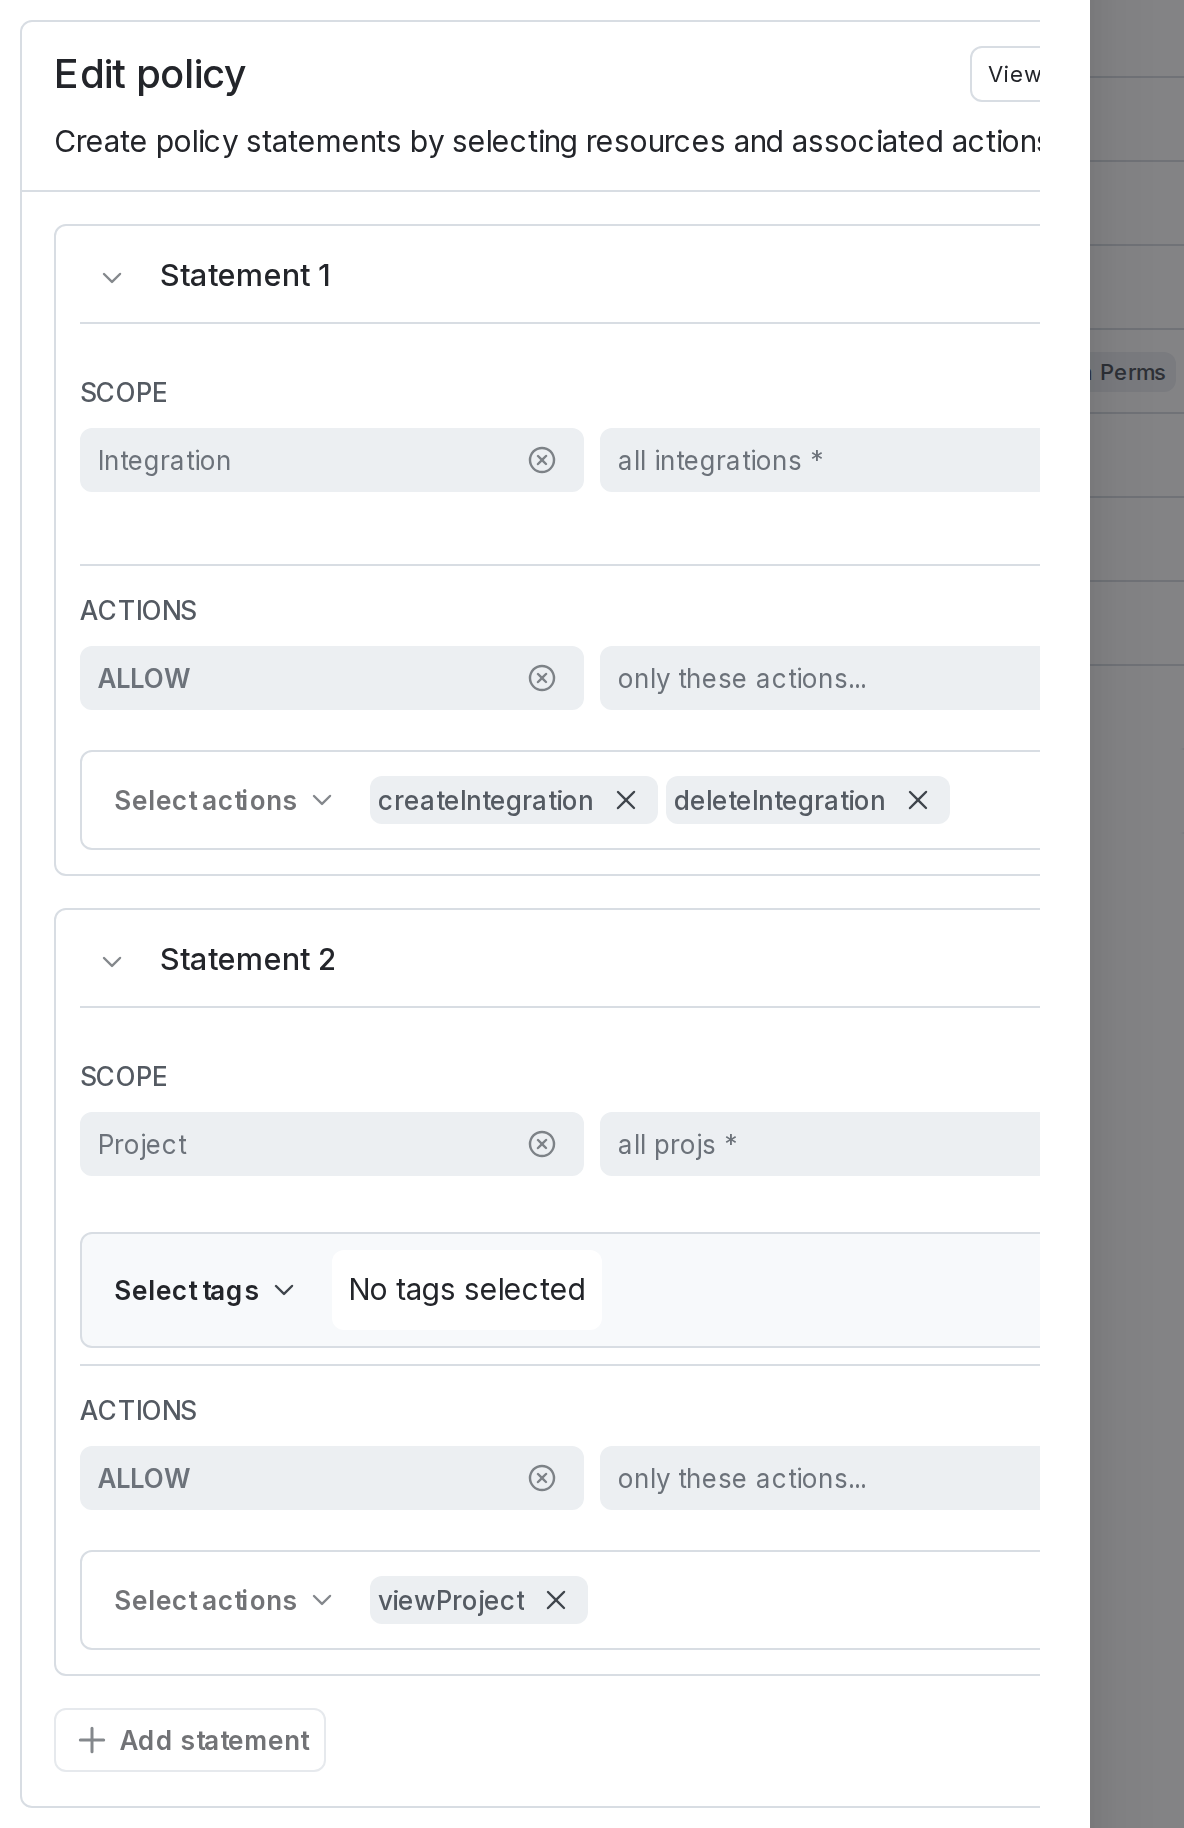
The Compass integration requires a LaunchDarkly personal or service API access token with a role policy that allows the token to perform the `createIntegration`, `deleteIntegration`, and `viewProject` actions.
Here's how to create an API access token with the appropriate inline policy:
1. Click the **gear** icon in the left sidebar to view Organization settings. The General settings page appears.
2. Click **Authorization**.
3. Click **Create token**. The "Create access token" dialog appears.
4. Give your token a human-readable **Name**, such as "Compass integration."
5. Give your token an "Inline policy" **Role**.
6. Click the **View JSON** button and specify the following policy in the **Editor** field to allow the token to perform the `createIntegration` and `deleteIntegration` actions on integration resources and the `viewProject` action on project resources:
```json title="Compass integration Inline policy" lines wrap theme={null}
[
{
"actions": ["createIntegration", "deleteIntegration"],
"effect": "allow",
"resources": ["integration/*"]
},
{
"resources": ["proj/*"],
"effect": "allow",
"actions": ["viewProject"]
}
]
```
7. If you are on an Enterprise LaunchDarkly plan, select **This is a service token**.
**Additional Atlassian integrations are also available**
If you use Compass, you may use other Atlassian products. You can also set up integrations for those. To learn more, read about the LaunchDarkly integrations with [Confluence](/docs/integrations/confluence), [Jira Cloud](/docs/integrations/jira), and [Trello](/docs/integrations/trello).
## Prerequisites
To complete this procedure, you must have the following prerequisites:
* Be a Compass administrator on your Atlassian site.
* Have a personal or service API access token. To learn more, read [API access tokens](/docs/home/account/api).
## Generate a new LaunchDarkly access token
The Compass integration requires a LaunchDarkly personal or service API access token with a role policy that allows the token to perform the `createIntegration`, `deleteIntegration`, and `viewProject` actions.
Here's how to create an API access token with the appropriate inline policy:
1. Click the **gear** icon in the left sidebar to view Organization settings. The General settings page appears.
2. Click **Authorization**.
3. Click **Create token**. The "Create access token" dialog appears.
4. Give your token a human-readable **Name**, such as "Compass integration."
5. Give your token an "Inline policy" **Role**.
6. Click the **View JSON** button and specify the following policy in the **Editor** field to allow the token to perform the `createIntegration` and `deleteIntegration` actions on integration resources and the `viewProject` action on project resources:
```json title="Compass integration Inline policy" lines wrap theme={null}
[
{
"actions": ["createIntegration", "deleteIntegration"],
"effect": "allow",
"resources": ["integration/*"]
},
{
"resources": ["proj/*"],
"effect": "allow",
"actions": ["viewProject"]
}
]
```
7. If you are on an Enterprise LaunchDarkly plan, select **This is a service token**.
 8. Click **Save token** and copy the newly created token to your clipboard. You will need it to configure the integration in Compass.
## Set up the Compass integration
The Compass integration is managed from the Atlassian Cloud site. Other than creating an API access token, there are no settings or preferences to configure in LaunchDarkly.
Here's how to set up your Compass integration:
1. Navigate to your Atlassian Compass site. For example, `https://mysite.atlassian.net/compass`.
2. In the top navigation, click **Apps**.
3. Find **LaunchDarkly** in the list of apps and click **Install**.
4. After the LaunchDarkly app is installed, click **Configure**.
5. Click **Allow access**. The "LaunchDarkly is requesting Access" screen appears.
6. Review the requested permissions, then click **Accept**.
8. Click **Save token** and copy the newly created token to your clipboard. You will need it to configure the integration in Compass.
## Set up the Compass integration
The Compass integration is managed from the Atlassian Cloud site. Other than creating an API access token, there are no settings or preferences to configure in LaunchDarkly.
Here's how to set up your Compass integration:
1. Navigate to your Atlassian Compass site. For example, `https://mysite.atlassian.net/compass`.
2. In the top navigation, click **Apps**.
3. Find **LaunchDarkly** in the list of apps and click **Install**.
4. After the LaunchDarkly app is installed, click **Configure**.
5. Click **Allow access**. The "LaunchDarkly is requesting Access" screen appears.
6. Review the requested permissions, then click **Accept**.
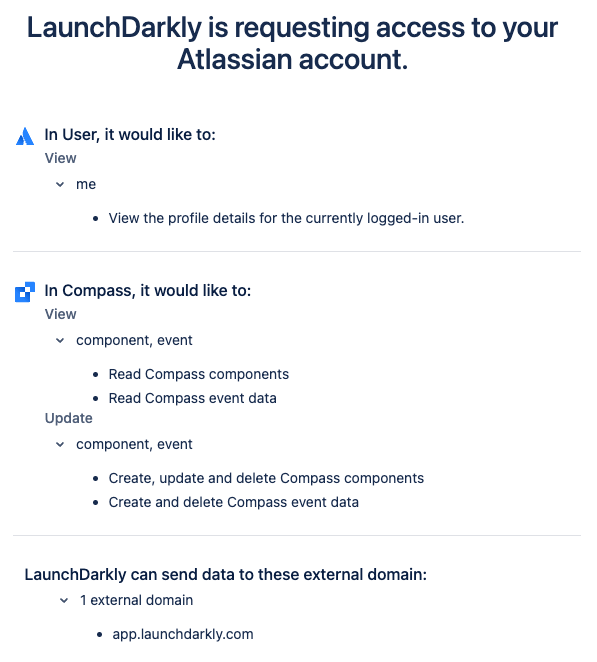 **You must authorize the requested permissions for the integration to work**
If you click **Cancel**, the integration cannot access your Compass data.
7. Enter your LaunchDarkly API access token in the **Access token** field.
8. Click **Submit**.
**You must authorize the requested permissions for the integration to work**
If you click **Cancel**, the integration cannot access your Compass data.
7. Enter your LaunchDarkly API access token in the **Access token** field.
8. Click **Submit**.
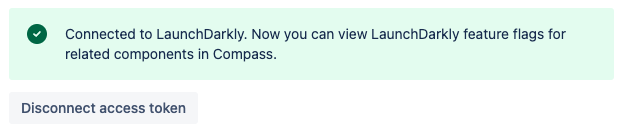
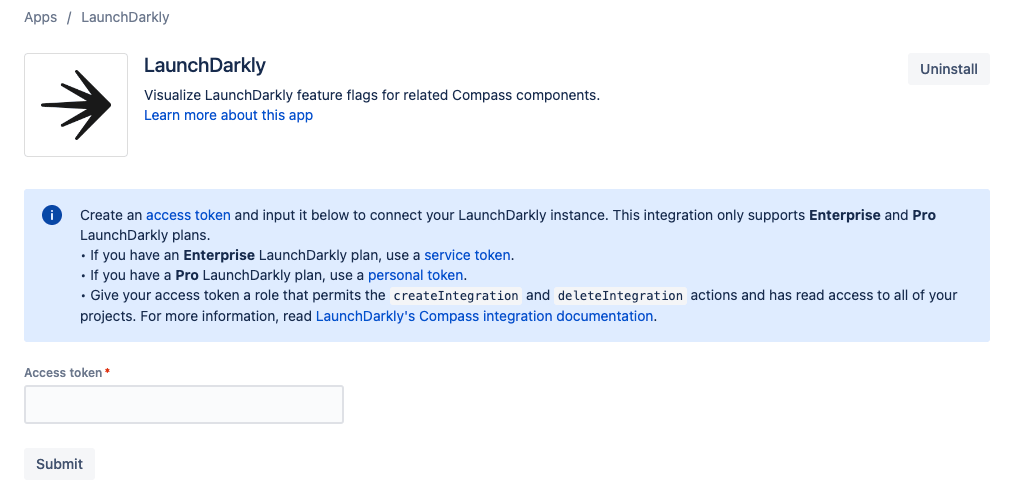 The integration has connected LaunchDarkly and Compass when the **Connected to LaunchDarkly** success message is displayed.
 ## Connect Compass components to LaunchDarkly
Now that you've set up the integration, you must connect your LaunchDarkly projects to Compass components to view feature flag data in Compass.
To connect feature flags to a Compass component:
1. In LaunchDarkly, navigate to the **Flags** list for the project you want to connect to Compass.
2. From the **Flags** list, open the environment you want to connect to Compass.
3. (Optional) If you would like to connect only flags with a specified tag, apply a tags filter. To learn more, read [Filter feature flags](/docs/home/flags/list#filter-feature-flags).
4. Copy the page URL to your clipboard. For example, `https://app.launchdarkly.com/projects/default/flags?env=production&selected-env=production`. The URL contains the project name, environment, and optional tag filter.
5. Navigate to your Compass site. For example, `https://mysite.atlassian.net/compass`.
6. Navigate to the Compass component you want to connect to LaunchDarkly.
7. In the **Other links** section of your Compass component, paste the LaunchDarkly URL as a new link.
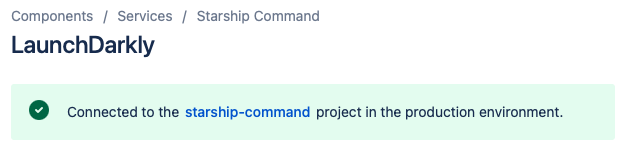
8. Click on the **LaunchDarkly** tab in the left sidebar to verify that the component was successfully connected.
## Connect Compass components to LaunchDarkly
Now that you've set up the integration, you must connect your LaunchDarkly projects to Compass components to view feature flag data in Compass.
To connect feature flags to a Compass component:
1. In LaunchDarkly, navigate to the **Flags** list for the project you want to connect to Compass.
2. From the **Flags** list, open the environment you want to connect to Compass.
3. (Optional) If you would like to connect only flags with a specified tag, apply a tags filter. To learn more, read [Filter feature flags](/docs/home/flags/list#filter-feature-flags).
4. Copy the page URL to your clipboard. For example, `https://app.launchdarkly.com/projects/default/flags?env=production&selected-env=production`. The URL contains the project name, environment, and optional tag filter.
5. Navigate to your Compass site. For example, `https://mysite.atlassian.net/compass`.
6. Navigate to the Compass component you want to connect to LaunchDarkly.
7. In the **Other links** section of your Compass component, paste the LaunchDarkly URL as a new link.
8. Click on the **LaunchDarkly** tab in the left sidebar to verify that the component was successfully connected.
 9. Repeat the above steps to associate your other LaunchDarkly projects to the applicable Compass components.
## View feature flag information for a Compass component
Once you have connected your Compass components to LaunchDarkly, you can view feature flag information on the component page in Compass.
Here's how:
1. Navigate to your Compass site. For example, `https://mysite.atlassian.net/compass`.
2. Navigate to the Compass component for which you want to view feature flag information.
3. Click on the **LaunchDarkly** tab in the left sidebar.
### Recent feature flag changes for a connected Compass component
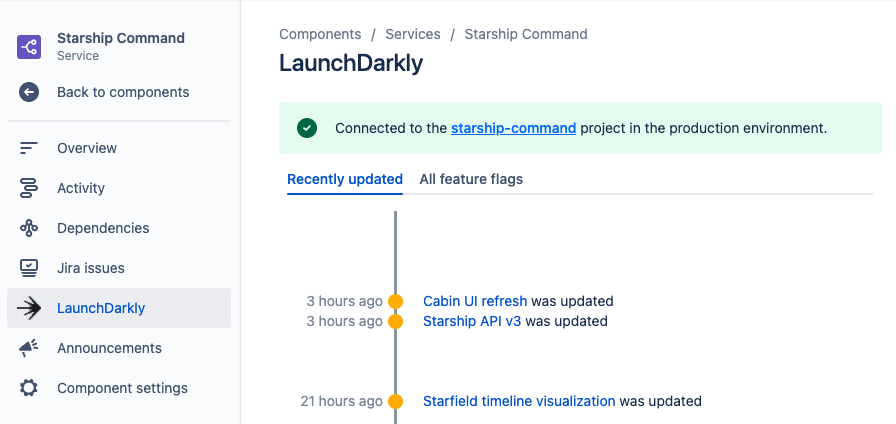
You can view a history of recent feature flag changes for the associated LaunchDarkly project on the **Recently updated** subtab.
Here's how:
* Click the dot next to each item to view more details about the feature flag change.
* Click the feature flag name to view the feature flag in LaunchDarkly.
9. Repeat the above steps to associate your other LaunchDarkly projects to the applicable Compass components.
## View feature flag information for a Compass component
Once you have connected your Compass components to LaunchDarkly, you can view feature flag information on the component page in Compass.
Here's how:
1. Navigate to your Compass site. For example, `https://mysite.atlassian.net/compass`.
2. Navigate to the Compass component for which you want to view feature flag information.
3. Click on the **LaunchDarkly** tab in the left sidebar.
### Recent feature flag changes for a connected Compass component
You can view a history of recent feature flag changes for the associated LaunchDarkly project on the **Recently updated** subtab.
Here's how:
* Click the dot next to each item to view more details about the feature flag change.
* Click the feature flag name to view the feature flag in LaunchDarkly.
 ### All feature flags for a connected Compass component
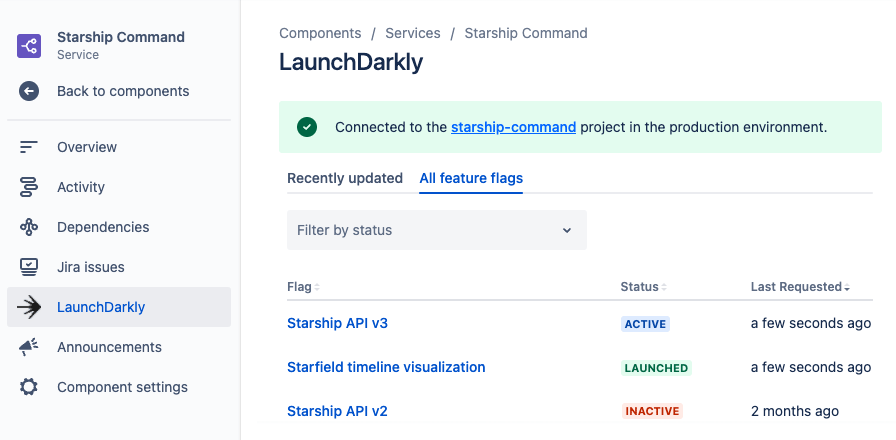
You can view a list of all feature flags for the associated LaunchDarkly project on the **All feature flags** subtab.
Here's how:
* Use the **Filter by status** dropdown to filter the list of flags displayed in the list.
* Click the column headings above the list to sort by the "Flag", "Status", or "Last requested" column.
* Click the feature flag name to view the feature flag in LaunchDarkly.
### All feature flags for a connected Compass component
You can view a list of all feature flags for the associated LaunchDarkly project on the **All feature flags** subtab.
Here's how:
* Use the **Filter by status** dropdown to filter the list of flags displayed in the list.
* Click the column headings above the list to sort by the "Flag", "Status", or "Last requested" column.
* Click the feature flag name to view the feature flag in LaunchDarkly.
 ## Disconnect Compass components from LaunchDarkly
The connection between a LaunchDarkly project and a Compass component is stored as a link on the Compass component, as described in the [Connect Compass components to LaunchDarkly](#connect-compass-components-to-launchdarkly) section. If desired, you can remove this connection on the Compass component page.
Here's how:
1. Navigate to your Compass site. For example `https://mysite.atlassian.net/compass`.
2. Navigate to the Compass component you want to disconnect from LaunchDarkly.
3. In the **Other links** section of your Compass component, remove the LaunchDarkly link. Verify that the component was successfully disconnected by clicking on the **LaunchDarkly** tab in the left sidebar. Feature flag information should no longer display on this tab.
## Disconnect your API access token
The Compass integration stores your LaunchDarkly API access token to read data from the LaunchDarkly API, as described in the [Set up the Compass integration](#set-up-the-compass-integration) section. If you need to cycle your LaunchDarkly access token, or if you want to connect Compass to a different LaunchDarkly organization, you can disconnect your access token.
Here's how:
1. Navigate to your Compass site. For example `https://mysite.atlassian.net/compass`.
2. In the top navigation, click the **Apps** link.
3. Find **LaunchDarkly** in the list of apps and click **Configure**.
4. Click **Disconnect access token**.
5. You can now provide Compass with a new access token if desired.
## Remove the Compass integration
To remove the Compass integration:
1. Navigate to your Compass site. For example `https://mysite.atlassian.net/compass`.
2. In the top navigation, click **Apps**.
3. Find **LaunchDarkly** in the list of apps and click **Uninstall**.
This removes the Compass integration with LaunchDarkly.
## Disconnect Compass components from LaunchDarkly
The connection between a LaunchDarkly project and a Compass component is stored as a link on the Compass component, as described in the [Connect Compass components to LaunchDarkly](#connect-compass-components-to-launchdarkly) section. If desired, you can remove this connection on the Compass component page.
Here's how:
1. Navigate to your Compass site. For example `https://mysite.atlassian.net/compass`.
2. Navigate to the Compass component you want to disconnect from LaunchDarkly.
3. In the **Other links** section of your Compass component, remove the LaunchDarkly link. Verify that the component was successfully disconnected by clicking on the **LaunchDarkly** tab in the left sidebar. Feature flag information should no longer display on this tab.
## Disconnect your API access token
The Compass integration stores your LaunchDarkly API access token to read data from the LaunchDarkly API, as described in the [Set up the Compass integration](#set-up-the-compass-integration) section. If you need to cycle your LaunchDarkly access token, or if you want to connect Compass to a different LaunchDarkly organization, you can disconnect your access token.
Here's how:
1. Navigate to your Compass site. For example `https://mysite.atlassian.net/compass`.
2. In the top navigation, click the **Apps** link.
3. Find **LaunchDarkly** in the list of apps and click **Configure**.
4. Click **Disconnect access token**.
5. You can now provide Compass with a new access token if desired.
## Remove the Compass integration
To remove the Compass integration:
1. Navigate to your Compass site. For example `https://mysite.atlassian.net/compass`.
2. In the top navigation, click **Apps**.
3. Find **LaunchDarkly** in the list of apps and click **Uninstall**.
This removes the Compass integration with LaunchDarkly.