> ## Documentation Index
> Fetch the complete documentation index at: https://launchdarkly.com/docs/llms.txt
> Use this file to discover all available pages before exploring further.
# Zendesk
**This integration is not available in federal environments**
To learn more, read LaunchDarkly in federal environments.
**This integration is not available in LaunchDarkly's European Union (EU) instance**
To learn more, read LaunchDarkly in the European Union (EU).
**The Zendesk integration is available to customers on select plans**
The Zendesk integration is only available to customers on select plans. To learn more, [read about our pricing](https://launchdarkly.com/pricing/). To upgrade your plan, [contact Sales](https://launchdarkly.com/contact-sales/).
This topic explains how to set up and use the LaunchDarkly Zendesk integration.
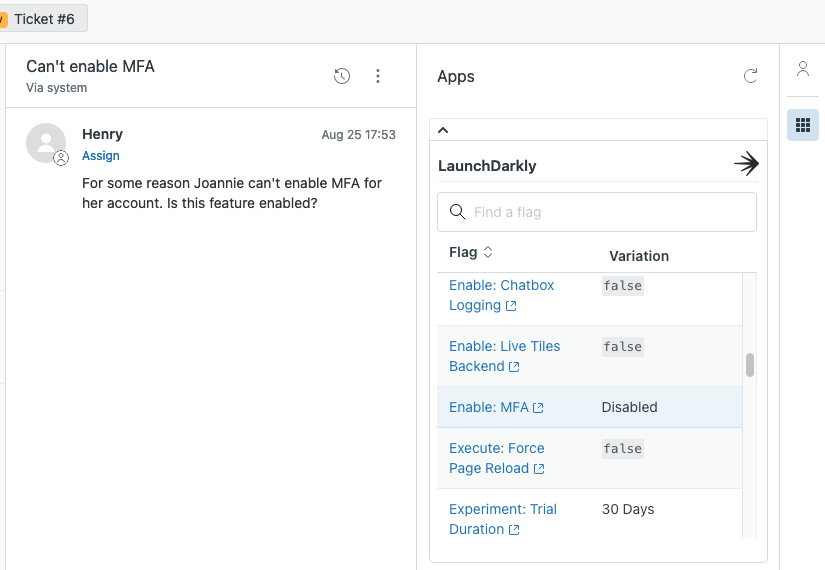
The LaunchDarkly Zendesk app gives you a read-only view of your feature flags. You can view the flag variations LaunchDarkly serves to your customers without leaving Zendesk. This is useful for customer success and support teams working with customers to debug issues or access new features.
 ## Prerequisites
In order to install and configure the LaunchDarkly Zendesk integration, you must have the following prerequisites:
* A LaunchDarkly Enterprise plan
* A Zendesk account with "admin" role privileges
## Set up the LaunchDarkly Zendesk integration
**Open LaunchDarkly and Zendesk**
You need your LaunchDarkly project and environment keys to set up the app. Keep your LaunchDarkly account open in a separate browser tab during setup to easily access your keys.
### Install the LaunchDarkly application from Zendesk Marketplace
1. Navigate to the [LaunchDarkly listing on the Zendesk Marketplace](https://www.zendesk.com/marketplace/apps/support/474556/launchdarkly).
2. Click **Install**. A popup appears.
3. Select the Zendesk account you would like to install the LaunchDarkly integration to and click **Install**.
### Configure the context key and context kind fields
You can configure Zendesk custom User Fields and custom Organization Fields to correspond to LaunchDarkly context keys and kinds.
**Zendesk does not support multi-contexts**
Zendesk only supports displaying variations for contexts with one context kind. To learn more about single and multi-contexts, read [Contexts](/docs/home/flags/contexts).
To display the specific flag variations served to a given Zendesk user, configure Zendesk custom User Fields to correspond to LaunchDarkly context keys and/or context kinds. Alternatively, if you target feature flags based on organizations rather than individual end users, configure Zendesk custom Organization Fields to correspond to LaunchDarkly context keys and/or context kinds.
To add a Zendesk custom User Field:
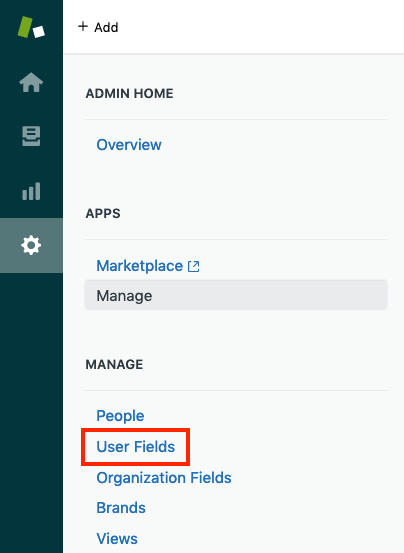
1. Click the Admin **gear** icon.
2. Under "Manage," select **User Fields**:
## Prerequisites
In order to install and configure the LaunchDarkly Zendesk integration, you must have the following prerequisites:
* A LaunchDarkly Enterprise plan
* A Zendesk account with "admin" role privileges
## Set up the LaunchDarkly Zendesk integration
**Open LaunchDarkly and Zendesk**
You need your LaunchDarkly project and environment keys to set up the app. Keep your LaunchDarkly account open in a separate browser tab during setup to easily access your keys.
### Install the LaunchDarkly application from Zendesk Marketplace
1. Navigate to the [LaunchDarkly listing on the Zendesk Marketplace](https://www.zendesk.com/marketplace/apps/support/474556/launchdarkly).
2. Click **Install**. A popup appears.
3. Select the Zendesk account you would like to install the LaunchDarkly integration to and click **Install**.
### Configure the context key and context kind fields
You can configure Zendesk custom User Fields and custom Organization Fields to correspond to LaunchDarkly context keys and kinds.
**Zendesk does not support multi-contexts**
Zendesk only supports displaying variations for contexts with one context kind. To learn more about single and multi-contexts, read [Contexts](/docs/home/flags/contexts).
To display the specific flag variations served to a given Zendesk user, configure Zendesk custom User Fields to correspond to LaunchDarkly context keys and/or context kinds. Alternatively, if you target feature flags based on organizations rather than individual end users, configure Zendesk custom Organization Fields to correspond to LaunchDarkly context keys and/or context kinds.
To add a Zendesk custom User Field:
1. Click the Admin **gear** icon.
2. Under "Manage," select **User Fields**:
 3. Select the **Text** custom field type on the right and drag it to the active fields area. Alternatively, click the **plus icon ( + )** beside the "Text" field type, then drag and drop the field into the order you would like it to appear in each User profile.
4. Enter a "Field title" shown to agents and a "Field key" in the "Properties" panel. These can be anything you want, but they should be descriptive enough for your agents to recognize them as LaunchDarkly context keys or context kinds. For example, as a field title you might use:
* "LaunchDarkly user key"
* "user ID"
* "member ID"
Save the field key for [the next section](#configure-your-launchdarkly-application).
5. Click **Create field**. The field now shows on all Zendesk user profiles.
To add a Zendesk custom Organization Field:
1. Click the Admin **gear** icon.
2. Under "Manage," select **Organization Fields**.
3. Select the **Text** custom field type on the right and drag it to the active fields area. Alternatively, click the **plus icon ( + )** beside the "Text" field type, then drag and drop the field into the order you would like it to appear in each Organization profile.
4. Enter a "Field title" shown to agents and a "Field key" in the "Properties" panel. These can be anything you want, but they should be descriptive enough for your agents to recognize them as LaunchDarkly context keys or context kinds. For example, as a field title you might use:
* "LaunchDarkly organization key"
* "account ID"
* "organization ID"
Save the field key for [the next section](#configure-your-launchdarkly-application).
5. Click **Create field**. The field now shows on all Zendesk organization profiles.
To learn more, read the [Zendesk documentation on custom field types](https://support.zendesk.com/hc/en-us/articles/203661866-About-custom-field-types).
### Configure your LaunchDarkly application
1. From your Zendesk account, click the Admin **gear** icon.
2. Under "Apps," select **Manage**.
3. Select the LaunchDarkly application:
3. Select the **Text** custom field type on the right and drag it to the active fields area. Alternatively, click the **plus icon ( + )** beside the "Text" field type, then drag and drop the field into the order you would like it to appear in each User profile.
4. Enter a "Field title" shown to agents and a "Field key" in the "Properties" panel. These can be anything you want, but they should be descriptive enough for your agents to recognize them as LaunchDarkly context keys or context kinds. For example, as a field title you might use:
* "LaunchDarkly user key"
* "user ID"
* "member ID"
Save the field key for [the next section](#configure-your-launchdarkly-application).
5. Click **Create field**. The field now shows on all Zendesk user profiles.
To add a Zendesk custom Organization Field:
1. Click the Admin **gear** icon.
2. Under "Manage," select **Organization Fields**.
3. Select the **Text** custom field type on the right and drag it to the active fields area. Alternatively, click the **plus icon ( + )** beside the "Text" field type, then drag and drop the field into the order you would like it to appear in each Organization profile.
4. Enter a "Field title" shown to agents and a "Field key" in the "Properties" panel. These can be anything you want, but they should be descriptive enough for your agents to recognize them as LaunchDarkly context keys or context kinds. For example, as a field title you might use:
* "LaunchDarkly organization key"
* "account ID"
* "organization ID"
Save the field key for [the next section](#configure-your-launchdarkly-application).
5. Click **Create field**. The field now shows on all Zendesk organization profiles.
To learn more, read the [Zendesk documentation on custom field types](https://support.zendesk.com/hc/en-us/articles/203661866-About-custom-field-types).
### Configure your LaunchDarkly application
1. From your Zendesk account, click the Admin **gear** icon.
2. Under "Apps," select **Manage**.
3. Select the LaunchDarkly application:
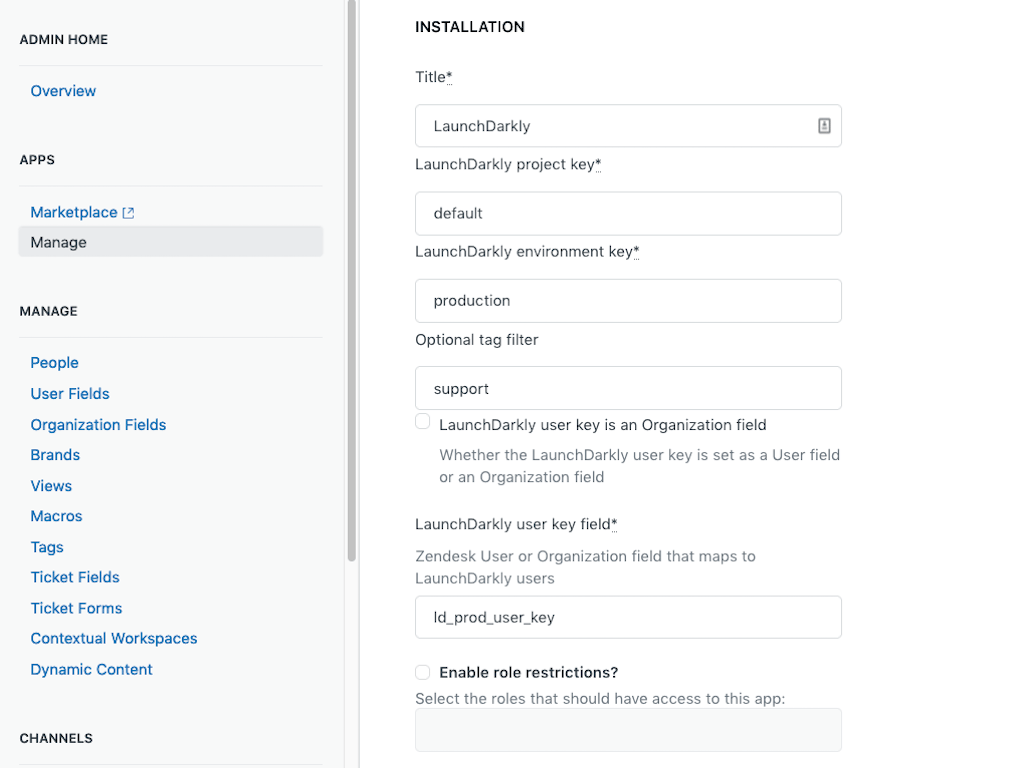 4. Enter the LaunchDarkly project and environment keys that you want to view customers' flag variations for.
5. Add any optional tags you would like to use to filter the feature flags displayed.
6. If you added the LaunchDarkly context key as a custom Organization field, check the box next to "LaunchDarkly user key is an Organization field." Otherwise, leave it blank.
7. Enter the field key you defined in step 4 of the [previous section](#install-the-launchdarkly-application-from-zendesk-marketplace) into the LaunchDarkly context key field.
8. Select whether or not you would like to enable role or group restrictions.
9. Under "OAuth Authentication," click **Authorize with LaunchDarkly**. A new tab appears.
10. Click **Authorize**. You are returned to the integration configuration page.
11. Click **Update** to save your settings.
## Troubleshooting
Here are some errors you may encounter and suggested solutions:
### There is a warning icon next to the Variation header
The warning (⚠) icon next to the "Variation" header on the flag table indicates that LaunchDarkly has not observed any flag evaluations for this user in the last 30 days.
Unless the user is new or inactive, you may have entered an incorrect value in the **User key** field. You can find context keys on the **Contexts** list in the "Key" column. To learn more, read [The Contexts list](/docs/home/flags/contexts-list).
To learn more, read [the troubleshooting article in the LaunchDarkly Knowledge Base](https://support.launchdarkly.com/hc/en-us/articles/27149190866971-Troubleshooting-incorrect-flag-values-and-warning-message-for-Zendesk-Integration).
### "Error: LaunchDarkly user key not found"
This error indicates that the **User key field** has been incorrectly configured.
If you checked the "LaunchDarkly user key is an Organization field" box as part of step 6 of [Configuring your LaunchDarkly application](#configure-your-launchdarkly-application), confirm that you also entered the field key into the context key field.
Review the [Configure the context key and context kind fields](#configure-the-context-key-and-context-kind-fields) section to ensure you have set it up correctly and that it is populated on the Zendesk User profile associated with the ticket you are viewing.
4. Enter the LaunchDarkly project and environment keys that you want to view customers' flag variations for.
5. Add any optional tags you would like to use to filter the feature flags displayed.
6. If you added the LaunchDarkly context key as a custom Organization field, check the box next to "LaunchDarkly user key is an Organization field." Otherwise, leave it blank.
7. Enter the field key you defined in step 4 of the [previous section](#install-the-launchdarkly-application-from-zendesk-marketplace) into the LaunchDarkly context key field.
8. Select whether or not you would like to enable role or group restrictions.
9. Under "OAuth Authentication," click **Authorize with LaunchDarkly**. A new tab appears.
10. Click **Authorize**. You are returned to the integration configuration page.
11. Click **Update** to save your settings.
## Troubleshooting
Here are some errors you may encounter and suggested solutions:
### There is a warning icon next to the Variation header
The warning (⚠) icon next to the "Variation" header on the flag table indicates that LaunchDarkly has not observed any flag evaluations for this user in the last 30 days.
Unless the user is new or inactive, you may have entered an incorrect value in the **User key** field. You can find context keys on the **Contexts** list in the "Key" column. To learn more, read [The Contexts list](/docs/home/flags/contexts-list).
To learn more, read [the troubleshooting article in the LaunchDarkly Knowledge Base](https://support.launchdarkly.com/hc/en-us/articles/27149190866971-Troubleshooting-incorrect-flag-values-and-warning-message-for-Zendesk-Integration).
### "Error: LaunchDarkly user key not found"
This error indicates that the **User key field** has been incorrectly configured.
If you checked the "LaunchDarkly user key is an Organization field" box as part of step 6 of [Configuring your LaunchDarkly application](#configure-your-launchdarkly-application), confirm that you also entered the field key into the context key field.
Review the [Configure the context key and context kind fields](#configure-the-context-key-and-context-kind-fields) section to ensure you have set it up correctly and that it is populated on the Zendesk User profile associated with the ticket you are viewing.