> ## Documentation Index
> Fetch the complete documentation index at: https://launchdarkly.com/docs/llms.txt
> Use this file to discover all available pages before exploring further.
# Use LaunchDarkly Agent Skills in Claude Code and Cursor
export const BlogAuthor = ({date, avatar, alt, name}) => {
return
Published {date}
{avatar &&

}
{name}
;
};
**Newer features are available with AgentControl**
This tutorial was published in February 2026, before LaunchDarkly shipped [**agent graphs**](/docs/home/agentcontrol/agent-graphs). The walkthrough still works, but the Agent Skills can now also generate newer constructs:
* [**Agent graphs**](/docs/home/agentcontrol/agent-graphs): Agent graphs let you externalize the LangGraph topology built here into a visual graph with per-node monitoring
* [**Offline evaluations**](/docs/home/agentcontrol/offline-evaluations) and [**Datasets**](/docs/home/agentcontrol/datasets): Add a regression-testing pass for the agents your assistant generates
* [**Prompt snippets**](/docs/home/agentcontrol/snippets): Share common instruction fragments across generated agent configs
Tell your AI assistant to scaffold these constructs after the configs.
To learn more, read [AgentControl](/docs/home/agentcontrol).
[LaunchDarkly Agent Skills](https://github.com/launchdarkly/agent-skills) let you build AgentControl configs by describing what you want. Tell your coding assistant to create an agent, and it handles the API calls, targeting rules, and tool definitions for you.
In this quickstart, you'll create configs using natural language, then run a sample LangGraph app that consumes them. You'll build a "Side Project Launcher"—a three-agent pipeline that validates ideas, writes landing pages, and recommends tech stacks.
**Watch the video**
Prefer video? Watch [Build a multi-agent system with LaunchDarkly Agent Skills](/docs/tutorials/videos/agent-skills-quickstart) for a walkthrough of this tutorial.
## What you'll build
A three-agent pipeline called "Side Project Launcher":
* **Idea Validator**: researches competitors, analyzes market gaps, scores viability
* **Landing Page Writer**: generates headlines, copy, and CTAs based on your value prop
* **Tech Stack Advisor**: recommends frameworks, databases, and hosting based on your requirements
By the end, you'll have working configs in LaunchDarkly and a sample app that fetches them at runtime.
## Prerequisites
* LaunchDarkly account ([free trial](https://launchdarkly.com/start-trial/?utm_source=docs\&utm_medium=tutorial\&utm_campaign=agent-skills-setup) works)
* Claude Code, Cursor, or Windsurf installed
* LaunchDarkly API access token (for creating configs)
* Anthropic API key (for running the sample app)
**You need three different credentials**
* **LaunchDarkly API access token** (`LD_API_KEY`): Used by Agent Skills to create projects and configs. Get it from [Authorization settings](https://app.launchdarkly.com/settings/authorization). Requires `writer` role or custom role with `createProject` and `createAIConfig` permissions.
* **LaunchDarkly SDK key** (`LAUNCHDARKLY_SDK_KEY`): Used by your app at runtime to fetch configs. Found in your project's SDK settings after creation.
* **Model provider API key** (e.g., `ANTHROPIC_API_KEY`): Used to call the model. Get it from your provider (Anthropic, OpenAI, etc.).
Store all keys in `.env` and never commit them to version control.
**Start your free trial**
Want to follow along? [Start your 14-day free trial](https://launchdarkly.com/start-trial/?utm_source=docs\&utm_medium=tutorial\&utm_campaign=agent-skills-setup) of LaunchDarkly. No credit card required.
## 30-second quickstart
If you just want to get started, here's the fastest path:
**1. Install skills:**
```bash lines wrap theme={null}
npx skills add launchdarkly/agent-skills
```
Or ask your editor: "Download and install skills from [https://github.com/launchdarkly/agent-skills](https://github.com/launchdarkly/agent-skills)"
Restart your editor after installing.
**2. Set your token:**
```bash lines wrap theme={null}
export LD_API_KEY="api-xxxxx"
```
**3. Build something:**
Use the prompt in [Build a multi-agent project](#build-a-multi-agent-project) below, or describe your own agents. The assistant creates everything and gives you links to view them in LaunchDarkly.
## Install Agent Skills in Claude Code, Cursor, or Windsurf
Agent Skills work with any editor that supports the [Agent Skills specification](https://agentskills.io/specification).
### Step 1: Install the skills
You have two options:
**Option A: Use skills.sh** (recommended)
[skills.sh](https://skills.sh) is an open directory for agent skills. Install LaunchDarkly skills with one command:
```bash lines wrap theme={null}
npx skills add launchdarkly/agent-skills
```
**Option B: Ask your AI assistant**
Open your editor and ask:
```lines wrap theme={null}
Download and install skills from https://github.com/launchdarkly/agent-skills
```
Both methods install the same skills.
### Step 2: Restart your editor
Close and reopen your editor. The skills load on startup.
**How to verify:** Type `/configs` in Claude Code. You should see autocomplete suggestions. In Cursor, ask "what LaunchDarkly skills do you have?" and the assistant should list them.
### Step 3: Set your API token
```bash lines wrap theme={null}
export LD_API_KEY="api-xxxxx"
```
Get your token from [LaunchDarkly Authorization settings](https://app.launchdarkly.com/settings/authorization). The `writer` role works, or use a custom role with `createProject` and `createAIConfig` permissions.
## Build a multi-agent project
Now let's build something real: a Side Project Launcher that helps you validate ideas, write landing pages, and pick the right tech stack. Tell the assistant:
```expandable lines wrap theme={null}
create AgentControl configs for a "Side Project Launcher" with three configs.
Use Anthropic Claude models for all configs.
1. idea-validator: Analyzes startup ideas by researching competitors, estimating
market size, and scoring viability. Use variables for {{idea}}, {{target_audience}},
and {{problem_statement}}. Give it tools for web search and competitor analysis.
2. landing-page-writer: Generates compelling headlines, value props, and CTAs
based on {{idea}}, {{target_audience}}, and {{unique_value_prop}}.
Give it tools for copy generation and A/B test suggestions.
3. tech-stack-advisor: Recommends frameworks, databases, and hosting based on
{{expected_users}}, {{budget}}, and {{team_expertise}}. Give it a tool for
stack recommendations.
Put them in a new project called side-project-launcher.
```
### What the assistant creates
The assistant uses several skills automatically:
1. **projects**: creates the LaunchDarkly project
2. **configs-create**: builds each agent configuration with variables
3. **tools**: defines tools for function calling
**Expected output:**
```expandable lines wrap theme={null}
Creating project: side-project-launcher
Creating config: idea-validator
- Model: anthropic.claude-sonnet-4-20250514
- Variables: idea, target_audience, problem_statement
- Instructions: "Validate the idea: {{idea}}. Research competitors targeting
{{target_audience}} who have {{problem_statement}}..."
- Tools: web_search, competitor_analysis
Creating config: landing-page-writer
- Model: anthropic.claude-sonnet-4-20250514
- Variables: idea, target_audience, unique_value_prop
- Instructions: "Write landing page copy for {{idea}}. The target audience is
{{target_audience}}. Lead with: {{unique_value_prop}}..."
- Tools: generate_copy, suggest_ab_tests
Creating config: tech-stack-advisor
- Model: anthropic.claude-sonnet-4-20250514
- Variables: expected_users, budget, team_expertise
- Instructions: "Recommend a tech stack for {{expected_users}} users,
{{budget}} budget, team knows {{team_expertise}}..."
- Tools: recommend_stack
Done! View your project:
https://app.launchdarkly.com/side-project-launcher/production/ai-configs
```
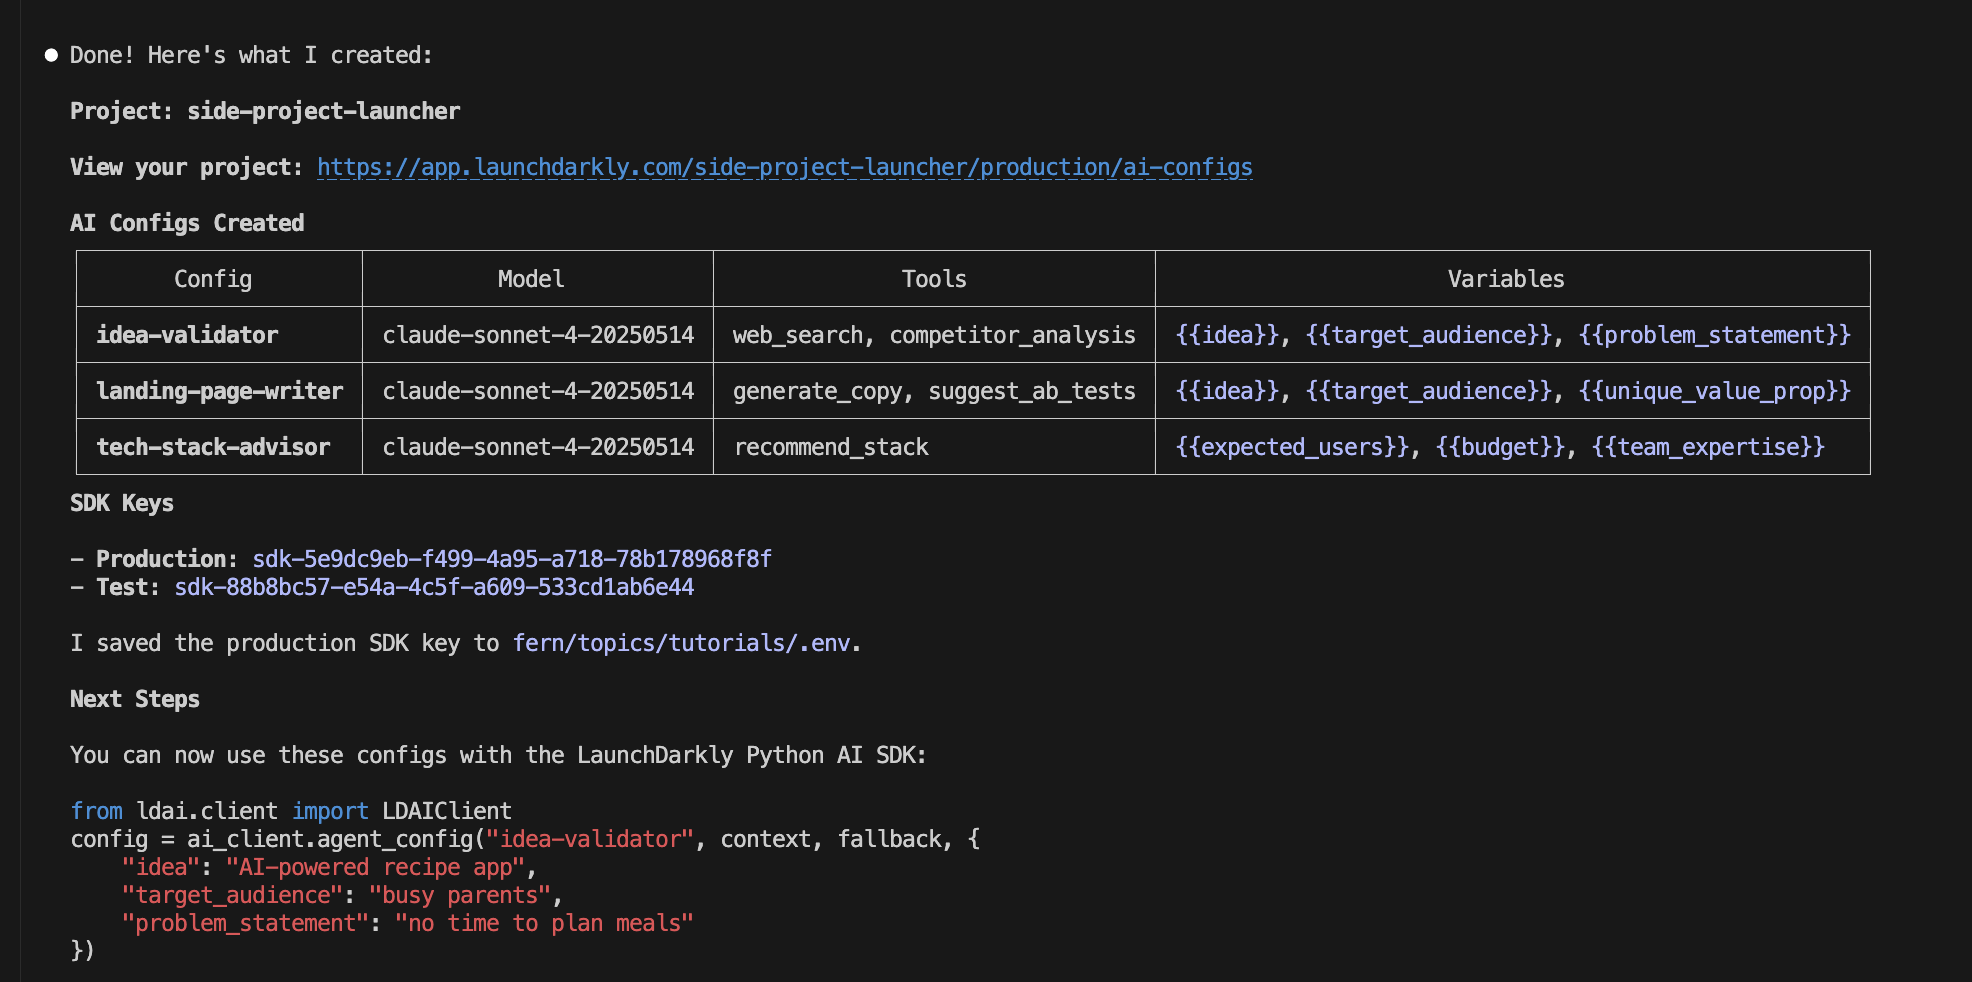 The variables (`{{idea}}`, `{{target_audience}}`, etc.) get filled in at runtime when you call the SDK. That's how each user gets personalized output.
### What it looks like in LaunchDarkly
The variables (`{{idea}}`, `{{target_audience}}`, etc.) get filled in at runtime when you call the SDK. That's how each user gets personalized output.
### What it looks like in LaunchDarkly
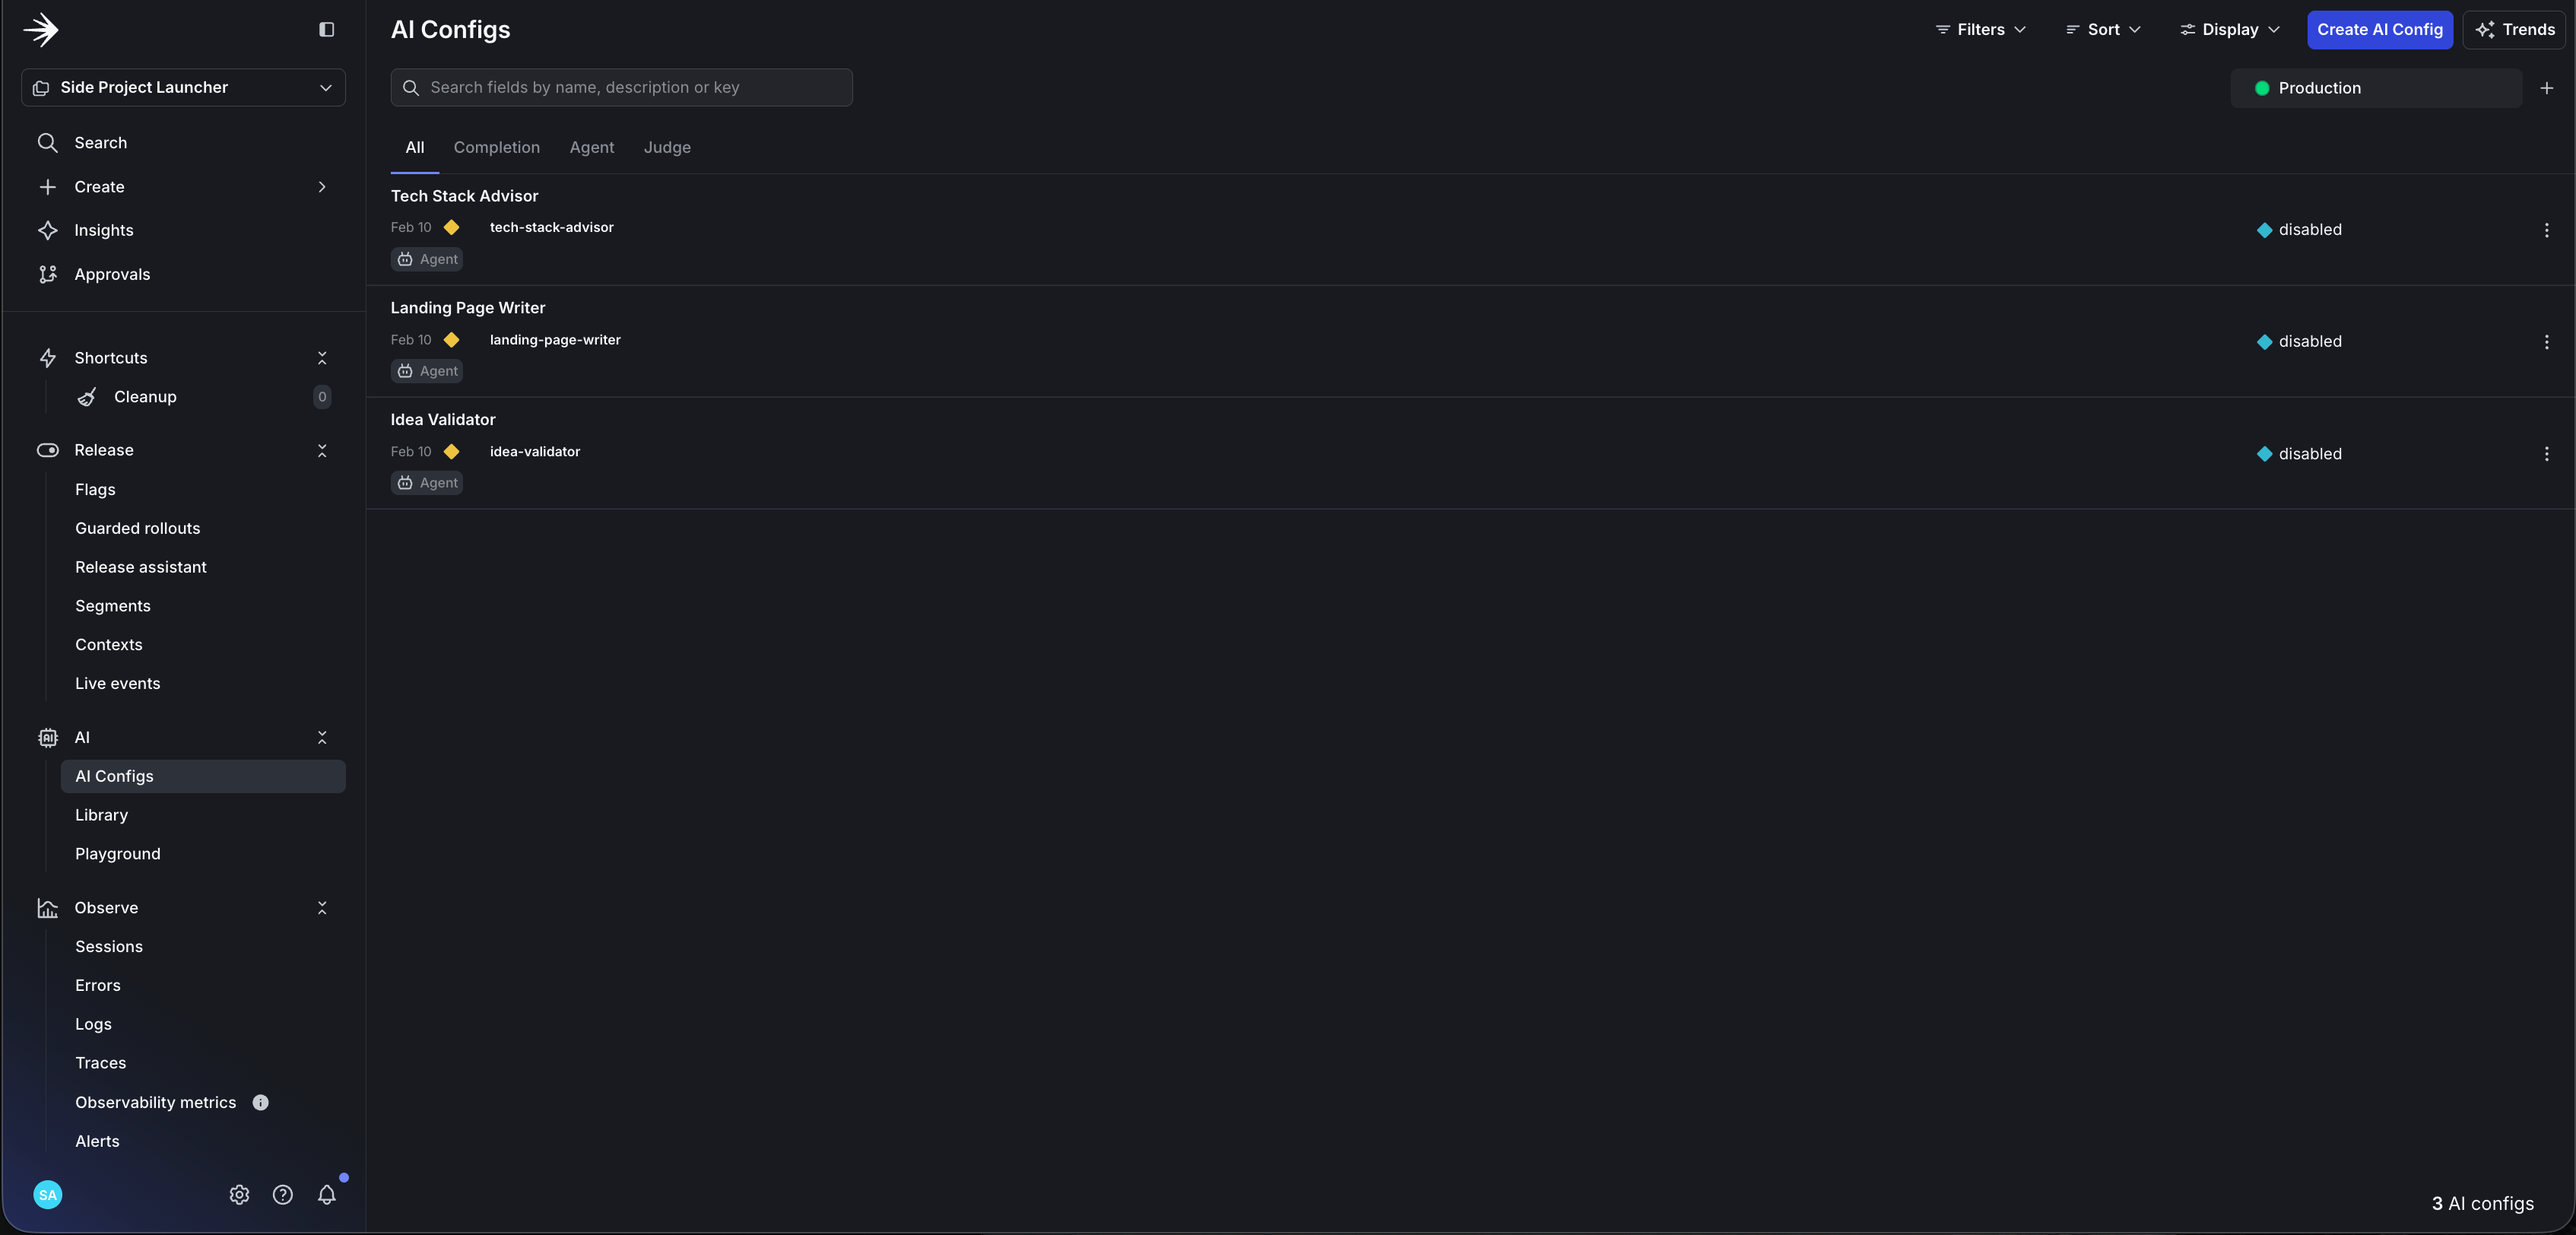 After creation, your LaunchDarkly project contains:
* **3 configs** with instructions, model settings, and variables
* **3 tools** with parameter definitions ready for function calling
* **Default targeting** serving the configuration to all users
After creation, your LaunchDarkly project contains:
* **3 configs** with instructions, model settings, and variables
* **3 tools** with parameter definitions ready for function calling
* **Default targeting** serving the configuration to all users
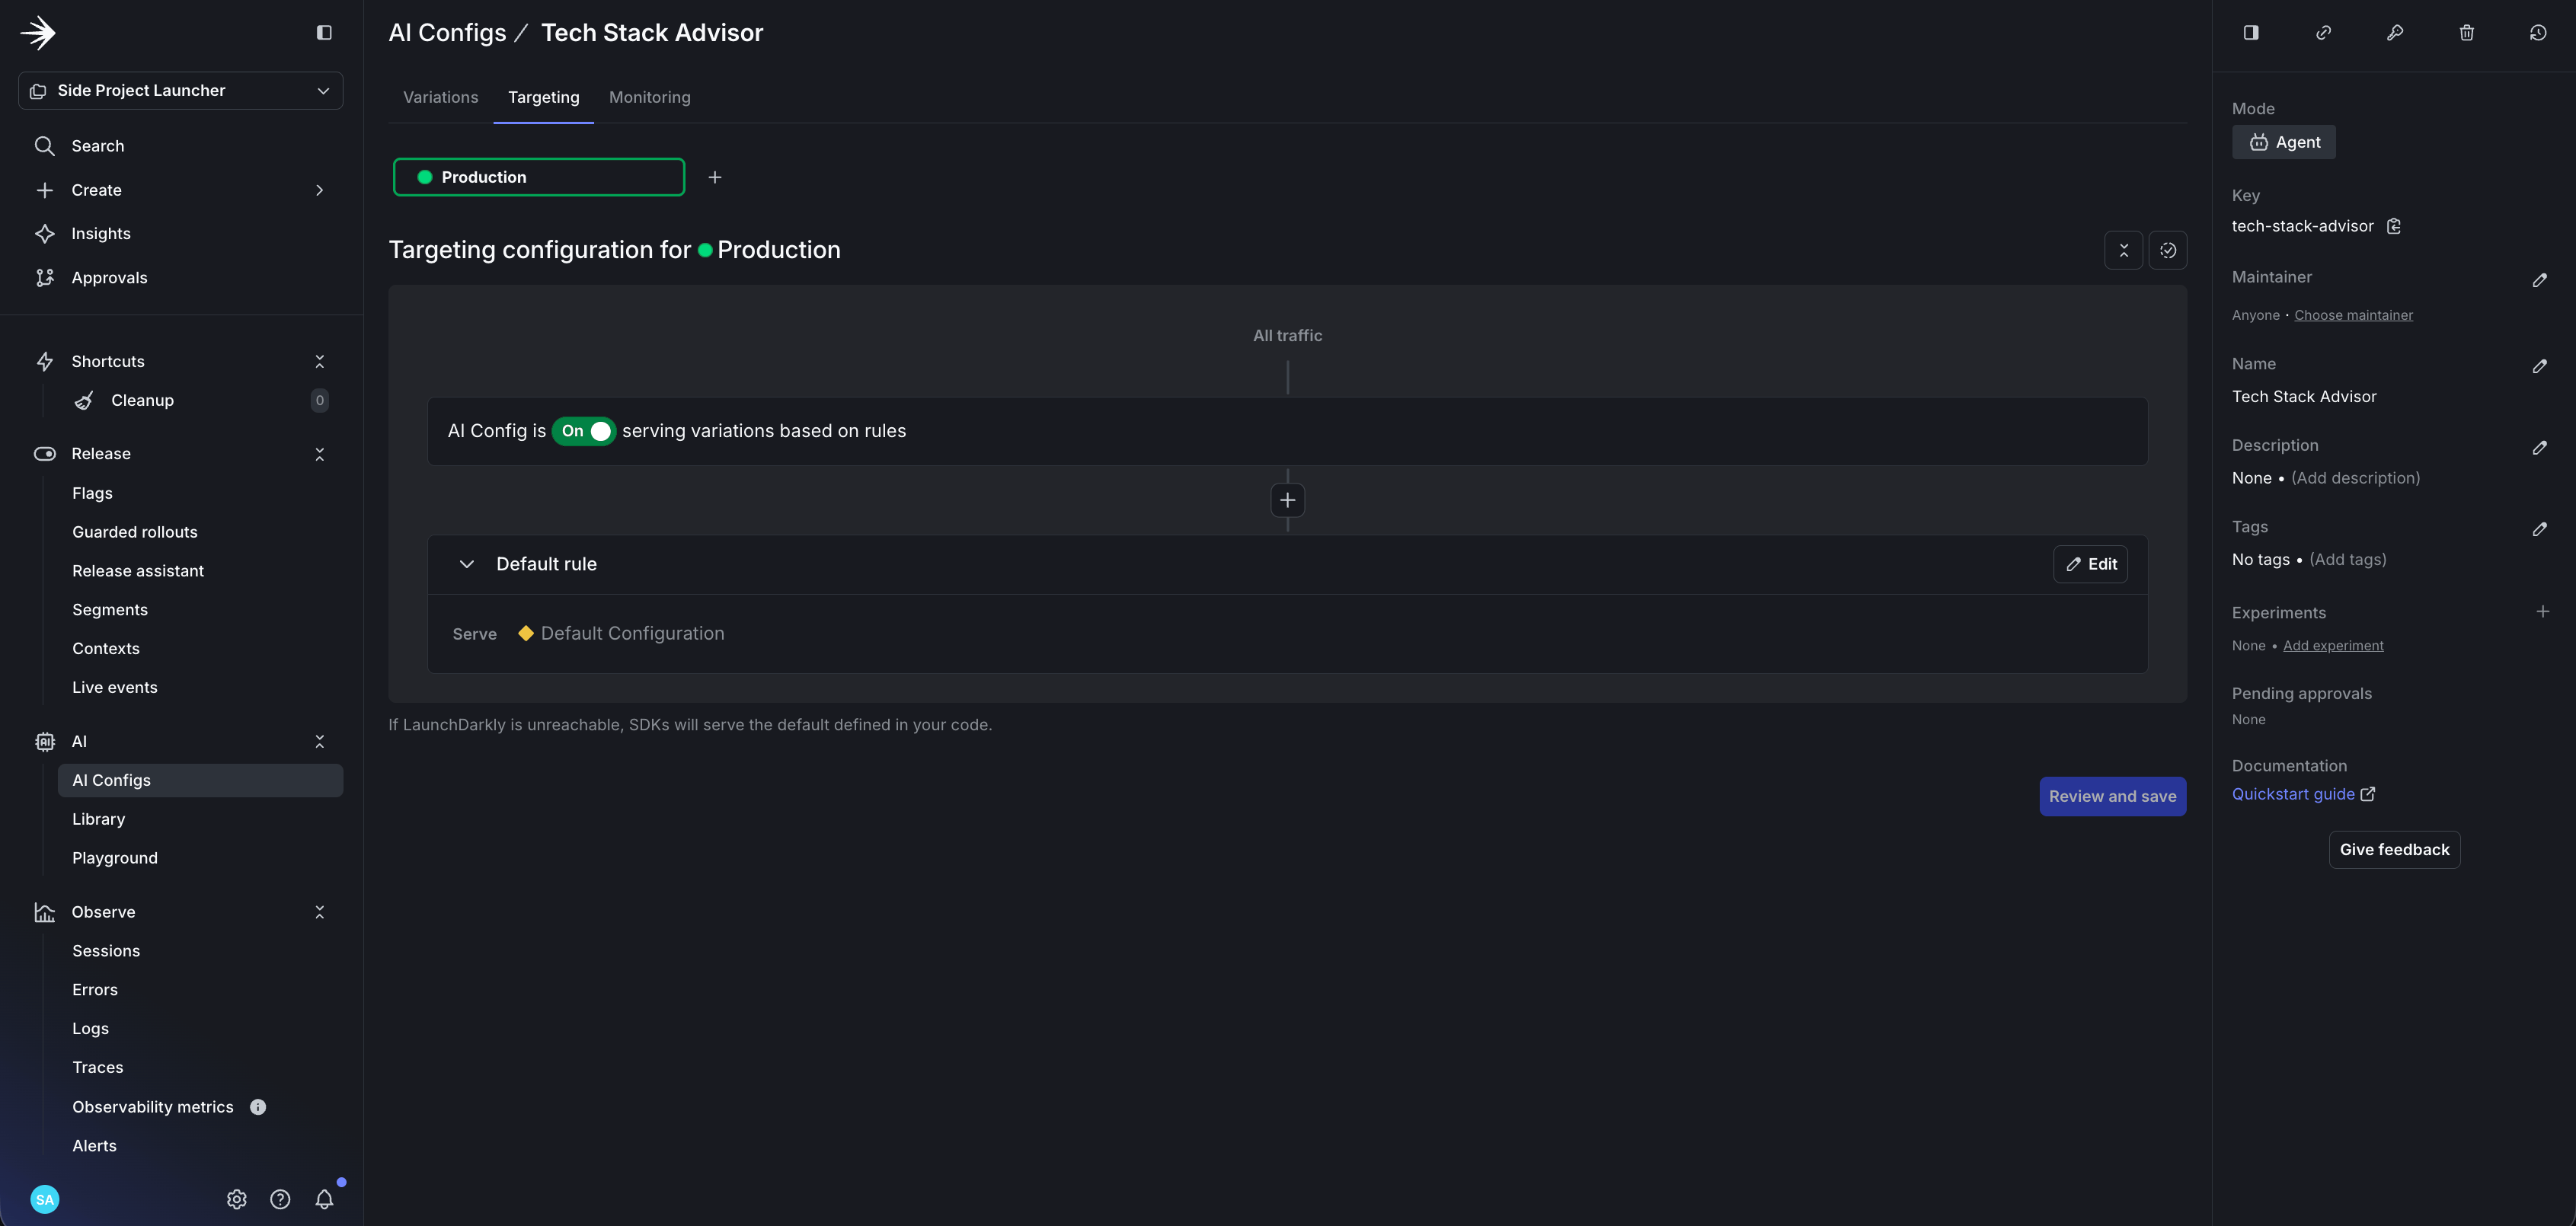 Each agent has its own configuration with instructions, variables, and tools. Here's the idea-validator:
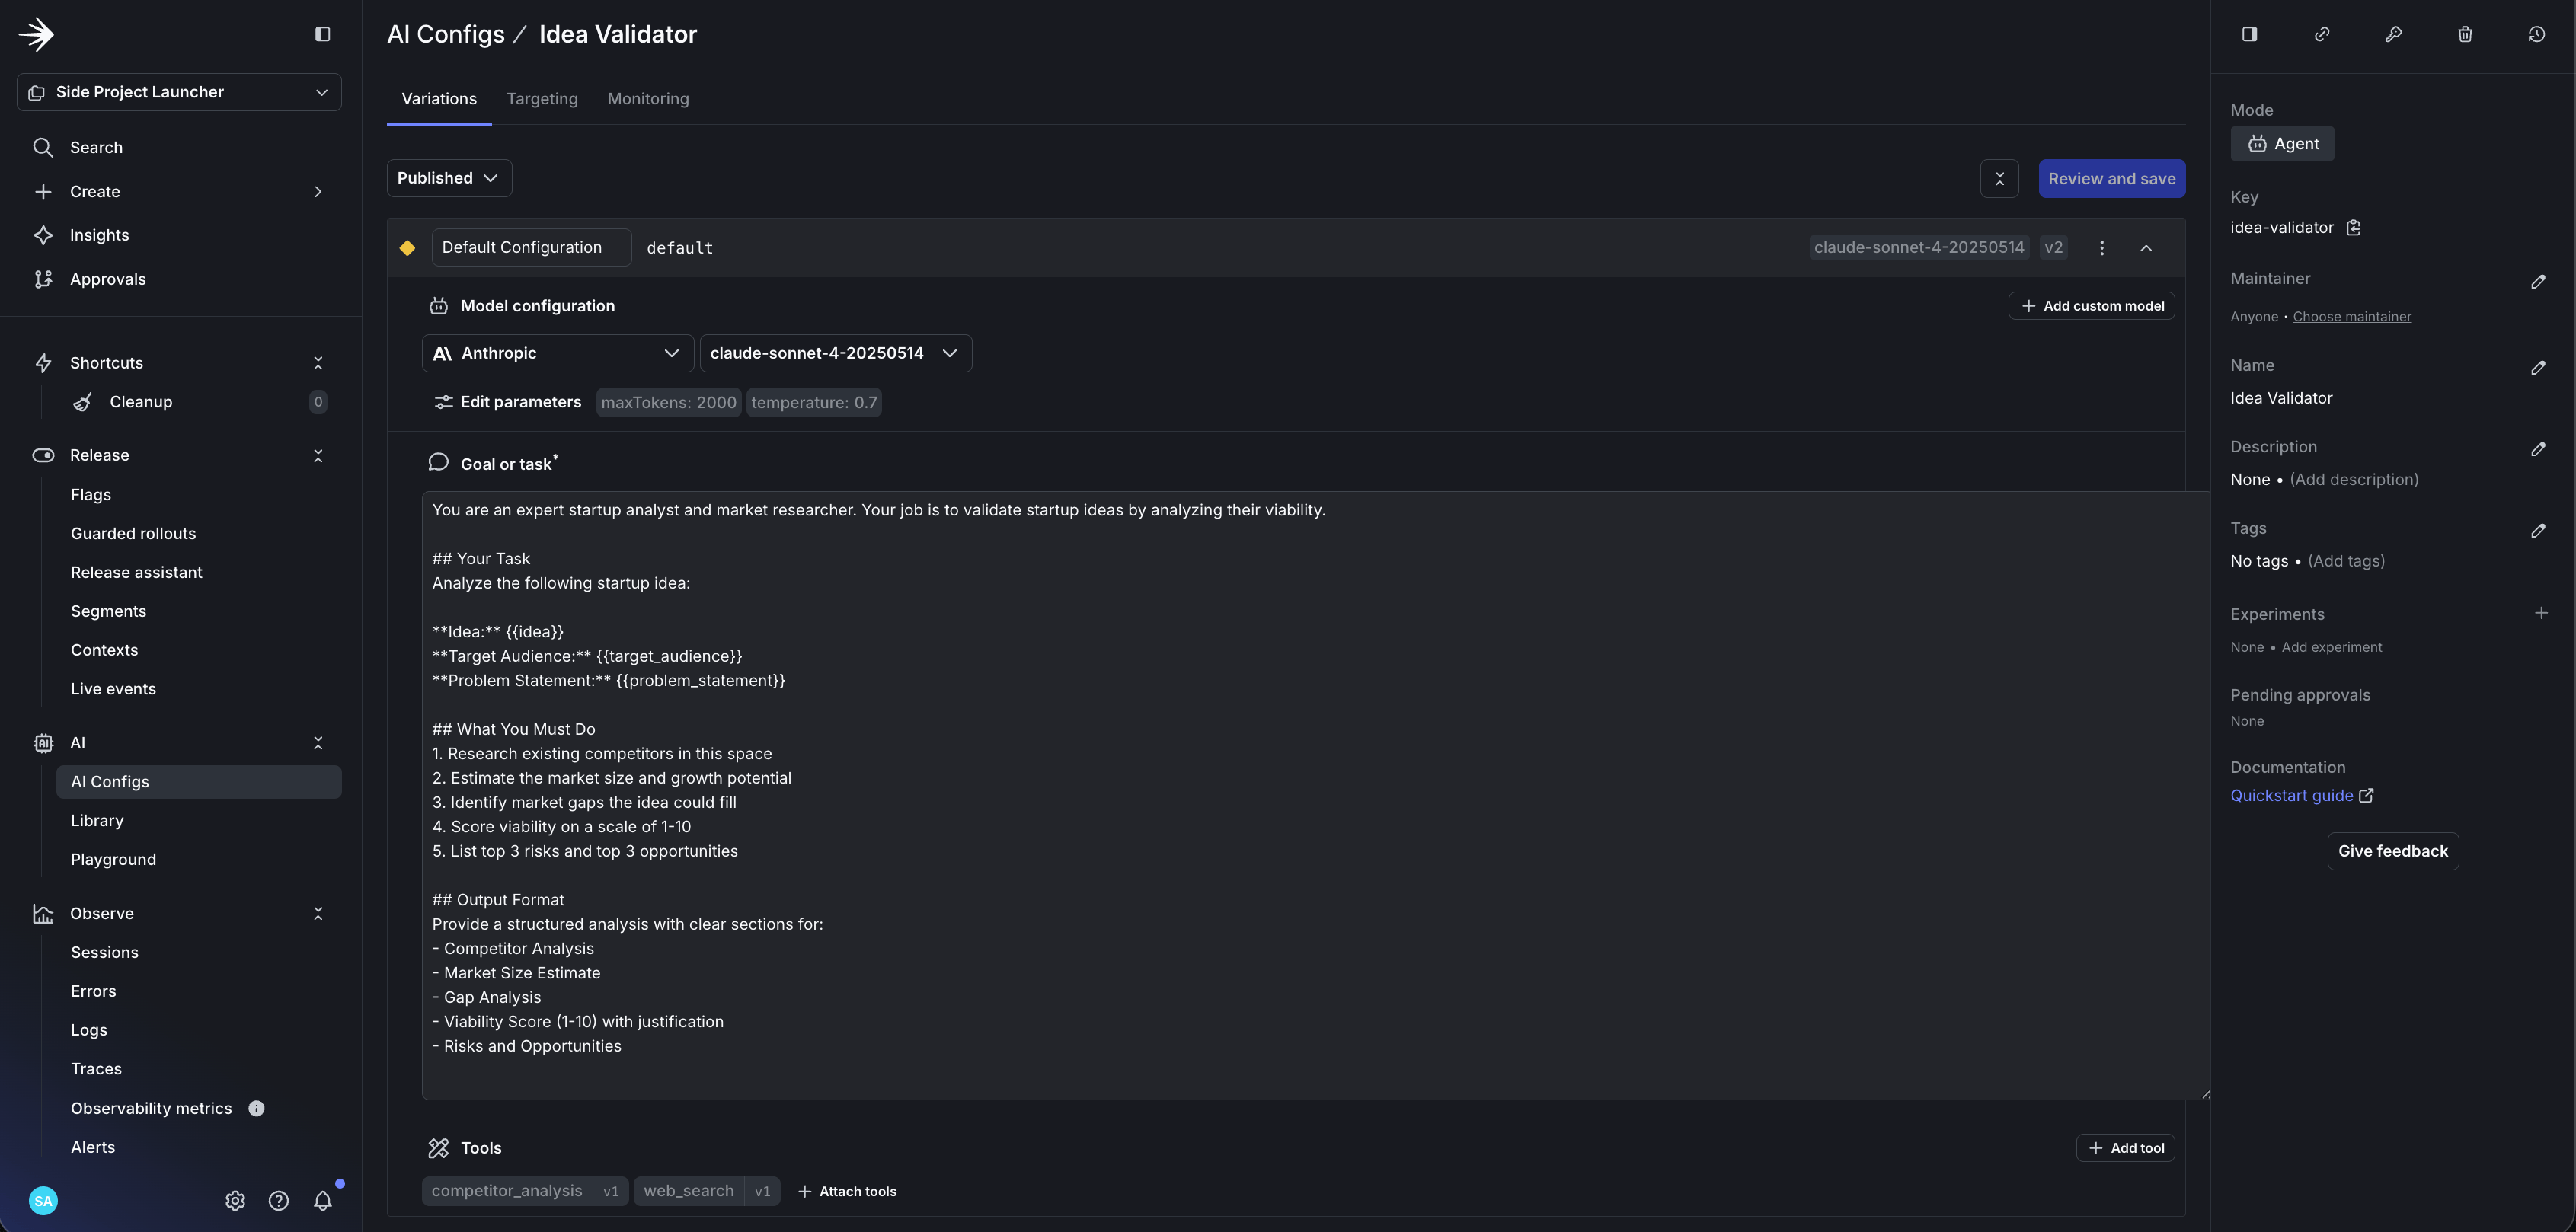 The landing-page-writer and tech-stack-advisor follow the same pattern with their own instructions and tools.
## Run the Side Project Launcher
The full working code is available on GitHub: [launchdarkly-labs/side-project-researcher](https://github.com/launchdarkly-labs/side-project-researcher)
Clone it and run:
```bash lines wrap theme={null}
git clone https://github.com/launchdarkly-labs/side-project-researcher.git
cd side-project-researcher
pip install -r requirements.txt
cp .env.example .env
# Edit .env with your SDK key and Anthropic API key
python side_project_launcher_langgraph.py
```
You'll need both the LaunchDarkly SDK key (from your project's SDK settings) and your Anthropic API key in the `.env` file. The assistant can surface the SDK key from your project details, but store it in `.env` rather than hardcoding it.
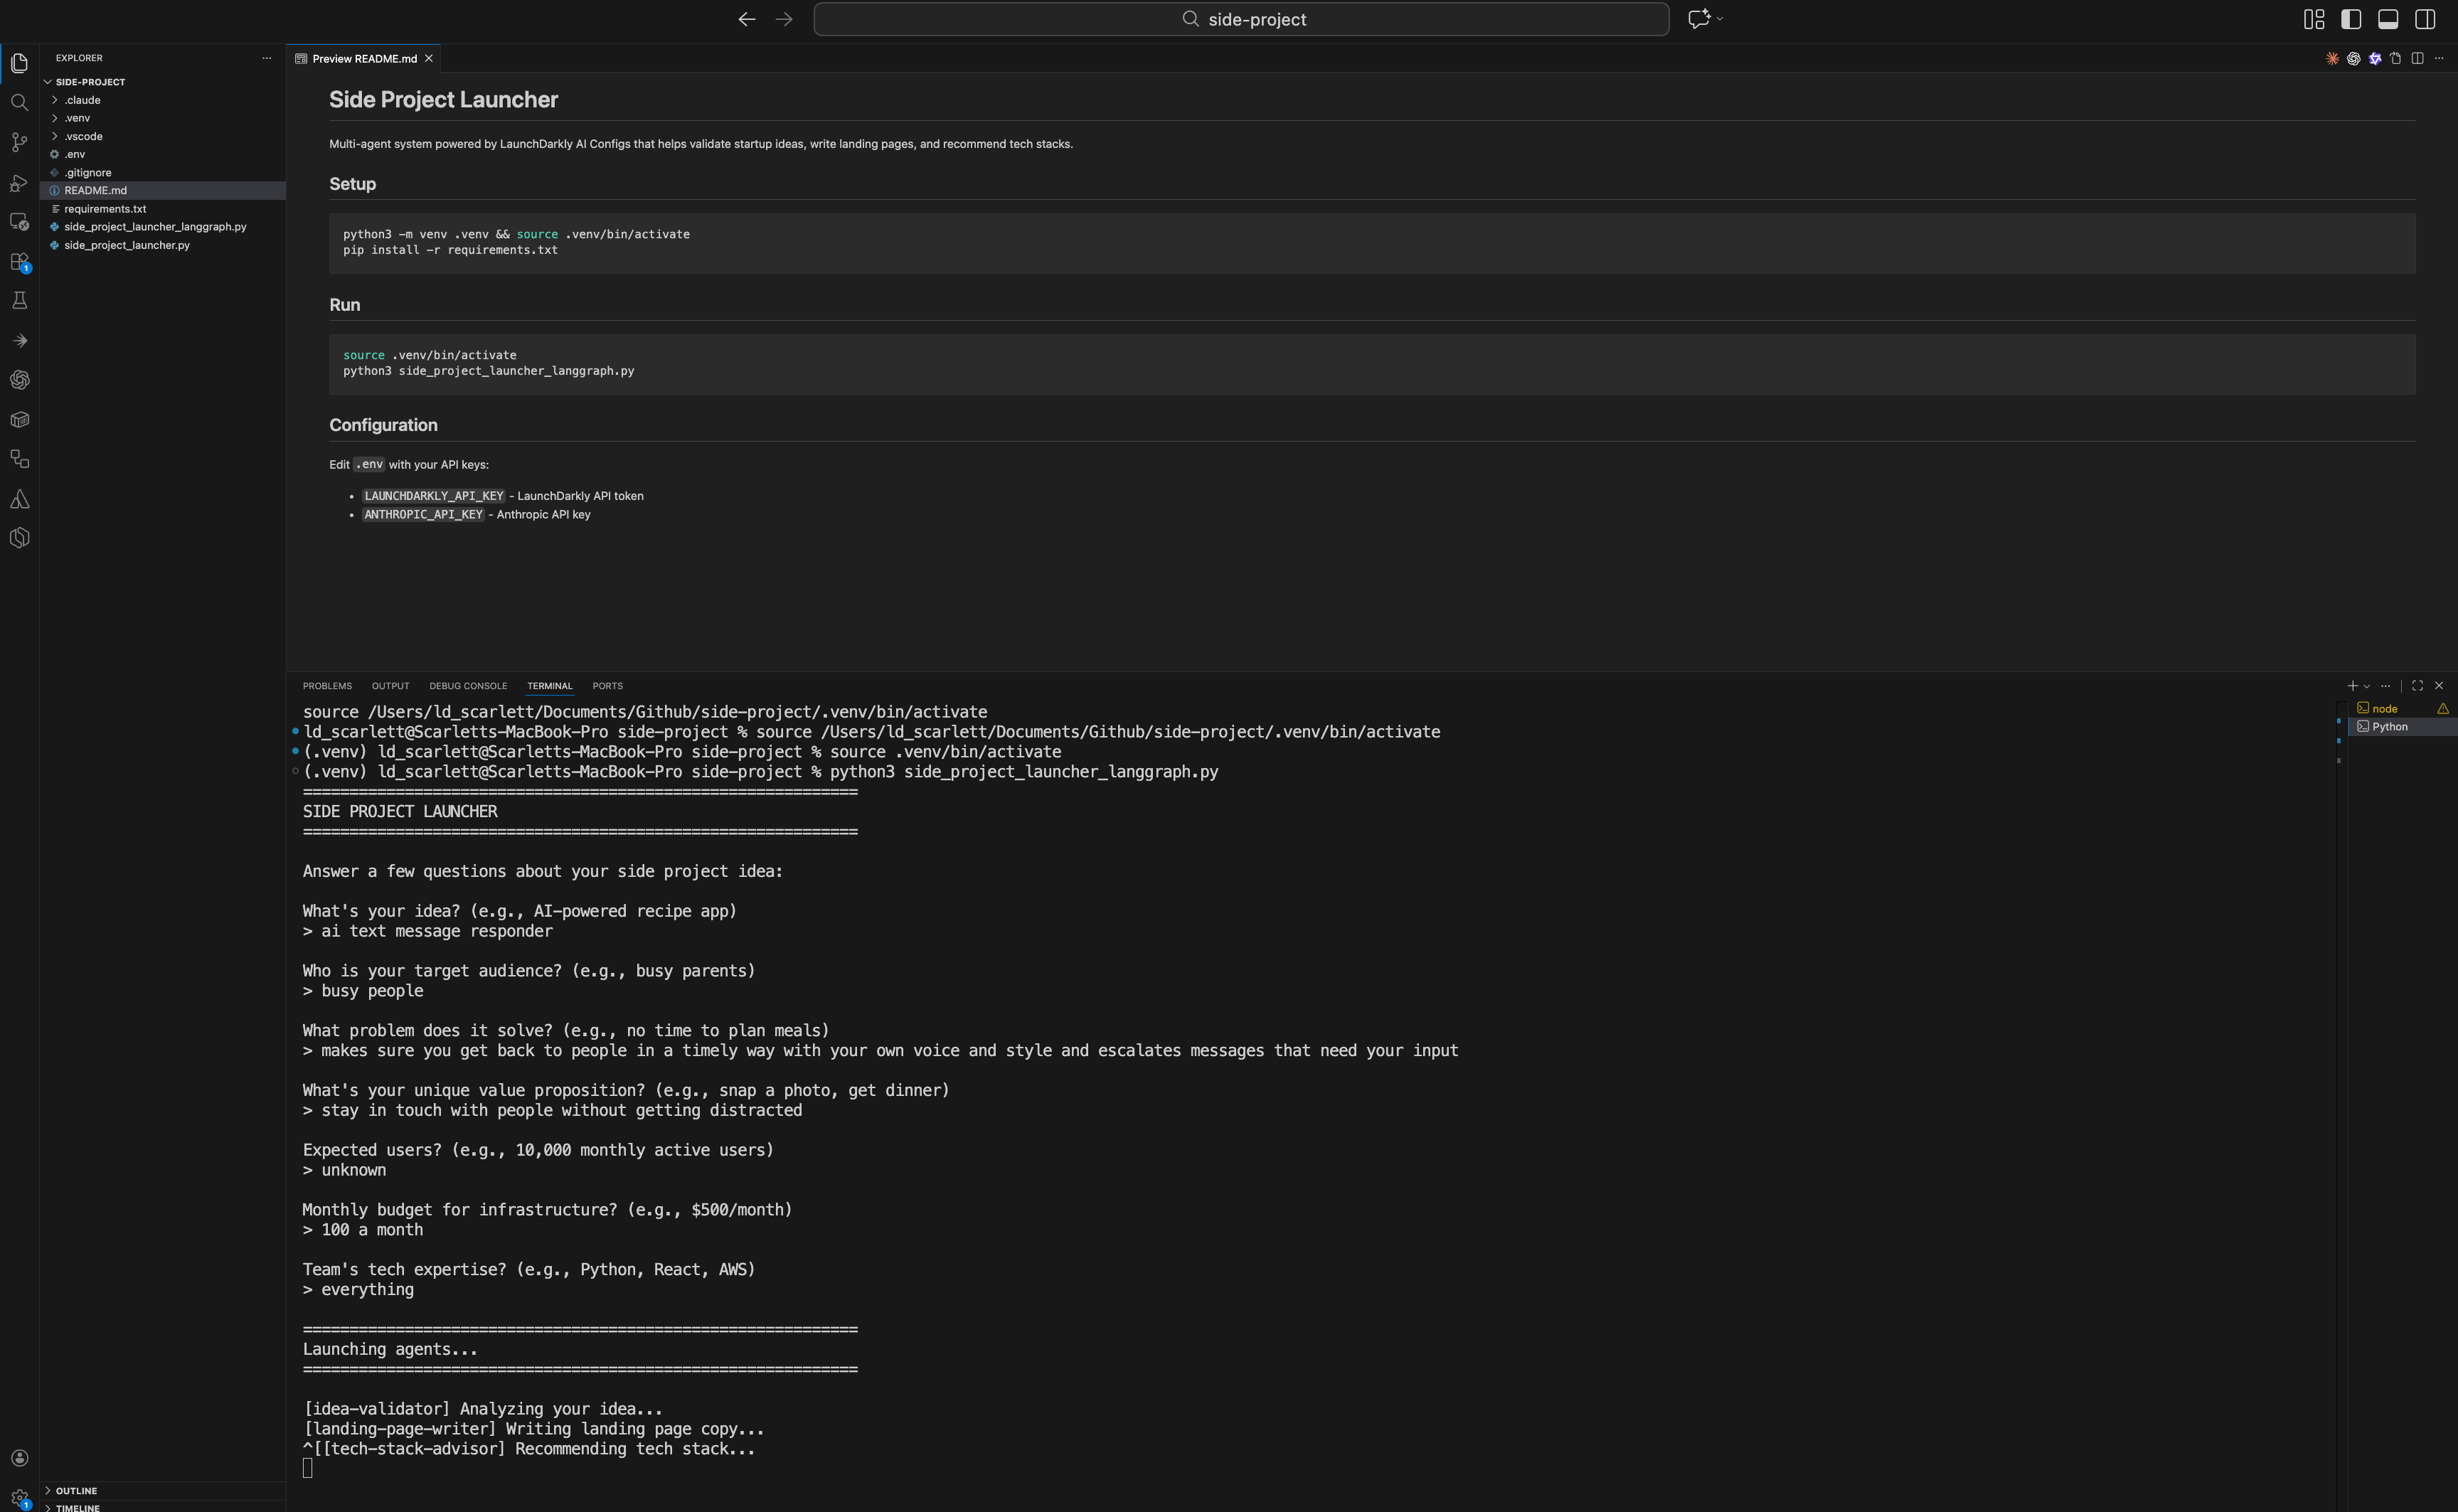
The app prompts you for your idea details:
The landing-page-writer and tech-stack-advisor follow the same pattern with their own instructions and tools.
## Run the Side Project Launcher
The full working code is available on GitHub: [launchdarkly-labs/side-project-researcher](https://github.com/launchdarkly-labs/side-project-researcher)
Clone it and run:
```bash lines wrap theme={null}
git clone https://github.com/launchdarkly-labs/side-project-researcher.git
cd side-project-researcher
pip install -r requirements.txt
cp .env.example .env
# Edit .env with your SDK key and Anthropic API key
python side_project_launcher_langgraph.py
```
You'll need both the LaunchDarkly SDK key (from your project's SDK settings) and your Anthropic API key in the `.env` file. The assistant can surface the SDK key from your project details, but store it in `.env` rather than hardcoding it.
The app prompts you for your idea details:
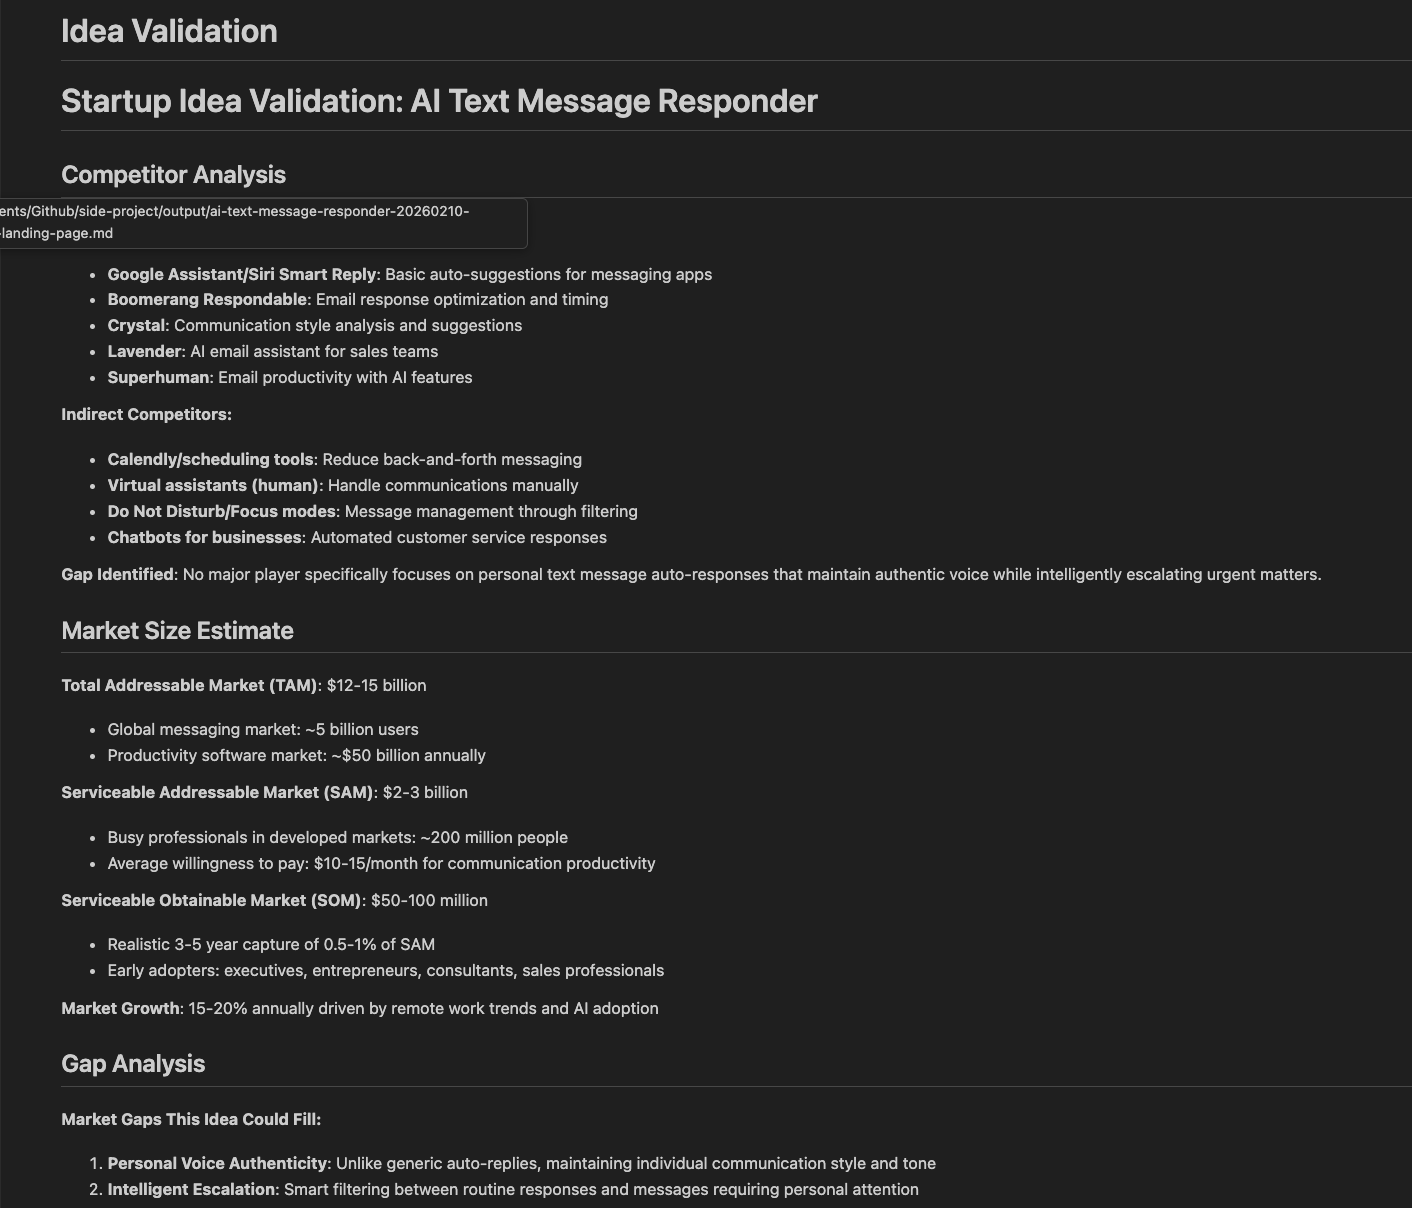
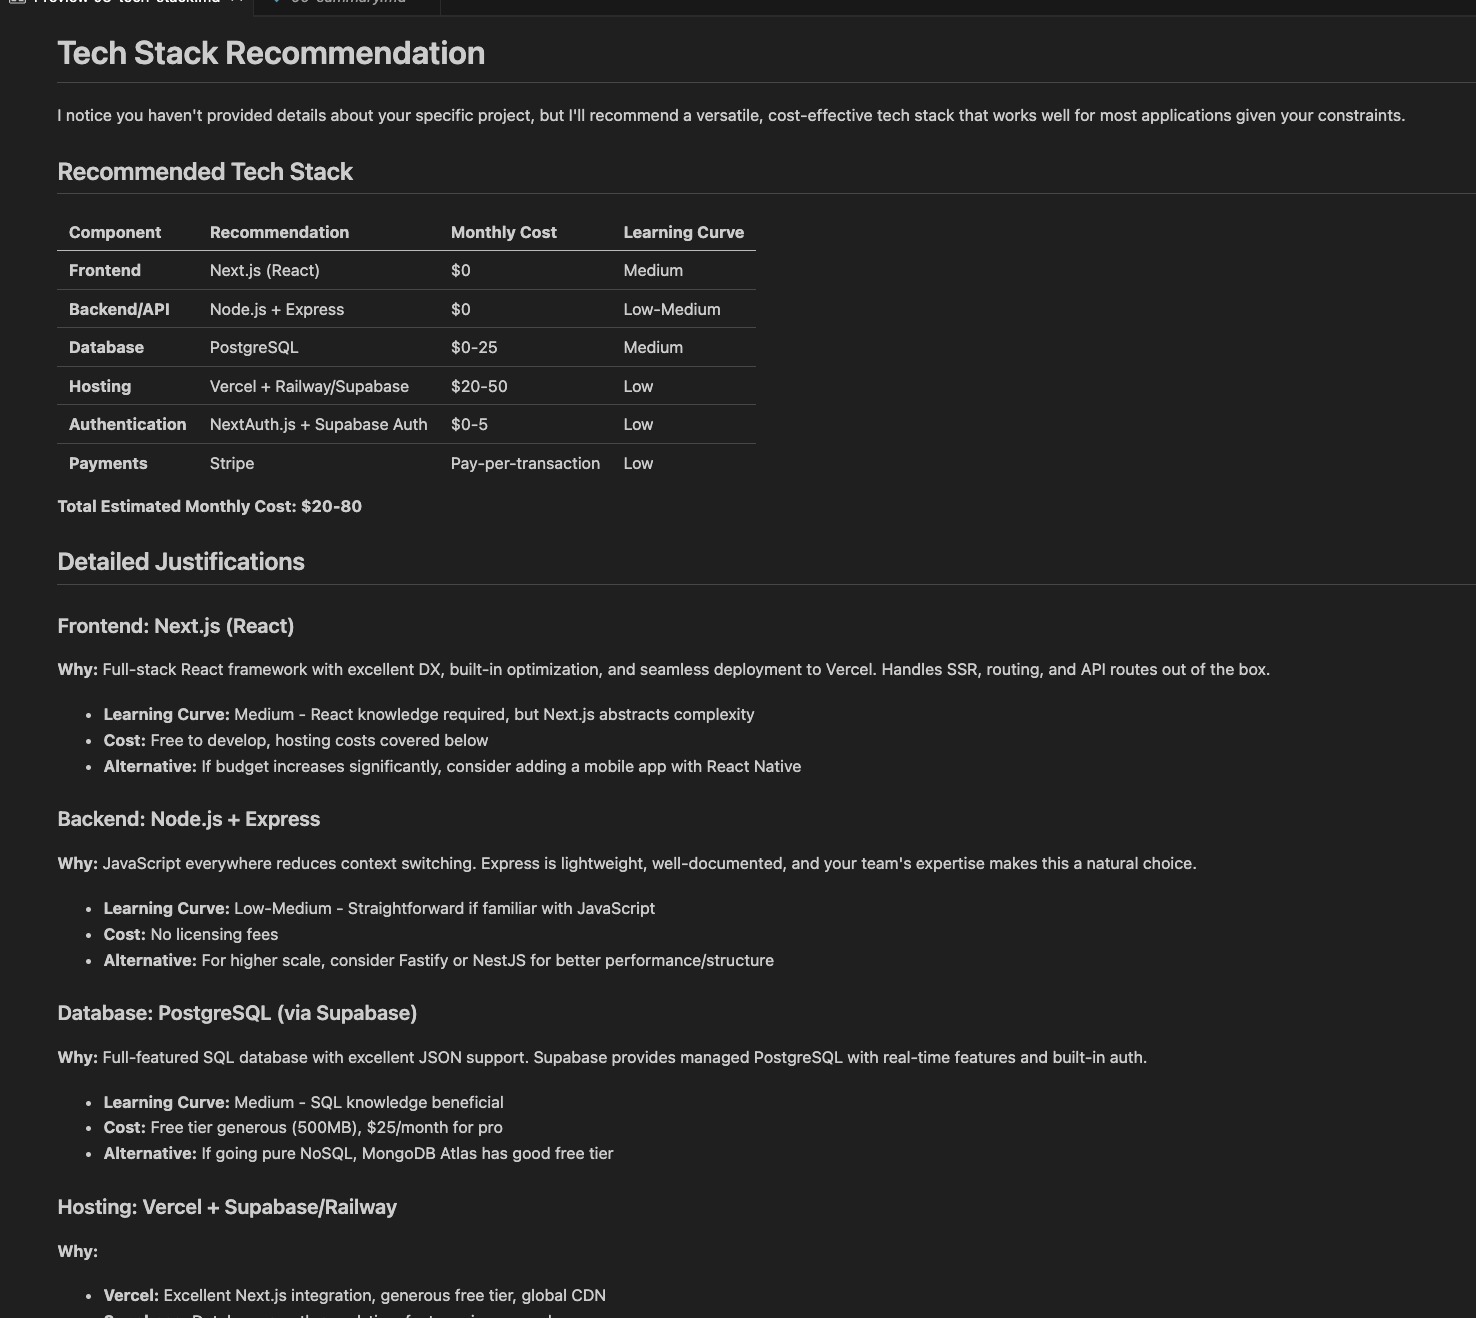
 Then each agent runs in sequence, fetching its config from LaunchDarkly and generating output:
 ## Connect to your framework
The config stores your model, instructions, and tools. The SDK fetches the config and handles variable substitution automatically.
**Code snippets show the pattern**
The snippets below show the integration pattern. They omit imports, error handling, and tool wiring for brevity. For complete, runnable code, use the [sample repo](https://github.com/launchdarkly-labs/side-project-researcher).
### Initialize the SDK
```python lines wrap theme={null}
import ldclient
from ldclient import Context
from ldclient.config import Config
from ldai import LDAIClient, AIAgentConfigDefault
# Initialize once at startup
SDK_KEY = os.environ.get('LAUNCHDARKLY_SDK_KEY')
ldclient.set_config(Config(SDK_KEY))
ld_client = ldclient.get()
ai_client = LDAIClient(ld_client)
```
### Fetch agent configs
```python lines wrap theme={null}
def build_context(user_id: str, **attributes):
"""Build LaunchDarkly context for targeting."""
builder = Context.builder(user_id)
for key, value in attributes.items():
builder.set(key, value)
return builder.build()
def get_agent_config(config_key: str, context: Context, variables: dict = None):
"""Get agent-mode config from LaunchDarkly."""
fallback = AIAgentConfigDefault(enabled=False)
return ai_client.agent_config(config_key, context, fallback, variables or {})
```
### Wire it to LangGraph
LangGraph orchestrates multi-agent workflows as a graph of nodes, but you can use any orchestrator—CrewAI, LlamaIndex, Bedrock AgentCore, or custom code. To compare options, read [Compare AI orchestrators](/docs/tutorials/ai-orchestrators).
By wiring configs to each node, your agents fetch their model, instructions, and tools dynamically from LaunchDarkly. This lets you swap models within a provider (e.g., Sonnet to Haiku), update prompts, or disable agents without redeploying.
**Tools require runtime handlers**
The config defines tool schemas, but your code must implement the actual tool handlers. The sample repo shows how to bind `config.tools` to LangChain tool functions. For this tutorial, the tools are defined but not wired—the agents respond based on their instructions alone.
Each agent becomes a node in your graph:
```python expandable lines wrap theme={null}
from langchain_anthropic import ChatAnthropic
from langchain_core.messages import HumanMessage, SystemMessage
from langgraph.graph import StateGraph, END
def idea_validator_node(state: SideProjectState) -> SideProjectState:
context = build_context(state["user_id"])
config = get_agent_config("idea-validator", context, {
"idea": state["idea"],
"target_audience": state["target_audience"],
"problem_statement": state["problem_statement"]
})
if config.enabled:
tracker = config.create_tracker()
llm = ChatAnthropic(model=config.model.name)
messages = [
SystemMessage(content=config.instructions),
HumanMessage(content="Please validate this idea and provide your analysis.")
]
response = llm.invoke(messages)
state["idea_validation"] = response.content
tracker.track_success()
return state
# Build the graph
workflow = StateGraph(SideProjectState)
workflow.add_node("validate_idea", idea_validator_node)
workflow.add_node("write_landing_page", landing_page_writer_node)
workflow.add_node("recommend_stack", tech_stack_advisor_node)
workflow.set_entry_point("validate_idea")
workflow.add_edge("validate_idea", "write_landing_page")
workflow.add_edge("write_landing_page", "recommend_stack")
workflow.add_edge("recommend_stack", END)
app = workflow.compile()
# Don't forget to flush before exiting
ld_client.flush()
```
To see a full example running across LangGraph, Strands, and OpenAI Swarm, read [Compare AI orchestrators](/docs/tutorials/ai-orchestrators).
## What you can do next
Once your agents are in LaunchDarkly:
* **A/B test variations**: split traffic between prompt variations or model sizes (e.g., Sonnet vs Haiku) to see which performs better
* **Target by segment**: premium users get one variation, free users get another
* **Kill switch**: disable a misbehaving agent instantly from the UI
* **Track costs**: monitor tokens and latency per variation
To learn more about targeting and experimentation, read [AgentControl best practices](/docs/guides/agentcontrol/best-practices).
## Troubleshooting
**Skills installed but not working**: Restart your editor after installing skills. They load on startup.
**"Permission denied" errors**: Check that your API token has `createProject` and `createAIConfig` permissions. The `writer` role includes both.
**Config comes back disabled**: Your targeting rules may not match the context you're passing. Check that default targeting is enabled, or that your context attributes match your rules.
**Tools defined but not executing**: The config defines tool schemas, but your code must implement handlers. See the sample repo for tool binding examples.
**Can't find SDK key**: After Agent Skills creates your project, find the SDK key in your project's **Settings > Environments > SDK key**. Copy it to your `.env` file.
## FAQ
### Do I need Claude Code, or does this work in Cursor/Windsurf?
Agent Skills work in any editor that supports the [Agent Skills specification](https://agentskills.io/specification). This includes Claude Code, Cursor, and Windsurf. The installation process is the same.
### What's the difference between Agent Skills and the MCP server?
Both give your AI assistant access to LaunchDarkly. Agent Skills are text-based playbooks that teach the assistant workflows. The MCP server exposes LaunchDarkly's API as tools. You can use either or both.
### What permissions does my API token need?
The `writer` role works, or use a custom role with `createProject` and `createAIConfig` permissions.
### Where do I see the created configs?
In the LaunchDarkly UI: go to your project, then **AgentControl** in the left sidebar. Each config shows its instructions, model, tools, and targeting rules.
### How do I delete or reset generated configs?
In the LaunchDarkly UI, open the config and click **Archive** (or **Delete** if available). Or ask the assistant: "Delete the config called researcher-agent in project valentines-day."
### Can I use this with frameworks other than LangGraph?
Yes. The SDK returns model name, instructions, and tools as data. You wire that into whatever framework you use: CrewAI, LlamaIndex, Bedrock AgentCore, or custom code.
### Does this work for completion mode (chat) or just agent mode?
Both. Use `ai_client.completion_config()` for completion mode (chat with message arrays) or `ai_client.agent_config()` for agent mode (instructions for multi-step workflows). To learn more, read [Agent mode vs completion mode](/docs/guides/agentcontrol/agent-vs-completion).
## Next steps
* Read the [Python AI SDK Reference](/docs/sdk/ai/python) for detailed SDK usage
* Try [building a data extraction pipeline](/docs/tutorials/data-extraction-pipeline) to deploy configs with Vercel
* [Beyond n8n for Workflow Automation: Agent Graphs](/docs/tutorials/agent-graphs) - Externalize the multi-agent topology you just built into a visual graph
* [Building Framework-Agnostic AI Swarms](/docs/tutorials/ai-orchestrators) - Run the same generated configs across LangGraph, Strands, and OpenAI Swarm
* [Offline Evaluation of RAG-Grounded Answers](/docs/tutorials/offline-evals) - Add a regression-testing pass for the agents you generated
* [When to add online evals](/docs/tutorials/when-to-add-online-evals) - Decide when to attach judges to your generated configs in production
## Connect to your framework
The config stores your model, instructions, and tools. The SDK fetches the config and handles variable substitution automatically.
**Code snippets show the pattern**
The snippets below show the integration pattern. They omit imports, error handling, and tool wiring for brevity. For complete, runnable code, use the [sample repo](https://github.com/launchdarkly-labs/side-project-researcher).
### Initialize the SDK
```python lines wrap theme={null}
import ldclient
from ldclient import Context
from ldclient.config import Config
from ldai import LDAIClient, AIAgentConfigDefault
# Initialize once at startup
SDK_KEY = os.environ.get('LAUNCHDARKLY_SDK_KEY')
ldclient.set_config(Config(SDK_KEY))
ld_client = ldclient.get()
ai_client = LDAIClient(ld_client)
```
### Fetch agent configs
```python lines wrap theme={null}
def build_context(user_id: str, **attributes):
"""Build LaunchDarkly context for targeting."""
builder = Context.builder(user_id)
for key, value in attributes.items():
builder.set(key, value)
return builder.build()
def get_agent_config(config_key: str, context: Context, variables: dict = None):
"""Get agent-mode config from LaunchDarkly."""
fallback = AIAgentConfigDefault(enabled=False)
return ai_client.agent_config(config_key, context, fallback, variables or {})
```
### Wire it to LangGraph
LangGraph orchestrates multi-agent workflows as a graph of nodes, but you can use any orchestrator—CrewAI, LlamaIndex, Bedrock AgentCore, or custom code. To compare options, read [Compare AI orchestrators](/docs/tutorials/ai-orchestrators).
By wiring configs to each node, your agents fetch their model, instructions, and tools dynamically from LaunchDarkly. This lets you swap models within a provider (e.g., Sonnet to Haiku), update prompts, or disable agents without redeploying.
**Tools require runtime handlers**
The config defines tool schemas, but your code must implement the actual tool handlers. The sample repo shows how to bind `config.tools` to LangChain tool functions. For this tutorial, the tools are defined but not wired—the agents respond based on their instructions alone.
Each agent becomes a node in your graph:
```python expandable lines wrap theme={null}
from langchain_anthropic import ChatAnthropic
from langchain_core.messages import HumanMessage, SystemMessage
from langgraph.graph import StateGraph, END
def idea_validator_node(state: SideProjectState) -> SideProjectState:
context = build_context(state["user_id"])
config = get_agent_config("idea-validator", context, {
"idea": state["idea"],
"target_audience": state["target_audience"],
"problem_statement": state["problem_statement"]
})
if config.enabled:
tracker = config.create_tracker()
llm = ChatAnthropic(model=config.model.name)
messages = [
SystemMessage(content=config.instructions),
HumanMessage(content="Please validate this idea and provide your analysis.")
]
response = llm.invoke(messages)
state["idea_validation"] = response.content
tracker.track_success()
return state
# Build the graph
workflow = StateGraph(SideProjectState)
workflow.add_node("validate_idea", idea_validator_node)
workflow.add_node("write_landing_page", landing_page_writer_node)
workflow.add_node("recommend_stack", tech_stack_advisor_node)
workflow.set_entry_point("validate_idea")
workflow.add_edge("validate_idea", "write_landing_page")
workflow.add_edge("write_landing_page", "recommend_stack")
workflow.add_edge("recommend_stack", END)
app = workflow.compile()
# Don't forget to flush before exiting
ld_client.flush()
```
To see a full example running across LangGraph, Strands, and OpenAI Swarm, read [Compare AI orchestrators](/docs/tutorials/ai-orchestrators).
## What you can do next
Once your agents are in LaunchDarkly:
* **A/B test variations**: split traffic between prompt variations or model sizes (e.g., Sonnet vs Haiku) to see which performs better
* **Target by segment**: premium users get one variation, free users get another
* **Kill switch**: disable a misbehaving agent instantly from the UI
* **Track costs**: monitor tokens and latency per variation
To learn more about targeting and experimentation, read [AgentControl best practices](/docs/guides/agentcontrol/best-practices).
## Troubleshooting
**Skills installed but not working**: Restart your editor after installing skills. They load on startup.
**"Permission denied" errors**: Check that your API token has `createProject` and `createAIConfig` permissions. The `writer` role includes both.
**Config comes back disabled**: Your targeting rules may not match the context you're passing. Check that default targeting is enabled, or that your context attributes match your rules.
**Tools defined but not executing**: The config defines tool schemas, but your code must implement handlers. See the sample repo for tool binding examples.
**Can't find SDK key**: After Agent Skills creates your project, find the SDK key in your project's **Settings > Environments > SDK key**. Copy it to your `.env` file.
## FAQ
### Do I need Claude Code, or does this work in Cursor/Windsurf?
Agent Skills work in any editor that supports the [Agent Skills specification](https://agentskills.io/specification). This includes Claude Code, Cursor, and Windsurf. The installation process is the same.
### What's the difference between Agent Skills and the MCP server?
Both give your AI assistant access to LaunchDarkly. Agent Skills are text-based playbooks that teach the assistant workflows. The MCP server exposes LaunchDarkly's API as tools. You can use either or both.
### What permissions does my API token need?
The `writer` role works, or use a custom role with `createProject` and `createAIConfig` permissions.
### Where do I see the created configs?
In the LaunchDarkly UI: go to your project, then **AgentControl** in the left sidebar. Each config shows its instructions, model, tools, and targeting rules.
### How do I delete or reset generated configs?
In the LaunchDarkly UI, open the config and click **Archive** (or **Delete** if available). Or ask the assistant: "Delete the config called researcher-agent in project valentines-day."
### Can I use this with frameworks other than LangGraph?
Yes. The SDK returns model name, instructions, and tools as data. You wire that into whatever framework you use: CrewAI, LlamaIndex, Bedrock AgentCore, or custom code.
### Does this work for completion mode (chat) or just agent mode?
Both. Use `ai_client.completion_config()` for completion mode (chat with message arrays) or `ai_client.agent_config()` for agent mode (instructions for multi-step workflows). To learn more, read [Agent mode vs completion mode](/docs/guides/agentcontrol/agent-vs-completion).
## Next steps
* Read the [Python AI SDK Reference](/docs/sdk/ai/python) for detailed SDK usage
* Try [building a data extraction pipeline](/docs/tutorials/data-extraction-pipeline) to deploy configs with Vercel
* [Beyond n8n for Workflow Automation: Agent Graphs](/docs/tutorials/agent-graphs) - Externalize the multi-agent topology you just built into a visual graph
* [Building Framework-Agnostic AI Swarms](/docs/tutorials/ai-orchestrators) - Run the same generated configs across LangGraph, Strands, and OpenAI Swarm
* [Offline Evaluation of RAG-Grounded Answers](/docs/tutorials/offline-evals) - Add a regression-testing pass for the agents you generated
* [When to add online evals](/docs/tutorials/when-to-add-online-evals) - Decide when to attach judges to your generated configs in production