> ## Documentation Index
> Fetch the complete documentation index at: https://launchdarkly.com/docs/llms.txt
> Use this file to discover all available pages before exploring further.
# Already using Datadog? Here's how to gate and observe your AI agent skills with LaunchDarkly (without OpenTelemetry)
export const BlogAuthor = ({date, avatar, alt, name}) => {
return
Published {date}
{avatar &&

}
{name}
;
};
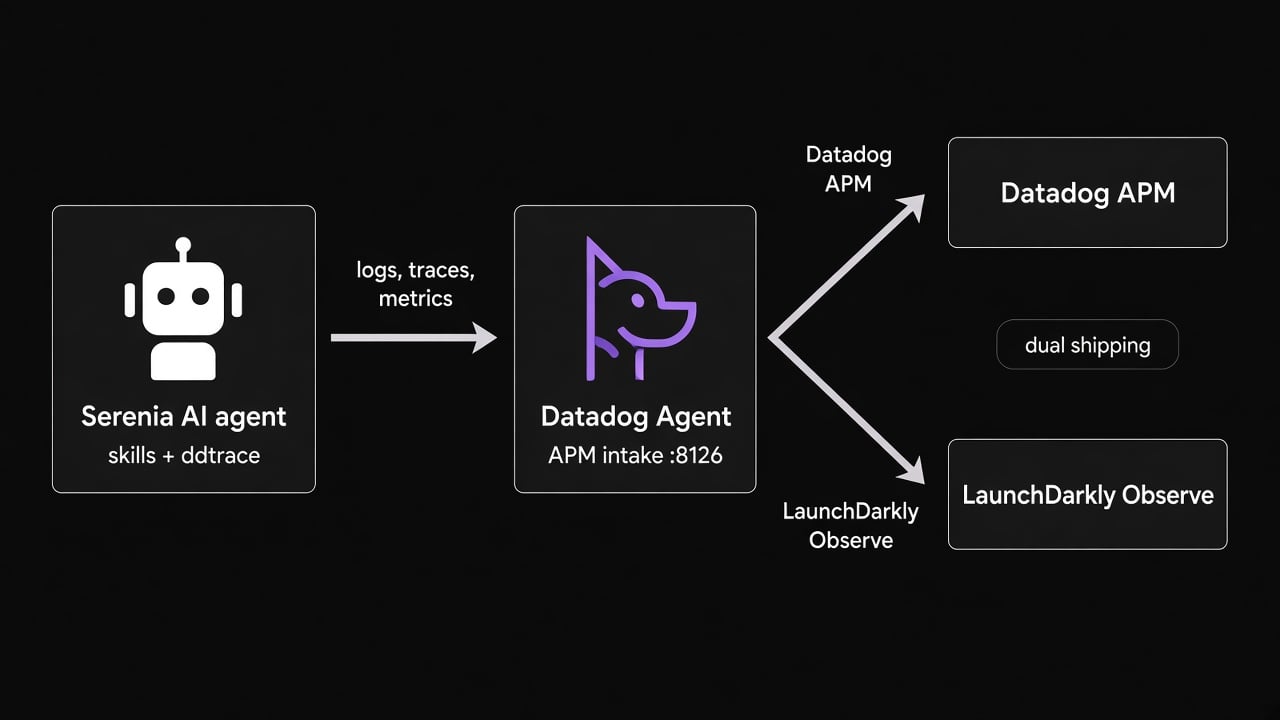 If you're already using Datadog to monitor your application, you can [forward your existing application performance monitoring (APM) trace data to LaunchDarkly using the Datadog Agent](/docs/home/observability/datadog-agent). No additional instrumentation required. This unlocks feature flags, Guarded Rollouts, and automatic rollbacks that use Observability data from your existing Datadog configuration.
This tutorial walks through that setup with **Serenia**, an AI assistant for an event space sales team. The higher-risk `qualify_lead` skill is gated by a feature flag. By the end, Datadog APM traces flow into both Datadog and LaunchDarkly.
All code for this tutorial is in the [`tutorial-datadog-part-one` branch](https://github.com/arober39/serenia-agent-skills/tree/tutorial-datadog-part-one) of the Serenia repo.
## Prerequisites
To complete this tutorial, you need:
* A [LaunchDarkly account](https://app.launchdarkly.com/signup) with Writer permissions
* A [Datadog account](https://www.datadoghq.com/) with the Datadog Agent installed
* An [Anthropic API key](https://console.anthropic.com/)
* Cursor, with the [LaunchDarkly Model Context Protocol (MCP) server](https://mcp.launchdarkly.com/mcp/launchdarkly) configured
* Python 3 and Node.js, to run the sample app
* An optional [Airtable account](https://airtable.com/), if you want skills to write lead records
## Serenia: Sales team AI assistant
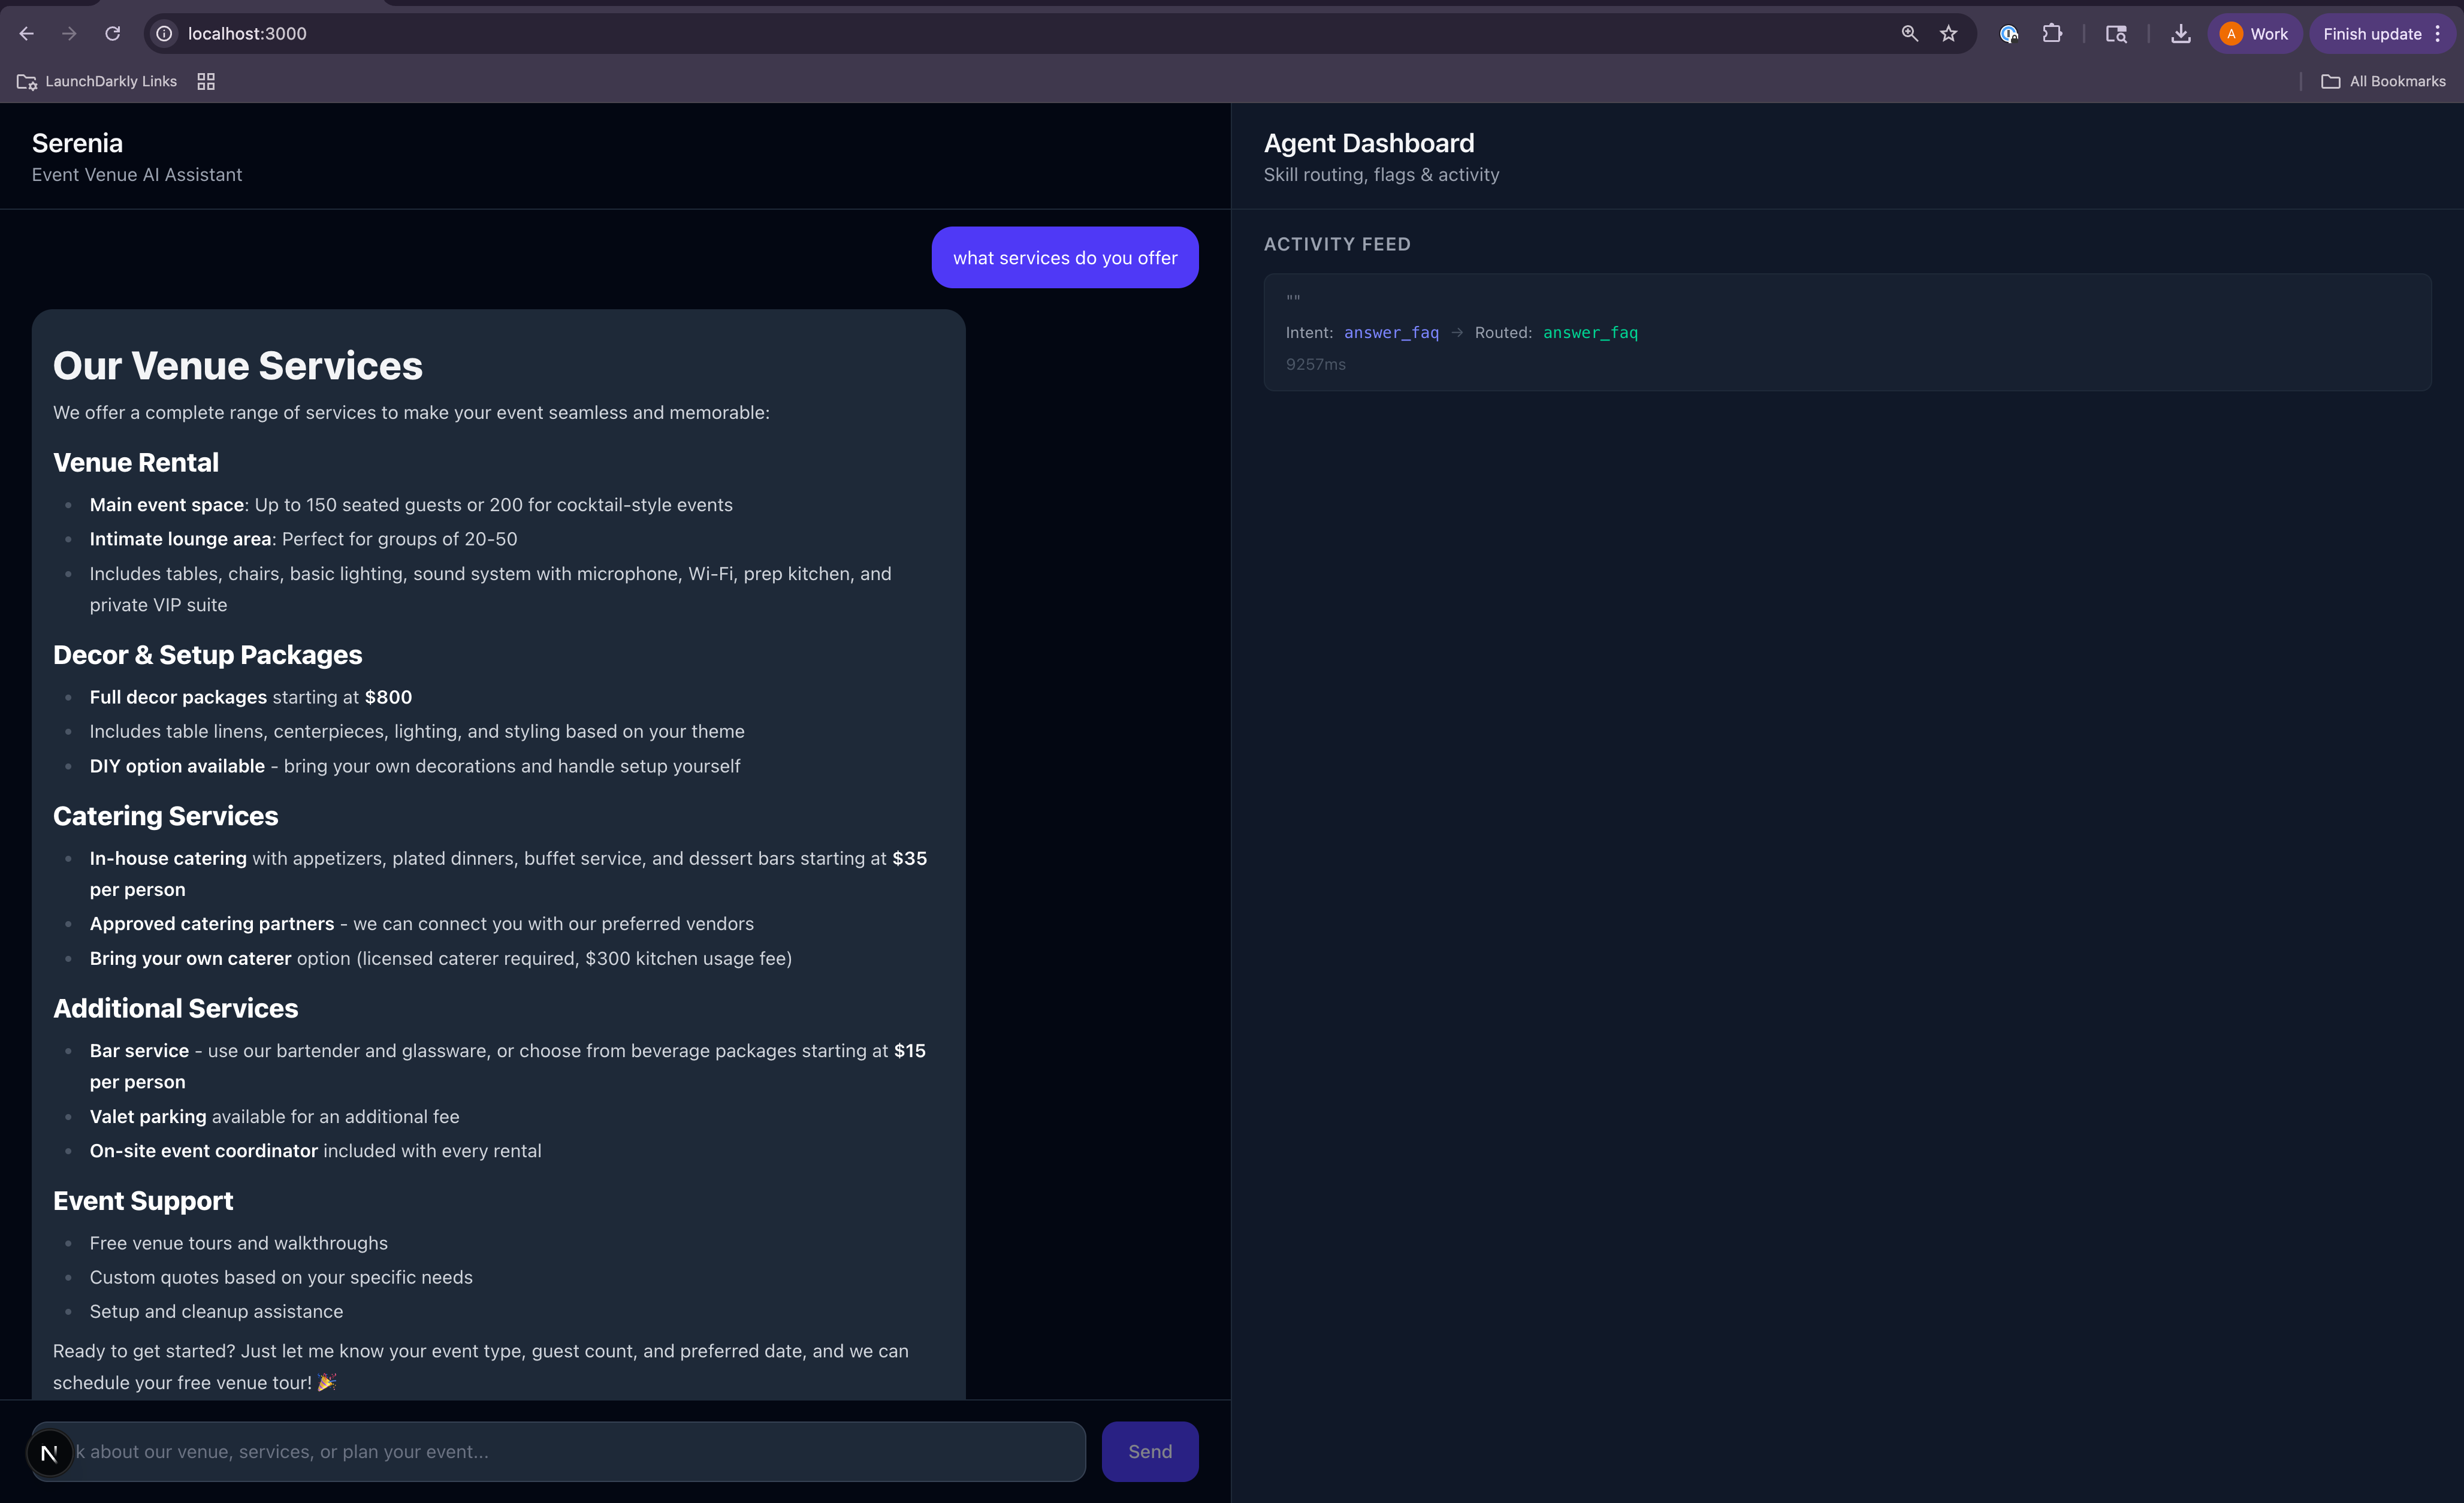
When a customer sends a message about reserving an event space, the agent classifies their intent and routes it to a skill. Skills can write lead information to Airtable for sales follow-up.
If you're already using Datadog to monitor your application, you can [forward your existing application performance monitoring (APM) trace data to LaunchDarkly using the Datadog Agent](/docs/home/observability/datadog-agent). No additional instrumentation required. This unlocks feature flags, Guarded Rollouts, and automatic rollbacks that use Observability data from your existing Datadog configuration.
This tutorial walks through that setup with **Serenia**, an AI assistant for an event space sales team. The higher-risk `qualify_lead` skill is gated by a feature flag. By the end, Datadog APM traces flow into both Datadog and LaunchDarkly.
All code for this tutorial is in the [`tutorial-datadog-part-one` branch](https://github.com/arober39/serenia-agent-skills/tree/tutorial-datadog-part-one) of the Serenia repo.
## Prerequisites
To complete this tutorial, you need:
* A [LaunchDarkly account](https://app.launchdarkly.com/signup) with Writer permissions
* A [Datadog account](https://www.datadoghq.com/) with the Datadog Agent installed
* An [Anthropic API key](https://console.anthropic.com/)
* Cursor, with the [LaunchDarkly Model Context Protocol (MCP) server](https://mcp.launchdarkly.com/mcp/launchdarkly) configured
* Python 3 and Node.js, to run the sample app
* An optional [Airtable account](https://airtable.com/), if you want skills to write lead records
## Serenia: Sales team AI assistant
When a customer sends a message about reserving an event space, the agent classifies their intent and routes it to a skill. Skills can write lead information to Airtable for sales follow-up.
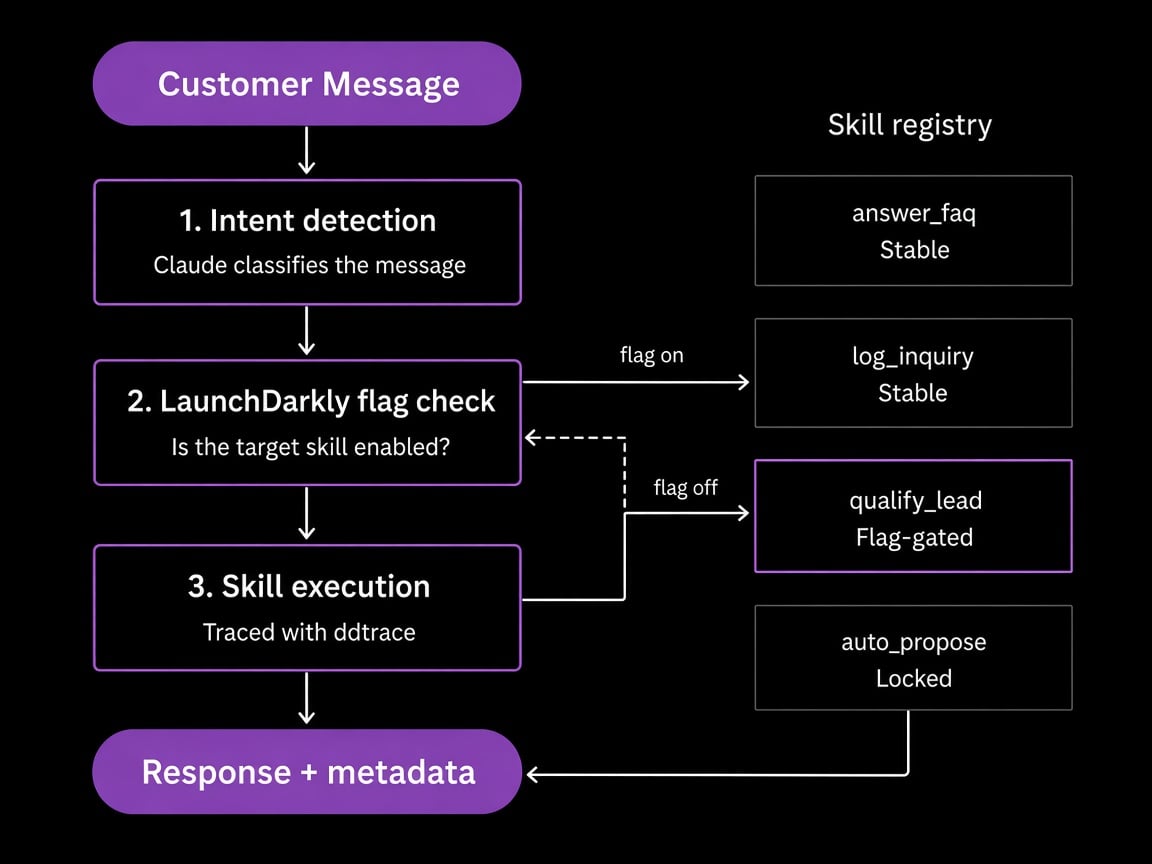 The agent uses these skills:
| Skill | Status | What it does |
| - | - | - |
| `answer_faq` | Stable | Answers venue questions using a knowledge base and Claude |
| `log_inquiry` | Stable | Records prospect contact info to Airtable |
| `qualify_lead` | Flag-gated | Scores leads as hot, warm, or cold and chooses a follow-up action |
| `auto_propose` | Locked | Generates custom event proposals (not used in this tutorial) |
`qualify_lead` is heavier and higher-risk than `log_inquiry`. The `qualify-lead-skill` flag gates it. If the flag is off, the agent falls back to `log_inquiry`.
## Clone the repo
To clone the demo and install dependencies:
```shell title="Clone and set up the project" lines wrap theme={null}
git clone https://github.com/arober39/serenia-agent-skills.git
cd serenia-agent-skills
git checkout tutorial-datadog-part-one
python -m venv venv && source venv/bin/activate
pip install -r requirements.txt
```
## Set up credentials
Copy the example environment file and fill in your keys:
```shell title="Copy environment file" lines wrap theme={null}
cp .env.example .env
```
You need credentials from these services:
| Service | Variable(s) | Where to find it |
| - | - | - |
| **Anthropic** | `ANTHROPIC_API_KEY` | [console.anthropic.com](https://console.anthropic.com/) > API Keys |
| **LaunchDarkly** | `LD_SDK_KEY` (server-side SDK key), `LD_CLIENT_SIDE_ID` | Project settings > Environments |
| **Datadog** | `DD_API_KEY`, `DD_SITE` | Organization Settings > API Keys |
| **Airtable** | `AIRTABLE_PAT`, `AIRTABLE_BASE_ID` | [airtable.com/create/tokens](https://airtable.com/create/tokens) |
For `ddtrace`, set `DD_TAGS` to your LaunchDarkly client-side ID. LaunchDarkly uses that tag to route traces to the correct project. Do not use `OTEL_RESOURCE_ATTRIBUTES` for this.
Your `.env` should look like this:
```shell title="Example .env file" lines wrap theme={null}
ANTHROPIC_API_KEY=sk-ant-your-key
LD_SDK_KEY=sdk-your-key
LD_CLIENT_SIDE_ID=your-client-side-id
DD_API_KEY=your-datadog-api-key
DD_SITE=datadoghq.com
DD_AGENT_HOST=localhost
DD_SERVICE=serenia-agent
DD_TAGS=launchdarkly.project_id:YOUR_CLIENT_SIDE_ID
AIRTABLE_PAT=patYourToken
AIRTABLE_BASE_ID=appYourBaseId
```
### Configure Airtable
Airtable is optional. If credentials are not set, skills still run and return responses. They skip the customer relationship management (CRM) write.
The `log_inquiry` and `qualify_lead` skills write to a **Leads** table. Create these fields:
| Field | Description |
| - | - |
| Name | Customer's name |
| Email | Customer's email address |
| Message | The customer's original message |
| Status | `"New"` or `"Qualified"` |
| Lead Score | `"Hot"`, `"Warm"`, or `"Cold"` |
| Lead Action | `"Scheduled call"`, `"Sent brochure"`, or `"Sent product info"` |
| Qualification Reason | LLM-generated explanation of the score |
The base ID is in your Airtable URL: `airtable.com//tbl`. Generate a personal access token with `data.records:write` on your base.
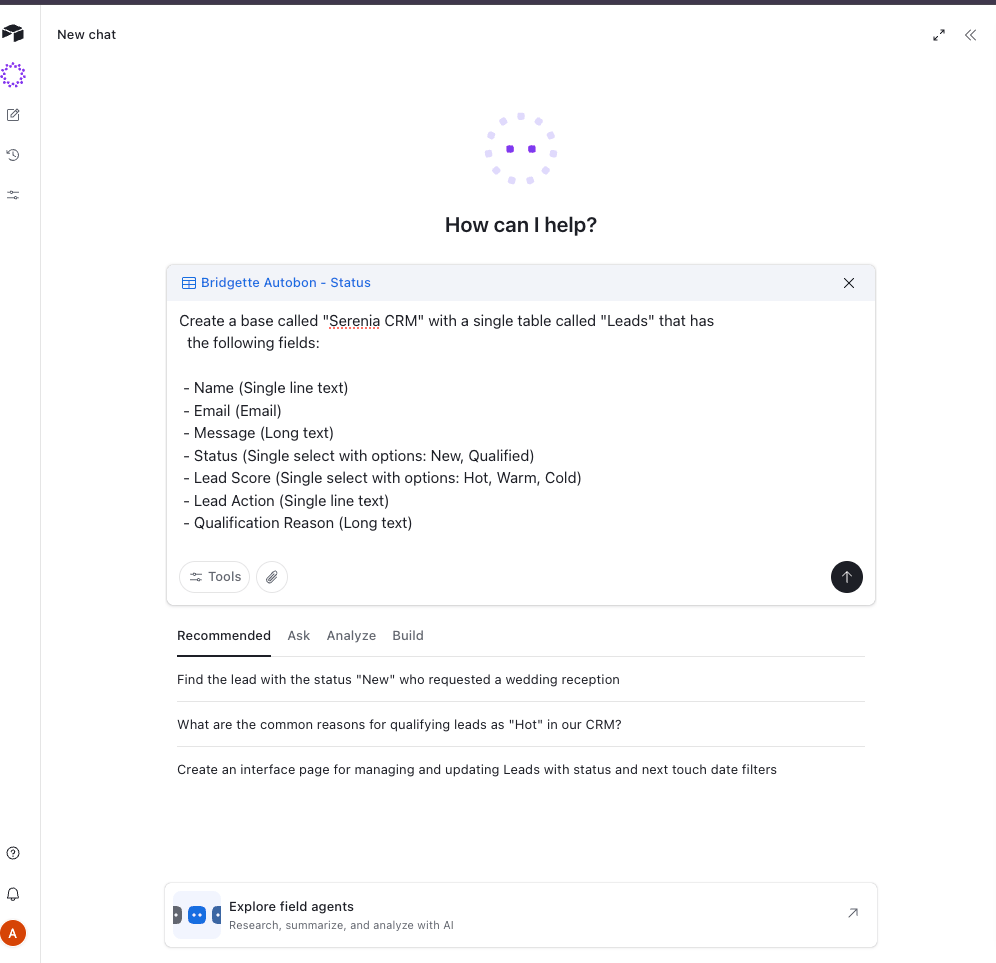
To create the base with the Airtable AI assistant, use this prompt:
```lines wrap theme={null}
Create a base called "Serenia CRM" with a single table called "Leads" that has
the following fields:
- Name (Single line text)
- Email (Email)
- Message (Long text)
- Status (Single select with options: New, Qualified)
- Lead Score (Single select with options: Hot, Warm, Cold)
- Lead Action (Single line text)
- Qualification Reason (Long text)
This table will be used to track customer inquiries and qualified leads for an
event venue. The "log_inquiry" skill creates records with Status "New". The
"qualify_lead" skill creates records with Status "Qualified" and fills in Lead
Score, Lead Action, and Qualification Reason.
```
The agent uses these skills:
| Skill | Status | What it does |
| - | - | - |
| `answer_faq` | Stable | Answers venue questions using a knowledge base and Claude |
| `log_inquiry` | Stable | Records prospect contact info to Airtable |
| `qualify_lead` | Flag-gated | Scores leads as hot, warm, or cold and chooses a follow-up action |
| `auto_propose` | Locked | Generates custom event proposals (not used in this tutorial) |
`qualify_lead` is heavier and higher-risk than `log_inquiry`. The `qualify-lead-skill` flag gates it. If the flag is off, the agent falls back to `log_inquiry`.
## Clone the repo
To clone the demo and install dependencies:
```shell title="Clone and set up the project" lines wrap theme={null}
git clone https://github.com/arober39/serenia-agent-skills.git
cd serenia-agent-skills
git checkout tutorial-datadog-part-one
python -m venv venv && source venv/bin/activate
pip install -r requirements.txt
```
## Set up credentials
Copy the example environment file and fill in your keys:
```shell title="Copy environment file" lines wrap theme={null}
cp .env.example .env
```
You need credentials from these services:
| Service | Variable(s) | Where to find it |
| - | - | - |
| **Anthropic** | `ANTHROPIC_API_KEY` | [console.anthropic.com](https://console.anthropic.com/) > API Keys |
| **LaunchDarkly** | `LD_SDK_KEY` (server-side SDK key), `LD_CLIENT_SIDE_ID` | Project settings > Environments |
| **Datadog** | `DD_API_KEY`, `DD_SITE` | Organization Settings > API Keys |
| **Airtable** | `AIRTABLE_PAT`, `AIRTABLE_BASE_ID` | [airtable.com/create/tokens](https://airtable.com/create/tokens) |
For `ddtrace`, set `DD_TAGS` to your LaunchDarkly client-side ID. LaunchDarkly uses that tag to route traces to the correct project. Do not use `OTEL_RESOURCE_ATTRIBUTES` for this.
Your `.env` should look like this:
```shell title="Example .env file" lines wrap theme={null}
ANTHROPIC_API_KEY=sk-ant-your-key
LD_SDK_KEY=sdk-your-key
LD_CLIENT_SIDE_ID=your-client-side-id
DD_API_KEY=your-datadog-api-key
DD_SITE=datadoghq.com
DD_AGENT_HOST=localhost
DD_SERVICE=serenia-agent
DD_TAGS=launchdarkly.project_id:YOUR_CLIENT_SIDE_ID
AIRTABLE_PAT=patYourToken
AIRTABLE_BASE_ID=appYourBaseId
```
### Configure Airtable
Airtable is optional. If credentials are not set, skills still run and return responses. They skip the customer relationship management (CRM) write.
The `log_inquiry` and `qualify_lead` skills write to a **Leads** table. Create these fields:
| Field | Description |
| - | - |
| Name | Customer's name |
| Email | Customer's email address |
| Message | The customer's original message |
| Status | `"New"` or `"Qualified"` |
| Lead Score | `"Hot"`, `"Warm"`, or `"Cold"` |
| Lead Action | `"Scheduled call"`, `"Sent brochure"`, or `"Sent product info"` |
| Qualification Reason | LLM-generated explanation of the score |
The base ID is in your Airtable URL: `airtable.com//tbl`. Generate a personal access token with `data.records:write` on your base.
To create the base with the Airtable AI assistant, use this prompt:
```lines wrap theme={null}
Create a base called "Serenia CRM" with a single table called "Leads" that has
the following fields:
- Name (Single line text)
- Email (Email)
- Message (Long text)
- Status (Single select with options: New, Qualified)
- Lead Score (Single select with options: Hot, Warm, Cold)
- Lead Action (Single line text)
- Qualification Reason (Long text)
This table will be used to track customer inquiries and qualified leads for an
event venue. The "log_inquiry" skill creates records with Status "New". The
"qualify_lead" skill creates records with Status "Qualified" and fills in Lead
Score, Lead Action, and Qualification Reason.
```
 ## Run the app and verify Datadog traces
The sample app is already instrumented with [`ddtrace`](https://docs.datadoghq.com/tracing/trace_collection/dd_libraries/python/). Start it, send a request, and confirm traces appear in Datadog APM before you forward anything to LaunchDarkly.
Start the API:
```shell title="Start the Serenia API" lines wrap theme={null}
uvicorn server:app --reload --port 8000
```
In a second terminal, start the UI:
```shell title="Start the Serenia UI" lines wrap theme={null}
cd ui
npm install
npm run dev
```
Generate traces by chatting with the agent at `http://localhost:3000`, or with `curl`:
```shell title="Send a test message via curl" lines wrap theme={null}
curl -X POST http://localhost:8000/api/chat \
-H "Content-Type: application/json" \
-d '{"message": "Do you host baby showers?"}'
```
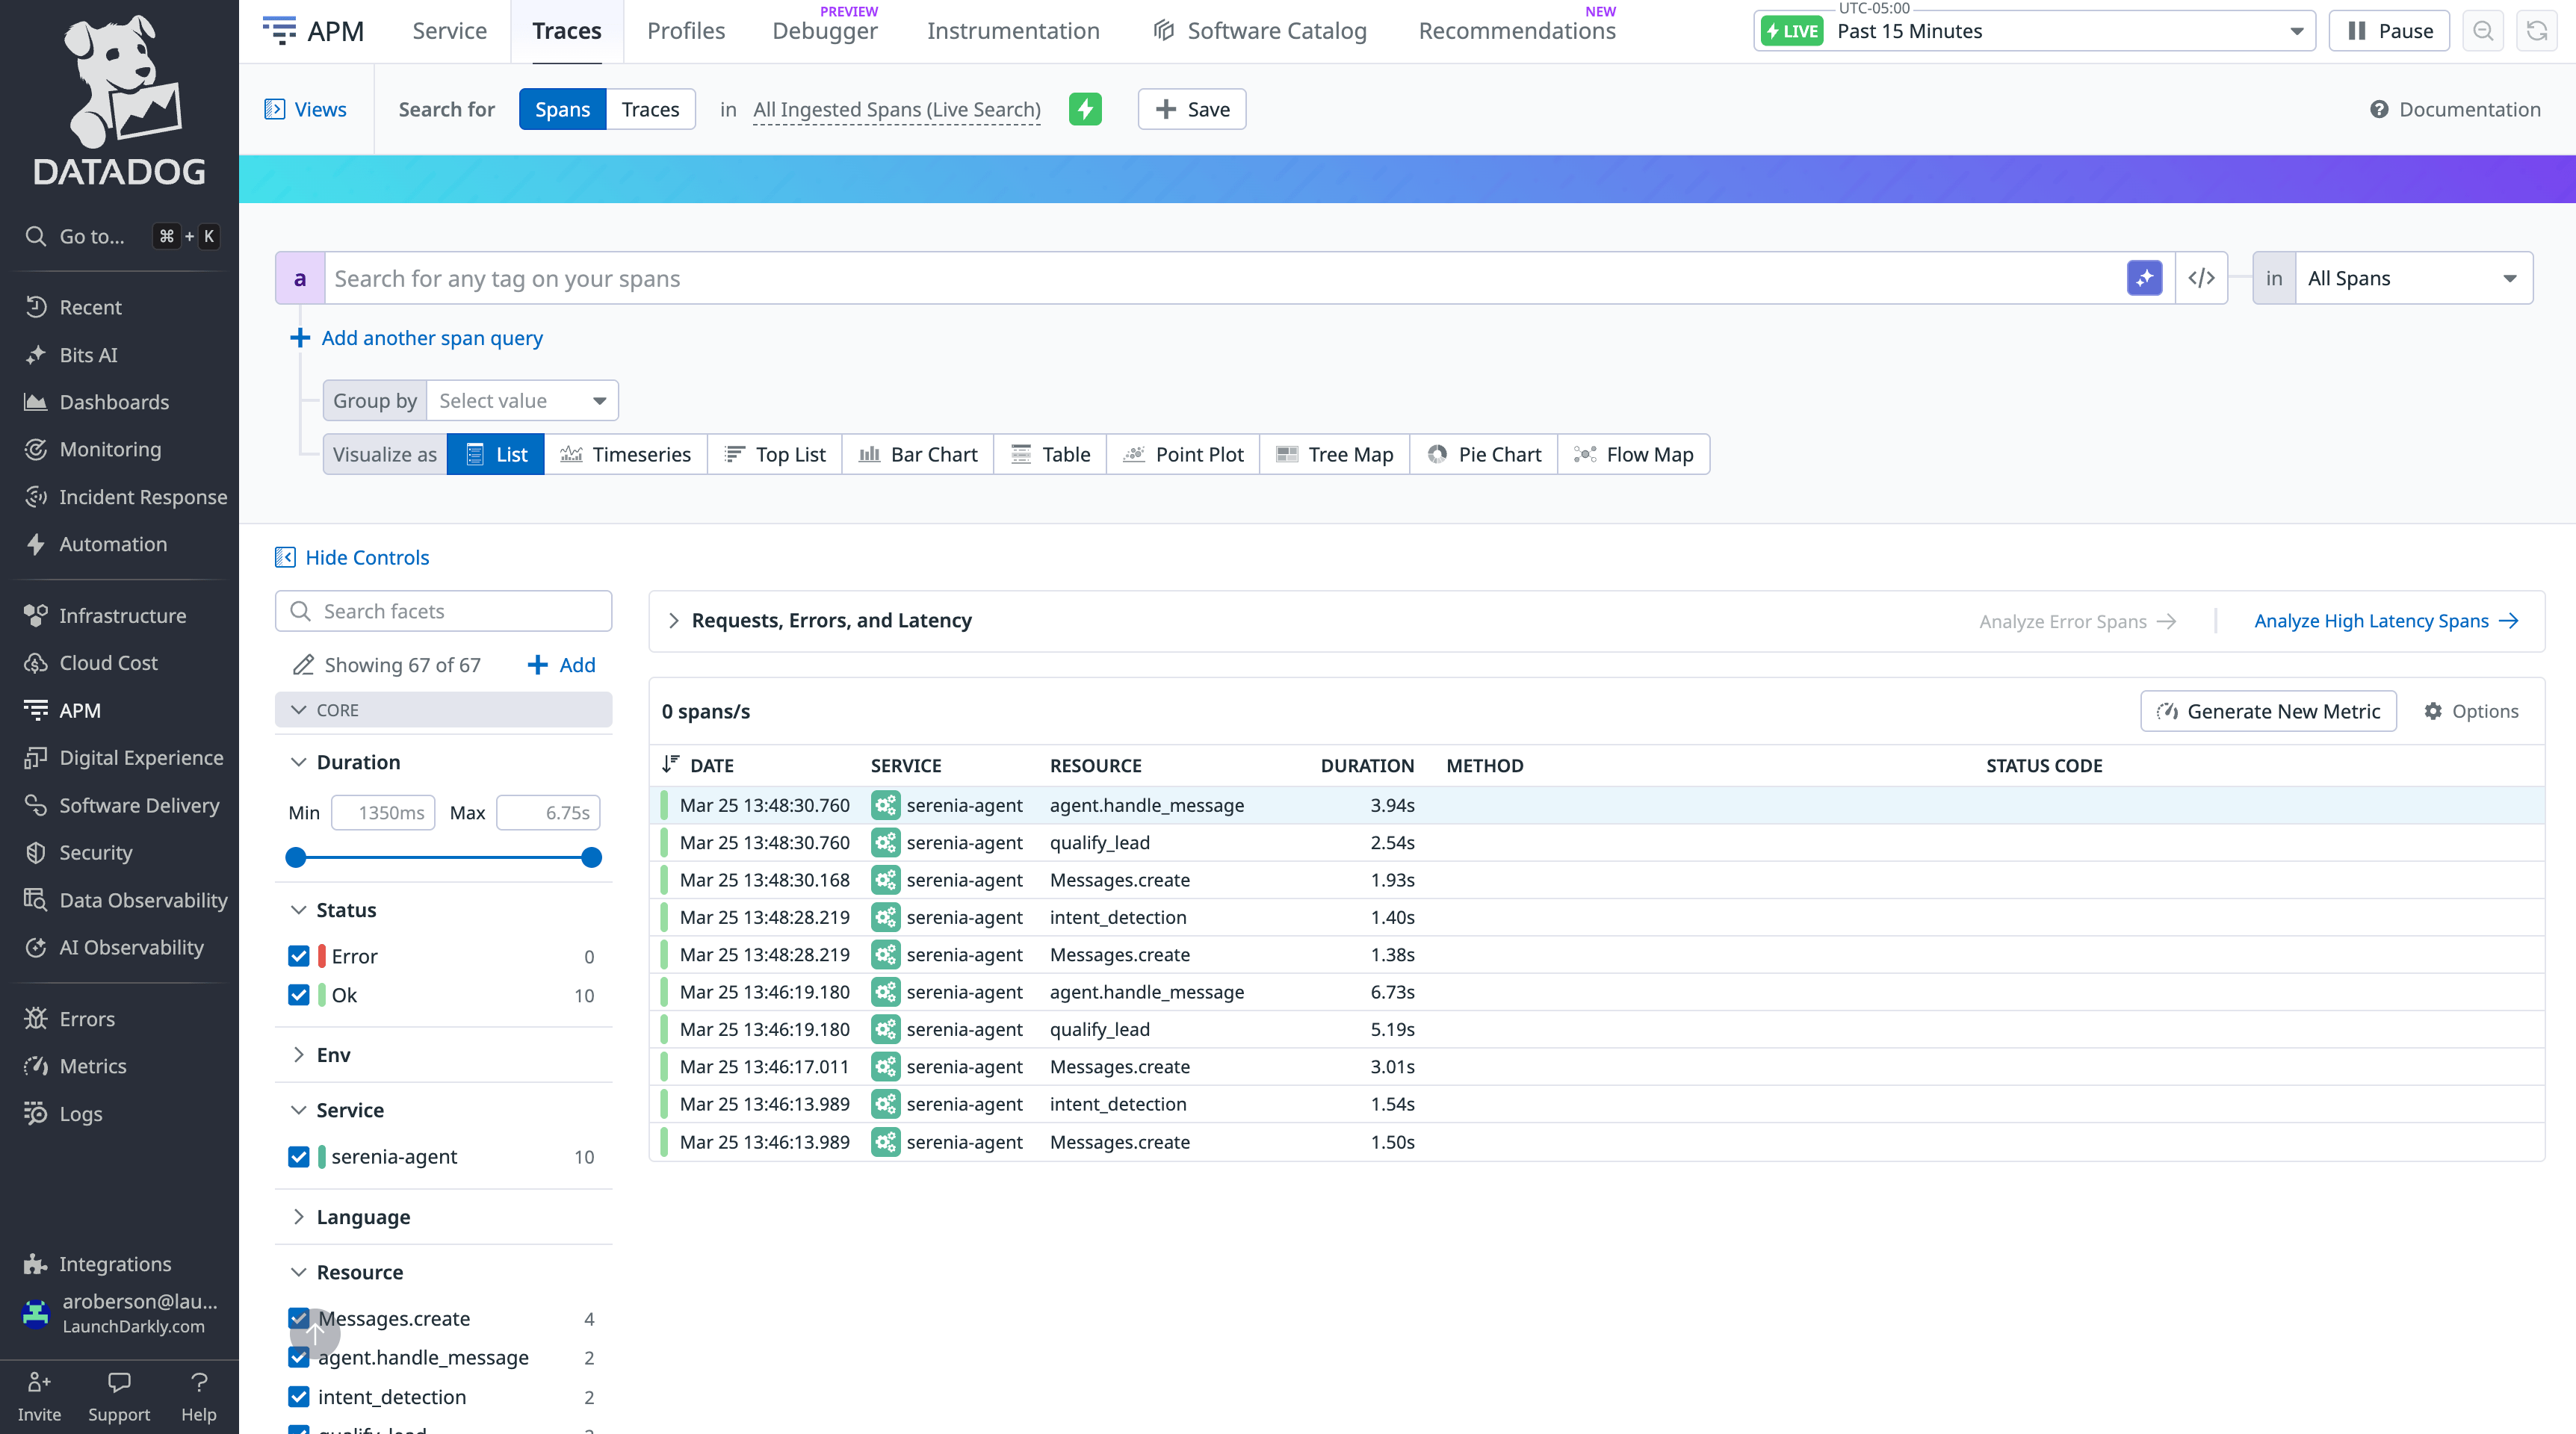
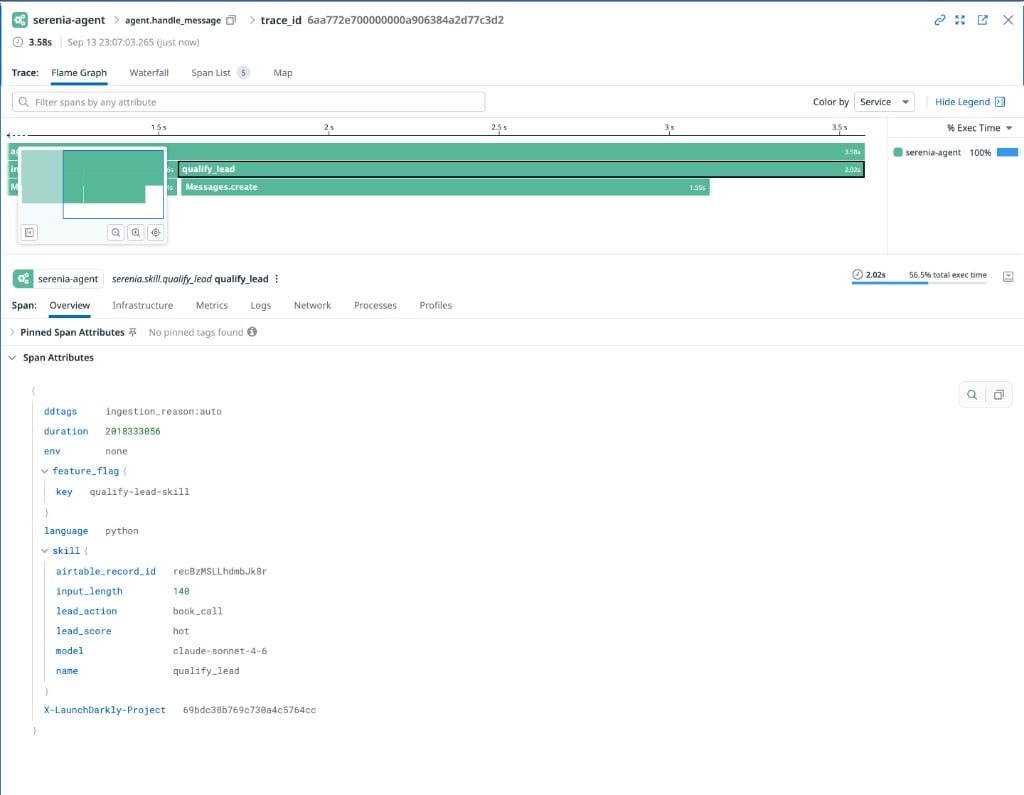
Open **Datadog > APM > Traces** and filter by `service:serenia-agent`. You should see traces for each request, with Anthropic calls nested inside skill spans such as `qualify_lead` or `agent.handle_message`.
## Run the app and verify Datadog traces
The sample app is already instrumented with [`ddtrace`](https://docs.datadoghq.com/tracing/trace_collection/dd_libraries/python/). Start it, send a request, and confirm traces appear in Datadog APM before you forward anything to LaunchDarkly.
Start the API:
```shell title="Start the Serenia API" lines wrap theme={null}
uvicorn server:app --reload --port 8000
```
In a second terminal, start the UI:
```shell title="Start the Serenia UI" lines wrap theme={null}
cd ui
npm install
npm run dev
```
Generate traces by chatting with the agent at `http://localhost:3000`, or with `curl`:
```shell title="Send a test message via curl" lines wrap theme={null}
curl -X POST http://localhost:8000/api/chat \
-H "Content-Type: application/json" \
-d '{"message": "Do you host baby showers?"}'
```
Open **Datadog > APM > Traces** and filter by `service:serenia-agent`. You should see traces for each request, with Anthropic calls nested inside skill spans such as `qualify_lead` or `agent.handle_message`.
 Those spans come from instrumentation already in the repo:
* **Auto-instrumentation:** `init_tracing()` calls `patch(anthropic=True)` once at startup. Every Anthropic SDK call is traced without wrappers in skill code. Read [`serenia/observability/tracing.py`](https://github.com/arober39/serenia-agent-skills/blob/tutorial-datadog-part-one/serenia/observability/tracing.py).
* **Skill spans:** `trace_skill()` creates a parent span that shows which skill ran, plus tags such as lead score and Airtable record ID. Read how [`qualify_lead.py`](https://github.com/arober39/serenia-agent-skills/blob/tutorial-datadog-part-one/serenia/skills/qualify_lead.py) uses it.
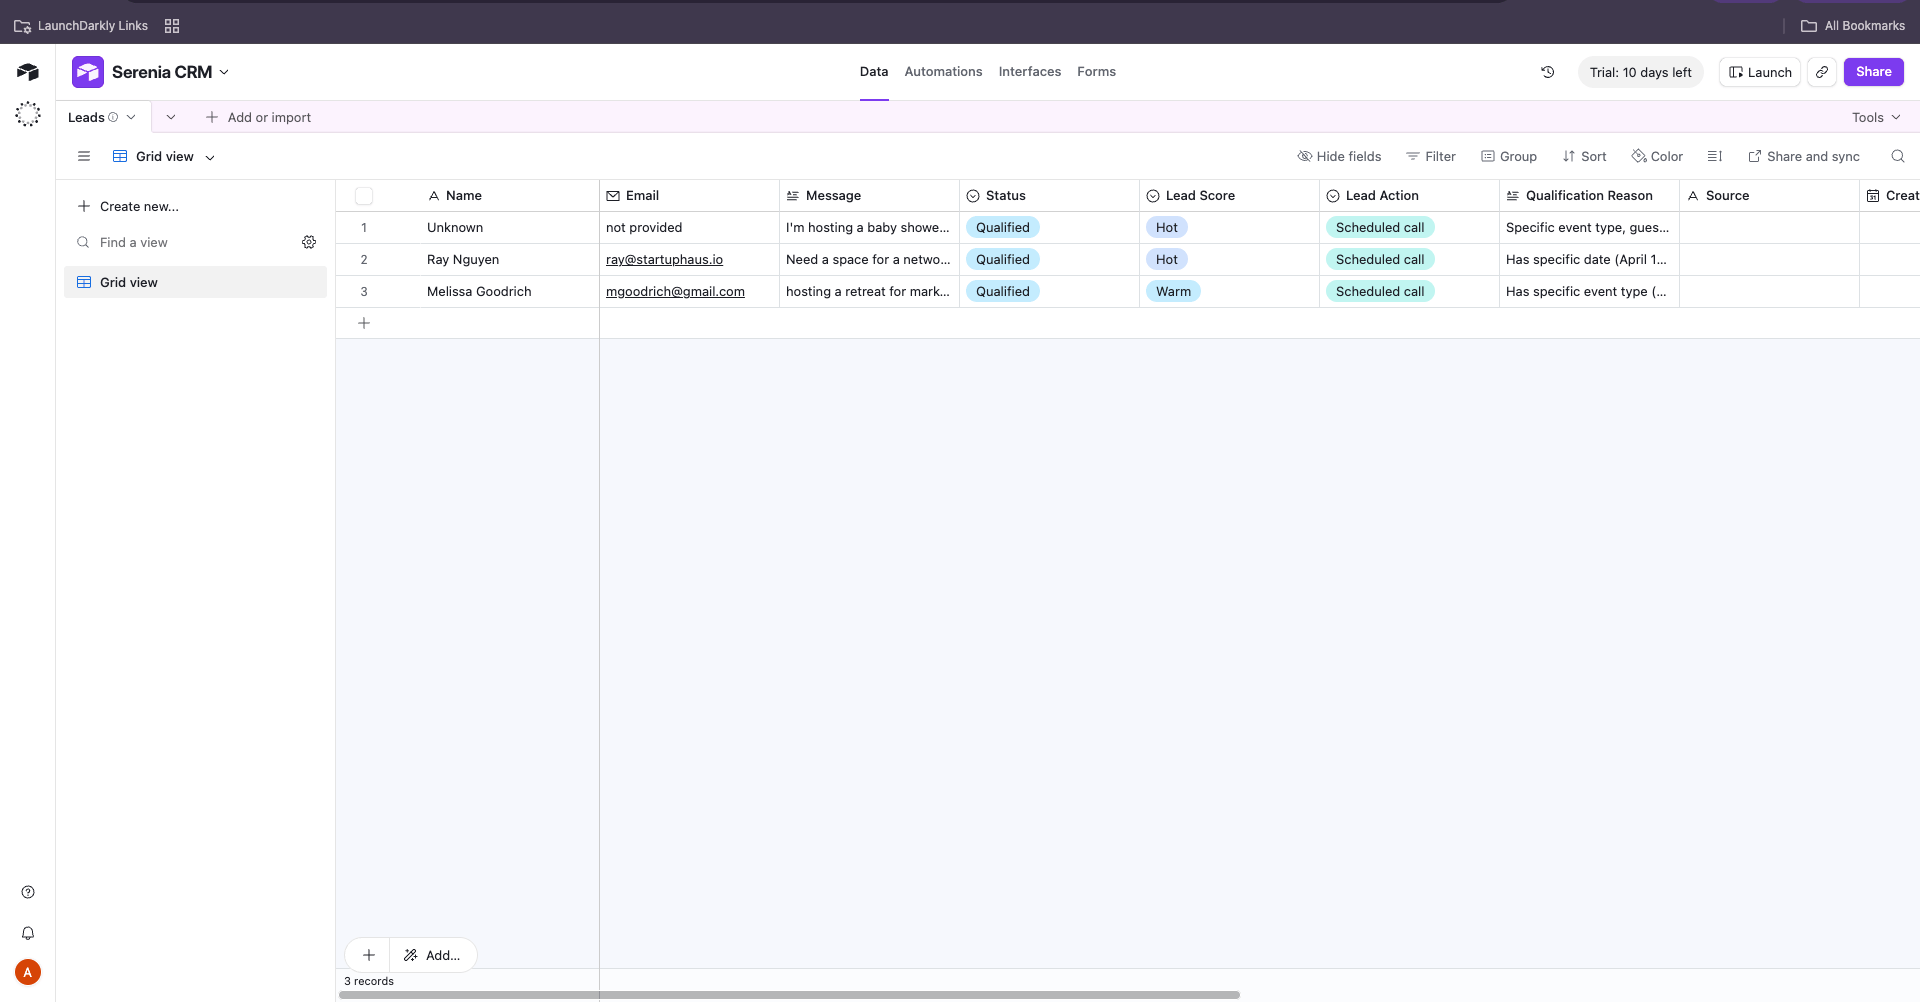
If Airtable credentials are set, new rows appear in Leads:
Those spans come from instrumentation already in the repo:
* **Auto-instrumentation:** `init_tracing()` calls `patch(anthropic=True)` once at startup. Every Anthropic SDK call is traced without wrappers in skill code. Read [`serenia/observability/tracing.py`](https://github.com/arober39/serenia-agent-skills/blob/tutorial-datadog-part-one/serenia/observability/tracing.py).
* **Skill spans:** `trace_skill()` creates a parent span that shows which skill ran, plus tags such as lead score and Airtable record ID. Read how [`qualify_lead.py`](https://github.com/arober39/serenia-agent-skills/blob/tutorial-datadog-part-one/serenia/skills/qualify_lead.py) uses it.
If Airtable credentials are set, new rows appear in Leads:
 ## Create the qualify-lead feature flag
The app already checks a LaunchDarkly flag before `qualify_lead` runs. Create the flag. Evaluations then appear on Datadog spans when the skill runs.
In Cursor, use the LaunchDarkly MCP server with this prompt:
```title="Cursor prompt to create the feature flag" lines wrap theme={null}
Can you create a new launchdarkly project called serenia-agent-skills and also
1. Create a new boolean feature flag
2. Key: qualify-lead-skill
3. Name: Qualify Lead Skill
4. Set the default variation to true for test environment
5. Make sure it's turned on in your environment
```
Confirm `LD_SDK_KEY` in `.env` is the **server-side SDK key** for the `serenia-agent-skills` project, not a REST API access token.
## Create the qualify-lead feature flag
The app already checks a LaunchDarkly flag before `qualify_lead` runs. Create the flag. Evaluations then appear on Datadog spans when the skill runs.
In Cursor, use the LaunchDarkly MCP server with this prompt:
```title="Cursor prompt to create the feature flag" lines wrap theme={null}
Can you create a new launchdarkly project called serenia-agent-skills and also
1. Create a new boolean feature flag
2. Key: qualify-lead-skill
3. Name: Qualify Lead Skill
4. Set the default variation to true for test environment
5. Make sure it's turned on in your environment
```
Confirm `LD_SDK_KEY` in `.env` is the **server-side SDK key** for the `serenia-agent-skills` project, not a REST API access token.
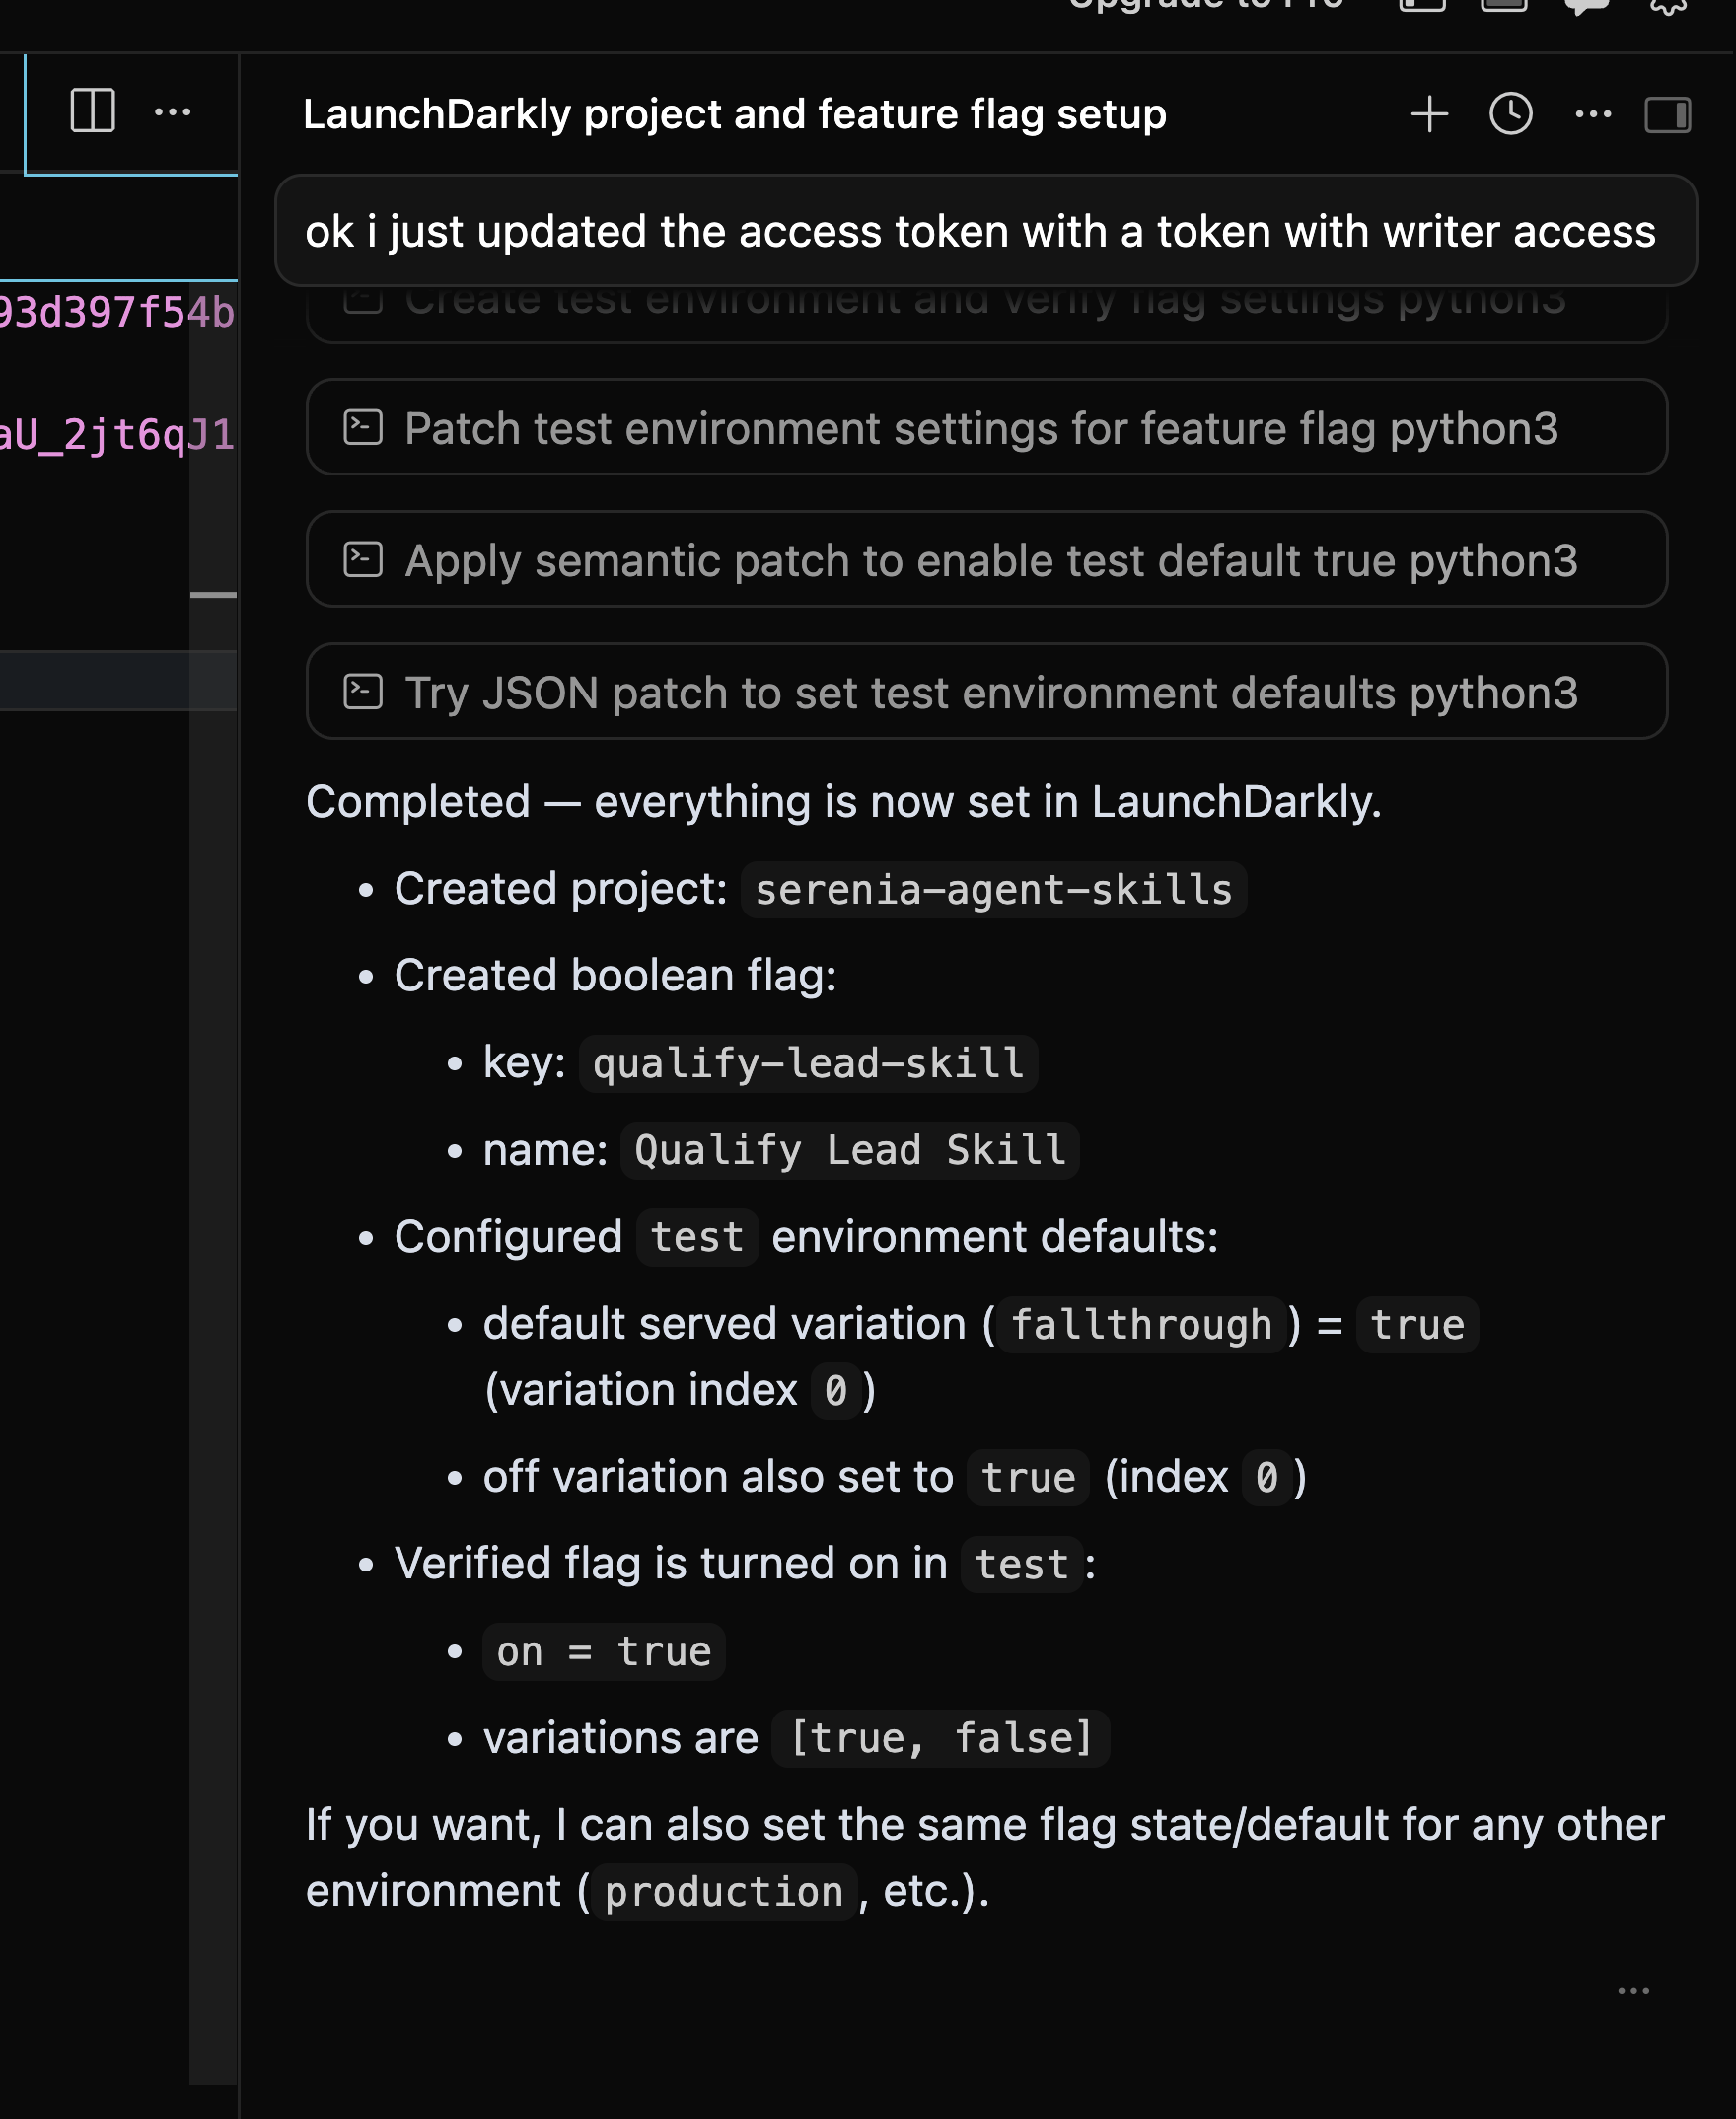 Open **Flags** in the `serenia-agent-skills` project and verify the flag. This app evaluates the flag with the server-side Python SDK. You do not need to enable client-side SDK availability.
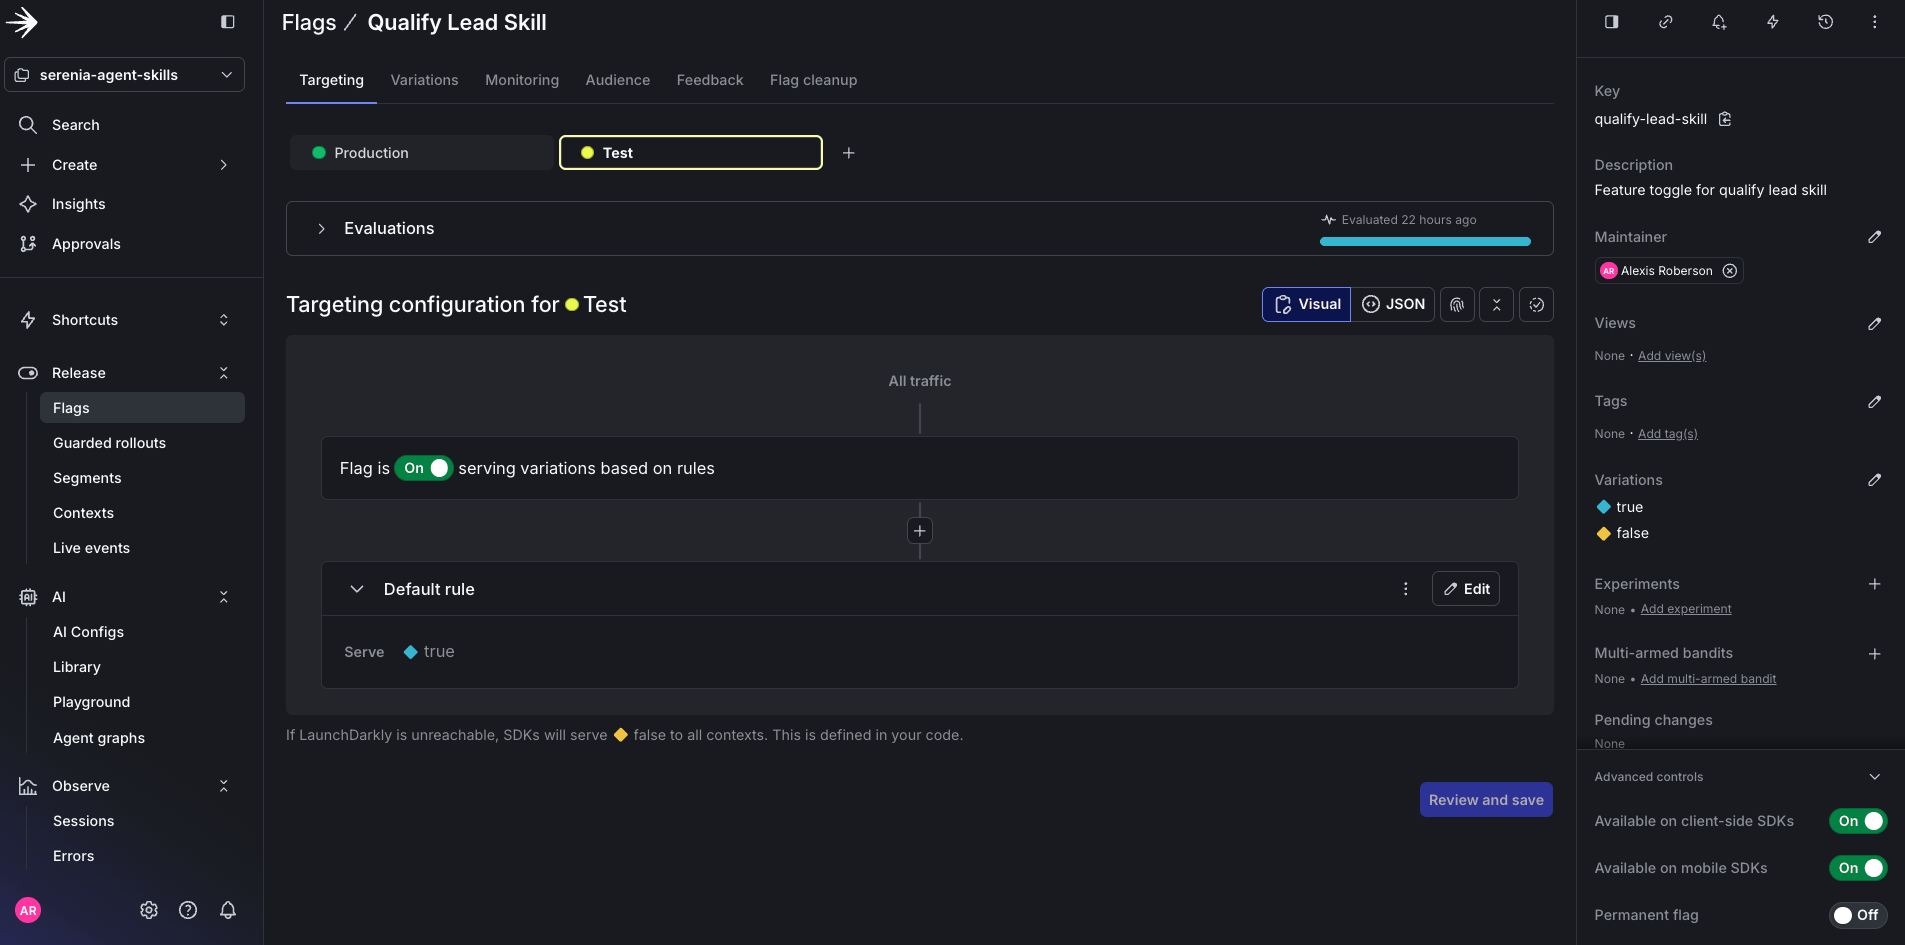 When the flag is **on**, `qualify_lead` runs. When it is **off**, the agent falls back to `log_inquiry`.
A custom SDK hook in [`serenia/observability/ld_hook.py`](https://github.com/arober39/serenia-agent-skills/blob/tutorial-datadog-part-one/serenia/observability/ld_hook.py) records each evaluation on the active Datadog span. After the flag is on, send another qualify-lead message. Open the trace in Datadog APM. The skill span includes tags like these:
```title="Feature flag tags on Datadog spans" lines wrap theme={null}
feature_flag.key: "qualify-lead-skill"
feature_flag.provider.name: "LaunchDarkly"
feature_flag.result.value: "true"
feature_flag.context.id: "user-abc123"
feature_flag.contextKeys: {"user":"user-abc123"}
```
When the flag is **on**, `qualify_lead` runs. When it is **off**, the agent falls back to `log_inquiry`.
A custom SDK hook in [`serenia/observability/ld_hook.py`](https://github.com/arober39/serenia-agent-skills/blob/tutorial-datadog-part-one/serenia/observability/ld_hook.py) records each evaluation on the active Datadog span. After the flag is on, send another qualify-lead message. Open the trace in Datadog APM. The skill span includes tags like these:
```title="Feature flag tags on Datadog spans" lines wrap theme={null}
feature_flag.key: "qualify-lead-skill"
feature_flag.provider.name: "LaunchDarkly"
feature_flag.result.value: "true"
feature_flag.context.id: "user-abc123"
feature_flag.contextKeys: {"user":"user-abc123"}
```
 ## Forward traces to LaunchDarkly
Configure the Datadog Agent to dual-ship the same APM traces to LaunchDarkly. You do not change application code. Keep Datadog as the Agent's primary APM intake and add LaunchDarkly as an additional endpoint, as described in [Datadog Agent ingestion](/docs/home/observability/datadog-agent) and [Datadog dual shipping](https://docs.datadoghq.com/agent/configuration/dual-shipping/).
If the Agent is not installed yet, follow [Datadog's install guide](https://docs.datadoghq.com/agent/), then confirm it is running:
```shell title="Check Datadog Agent status" lines wrap theme={null}
sudo datadog-agent status
```
Edit `datadog.yaml` (typically `/opt/datadog-agent/etc/datadog.yaml` on macOS or `/etc/datadog-agent/datadog.yaml` on Linux). Your `api_key` and `site` should already point at Datadog. Add this `apm_config` block:
```yaml title="Dual shipping configuration in datadog.yaml" lines wrap theme={null}
# /opt/datadog-agent/etc/datadog.yaml
apm_config:
enabled: true
additional_endpoints:
"https://datadog.observability.app.launchdarkly.com:8126":
- placeholder
```
The Datadog Agent requires a non-empty key for each additional endpoint. LaunchDarkly does not validate that value. Use any placeholder string.
**LaunchDarkly only:** If you do not need traces in Datadog APM, set `apm_dd_url: https://datadog.observability.app.launchdarkly.com:8126` instead of `additional_endpoints`.
Restart the Agent:
```shell title="Restart the Datadog Agent" lines wrap theme={null}
sudo datadog-agent restart
```
Confirm `.env` still has `DD_AGENT_HOST=localhost` and `DD_TAGS=launchdarkly.project_id:` plus your client-side ID. Restart the Serenia API. After `ddtrace` reconnects, send a few messages.
In LaunchDarkly, go to **Observe > Traces** and click **Run query**. You should see traces from Datadog.
## Forward traces to LaunchDarkly
Configure the Datadog Agent to dual-ship the same APM traces to LaunchDarkly. You do not change application code. Keep Datadog as the Agent's primary APM intake and add LaunchDarkly as an additional endpoint, as described in [Datadog Agent ingestion](/docs/home/observability/datadog-agent) and [Datadog dual shipping](https://docs.datadoghq.com/agent/configuration/dual-shipping/).
If the Agent is not installed yet, follow [Datadog's install guide](https://docs.datadoghq.com/agent/), then confirm it is running:
```shell title="Check Datadog Agent status" lines wrap theme={null}
sudo datadog-agent status
```
Edit `datadog.yaml` (typically `/opt/datadog-agent/etc/datadog.yaml` on macOS or `/etc/datadog-agent/datadog.yaml` on Linux). Your `api_key` and `site` should already point at Datadog. Add this `apm_config` block:
```yaml title="Dual shipping configuration in datadog.yaml" lines wrap theme={null}
# /opt/datadog-agent/etc/datadog.yaml
apm_config:
enabled: true
additional_endpoints:
"https://datadog.observability.app.launchdarkly.com:8126":
- placeholder
```
The Datadog Agent requires a non-empty key for each additional endpoint. LaunchDarkly does not validate that value. Use any placeholder string.
**LaunchDarkly only:** If you do not need traces in Datadog APM, set `apm_dd_url: https://datadog.observability.app.launchdarkly.com:8126` instead of `additional_endpoints`.
Restart the Agent:
```shell title="Restart the Datadog Agent" lines wrap theme={null}
sudo datadog-agent restart
```
Confirm `.env` still has `DD_AGENT_HOST=localhost` and `DD_TAGS=launchdarkly.project_id:` plus your client-side ID. Restart the Serenia API. After `ddtrace` reconnects, send a few messages.
In LaunchDarkly, go to **Observe > Traces** and click **Run query**. You should see traces from Datadog.
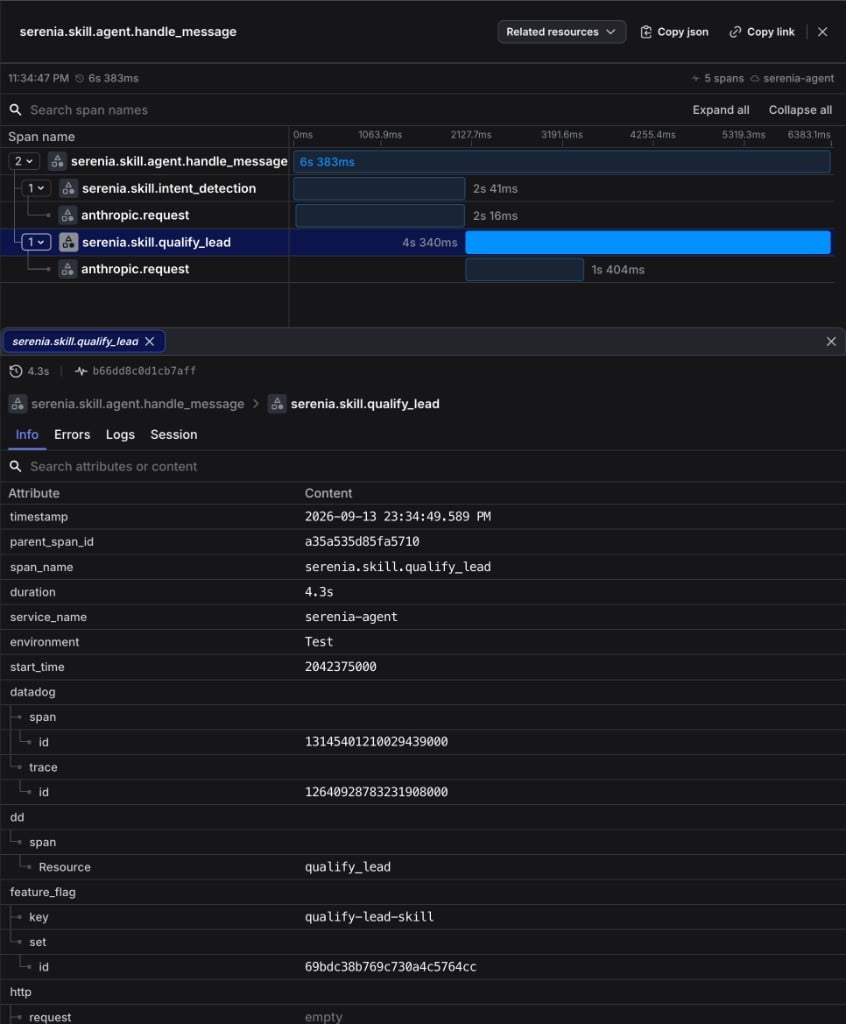
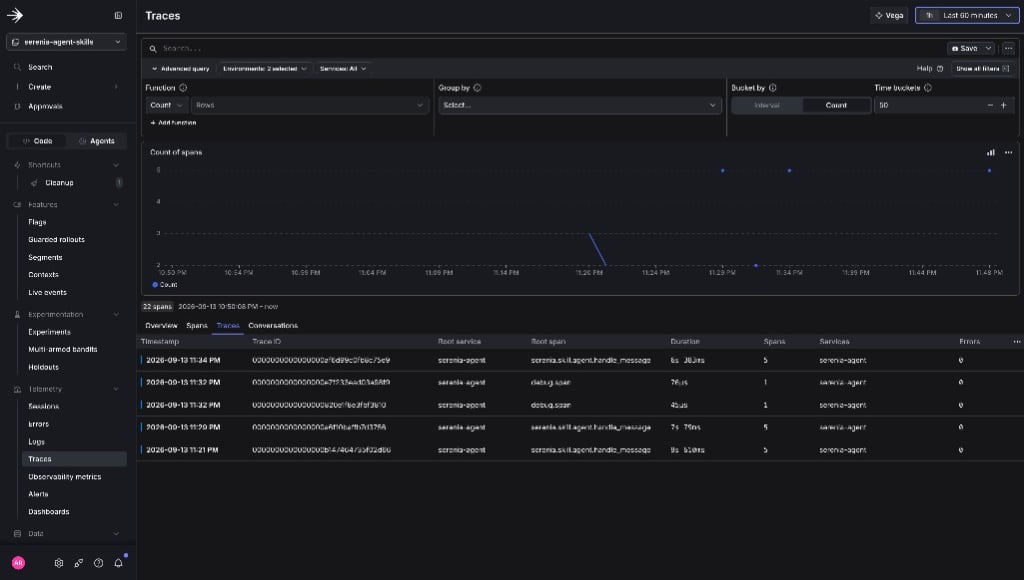 Expand the qualify-lead span. It includes the feature flag and, if CRM credentials are set, the Airtable record.
 ## Further reading
* [LaunchDarkly Observability: Datadog Agent](/docs/home/observability/datadog-agent)
* [Datadog Agent Dual Shipping](https://docs.datadoghq.com/agent/configuration/dual-shipping/)
## Further reading
* [LaunchDarkly Observability: Datadog Agent](/docs/home/observability/datadog-agent)
* [Datadog Agent Dual Shipping](https://docs.datadoghq.com/agent/configuration/dual-shipping/)