> ## Documentation Index
> Fetch the complete documentation index at: https://launchdarkly.com/docs/llms.txt
> Use this file to discover all available pages before exploring further.
# Create a feature flag in your IDE in 5 minutes with the LaunchDarkly MCP server
export const BlogAuthor = ({date, avatar, alt, name}) => {
return
Published {date}
{avatar &&

}
{name}
;
};
This topic explains how to create, evaluate, and modify flags from within your IDE or AI client using natural language with the LaunchDarkly model-context protocol (MCP) server.
This tutorial uses the LaunchDarkly hosted MCP server, which connects your AI client to LaunchDarkly over HTTP and authenticates with OAuth. To learn more, read [LaunchDarkly MCP server](/docs/home/getting-started/mcp) and [LaunchDarkly hosted MCP server](/docs/home/getting-started/mcp-hosted).
## Prerequisites
To complete this tutorial, you must have the following prerequisites:
* A LaunchDarkly account. [Sign up for free](https://app.launchdarkly.com/signup).
* Any AI client that supports MCP, such as [Cursor](https://www.cursor.com/). The examples in this tutorial use Cursor.
## What is MCP?
Model-context protocol [(MCP)](https://modelcontextprotocol.io/docs/getting-started/intro) is an open protocol that lets you interact with APIs using natural language.
The LaunchDarkly hosted MCP server covers multiple product areas, including feature management for managing feature flags, AgentControl for managing configs, and observability for querying logs, traces, and errors. To learn more about the available capabilities, read [Available MCP tools](/docs/home/getting-started/mcp#available-mcp-tools).
## Authenticating with the hosted MCP server
The hosted MCP server uses OAuth to authenticate with your LaunchDarkly account, so you don't need to create or manage an API access token. When you connect your AI client, LaunchDarkly prompts you to authorize access in your browser, and your existing permissions apply automatically.
**Using the federal or EU instance?**
The hosted MCP server is not available in the LaunchDarkly federal or European Union (EU) instances. Instead, use the [local MCP server](/docs/home/getting-started/mcp-local), which authenticates with an API access token. To learn more, read [LaunchDarkly in federal environments](/docs/home/infrastructure/federal) or [LaunchDarkly in the European Union (EU)](/docs/home/infrastructure/eu).
## Installing the MCP server
The quickest way to connect is the [MCP server install page](https://mcp.launchdarkly.com/mcp/launchdarkly/install). Visit this page, select your AI client, and follow the prompts to authorize and connect. This tutorial uses Cursor, which you can also configure manually.
To add the hosted MCP server in Cursor:
1. In Cursor, navigate to **Settings** > **Cursor Settings** > **Tools & Integrations** > **MCP Tools**.
2. Click **Add Custom MCP**. An "Install MCP Server?" dialog appears.
3. Enter the following values:
* **Name**: `LaunchDarkly`
* **Type**: `streamableHttp`
* **URL**: `https://mcp.launchdarkly.com/mcp/launchdarkly`
4. Click **Install**.
5. Toggle on the LaunchDarkly server, then click **Connect** to authorize with your LaunchDarkly account.
Alternatively, you can edit `.cursor/mcp.json` in your project root directly:
```json title="Add the MCP server from the project root" lines wrap theme={null}
{
"mcpServers": {
"launchdarkly": {
"url": "https://mcp.launchdarkly.com/mcp/launchdarkly",
"headers": {}
}
}
}
```
After you save the file, toggle on the LaunchDarkly server in Cursor and click **Connect** to authorize your account.
For manual configuration steps for Claude Code, Windsurf, and GitHub Copilot, or to migrate from an earlier `npx`-based local server, read [LaunchDarkly hosted MCP server](/docs/home/getting-started/mcp-hosted).
## Creating a feature flag with MCP
Toggle Cursor's AI pane. Try asking the agent to create a flag using the following prompt:
*create a feature flag to gate my awesome new feature*
Model responses are non-deterministic, so your response may not exactly match the following, but it should be something like this:
*To create a feature flag for your awesome new feature, I'll need to know which LaunchDarkly project you want to add the flag to. Could you please provide the project key (the unique identifier for your LaunchDarkly project)? If you have a preferred flag key or description, let me know as well, or I can generate them for you!*
Oops, we forgot to specify which LaunchDarkly project we wanted to use. Luckily the agent retains context between queries, and knows how to ask us for the info it needs. The MCP protocol is forgiving and you don't have to get prompts perfect on the first try.
My example LaunchDarkly project is named [*raccoon-api-facts*](https://launchdarkly.com/blog/upgrade-api-safely-progressive-rollouts-expressjs/). 🦝 Don't judge me. Input your own project name in the AI chat pane and hit Enter. Although these flag and project names are technically called *keys* when referenced in code, the LaunchDarkly MCP server can understand what we are asking for without that level of specificity. Hooray for natural language interfaces.
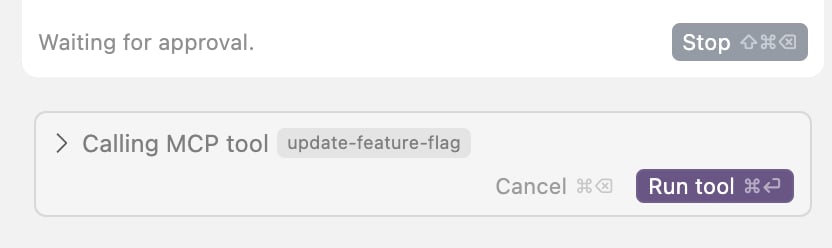
Click **Run tool** in your AI pane in Cursor to finish creating the flag. You'll need to do this every time the AI agent attempts to interact with the LaunchDarkly API. MCP servers require explicit approval before calling external APIs as a security measure.
 Next, roll over to the [LaunchDarkly UI](https://app.launchdarkly.com/). You should read about the *awesome-new-feature* flag in your list. If it's not there, double-check that you're in the correct project.
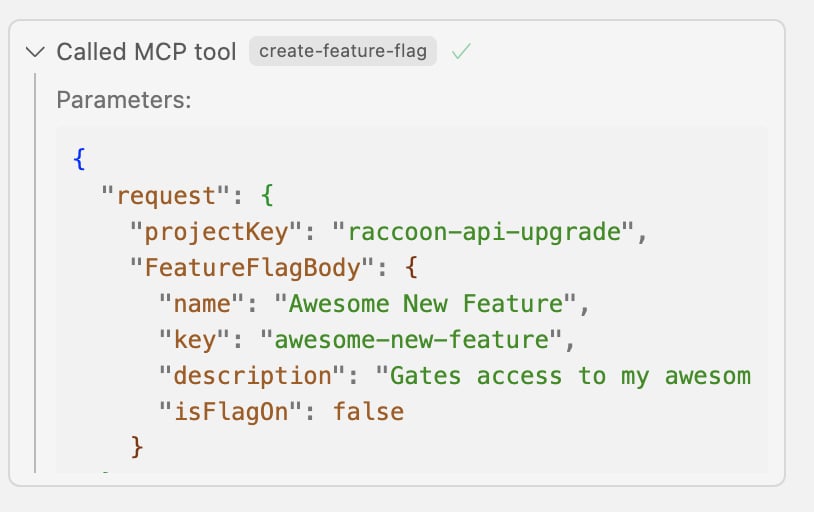
 Back in Cursor, if you click on **called MCP tool** you can read about the details of the request the MCP server sent to the LaunchDarkly API:
 ## Enabling a feature flag
Ask the AI agent to check the value of the flag:
*what is the value of the awesome-new-feature flag?*
Your response should be something like this:
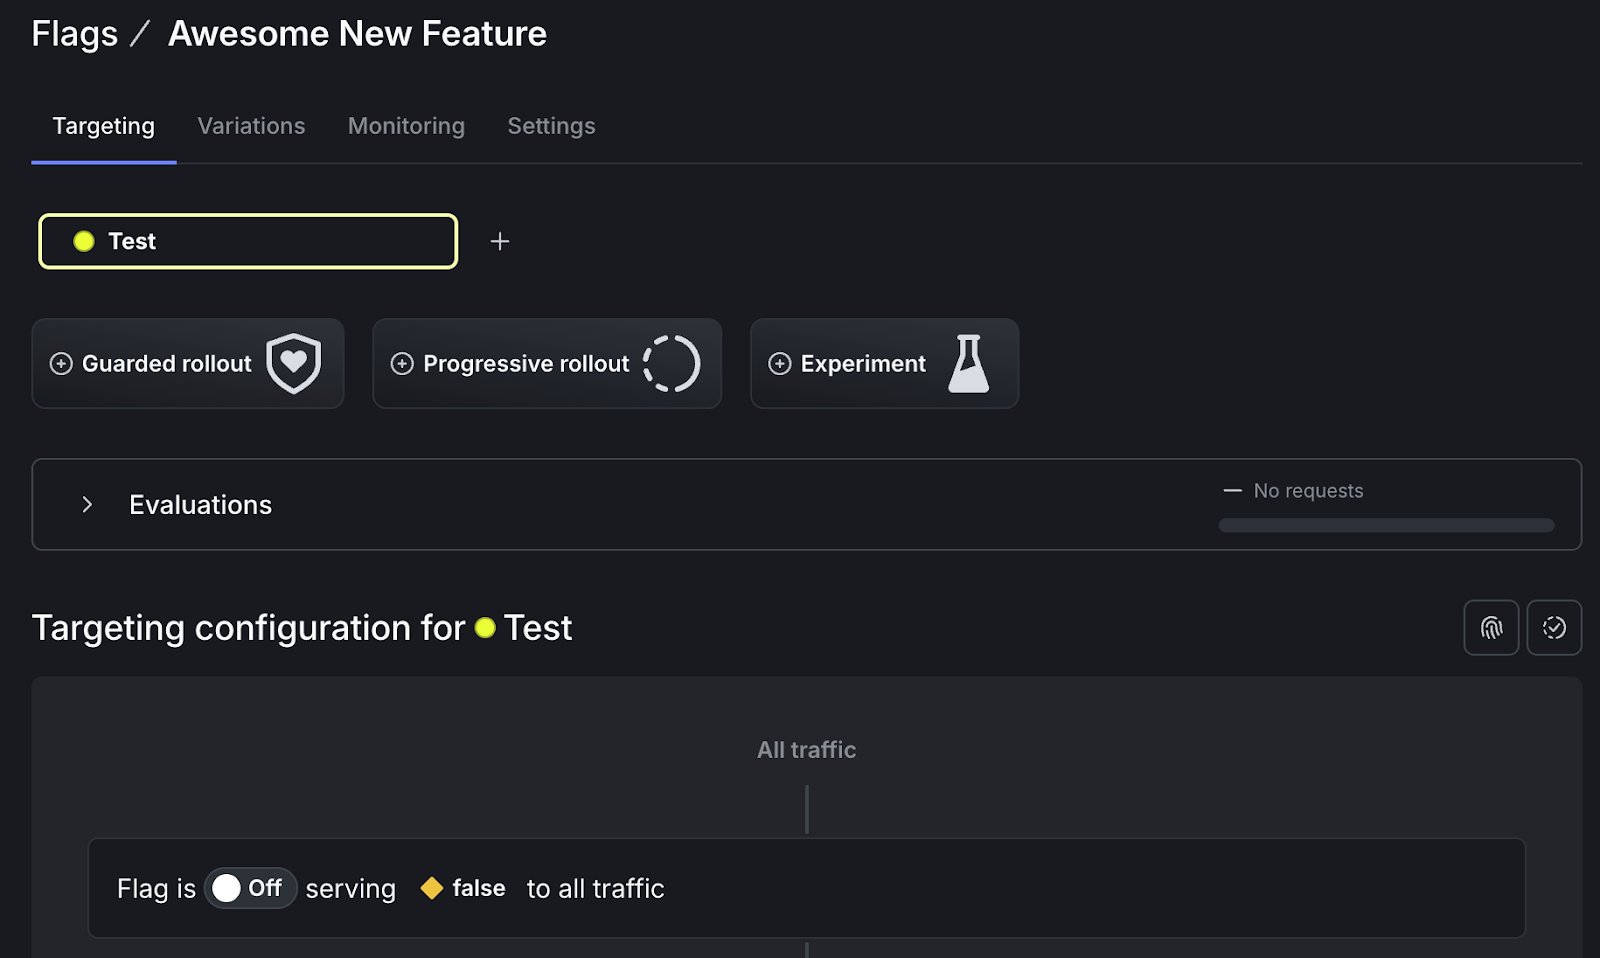
*The value of the awesome-new-feature flag is currently set to off (false) by default in both the production and test environments. If you want to enable it or check its value for a specific user or context, let me know!*
This matches what we see in the LaunchDarkly UI:
## Enabling a feature flag
Ask the AI agent to check the value of the flag:
*what is the value of the awesome-new-feature flag?*
Your response should be something like this:
*The value of the awesome-new-feature flag is currently set to off (false) by default in both the production and test environments. If you want to enable it or check its value for a specific user or context, let me know!*
This matches what we see in the LaunchDarkly UI:
 Let's try to turn the flag on and see what happens!
*Turn the awesome new feature flag ON, serving True to all users.*
Don't forget to click **Run tool** after submitting your prompt to the agent.
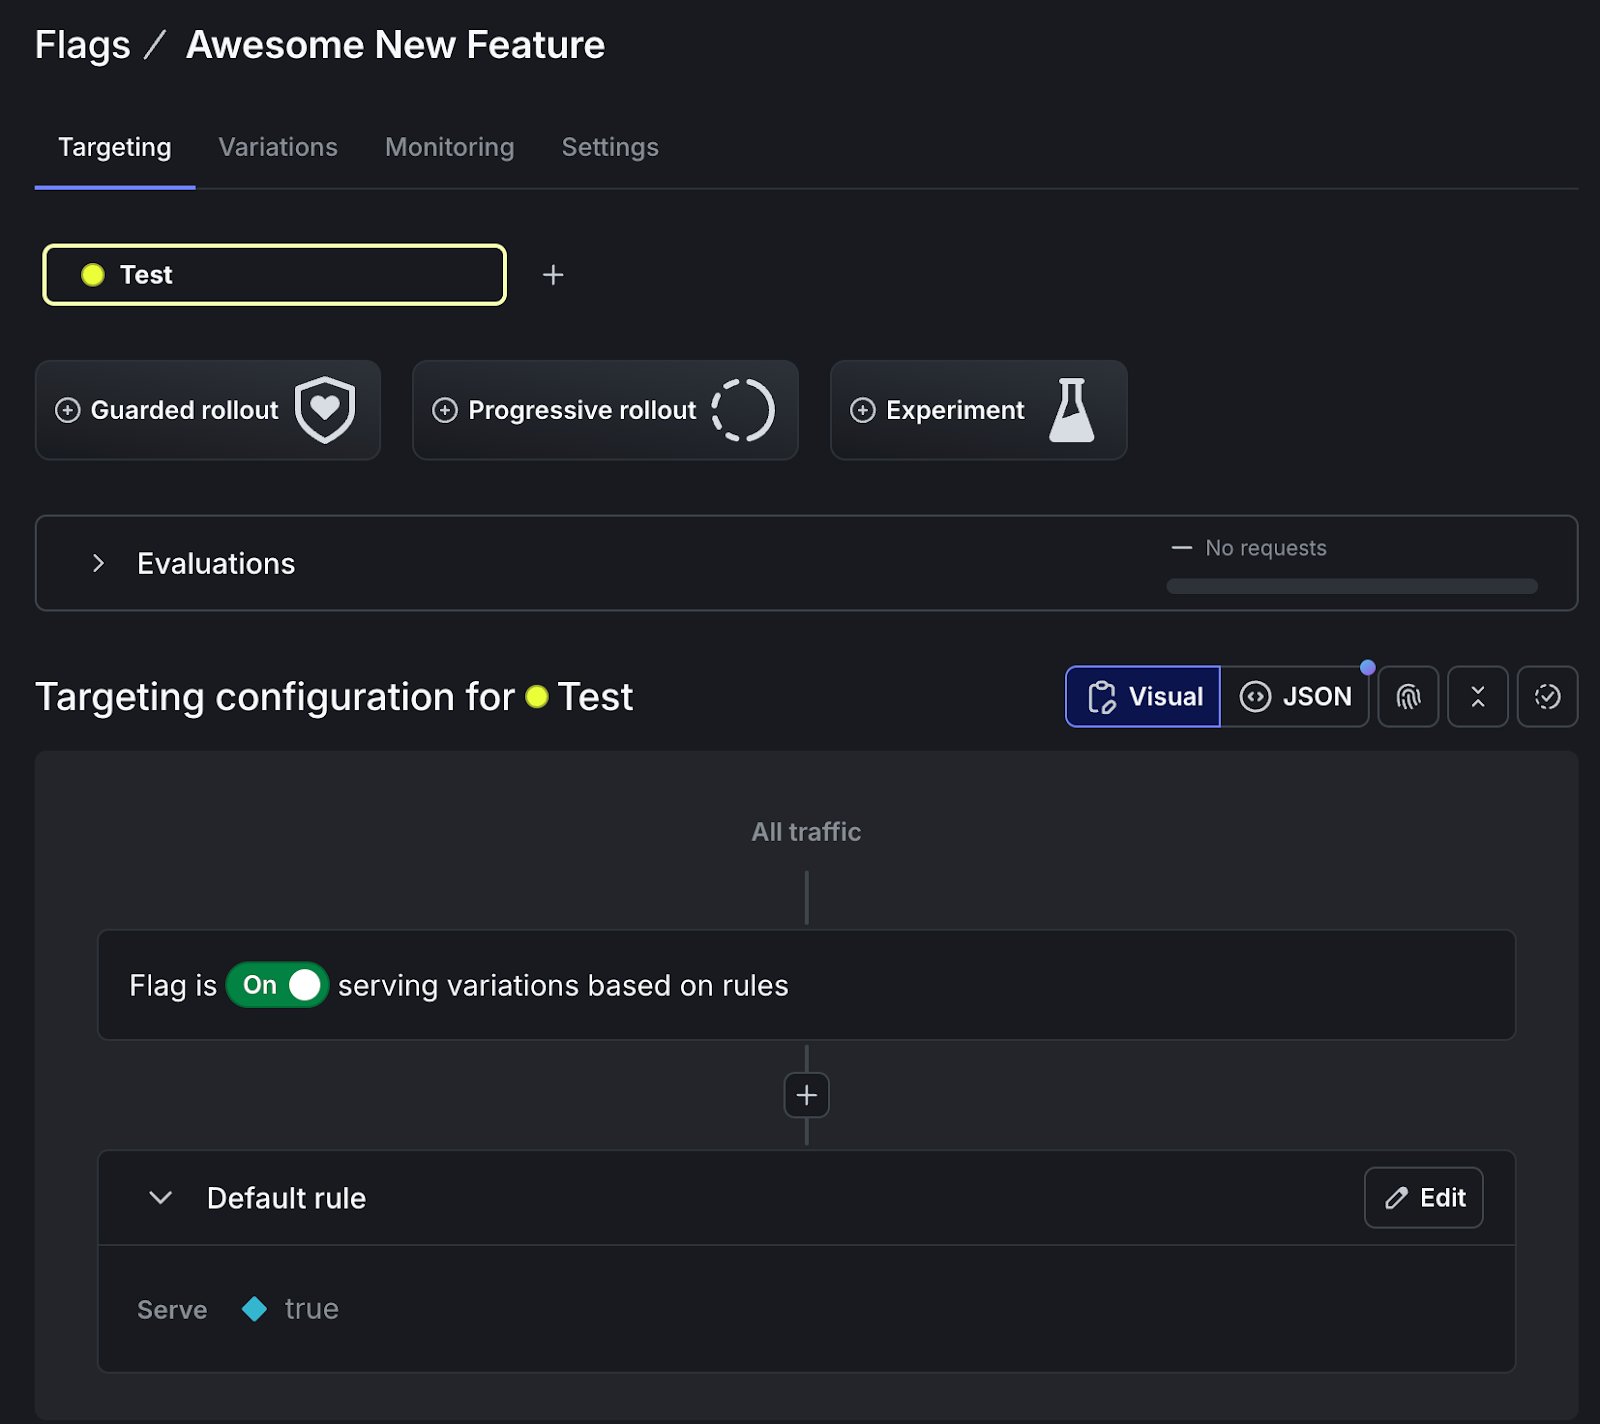
*The awesome-new-feature flag is now turned ON in both the production and test environments! Your awesome new feature is now enabled for all users in these environments.*\
*If you want to target specific users, add rules, or need to verify the flag's status, just let me know!*
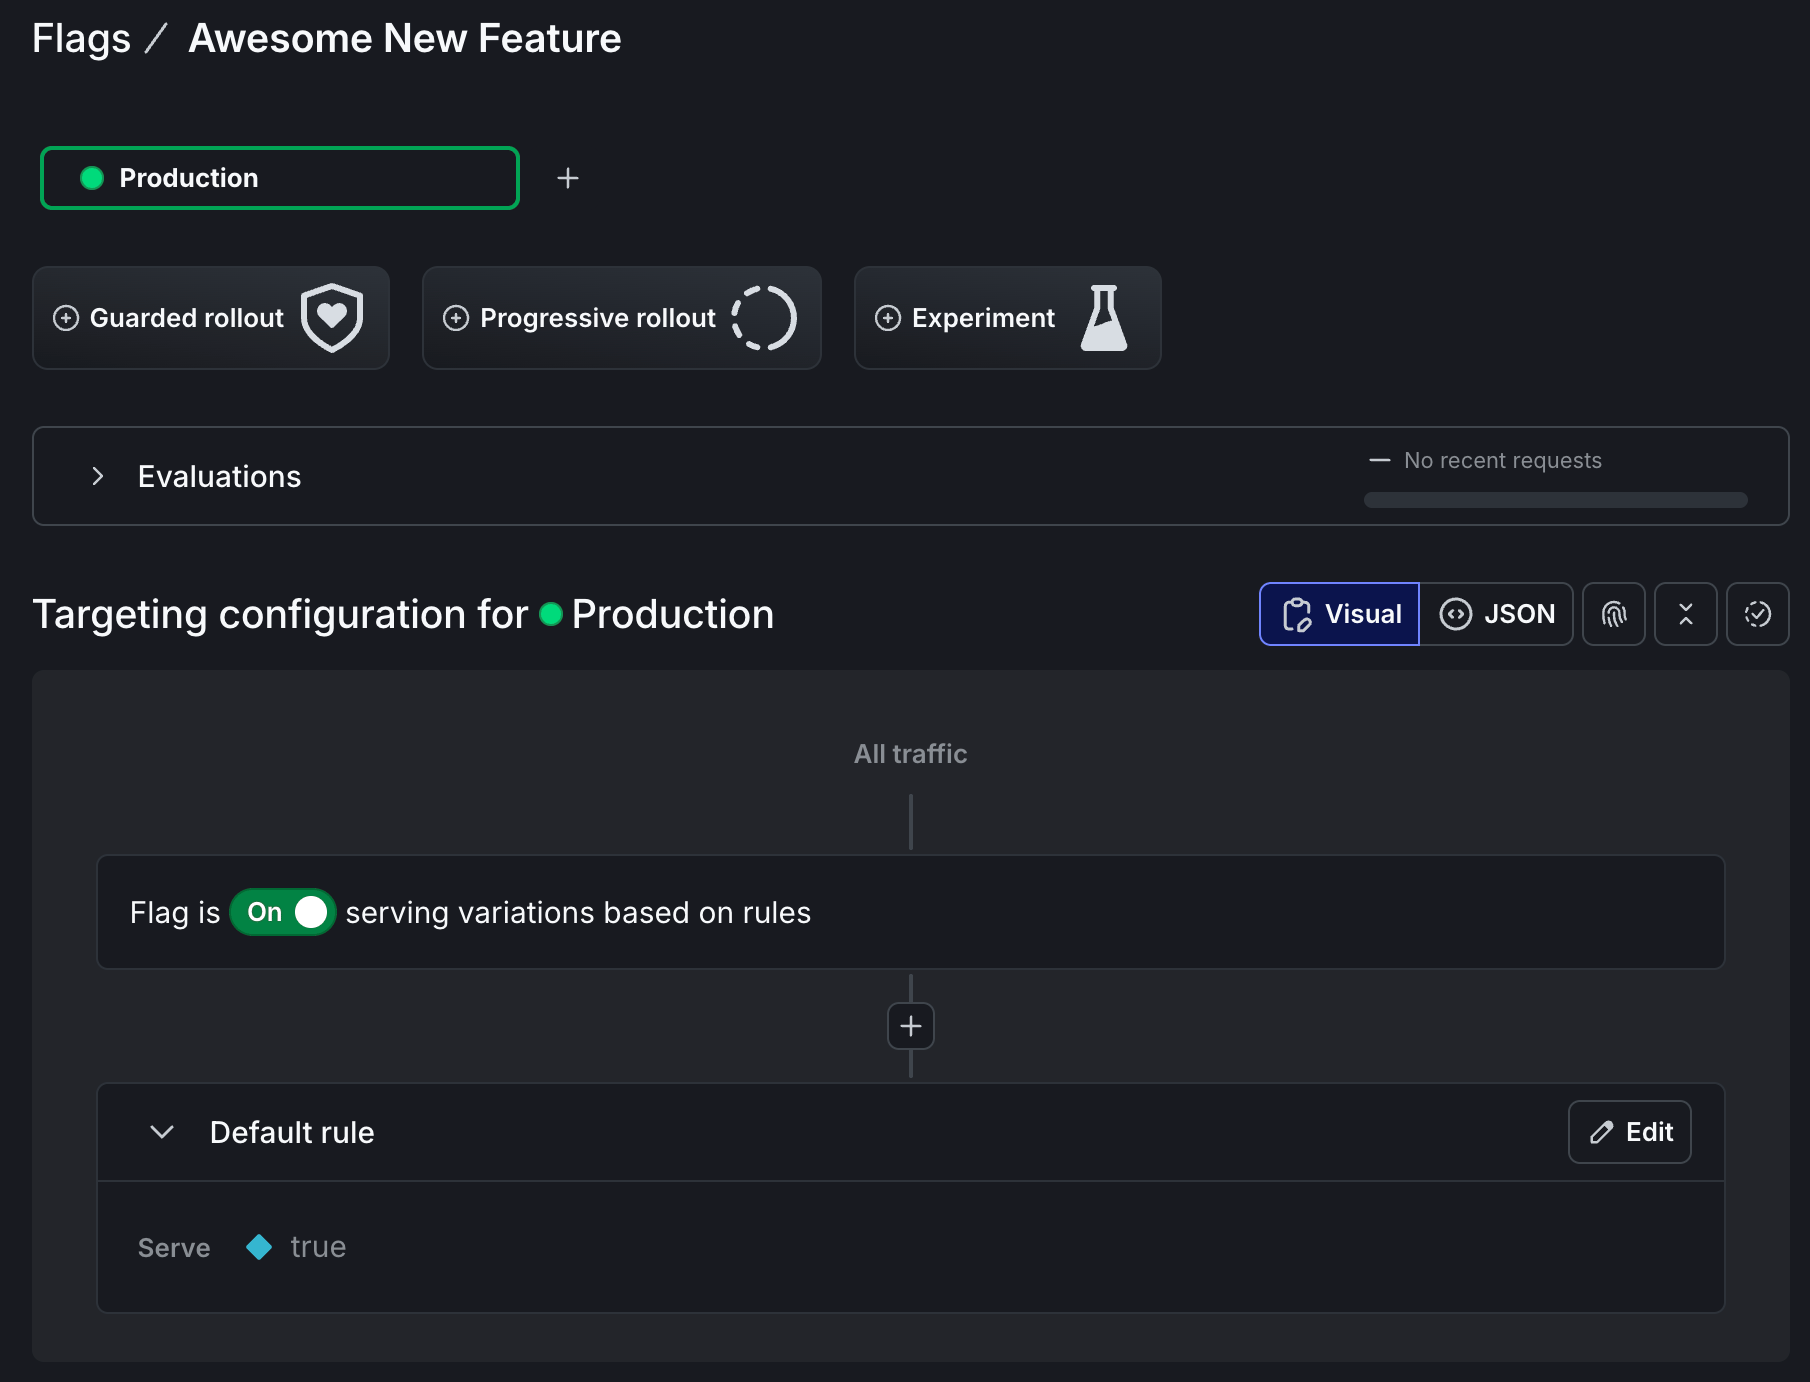
You may need to reload the LaunchDarkly UI in your browser to read about the updated flag state:
Let's try to turn the flag on and see what happens!
*Turn the awesome new feature flag ON, serving True to all users.*
Don't forget to click **Run tool** after submitting your prompt to the agent.
*The awesome-new-feature flag is now turned ON in both the production and test environments! Your awesome new feature is now enabled for all users in these environments.*\
*If you want to target specific users, add rules, or need to verify the flag's status, just let me know!*
You may need to reload the LaunchDarkly UI in your browser to read about the updated flag state:
 ## Adding a flag targeting rule
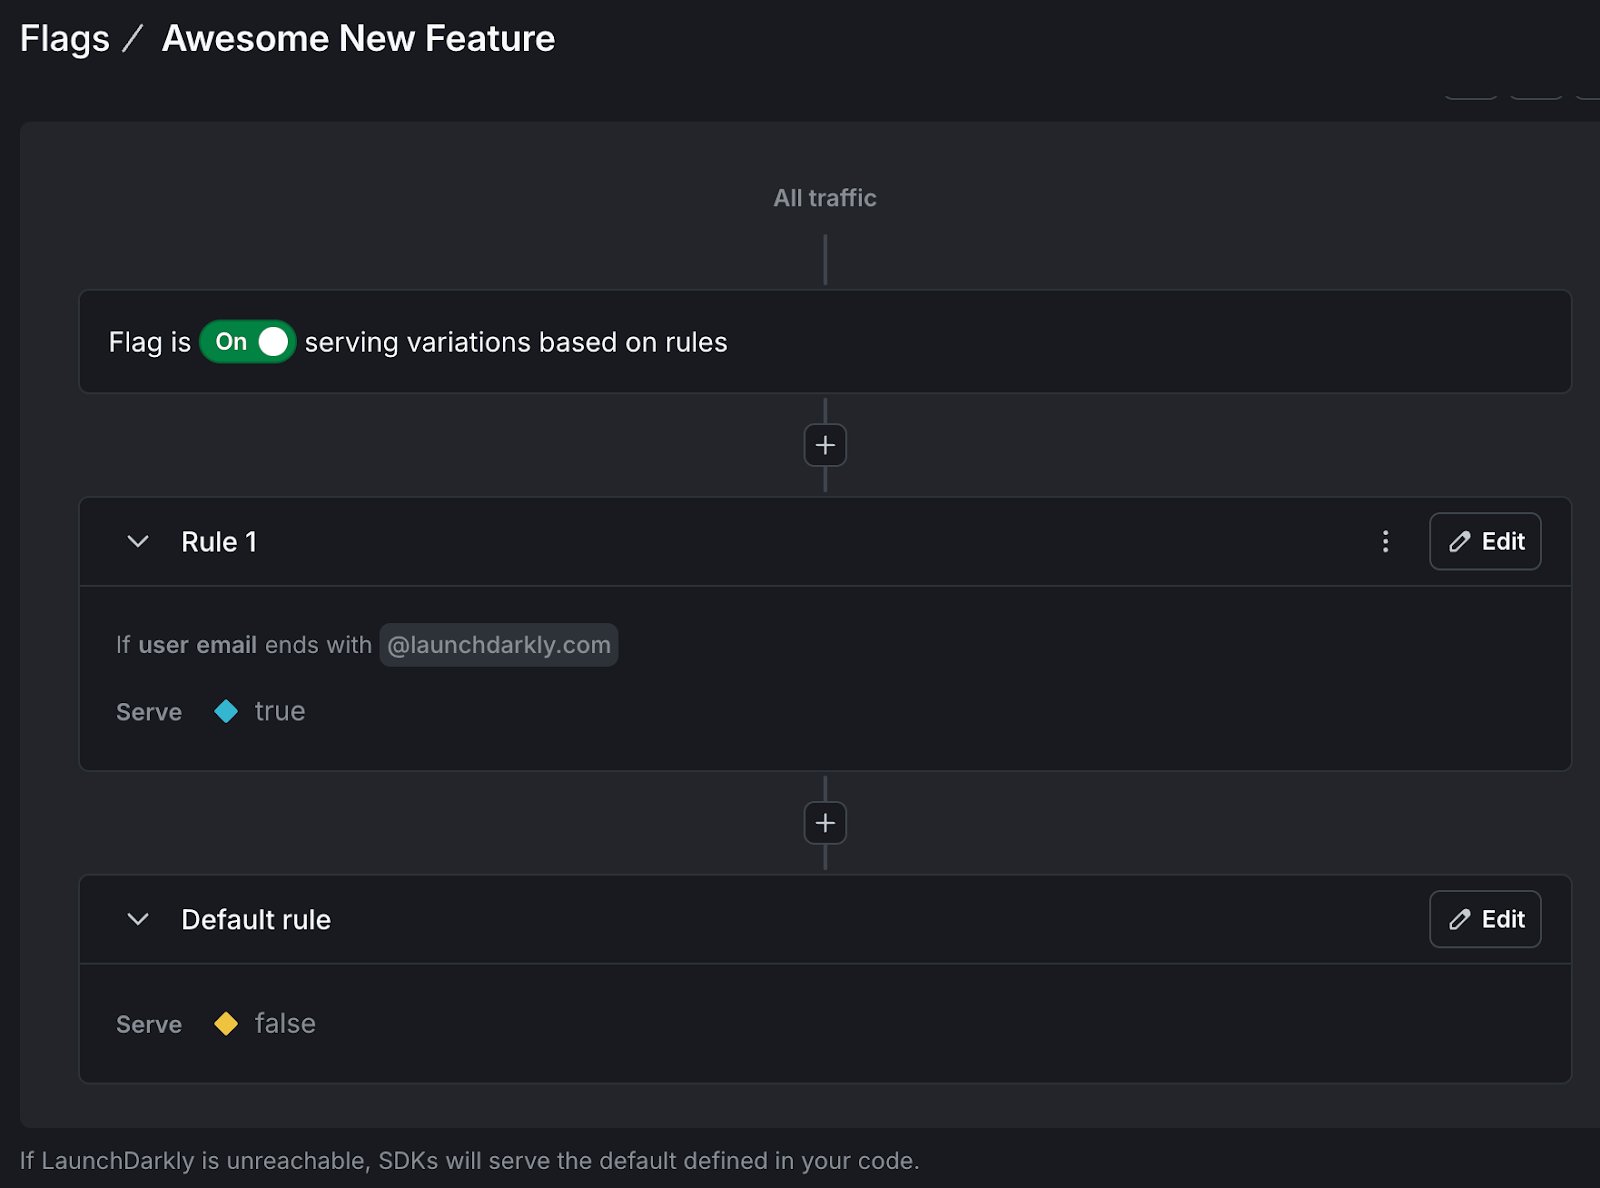
What if we ask the AI agent to do something a little more complicated? Let's [create a targeting rule](/docs/home/flags/target-rules) so that the flag is serving true for users whose email addresses end in launchdarkly.com. This could be useful if we wanted to roll out our awesome new feature to internal users first, to test for bugs.
*For the awesome new feature flag, update the targeting rules so the flag is only enabled and serving true for users who have email addresses ending with `launchdarkly.com`. Everyone else should get the false variation.*
*The awesome-new-feature flag is now enabled only for users whose email addresses end with `launchdarkly.com` in both production and test environments. For all other users, the flag will be off.*\
*If you need to further adjust the targeting or want to verify the setup, let me know!*
Checking the AI agent's work in the LaunchDarkly UI, it looks like the targeting updates were successful:
## Adding a flag targeting rule
What if we ask the AI agent to do something a little more complicated? Let's [create a targeting rule](/docs/home/flags/target-rules) so that the flag is serving true for users whose email addresses end in launchdarkly.com. This could be useful if we wanted to roll out our awesome new feature to internal users first, to test for bugs.
*For the awesome new feature flag, update the targeting rules so the flag is only enabled and serving true for users who have email addresses ending with `launchdarkly.com`. Everyone else should get the false variation.*
*The awesome-new-feature flag is now enabled only for users whose email addresses end with `launchdarkly.com` in both production and test environments. For all other users, the flag will be off.*\
*If you need to further adjust the targeting or want to verify the setup, let me know!*
Checking the AI agent's work in the LaunchDarkly UI, it looks like the targeting updates were successful:
 ## Evaluating a feature flag
Now that our targeting rule is set up, let's try evaluating our awesome feature flag using a few different contexts.
*Evaluate the awesome new feature flag using the following context:
\{"name": "tilde", "email": "`tthurium@launchdarkly.com`"}*
*To evaluate the awesome-new-feature flag for the context:*
\{"name": "tilde", "email": "`tthurium@launchdarkly.com`"}\*
* *The flag is ON, but only enabled for users whose email ends with `@launchdarkly.com`.*
* *The provided email `tthurium@launchdarkly.com` matches this rule.*
*Result: The awesome-new-feature flag will be enabled (true) for this user.*\
*If you want to see the raw evaluation or check for a different context, let me know!*
Great. What about evaluating a context that should be false?
*evaluate the awesome new feature flag using the following context:
\{"name": "tilde", "email": "`tthurium@foo.com`"}*
*For the context \{"name": "tilde", "email": "`tthurium@foo.com`"}:*
* *The awesome-new-feature flag is ON, but only enabled for users whose email ends with "`@launchdarkly.com`".*
* *The email `tthurium@foo.com` does not match this rule.*
*Result: The awesome-new-feature flag will be disabled (false) for this user. If you want to check for another context or need the raw evaluation details, let me know!*
You can even pass in the context in natural language rather than JSON.
*Evaluate the value of Awesome New Feature flag with a context where the user has an email address `foo@bar.com`*
Given the current targeting rules for the "Awesome New Feature" flag:
* *The only users who receive the true variation are those whose email ends with `launchdarkly.com`.*
* *All other users receive the false variation.*
*For a user with the email address `foo@bar.com`, the flag will evaluate to false in both the Production and Test environments.*
The LaunchDarkly API doesn't have an endpoint for evaluating feature flags. For that, you can use one of the [SDKs](/docs/sdk). When you evaluate a feature flag through the MCP server, the AI model is running the evaluation logic.
## Conclusion
In this tutorial you learned how to create and manage feature flags from within your IDE, using the LaunchDarkly hosted MCP server. This can save you time and the mental energy of context switching, which will ultimately help you ship more quickly.
For more complex, multi-step workflows, you can pair the MCP server with [LaunchDarkly agent skills](/docs/home/getting-started/mcp#use-agent-skills-with-the-mcp-server), which guide your agent through the right sequence of tool calls.
### Related content
If you enjoyed this tutorial, here's some related reading:
* [LaunchDarkly MCP server](/docs/home/getting-started/mcp)
* [LaunchDarkly hosted MCP server](/docs/home/getting-started/mcp-hosted)
* [Getting started with the LaunchDarkly REST API](/docs/guides/api/rest-api)
* [Customizing user experiences using FastAPI and LaunchDarkly segment targeting](https://launchdarkly.com/blog/tutorial-fastapi-targeting-segment/)
## Evaluating a feature flag
Now that our targeting rule is set up, let's try evaluating our awesome feature flag using a few different contexts.
*Evaluate the awesome new feature flag using the following context:
\{"name": "tilde", "email": "`tthurium@launchdarkly.com`"}*
*To evaluate the awesome-new-feature flag for the context:*
\{"name": "tilde", "email": "`tthurium@launchdarkly.com`"}\*
* *The flag is ON, but only enabled for users whose email ends with `@launchdarkly.com`.*
* *The provided email `tthurium@launchdarkly.com` matches this rule.*
*Result: The awesome-new-feature flag will be enabled (true) for this user.*\
*If you want to see the raw evaluation or check for a different context, let me know!*
Great. What about evaluating a context that should be false?
*evaluate the awesome new feature flag using the following context:
\{"name": "tilde", "email": "`tthurium@foo.com`"}*
*For the context \{"name": "tilde", "email": "`tthurium@foo.com`"}:*
* *The awesome-new-feature flag is ON, but only enabled for users whose email ends with "`@launchdarkly.com`".*
* *The email `tthurium@foo.com` does not match this rule.*
*Result: The awesome-new-feature flag will be disabled (false) for this user. If you want to check for another context or need the raw evaluation details, let me know!*
You can even pass in the context in natural language rather than JSON.
*Evaluate the value of Awesome New Feature flag with a context where the user has an email address `foo@bar.com`*
Given the current targeting rules for the "Awesome New Feature" flag:
* *The only users who receive the true variation are those whose email ends with `launchdarkly.com`.*
* *All other users receive the false variation.*
*For a user with the email address `foo@bar.com`, the flag will evaluate to false in both the Production and Test environments.*
The LaunchDarkly API doesn't have an endpoint for evaluating feature flags. For that, you can use one of the [SDKs](/docs/sdk). When you evaluate a feature flag through the MCP server, the AI model is running the evaluation logic.
## Conclusion
In this tutorial you learned how to create and manage feature flags from within your IDE, using the LaunchDarkly hosted MCP server. This can save you time and the mental energy of context switching, which will ultimately help you ship more quickly.
For more complex, multi-step workflows, you can pair the MCP server with [LaunchDarkly agent skills](/docs/home/getting-started/mcp#use-agent-skills-with-the-mcp-server), which guide your agent through the right sequence of tool calls.
### Related content
If you enjoyed this tutorial, here's some related reading:
* [LaunchDarkly MCP server](/docs/home/getting-started/mcp)
* [LaunchDarkly hosted MCP server](/docs/home/getting-started/mcp-hosted)
* [Getting started with the LaunchDarkly REST API](/docs/guides/api/rest-api)
* [Customizing user experiences using FastAPI and LaunchDarkly segment targeting](https://launchdarkly.com/blog/tutorial-fastapi-targeting-segment/)