> ## Documentation Index
> Fetch the complete documentation index at: https://launchdarkly.com/docs/llms.txt
> Use this file to discover all available pages before exploring further.
# DeepSeek vs Qwen: local model showdown featuring LaunchDarkly AgentControl
export const BlogAuthor = ({date, avatar, alt, name}) => {
return
Published {date}
{avatar &&

}
{name}
;
};
AgentControl([https://launchdarkly.com/blog/launch-week-2024-introducing-ai-configs/](https://launchdarkly.com/blog/launch-week-2024-introducing-ai-configs/)) now support bringing your own model. This capability unlocks more flexibility than ever before for supporting fine-tuned models, or even running your own models on local hardware.
In this post, we'll compare two open source models ([DeepSeek-R1](https://github.com/deepseek-ai/DeepSeek-R1) and [Alibaba's Qwen](https://www.reuters.com/technology/artificial-intelligence/alibaba-releases-ai-model-it-claims-surpasses-deepseek-v3-2025-01-29/)) using Ollama and AgentControl.
## Prerequisites
* A dev environment with Node.js, npm, and a terminal installed
* A computer with [at least 16gb RAM](https://dev.to/askyt/deepseek-r1-ram-requirements-105a)
* Ideally, a fast internet connection; otherwise downloading models might take a while.
## Locally running LLMs: why and how
Running LLMs on your own hardware has a few advantages over using cloud-provided models:
* *Enhanced data privacy*. You are in control and can be confident you're not leaking data to a model provider.
* *Accessibility*. Locally running models work without an internet connection.
* *Sustainability and reduced costs*. Local models take less power to run.
I was intimidated by the idea of running a model locally. Fortunately, tooling and models have come a long way! You don't need super specialized knowledge, or particularly powerful hardware.
[Ollama](https://ollama.com/) is an awesome open source tool we'll be using to run large language models on local hardware.
## Choosing our models
Ultimately, which model to choose is an extremely complex question that depends on your use case, hardware, latency, and accuracy requirements.
Reasoning models are designed to provide more accurate answers to complex tasks such as coding or solving math problems. DeepSeek made a splash releasing their open source R1 reasoning model in January.
The open source DeepSeek models are distillations of the Qwen or Llama models. Distillation is training a smaller, more efficient model to mimic the behavior and knowledge of a larger, more complex model. Let's pit the distilled version against the original here and see how they stack up.
In this post, we'll use small versions of these models (deepseek-r1:1.5b and qwen:1.8b) to make this tutorial accessible and fast for those without access to advanced hardware. Feel free to try whatever models best suit your needs as you follow along.
## Installing and configuring Ollama
Head to the [Ollama download page](https://ollama.com/download). Follow the instructions for your operating system of choice.
To install our first model and start it running, type the following command in your terminal:
```bash lines wrap theme={null}
ollama run deepseek-r1:1.5b
```
Let's run a test query to ensure that Ollama can generate results. At the prompt, type a question:
```bash lines wrap theme={null}
>>> "why is the sky blue?"
The color of the sky appears blue due to a
combination of factors related to light
refraction and reflection. Here's a
step-by-step explanation:
...
```
To exit the Ollama prompt, use the `/bye` command.
Follow the same process to install *qwen:1.8b*:
```bash lines wrap theme={null}
ollama run qwen:1.8b
```
Although you have exited the terminal process, Ollama is still running in the background via a Docker image. That lets us run code that queries the models we've downloaded. Next we'll create a Node.js project that connects with Ollama.
## Connecting Ollama with a Node.js project
Run the following commands to set up a new Node.js project:
```bash lines wrap theme={null}
mkdir ollama-js-launchdarkly
cd ollama-js-launchdarkly
touch package.json
```
Open *package.json* in your editor. Copy the following into *package.json* and then save the file.
```json expandable lines wrap theme={null}
{
"name": "ollama-launchdarkly",
"version": "1.0.0",
"main": "index.js",
"scripts": {
"test": "echo \"Error: no test specified\" && exit 1"
},
"author": "Your name here",
"license": "MIT",
"type": "module",
"description": "Example app connecting Ollama with AgentControl",
"dependencies": {
"@launchdarkly/node-server-sdk": "^9.7.4",
"@launchdarkly/server-sdk-ai": "^0.9.1",
"dotenv": "^16.4.7",
"ollama": "^0.5.13"
}
}
```
Install dependencies:
```bash lines wrap theme={null}
npm install
```
Create a new file named *testQuery.js*. Enter the following code:
```javascript lines wrap theme={null}
import ollama from "ollama";
const response = await ollama.chat({
model: "deepseek-r1:1.5b",
messages: [{ role: "user", content: "Why is the sky blue?" }],
});
console.log(response.message.content);
```
Run this script to verify that local inference is working.
```bash lines wrap theme={null}
node testQuery.js
```
You should see terminal output that answers the question:
```bash lines wrap theme={null}
The color of the sky, also known as atmospheric red or violet, is primarily due to a process called Rayleigh scattering.
...
```
## Adding a custom model to AgentControl
Head over to [the model configuration page on LaunchDarkly UI](https://app.launchdarkly.com/projects/default/settings/model-configs/). Click the **Add AI model config** button. Fill out the form using the following configuration:
* Name: deepseek-r1:1.5b
* Provider: DeepSeek
* Model ID: deepseek-r1:1.5b
**Model ID** represents how you intend to refer to the model in your code. **Name** is how the model will show up in the LaunchDarkly UI. If you are using a model with one of those terribly long gobbledygook names like *llama-mama-10-gajillion-u234oiru32-preview-instrukt-latest*, giving it a shorter, human readable **Name** might make your dashboard more legible. In this case, we're sticking with *deepseek-r1:1.5b* since it's relatively short and clear. Click **Save**.
Click the **Add AI model config** button again to add the second model.
* Name: qwen:1.8b
* Provider: Custom (Qwen)
* Model ID: qwen:1.8b
Click **Save**.
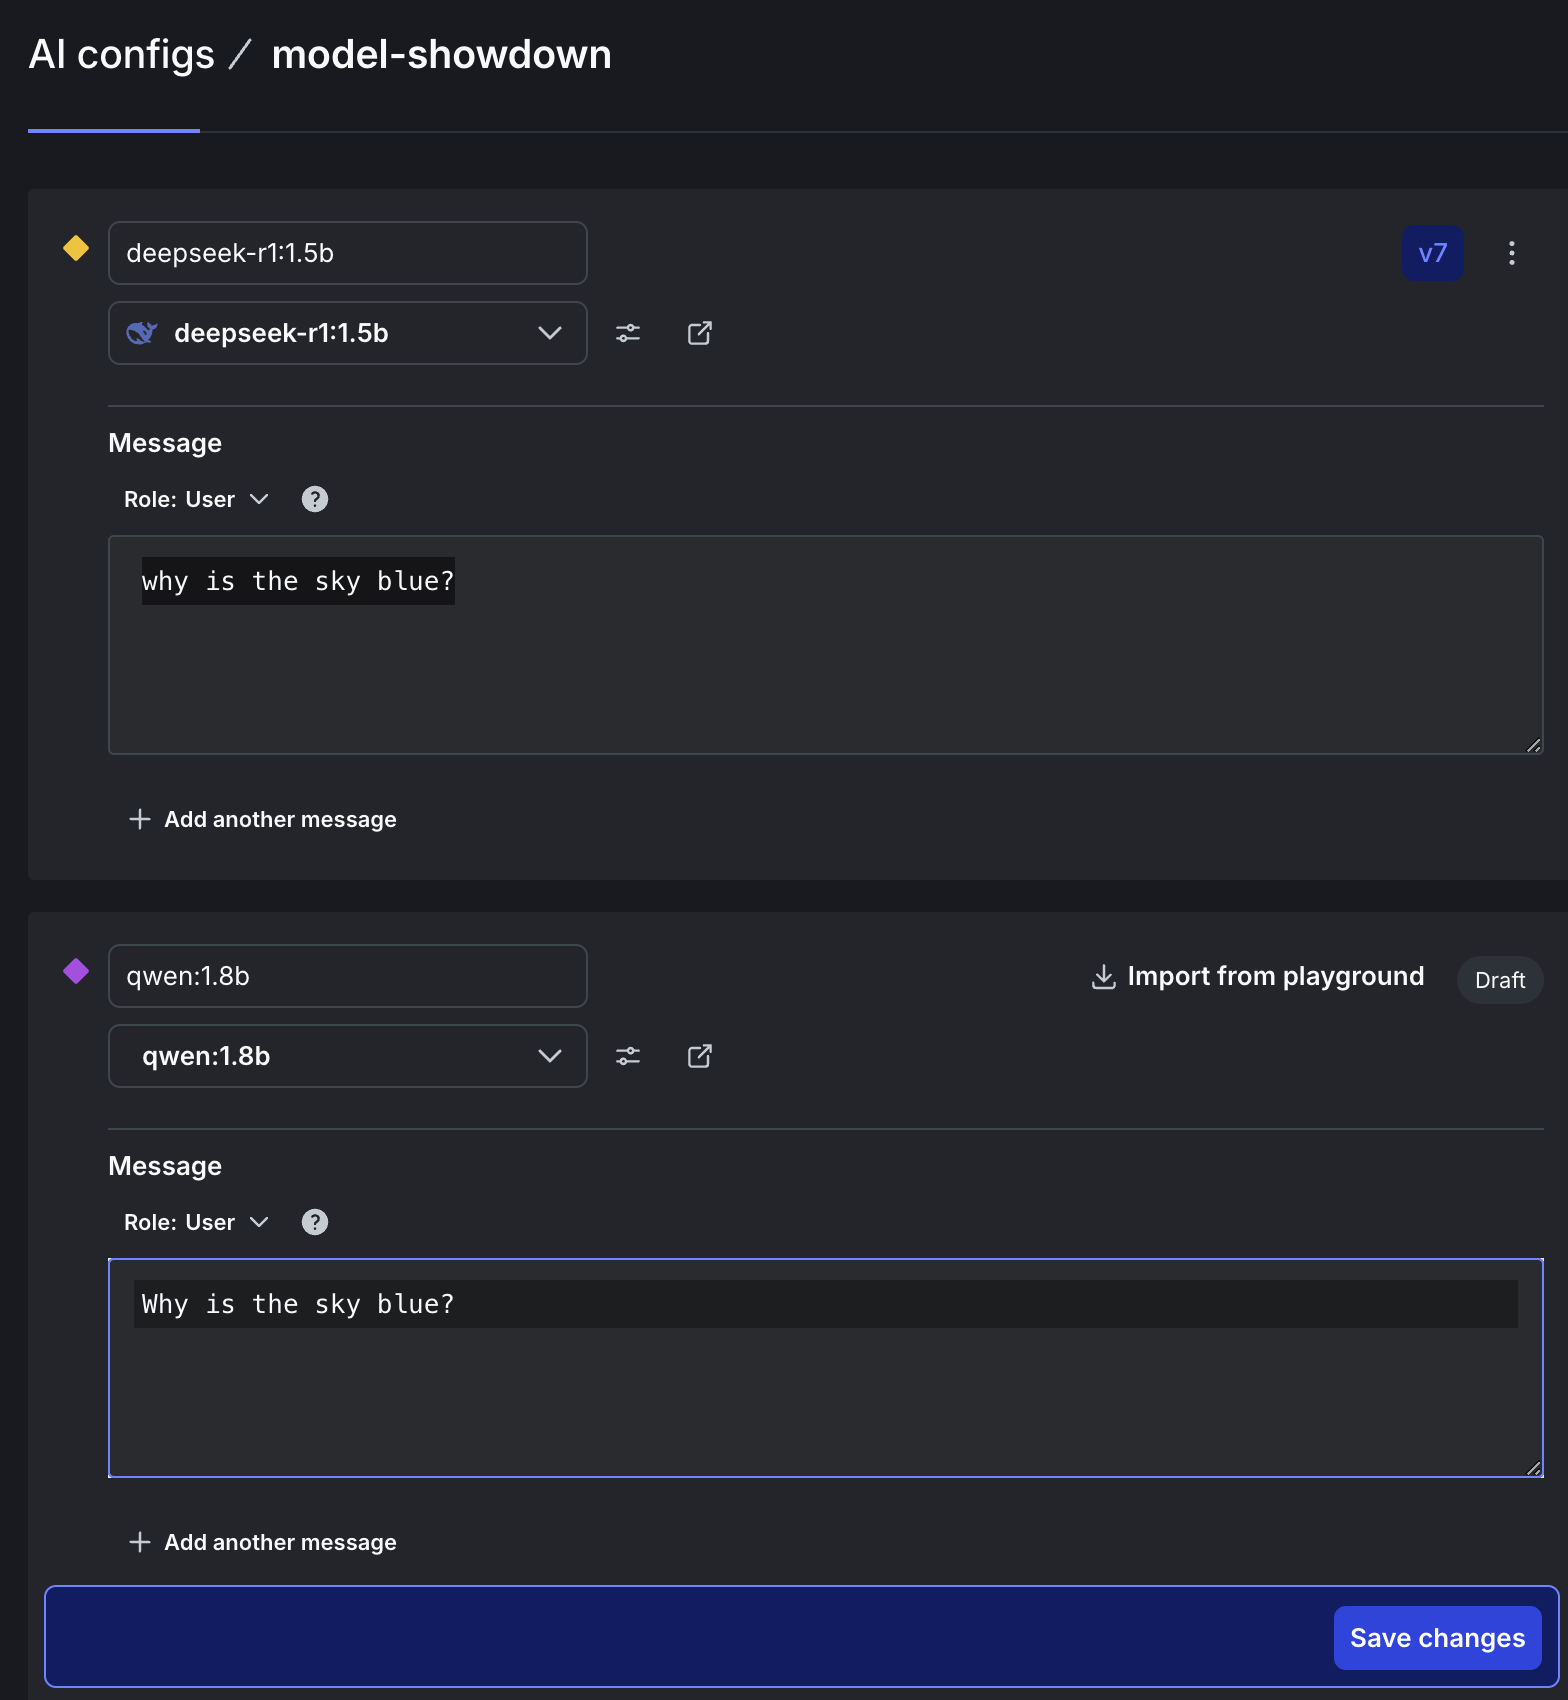
Next, we'll create the config variation representing the prompt and model combinations that we can swap out at runtime. Variations are editable and versioned, so it's okay to make mistakes. Click the **Create** button, and select **Config** from the menu.
Enter "model-showdown" in the config name field. Click **Create**. Configure the next page like so:
* Name: deepseek-r1:1.5b
* Model: deepseek-r1:1.5b
* Role: User. ([DeepSeek reasoning models aren't optimized for System prompts.](https://huggingface.co/deepseek-ai/DeepSeek-R1#usage-recommendations))
* Message: Why is the sky blue?
**Save changes.**
To use *qwen:1.8b*, click **Add another variation**. *Variations* record metrics separately. In order to measure how each model performs, we need one variation per model. To compare fairly between models, keep the prompt the same in both variations. When you're done, **Save changes**.
* Name: qwen:1.8b
* Model: qwen:1.8b
* Role: User
* Message: Why is the sky blue?
 On the **Targeting** tab, edit the default rule to serve the deepseek-r1:1.5b variation. Click the toggle to enable the config. Click **Review and save**.
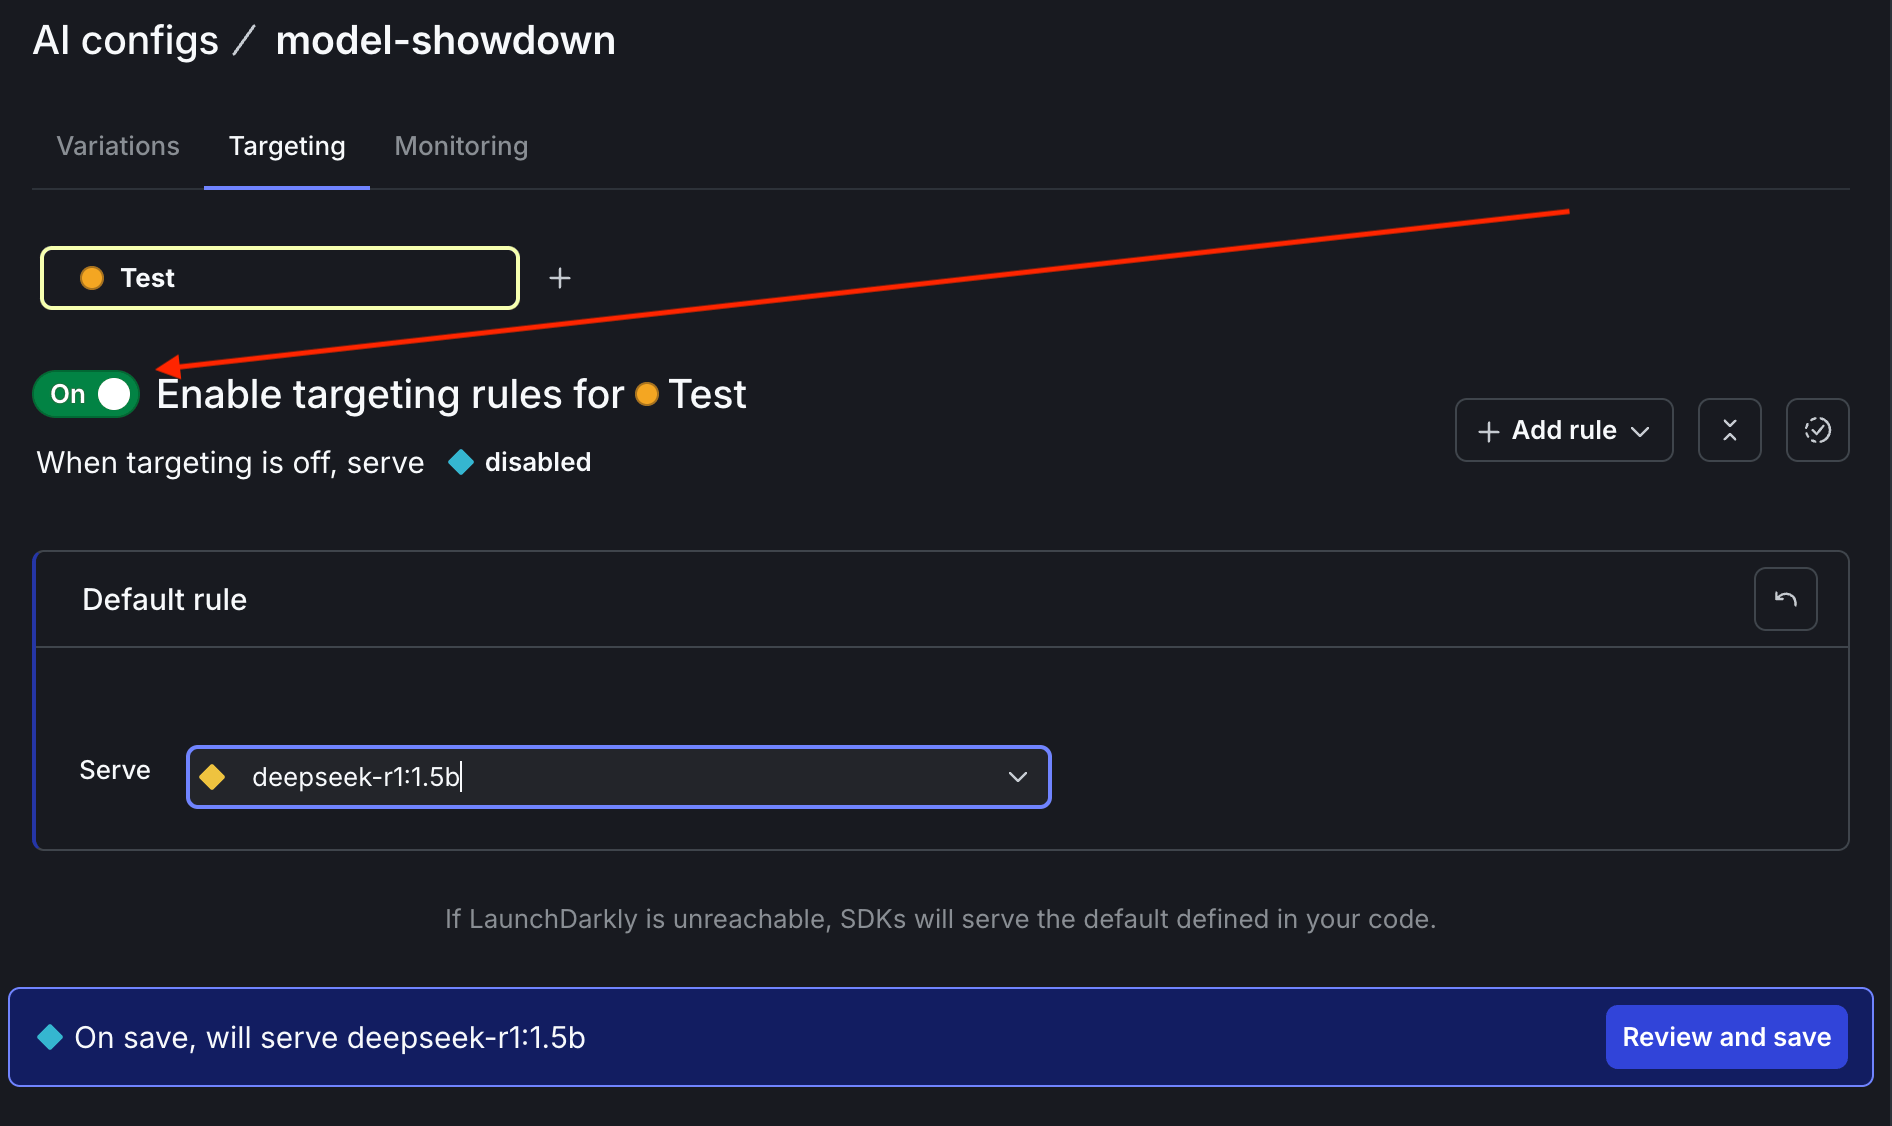 If your LaunchDarkly permissions require it, enter a comment to explain these changes.
There's one more configuration step. On the … dropdown next to the **Test** environment on the **Targeting tab**, select **SDK key** to copy your SDK key to the clipboard.
If your LaunchDarkly permissions require it, enter a comment to explain these changes.
There's one more configuration step. On the … dropdown next to the **Test** environment on the **Targeting tab**, select **SDK key** to copy your SDK key to the clipboard.
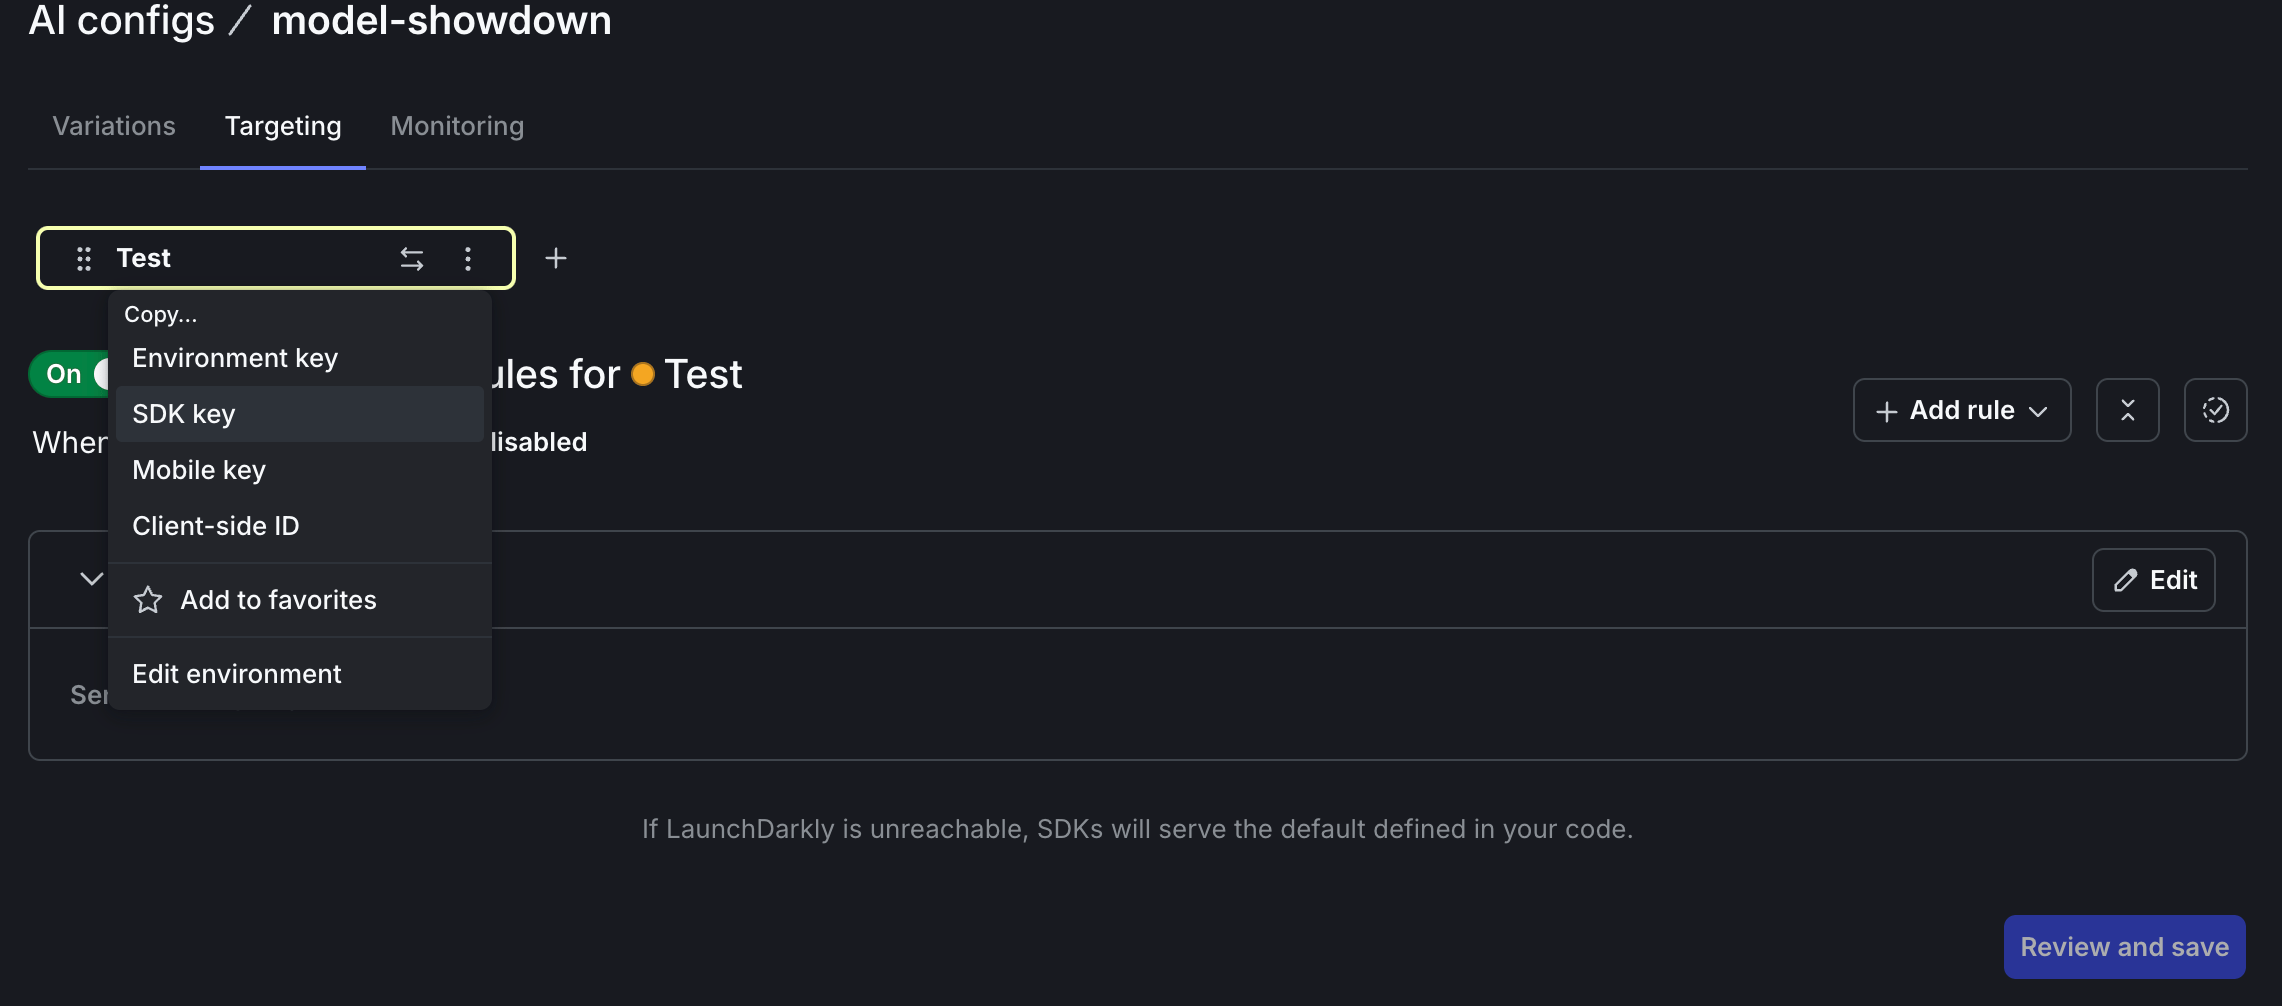 Create an *.env* file at the root of your project. Paste the following line in, replacing "YOUR KEY HERE" with your actual key.
```bash lines wrap theme={null}
LAUNCHDARKLY_SDK_KEY="YOUR KEY HERE"
```
Save the .env file.
Be careful not to check this file into source control if you are using it. Keep those secrets safe.
## Connecting AgentControl to Ollama
Back in your Node project, create a new file named *generate.js*. Add the following lines of code:
```javascript maxLines=0 expandable lines wrap theme={null}
import ollama from "ollama";
import "dotenv/config";
import launchDarkly from "@launchdarkly/node-server-sdk";
import launchDarklyAI from "@launchdarkly/server-sdk-ai";
const LD_CONFIG_KEY = "model-showdown";
const DEFAULT_CONFIG = {
enabled: true,
model: { name: "deepseek-r1:1.5b" },
// double ??s so you know it fell back to the default value
messages: [{ role: "user", content: "Why is the sky blue??" }],
};
// In a real app you'd fill in this example data
const userContext = {
kind: "user",
name: "Mark",
email: "mark.s@lumonindustries.work",
key: "example-user-key",
};
const ldClient = launchDarkly.init(process.env.LAUNCHDARKLY_SDK_KEY);
const ldAiClient = launchDarklyAI.initAi(ldClient);
// Wait for LaunchDarkly client to initialize
async function waitForLDClient() {
return new Promise((resolve) => {
ldClient.once("ready", () => {
resolve();
});
});
}
function trackMetrics(tracker, response) {
if (!response) return;
tracker.trackSuccess();
// ollama provides duration in nanoseconds but LaunchDarkly wants milliseconds
const durationInMilliseconds = response.total_duration / 1_000_000;
tracker.trackDuration(durationInMilliseconds);
// Track token usage
const tokens = {
input: response.prompt_eval_count,
output: response.eval_count,
total: response.prompt_eval_count + response.eval_count,
};
tracker.trackTokens(tokens);
}
async function generate(options = {}) {
/**
* Generates text using a large language model.
* @param {Object} options - Configuration options for the generation
* @returns {Promise} The generated text or null if an error occurs
*/
await waitForLDClient();
console.log("User context being evaluated:", userContext);
const configValue = await ldAiClient.completionConfig(
LD_CONFIG_KEY,
userContext,
DEFAULT_CONFIG,
options
);
console.log("configValue: ", configValue);
const { model, tracker, messages = [] } = configValue;
try {
const response = await ollama.chat({
model: model.name,
messages,
});
console.log(response);
trackMetrics(tracker, response);
return response;
} catch (error) {
tracker.trackError(error);
console.error("Error generating AI response:", error);
return null;
}
}
generate();
```
Run this code using `node generate.js` in your terminal. Output should show the response comes from deepseek-r1:1.5b.
```bash lines wrap theme={null}
info: [LaunchDarkly] Opened LaunchDarkly stream connection
{
model: 'deepseek-r1:1.5b',
created_at: '2025-03-03T19:16:22.082877Z',
message: {
role: 'assistant',
content: '\n' +
'\n' +
'\n' +
'\n' +
"The color of the sky, or its blue appearance, is primarily due to a phenomenon called Rayleigh scattering.
...
```
Cool! Let's try the other model. Back in [the LaunchDarkly UI](https://app.launchdarkly.com/), edit your default rule for the *model-showdown* config to serve the `qwen:1.8b` model. **Save changes**.
Create an *.env* file at the root of your project. Paste the following line in, replacing "YOUR KEY HERE" with your actual key.
```bash lines wrap theme={null}
LAUNCHDARKLY_SDK_KEY="YOUR KEY HERE"
```
Save the .env file.
Be careful not to check this file into source control if you are using it. Keep those secrets safe.
## Connecting AgentControl to Ollama
Back in your Node project, create a new file named *generate.js*. Add the following lines of code:
```javascript maxLines=0 expandable lines wrap theme={null}
import ollama from "ollama";
import "dotenv/config";
import launchDarkly from "@launchdarkly/node-server-sdk";
import launchDarklyAI from "@launchdarkly/server-sdk-ai";
const LD_CONFIG_KEY = "model-showdown";
const DEFAULT_CONFIG = {
enabled: true,
model: { name: "deepseek-r1:1.5b" },
// double ??s so you know it fell back to the default value
messages: [{ role: "user", content: "Why is the sky blue??" }],
};
// In a real app you'd fill in this example data
const userContext = {
kind: "user",
name: "Mark",
email: "mark.s@lumonindustries.work",
key: "example-user-key",
};
const ldClient = launchDarkly.init(process.env.LAUNCHDARKLY_SDK_KEY);
const ldAiClient = launchDarklyAI.initAi(ldClient);
// Wait for LaunchDarkly client to initialize
async function waitForLDClient() {
return new Promise((resolve) => {
ldClient.once("ready", () => {
resolve();
});
});
}
function trackMetrics(tracker, response) {
if (!response) return;
tracker.trackSuccess();
// ollama provides duration in nanoseconds but LaunchDarkly wants milliseconds
const durationInMilliseconds = response.total_duration / 1_000_000;
tracker.trackDuration(durationInMilliseconds);
// Track token usage
const tokens = {
input: response.prompt_eval_count,
output: response.eval_count,
total: response.prompt_eval_count + response.eval_count,
};
tracker.trackTokens(tokens);
}
async function generate(options = {}) {
/**
* Generates text using a large language model.
* @param {Object} options - Configuration options for the generation
* @returns {Promise} The generated text or null if an error occurs
*/
await waitForLDClient();
console.log("User context being evaluated:", userContext);
const configValue = await ldAiClient.completionConfig(
LD_CONFIG_KEY,
userContext,
DEFAULT_CONFIG,
options
);
console.log("configValue: ", configValue);
const { model, tracker, messages = [] } = configValue;
try {
const response = await ollama.chat({
model: model.name,
messages,
});
console.log(response);
trackMetrics(tracker, response);
return response;
} catch (error) {
tracker.trackError(error);
console.error("Error generating AI response:", error);
return null;
}
}
generate();
```
Run this code using `node generate.js` in your terminal. Output should show the response comes from deepseek-r1:1.5b.
```bash lines wrap theme={null}
info: [LaunchDarkly] Opened LaunchDarkly stream connection
{
model: 'deepseek-r1:1.5b',
created_at: '2025-03-03T19:16:22.082877Z',
message: {
role: 'assistant',
content: '\n' +
'\n' +
'\n' +
'\n' +
"The color of the sky, or its blue appearance, is primarily due to a phenomenon called Rayleigh scattering.
...
```
Cool! Let's try the other model. Back in [the LaunchDarkly UI](https://app.launchdarkly.com/), edit your default rule for the *model-showdown* config to serve the `qwen:1.8b` model. **Save changes**.
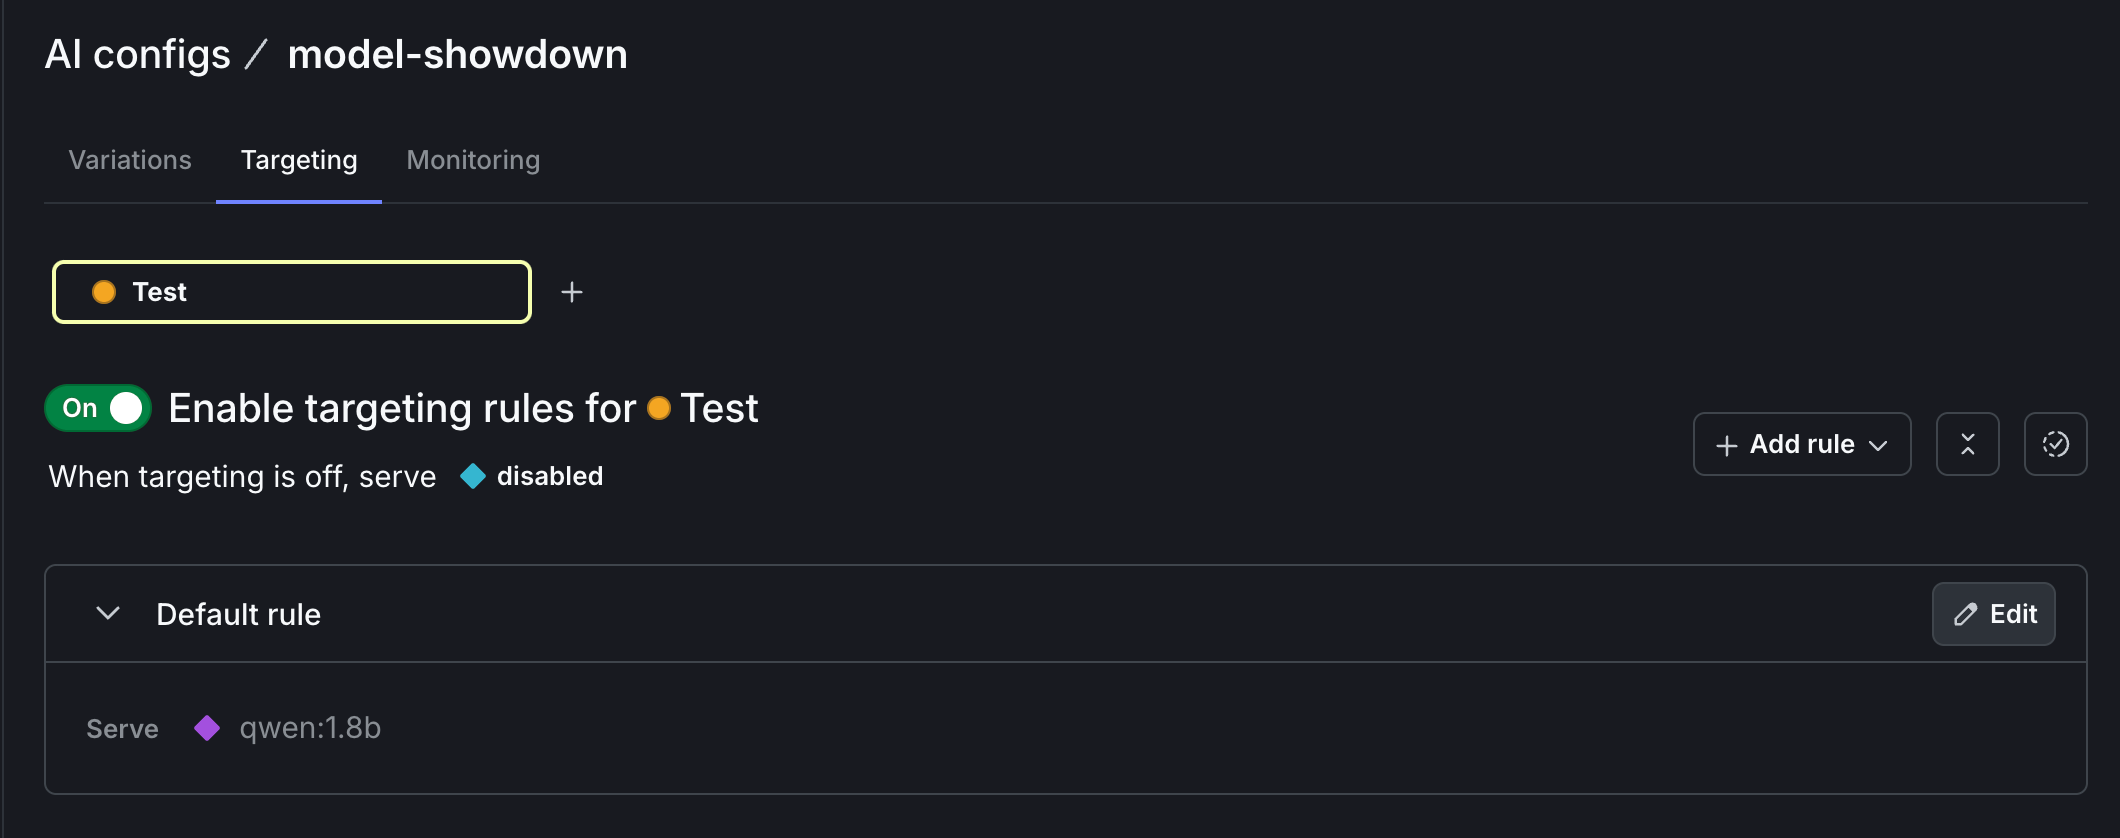 Rerun `generate.js` and you'll see the response from `qwen:1.8b`:
```bash lines wrap theme={null}
model: 'qwen:1.8b',
created_at: '2025-03-03T20:04:19.16003Z',
message: {
role: 'assistant',
content: 'The sky appears blue to us because of a phenomenon known as Rayleigh scattering. \n' +
...
```
Some other queries you can try to test reasoning models' capabilities:
* What is 456 plus 789?
* What is the color most closely matching this HEX representation: #8002c6 ?
[Google maintains an awesome list of questions to evaluate reasoning models on GitHub](https://github.com/google/BIG-bench/blob/main/bigbench/benchmark_tasks/README.md). You'll get the most applicable results if you stick to questions that are close to your use case.
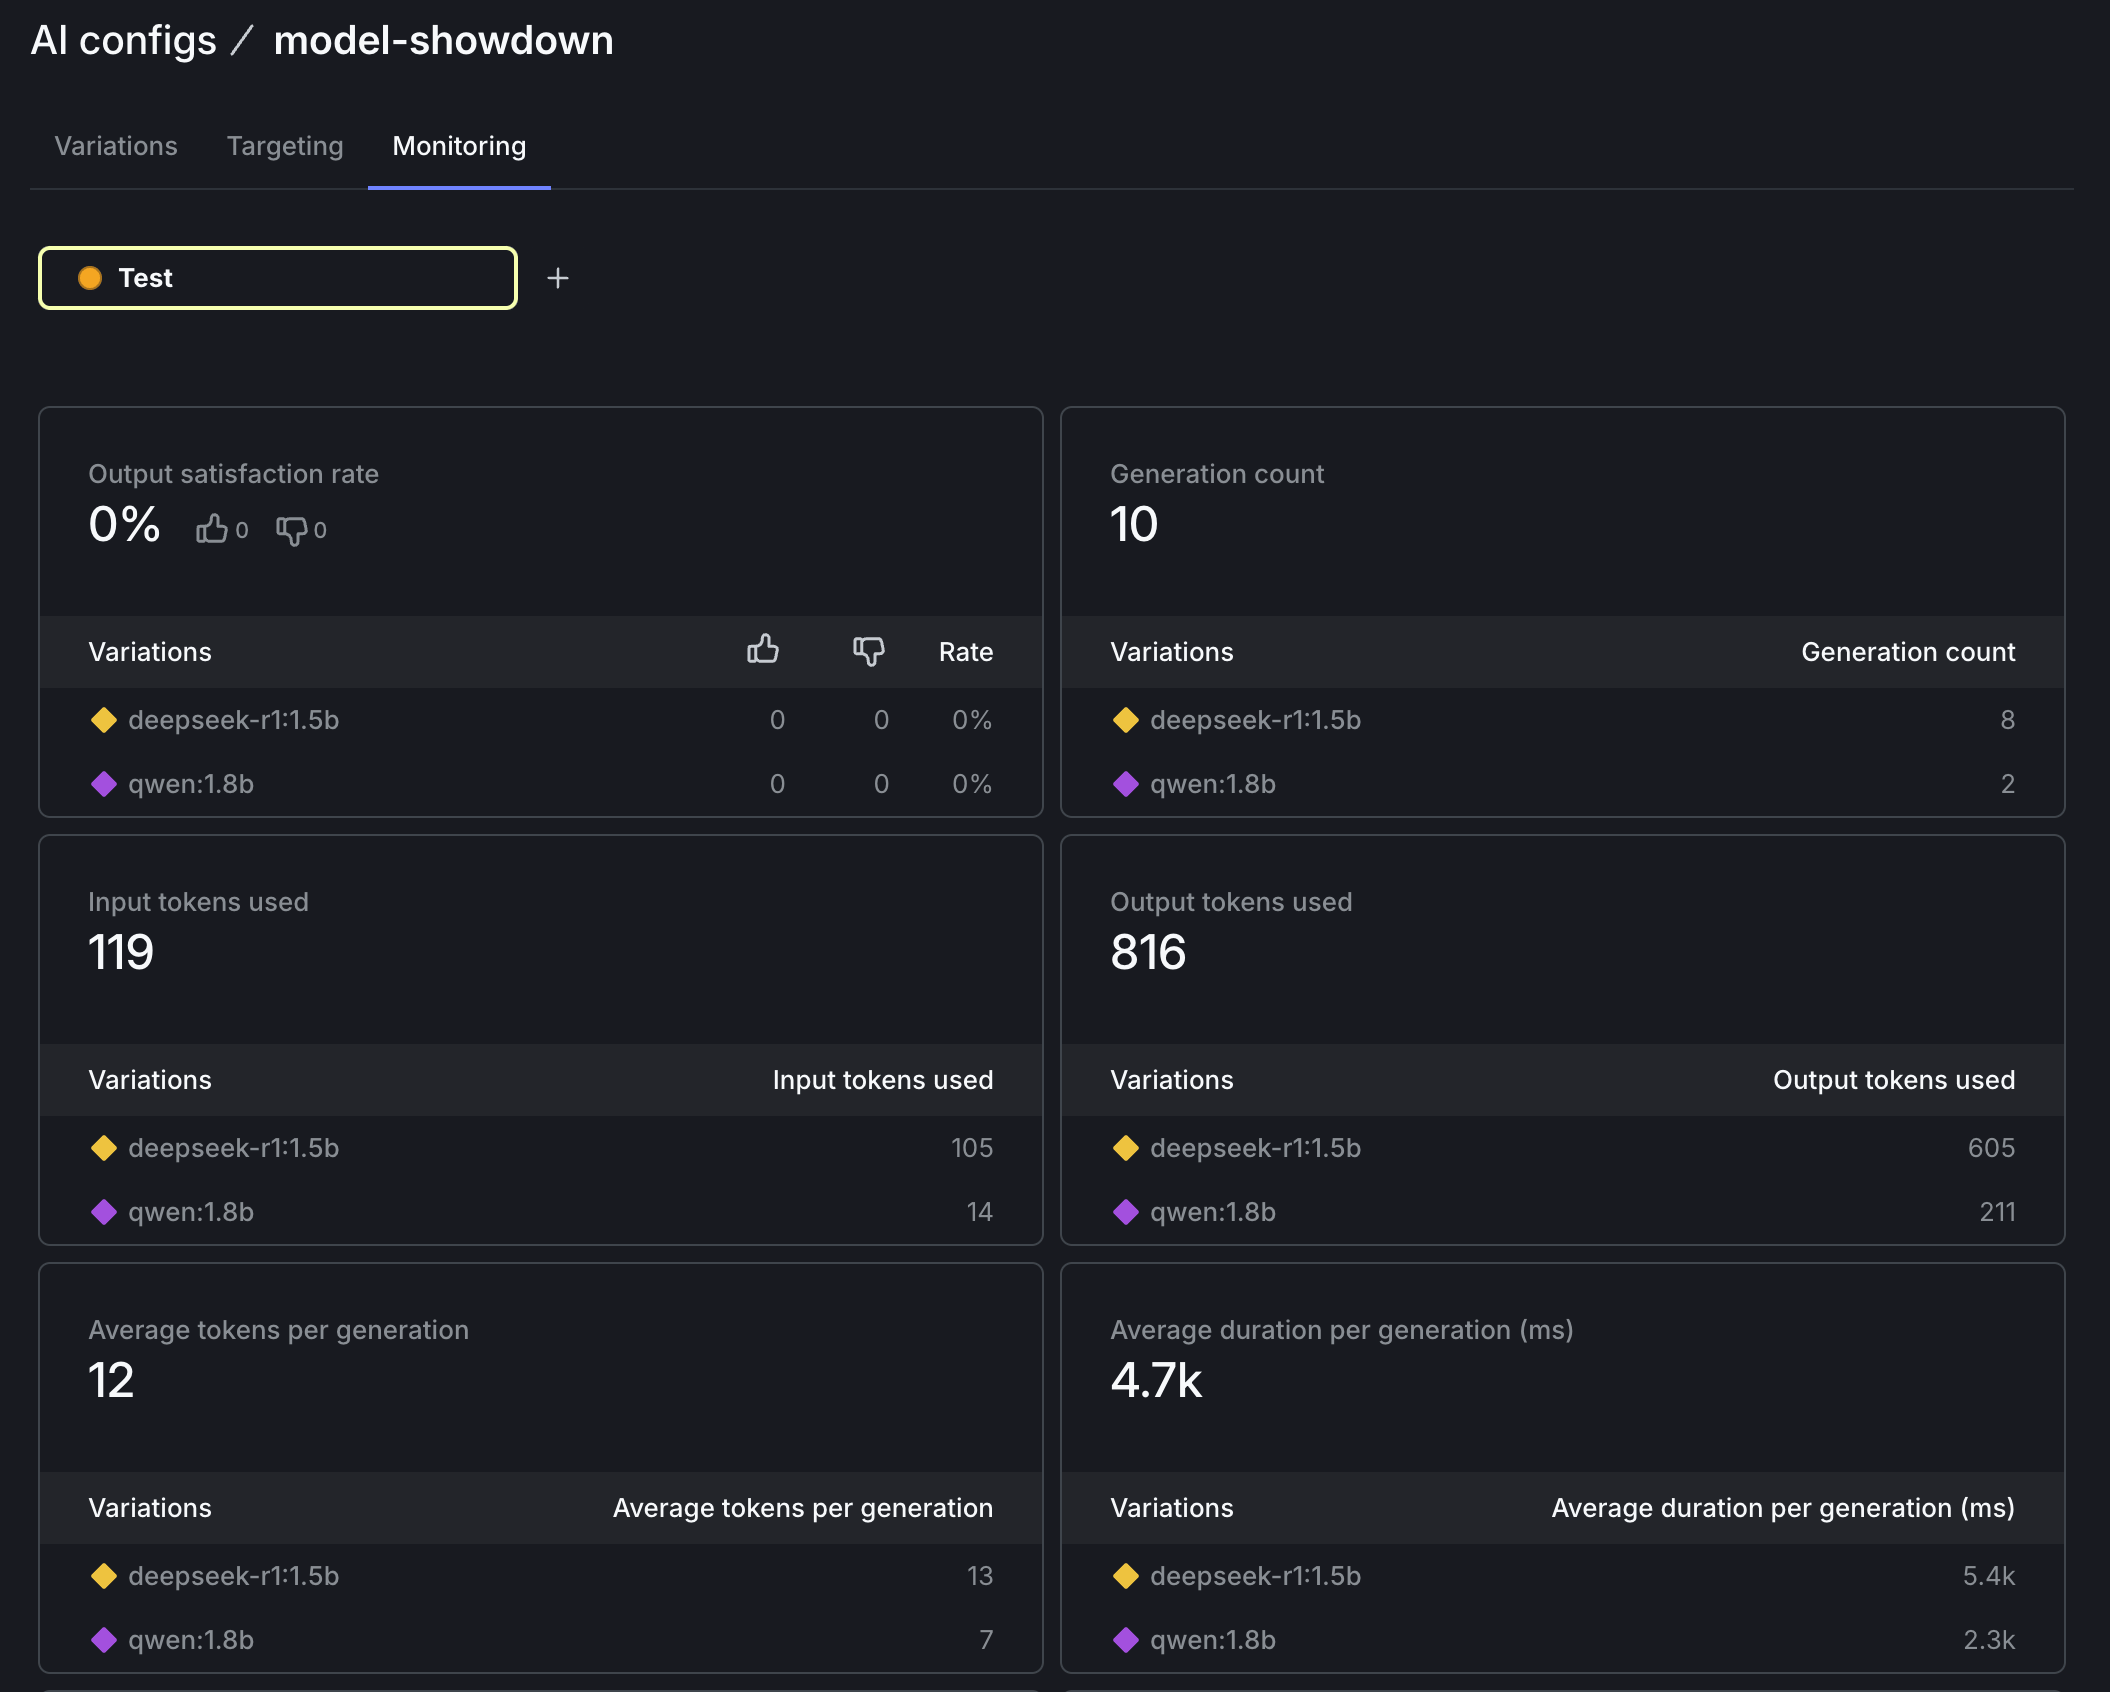
When we call `trackMetrics` in our app, the data we send is visualized in the **Monitoring** tab on the LaunchDarkly app. Our code tracks input and output tokens, request duration, and how many times each model was called (generation count).
Rerun `generate.js` and you'll see the response from `qwen:1.8b`:
```bash lines wrap theme={null}
model: 'qwen:1.8b',
created_at: '2025-03-03T20:04:19.16003Z',
message: {
role: 'assistant',
content: 'The sky appears blue to us because of a phenomenon known as Rayleigh scattering. \n' +
...
```
Some other queries you can try to test reasoning models' capabilities:
* What is 456 plus 789?
* What is the color most closely matching this HEX representation: #8002c6 ?
[Google maintains an awesome list of questions to evaluate reasoning models on GitHub](https://github.com/google/BIG-bench/blob/main/bigbench/benchmark_tasks/README.md). You'll get the most applicable results if you stick to questions that are close to your use case.
When we call `trackMetrics` in our app, the data we send is visualized in the **Monitoring** tab on the LaunchDarkly app. Our code tracks input and output tokens, request duration, and how many times each model was called (generation count).
 ## Wrapping it up: bring your own model, track your own metrics, take the next steps
In this tutorial you've learned how to run large language models locally with Ollama and query the results from a Node.js application. Furthermore, you've created a custom model config with LaunchDarkly that tracks metrics such as latency, token usage, and generation count.
There's so much more we could do with AgentControl on top of this foundation.
One upgrade would be to add additional metrics. For example, you could [track output satisfaction and let users rate the quality of the response](/docs/sdk/features/ai-metrics). If you are using LLMs in production, [AgentControl even supports running A/B tests and other kinds of experiments](/docs/home/experimentation/types) to determine which variation performs the best for your use case using the power of statistics.
[AgentControl also has advanced targeting capabilities](/docs/home/agentcontrol/target). For example, you could [use a more expensive model for potentially high-value customers with enterprise-y email addresses](/docs/guides/agentcontrol/targeting-python). Or you could give users a more linguistically localized experience by serving them a model trained in the language specified in their [accept-lang header](https://developer.mozilla.org/en-US/docs/Web/HTTP/Headers/Accept-Language).
If you want to learn more about runtime model management, here's some further reading:
* [Compare AI Models in Python Flask Applications — Using AgentControl](https://launchdarkly.com/blog/ai-configs-python-flask-compare-models/)
* [Upgrade OpenAI models in ExpressJS applications — using AgentControl](https://launchdarkly.com/blog/upgrade-openai-models-expressjs-ai-configs/)
Thanks so much for following along. [Hit me up on Bluesky](https://bsky.app/profile/annthurium.bsky.social) if you found this tutorial useful. You can also reach me via email ([tthurium@launchdarkly.com](mailto:tthurium@launchdarkly.com)), [Discord](https://discord.com/invite/launchdarklycommunity), or [LinkedIn](https://www.linkedin.com/in/annthurium/).
## Wrapping it up: bring your own model, track your own metrics, take the next steps
In this tutorial you've learned how to run large language models locally with Ollama and query the results from a Node.js application. Furthermore, you've created a custom model config with LaunchDarkly that tracks metrics such as latency, token usage, and generation count.
There's so much more we could do with AgentControl on top of this foundation.
One upgrade would be to add additional metrics. For example, you could [track output satisfaction and let users rate the quality of the response](/docs/sdk/features/ai-metrics). If you are using LLMs in production, [AgentControl even supports running A/B tests and other kinds of experiments](/docs/home/experimentation/types) to determine which variation performs the best for your use case using the power of statistics.
[AgentControl also has advanced targeting capabilities](/docs/home/agentcontrol/target). For example, you could [use a more expensive model for potentially high-value customers with enterprise-y email addresses](/docs/guides/agentcontrol/targeting-python). Or you could give users a more linguistically localized experience by serving them a model trained in the language specified in their [accept-lang header](https://developer.mozilla.org/en-US/docs/Web/HTTP/Headers/Accept-Language).
If you want to learn more about runtime model management, here's some further reading:
* [Compare AI Models in Python Flask Applications — Using AgentControl](https://launchdarkly.com/blog/ai-configs-python-flask-compare-models/)
* [Upgrade OpenAI models in ExpressJS applications — using AgentControl](https://launchdarkly.com/blog/upgrade-openai-models-expressjs-ai-configs/)
Thanks so much for following along. [Hit me up on Bluesky](https://bsky.app/profile/annthurium.bsky.social) if you found this tutorial useful. You can also reach me via email ([tthurium@launchdarkly.com](mailto:tthurium@launchdarkly.com)), [Discord](https://discord.com/invite/launchdarklycommunity), or [LinkedIn](https://www.linkedin.com/in/annthurium/).