
Redshift Data Export
Data Export is available as an add-on feature to select plans. To learn more, read about our pricing. To add Data Export to your plan, contact Sales.
This topic explains how to create and test an Amazon Redshift destination for Data Export. Redshift is a cloud-based data processing and analysis platform that lets you work with large sets of data. By exporting your LaunchDarkly flag evaluation and experiment data to the same Redshift cluster as your other data, you can build custom reports in Redshift to answer product behavior questions.
LaunchDarkly stages exported data in an Amazon S3 bucket before it loads the data into Redshift. These setup instructions include configuring the S3 staging bucket and the AWS Identity and Access Management (IAM) role that LaunchDarkly needs.
Prerequisites
To configure the Redshift Data Export integration, you must have the following prerequisites:
- A LaunchDarkly role that allows you to add and edit integrations and add destinations.
- Access to an existing provisioned Amazon Redshift cluster. The cluster must be provisioned, not serverless.
- IAM permissions in AWS to create roles, policies, and S3 buckets.
- The ability to run SQL commands through Redshift Query Editor v2 or another SQL client connected to your cluster.
- Your Redshift cluster endpoint, cluster identifier, and AWS account ID. You can find these in the AWS console under Amazon Redshift > Clusters > [your cluster name].
- If your cluster restricts inbound connections by IP, you must allow the LaunchDarkly data transfer service’s static IP address:
35.192.85.117.
For best performance, create your S3 staging bucket in the same AWS region as your Redshift cluster.
You can configure only one Data Export destination per LaunchDarkly environment, regardless of destination kind. If you need more than one Data Export destination for the same data, configure them in different environments.
Redshift naming conventions
When you select a project and environment, LaunchDarkly pre-fills default names for the resources the setup creates. Redshift converts unquoted identifiers to lowercase, so all defaults are lowercase.
You can keep these defaults or customize them in step 2 of the setup:
- Database:
ld_export. Shared across all environments. - Schema:
export_<projKey>__<envKey>, where<projKey>is your project key and<envKey>is your environment key. Unique to a project and environment. - User:
ld_export_user_<projKey>__<envKey>. Unique to a project and environment. - S3 staging bucket:
ld-export-staging-<projKey>--<envKey>. LaunchDarkly uses lowercase characters for the name and also replaces underscores with hyphens, because S3 bucket names cannot contain underscores. Unique to a project and environment. Do not customize this name.
If you customize a database, schema, or user name, it must:
- start with a lowercase letter or underscore
- contain only lowercase letters, digits, and underscores
- be 127 characters or fewer
- not be a Redshift reserved word
Set up the integration
To set up Redshift Data Export, enter your cluster connection details, run a generated SQL script in Redshift, create the S3 staging bucket and IAM role in AWS, then test the connection and save the destination.
We recommend having browser windows open for LaunchDarkly, AWS, and Redshift so that you can switch between them.
Step 1: Connect your LaunchDarkly environment to Redshift
To start the configuration in LaunchDarkly:
- Click the gear icon in the left sidebar to view Organization settings.
- Click Integrations and find “Redshift Data Export.”
- Click Add integration. The Redshift Data Export configuration page appears.
- Give the integration a human-readable Name.
- Choose a Project and environment to export data from. Environments that already have a Data Export destination are unavailable.
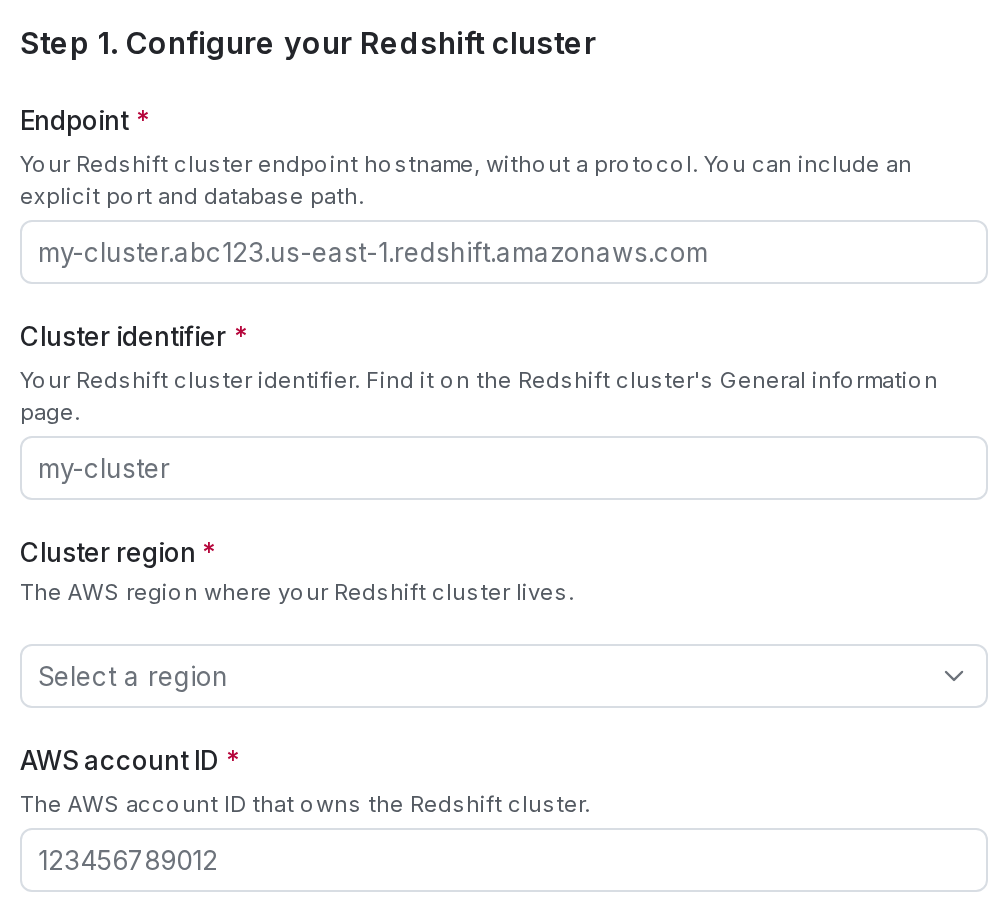
- Enter the Redshift cluster Endpoint. Custom Network Load Balancer (NLB) and VPC endpoints are supported.
- Enter the Cluster identifier.
- Select the Cluster region.
- Enter your AWS account ID. This is the 12-digit number for the AWS account that owns the cluster.
Step 2: Customize resource names (optional)
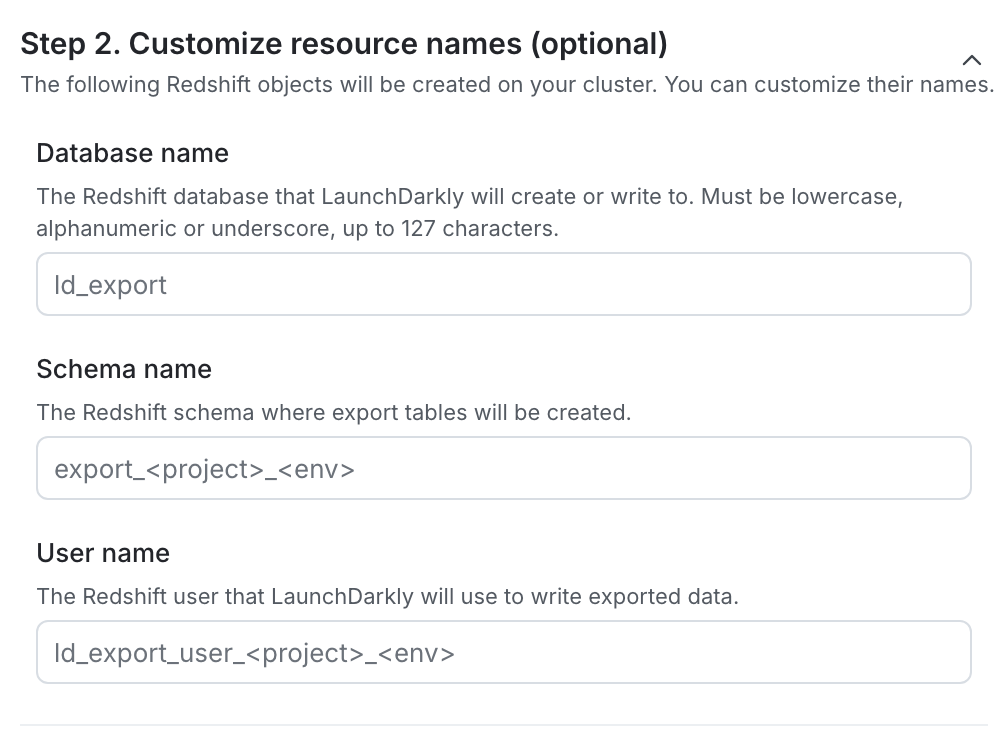
If your organization uses specific naming conventions for Redshift objects, you can override the defaults LaunchDarkly creates. Expand the Customize resource names section to edit any of:
- Database name
- Schema name
- User name
LaunchDarkly uses any value you enter in the generated SQL script and in the connection it makes to Redshift. If you leave a field blank, LaunchDarkly uses the default value listed under Redshift naming conventions.
Step 3: Generate and run the SQL script
Now, generate the script that creates the database, schema, user, and grants in your cluster:
- Click Generate setup script. LaunchDarkly returns a setup script that creates the database, schema, user, and grants using the names you chose.
- Copy the script.
- In Redshift Query Editor v2 or your SQL client, connect to your cluster with a user that has permission to create databases, create users, and grant privileges.
- Paste the script into a new query tab and run it.
You can run the generated script more than once without errors. Per-environment objects (schema, user, grants) use CREATE SCHEMA IF NOT EXISTS and a NONATOMIC stored-procedure pattern that catches the 42710 “object already exists” error. Re-running produces RAISE INFO messages rather than failures. The CREATE DATABASE step at the top of the script uses a SELECT pg_database pre-flight check to skip the statement if the database already exists, because Redshift does not support CREATE DATABASE IF NOT EXISTS.
Step 4: Create the S3 staging bucket
LaunchDarkly stages exported data in an S3 bucket in your AWS account before loading it into Redshift. LaunchDarkly generates the bucket name for you, and you create a bucket with that exact name.
To create the staging bucket:
- In LaunchDarkly, copy the read-only S3 staging bucket name from Step 4 of the configuration page. The name follows the pattern
ld-export-staging-<projKey>--<envKey>. - Select the S3 staging bucket region. This must be the same region as your Redshift cluster.
- In the AWS console, create an S3 bucket with the exact name you copied, in the region you selected.
Step 5: Create the IAM role
The LaunchDarkly data transfer service assumes an IAM role in your AWS account to read from the staging bucket and run COPY into your Redshift cluster. You create the role using the two policy documents LaunchDarkly generates for you, then paste the role’s ARN back into LaunchDarkly.
To create the role:
- In LaunchDarkly, copy the Permissions policy from Step 5 of the configuration page.
- In the AWS console, navigate to IAM > Policies and click Create policy. Select the JSON editor and paste the permissions policy. Add policy details, then create the policy.
- In LaunchDarkly, copy the Trust policy from Step 5 of the configuration page.
- In the AWS console, navigate to IAM > Roles and click Create role. Select a Custom trust policy and paste the trust policy. On the permissions step, attach the policy you created in step 2.
- Add role details, then create the role.
- Copy the ARN of the new role.
- Return to LaunchDarkly and paste the ARN into the IAM role ARN field.
Test and save the connection
To finish the setup:
- Read the Integration Terms and Conditions, then select the I have read and agree to the Integration Terms and Conditions checkbox.
- Click Test connection and save. LaunchDarkly assumes the IAM role you provided, tests the Redshift connection, and, if both succeed, activates the destination and starts the initial transfer.
After you create an IAM role in AWS, the sts:AssumeRole action can take up to five minutes to be reachable from another AWS account. If Test connection and save fails immediately after you create the role, wait a few minutes and try again. The error message includes the response from sts:AssumeRole.
Your Redshift Data Export destination is now configured.
Redshift Data Export runs an hourly job, on the hour, that publishes raw LaunchDarkly data in your Redshift cluster. New data is available in your cluster within 10 to 15 minutes after the hour.
To learn about the different event kinds for Redshift Data Export destinations, read Warehouse Data Export schema reference.
View an existing destination
The destination setup is visible on the edit page so that you can re-copy the SQL script or look up the staging bucket name or IAM role ARN without having to reconstruct any values from scratch. However, all fields on the edit page are read-only.
You may need to use the read-only fields in the following ways:
- Copy the SQL script in step 3 if you need to re-run the setup in Redshift, for example after re-creating the cluster.
- Copy the S3 staging bucket name if you need to look up the bucket in AWS.
To view an existing Redshift Data Export destination:
- In LaunchDarkly, click the gear icon in the left sidebar to view Organization settings.
- Click Integrations and find “Redshift Data Export.”
- Find the destination you want to edit and click Edit. The Redshift Data Export configuration page appears with the destination’s settings.
To change any value on the edit page, delete the destination and configure a new one.
In rare cases, LaunchDarkly cannot render the setup SQL script and staging bucket name from the destination’s saved configuration. When that happens, the edit page shows a warning callout in Step 3 with a Refresh button. Click Refresh to reload the page and try again. If the warning persists, contact LaunchDarkly Support.
Health checks
If your warehouse Data Export integration develops connection problems or other errors, the integration will display a health check warning. To learn more, read Warehouse health checks.