

launchdarkly-experiment-setup agent skill to run
your first A/B test. Your agent handles the busywork: it builds a small app, creates the flag,
and sets up the metric and experiment. You make the important decisions: you write the experiment design,
approve it, turn on the flag, and decide when the experiment starts.
When you’re done, LaunchDarkly results show which version performed better and how confident
you can be. That way, the next debate about button text ends with data instead of opinion.
Prerequisites
Accounts and information- A LaunchDarkly account with Experimentation, and permission to create flags, metrics, and experiments.
- A LaunchDarkly project to work in, and the SDK key for the environment you’ll use. This tutorial uses the test environment.
- A coding agent that supports Model Context Protocol (MCP) and agent skills, such as Cursor or Claude Code, running on your computer.
- Node.js long-term support (LTS) and npm.
- Optional: Git, to clone the companion repo.
- The hosted LaunchDarkly MCP server, connected and signed in to your account. This lets your agent create the flag, metric, and experiment. If you have more than one LaunchDarkly plugin or MCP server installed, keep only the hosted server on. This means your agent uses the current skill.
- The
launchdarkly-experiment-setupagent skill, version 0.3.0 or later. You install this in Step 1.
Skip ahead with the companion repo: Clone the repo, check out the
finish branch,
run npm install, and add your SDK key to .env. Then install the experiment skill
in the project folder, as described in Step 1, and start at Step 3. In Step 6, skip
building the simulator, and run npm run simulate.Step 1: Plan what to build with your agent
Start by deciding what to test, then ask your agent for a plan rather than code. Reviewing the plan first lets you check what the agent intends to build before it changes any files. To set up your project:- Create an empty folder for the project.
- Open the folder in your coding agent.
-
Run
git initin a terminal in that folder. -
Install the experiment skill in the same folder:
The skill is added to a
.agents/skills/folder in your project, where your agent reads it. - Start a new chat in your agent. This ensures it picks up the skill.
cta-button-text flag for each visitor, and clicking the button sends a cta-clicked
event for that same visitor. The plan ends by asking whether to build the page.
Your agent’s plan may be worded differently, or use different file names. That’s
expected. What matters is that it uses the flag key cta-button-text and the event key
cta-clicked exactly as written, because the later steps depend on them.
To learn more about the SDK your agent uses, read Node.js SDK reference (server-side).
Step 2: Build the signup page
Next, have your agent build what it planned. You add your SDK key yourself. Do not paste it in chat. Send this prompt to your agent:- Copy the SDK key for your test environment from LaunchDarkly. It’s the server-side key.
- Replace the placeholder in your
.envfile with the key. - Save the file.
- Run
npm startin your terminal. - Open
http://localhost:3000. The button reads “Start free trial.” - Click the button a few times. A thank-you page appears after each click.
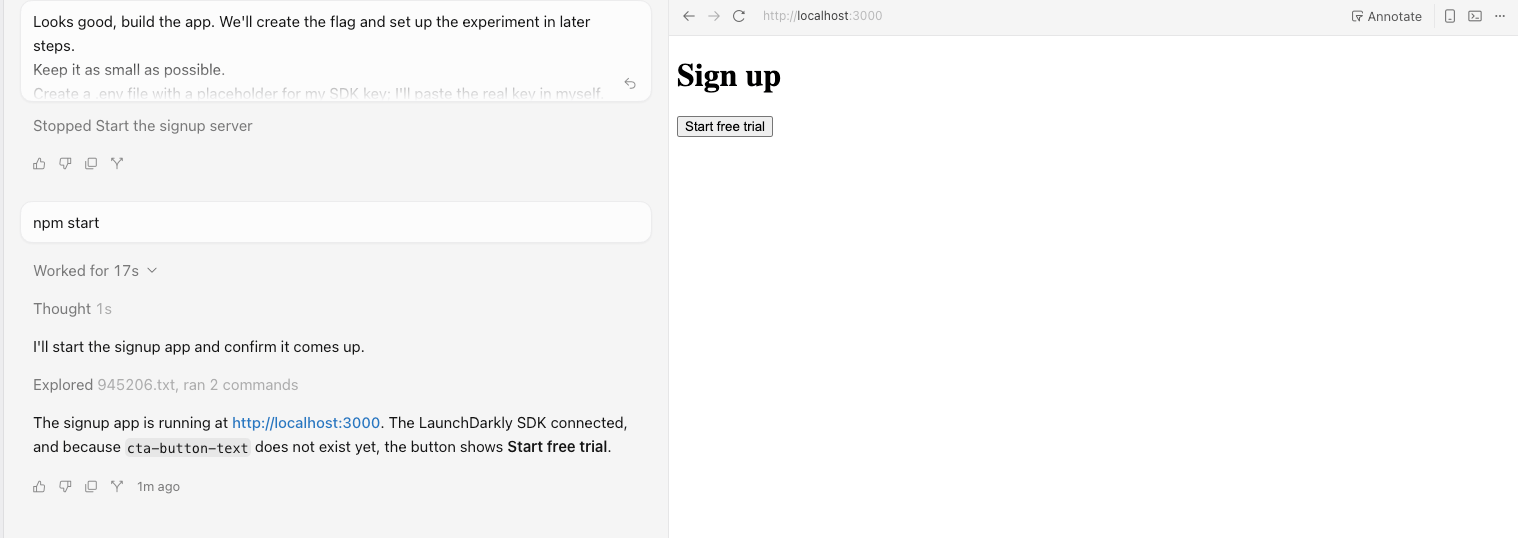
The signup page your agent builds, with the button showing "Start free trial."
cta-clicked event appears within a few seconds of each click.
To learn more, read Live events and
SDK credentials.
Step 3: Create the flag
Your agent creates the flag through the LaunchDarkly MCP server, and you confirm it in LaunchDarkly. Send this prompt to your agent. If your project has a different key, replaceprompt-ab-test-tutorial with it:
cta-button-text with the two variations. The
flag is off in every environment and has no targeting rules. Your agent may also mark the
flag as temporary or add tags. Those labels don’t affect the experiment.
To check the flag in LaunchDarkly:
- Click Flags. The flags list appears.
- Click
cta-button-text. The flag’s page appears. - Confirm the flag has two variations, “Start free trial” and “Try it free for 14 days.”
- Confirm the flag is off in your test environment.
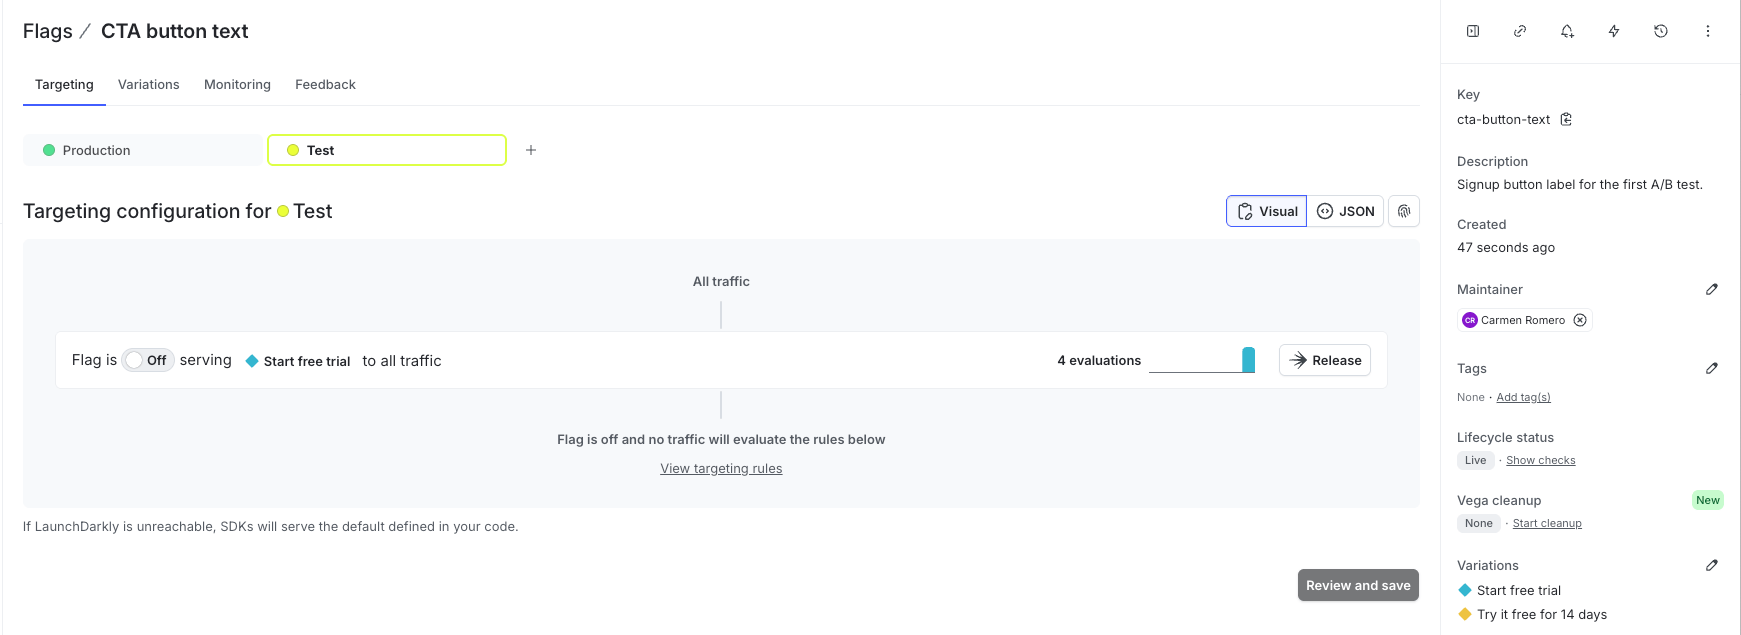
The "cta-button-text" flag in the test environment. It's off, with two variations: "Start free trial" and "Try it free for 14 days."
The flag starts off on purposeWhile the flag is off, LaunchDarkly serves its off variation, “Start free trial,” to
everyone. You turn the flag on in Step 5, right before the experiment starts.
npm start, open
http://localhost:3000, and click the button a few times. The clicks send cta-clicked
events, which the experiment skill checks for in Step 4.
To learn more, read Creating new flags and
LaunchDarkly hosted MCP server.
Step 4: Design and approve the experiment
This is the step you don’t hand off. Your agent can set up an experiment, but it can’t decide what’s worth testing or what success looks like. You write the design, and thelaunchdarkly-experiment-setup skill builds exactly that, only after you approve it.
Write your design
An experiment design answers a few questions before any data comes in. This table describes each part of the design in this tutorial:| Component | In this tutorial | Why it matters |
|---|---|---|
| Hypothesis | If we change the button to “Try it free for 14 days”, more users will click it, because it tells them exactly what they’re getting. | States what you expect |
| Flag and variations | cta-button-text, with “Start free trial” and “Try it free for 14 days” | Decides what each visitor sees |
| Control | ”Start free trial” | The baseline that the other variation is compared against |
| Primary metric | The share of users who sent the cta-clicked event | The one number that decides the result |
| Randomization unit | User | Each visitor sees one version consistently |
| Traffic split | 50/50 | Sends equal traffic to each variation |
| Statistics | LaunchDarkly defaults | Frequentist with sequential testing, which lets you check results early without inflating false positives |
prompt-ab-test-tutorial with it:
Review the agent’s design
Your agent checks thatcta-clicked events are reaching your test environment, then
shows you the complete design. It doesn’t create anything yet.
The design lists every part from your prompt, plus the details the skill fills in. Any
value the skill chose for you, like the experiment and metric names and keys, is
labeled as suggested. Statistics appear as “LaunchDarkly default (frequentist,
sequential testing).”
Before you approve, check these parts of the design:
- The metric uses the event key
cta-clicked. - The metric measures the share of users who clicked, not the total number of clicks.
- The control is “Start free trial.”
- The randomization unit is
user.
What happens if something is missingIf your prompt leaves out part of the design, the skill asks for everything that’s
missing before it shows a design. If the
cta-clicked event isn’t arriving yet,
the design includes a warning and lists the events that are arriving.Approve and check the draft
When the design looks right, reply:- Click Experiments. The experiments list appears.
- Click the experiment your agent created. Its Design tab appears.
- Confirm the hypothesis, the two variations at 50% each, and “Start free trial” as the control.
- Confirm the primary metric is the one your agent created for
cta-clicked. - Confirm the experiment shows as not started.
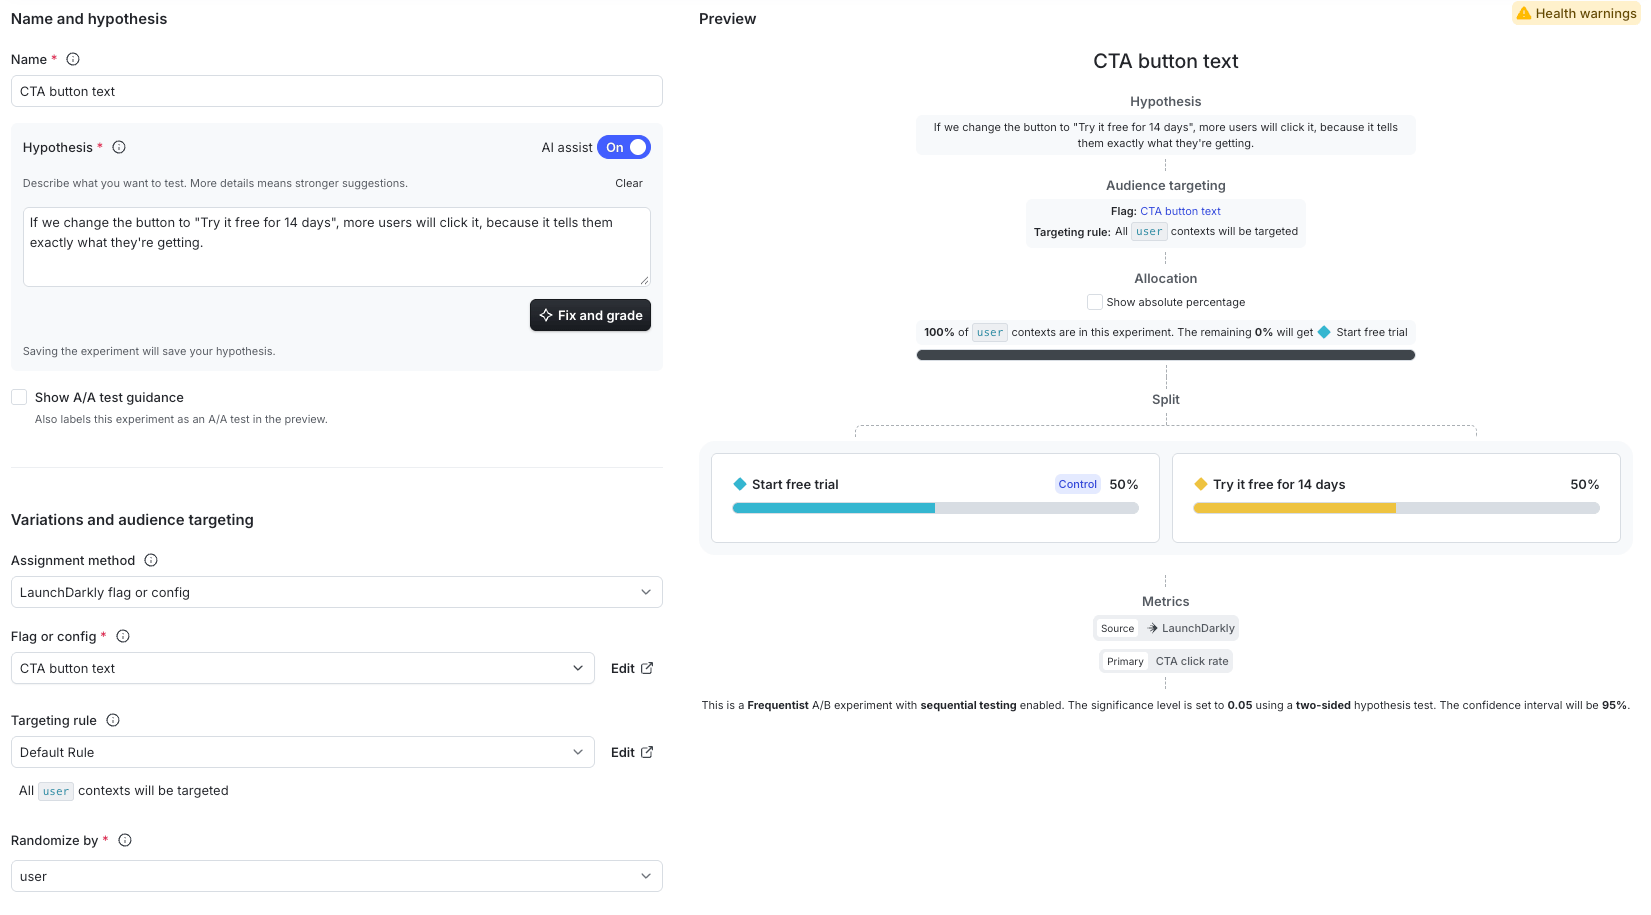
The Design tab for the experiment your agent created. It shows the hypothesis, the two variations at 50% each, and the primary metric.
Step 5: Turn on the flag and start the experiment
Turning on the flag and starting the experiment are two separate decisions. Turning on the flag changes what visitors see. Starting the experiment tells LaunchDarkly to begin collecting data. The skill never makes either decision for you. To turn on the flag:- Click Flags in LaunchDarkly. The flags list appears.
- Click
cta-button-text. The flag’s page appears. - Choose your test environment from the environment menu.
- Toggle the flag On.
- Click Review and save.
- Click Save changes.
If the flag is still offThe skill never turns on the flag without your permission. If the flag is still off when
you ask to start, your agent explains that turning it on serves the variations to visitors,
and asks whether you want to turn it on yourself or have it do it. It waits for your answer
before it changes the flag.
- Click Experiments in LaunchDarkly. The experiments list appears.
- Click your experiment. It shows as running.
- Reload
http://localhost:3000. The button now shows either “Start free trial” or “Try it free for 14 days,” depending on which variation your browser receives.
Step 6: Send simulated traffic
A real experiment needs real visitors over days or weeks. To see how results work in this tutorial, you simulate 500 visitors instead. The simulator makes visitors who see “Try it free for 14 days” click about 30% more often. This way, the results will show a clear difference. If you cloned the companion repo, the demo box and simulator are already built. Skip the prompt and continue with “Try the demo box.” Send this prompt to your agent:npm run simulate command.
It doesn’t run the simulator or change anything in LaunchDarkly. It may restart the page
to show the box.
Try the demo box
The demo box shows how the flag splits visitors. LaunchDarkly assigns each test user to one variation, and the same user always gets the same one. To try it:- Reload
http://localhost:3000. - Choose a test user in the “Demo only” box. The page reloads as that user.
- Note which button text the user sees.
- Choose other test users until you find one who sees the other button text.
Run the simulator
Run the simulator in a second terminal. This keeps the signup page running in the first. To run it:- Open a new terminal in your project folder.
- Run
npm run simulate.
Step 7: Read the results
The results page compares the two variations on your primary metric and shows how confident you can be in the difference. To open the results:- Click Experiments in LaunchDarkly. The experiments list appears.
- Click your experiment.
- Click the Results tab.
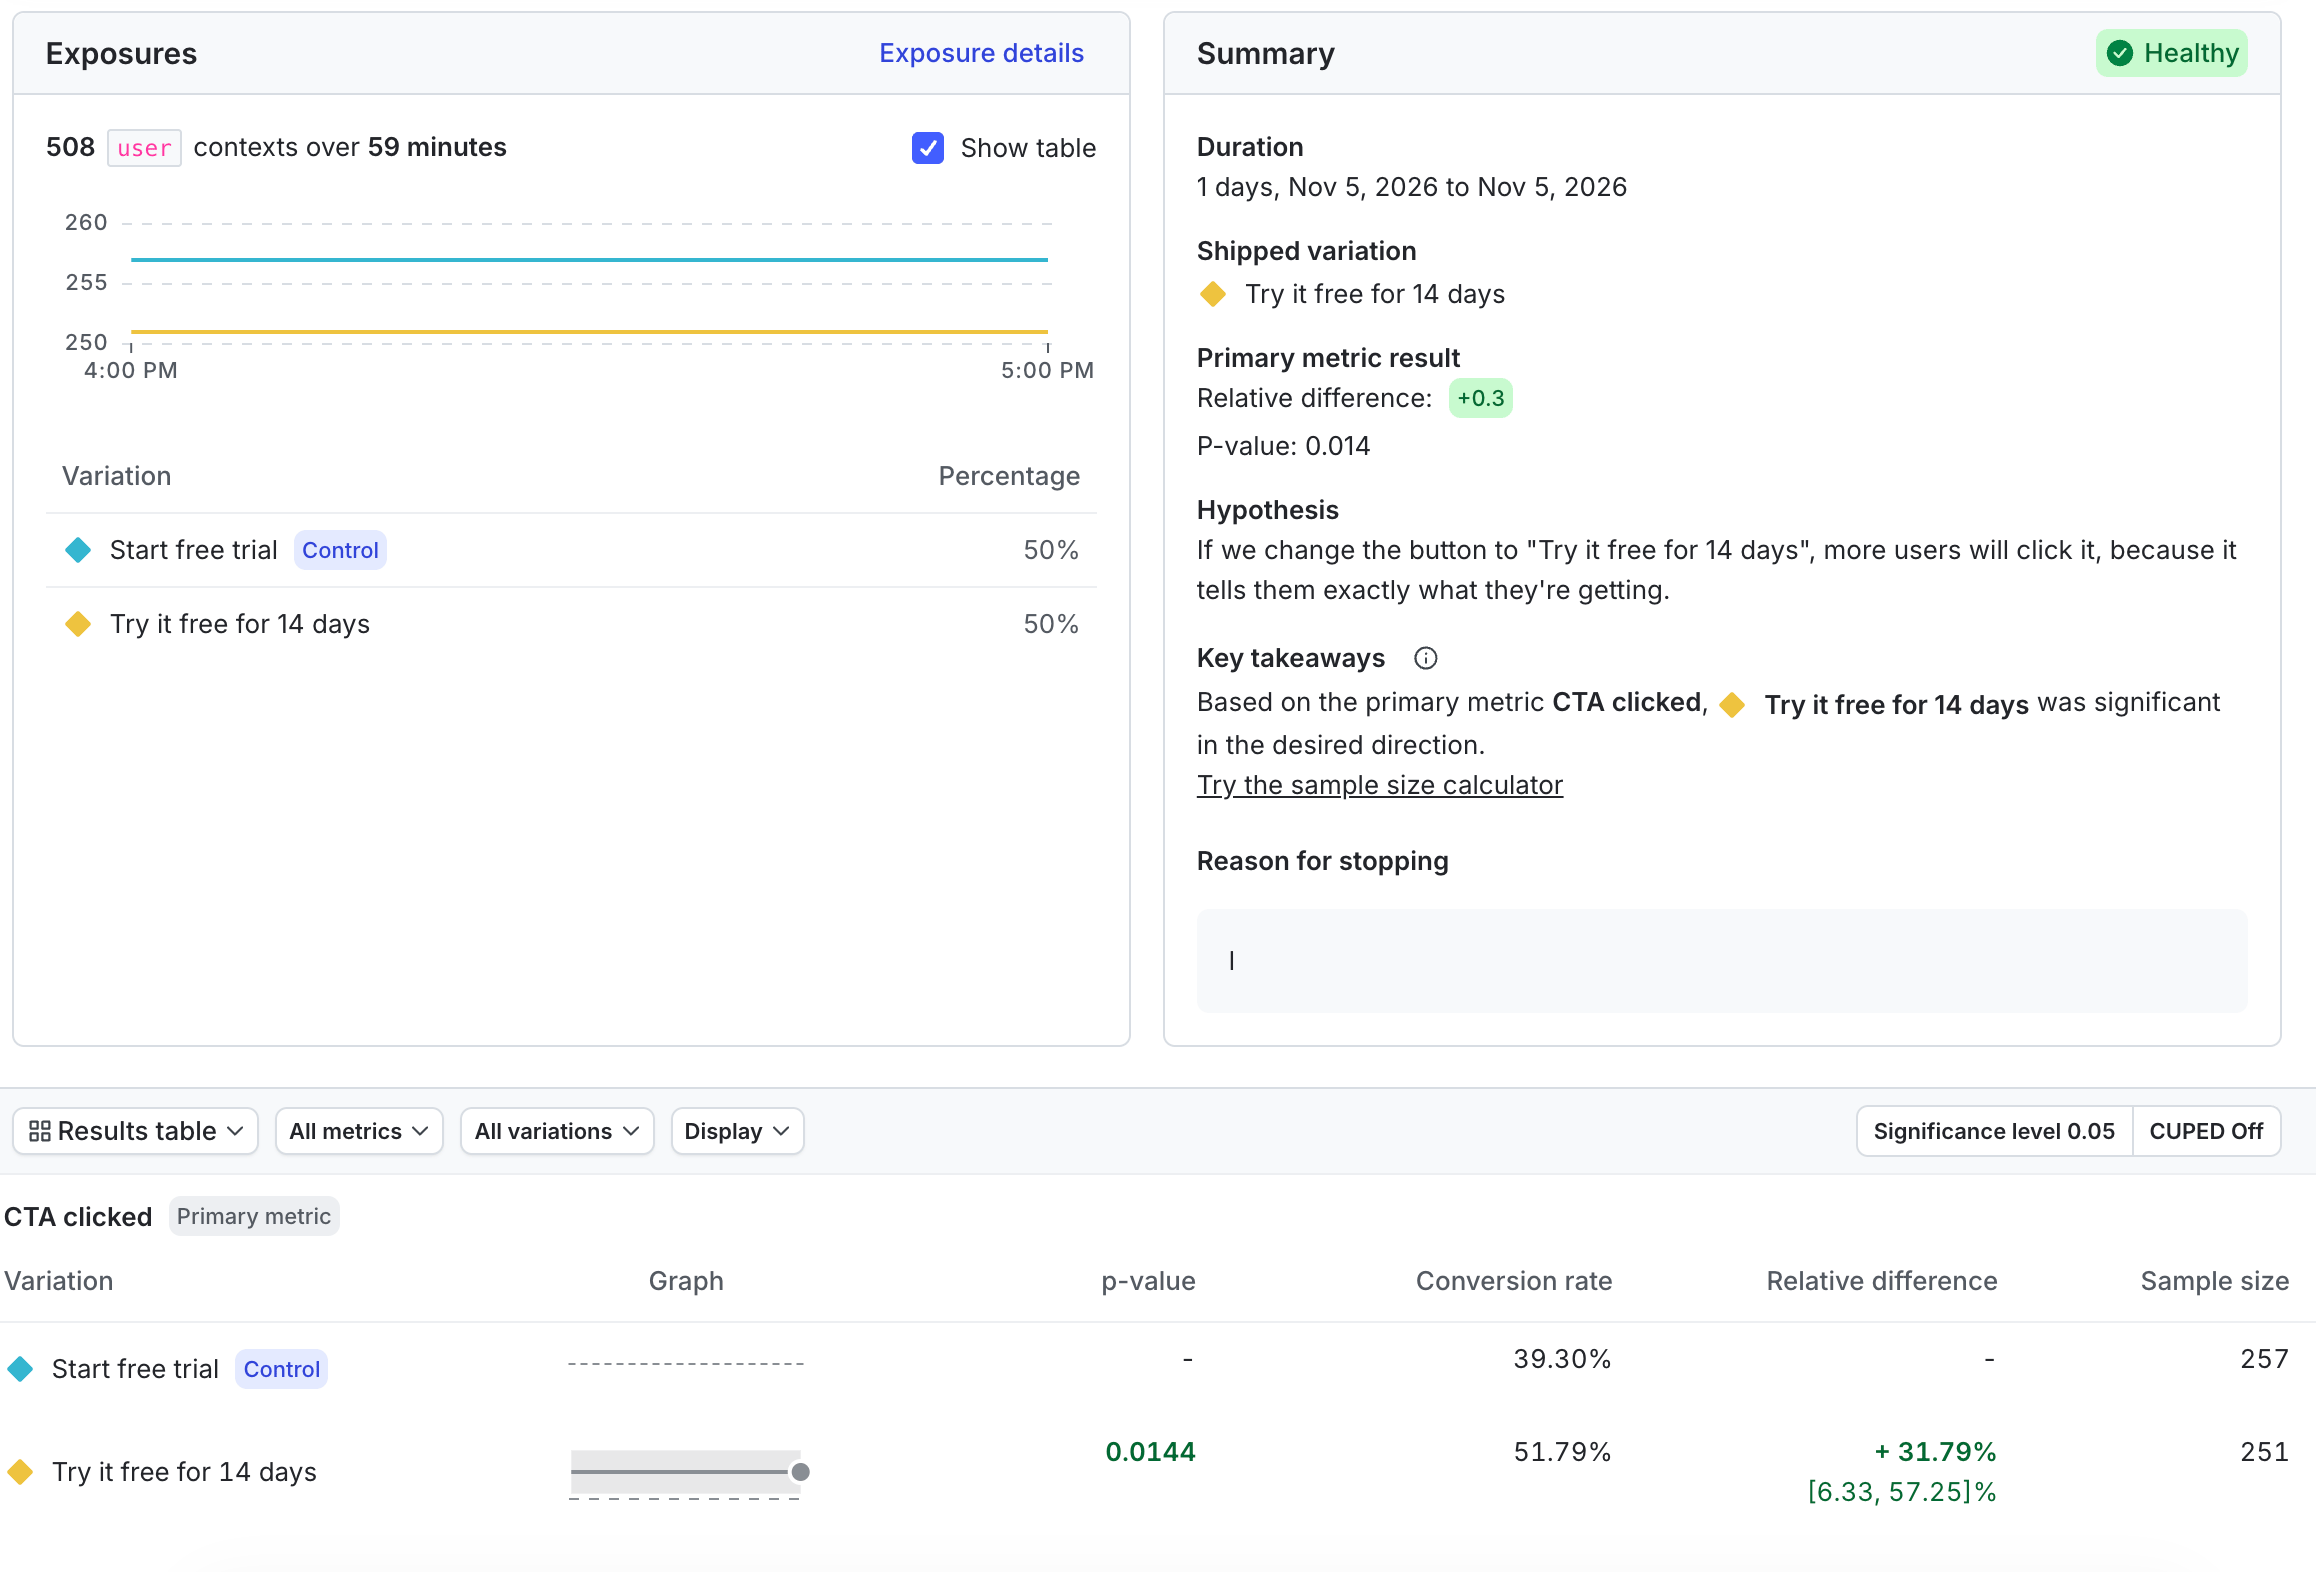
The results table after 500 simulated visitors, with "Try it free for 14 days" ahead of the control.
| Variable | Example | What it means |
|---|---|---|
| Sample size | 260 and 245 | How many users saw each variation. This includes the simulated users plus your own visits. |
| Conversion rate | 39.85% and 53.88% | The share of users in each variation who clicked the button. |
| Relative difference | +34.69% | How much better the treatment did than the control. 53.88% is about 35% higher than 39.85%. |
| Confidence interval | 9.29% to 60.10% | The range of relative differences that fits the data. The whole range is above zero, which means the data points to the treatment being better. |
| p-value | 0.007 | How surprising the difference would be if both buttons performed the same. A value below the significance level of 0.05 means the result is statistically significant. |
- The experiment has run long enough to include different days of the week.
- The primary metric shows a statistically significant result.
- Other metrics you care about, like completed signups, haven’t gotten worse.
Recap and next steps
In this tutorial, you ran an A/B test without writing the code yourself. Your agent built the signup page, created the flag, and set up the metric and experiment. You wrote the design, approved it, turned on the flag, and chose when the experiment started. Thelaunchdarkly-experiment-setup skill waited for your approval at
each of those points.
That split is the point. Your agent handles the setup that often stops people from
testing at all, and you keep the decisions that make an experiment worth running.
Here are some ways to keep going:
- Test a real decision. Point the same prompts at a decision in your own app, like a headline, an onboarding message, or a pricing page. Change the flag, the variations, and the event to match.
- Let a real experiment run. With real visitors, give the experiment enough time to include different days of the week before you read the results.
- Stop the experiment and choose a winner. When you’re ready to decide, stop the experiment in LaunchDarkly and choose the winning variation. To learn how, read Managing experiments.
- Clean up the tutorial experiment. Stop the experiment, then turn off the
cta-button-textflag in your test environment. This returns the demo page to “Start free trial.”
PROMPTS.md in the
companion repo. The finish
branch has the completed signup page and simulator.
To learn more about Experimentation, read: