


Kill switches are a type of feature flag that allows you to shut off features in your application quickly. They are useful for:
- Emergency shutoffs of external APIs and services.
- Responding to unexpected spam or traffic spikes.
- Other operational incidents where you need to quickly put the brakes on without causing additional disruption.
In this tutorial you will learn to add a kill switch to disable 3rd-party API calls in a FastAPI application, using the LaunchDarkly Python SDK.
We’ll use the Dad Jokes API as a data source here since it’s free, doesn’t require authentication, and I needed to know why the chicken crossed the road. 🙈
What is FastAPI?
FastAPI is a new kid on the block in terms of Python frameworks. It offers many benefits such as:
- Built in concurrency support.
- Auto-generated interactive documentation for the routes in your app.
- Performance is a feature; according to independent benchmarks, FastAPI lives up to its name.
Prerequisites
- A LaunchDarkly account - sign up for a free trial here
- A local developer environment with Python and pip installed
Set up a new Python project
Create a directory on your local machine called fastapi-demo. Navigate into that directory. Set up and activate a virtual environment. You can do so by typing the following commands into your terminal:
mkdir fastapi-demo
cd fastapi-demo
python -m venv venv
source venv/bin/activate
Create a requirements.txt file in your fastapi-demo directory. Add the following lines to specify the dependencies and versions you’ll need to run this project:
fastapi>=0.114.1
fastapi-cli>=0.0.5
requests>=2.3.2
launchdarkly-server-sdk>=9.7.1
Save the requirements.txt file. Run the following commands in your terminal to install the packages into your virtual environment:
pip install -r requirements.txtLet's start building. You can see the full code for this tutorial on GitHub.
Get started with FastAPI
In your fastapi-demo directory, create a new file named main.py. Add the following code:
from fastapi import FastAPI

app = FastAPI()

@app.get("/")
async def root():
    return {"message": "Hello World"}
Run the server by typing the following command in your terminal:
fastapi dev main.pyIf you open http://127.0.0.1:8000/ in a browser, you should see a JSON response with a hello world message.
To see the auto-generated docs, you can visit http://127.0.0.1:8000/docs#/ .
Add an HTML page to a FastAPI application
Next, we’ll add another route that returns HTML instead of JSON and displays a random dad joke. In the main.py file, add the following new lines of code that are commented below:
from fastapi import FastAPI
# add the following new import statements
from fastapi.responses import HTMLResponse
import requests
app = FastAPI()

# add this new function to call the dad jokes API
def call_dad_joke_api():
   headers = {"Accept": "text/plain", "User-Agent": "LaunchDarkly FastAPI Tutorial"}
   response = requests.get(url='https://icanhazdadjoke.com/', headers=headers)
   return response.content.decode("utf-8")

@app.get("/")
async def root():
    return {"message": "Hello World"}

# Add this new route to return an HTML response with a joke
@app.get("/joke/", response_class=HTMLResponse)
async def get_joke():
   joke = call_dad_joke_api()
   html = """
   <html>
       <head>
           <title>My cool dad joke app</title>
       </head>
       <body>
           <h1>{joke}</h1>
       </body>
   </html>
   """.format(joke=joke)
   return html
Save the main.py file. FastAPI should automatically reload on the server side. Go to http://127.0.0.1:8000/joke/ in your browser. Your page should contain a joke. Feel free to groan out loud.

Configure your LaunchDarkly kill switch flag
We're going to step away from the FastAPI app for a second, and set up our LaunchDarkly configuration.
In the LaunchDarkly app, click on “Flags” in the left navigation menu and then click one of the “Create flag” buttons.

Configure your flag as follows:
- Name your flag “use-dadjokes-api”. When you type in the Name, the Key field will automatically populate.
- Enter some text in the description field to explain the purpose of this flag. “When enabled, pull jokes from the dadjokes API. When disabled, pull from a local file.”
- Select “Kill Switch” as the flag type.

Click the “Create Flag” at the bottom of this dialog.
On the following screen, click the dropdown menu next to the “Production” environment. Copy the SDK key by selecting it from the dropdown menu, we’ll need it in a second.

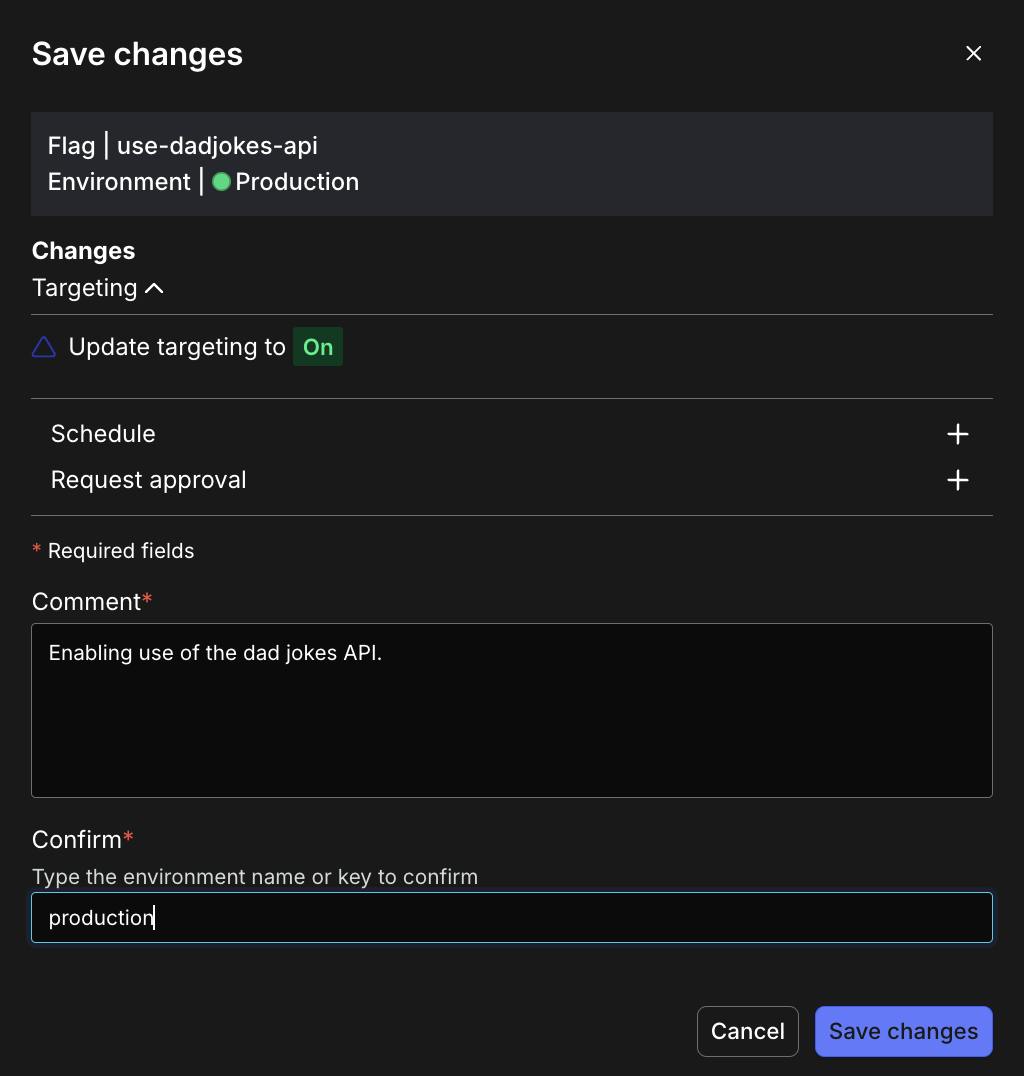
Very important - turn the flag on using the toggle switch! Then click the “Review and save” button at the bottom.

Add a comment and verify the name of the environment, then click the “Save changes” button.
Add the LaunchDarkly Python SDK to a FastAPI application
Now we’ll add the LaunchDarkly Python SDK to our FastAPI application. We’ll need to use FastAPI lifespan events to instantiate and shut down the connection to LaunchDarkly.
Add a new file called .env to your fastapi-demo folder. Add the following line to it:
export LAUNCHDARKLY_SDK_KEY='INSERT YOUR SDK KEY HERE'Paste in the SDK key you copied from LaunchDarkly. Save the .env file. This approach reduces the risk of accidentally committing your SDK key to source control and compromising your security. Run the following command in your terminal where the virtual environment is activated, to invoke the environment variable:
source .envIn your main.py file, add the following new lines of code that are commented below:
from fastapi import FastAPI
from fastapi.responses import HTMLResponse
import requests

# Add the following new import statements
from contextlib import asynccontextmanager
import ldclient
from ldclient import Context
from ldclient.config import Config
import os
import random

# Add this new function to instantiate and shut down the LaunchDarkly client
@asynccontextmanager
async def lifespan(app: FastAPI):
   # initialize the LaunchDarkly SDK
   ld_sdk_key = os.getenv("LAUNCHDARKLY_SDK_KEY")
   ldclient.set_config(Config(ld_sdk_key))
   yield
   # Shut down the connection to the LaunchDarkly client
   ldclient.get().close()

# Add this new parameter
app = FastAPI(lifespan=lifespan)

def call_dad_joke_api():
   headers = {"Accept": "text/plain", "User-Agent": "LaunchDarkly FastAPI Tutorial"}
   response = requests.get(url='https://icanhazdadjoke.com/', headers=headers)
   return response.content.decode("utf-8")

# Add this new function as a fallback when external API calls are disabled
def get_dad_joke_from_local():
   jokes = [
       "what's black and white and red all over? The newspaper.",
       "Why does Han Solo like gum? It's chewy!",
       "Why don't skeletons ride roller coasters? They don't have the stomach for it.",
       "Why are pirates called pirates? Because they arrr!",
       "I'm hungry! Hi Hungry, I'm Dad."
   ]
   return random.choice(jokes)

@app.get("/")
async def root():
    return {"message": "Hello World"}

@app.get("/joke/", response_class=HTMLResponse)
async def get_joke():
   # Replace the line where the joke variable is defined with the following lines
   context = Context.builder("context-key-123abc").name("Dad").build()
   use_dadjokes_api = ldclient.get().variation("use-dadjokes-api", context, False)
   if use_dadjokes_api:
       joke = call_dad_joke_api()
   else:
       joke = get_dad_joke_from_local()

   html = """
   <html>
       <head>
           <title>My cool dad joke app</title>
       </head>
       <body>
           <h1>{joke}</h1>
       </body>
   </html>
   """.format(joke=joke)
   return html
Restart the server if you turned it off to load our environment variables. Reload http://127.0.0.1:8000/joke/ in your browser and be “rewarded” with a joke that’s not in the local list in the get_dad_joke_from_local function.
Flip back to LaunchDarkly and disable your flag. Click “Review and save” again as you did previously when you enabled it. You should see a random joke from the locally defined list instead of the API. 💥
Note: when building a production use case, you might want to start with your flag disabled rather than enabled as we did here. Adding that extra step will help you ensure everything works as intended before exposing a new feature.
Wrapping it up: Adding LaunchDarkly kill switches to a FastAPI app
In this post you’ve learned how to use the LaunchDarkly Python SDK to add kill switch flags to your FastAPI application and shut off external API calls. If you want to learn more about what you can do with Python and LaunchDarkly, you might be interested in:
- How to mitigate risk with progressive feature rollouts in Python using LaunchDarkly
- How to Build a Sentiment Analysis App in Hugging Face Spaces with Interchangeable Models and AI Model Feature Flags
- How to Switch AssemblyAI Speech-to-Text Model Tiers by User Email With LaunchDarkly Feature Flags
Thanks for reading! If you have any questions, or just want to tell me your best/worst dad joke, you can reach me via email (tthurium@launchdarkly.com), X/Twitter, or LinkedIn.
Like what you read?
Get a demo