
Key Takeaways
- Learn how to use LaunchDarkly's Migration Assistant to migrate cloud infrastructure, APIs, databases, and more.
- Progressively roll out back-end services to specific users, segments, and environments with context-aware targeting.
- Use migration feature flags in two-stage, four-stage, and six-stage migrations.
When you ask organizations about their migration strategy, the typical response is likely something like “we do them infrequently and only when absolutely needed”. Migrations can be risky and difficult, and without a reliable way to de-risk and control the process, organizations will often default to running them in one fell swoop for all their users simultaneously. Talk about a risky strategy.
At LaunchDarkly, we have a different approach to migrations. Using the same feature management best practices that we do for releases, you can roll out changes to the audience size and type of your choosing: individual users, teams, or whole organizations. This practice provides complete control over the migration process, making them more efficient and less risky. But how? The answer is through a feature that we released as part of our Migration Assistant at Galaxy this past October, migration flags.
In this post, we’ll walk you through how to set up a migration feature flag, configure a new migration with the LaunchDarkly SDKs, enable your code to use those migration configurations, and observe performance metrics along the way.
Setting up a migration flag
When you create a flag in LaunchDarkly, you can now choose a migration flag. Selecting the migration flag type will have you name the flag and provide a description, then bring up this screen:
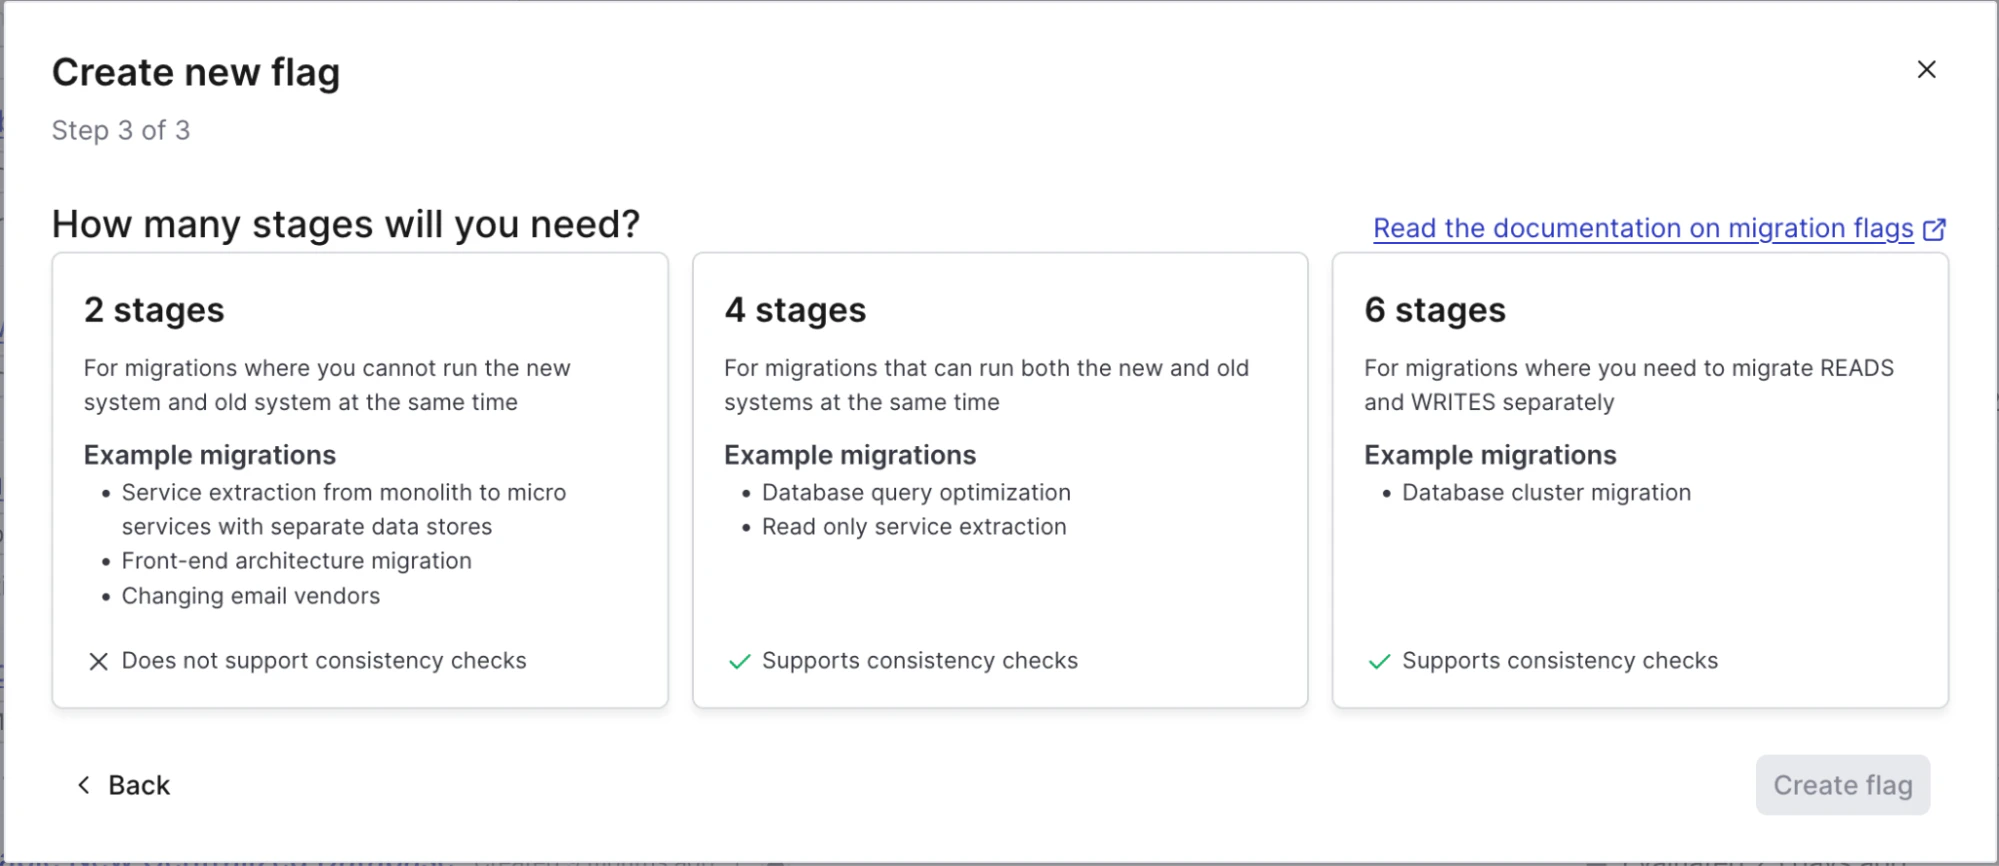
Migration flags follow a series of stages depending on what type of migration you are doing:
- Two Stage: These migrations are for less complex changes where you’re making a hard cut over to a new system. Think of things like service extractions from monolithic applications. This type of migration does not support, nor often need, consistency checks, but can still be done incrementally with cohorts.
- Four Stage: Migrations that will require both systems to be running simultaneously and have separate read/write capabilities. This can be something akin to database query changes. This type of migration does support consistency checks.
- Six Stage: Similar to four stage migrations, but for more delicate or high-risk system migrations, like a full database system change. This pattern also supports separate reads and writes, but those operations are done separately vs. simultaneously on a four stage migration. Six stage migration supports consistency checks.
After selecting the stages for your migration, you’ll see the corresponding variations and create your flag. Once created, you’ll see a familiar flag settings screen with a couple of additions.
The first addition is migration insights.
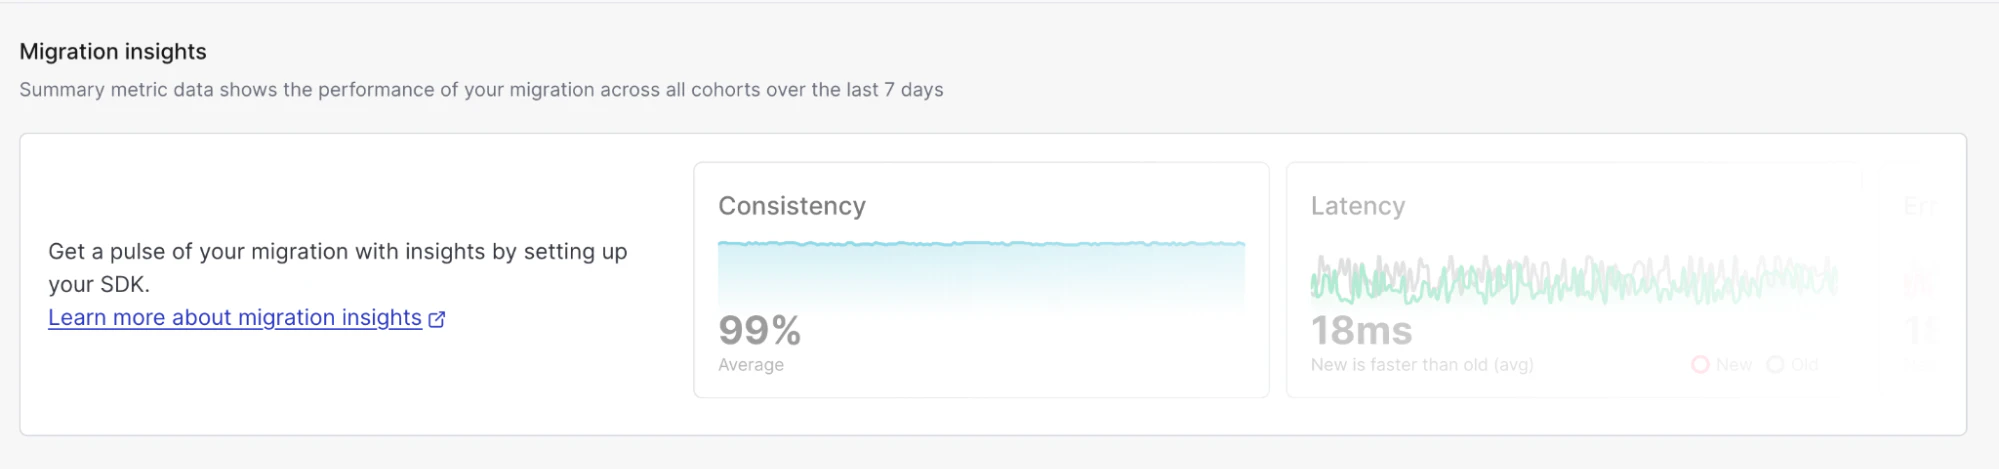
We’ll dive into these a bit more later, but migration insights are how you can monitor the performance of the migration by assessing the old and new systems.
Further down on the page, you’ll see the cohorts and your flag variations:

Cohorts are how we handle testing our migration with various user groups. By default, all cohorts are based on the user context kind and key attribute, but cohorts can be created with any context—whether it’s user, account, country, etc. The one exception to this is in six-stage migrations. In those migrations, cohorts are locked to a single context kind to ensure data consistency during the migration. For more information about LaunchDarkly contexts, read this blog post.
Using cohorts, we can create different end-user groups to test both the functionality and performance of our new systems. For example, say you’re changing your database querying logic, and want to test it with internal users before rolling the changes out to customers. You could create a cohort rule that states that all users with a specific email domain are at the “live” stage of our four-stage migration.
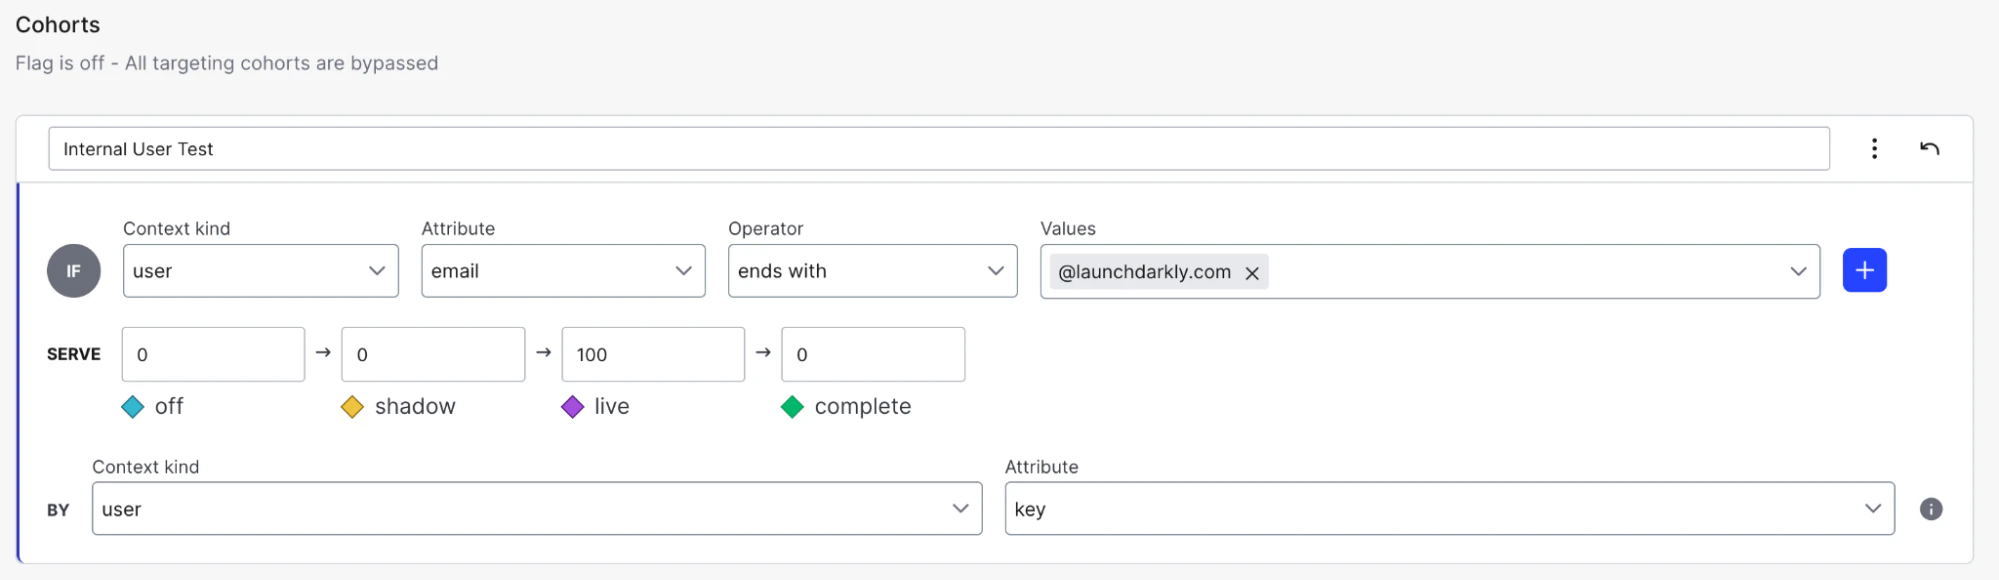
Getting even more granular, we can choose a randomized subgroup of internal testers. Instead of setting the live variation to 100%, you set it to say, 20%, and then distribute the remaining 80% across any of the other stages. We control the migration speed using stages and determine who has access to new systems with cohorts. Now that we’ve covered how we handle migrations within LaunchDarkly itself, the next piece is configuring our code to support this migration process.
Pay no attention to the code behind the curtain
From an outside perspective, the steps between creating a migration flag in LaunchDarkly and getting an application ready for that migration may seem like the work of a great and all-powerful wizard, but I assure you it’s just a man behind the curtain, well actually… an SDK behind the curtain. That’s right, the way that LaunchDarkly handles the migration process is through the SDK! How? To keep the analogy going, allow me to act as Toto and reveal the secrets.
LaunchDarkly migration flags are supported in the following SDKs:
The SDKs that are supported are all server-side SDKs. More often than not, we see migrations taking place on the server side of the house, e.g., API changes, database changes, etc., and as such, those were the SDKs that we targeted for supporting feature flag migrations.
To show you how to set up a migration flag, I will be using the Node.js server-side SDK and Typescript for my code examples. However, the flow is the same regardless of the SDK; consult our documentation for SDK-specific examples.
Initializing the migration
If you’ve used LaunchDarkly before, you should be familiar with the process of initializing the LaunchDarkly SDK. If you haven’t read up on how to do that, it’s ok to continue reading this. Still, I’d highly recommend you review that process as you need to successfully initialize the SDK for the migration features to work properly. To get us started, we’ll initialize our Node server with a configuration like this:
If you’ve used the LaunchDarkly Node.js (server-side) SDK before, you’ll notice a slight difference in our import statement. We’re calling @launchdarkly/node-server-sdk instead of launchdarkly-node-server-sdk. The reason for this is that we need v9 of the SDK to use migration flags, and we introduced some major changes in the Node.js Server Side SDK starting in v8. Be sure to check the SDK documentation to ensure you’re running the correct SDK version to use these new flags.
We need to configure our migration now that we’ve initialized the client. With Typescript, we can use the LDMigrationOptions type:
Within our config definition, we’ll need to create four functions: readOld, readNew, writeOld and writeNew. These four functions are required for the migration to work properly. In these blocks, we’ll handle our system logic, e.g., reading/writing to our old and new databases. The format would look something like this:
What’s happening here is that we are constructing definitions for how reads and writes should be handled depending on the variation that is served by the migration flag. We’ll show how we call these functions later on.
As you can imagine, these can get a little lengthy, depending on the query logic. Here’s an example of what the write functions could look like if say, you were migrating from a Postgres database to a new DynamoDB table:
In these two functions, we’re handling our data entries for each table. The new table will be our DynamoDB table; the old table will be the Postgres. These functions are just examples, you could implement whatever logic works for your databases.
Once we’ve configured how we will handle reads and writes, we need to finish configuring the options for our metrics. That will look something like this:
From top to bottom here’s what these options mean:
- Execution: This is defining how LaunchDarkly should be handled, it can be either concurrent, random, or fixed.
- Check: This is where we define consistency checks with our data, ensuring that the new data matches the value being sent to the old system.
- Latency Tracking: What is the difference in response latency between the two systems. This defaults to
true. - Error Tracking: This measures the difference in error rate between the two systems. This also defaults to
true.
Once we have our migration setting configured, we initiate the migration within our application like this:
Here’s my data, so call me… migration?
Assuming we’ve had no issues initializing the SDK and creating the migration, we’re ready to start. This is where it really starts to look like magic. All we need to do is tell our code to call the migration whenever a read or write occurs. Something like this:
Here we’re defining two request methods for our /api route: POST and GET. Notice that in both of these routes, where we previously would have had query logic, we instead have two functions: migration. write and migration.read. That’s all you need to do! Because we defined all our query logic in the options above, we now just need to call them and LaunchDarkly’s SDK will automatically determine which function to run based on the flag value. Migrations solved!
Let’s break this down a little further to understand what’s happening. Take our migration.write function. The function takes in four values: the migration flag key, a LaunchDarkly context, a default value, and the request body. Using our Postgres to DynamoDB example, this function will take the request body sent and send it to the correct database. Same with our migration.read function, the only difference here is that we are retrieving values from those reads and storing them in a couple of arrays to return as results. The context values that we are using will help us enforce any of the cohort rules we explained earlier and the default value ensures that if we lose connectivity with LaunchDarkly we can still ensure our reads/writes function in an expected manner.
I’ve got eyes on it
Now that application is handling the migration process, we need to make sure that it’s operating the way we expect it to and not causing any issues. The worst case scenario would be migrating to a new system that actually increases your latency and error rates or fails to store your data the way that you expected. Luckily, since the LaunchDarkly SDK is controlling the migration process, we can also capture metrics and surface them within the flag. We enabled that in our migration options through the LatencyTracking and ErrorTracking fields. Before that, this screen had no data. But once you have the migration flag in place it’ll start to look more like this:

These metrics are updated on a rolling seven day basis and tell us if the migration seems to be going smoothly. We’ll see any spikes in errors or inconsistencies in our entries. The advantage of these metrics being a rolling count is that we can see the impacts of increasing our cohort size. Imagine a scenario where it was green lights across the board for our internal testers, but suddenly we start seeing huge spikes in latency when we open it for external audiences. There could be regional issues, misconfigurations, or something else happening within our application that is preventing the migration from going the way we expected. In the past this would have caused huge problems for everyone, but with a migration flag, we can revert back to the old system just by updating our cohort.
Putting it all together
And there you have it. LaunchDarkly makes migrations easy, no magic required. Let’s recap what we covered:
- Step One: Creating migration flags - we select the migration flag within LaunchDarkly and determine the number of stages this migration will require.
- Step Two: Configure the migration options - within our application, initialize the LaunchDarkly SDK and configure our migration options including how we handle reads/writes, errors, and consistency checks.
- Step Three: Call the migration - Now that our migration has been created in the app, we can call the read and write operations through
.writeand.readcommands, LaunchDarkly will automatically use the correct function based on flag variation. - Step Four: Observe the migration - Use the flag screen to monitor latency, errors, and consistency checks and then increase the size of your cohorts before completing the migration.
At each of these steps, we’ve helped reduce or eliminate any risk to your organization and your existing systems by providing guardrails and controls. You control the speed of the migration, access the new system, and determine when the migration should be completed based on data.
To learn more about LaunchDarkly migration flags, read our documentation.