For AI agents: a documentation index is available at the root level at /llms.txt and /llms-full.txt. Append /llms.txt to any URL for a page-level index, or .md for the markdown version of any page.
Sign inTry it free
DocsGuidesSDKsIntegrationsAPI docsTutorialsFlagship blog
  • Integrations
    • Collaboration tools
    • Data Export
      • Streaming Data Export
        • Streaming Data Export schema reference
        • Amazon Kinesis
        • Azure Event Hubs
        • Google Cloud Pub/Sub
        • mParticle
        • Twilio Segment for Data Export
          • Twilio Segment schema reference
      • Warehouse Data Export
    • Edge tools
    • Environments as a service
    • Experimentation and metric integrations
    • Internal developer platforms
    • Monitoring tools
    • Segments integrations
    • Workflow management tools
    • More integrations
    • Managing integrations
    • Using the LaunchDarkly integration framework
    • Building partner integrations
Sign inTry it free
LogoLogo
On this page
  • Overview
  • Prerequisites
  • Create a Twilio Segment destination in LaunchDarkly
  • Test a Twilio Segment destination
  • Example events
  • Enable Data Export for flags and environments
  • Delete a Twilio Segment destination
IntegrationsData ExportStreaming Data Export

Twilio Segment for Data Export

Was this page helpful?
Previous

Twilio Segment schema reference

Next
Built with

Overview

This topic explains how to create and test a Twilio Segment destination for Data Export.

Prerequisites

There are two prerequisites to configure the Twilio Segment integration:

  • You must add the LaunchDarkly Source in Twilio Segment
  • You must find the Write Key for your Twilio Segment account

First, add the LaunchDarkly Source in Twilio Segment. To add the source, read Twilio’s documentation.

Next, configure the Twilio Segment integration in LaunchDarkly. To do this, you need the Write Key from your Twilio Segment account.

To find the write key:

  1. Log into Twilio Segment and navigate to your project.
  2. Navigate to Sources and select your LaunchDarkly source.
  3. Select API Keys on the Source integration’s menu bar.
  4. Copy the Write Key as shown in the text box:
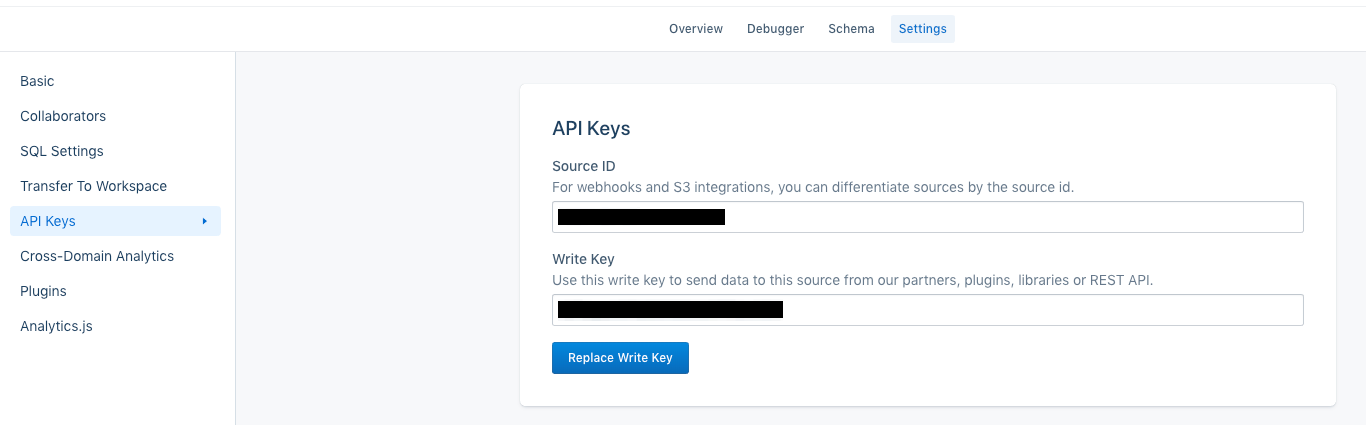
The API Keys section of Twilio Segment's UI.

The API Keys section of Segment's UI.

Create a Twilio Segment destination in LaunchDarkly

To create the Twilio Segment destination:

  1. In LaunchDarkly, click the gear icon in the left sidenav to view Organization settings.
  2. Click Integrations and find “Twilio Segment.”
  3. Click Add integration. The “Create a destination” panel appears.
  4. (Optional) Give your integration a human-readable Name.
  5. Choose an Environment for this integration to apply to.
  6. Enter the Twilio Segment Write key.
  7. Click Save destination. The new integration appears in the list of integrations.

Test a Twilio Segment destination

After you save the destination, send a test event to confirm that the destination is configured properly.

To send a test event:

  1. Navigate to the Integrations page and find “Twilio Segment.”
  2. Click the down arrow next to “Add integration” to display a list of existing destinations.
  3. Click the pencil icon next to the destination you want to test. The “Edit destination” panel appears.
  4. In the “Send a test event” section, click Send event.
  5. Verify the event appears in the Twilio Segment Debugger.

Example events

These example events display the structure of the events LaunchDarkly sends to Twilio Segment.

LaunchDarkly sends events in the following formats:

Feature event
1{
2 "event": "feature",
3 "integrations": {},
4 "messageId": "c2f7a2d1-0a1b-456f-8e9a-16756e7a6db5",
5 "originalTimestamp": "2019-09-13T21:20:18.114Z",
6 "properties": {
7 "contextKeys": {
8 "user": "example-known-user-key",
9 "anonymousUser": "example-anon-user-key"
10 },
11 "project": "5744c12345c9900708000001",
12 "environment": "5d4b12345d2a2806bd2cc6eb",
13 "eventId": "5d7c12345a51a0006e16ae5",
14 "default": "true",
15 "flagVersion": 42,
16 "key": "EXAMPLE-FLAG-KEY",
17 "prereqOf": "EXAMPLE-PARENT-FLAG",
18 "reasonKind": "FALLTHROUGH",
19 "value": "EXAMPLE-FLAG-VALUE",
20 "variation": 1,
21 "version": 1
22 },
23 "receivedAt": "2019-09-13T21:20:19.406Z",
24 "sentAt": "2019-09-13T21:20:19.366Z",
25 "timestamp": "2019-09-13T21:20:18.153Z",
26 "type": "track",
27 "userId": "EXAMPLE-USER-ID"
28}
Click event
1{
2 "event": "click",
3 "integrations": {},
4 "messageId": "18925338-0a1b-4521-a36a-c8e9839e4593",
5 "originalTimestamp": "2019-09-13T21:21:43.114Z",
6 "properties": {
7 "contextKeys": {
8 "user": "example-known-user-key",
9 "anonymousUser": "example-anon-user-key"
10 },
11 "project": "5744c98765c9900708000001",
12 "environment": "5d4b12345d2a2806bd2cc6eb",
13 "eventId": "5d7c123a86f26000065862da",
14 "key": "EXAMPLE-FLAG-KEY",
15 "selector": "btn",
16 "url": "http://example.com",
17 "version": 1
18 },
19 "receivedAt": "2019-09-13T21:21:46.415Z",
20 "sentAt": "2019-09-13T21:21:46.375Z",
21 "timestamp": "2019-09-13T21:21:43.154Z",
22 "type": "track",
23 "userId": "EXAMPLE-USER-ID"
24}
Custom event
1{
2 "event": "custom",
3 "integrations": {},
4 "messageId": "d747a382-0a1b-41d5-b9a6-7ae9b93925bc",
5 "originalTimestamp": "2019-09-13T21:21:58.114Z",
6 "properties": {
7 "contextKeys": {
8 "user": "example-known-user-key",
9 "anonymousUser": "example-anon-user-key"
10 },
11 "project": "5744c12345c9900708000001",
12 "environment": "5d4b12345d2a2806bd2cc6eb",
13 "eventId": "5d7c123452db400061b14dd",
14 "key": "EXAMPLE-EVENT-KEY",
15 "version": 1
16 },
17 "receivedAt": "2019-09-13T21:22:00.673Z",
18 "sentAt": "2019-09-13T21:22:00.393Z",
19 "timestamp": "2019-09-13T21:21:58.393Z",
20 "type": "track",
21 "userId": "EXAMPLE-USER-ID"
22}
Page view event
1{
2 "integrations": {},
3 "messageId": "8c235148-0a1b-4428-a4de-00b90adf2833",
4 "originalTimestamp": "2019-09-13T21:19:43.114Z",
5 "properties": {
6 "contextKeys": {
7 "user": "example-known-user-key",
8 "anonymousUser": "example-anon-user-key"
9 },
10 "project": "5744c123459900708000001",
11 "environment": "5d123454d2a2806bd2cc6eb",
12 "eventId": "5d7c12345db400061b14c1",
13 "key": "EXAMPLE-FLAG-KEY",
14 "url": "http://example.com",
15 "version": 1
16 },
17 "receivedAt": "2019-09-13T21:19:45.371Z",
18 "sentAt": "2019-09-13T21:19:45.331Z",
19 "timestamp": "2019-09-13T21:19:43.154Z",
20 "type": "page",
21 "userId": "EXAMPLE-USER-ID"
22}

Enable Data Export for flags and environments

After you create a Data Export destination, you must start sending flag or environment event data to it. You can enable Data Export for individual flags, or for all the flags in an environment.

To learn more, read Export event data for flags and environments.

Delete a Twilio Segment destination

You can delete a Data Export destination from the Integrations screen.

To delete a destination:

  1. Navigate to the Integrations page and find “Segment.”
  2. Click into the “Segment” section to display a list of destinations.
  3. Click the pencil icon next to the destination you wish to delete. The “Edit destination” panel appears.
  4. Click Delete destination.