


LaunchDarkly’s new AI configs (now in Early Access) can help reduce risks of deploying AI models into production! With AI configs, you can change your model or prompt without needing to deploy any new code. Decoupling configuration changes from deployment grants developers a ton of flexibility to roll out changes quickly and under your discretion based on AI specific metrics.
In this tutorial, we’ll teach you to use AI configs to serve two different AI models for a specific percentage of your user traffic while recording metrics. This example app generates a lesson plan based on information from various academic sources. Feel free to alter the use cases based on your interests.
Tutorial requirements
- Python 3.6 or newer. If your operating system does not provide a Python interpreter, you can go to python.org to download an installer.
- Visual Studio Code or your favorite IDE.
- LaunchDarkly account. If you haven’t done so already, create a free account.
- OpenRouter API key to run calls to the DeepSeek AI API for free.
- An OpenAI API key. You can create one here.
Choose your AI model
GPT-4o is an advanced model that offers strong reasoning abilities and adaptability while being able to process text, images, and audio files. There is stronger contextual understanding and interactive support to generate more diverse content based on the users’ inputs and circumstances.
On the other hand, DeepSeek models have taken the AI world by storm with their open source generative AI models. Supposedly, their R1 reasoning model rivals OpenAI’s 01 and was trained for a fraction of the cost. This model offers strong text-generation capabilities that can be fine-tuned to your specific needs. You can find an up to date list of DeepSeek’s available models on their website.
Configuration
If you are using a Unix or Mac OS system, open a terminal and enter the following commands to do the tasks described below:
$ mkdir launchdarkly-ai-config-flask
$ cd launchdarkly-ai-config-flask
$ python3 -m venv venv
$ source venv/bin/activate
(venv) $ pip install openai ldclient launchdarkly-server-sdk-ai python-dotenv flask
For those of you following the tutorial on Windows, enter the following commands in a command prompt window:
$ md launchdarkly-ai-config-flask
$ cd launchdarkly-ai-config-flask
$ python -m venv venv
$ venv\Scripts\activate
(venv) $ pip install openai ldclient launchdarkly-server-sdk-ai python-dotenv flask
Set up the developer environment for the Python application
Make sure that you are currently in the virtual environment of your project’s directory in the terminal or command prompt.
Create a file at the root of your project folder named .env and add the following lines to define the environment variables. These are placeholder values, which you’ll be updating later with real ones.
LAUNCHDARKLY_SDK_KEY="sdk-###############"
OPENROUTER_API_KEY="sk-###############""
Build the Python AI config application scaffolding
The Python application will utilize the DeepSeek R1 model to generate responses for a chatbot that helps students with their homework and material understanding.
Initialize the clients
Create a file named app.py and paste in the following code.
import os
import openai
import ldclient
from ldclient import Context
from ldclient.config import Config
from ldai.client import LDAIClient, AIConfig, ModelConfig, LDMessage, ProviderConfig
from dotenv import load_dotenv
from flask import Flask, jsonify, render_template

app = Flask(__name__)
load_dotenv()

# Initialize clients
ldclient.set_config(Config(os.getenv("LAUNCHDARKLY_SDK_KEY")))
ld_ai_client = LDAIClient(ldclient.get())

# use the following client for openrouter / deepseek
openrouter_client = openai.OpenAI(
  base_url="https://openrouter.ai/api/v1",
  api_key=os.getenv("OPENROUTER_API_KEY"),
)
OpenRouter is a handy product that normalizes model APIs so you can call them using the OpenAI spec. In order to use the DeepSeek model for free, please make sure you have an account with OpenRouter and create an API key for the “DeepSeek-R1 (free)” model, and add it to your project’s .env file. Thank you to Mehul Gupta on Medium for the tutorial on how to implement OpenRouter to your project.
Define the Flask routes
This project will display the AI generated results on an HTML webpage for your convenience. Copy and paste the following to the app.py file after the AI client definitions:
@app.route("/")
def index():
    return render_template("index.html")

@app.route("/generate", methods=["GET"])
def generate_text():
    response = generate()
   # Clean up the response text for better readability
    cleaned_text = response.choices[0].message.content
    cleaned_text = cleaned_text.replace('[', '').replace(']', '')
    cleaned_text = cleaned_text.replace('\\n', '\n')
    cleaned_text = '\n\n'.join(filter(None, cleaned_text.split('\n')))
    cleaned_text = cleaned_text.strip()
    return jsonify({"text": cleaned_text})

if __name__ == "__main__":
    try:
        app.run(debug=True)
    except KeyboardInterrupt:
        pass
Create two subdirectories in the root of your project folder with the names of static and templates. Copy the contents of these directories from this GitHub repository.
Create the AI config
AI configs allow you to manage your generative AI models at runtime and record AI-specific metrics. They are capable of storing multiple prompt and model combinations to target specific audiences and use cases.
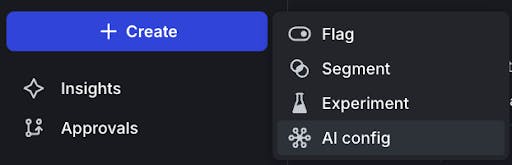
Go to the LaunchDarkly app. Click on the Create button. Select AI config from the menu.
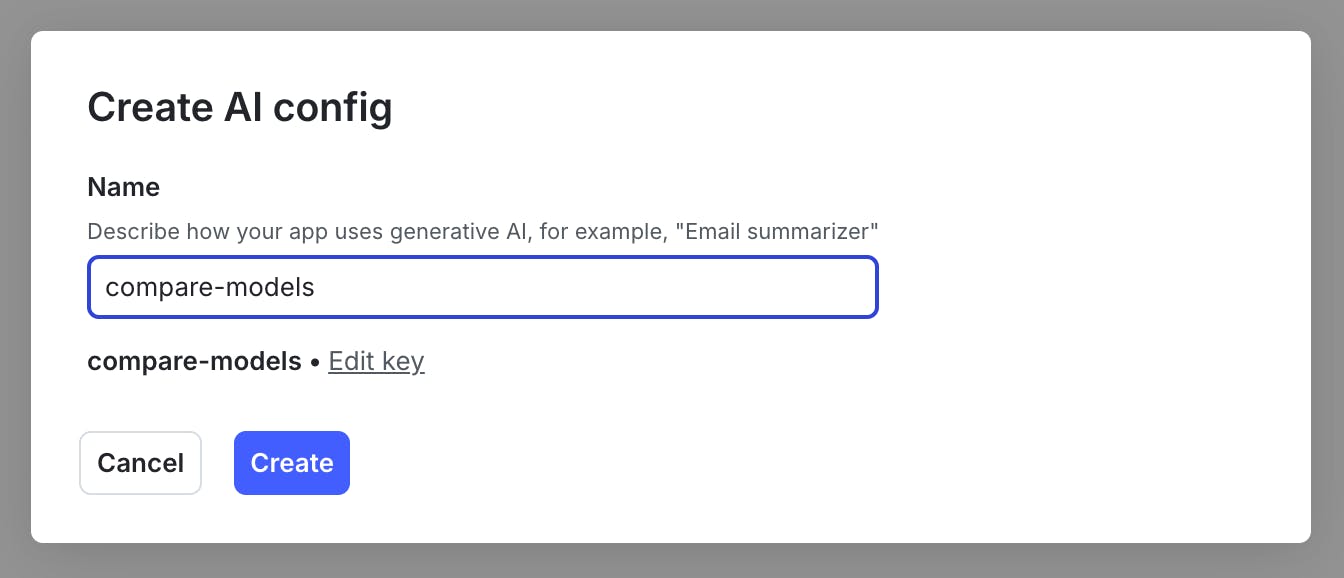
Give your AI config a name, such as “compare-models.” Please keep in mind that this is “ai_config_key” in your Python project, and it is essential to use this key every time you want to generate content from the chosen AI model.
Click Create.
Next, we’re going to add a variation. Variations are an abstraction that represents a specific combination of models and messages, plus other options such as temperature and tokens. Variations are editable, so it’s okay to make mistakes.
With the Variations tab selected, configure the first variation using the following options:
- Name: deepseek-reasoner
- Model: deepseek-reasoner
- Role: system - “You are a young teacher who would like to teach a 5 week seminar course about art history hosted at a community college.”
- Role: user - “Generate a lesson plan that spans over a 5 week seminar. The lesson plan must highlight female identifying artists. Include the findings in the following academic papers:
- "Why have there been no great women artists?" by Linda Nochlin
- "The Story of Art" - Gombrich
- "Art and Agency: an Anthropological Theory" By A. Gell”
Leave the max tokens and temperature as is.
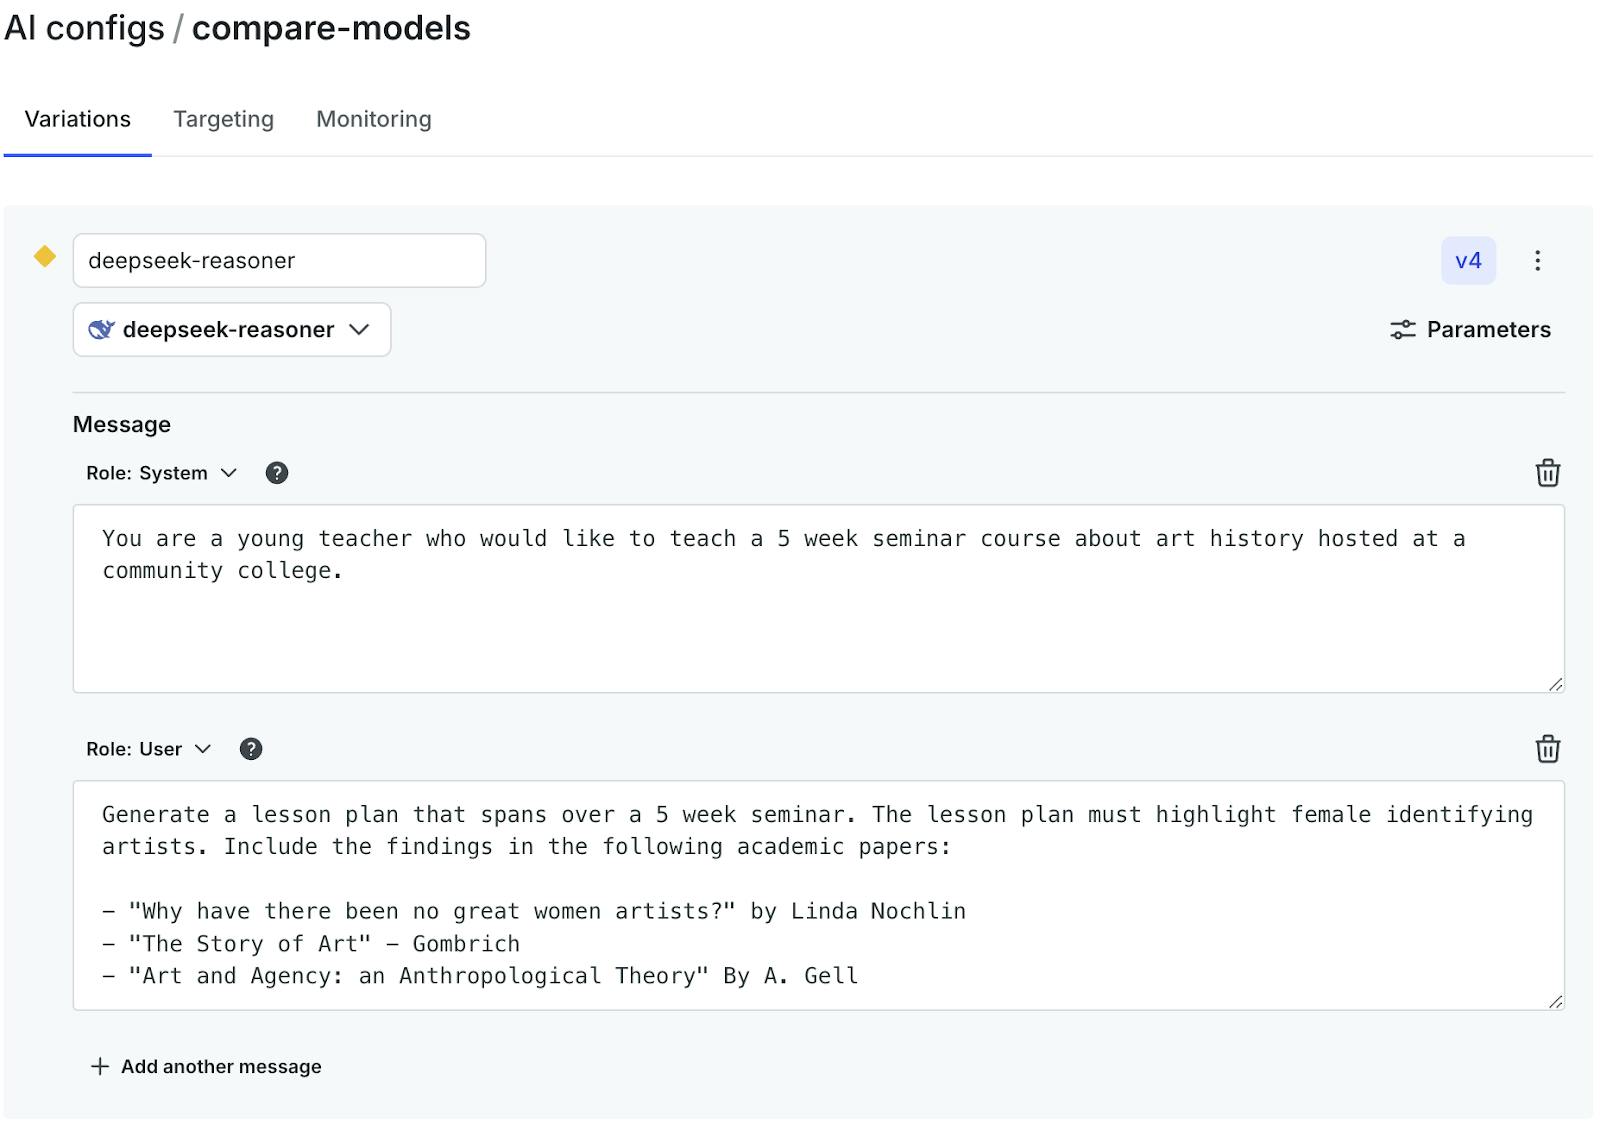
Save changes.
Next, create the variation for the other model. When comparing model performance metrics, changing one thing at a time streamlines analysis. Thus, the prompt must be identical to the first variant.
Click the Add another variation button at the bottom, just above the Save changes button. Then input the following information into the variation section:
- Name: chatgpt-4o-latest
- Model: chatgpt-4o-latest
- Role: system - “You are a young teacher who would like to teach a 5 week seminar course about art history hosted at a community college.”
- Role: user - “Generate a lesson plan that spans over a 5 week seminar. The lesson plan must highlight female identifying artists. Include the findings in the following academic papers:
- "Why have there been no great women artists?" by Linda Nochlin
- "The Story of Art" - Gombrich
- "Art and Agency: an Anthropological Theory" By A. Gell”

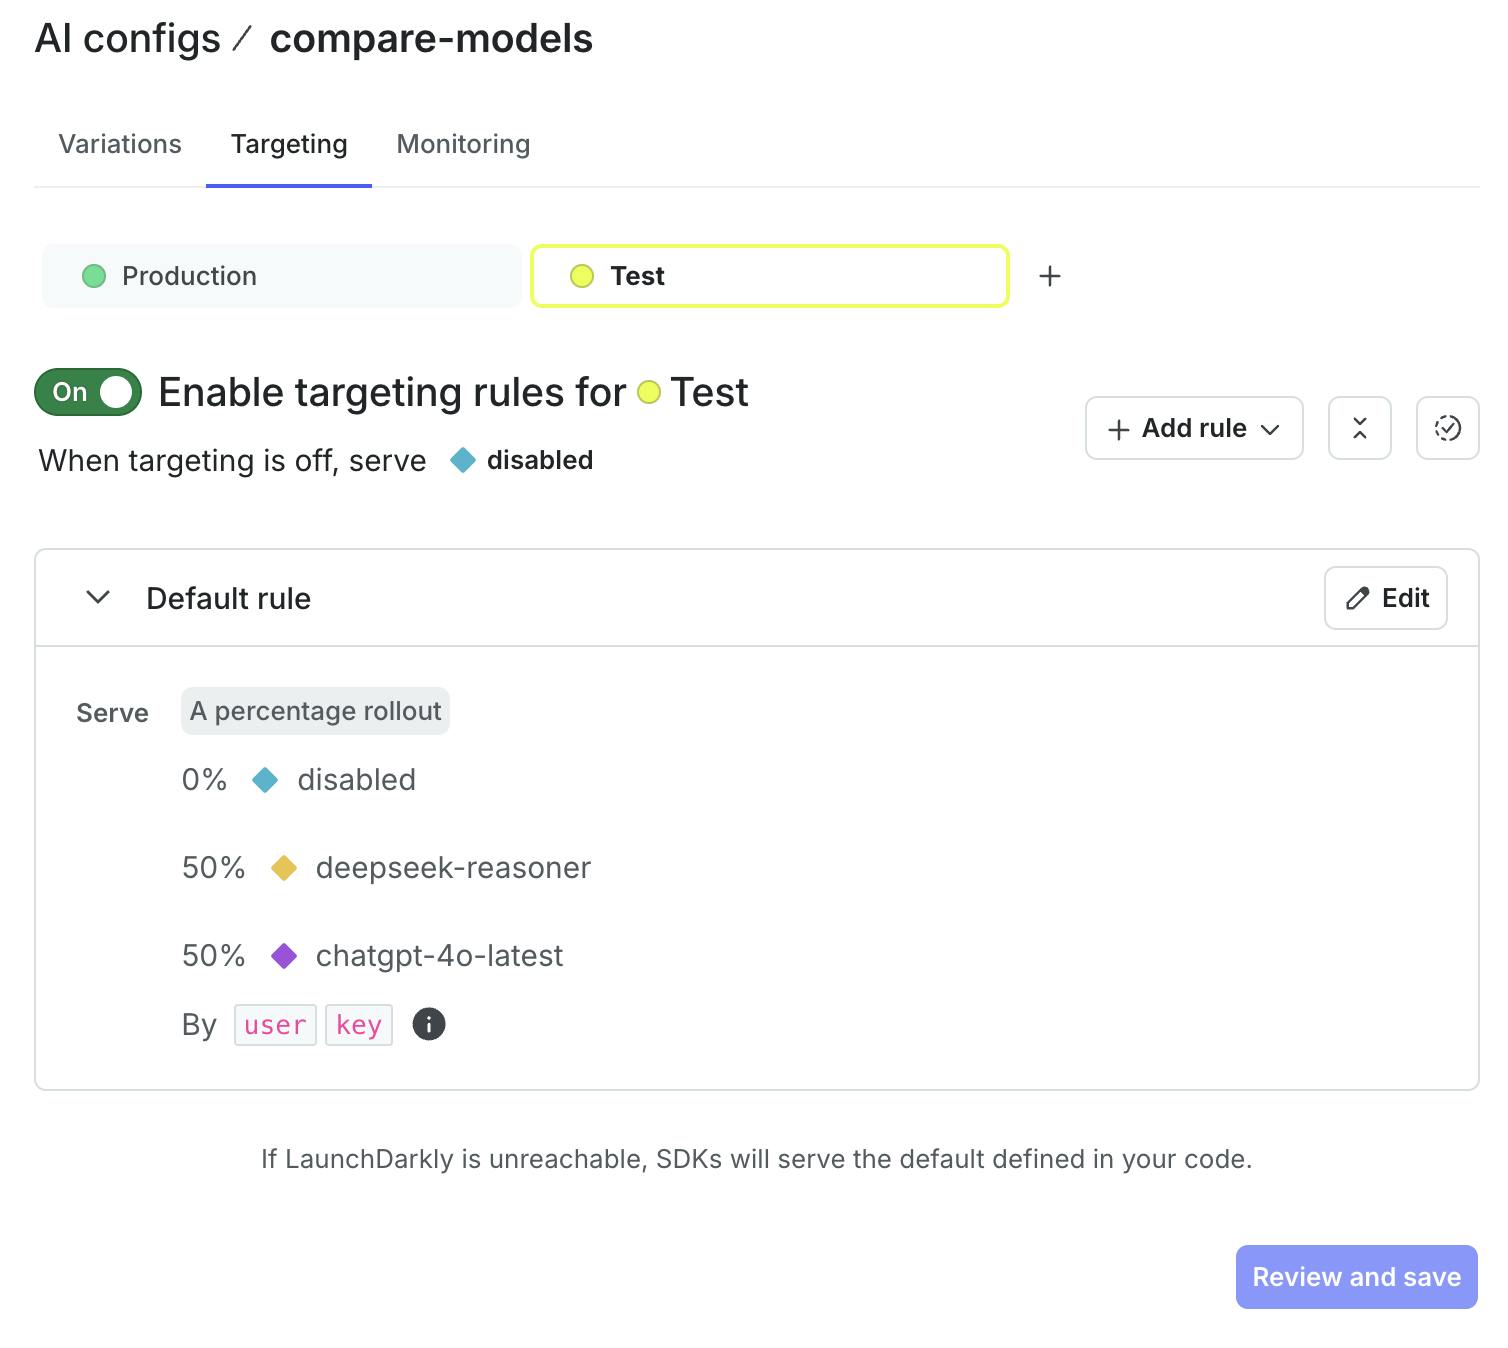
Like feature flags, AI configs must be enabled in order to start serving data to your application. Click on the Targeting tab, and then click the Test button to select that environment. (Alternatively, you could use Production, or any other environment that exists in your LaunchDarkly project.) Toggle the button to green in order to enable targeting rules for this Test environment.
To authenticate with LaunchDarkly, we’ll need to copy the SDK key into the .env file in our Python project.
Select the … dropdown next to the Test environment. Select SDK key from the dropdown menu to copy it to the clipboard.
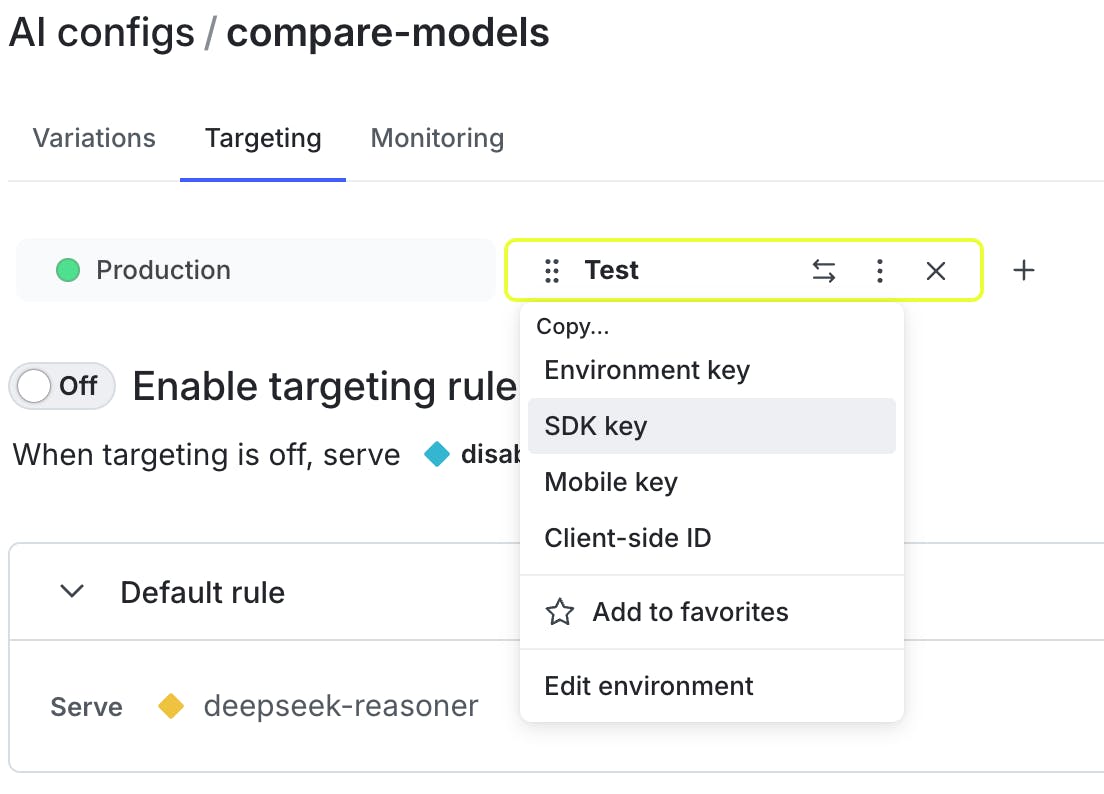
Open the .env file in your editor. Paste in the SDK key for “LAUNCHDARKLY_SDK_KEY”. Save the .env file.
Add percentage rollout rules
We’re going to use percentage rollouts to serve different AI models to users and record metrics about the generated results.
Percentage rollouts allow you to control what percentage of your traffic is being served each variation of an AI config or feature flag. When you have collected enough data to understand which variation performs best, you can update the traffic allocation to serve the winning variant to 100% of your users.
On the Targeting tab, click Edit on the “Default rule” section. Select “Manual percentage” from the dropdown.
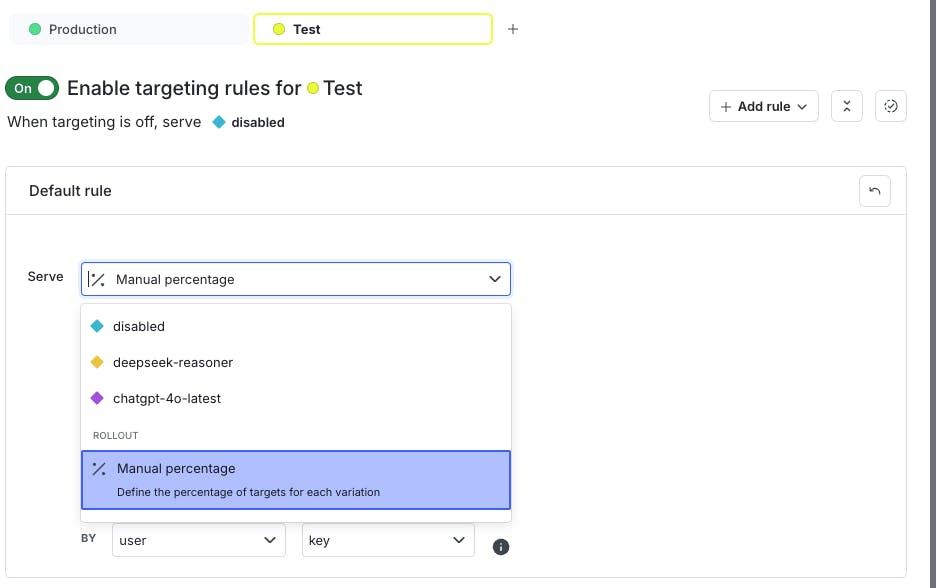
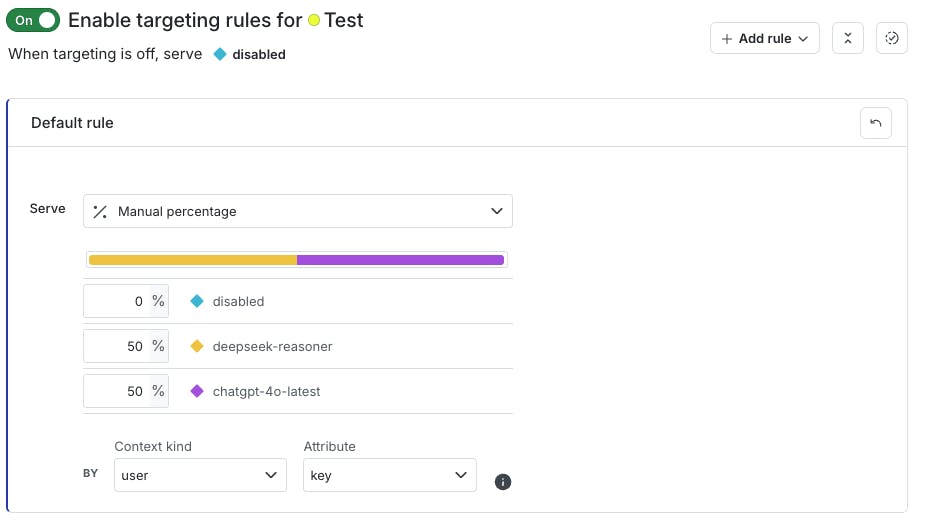
Give each of the models 50% then click on the Review and save button.
This means that 50% of the user contexts will generate AI results with the yellow variation associated with deepseek-reasoner, and the other 50% will serve traffic to the purple variation for chatgpt-4o-latest. If the model and prompt generate results that fit your needs, you can increase the percentage of contexts incrementally, until it eventually reaches 100%.
Now that the AI configs are configured on the dashboard, let’s build out the application.
Keep in mind that in an actual production environment, you might prefer to start at a lower percentage from 1-10% and increase from there, depending on the volume of user traffic your application is serving. However, it is acceptable to start at at 50% in a testing environment and for tutorial purposes.
Retrieve AI config values within a Python application
Navigate back to the app.py file and create the generate function with the code below:
def generate(options=None):
    context = Context.builder('example-user-key').kind('user').name('Sandy').build()

    # !! IMPORTANT !! name of ai configs key
    ai_config_key = "compare-models"
    default_value = AIConfig(
        enabled=True,
        model=ModelConfig(name='deepseek-reasoner'),
        messages=[],
    )
    config_value, tracker = ld_ai_client.config(
        ai_config_key,
        context,
        default_value,
)
    model_name = config_value.model.name
    print("CONFIG VALUE: ", config_value)
    print("MODEL NAME: ", model_name)

    messages = [] if config_value.messages is None else config_value.messages
    messages_dict=[message.to_dict() for message in messages]

    completion = openrouter_client.chat.completions.create(
            model="deepseek/deepseek-r1:free",
            messages=messages_dict,
        )
    track_success = tracker.track_success()
    print(completion.choices[0].message.content)
    print("Successful AI Response:")
    return completion
Start your server using the following command "flask run":
If your AI model generates “{"text":""}”, be sure to refresh the page and hit the generate button again.
You can refresh the webpage and click on the Generate button as many times as you would like to examine new results of the different models.
Some results from the DeepSeek R1 model
Let’s examine the sample results from the DeepSeek R1 model:
CONFIG VALUE:  AIConfig(enabled=True, model=<ldai.client.ModelConfig object at 0x11aa2ad50>, messages=[LDMessage(role='system', content='You are a young teacher who would like to teach a 5 week seminar course about art history hosted at a community college.'), LDMessage(role='user', content='Generate a lesson plan that spans over a 5 week seminar. The lesson plan must highlight female identifying artists. Include the findings in the following academic papers: \n\n- "Why have there been no great women artists?" by Linda Nochlin\n- "The Story of Art" - Gombrich\n- "Art and Agency: an Anthropological Theory" By A. Gell')], provider=None)
MODEL NAME:  deepseek-reasoner
**5-Week Seminar Lesson Plan: Reclaiming Female Agency in Art History**

**Course Overview:**
This seminar challenges traditional art historical narratives by centering female-identifying artists through the lenses of institutional critique, canonical re-examination, and anthropological theory. Readings include Nochlin, Gombrich, and Gell.

---

### **Week 1: Systemic Barriers & Institutional Sexism**
**Theme:** Linda Nochlin’s foundational critique of art historical exclusion.
**Key Artists:** Sofonisba Anguissola (Renaissance), Artemisia Gentileschi (Baroque).
**Readings:** Excerpts from *“Why Have There Been No Great Women Artists?”* (Nochlin).
**Activities:**
- Lecture: Nochlin’s arguments on institutional barriers.
- Group Discussion: How did Anguissola/Gentileschi navigate societal constraints?
- Primary Source Analysis: Compare male and female artists’ career trajectories.
**Assignment:** Reflection on Nochlin’s relevance today (500 words).
---

### **Week 2: Re-examining Gombrich’s Canon**
**Theme:** Critiquing traditional narratives in *“The Story of Art.”*
**Key Artists:** Rosa Bonheur (19th c.), Berthe Morisot (Impressionism).
**Readings:** Gombrich’s chapter on 19th-century art; feminist critiques of his omissions.
**Activities:**
- Comparative Analysis: Gombrich’s text vs. feminist art histories.
- Activity: “Rewrite Gombrich” – Add a female artist to his timeline with justification.
**Assignment:** Short essay on one omitted artist’s contributions (using Gombrich’s style).

—
…

**Grading:**
- Participation (20%), Weekly Assignments (30%), Mid-term Paper (20%), Final Project (30%).

**Additional Notes:**
- Encourage exploration of non-Western artists (e.g., Amrita Sher-Gil, Mickalene Thomas).
- Address limitations of readings (e.g., Eurocentrism) through supplementary materials.

This plan fosters critical engagement with art history’s gaps while celebrating female artists’ resilience and creativity. 🌟
Some results from the chatgpt-4o-latest model
Here are the results for the other 50% of users that were served the purple variation with the chatgpt-4o-latest model:
MODEL NAME:  chatgpt-4o-latest


**5-Week Seminar: Reclaiming Art History—Female Identified Artists & Theoretical Frameworks**

**Course Objective:**
Explore the contributions of female artists through critical analysis of historical barriers, canonical narratives, and the agency of art, integrating Linda Nochlin’s institutional critique, Gombrich’s *The Story of Art*, and A. Gell’s *Art and Agency*.

---

### **Week 1: Institutional Barriers & Nochlin’s Provocation**
**Objective:** Introduce systemic obstacles faced by women in art history.
**Key Readings:**
- Linda Nochlin, *Why Have There Been No Great Women Artists?*
**Key Concepts:** Institutional exclusion, canon formation, and the myth of innate genius.
**Case Studies:**
- **Artemisia Gentileschi** (Baroque period): Survived sexual violence and leveraged patronage networks.
- **Sofonisba Anguissola** (Renaissance): Court painter challenged gender norms.
**Discussion Questions:**
- How did education, patronage, and societal roles limit women’s careers?
- Why does Nochlin argue the question itself is flawed?
**Activity:** Compare Gentileschi’s *Judith Slaying Holofernes* with Caravaggio’s male-centric violence. Analyze disparities in historical reception.

---

### **Week 2: Canon Revisions & Gombrich’s Omissions**
**Objective:** Critique traditional art history narratives and amplify marginalized voices.
**Key Readings:**
- Gombrich, *The Story of Art* (excerpts on Impressionism and Renaissance).
- Feminist critiques of Gombrich’s omissions.
**Key Concepts:** Canon formation, Eurocentrism, and gendered erasure.
**Case Studies:**
- **Berthe Morisot** (Impressionism): Rejected from male-dominated exhibitions.
- **Mary Cassatt**: Explored motherhood through a feminist lens.
**Discussion Questions:**
- How does Gombrich’s narrative exclude women?
- How do Cassatt’s depictions of domesticity challenge stereotypes?
**Activity:** Rewrite a Gombrich textbook passage to include Morisot and Cassatt. Present revisions to the class.

---
…

**Assessment:**
- Participation (20%)
- Weekly reflections connecting readings to case studies (30%)
- Final presentation + 1,500-word essay (50%)

**Inclusive Add-ons:** Invite local female artists for Q&A (virtual/in-person) and screen documentaries (e.g., *Women Art Revolution*).

This plan challenges canonical biases, centers female creators, and equips students to critically engage with art’s societal role.
What do you think? Does the DeepSeek R1 live up to the hype of understanding academic texts better, or does GPT-4o provide stronger results with potential to enhance further with various media files?
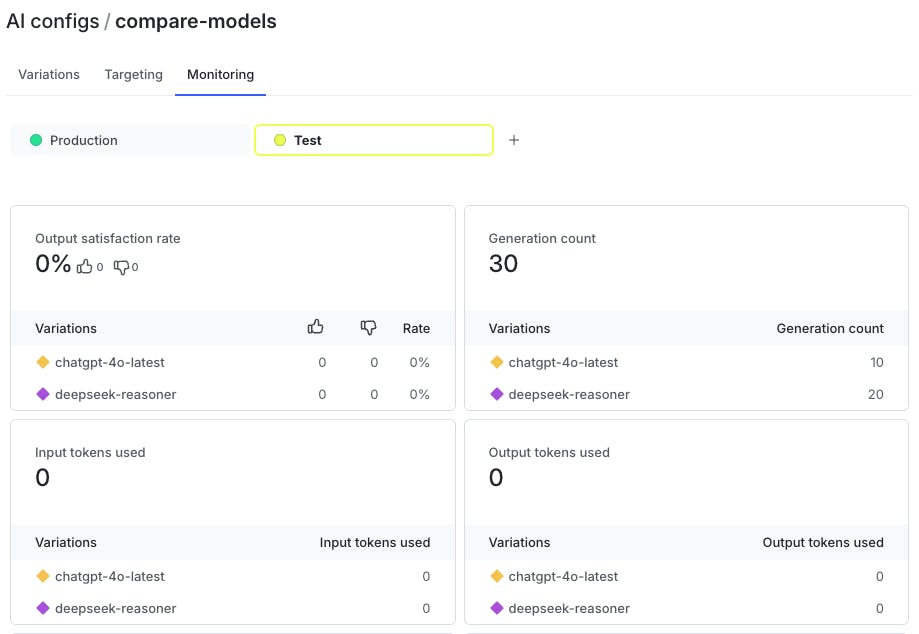
Monitor the AI configs results
LaunchDarkly also records input tokens, output tokens, generation count, and optional user feedback about the response quality. The docs on tracking AI metrics go into more detail if you are curious.
With a call to tracker.track_success(), the application will return “None” if successful, and also record the amount of successful generations.
On the Monitoring tab of the AI configs panel, you can see the generation counts for each variation, along with input tokens, output tokens, and satisfaction rate. Notice that the deepseek-reasoner variation served more users than the chatgpt-4o-latest variation. The Generation count should increase anytime you run the application as seen below:
What’s next for building with AI configs in Python Flask applications?
Congratulations on building a Flask application that lets you serve two different models to your users and compare the results
You could even customize your prompts by adding specific details about the classroom’s prior knowledge to the subjects, tweaking parameters, and even testing different variations of the prompts to see which one performs best.
Experimentation is a great way to measure the effect of AI configs on end users by mapping customer behavior to the metrics your team cares about. Give that a try!
If you want to learn more about utilizing AI configs, here’s some further reading:
- Add DeepSeek-R1 to your Python app in 7 minutes with LaunchDarkly AI Configs
- Learn how to Upgrade OpenAI models in Python FastAPI applications — using LaunchDarkly AI configs
- Upgrade OpenAI models in ExpressJS applications — using LaunchDarkly AI configs
Join us on Discord, send me an email at dphan@launchdarkly.com, or connect with me on LinkedIn and let us know what you're building.
Like what you read?
Get a demo