
Introduction
Imagine being able to update your email marketing strategy on the fly—without ever touching your code. Whether it’s sending exclusive deals to your premium users or encouraging new users to make their first purchase, this tutorial will show you how to do just that. With Supabase, LaunchDarkly, and SendGrid, we’ll build a dynamic, scalable email personalization system that’s ready for production.
If you’ve followed our previous tutorial, you’ll recognize some concepts, but this time we’re leveling up. Instead of SQLite and Resend, we’re using PostgreSQL (via Supabase) and SendGrid for even more flexibility and power.
By the end of this guide, you’ll have a system that:
- Stores and retrieves user data using Supabase.
- Personalizes emails dynamically with LaunchDarkly feature flags.
- Sends targeted emails through SendGrid.
Let’s get started!
What We’re Building
We’re creating a system that sends personalized emails based on user type:
- Premium Users: Get premium content (e.g., exclusive offers).
- Regular Users: Get regular content (e.g., newsletters).
- First-Time Users: Get premium content to encourage a first purchase.
We’ll use LaunchDarkly’s premium-content feature flag to decide what content to send, while Supabase stores user data and SendGrid handles email delivery. The best part? You can update your email rules directly in LaunchDarkly—no code changes required.
What You’ll Learn
By following this guide, you’ll learn how to:
- Set up and query a PostgreSQL database using Supabase.
- Use LaunchDarkly feature flags to segment users dynamically.
- Send personalized emails with SendGrid based on feature flag evaluations.
- Combine these tools into a production-ready workflow.
What You’ll Need
To follow along, you’ll need:
- Basic Python knowledge: A working understanding of Python and how to run scripts.
- A developer environment with Python and pip installed.
- Accounts:
- Supabase (to manage your database)
- LaunchDarkly (to create feature flags) - sign up for a free account here
- Twilio SendGrid (to send emails)
A verified sender email address: To send emails using Twilio SendGrid, you need to verify the sender email address. After signing up, follow SendGrid's instructions to verify your email address before proceeding.
Let’s start by setting up our database. Supabase is an open-source alternative to Firebase, built on PostgreSQL. We’ll use it to store and retrieve user data.
1.1. Create a Supabase Project
- Go to Supabase and log in.
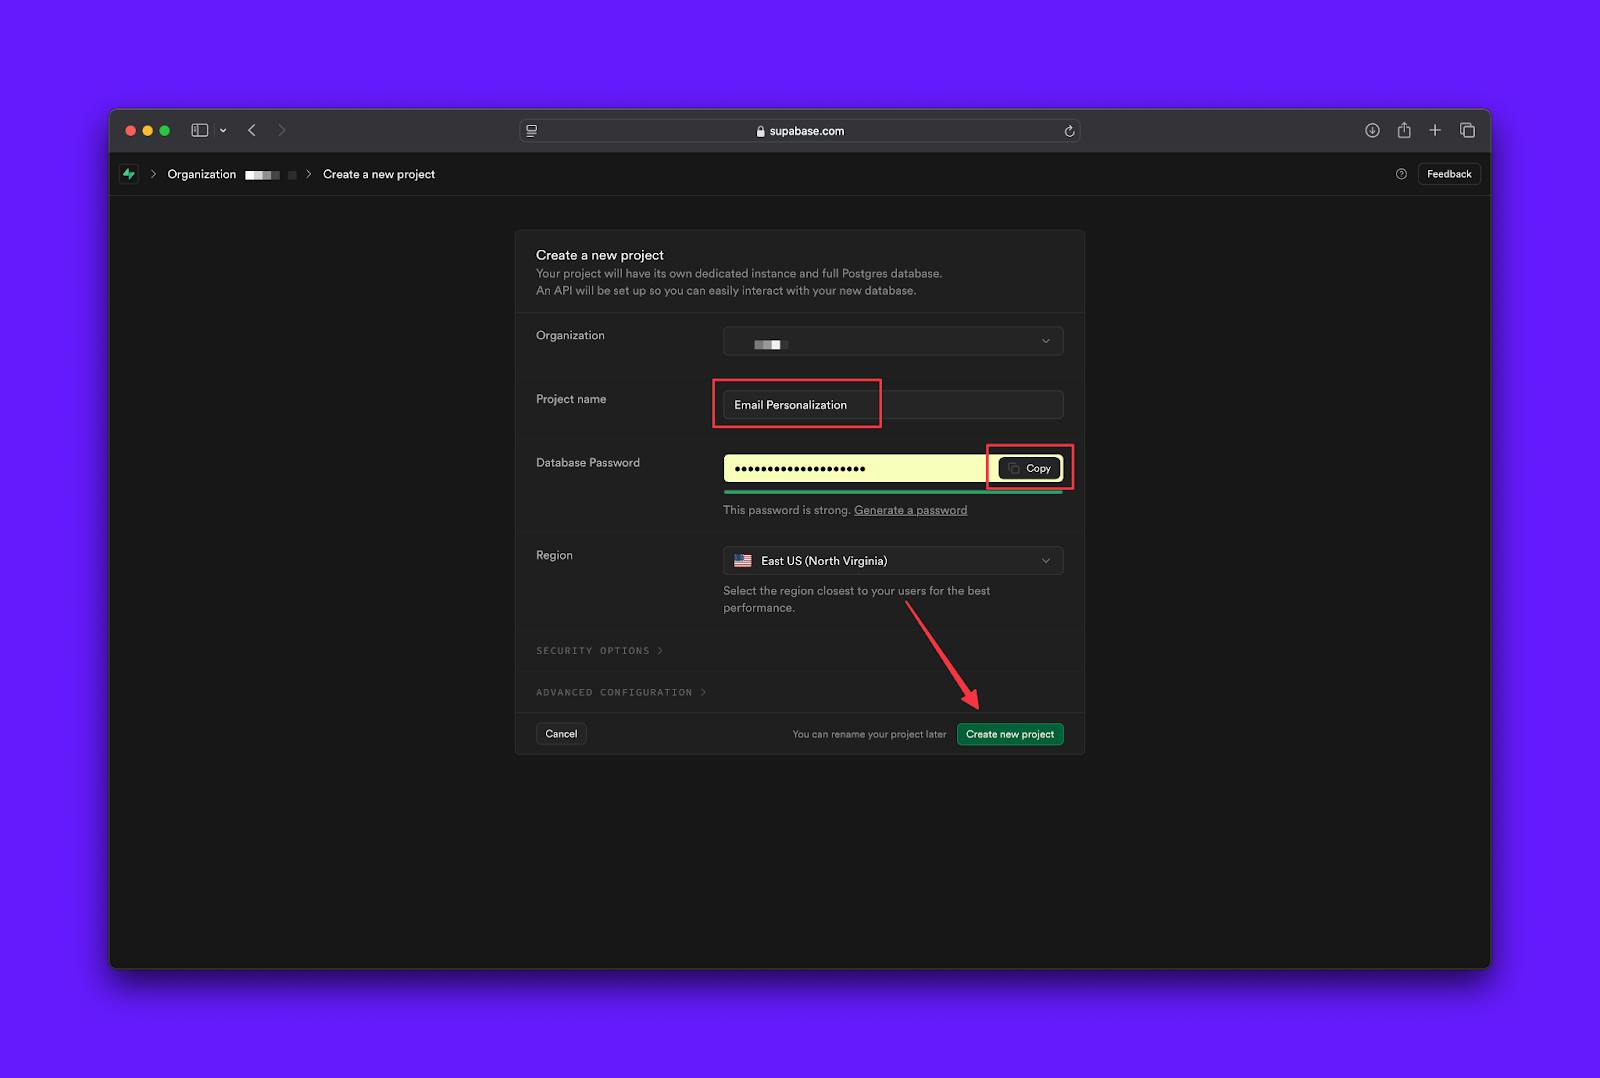
- Click New Project and provide the following details:
- Project Name: Email Personalization
- Database Password: Set a strong password.
- Region: Choose the closest region to your users.
- Click Create new project.
- Copy the service_role key: When you create a project, two default API keys (anon key for client-side access and service_role key for secure server-side operations) will be generated. For this project, we will use service_role key
Copy the Project URL: Additionally, your project will also have a unique Project URL. Copy this as well.
1.2. Create the users Table
This table will store user details like their email, subscription type, and activity. Here’s how to set it up:
In the Table Editor in Supabase, click New Table.
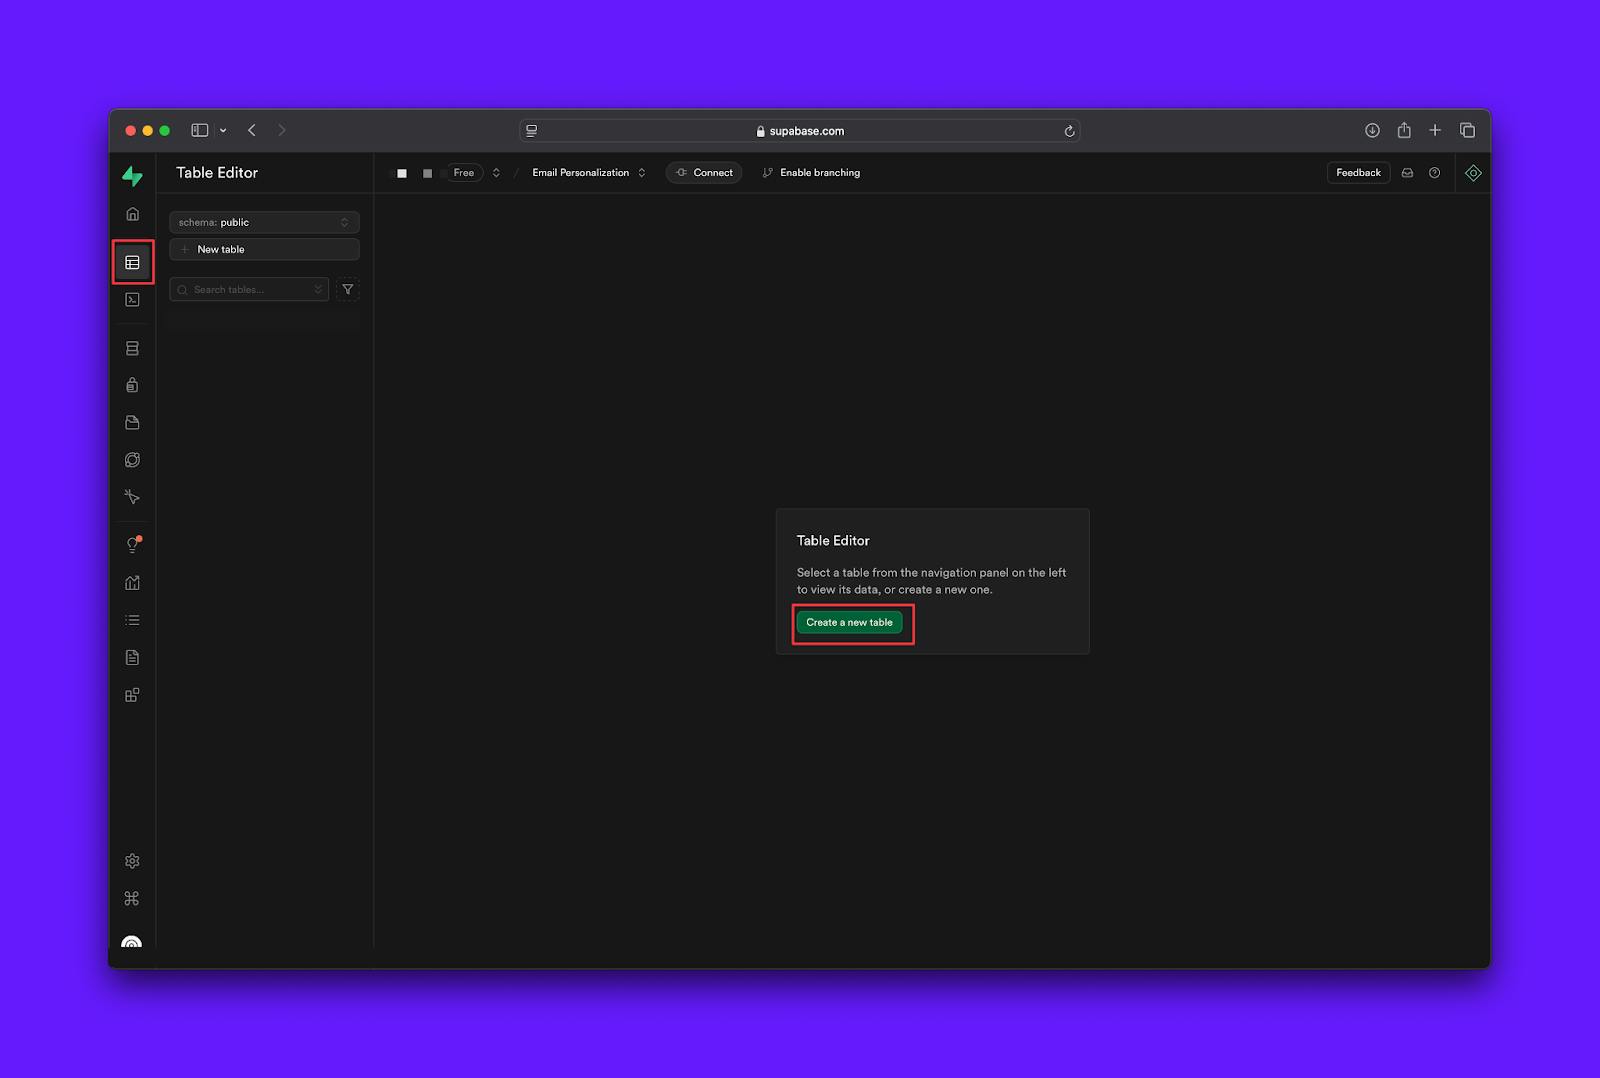
Use these settings:
- Table Name: users
- Schema:public
Add these columns:
- id (UUID, Primary Key)
- email (Text, Unique)
- subscription_status (Text)
- purchase_count (Integer)
- last_login_date (Timestamp)

Alternatively, you can create the table with this SQL command:
1.3. Insert Sample Data
Adding some sample users will help us test our setup. Insert these rows into your table:
Now your database is ready!
Step 2: Connect to Supabase
Now, let’s connect to your Supabase database.
2.1. Get the Supabase API Key
During project setup, you copied the service_role key and Project URL. If not, you can retrieve them from Supabase Dashboard:
Here’s how to find your keys:
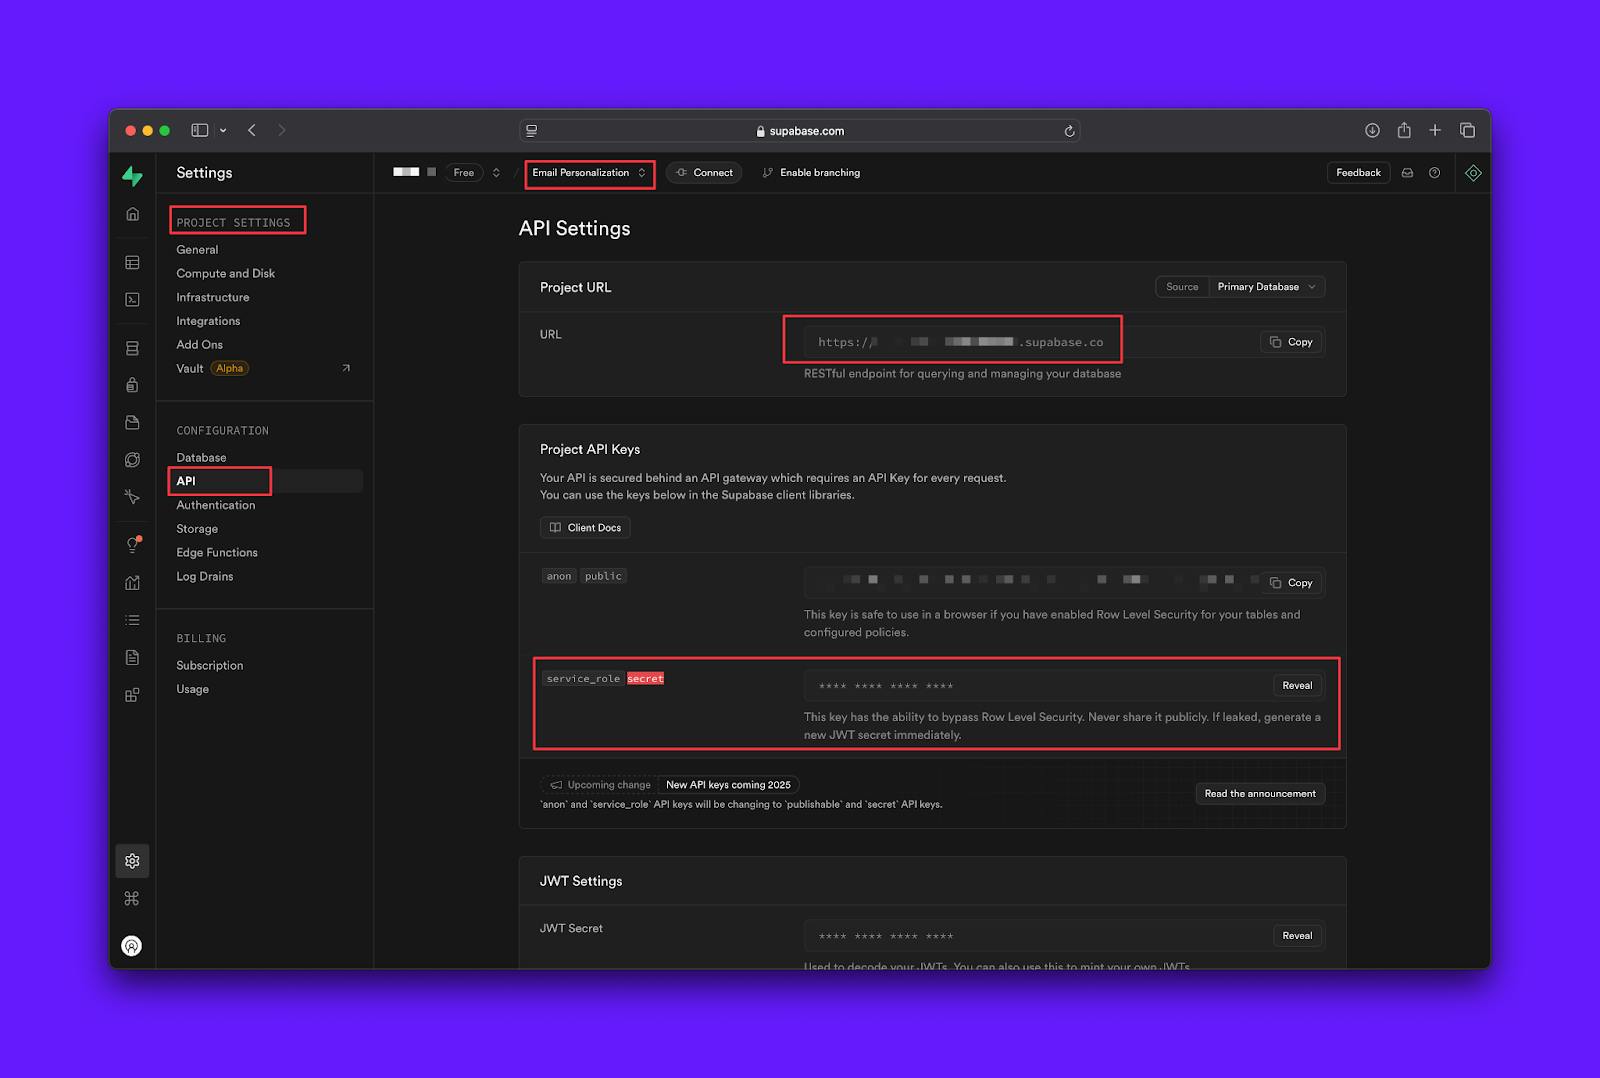
- Go to your Supabase Dashboard.
- Navigate to your project and click API Settings.
Copy the service_role key and the Project URL under the Project API section. Since this project involves server-side access, we’ll use the service_role key.
You can read more about API keys in the Supabase API documentation.
2.2 Create Environment Variables
To securely store and access your Supabase credentials, create a .env file in your project directory and add the following:
Create a .env file with:
- SUPABASE_URL: Paste the Project URL you copied earlier.
- SUPABASE_KEY: Paste the service_role key here.
Tip: For now, you only need to paste the Supabase credentials (SUPABASE_URL and SUPABASE_KEY). We’ll add the other keys as we proceed.
2.3 Install Required Packages
To work with Supabase, LaunchDarkly, and SendGrid, we need a few Python libraries.
Pro Tip: To keep your project environment clean, consider using a virtual environment:
First, let’s create a requirements.txt file in your project directory and list the dependencies:
Now, install them all with:
2.4. Connect to Supabase with Python
Now that your .env file is ready and the required libraries are installed, let’s connect to your Supabase database and fetch user data. We’ll use the supabase Python library to make this simple.
Initialize the Supabase Client
The first step is to create a client object that securely connects to your Supabase project. This client will use the SUPABASE_URL and SUPABASE_KEY from your .env file.
Write a Function to Fetch Users
Next, we’ll write a function to fetch all users from the users table. This table holds details like email, subscription status, and purchase history.
Here’s how your code should look:
This function queries the users table and retrieves all the records. Run it to confirm that your database connection works and your sample data is accessible.
Test Your Connection
Run the script to ensure everything is working:
You should see a list of users (or an error message if something went wrong).
Step 3: Create Feature Flags in LaunchDarkly
We’ll use LaunchDarkly feature flags to decide what type of email content each user receives. Feature flags allow you to control your application’s behavior without deploying new code.
Let’s create the premium-content flag.
3.1. Steps to Create the Feature Flag
- Log in to LaunchDarkly.
- Navigate to your project and environment where you want to create the feature flags.
- Click on the Flags tab in the sidebar.
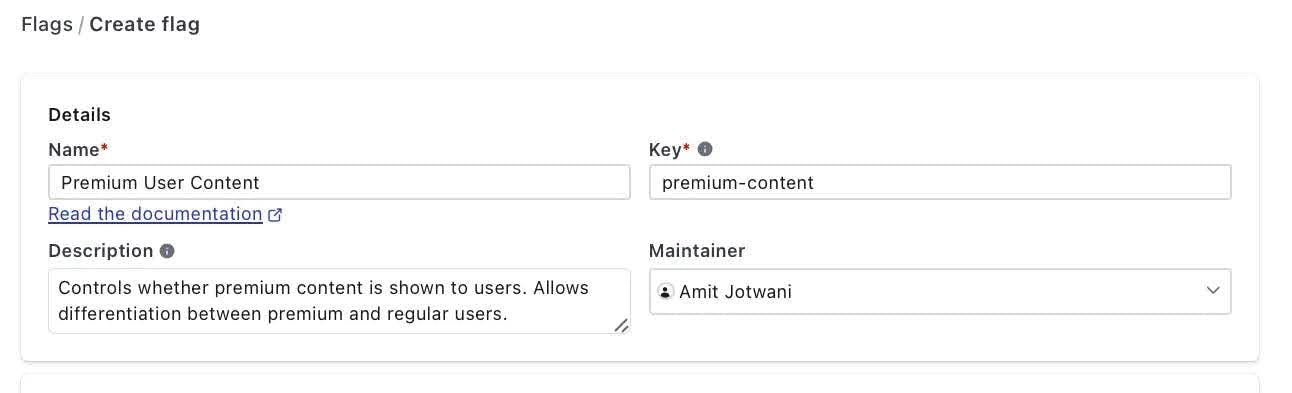
- Click Create flag.

- Use these details:
- Flag name: "Premium Content"
- Flag key: "premium-content"
Description: "Controls whether premium content is shown to users. Allows differentiation between premium and regular users."
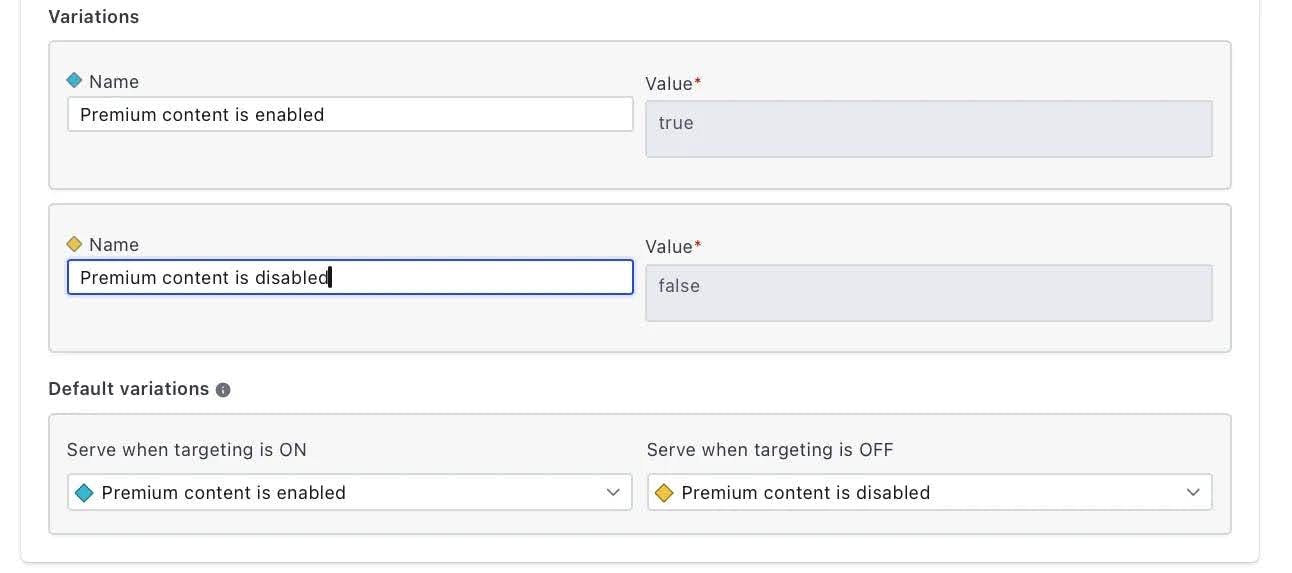
- In the Configuration section: Choose Custom. Set the Flag type to boolean. Check "Is this flag temporary?": No
- Under Variations, define the following: True: Premium content is enabled. False: Premium content is disabled.
8. Leave the Default variations as: Serve when targeting is ON: Premium content is enabled. Serve when targeting is OFF: Premium content is disabled.
9. Click Create flag.
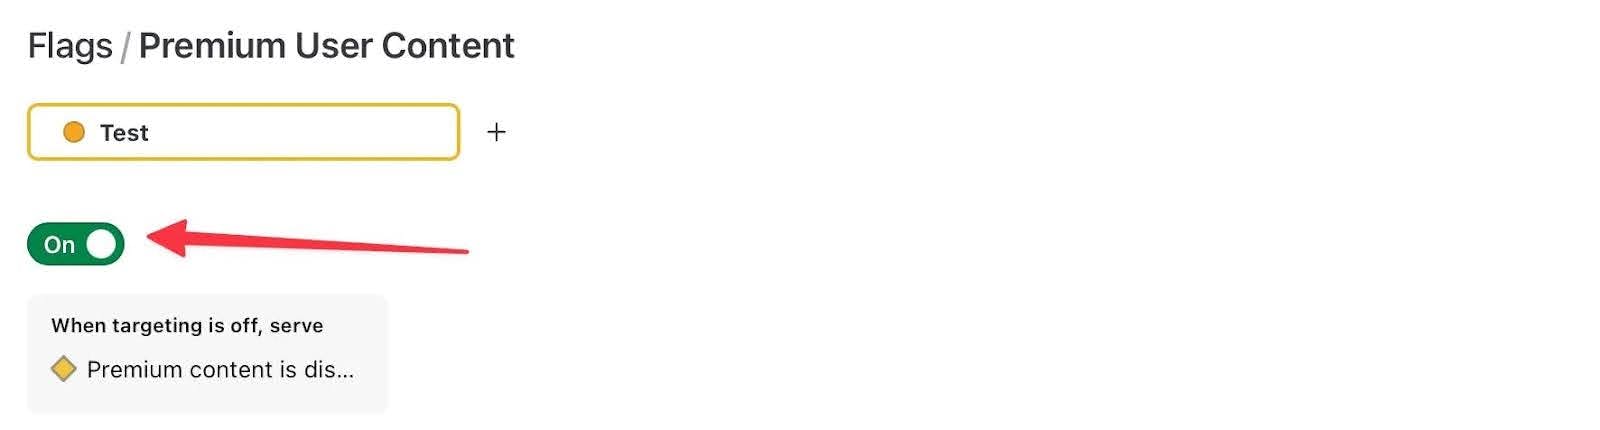
3.2. Turn the premium-content Flag on
Once the flag is added, it is turned off by default. Turn on the flag by toggling the switch at the top of the page. Follow the prompt to add a comment explaining these changes, then click "Review and save."
3.3) Add Custom Rules for subscription_status and purchase_count
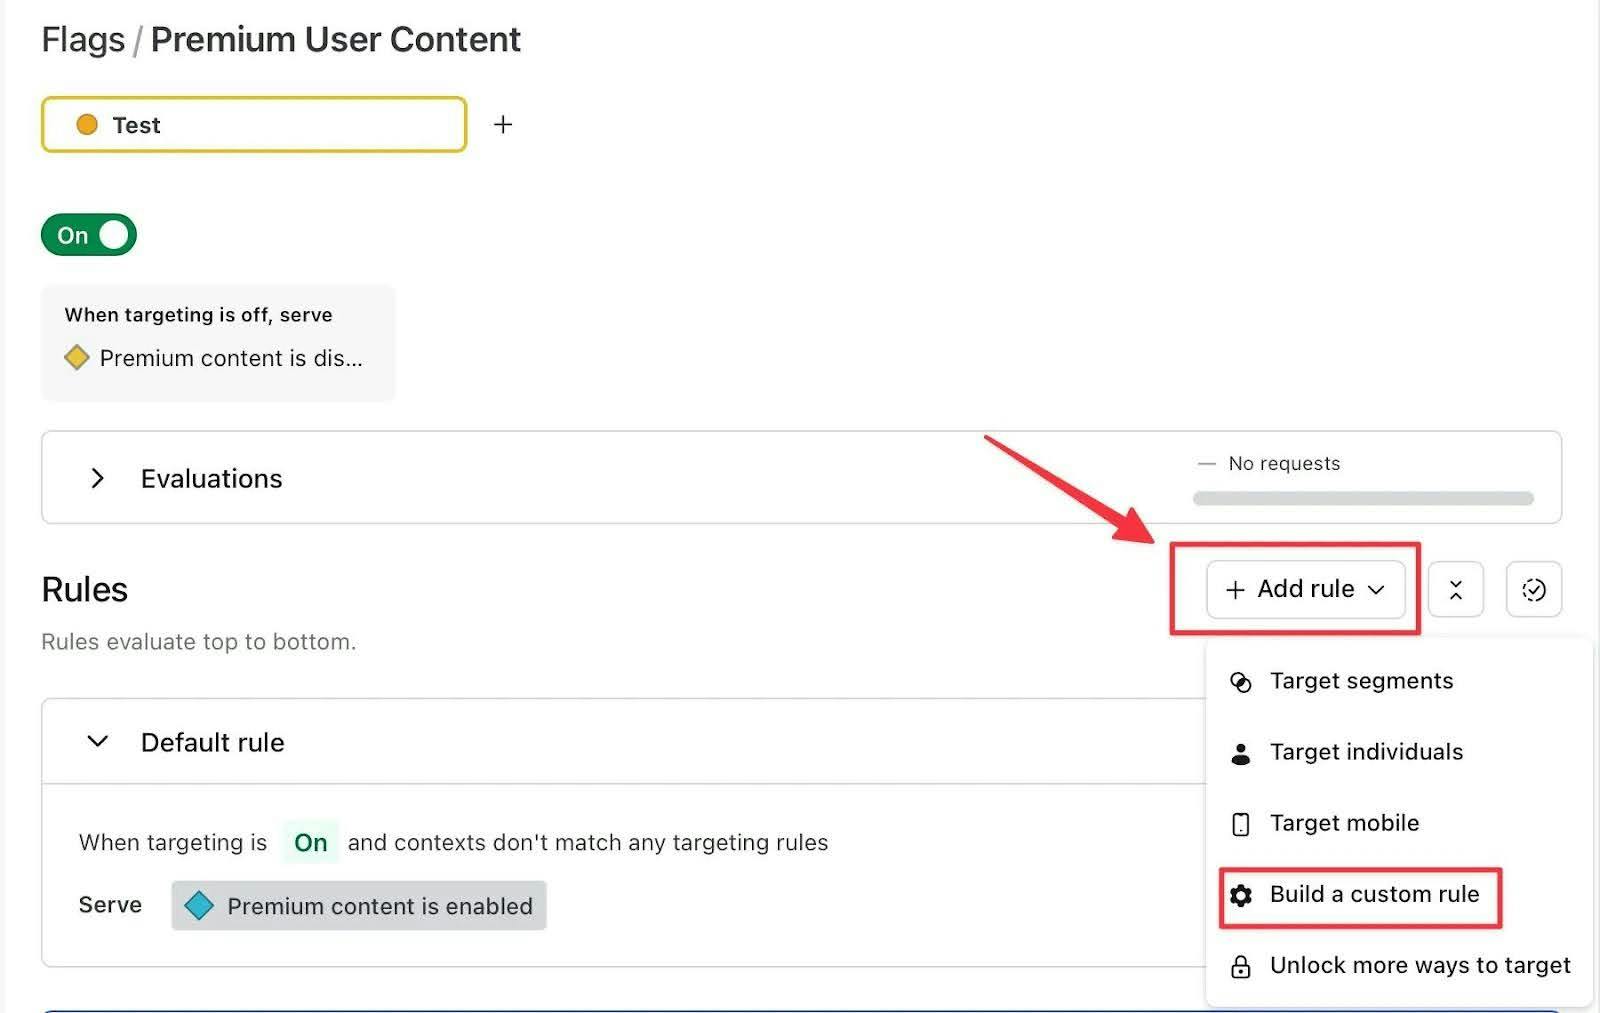
Now that we've created the flag, let's define rules that target premium users based on their subscription_status and purchase_count.
- Scroll down to the Rules section.
- Click on + Add rule and select Build a custom rule.
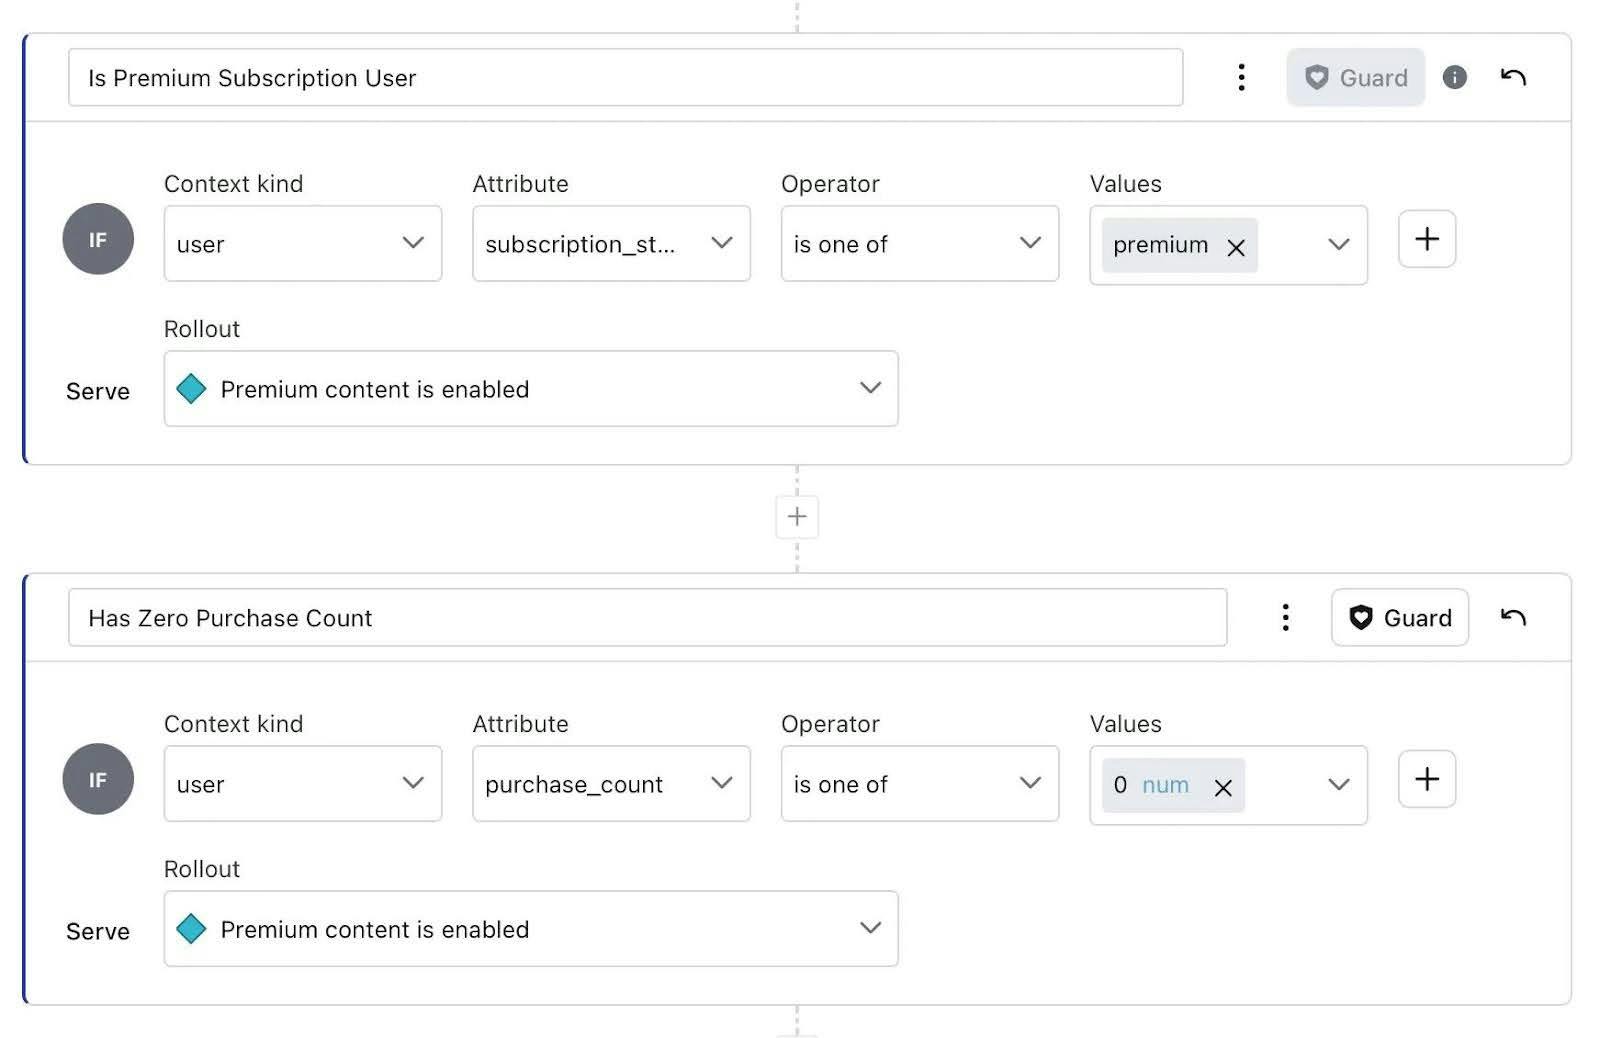
Rule 1: Target Premium Subscription Users
- Rule Name: Type "Is Premium Subscription User".
- Context Kind: User.
- Attribute: Type subscription_status and click Add subscription_status.
- Operator: is one of.
- Values: Type premium and click Add premium.
- Serve: Premium content is enabled.
💡 This rule essentially translates to: "If the user’s subscription_status is premium, they will receive premium content."
Rule 2: Target Users with Zero Purchase Count
- Rule Name: Type "Has Zero Purchase Count".
- Context Kind: User.
- Attribute: Type purchase_count and click Add purchase_count.
- Operator: is one of.
- Values: Type 0 and click Add 0.
- Serve: Premium content is enabled.
This rule is useful if you want to encourage users who haven’t made any purchases yet by serving them premium content to entice them to make a purchase.
The two rules should look like this:
3.4. Update Default Rule Behavior
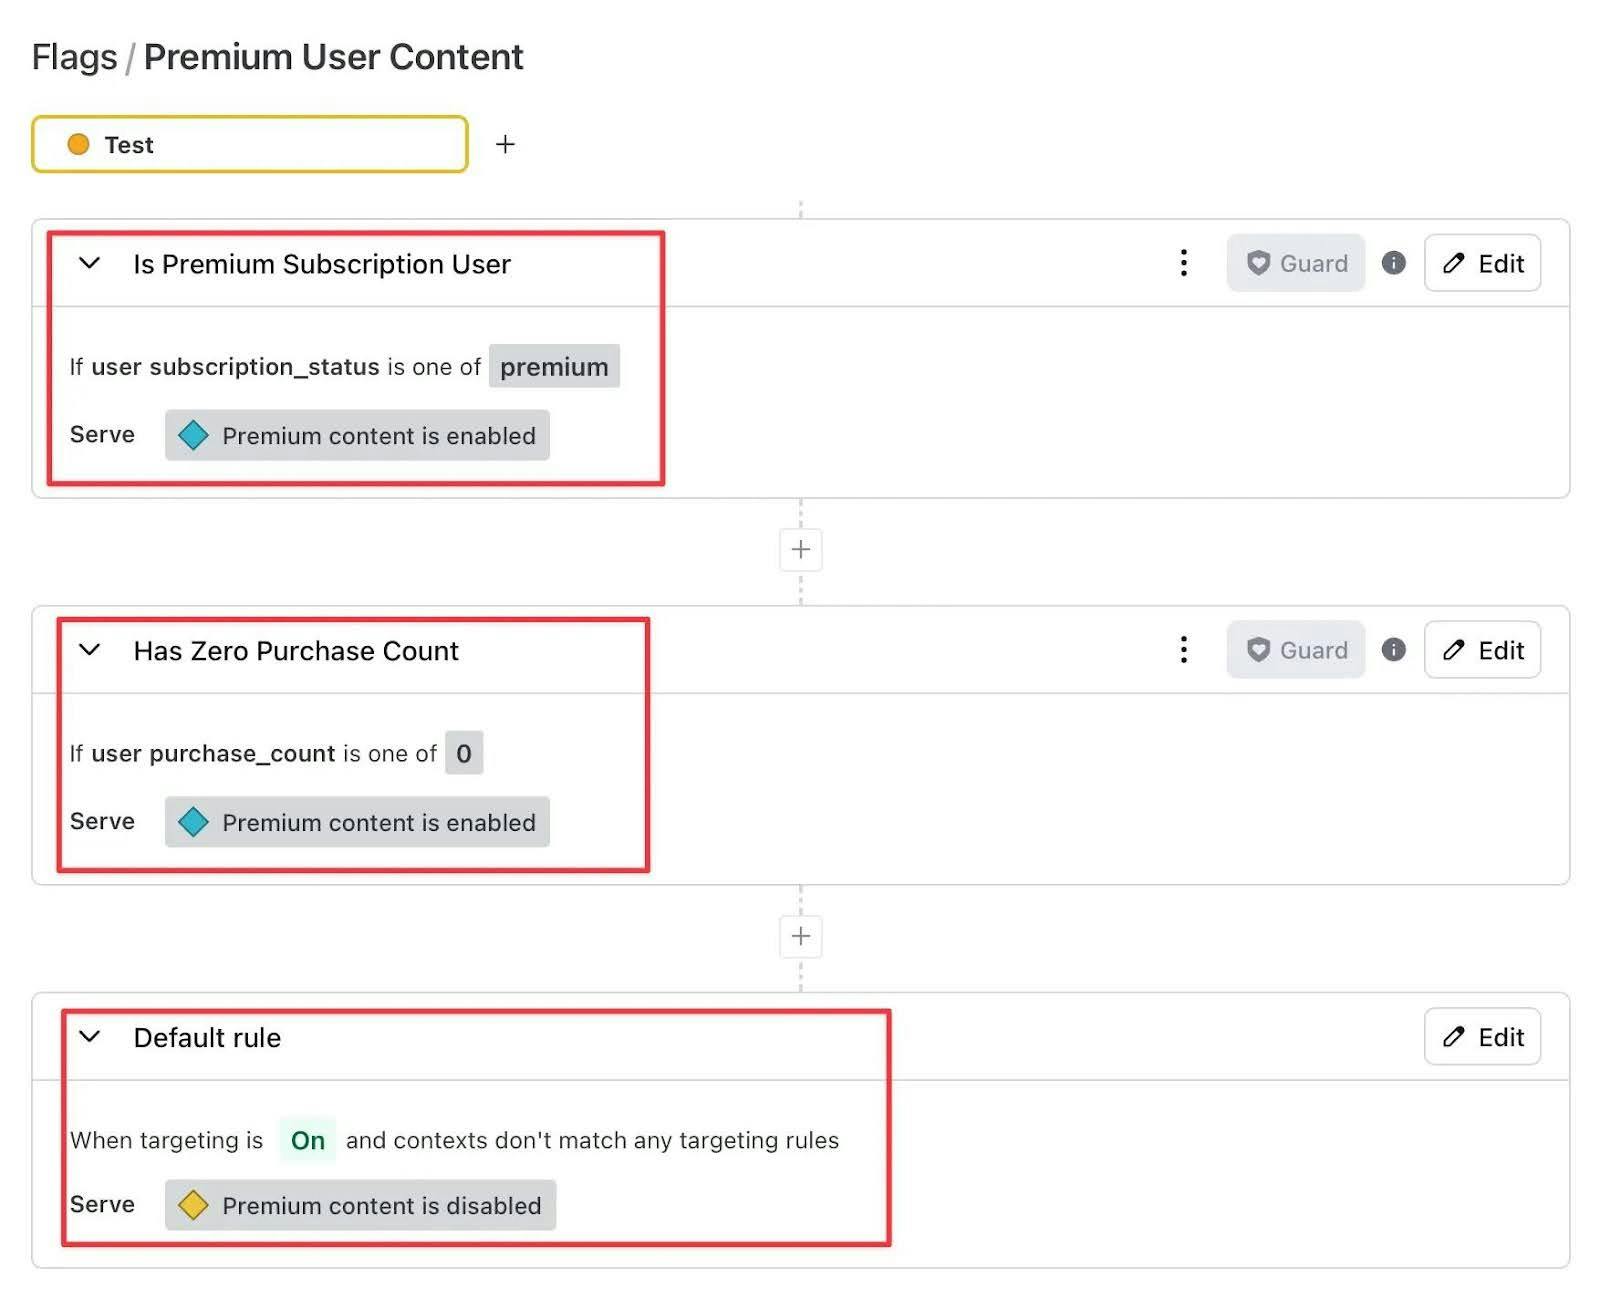
Finally, update the Default Rule to serve "Premium content is disabled." This ensures that regular content is shown to all users by default unless their subscription status is set to premium, or their purchase count is zero.
Click on "Review and save" to apply the changes.
The rules for the Premium User Content flag should now look like this:
3.5. Get Your LaunchDarkly SDK Key
To begin, you’ll need your SDK key from LaunchDarkly to authenticate your app:
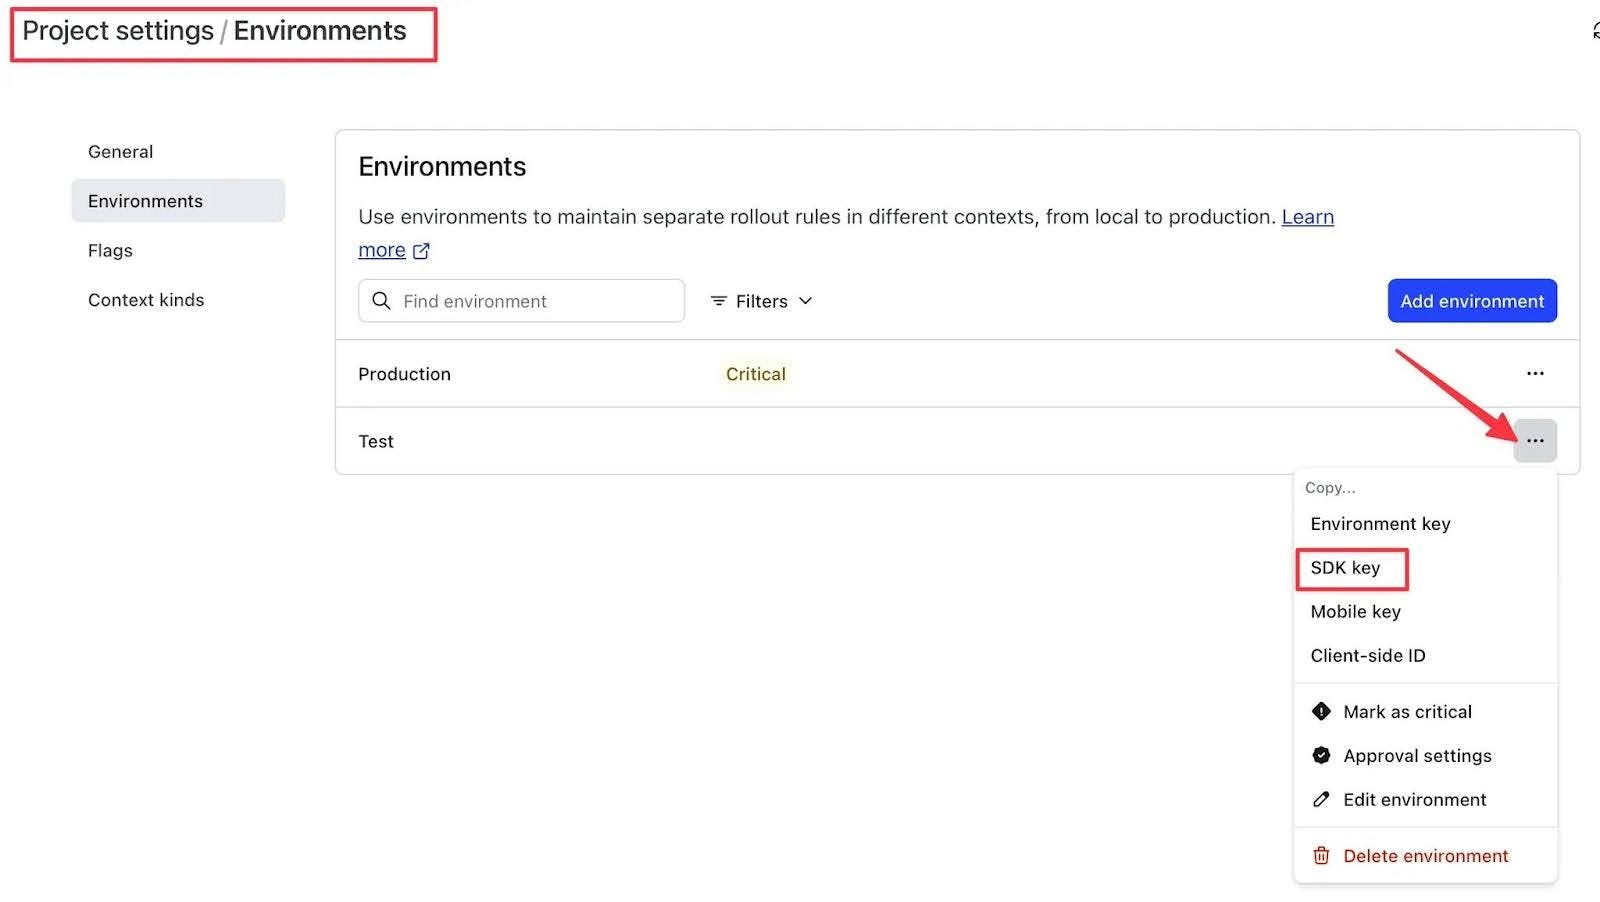
- In the LaunchDarkly app, navigate to your Projects.
- Click on the project you're working on.
- In the Environments tab, copy the SDK key.
For this guide, we’ll use the SDK key for the Test environment, but feel free to use any environment that matches your setup.
Step 4: Evaluate Feature Flags with LaunchDarkly
Next, we’ll use the LaunchDarkly Python SDK to evaluate feature flags dynamically.
4.1. Update Environment Variable
Now that you have your LaunchDarkly SDK Key, add it to your .env file:
4.2. Write a Function to Evaluate Flags
Here’s the code to evaluate the premium-content flag for each user:
This function uses LaunchDarkly to decide whether each user qualifies for premium content.
Step 5: Send Emails with SendGrid
Now that we’ve set up Supabase and LaunchDarkly, let’s integrate SendGrid to handle email delivery.
Get the API key
To use SendGrid, you’ll need an API key:
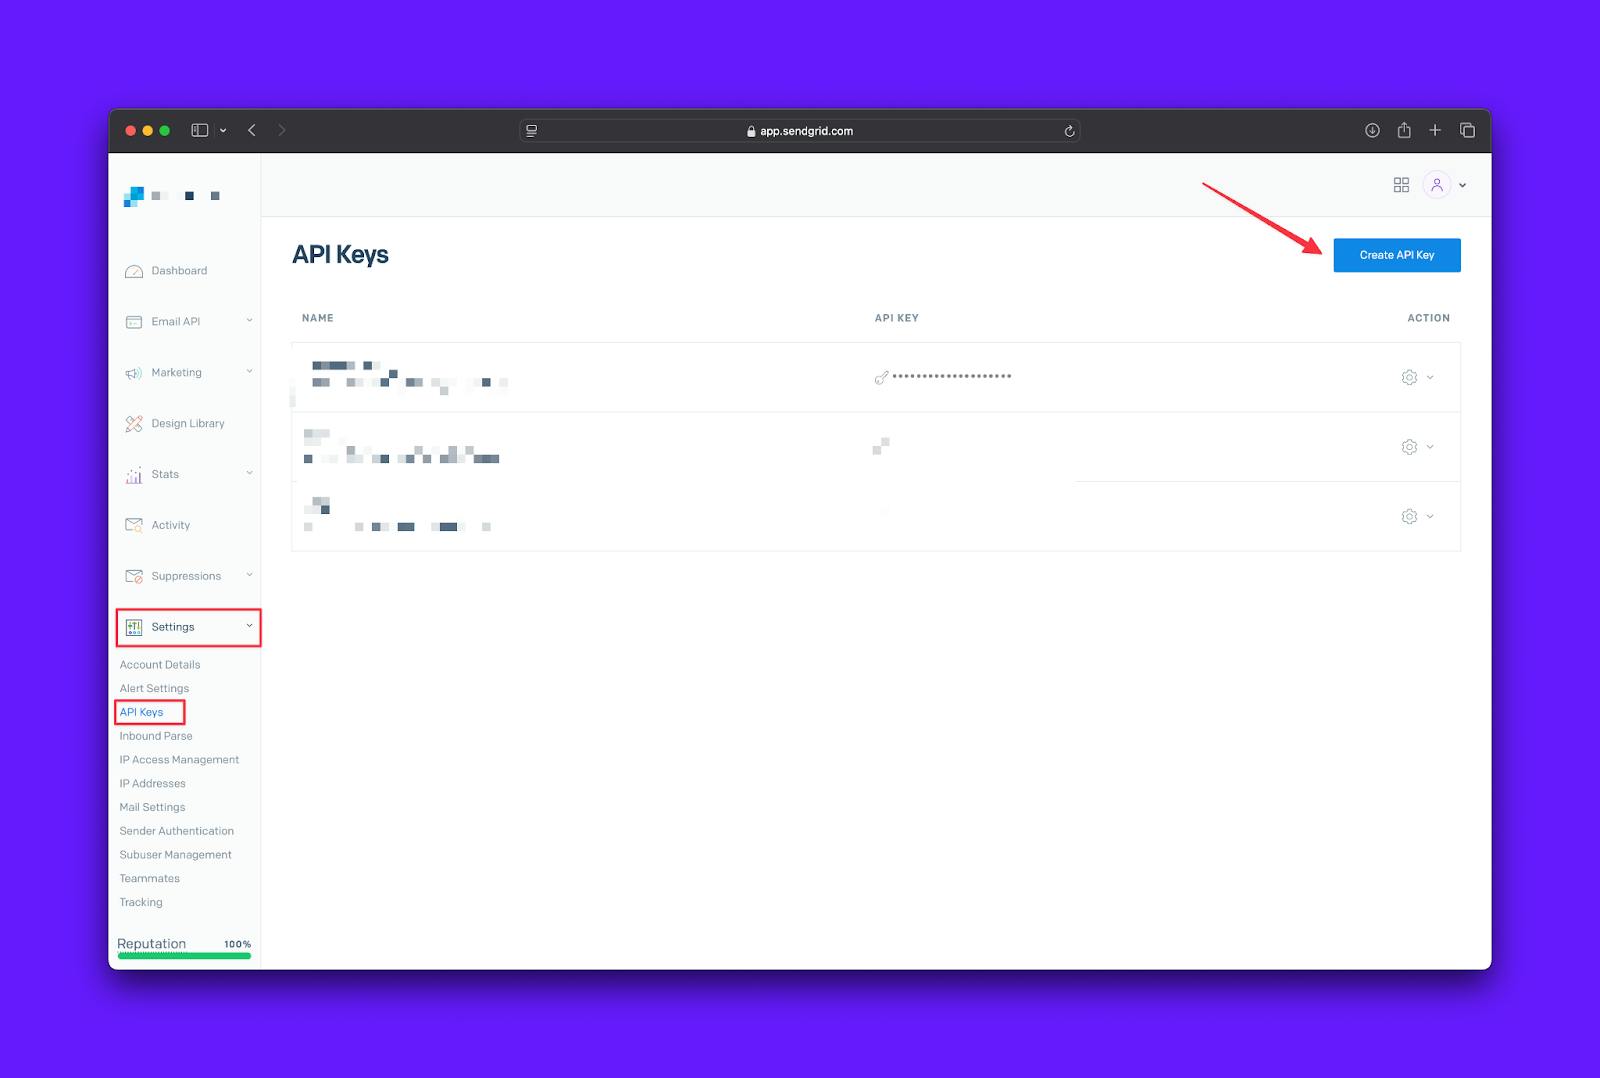
- Log in to your SendGrid account.
- Navigate to the Settings section in the left sidebar.
- Click on API Keys and select Create API Key.
- Provide a name for the key and set the permission level to Full Access.
Click Create Key and copy the generated API key into your .env file. (Make sure to store it securely—you won’t be able to view it again.)
Install the SendGrid SDK
If you haven't already, install the SendGrid SDK:
Update the Environment Variable
Add your SendGrid API Key to the .env file:
Write a Function to Send Emails
Here’s how to create a function that sends personalized emails based on user data:
Complete Code
Here’s the full script combining all the steps. You can copy-paste this into a single file and run it:
Expected Output
When the script (app.py) is run, it will evaluate the feature flag for a user based on their subscription_status and purchase_count. The script will output the feature flag's evaluation (True or False), as well as the reason for the evaluation (such as whether it matched a rule or was based on a default condition).
You can test with multiple email addresses by adding them to your database or edit user attributes such as subscription status or purchase count to simulate different scenarios. This way, you can test all possible cases without needing multiple email addresses.
Scenario 1: User with a Premium Subscription
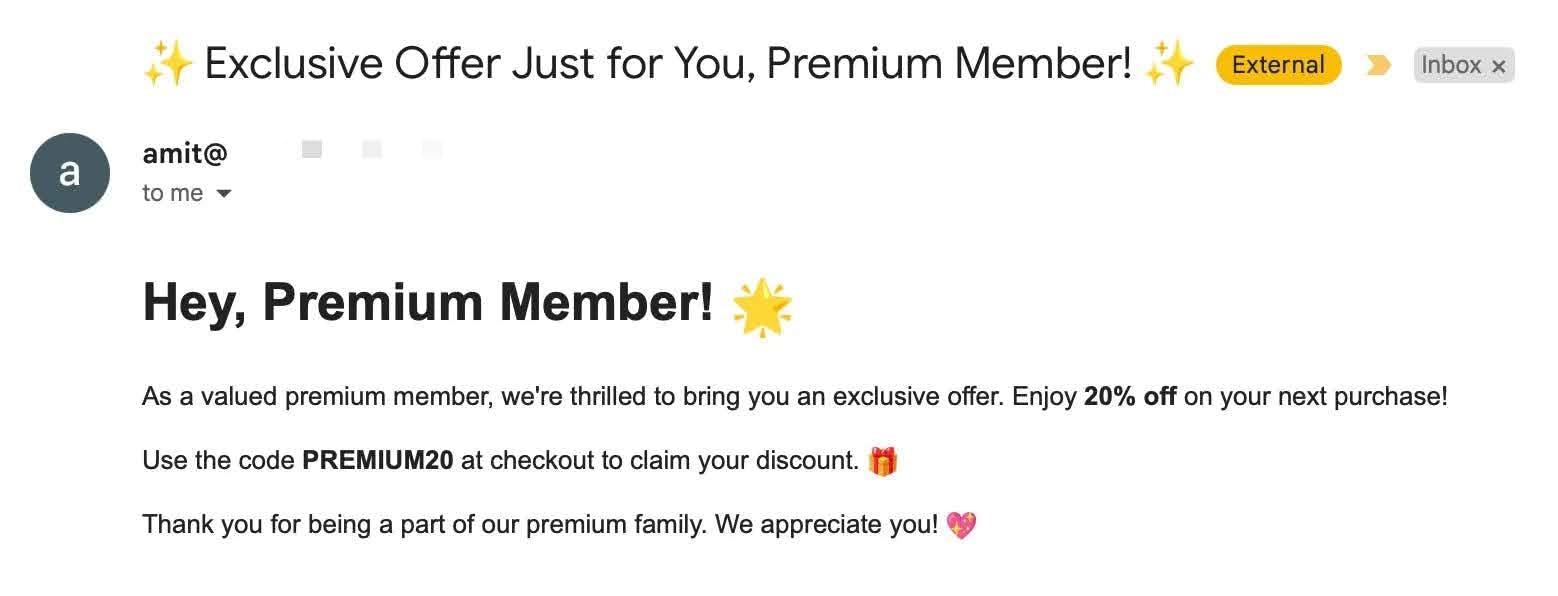
For a user with a premium subscription, LaunchDarkly would evaluate the flag premium-content to True because it will match our first rule (index 0) - Is Premium Subscription User.
Scenario 2: Regular User with Zero Purchase Count
For a user with a regular subscription and 0 purchases, LaunchDarkly will evaluate that they should receive premium content (based on the rule we created for users with zero purchase count - rule index 1 - Has Zero Purchase Count).
Both these users will receive an email with Premium Content similar to this:
Scenario 3: Regular User with More Than 0 Purchase Count
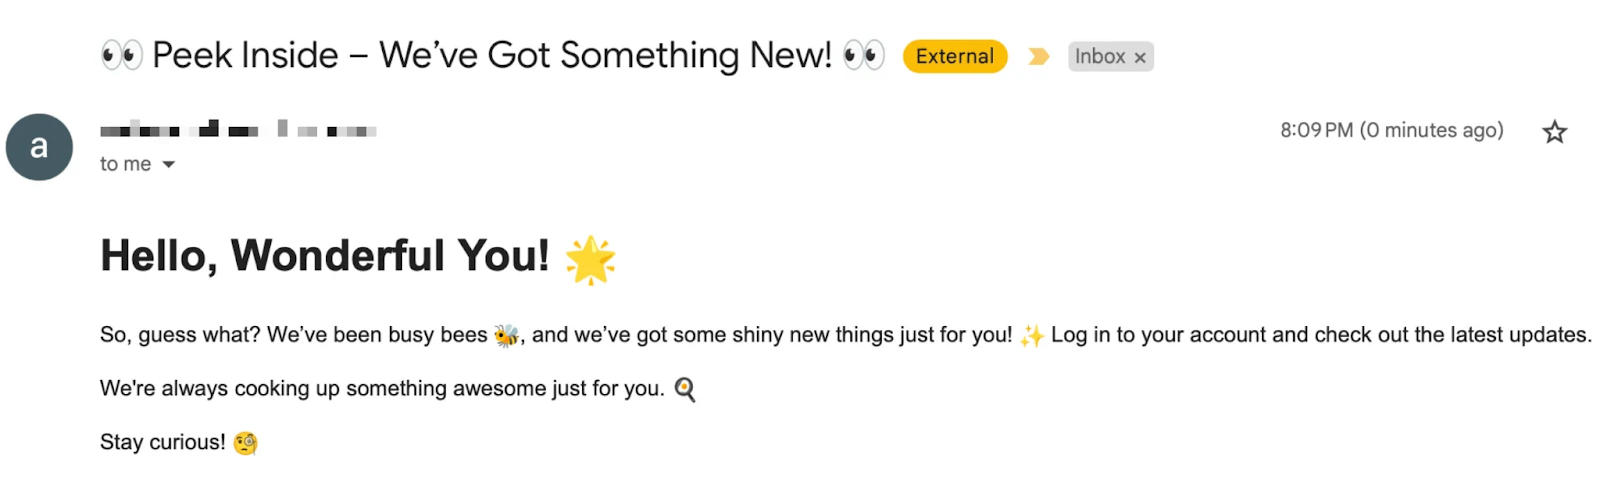
For a user with a regular subscription and more than 0 purchases, LaunchDarkly will evaluate the feature flag to False, meaning the user should receive regular content:
They will receive an email similar to this:
Conclusion
You’ve built a flexible email personalization system using Supabase, LaunchDarkly, and SendGrid. With feature flags controlling email content and a PostgreSQL backend managing user data, you can now target users dynamically without touching your code.
Recap
- Dynamic personalization: Tailored emails using LaunchDarkly feature flags.
- Efficient delivery: Sent personalized emails with SendGrid.
- Scalable data management: Stored and retrieved user data with Supabase.
What’s Next?
- Refine targeting: Experiment with more detailed feature flag rules—by region, engagement, or preferences.
Test smarter: experimentation and rollouts in LaunchDarkly to optimize engagement.