


Large Language Models (LLMs) power a wide range of AI applications today, including chatbots, enterprise automation systems, search assistants, and coding copilots. While LLMs have significantly improved the performance of AI applications across all major benchmarks, they come with a cost.
Monitoring LLM usage and pricing is critical to help ensure your product remains sustainable and profitable over time. By consistently tracking costs, you can avoid unexpected bills, make informed architectural decisions, and iterate on features with both performance and budget in mind.
Several lightweight tools, such as PricePerToken and llm-price, can give you a quick snapshot of current model prices. However, relying only on these tools isn’t enough for real-world cost planning. Truly minimizing LLM spend requires understanding usage patterns, tracking token consumption over time, comparing multiple providers, and evaluating deployment options in a structured way. This article focuses on the deeper planning and operational strategies teams need to help ensure sustainable, predictable LLM costs.
This article offers a comprehensive overview of LLM pricing comparisons and provides practical strategies for comparing and managing these costs.
Summary of key LLM pricing comparison best practices
The table below summarizes the eight LLM pricing comparison best practices teams can use to help ensure they make a smart financial decision when choosing an LLM.
Best Practice | Description |
|---|---|
Track token usage per request | Monitor both input and output tokens for every API call. Token counts can increase unexpectedly due to long prompts, large context windows, or verbose responses. Consistent monitoring helps identify high-cost features early and provides accurate data for billing or optimization |
Compare multiple LLM providers | Regularly test LLMs from various providers, such as OpenAI, Anthropic, Cohere, and Mistral. Each model varies in price, latency, and accuracy. Comparing real-world results helps you strike a balance between cost and quality. |
Optimize prompts and context | Remove unnecessary instructions and avoid feeding excessive context. Concise prompts reduce input token costs, and tighter context windows minimize retrieval overhead. |
Choose the right deployment model | Select between API-based access, cloud-hosted open-source models, or local deployments depending on your workload. APIs are flexible and pay-as-you-go; cloud hosting provides customization and control, while local setups are best suited for privacy-sensitive or research workloads. |
Automate cost tracking | Utilize internal logging systems or third-party dashboards to track LLM costs in real-time. Automation enables early alerts on budget overruns, provides visibility into costs per feature, and supports data-driven optimization decisions. |
Align pricing with customer billing | Connect your internal LLM costs to customer pricing tiers. By monitoring which users or plans generate higher token usage, you can adjust pricing or usage limits to maintain healthy margins and to help ensure predictable profitability. |
Use feature flags for A/B testing | Use LaunchDarkly AI Configs to swap models, prompts, and parameters instantly without redeployment. Controlled rollouts help measure performance and cost impact safely before applying changes across your entire user base. |
Revisit provider pricing regularly | LLM providers frequently adjust rates or release new models. Periodically review your pricing assumptions, rerun comparisons, and update your configurations to stay competitive and to help ensure ongoing cost efficiency. |
Why tracking LLM pricing is important
Let’s delve deeper into why tracking LLM pricing is so important, focusing on three reasons: unpredictable usage patterns, maintaining healthy business margins, and choosing the right model for the job
Unpredictable usage patterns
Unlike traditional APIs, where you can roughly estimate the cost per call, LLM costs can fluctuate based on input size, output length, and system settings such as temperature or context window size. One user might ask a simple question that consumes 20 tokens, while another might ask for a detailed report with a long context, which could consume 2,000 tokens. Multiply these differences by thousands of users, and it will become almost impossible to forecast your monthly usage.
Monitoring this cost is crucial, as users might overuse tokens, for example, by pasting large amounts of text, which can lead to unintended costs. Additionally, model behavior can change. For example, if an update to GPT-4 suddenly results in 20% longer answers, your costs will also increase by 20%. Only by monitoring token usage can you catch such shifts early.
This effect is magnified in AI solutions such as chatbots, agents, and conversational assistants, where you cannot reliably predict the length of responses. Even if you constrain system prompts, models may generate variable-length outputs depending on user queries, dialog depth, or contextual ambiguity.
Client billing & profit margins
If you are developing an application that uses LLMs under the hood, you likely have your own pricing model for customers. You may charge a subscription fee or charge per use case, such as per document generation. In any case, you need to ensure that what you charge covers the costs of calling an LLM, with a healthy margin left over (unless you are running a non-profit organization).
Additionally, cost tracking can reveal new revenue streams or identify cost-saving strategies. For example, if you discover that a particular user has a very high consumption, you can up-sell them to a higher plan or adjust their pricing accordingly. Alternatively, you might introduce tiered model options, e.g., offering a premium LLM at a higher fee and a basic one at a lower fee.
Picking the right LLM at the right price
The number of LLMs available is growing, and their capabilities and costs vary widely. Suppose you are not paying attention to prices. In that case, you might be overpaying for a top-tier model when a cheaper one would suffice, or conversely, you might stick with a cheaper model without realizing that a slightly pricier one could drastically improve your product.
A commonly cited example comparison of Llama-2 70B vs GPT-4 compares open-source and proprietary models for summarization tasks. In one published evaluation, a large open-source model achieved similar factual accuracy to a proprietary model while showing significantly lower estimated cost under the experiment’s assumptions. However, these results depend heavily on pricing, tokenization, and workload characteristics, and should be interpreted as directional rather than absolute.
Costs associated with different LLM deployment models
AI and LLM deployments come in several flavors, each with its own cost structure. Broadly, you might consume LLMs via hosted APIs (from providers like OpenAI or Anthropic), deploy open-source models on cloud infrastructure, or run models locally on your own hardware. Each deployment model has its own associated cost.
API-based LLM services
Using a hosted LLM service via API is often the fastest way to get started. The main cost here is the per-token processing fee. Providers typically charge different rates for tokens passed as inputs to an LLM and for those generated as outputs. This means that every prompt you pass to your LLM, and every word that a mode generates directly incurs a fee.
The approach has several advantages. There are no upfront hardware investments and corresponding maintenance costs, and you only pay for what you actually use. Many providers also offer volume discounts or tiered pricing at higher usage levels, which can improve the unit economics for large-scale applications.
API-based LLM pricing is straightforward as it shifts the infrastructure costs to the provider, making it ideal for teams that want rapid deployment and production cycles.
Open-source LLMs hosted on cloud platforms
The significant costs associated with LLM deployment on cloud platforms, such as GCP, AWS, and Azure, come from computing resources. You will need to provision powerful GPU instances (e.g., NVIDIA A100 or H100) to serve the model. Cloud providers charge for these instances on an hourly (or per-second) basis, which means you incur costs as long as the servers are running, even if they’re underutilized at times. Unlike API based providers, there’s no per-token fee; instead, you pay for the raw compute time, storage, and bandwidth your model consumes.
Beyond cloud infrastructure costs, the engineering hours required to deploy, monitor, and maintain the system add to the total cost. Finally, you should also consider the potential costs of switching cloud providers in the future, such as migration or reintegration efforts.
Running LLMs locally
Some organizations choose to run LLMs on on-premises hardware or local machines. In this scenario, you take on full ownership of the infrastructure. The cost structure shifts heavily toward capital expenditures, including the purchase of high-end GPUs or servers, as well as operational costs such as power and cooling.
This upfront hardware investment is a significant consideration: it pays off once you have sustained, long-term workloads for the model. Otherwise, the effective cost per inference is typically higher than using a cloud or API service alone.
A major benefit of this approach is that the data never “leaves” the organization, which is often crucial when data security and privacy are paramount.
However, only organizations with very high, stable usage or special data requirements can justify on-prem LLM deployments purely on cost grounds.
Hybrid and federated LLM deployments
Some teams now use hybrid or federated setups to balance cost, speed, and privacy. In a hybrid model, smaller or task-specific LLMs run on local servers or edge devices, while complex queries are sent to larger cloud models. This approach lowers cloud usage costs, improves response times, and helps keep sensitive data within the organization.
Federated learning takes this idea further by training or fine-tuning models across multiple devices or sites without moving the data. Only model updates are shared, helping to protect privacy and reducing data transfer costs. These methods can reduce overall expenses, but they also add challenges in coordination, monitoring, and maintenance.
Which option to choose?
The decision regarding which deployment model to choose depends on the specific needs and constraints of your project. The following compares these approaches side by side.
Deployment | Pros | Cons | Best for |
|---|---|---|---|
Third-Party API | Zero infrastructure to manage Instant access to state-of-the-art models Scales automatically with demand Pay-as-you-go | Can become expensive at very high volume Dependent on an external provider Data leaves your environment (potential compliance concerns) | Startups and fast prototyping Low-to-medium usage apps Teams without ML ops expertise |
Self-Hosted on Cloud | Complete control over models and environment Can choose open-source or custom models Potential cost savings at a massive scale Data can be kept in your cloud/VPC | Requires DevOps/MLOps work Fixed costs (instances run whether used or not) Hard to beat API efficiency at small scales Need expertise to optimize throughput | High, steady workloads Cases needing specific model not offered via API Organizations with cloud credits or infra expertise |
Local / On-Premise | Maximum data privacy and control One-time hardware investment (no ongoing API fees) Can operate offline, no external dependency | Very high upfront hardware cost Must handle all maintenance, updates, and security Generally not cost-effective unless hardware is fully utilized | Strict data governance environments Small-scale or individual use (with small models) Situations with existing spare GPU capacity |
Hybrid/federated | Balances cost, speed, and privacy Reduces cloud usage by processing simpler tasks locally Keeps sensitive data within the organization | Adds complexity in routing and synchronization Harder to monitor and maintain Requires careful coordination between local and cloud environments | Enterprises combining local and cloud models Teams that need strict privacy, faster responses, or lower long-term costs |
How to perform LLM pricing comparisons
Of all the costs associated with the previous section, the cost for token usage via third-party API remains constant and can be monitored. The remaining costs depend on your individual use case and infrastructure requirements. In this section, we will cover approaches to comparing costs incurred while calling an LLM via API providers.
Manual LLM pricing comparison
The simplest approach is to compare LLM pricing through manual search. This involves visiting the pricing pages or documentation of various LLM providers, such as OpenAI, Anthropic, and Google Cloud, and gathering their pricing details. You will typically note things like the cost per token (or per million tokens) for each model, any distinctions between prompt input and model output token pricing, and any other fees. With that data, you can set up a basic spreadsheet to compare costs for a hypothetical usage scenario.
However, this approach is slow and prone to error. There can be multiple API providers with tens of models. Keeping track of all these prices and updating them in your system can be cumbersome. Additionally, you will need to regularly review price updates for various LLMs.
Using custom code for LLM pricing comparison
To get a more precise estimation of what each call to an LLM costs, you can write custom code. This approach involves scraping LLM pricing for different models from provider websites and multiplying them by the number of tokens consumed per call.
Many providers return token usage information along with the LLM response. For example, OpenAI returns input, output, and total tokens consumed in each request as shown in the script below.
Note: You can get working codes for this article in this Google Colab notebook.
from openai import OpenAI
from google.colab import userdata
OPENAI_API_KEY = userdata.get('OPENAI_API_KEY')
client = OpenAI(api_key = OPENAI_API_KEY)
response = client.responses.create(
model="gpt-4",
input="Write a four line poem on kite flying over the ocean."
)
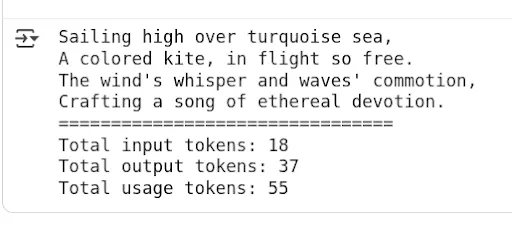
print(response.output[0].content[0].text)
print("================================")
print(f"Total input tokens: {response.usage.input_tokens}")
print(f"Total output tokens: {response.usage.output_tokens}")
print(f"Total usage tokens: {response.usage.total_tokens}")Output:
You can then multiply the price per input, output, and reasoning tokens (if any) by the corresponding token usage and calculate the price per API call.
The following script provides an example of calculating the price for making API calls to the GPT-4o and GPT-4o-mini models.
Note: LLM pricing and model behavior evolve frequently. The example below uses static pricing values for demonstration purposes only. In practice, pricing should be retrieved from the provider’s official documentation or API and treated as subject to change. The example below uses static pricing values for demonstration purposes only and may not reflect the latest provider rates. Validated as of April 2026.
The script below defines a function called' call_openai_and_calculate_cost() ' that accepts the input prompt and the model name, and returns the price per call.
MODEL_PRICING = {
    "gpt-4o": {"input": 2.50, "output": 10.00},
    "gpt-4o-mini": {"input": 0.15, "output": 0.60},
}

def call_openai_and_calculate_cost(prompt: str, model: str = "gpt-4o"):

    if model not in MODEL_PRICING:
        raise ValueError(f"No pricing defined for model '{model}'")

    response = client.responses.create(
        model=model,
        input=prompt
    )

    input_tokens = response.usage.input_tokens
    output_tokens = response.usage.output_tokens

    price_in = MODEL_PRICING[model]["input"]
    price_out = MODEL_PRICING[model]["output"]

    # Divide by 1_000_000 for per-million-token pricing
    total_cost = (input_tokens / 1_000_000) * price_in + (output_tokens / 1_000_000) * price_out

    return {
        "response_text": response.output[0].content[0].text,
        "input_tokens": input_tokens,
        "output_tokens": output_tokens,
        "total_cost_usd": round(total_cost, 8),
Let’s test the above function using the gpt-4o model.
result = call_openai_and_calculate_cost("Write a four line poem on kite flying over the ocean.",
                                       "gpt-4o")
print(f"Response: {result['response_text']}")
print("====================")
print(f"Input tokens: {result['input_tokens']}")
print(f"Output tokens: {result['output_tokens']}")
print(f"Total cost in USD: {result['total_cost_usd']:.8f}")
For comparison, let’s calculate the price of gpt-4o-mini model.
result = call_openai_and_calculate_cost("Write a four line poem on kite flying over the ocean.",
                                        "gpt-4o-mini")
print(f"Response: {result['response_text']}")
print("====================")
print(f"Input tokens: {result['input_tokens']}")
print(f"Output tokens: {result['output_tokens']}")
print(f"Total cost in USD: {result['total_cost_usd']:.8f}")
In this example, the smaller model produces a lower total cost due to reduced per-token pricing. Actual costs will vary depending on token usage, prompt length, and response size, so these results should be treated as illustrative rather than exact benchmarks.
The main benefit of custom code is automation and accuracy. The downsides are the effort required and needing to maintain the pricing data (which might change). However, once set up, a script can be easily rerun whenever you want to reevaluate or when a new model is released.
Third-party tools for conducting LLM pricing comparison
Given the complexity of manual tracking, it’s no surprise that several third-party tools have emerged to help compare LLM pricing. These range from simple web calculators to more integrated platforms.
For example, Web-based calculators like PricePerToken.com let you enter token usage and make quick comparisons by displaying costs for models such as GPT-4, Claude, and Cohere. Developers can also use tools like OpenRouter that consistently compile and update model pricing data. Finally, LaunchDarkly AI Configs enables teams to test and switch between models, prompts, and parameters live, with built-in dashboards for comparing costs, token usage, and quality metrics across variations live, observing cost and performance side by side.
The main advantage of using these tools is that they save time, reduce human error, and provide instant visibility into how different models compare in real-world scenarios. For example, LaunchDarkly provides a monitoring dashboard that lets you compare prices, token usage, time per request, and satisfaction rates across different models for your use case in real time. AI Configs also includes automatic metrics tracking via the SDK - token counts, latency, and success/error rates flow to the dashboard without custom instrumentation.
However, third-party monitoring tools come with trade-offs. Many rely on aggregated public data, which may lag behind official updates. Some platforms integrate deeply into your workflow, which can make later migration difficult or create vendor lock-in if pricing or policies change.
How to use LaunchDarkly AI configs for LLM pricing comparison
Using automated price-tracking tools can make a big difference in tracking and optimizing LLM costs. LaunchDarkly AI Configs are purpose-built for AI applications, providing runtime control over models, prompts, and parameters with built-in metrics tracking and experimentation capabilities. For AI implementation engineers, this means you have runtime control over your model, enabling cost tracking, rapid switching between providers, and A/B testing, all without redeploying code.
AI Configs help you with the following tasks:
Dynamically route traffic between models
Suppose you want to compare OpenAI’s GPT-4 with Anthropic’s Claude on a portion of real user queries. Instead of writing custom logic and redeploying, you can set up two variations in LaunchDarkly, e.g., Variation A, which uses GPT-4 and Variation B, which uses Claude, and toggle the rollout percentage. This can be done live in production, allowing you to increase or decrease traffic for each variation using a slider without redeploying or restarting the application. You can also target specific user segments - for example, route enterprise customers to GPT-4 while testing Claude with internal users, or use geographic targeting to comply with data residency requirements.
A/B experiments on models and prompts
The platform integrates with the LaunchDarkly experimentation engine, allowing you to statistically measure differences in outcomes between model variations. You can test whether a new prompt or a fine-tuned model actually reduces user follow-up questions (indicating better answers) and how it impacts the cost per request.
LaunchDarkly even lets you do these experiments across cohorts or regions with guardrails to stop if one variant underperforms badly.
Track key metrics cost in real-time
AI Configs includes built-in monitoring for each model variation. The SDK's track_openai_metrics() method automatically captures tokens, duration, and cost - no manual instrumentation required. It can display, for example, the average tokens consumed per request and even the cost-per-call for each model variation over time. If one model suddenly starts using more tokens (and thus more cost) per query than expected, you will see that spike in the dashboard. This real-time visibility into LLM usage and costs is highly valuable for detecting regressions.
No redeployment rollbacks and fine-grained control
Suppose a model update or prompt tweak increases latency or cost. In that case, AI Configs lets you revert to the previous version instantly, reducing the risk of experimenting with new models in production. This mechanism helps ensure you don’t accidentally enable an expensive model for everyone without approval.
In the next section, you will see LaunchDarkly AI Configs in action for tracking and comparing LLM prices for the customer sentiment classification use case.
It is important to note that, unlike sentiment classification, where the output is typically a single token, chatbots and conversational agents often produce variable-length responses. However, the core concepts and workflows explained in the following section also apply directly to those systems.
End-to-end LLM Pricing comparison example with LaunchDarkly
LaunchDarkly currently provides AI configs SDKs for .NET, Go, Python, Node.js, and Ruby. For the examples in this section, we will use the Python SDK.
Run the following script to install the SDK.
!pip install launchdarkly-server-sdk
!pip install launchdarkly-server-sdk-ai
The working code for this article can be found in this Google Colab Notebook.
The following script imports the libraries and LaunchDarkly’s SDK Key into your Python application.
import ldclient
from ldclient import Context
from ldclient.config import Config
from ldai.client import LDAIClient, AIConfig, ModelConfig, LDMessage, ProviderConfig
from ldai.tracker import FeedbackKind

LD_SDK_KEY  = userdata.get('LD_SDK_KEY')
Run the script below to see if your LaunchDarkly SDK is successfully initialized.
ldclient.set_config(Config(LD_SDK_KEY))
aiclient = LDAIClient(ldclient.get())

if not ldclient.get().is_initialized():
    print('SDK failed to initialize')
    exit()
print('SDK successfully initialized')
aiclient = LDAIClient(ldclient.get())
Output:
SDK successfully initializedIf you see the above message, you are all set.
The next step is to define LaunchDarkly AI Configs that we will use in this example. To do so, go to the LaunchDarkly dashboard and click “AI Configs” from the left sidebar. You will see all of your existing AI configs.
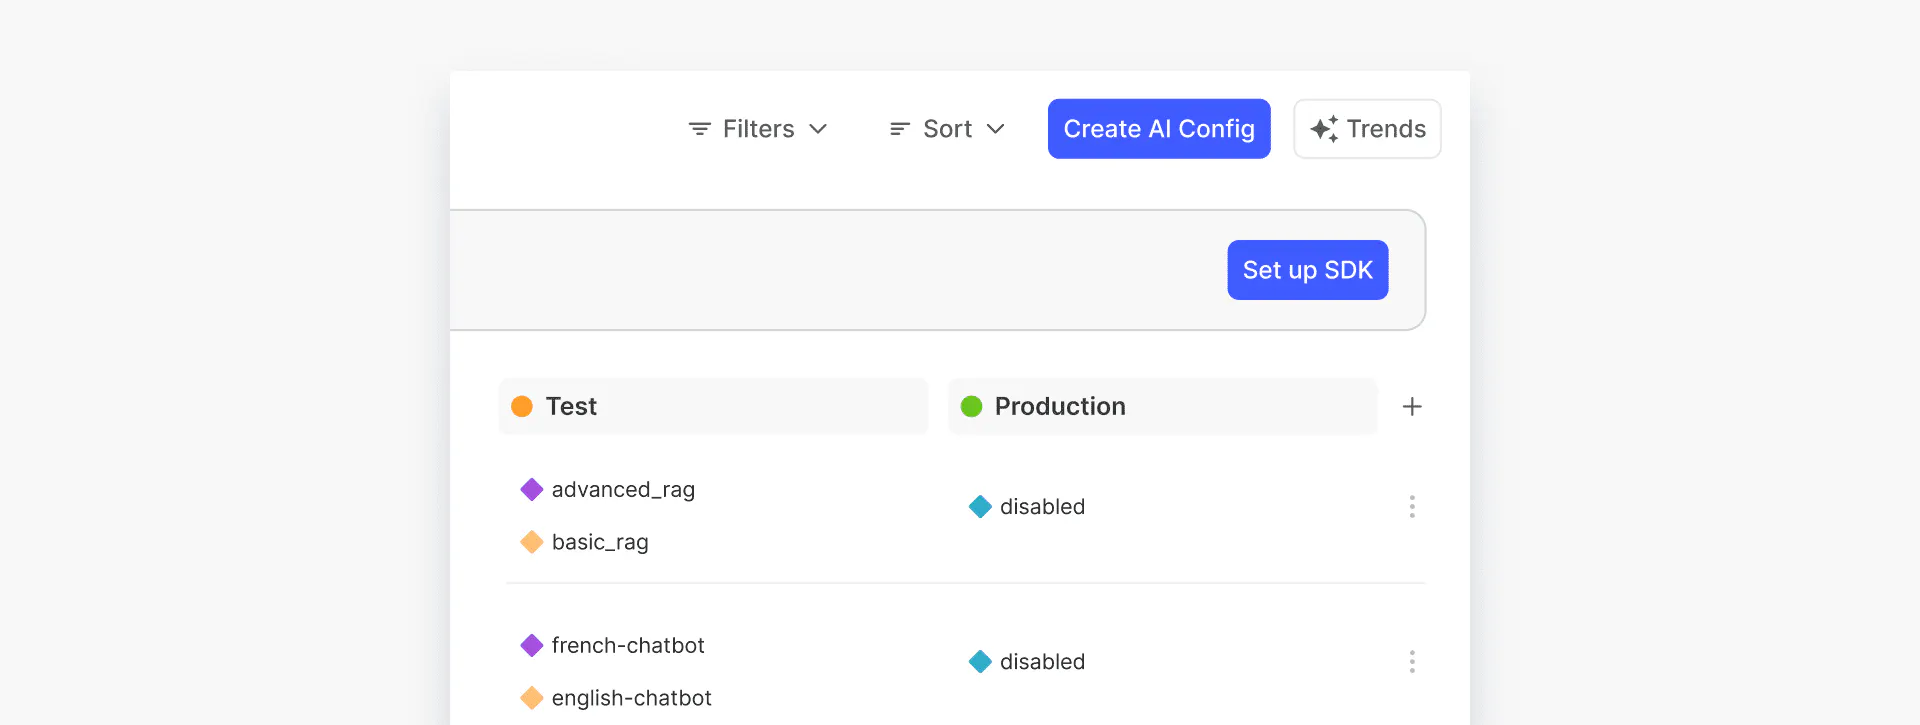
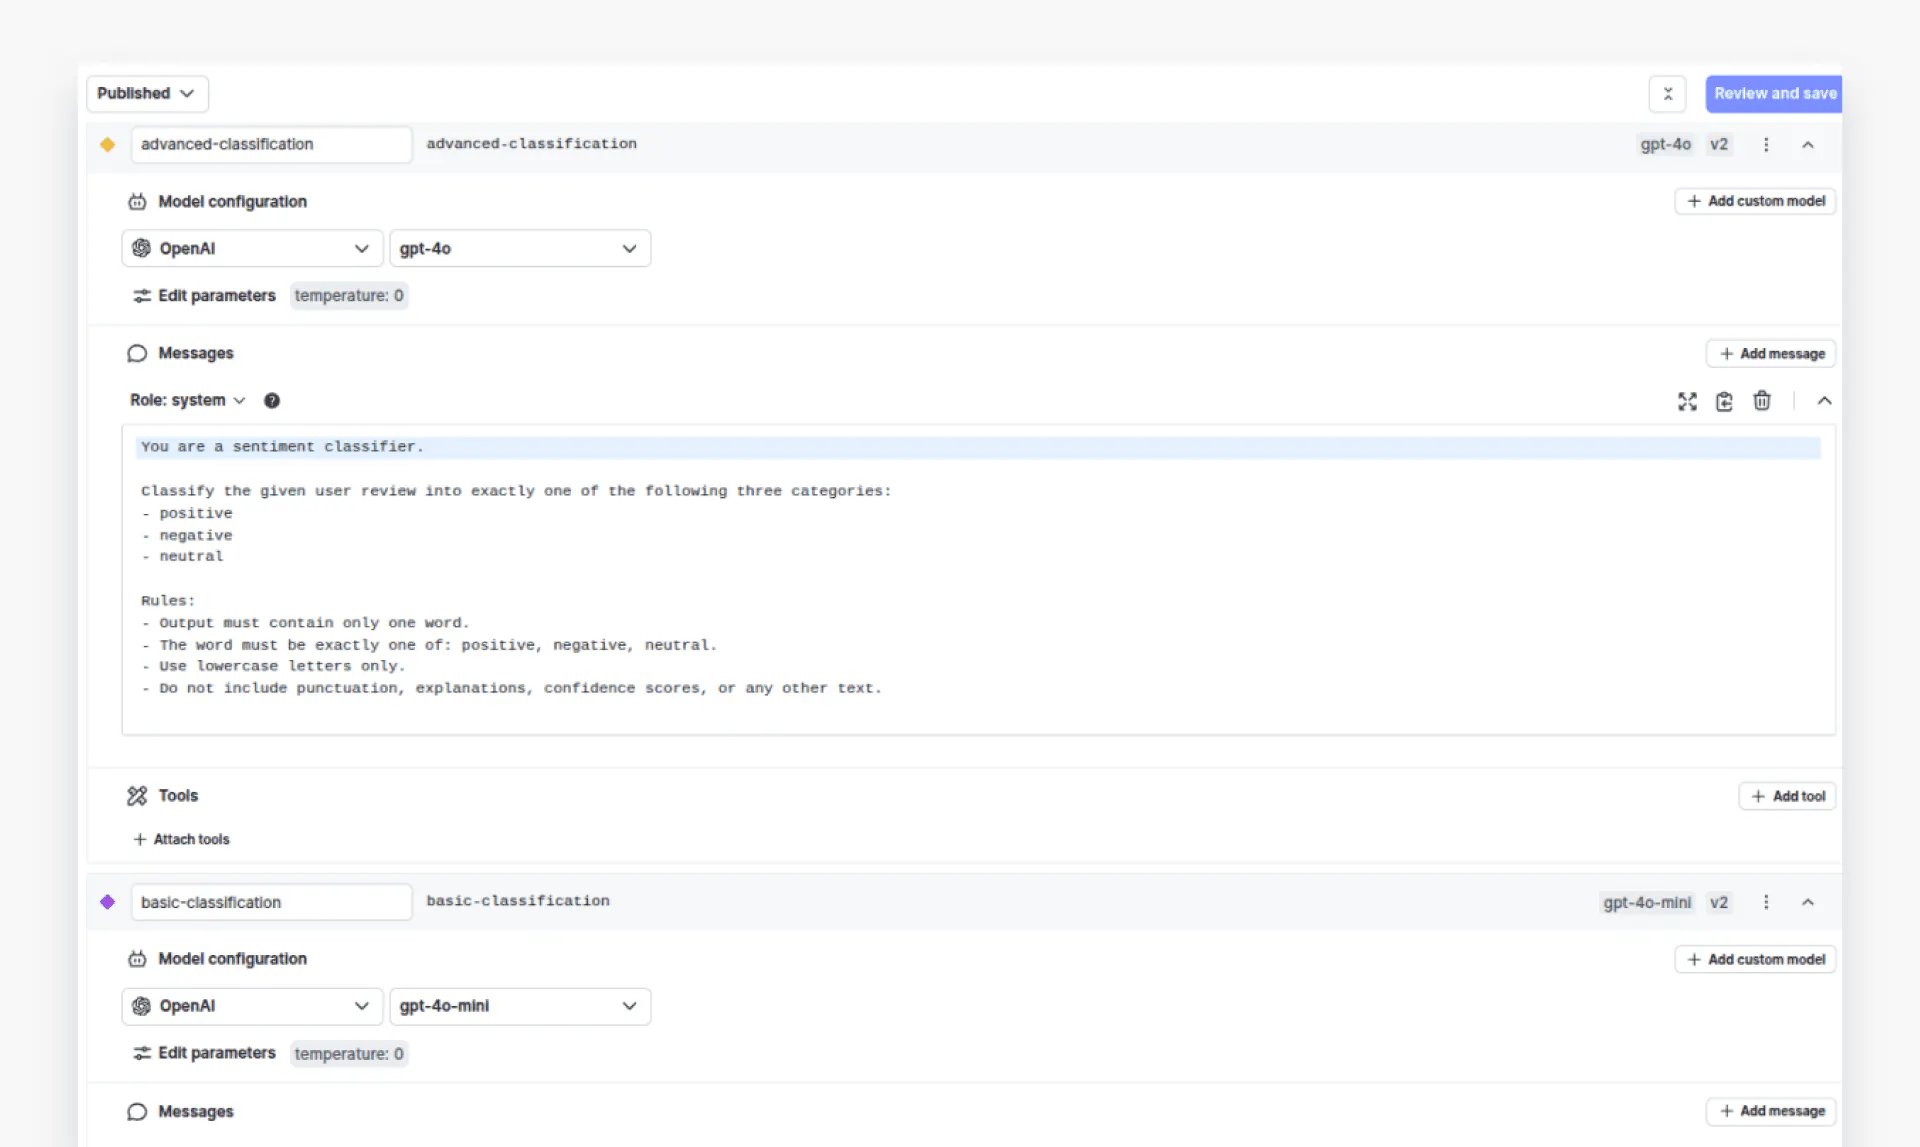
Click the “Create AI Config” button in the top-right corner to create a new configuration. In this example, we will create an AI configuration called “Customer Sentiment Classification” with two variations: “advanced-classification” and “basic-classification”. The `advanced-classification` variation will use the GPT-4o model, while the `basic-classification` will use the GPT-4o-mini model. The temperature for both variations is set to 0.
The system prompt for both variations will be the same:
Classify the given user review into exactly one of the following three categories:
- positive
- negative
- neutral

Rules:
- Output must contain only one word.
- The word must be exactly one of: positive, negative, neutral.
- Use lowercase letters only.
- Do not include punctuation, explanations, confidence scores, or any other text.
Here’s how the two variations look:
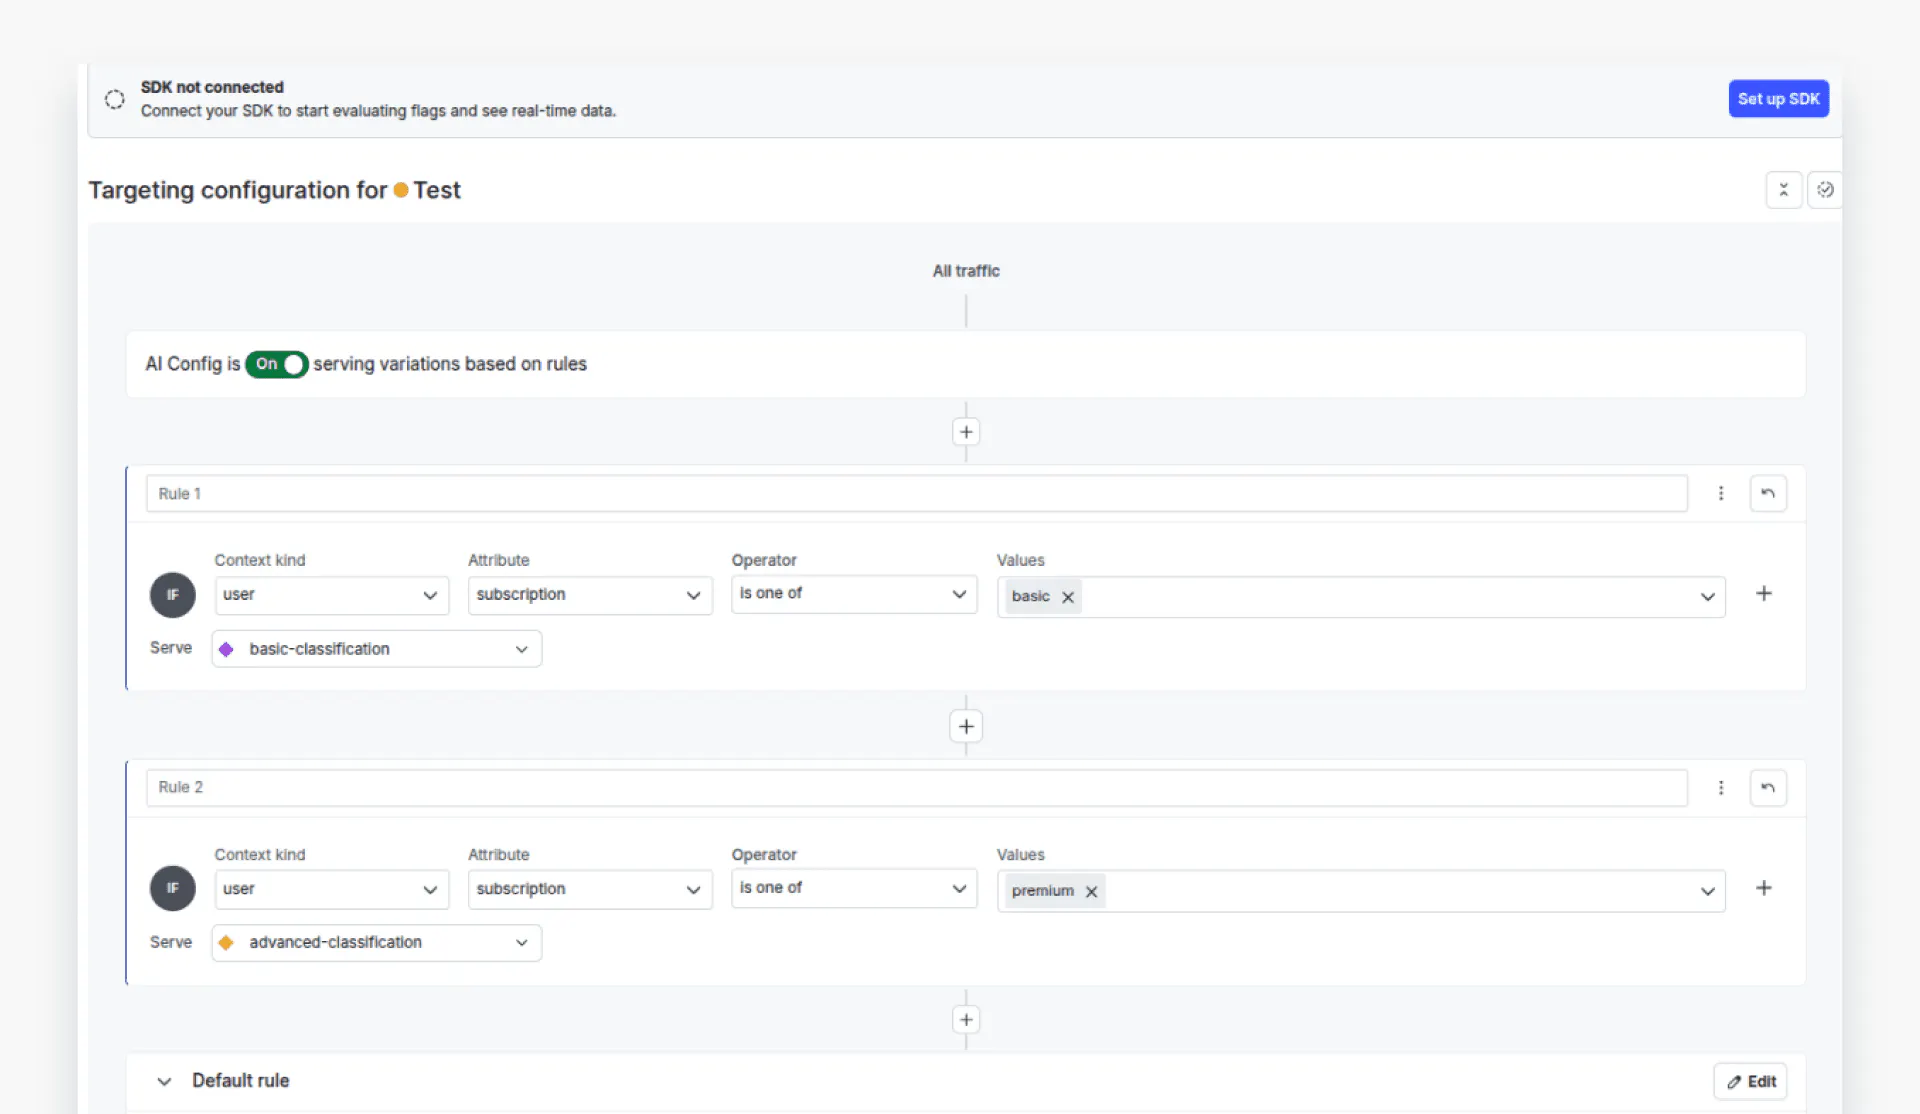
Next, we will define targeting rules for our variations. Click the “Targeting” tab from the top menu to see your targeting rules.
We will define two rules: users with a premium subscription will be served by the `advanced-classification` variation, i.e., GPT-4o. In contrast, those with a `basic` subscription will be served by the `basic-variation`, i.e., GPT-4o-mini.
Now that you have defined the configurations, return to the code and create contexts that will help LaunchDarkly identify which variation to call based on a user's request.
The following code defines contexts for premium and basic users. You can see that the `subscription` attribute for the premium context is set to `premium`, while for the basic context it is set as `basic`.
context_premium = Context.builder("context-premium") \
    .kind("user") \
    .set("name", "Premium Customer") \
    .set("subscription", "premium") \
    .build()

context_basic = Context.builder("context-basic") \
    .kind("user") \
    .set("name", "Basic Customer") \
    .set("subscription", "basic") \
    .build()
Next, we will define fallback values in case our application fails to retrieve values from the AI Config.
fallback_value = AIConfig(
    model=ModelConfig(name='gpt-4o', parameters={'temperature': 0.0}),
    messages=[LDMessage(role='system', content='Classify the user sentiment into positive, negative, or neutral sentiments.')],
    provider=ProviderConfig(name='openai'),
    enabled=True,
)
The next step is to fetch the variations from your AI Config based on the current context. You can do this using the “aiclient.config” class, which returns both the selected variation and the tracker classes. From the variation, you can access values such as the model and the messages list. The tracker, on the other hand, helps you monitor various metrics as you make model calls.
# -------- Fetch variation for Premium Context -------- #
config_prem, tracker_prem = aiclient.config(
    "customer-sentiment-classification",   # Replace with your actual AI Config key
    context_premium,
    fallback_value
)
print("Premium variation selected →", config_prem.model.name)
print("Messages:", [msg.content for msg in config_prem.messages])

# -------- Fetch variation for Basic Context -------- #
config_basic, tracker_basic = aiclient.config(
    "customer-sentiment-classification",   # Replace with your actual AI Config key
    context_basic,
    fallback_value
)
print("Basic variation selected →", config_basic.model.name)
print("Messages:", [msg.content for msg in config_basic.messages])
Output:

Finally, we will define a function named `get_sentiment()` that accepts a variation and tracker, the user query, and calls the OpenAI model. The function uses AI Config to call the corresponding variation and generate a response.
def get_sentiment(ai_config, tracker, query):

    messages = [{"role": msg.role, "content": msg.content} for msg in ai_config.messages]
    messages.append({"role": "user", "content": query})
    try:
        # Track metrics using the AI Client tracker
        completion = tracker.track_openai_metrics(
            lambda: client.chat.completions.create(
                model=ai_config.model.name,
                messages=messages
            )
        )

        return completion
    except Exception as e:
        print(f"Error during chat completion: {e}")
Note: The track_openai_metrics() method automatically records token usage, duration, and marks the request as successful. For error cases, use tracker.track_error() to capture failures.
Let’s test both configurations. We will try to predict the sentiment of a customer’s review using both basic and premium configurations.
query = "The movie was a complete snoozefest.  I regretted every second.  Total waste of money."
response = get_sentiment(config_prem, tracker_prem, query).choices[0].message.content
print(response)
Output:
negative query = "The movie was a complete snoozefest. I regretted every second. Total waste of money."
response = get_sentiment(config_basic, tracker_basic, query).choices[0].message.content
print(response)Output:
negativeNow, if you go to the “Monitoring” tab in your AI Configs dashboard, you should see the data associated with two variations. Click “Costs” from the dropdown list to view the costs for both variations.
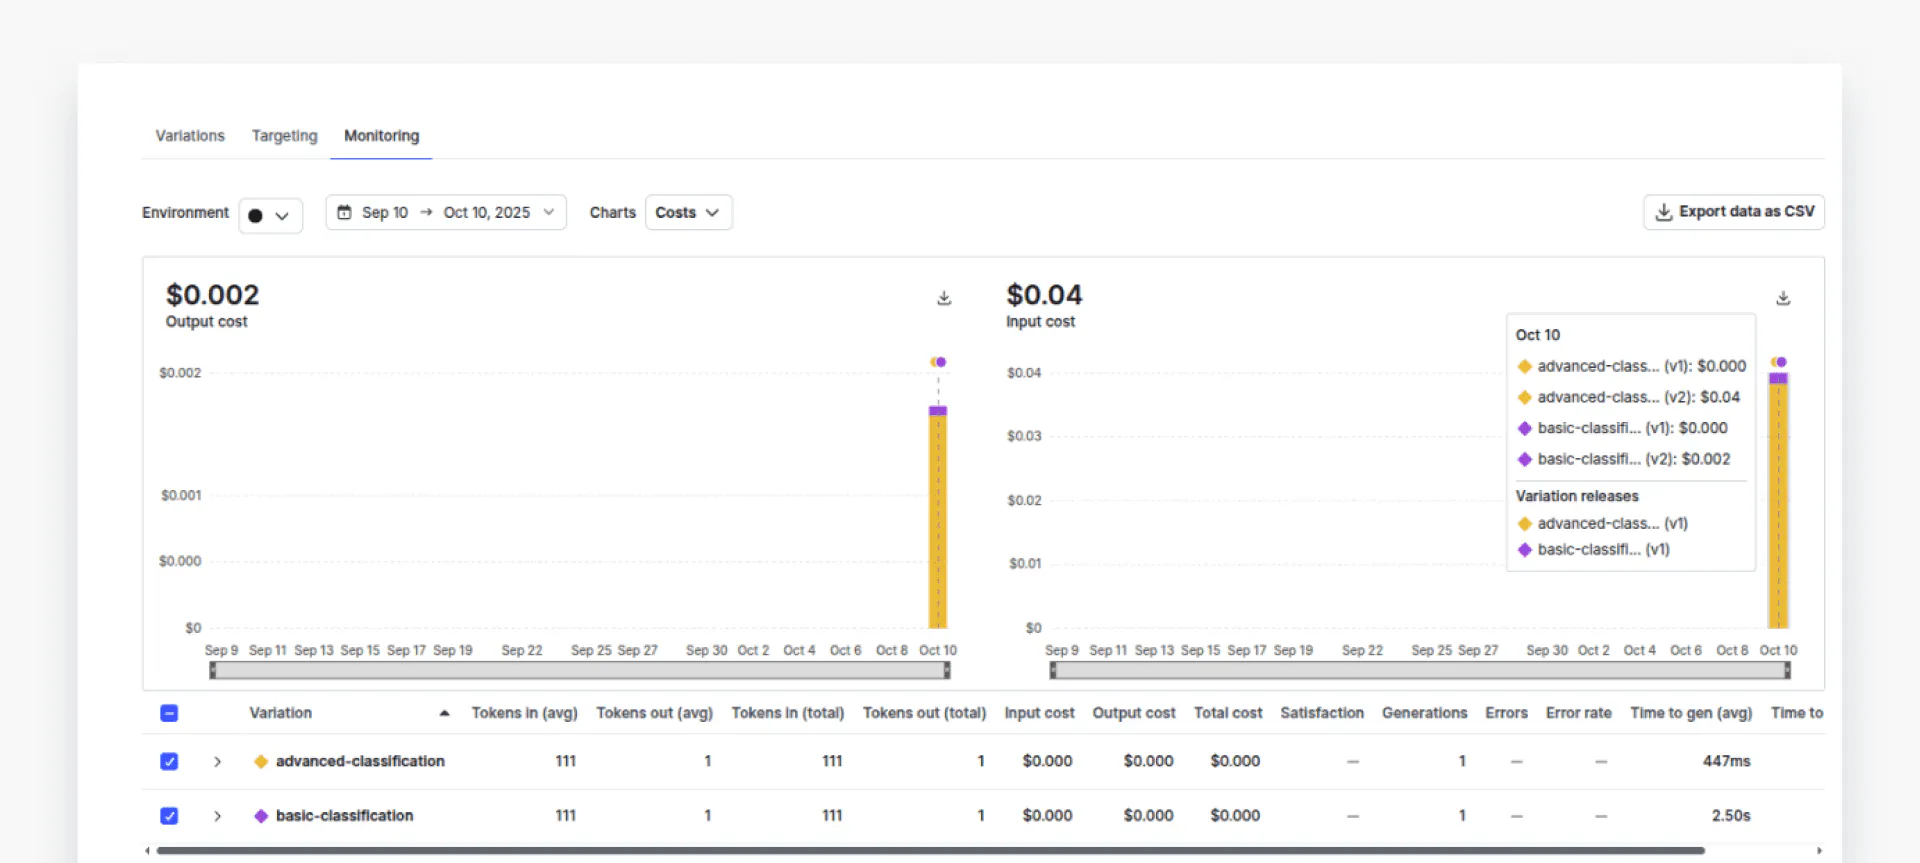
You can see that the cost associated with the `advanced-classification` (yellow part) is much higher compared to the cost of “basic-classification” (purple part). You can also check token usage, error rates, and time per request, among other metrics.
We have compared one request per variation. In real scenarios, you will have hundreds of requests, and you would like to see how two variations perform and what the overall cost is. Let’s see an example of such a scenario.
We will classify 105 customer sentiments into three categories: positive, negative, and neutral, using both variations. We will then compare the cost and performance of the two variations.
The following script imports the dataset we will use.
import pandas as pd
# Login using e.g. `huggingface-cli login` to access this dataset
df = pd.read_csv("hf://datasets/InfinitodeLTD/CRSD/data.csv")
df = df[['review', 'sentiment']]
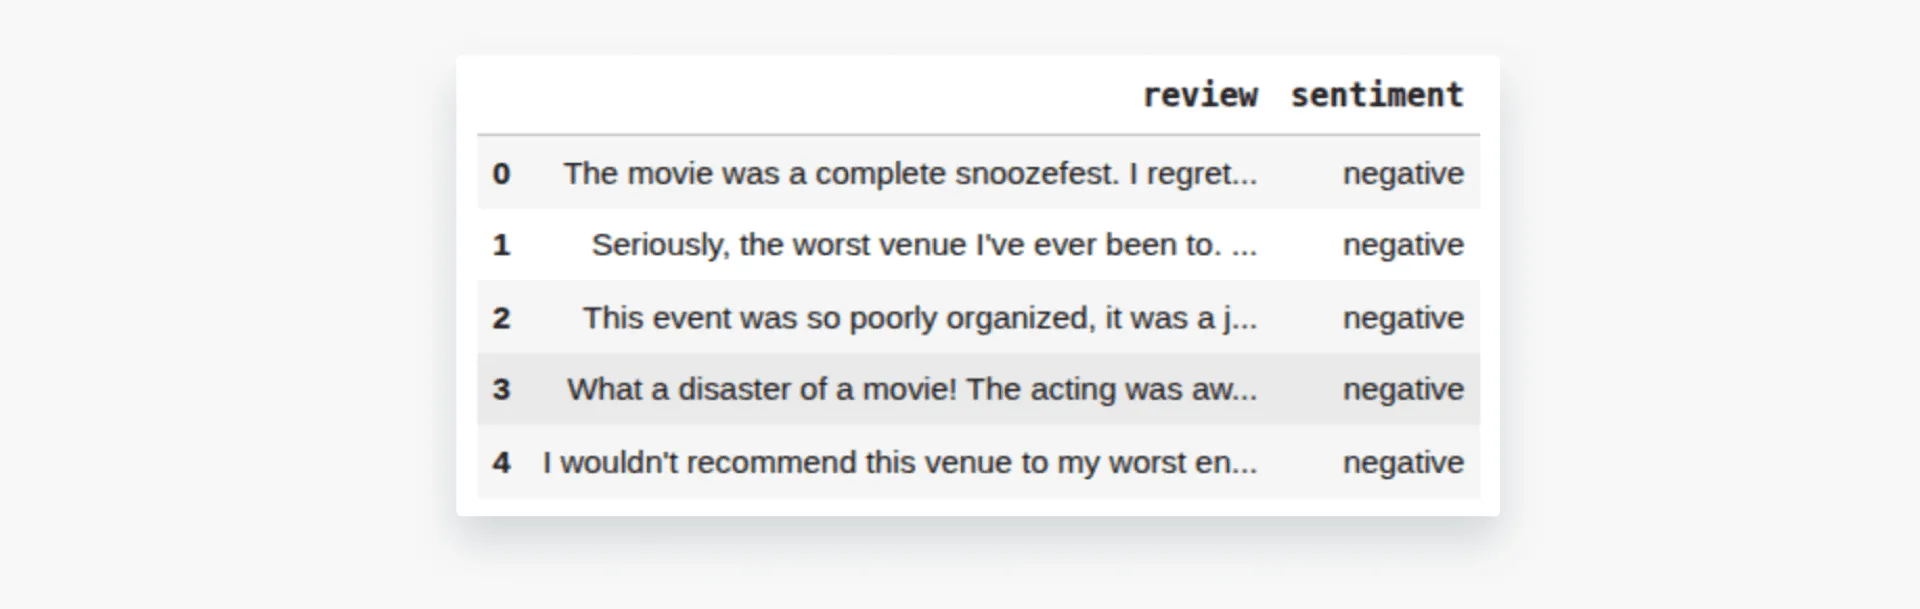
df.head()Output:
We will define a function `sample_balanced_reviews()` that gives us 35 reviews per category. You can increase or decrease the number of reviews you want for testing.
def sample_balanced_reviews(df, per_class=35, seed=42):

    sampled = []
    for s in ["positive", "negative", "neutral"]:
        subset = df[df["sentiment"] == s]
        # If not enough, raise or fallback
        if len(subset) < per_class:
            raise ValueError(f"Not enough records for sentiment = {s}")
        sampled.append(subset.sample(per_class, random_state=seed))
    df_samples = pd.concat(sampled).sample(frac=1, random_state=seed).reset_index(drop=True)
    return df_samples

sampled_df = sample_balanced_reviews(df)
sampled_df['sentiment'].value_counts()
Output:

Next, we will define the `evaluate_reviews()` function, which takes our AI Config variation, the corresponding tracker, and the sample dataset.
The' evaluate_reviews()' function internally calls the `get_sentiment()` function we defined earlier to predict the sentiment of all reviews in the sampled dataset. If the prediction matches the target label in the dataset, we increment the number of correct predictions by one and also invoke the `track_feedback` method of the tracker object, passing the' FeedbackKind. Positive' enum, which indicates that the prediction was correct. In case of an incorrect prediction, we pass “FeedbackKind.Negative”.
def evaluate_reviews(ai_config, tracker, df_samples):
    results = []
    correct = 0
    total = len(df_samples)

    for idx, row in df_samples.iterrows():

        if idx % 10 == 0:
          print(f"Processing record {idx + 1}")
        true = row["sentiment"]
        review_text = row["review"]

        completion = get_sentiment(ai_config, tracker, review_text)

        predicted = completion.choices[0].message.content.strip().lower()

        is_correct = (predicted == true)
        if is_correct:
            # feedback positive
            tracker.track_feedback({"kind": FeedbackKind.Positive})
            correct += 1
        else:
            tracker.track_feedback({"kind": FeedbackKind.Negative})

        results.append({
            "true": true,
            "predicted": predicted,
            "is_correct": is_correct,
            "review": review_text,
        })

    accuracy = correct / total if total > 0 else 0.0
    return accuracy, results
Let’s first test the `advanced-classification` variation using the premium user configuration.
accuracy, results = evaluate_reviews(config_prem, tracker_prem, sampled_df)

print("Accuracy:", accuracy)
Next, we will test the `basic-classification` via basic configuration.
accuracy, results = evaluate_reviews(config_basic, tracker_basic, sampled_df)

print("Accuracy:", accuracy)
The performance difference is around 4%.
You can return to the AI Config monitoring tab to compare costs side-by-side.
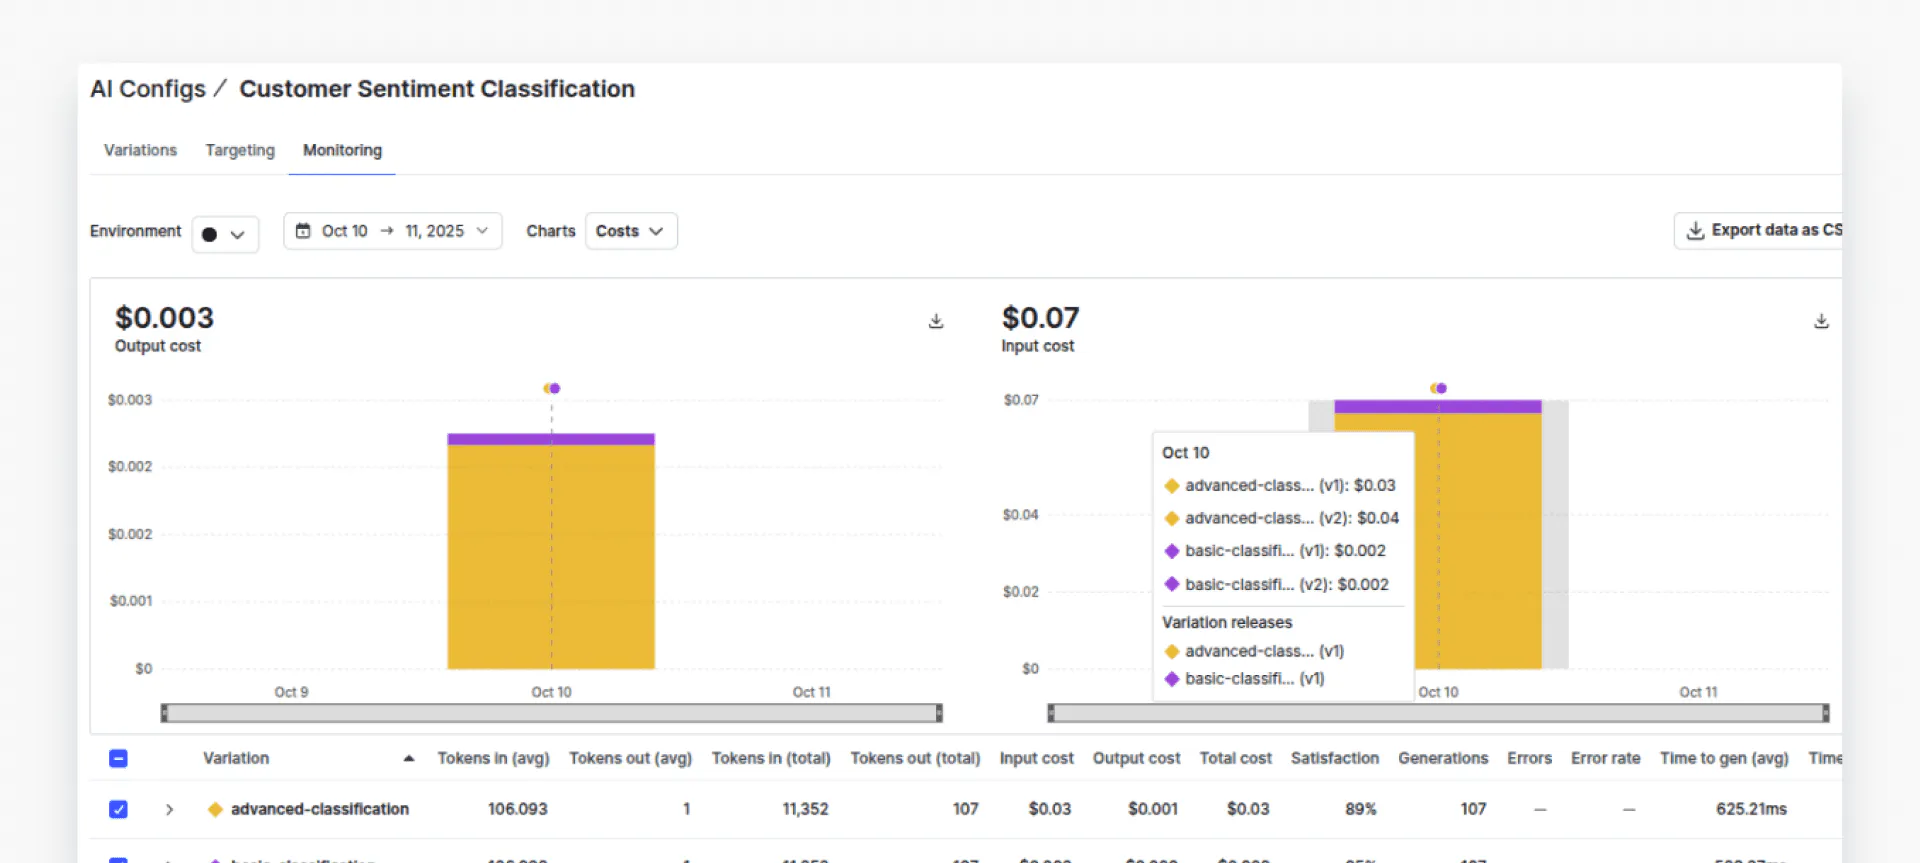
The dashboard shows that advanced-classification (GPT-4o) costs approximately 20x more than basic-classification (GPT-4o-mini) - but with only a 4% accuracy improvement. This data-driven comparison helps teams make informed cost-performance tradeoffs.
Click “Satisfaction” from the dropdown list. You should perform a performance comparison of both variations.
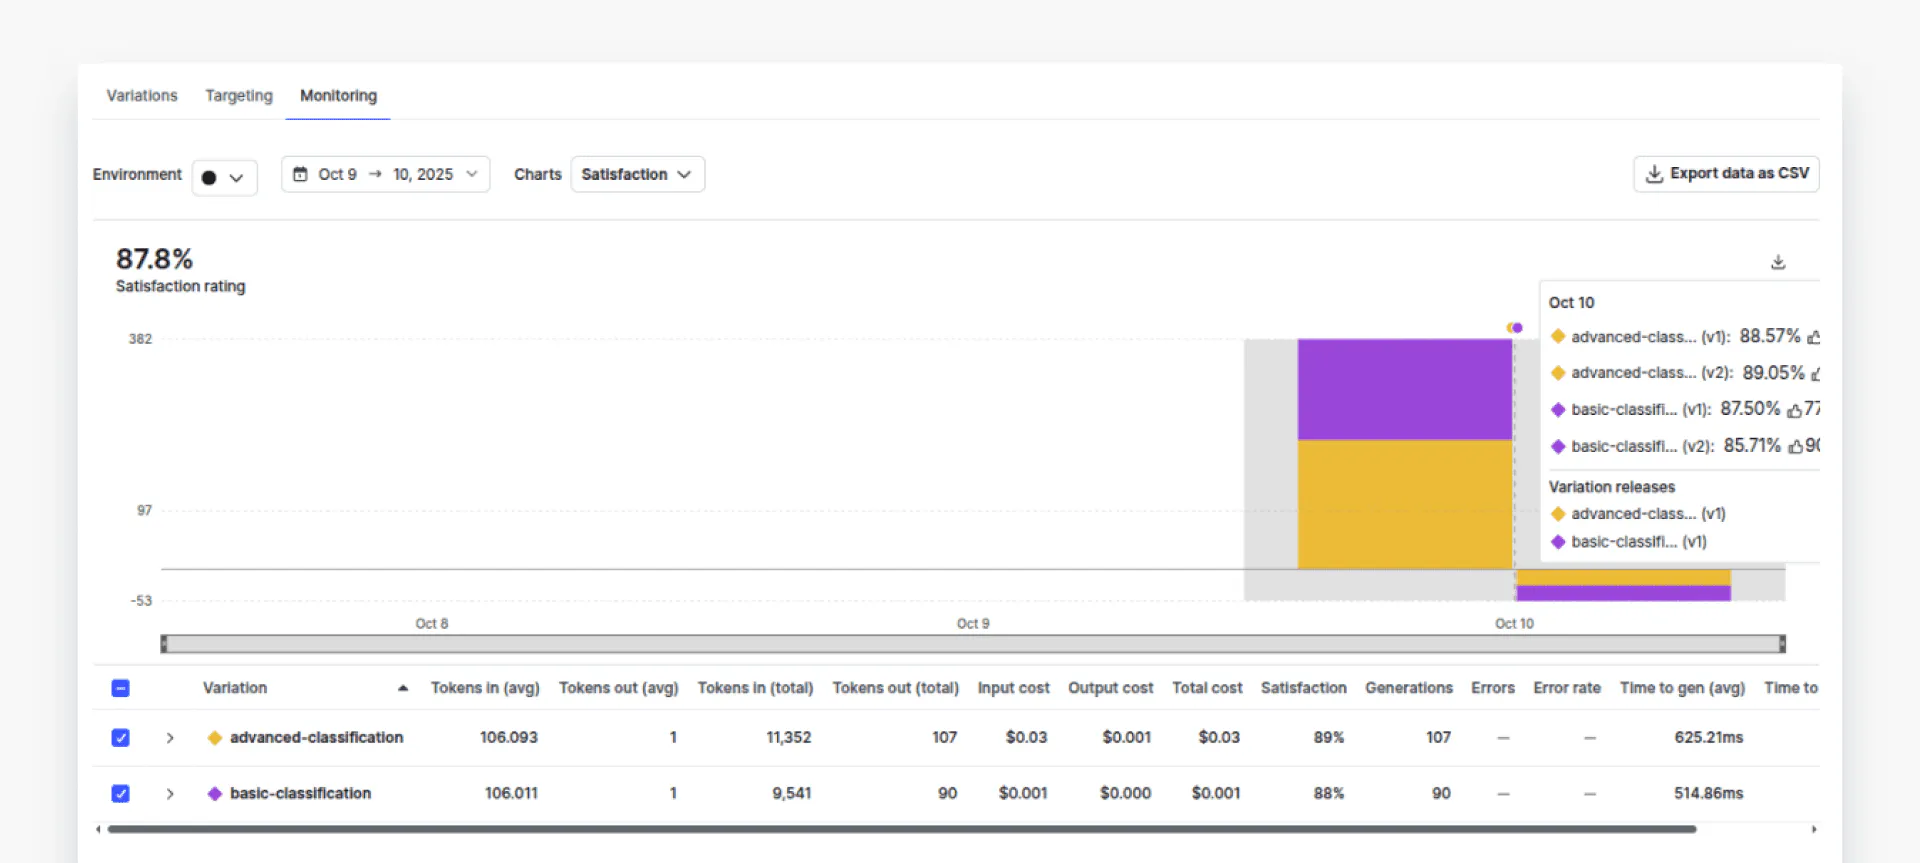
You can see that the cost of using the `advanced-classification` variation is about 20 times that of the `basic-configuration`.
Click “Satisfaction” from the dropdown list. With this in mind, you should compare the performance of both variations to see if the advanced performance justifies the cost. In doing so, we can see that there is only 4% performance difference. It is now up to you to decide if the 4% percent performance improvement is worth about 20 times the cost. With AI Configs, you can easily act on this insight - adjust targeting rules to route simple queries to the cheaper model while reserving the premium model for complex cases, all without code changes.
This practical example demonstrates how LaunchDarkly enables you to target different user segments and compare their performance and pricing. This approach is handy because it hides the abstraction for finding and calculating prices across different models, and it avoids writing complex code for cost-benefit analysis.
Final thoughts
Effective cost management and reliable LLM pricing comparison are essential for building AI systems that scale without breaking budgets. Understanding how different models and deployment options affect cost helps teams make more informed technical and business decisions.
If you are starting or testing ideas, manual comparisons and simple spreadsheets are often enough to estimate costs and stay within budget. As your application grows and you begin integrating multiple providers, code-based tracking with automated scripts or APIs becomes more efficient, offering greater precision and flexibility. For production-scale systems that require constant experimentation and real-time monitoring, platform-level tools such as LaunchDarkly AI Configs offer the most control, enabling you to test, compare, and roll out models safely without redeploying code.
For more information about LaunchDarkly, refer to the official document: Quickstart for AI Configs, Python AI SDK, and AI Configs Best Practices.