


Treating every user the same is risky when they may have different goals, dreams, desires, and features they care about. To provide the best experience, you want to customize your website based on what you know about your users. Luckily, LaunchDarkly makes it easy to do just that.
In this tutorial, you will learn how to use segment targeting to show users with a .edu email address a student version of your website using LaunchDarkly and Fastify.
Fastify (not to be confused with Fastly) is a Node.js server framework that is fast and lightweight. As of press time it has over 30k stars on GitHub, 1.7 million weekly downloads, and is hosted by the OpenJS Foundation.
Prerequisites
- A development environment with git, Node.js and npm installed
- A LaunchDarkly account - sign up for a free one here!
Getting the example Fastify + LaunchDarkly app up and running
First, clone this repository on your local machine:
git clone https://github.com/annthurium/fastify-starter-basic If you want to cut to the chase, a code-complete demo repo with Fastify and LaunchDarkly segments lives here.
Once cloned, navigate into your project directory:
cd fastify-starter-basicNext, configure your credentials.
Copy your SDK key from the LaunchDarkly application under Project settings / Environments:
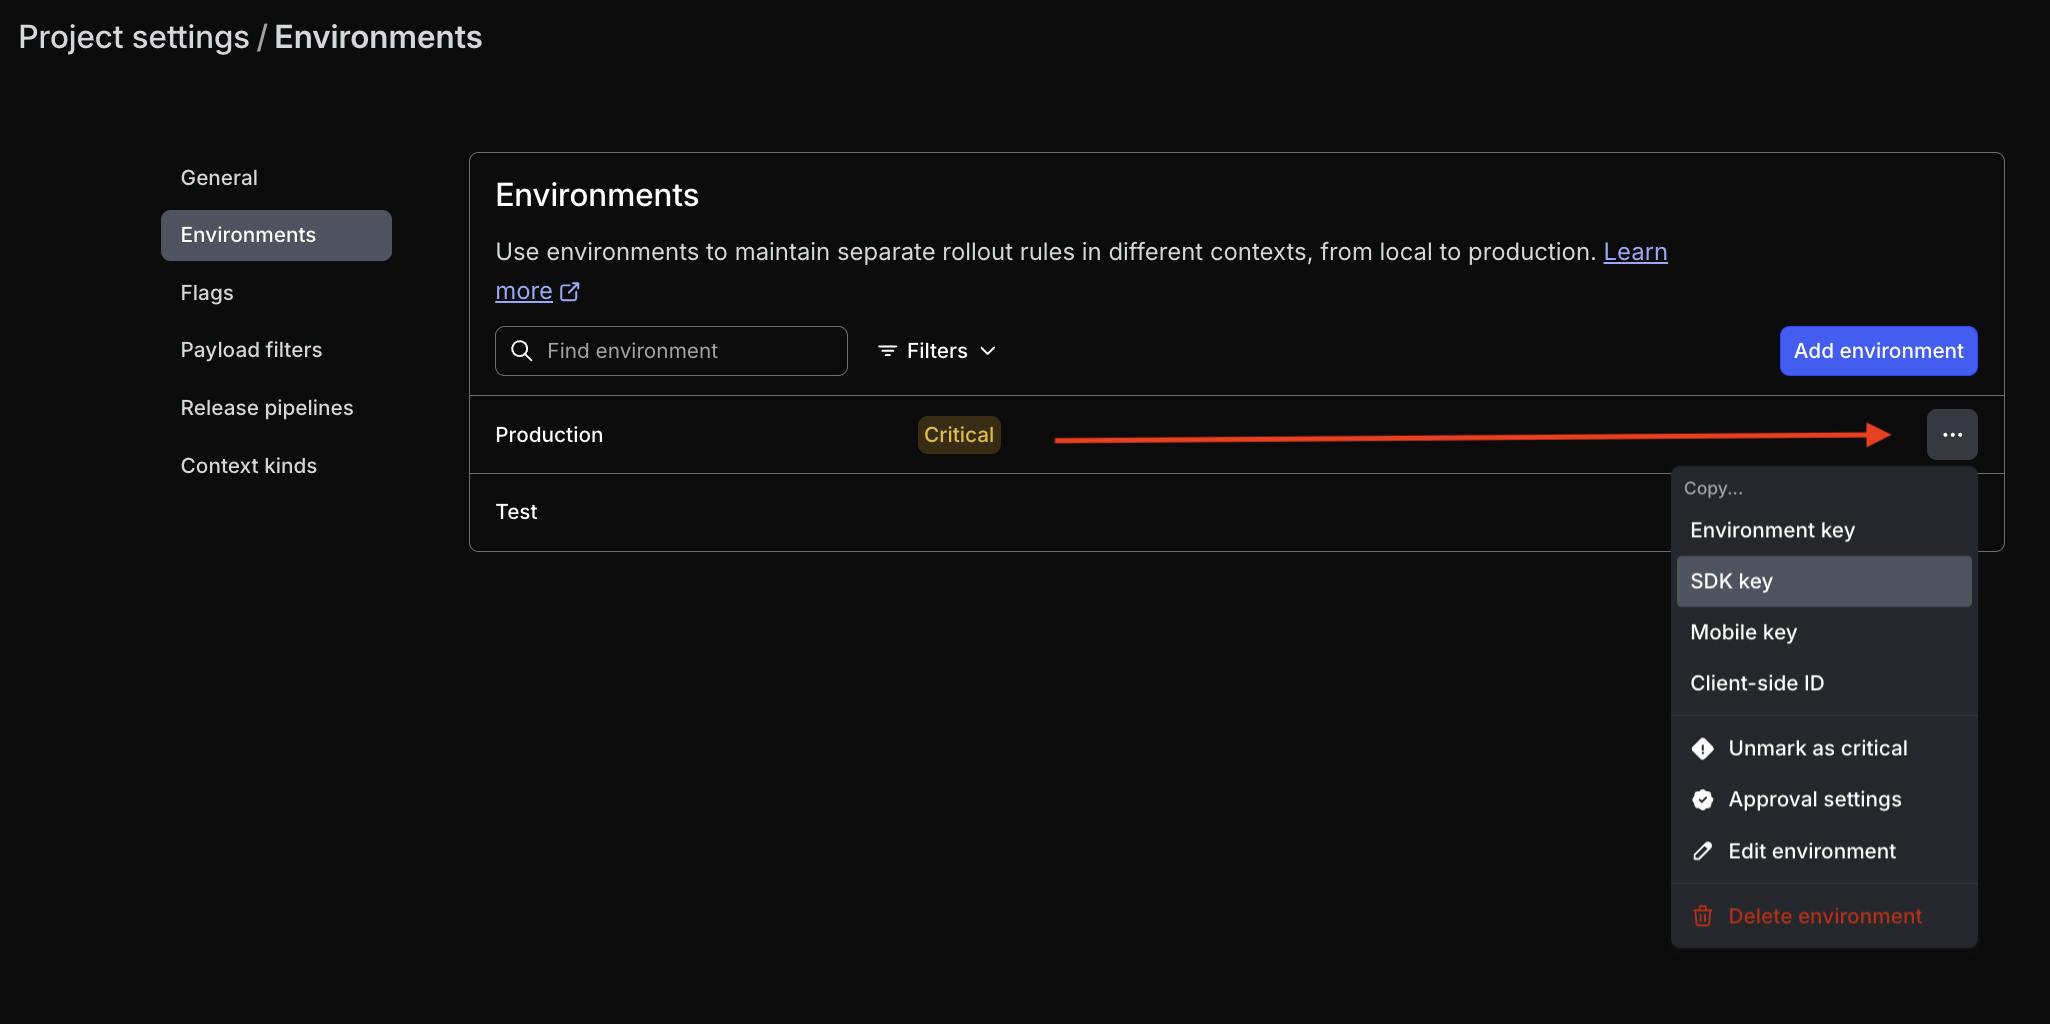
Important—SDK keys are environment-specific, so make sure you are using the key from your “Production” environment. Paste the key into the .env.example file. Rename the .env.example file to .env.
With this setup, the LaunchDarkly SDK can access the credentials locally but you won’t accidentally commit them to source control and compromise your security.
Install dependencies using the following command:
npm installRun the server:
npm startLoad http://127.0.0.1:3000/ in the browser. You should see a “hello, world” page.
Create a segment to target
Segments are groups that allow you to consistently target the same audiences, serving as a single source of truth for your targeting logic. While there’s nothing stopping you from duplicating targeting rules across different flags, keeping them all up to date when requirements change can be a time sink. That’s where segments come in.
Segments can be shared across LaunchDarkly environments, making it easier to keep things in sync between dev/test and production. Let’s create a segment, add a targeting rule and then use it in a flag.
Creating a segment
Head back to the LaunchDarkly application. Make sure you’re in the Production environment that matches the SDK key you copied into your .env file.
Click on “Segments” on the left-hand menu, and then click one of the “Create segment” buttons.

Select “Rule-based segments” in the next section.

In the following window, choose a name for your segment. Enter a description as a gift for your future self. Click “Save segment”.

On the following screen, create a rule. Select the following values and save.
- Context kind: user
- Attribute: email
- Operator: ends with
- Values: .edu

You’ll be prompted to enter a comment explaining your changes and then confirm them.

Create a flag
Finally, you’ll create a flag that targets that specific segment. Hang in there, we’re almost through configuring things. 😅
On the left navigation menu, click “Flags” and then the “Create Flag” button.
![]()
Name this flag “show-student-version”, which will match the flagKey variable in your application code. The key will auto-populate. Click the “Create flag” when you’re done typing in the name and description.

On the next screen, click the “add rule” dropdown and select “Target segments.” Configure the rule as follows, and then click “Confirm and save.”
- If Context is in Students, serve true
- When no targeting rules are matched (the "Default rule"), serve false
- Flag is On

In the “Save” dialog, add a comment explaining these changes, type “production” to confirm the environment.

Serving static pages from Fastify
Now the fun part begins: adding some code to the app so that it can serve different static pages.
Open static/index.html in your editor of choice. Replace the code in that file with the following. Feel free to sprinkle in your own enterprise flavor.
<!DOCTYPE html>
<head>
   <meta charset="UTF-8">
   <title>Business McBusinessFace's Enterprise Website</title>
</head>
<body>
   <h1>Business McBusinessFace's Enterprise Website</h1>
   <h2>Delving into tomorrow's solutions</h2>
   <p>At [Company Name], we’re at the forefront of [industry/sector], dedicated to delivering innovative solutions that drive your business forward.
       With a legacy of [number] years of excellence, our enterprise is committed to innovation, quality, and unparalleled synergies.</p>
</body>
If you open the page in your browser, you should see something like the screenshot below.

Next, we’ll add another version of the homepage that could be shown to students. Create a new file in the static/ folder named student-index.html. Copy the following code into that file:
<meta charset="UTF-8">
  <title>Student Edition Starter Pack</title>
  <link rel="stylesheet" href="static/style.css">
</head>
<body>
  <h1>Student Edition Starter Pack</h1>
  <h2>Investing in Future You</h2>
  <p>Less features but a cooler design!</p>
</body>
Just for funzies, let’s give the student page a little bit of ✨style ✨. Create another file in the static folder named style.css. Add the following code:
body {
   background: linear-gradient(0.25turn, #ff0072, #f100c3, #21004f);
   color: #84fdff;
   font-family: courier, courier new, serif;
   font-size: 30px;
}
Change the code in index.js to serve the student version of the website.
const fastify = require('fastify')({logger: true});
const path = require('node:path');

fastify.register(require('@fastify/static'), {
 root: path.join(__dirname, 'static'),
 prefix: '/static/', // optional: default '/'
});

fastify.get('/', function (req, reply) {
 reply.sendFile('student-index.html')
});

// Run the server!
fastify.listen({ port: 3000 }, (err, address) => {
 if (err) throw err
 // Server is now listening on ${address}
});
The server should reload automatically when you change your code. Reload localhost in the browser and vibe with the slick gradient.

Using a LaunchDarkly flag in your Fastify application
To initialize the LaunchDarkly client, you need the SDK key which is in your .env file. Back in the index.js file, add some code to grab the value of that variable and initialize the client. At the top of index.js, add the following:
require("dotenv").config();
const ld = require("@launchdarkly/node-server-sdk");

const sdkKey = process.env.LAUNCHDARKLY_SDK_KEY;

const client = ld.init(sdkKey);
Next, add a Fastify pre-parsing hook to evaluate the flag (get its value) in index.js before the .get function.
fastify.addHook("preParsing", async (request) => {
 const context = {
   kind: "user",
   key: "user-key-123abcde",
   email: "bizface@enterprise.dev",
 };

 const flagKey = "show-student-version";

 const showStudentVersion = await client.variation(flagKey, context, false);
 console.log("showStudentVersion", showStudentVersion);
 request.showStudentVersion = showStudentVersion;
});
Finally, change the .get function for your root route to check for the .show-student-version attribute:
fastify.get("/", function (req, reply) {
 let fileName = "index.html";
 if (req.showStudentVersion) {
   fileName = "student-index.html";
 }
 reply.sendFile(fileName);
});
If you load the page again, it should show the enterprise version of the site.
Try changing the email address in the context to something that ends in .edu. Save these changes in your editor:
 const context = {
   kind: "user",
   key: "user-key-123abcde",
   email: "learner@student.edu",
 };
Without changing any of your flag configurations or targeting in LaunchDarkly, the app is now serving the student version of the website. Tada! 🏁
If it’s not working - double-check that your flag is On.
Conclusion: how to target different segments with LaunchDarkly in a Fastify application
In this tutorial, you’ve learned how to target different segments within the LaunchDarkly application. By leveraging the use of targeting rules and segments, you can create custom user experiences, avoid duplicating flag rules, and showcase different features of your site based on a user’s email address.
Email addresses are just the beginning, you can take the same discoveries we used today and apply different contexts such as name, plan type, zip code, and more. Read more about targeting a specific segment in the LaunchDarkly docs.
This barely scratches the surface of how you can use LaunchDarkly to deliver software more safely.
If you’re curious and want to learn more, you might enjoy:
- How to instantly roll back buggy features with LaunchDarkly’s JavaScript client library
- Using segments and targeting to manage early access programs
- How to Switch AssemblyAI Speech-to-Text Model Tiers by User Email With LaunchDarkly Feature Flags
Thanks so much for reading! If you have any questions, or just want to synergize your enterprise applications in my general direction, you can circle back via email (tthurium@launchdarkly.com), X/Twitter, or LinkedIn.
Like what you read?
Get a demo