


DeepSeek models have taken the AI world by storm. LaunchDarkly AI Configs (now in early access!) can help developers integrate DeepSeek models into your applications. In this tutorial we'll show you how to use DeepSeek's free R1 model with our Python AI SDK.
Prerequisites
- A free LaunchDarkly account with AI configs enabled. In order to get access to AI configs, click on ‘AI configs’ in the left-hand navigation and click ‘Join the EAP’ to join the waitlist.
- OpenRouter API key to run calls to the DeepSeek AI API for free.
Python 3.6 or newer. If your operating system does not provide a Python interpreter, you can go to python.org to download an installer.
What is DeepSeek?
DeepSeek is a Chinese company that builds open source generative AI models. Supposedly, their R1 reasoning model rivals OpenAI’s 01 and was trained for a fraction of the cost. You can find an up to date list of DeepSeek’s available models on their website.
Configuration
If you are using a Unix or Mac OS system, open a terminal and enter the following commands to do the tasks described below:
$ mkdir deepseekconfigs
$ cd deepseekconfigs
$ python3 -m venv venv
$ source venv/bin/activate
(venv) $ pip install openai ldclient launchdarkly-server-sdk-ai python-dotenv
For those of you following the tutorial on Windows, enter the following commands in a command prompt window:
$ md deepseekconfigs
$ cd deepseekconfigs
$ python -m venv venv
$ venv\Scripts\activate
(venv) $ pip install openai ldclient launchdarkly-server-sdk-ai python-dotenv
Set up the developer environment for the Python application
Make sure that you are currently in the virtual environment of your project’s directory in the terminal or command prompt.
Create a file at the root of your project folder named .env and add the following lines to define the environment variables. These are placeholder values, which you’ll be updating later with real ones.
LAUNCHDARKLY_SDK_KEY="sdk-###############"
OPENROUTER_API_KEY="sdk-###############"
Build the Python AI config application scaffolding
The Python application will utilize the DeepSeek-R1 model to generate responses for a chatbot that helps students with their homework and material understanding.
Initialize the clients
Create a file named app.py and paste the following code.
import os
import openai
import ldclient
from ldclient import Context
from ldclient.config import Config
from ldai.client import LDAIClient, AIConfig, ModelConfig, LDMessage, ProviderConfig
from dotenv import load_dotenv

load_dotenv()

# Initialize clients
ldclient.set_config(Config(os.getenv("LAUNCHDARKLY_SDK_KEY")))
ld_ai_client = LDAIClient(ldclient.get())

client = openai.OpenAI(
  base_url="https://openrouter.ai/api/v1",
  api_key=os.getenv("OPENROUTER_API_KEY"),
)
OpenRouter is a handy product that normalizes model APIs so you can call them using the OpenAI spec. In order to use the DeepSeek model for free, please make sure you have an account with OpenRouter and create an API key for the “DeepSeek-R1 (free)” model. Thank you to Mehul Gupta on Medium for the tutorial on how to implement OpenRouter to your project.
Create the AI config
AI Configs allow you to manage your generative AI models at runtime and record AI-specific metrics. They are capable of storing multiple prompt and model combinations to target specific audiences and use cases.
Go to the LaunchDarkly app. Click on the Create button. Select AI config from the menu.

Give your AI config a name, such as “quickdeepseek.” Please keep in mind that this is “ai_config_key” in your Python project, and it is essential to call this every time you want to generate content from the chosen AI model.
Click Create.

Next, we’re going to add a variation. Variations are an abstraction that represents a specific combination of models and messages, plus other options such as temperature and tokens. Variations are editable, so it’s okay to make mistakes.
With the Variations tab selected, configure the first variation using the following options:
- Name: deepseek-reasoner
- Model: deepseek-reasoner
- Role: system - “Create an AI chatbot that helps students with homework, explains concepts, and even generates practice problems.”
Leave the max tokens and temperature as is.

Save changes.
Like feature flags, AI configs must be enabled in order to start serving data to your application. Click on the Targeting tab, and then click the Test button to select that environment. (Alternatively, you could use Production, or any other environment that exists in your LaunchDarkly project.)
Edit the Default rule to serve the deepseek-reasoner variation.
Click the toggle to turn the config on. When you’re done, click Review and save.

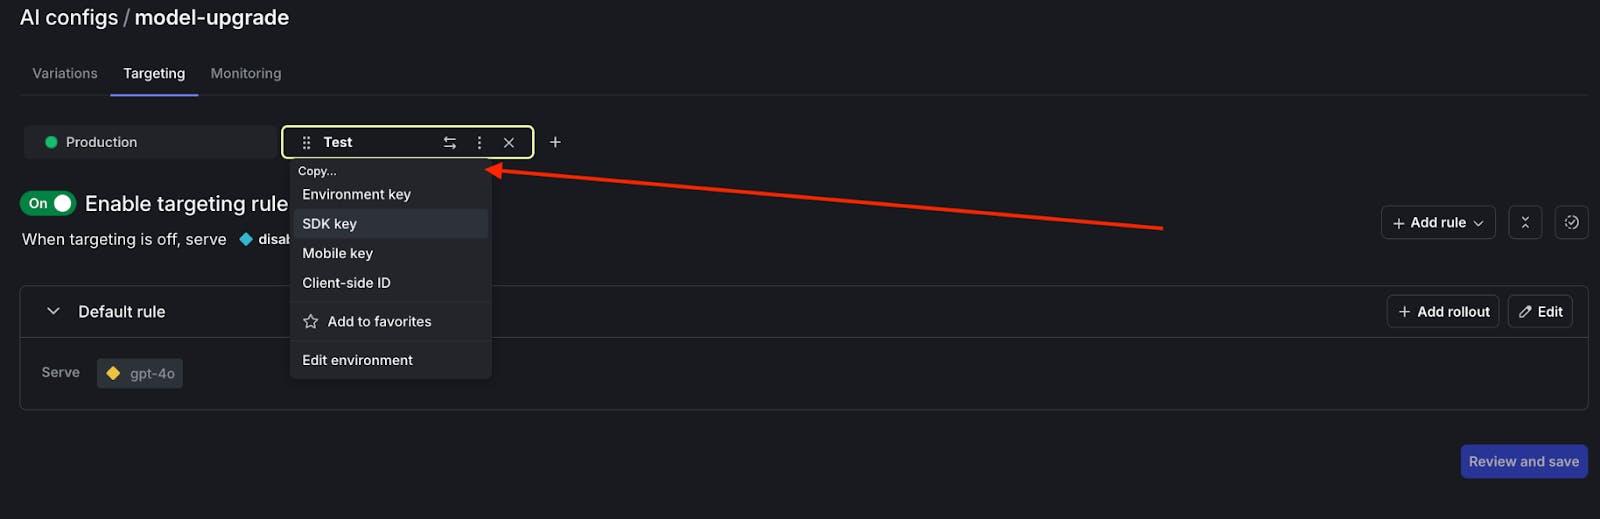
To authenticate with LaunchDarkly, we’ll need to copy the SDK key into the .env file in our Python project.
Select the … dropdown next to the Test environment. Select SDK key from the dropdown menu to copy it to the clipboard.
Open the .env file in your editor. Paste in the SDK key for “LAUNCHDARKLY_SDK_KEY”. Save the .env file.
Retrieve AI Config values within a Python application
Navigate back to the app.py file and create the generate function with the code below:
def generate(options=None):
    context = Context.builder('example-user-key').kind('user').name('Sandy').build()

    ai_config_key = "quickdeepseek"  # name of ai configs projects name
    default_value = AIConfig(
        enabled=True,
        model=ModelConfig(name='deepseek-chat'),
        messages=[],
    )
    config_value, tracker = ld_ai_client.config(
        ai_config_key,
        context,
        default_value,
)
    model_name = config_value.model.name
    print("CONFIG VALUE: ", config_value)
    print("MODEL NAME: ", model_name)
    messages = [] if config_value.messages is None else config_value.messages

    messages_dict=[message.to_dict() for message in messages]

    completion = client.chat.completions.create(
            model="deepseek/deepseek-r1:free",
            messages=messages_dict,
        )
    track_success = tracker.track_success()
    print(completion.choices[0].message.content)

    print("Successful AI Response:", completion)
    return completion

if __name__ == "__main__":
    generate()
Contexts are defined and passed through at the time of initiating the SDK after login. This process determines how feature flags should behave for a specific user or entity.
The "example-user-key" is the unique identifier for the context that ensures that the flag evaluations are consistent for the same user or entity across sessions.
The “kind” attribute is set to “user” to represent an individual user, who is named “Sandy” in this case. It is optional to change the name for personal debugging and viewing purposes.
Make sure that the AI Config is configured correctly with the appropriate values that can be found in LaunchDarkly AI Configs Variations section.
The messages object is parsed and stored in a dictionary variable for the DeepSeek API to work with. If nothing is initialized, then an empty dictionary is created by default.
Generate DeepSeek AI results in the Python application
Save the app.py file and go back to the terminal. Run the command “python3 app.py” and wait for the DeekSeek API to generate results on an outlined chatbot to use in a school curriculum. As a heads up, the model might run slowly as is common with free tiers.
Feel free to reference the full code on this GitHub repository.
Your model response should start out with something like this, although this example has been truncated for brevity:
**AI-Powered Educational Chatbot: Homework Helper & Learning Companion**

**Features Overview:**

1. **Homework Assistance:**
   - **Step-by-Step Solutions:** Integrates with computational engines (e.g., Wolfram Alpha) to solve math/science problems and display detailed steps.
   - **Hint System:** Offers hints instead of direct answers to encourage critical thinking.
   - **Multimodal Input:** Accepts text, LaTeX, or image uploads (using OCR for problem recognition).

…

**Conclusion:**
This chatbot combines AI innovation with educational psychology to create a personalized, secure, and engaging learning tool. By focusing on comprehension over rote answers, it empowers students to master subjects independently.
What do you think? What else should teachers implement in a chatbot that aims to be a learning resource for students?
Track the metrics on the DeepSeek AI Config
LaunchDarkly also records input tokens, output tokens, generation count, and optional user feedback about the response quality. The docs on tracking AI metrics go into more detail if you are curious.
With a call to tracker.track_success(), the application will return “None” if successful, and also record the amount of successful generations.
In the LaunchDarkly dashboard, click on the Monitoring section to view the metrics. The Generation count should increase anytime you run the application as seen below:

What’s next for building with DeepSeek and AI Configs?
Congratulations on integrating DeepSeek-R1 with your Python app, using AI Configs. Challenge yourself by comparing the results from the deepseek-chat model with the deepseek-reasoner model to determine which results you prefer. You could even customize your prompts by adding user messages, tweaking parameters, and even testing different variations of the prompts to see which one performs best.
If you want to learn more about feature management for generative AI applications, here’s some further reading:
- Learn how to Upgrade OpenAI models in Python FastAPI applications — using LaunchDarkly AI configs
- Upgrade OpenAI models in ExpressJS applications — using LaunchDarkly AI configs
- Use targeting to manage AI model usage by tier with the Python AI SDK
Join us on Discord, send me an email at dphan@launchdarkly.com, or connect with me on LinkedIn and let us know what you're building.
Like what you read?
Get a demo