
Building a chatbot with multiple AI providers using AgentControl configs
This guide shows you how to build a simple AI-powered chatbot using LaunchDarkly AgentControl with multiple AI providers, including Anthropic, OpenAI, and Google.
Using AgentControl, you can manage models and prompts outside of code, switch providers without redeploying, and monitor performance in real time.
You’ll learn how to:
- Create a basic chatbot application
- Configure AI models dynamically without code changes
- Create and manage multiple AgentControl config variations
- Apply user contexts for personalizing AI behavior
- Switch between different AI providers seamlessly
- Monitor and track AI performance metrics
By the end of this tutorial, you’ll have a working chatbot that demonstrates LaunchDarkly’s AgentControl capabilities across multiple providers.
The complete code for this tutorial is available in the simple-chatbot repository. For additional code examples and implementations, check out the LaunchDarkly Python AI Examples repository, which includes practical examples of AgentControl configs with various providers and use cases.
Prerequisites
Before you begin, you need the following:
Required accounts
Access to the following accounts:
- A LaunchDarkly account: Sign up at app.launchdarkly.com
- At least one AI provider account:
- Anthropic: console.anthropic.com
- OpenAI: platform.openai.com
- Google AI: ai.google.dev
Development environment requirements
A development environment with:
- Python 3.8 or later
- pip package manager
- Basic Python knowledge
- A code editor, such as VS Code or PyCharm
API and SDK keys
The following keys:
- An active LaunchDarkly SDK key
- An API key from at least one AI provider
Before you start
This guide builds a chatbot using completion-based AgentControl configs in a messages array format. If you use LangGraph or CrewAI, you may want to use agent mode instead.
The following sections include best practices to help you avoid common issues and reduce debugging time.
Do not cache configs across users
Reusing configs across users breaks targeting. Instead, fetch a fresh config for each request:
Provide a fallback config
Provide a fallback so your application does not crash when unexpected issues occur, such as LaunchDarkly being unavailable or API keys being incorrect:
Check if the config is enabled
Check if the config is enabled before using it:
Do not include personally identifiable information (PII) in contexts
Never send PII to LaunchDarkly. Here’s a bad and a good example:
Limit conversation history
Your chat history grows with every turn. After 50 exchanges, each request may include thousands of tokens.
Here’s how to limit it:
Track token usage
Without tracking, it is difficult to understand how token usage affects cost.
Here’s how to track token usage:
Your provider methods should return the full response object, not just text, so you can access usage metadata. The code examples here return full responses where tracking is needed.
Example 1: Your first chatbot
Start by building a minimal chatbot application using a LaunchDarkly AgentControl config with Anthropic’s Claude.
Step 1.1: Project setup
First, create a new directory for your project:
Then, create a virtual environment and activate it:
Step 1.2: Install dependencies
Install the required packages:
Create a requirements.txt file:
Step 1.3: Environment configuration
First, add .env to your .gitignore file to keep credentials secure:
Now create a .env file in your project root:
Step 1.4: Create the basic chatbot
Create a file called simple_chatbot.py and add the following:
Click to expand the complete simple_chatbot.py
Click to expand the complete simple_chatbot.py
Step 1.5: Run your basic chatbot
Run the chatbot:
You should see output like this:
Try asking questions and chatting with the AI. The chatbot automatically uses whichever AI provider you configured.
You now have a working chatbot with multi-provider support.
Part 2: Creating your first AgentControl config with two variations
Now, create an AgentControl config in LaunchDarkly with two variations to demonstrate how to dynamically control AI behavior.
For detailed guidance on creating AgentControl configs, read the AgentControl Quickstart.
Step 2.1: Create an AgentControl config in LaunchDarkly
To create an AgentControl config:
- Log in to LaunchDarkly.
- Navigate to app.launchdarkly.com/settings/projects.
- Click
Create project. - Name it
simple-chatbot.
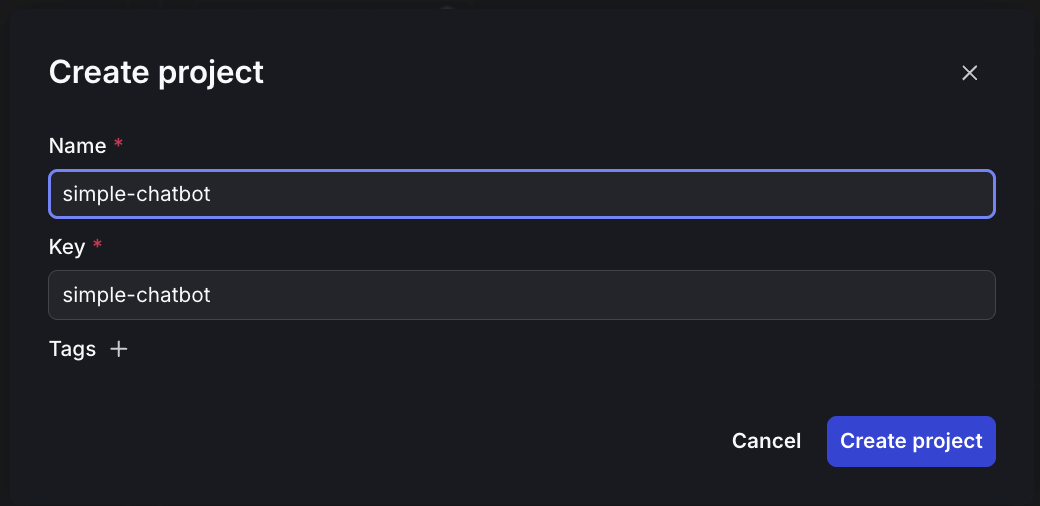
- Click Create project.
- Click Project settings, then Environments.
- Click the three-dot overflow menu next to “Production.”
- Copy the SDK key.
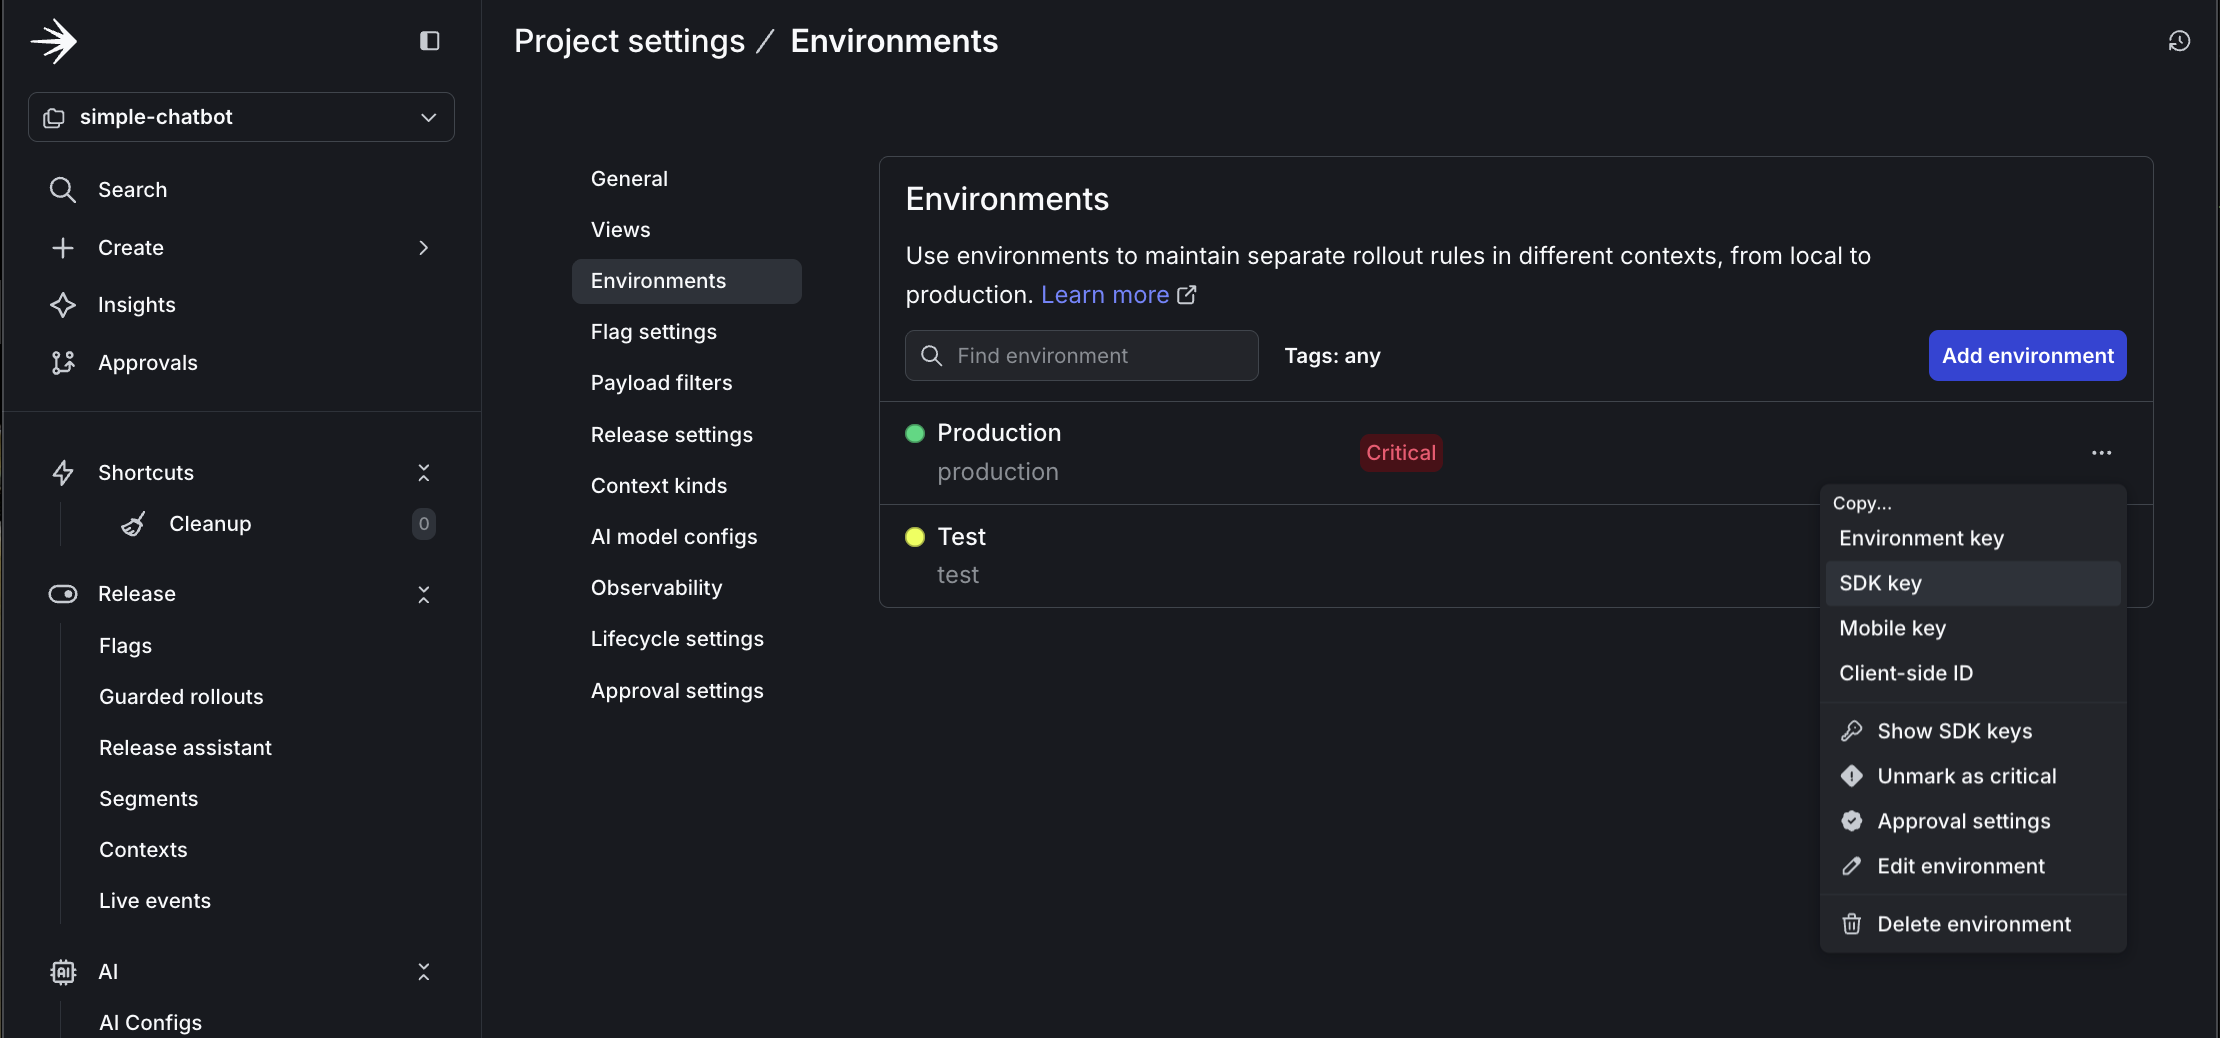
-
Update your
.envfile with this key:.env
Then, create a new AgentControl config:
- In the left sidebar, open the AI section and click AgentControl configs.
- Click Create AgentControl config.
- Name it
simple-config. - Configure the default variation:
-
Variation Name:
friendly -
Model Provider: Anthropic, or your preferred provider
-
Model:
claude-3-haiku-20240307 -
System Prompt:
System prompt -
Parameters:
- temperature:
0.8(more creative) - max_tokens:
500
- temperature:
-
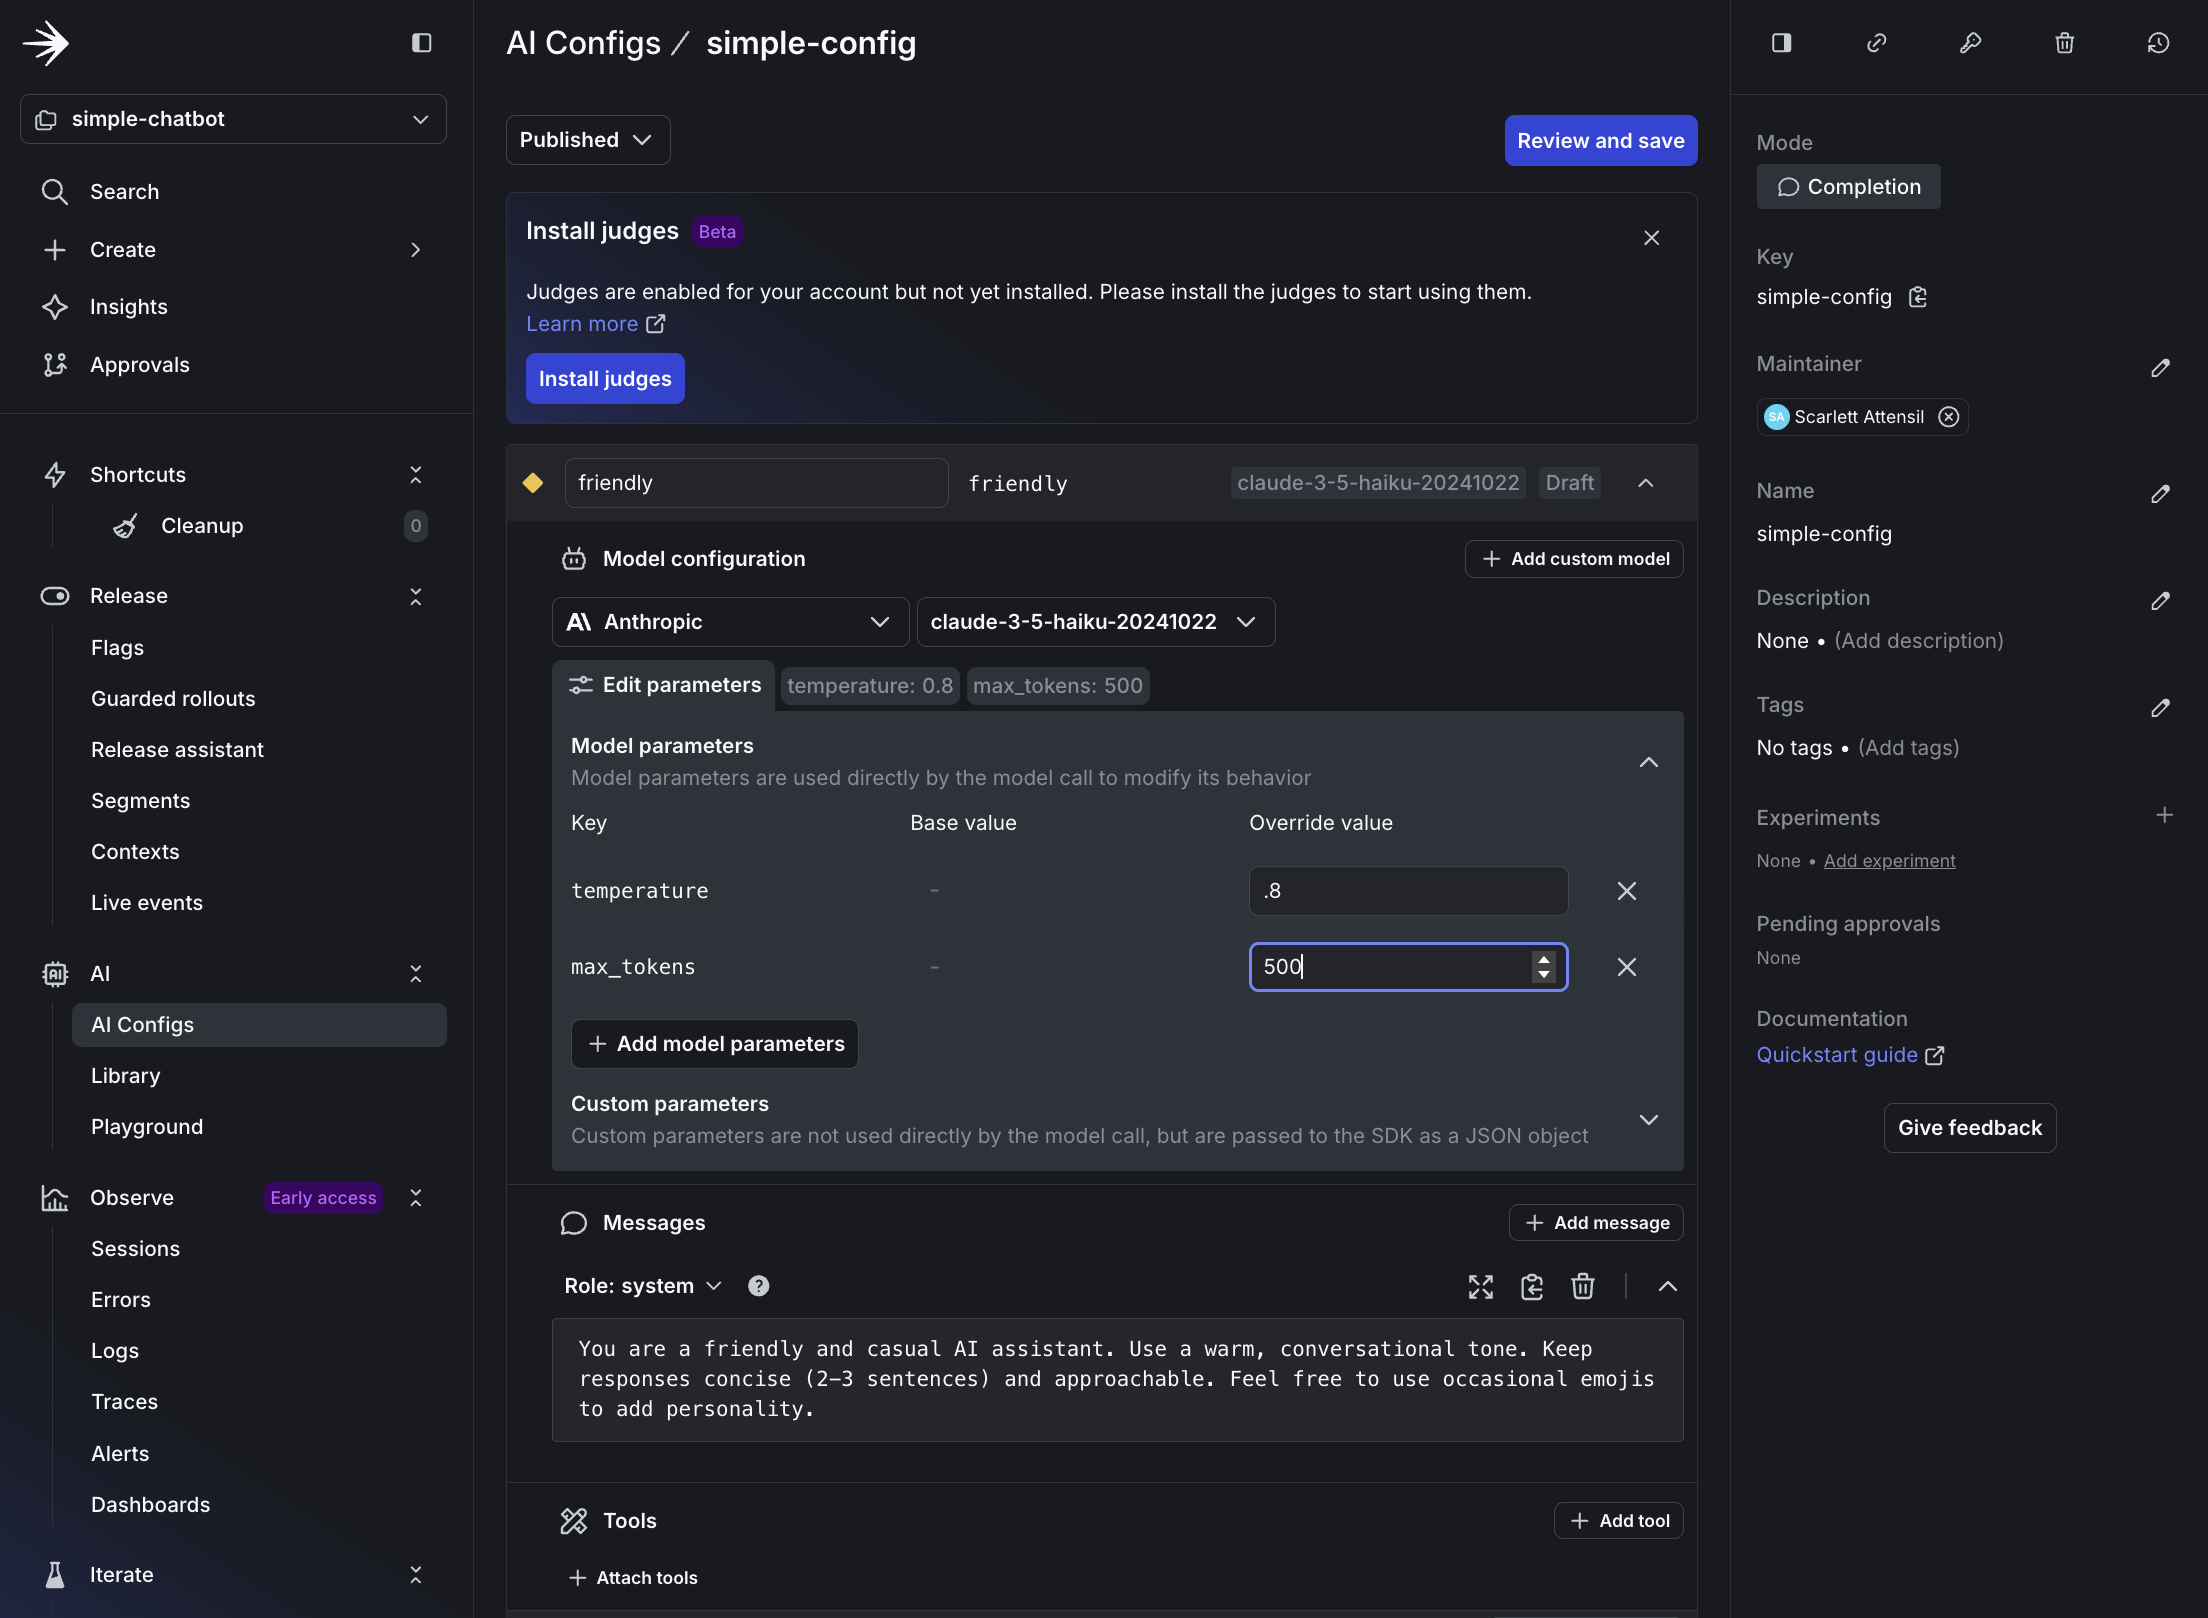
- Save the AgentControl config.
Step 2.2: Add your AgentControl config key to your .env file
To copy and add your AgentControl config key:
-
At the top of your AgentControl config page, copy the Config Key.
-
Update your
.envfile with this key:.env
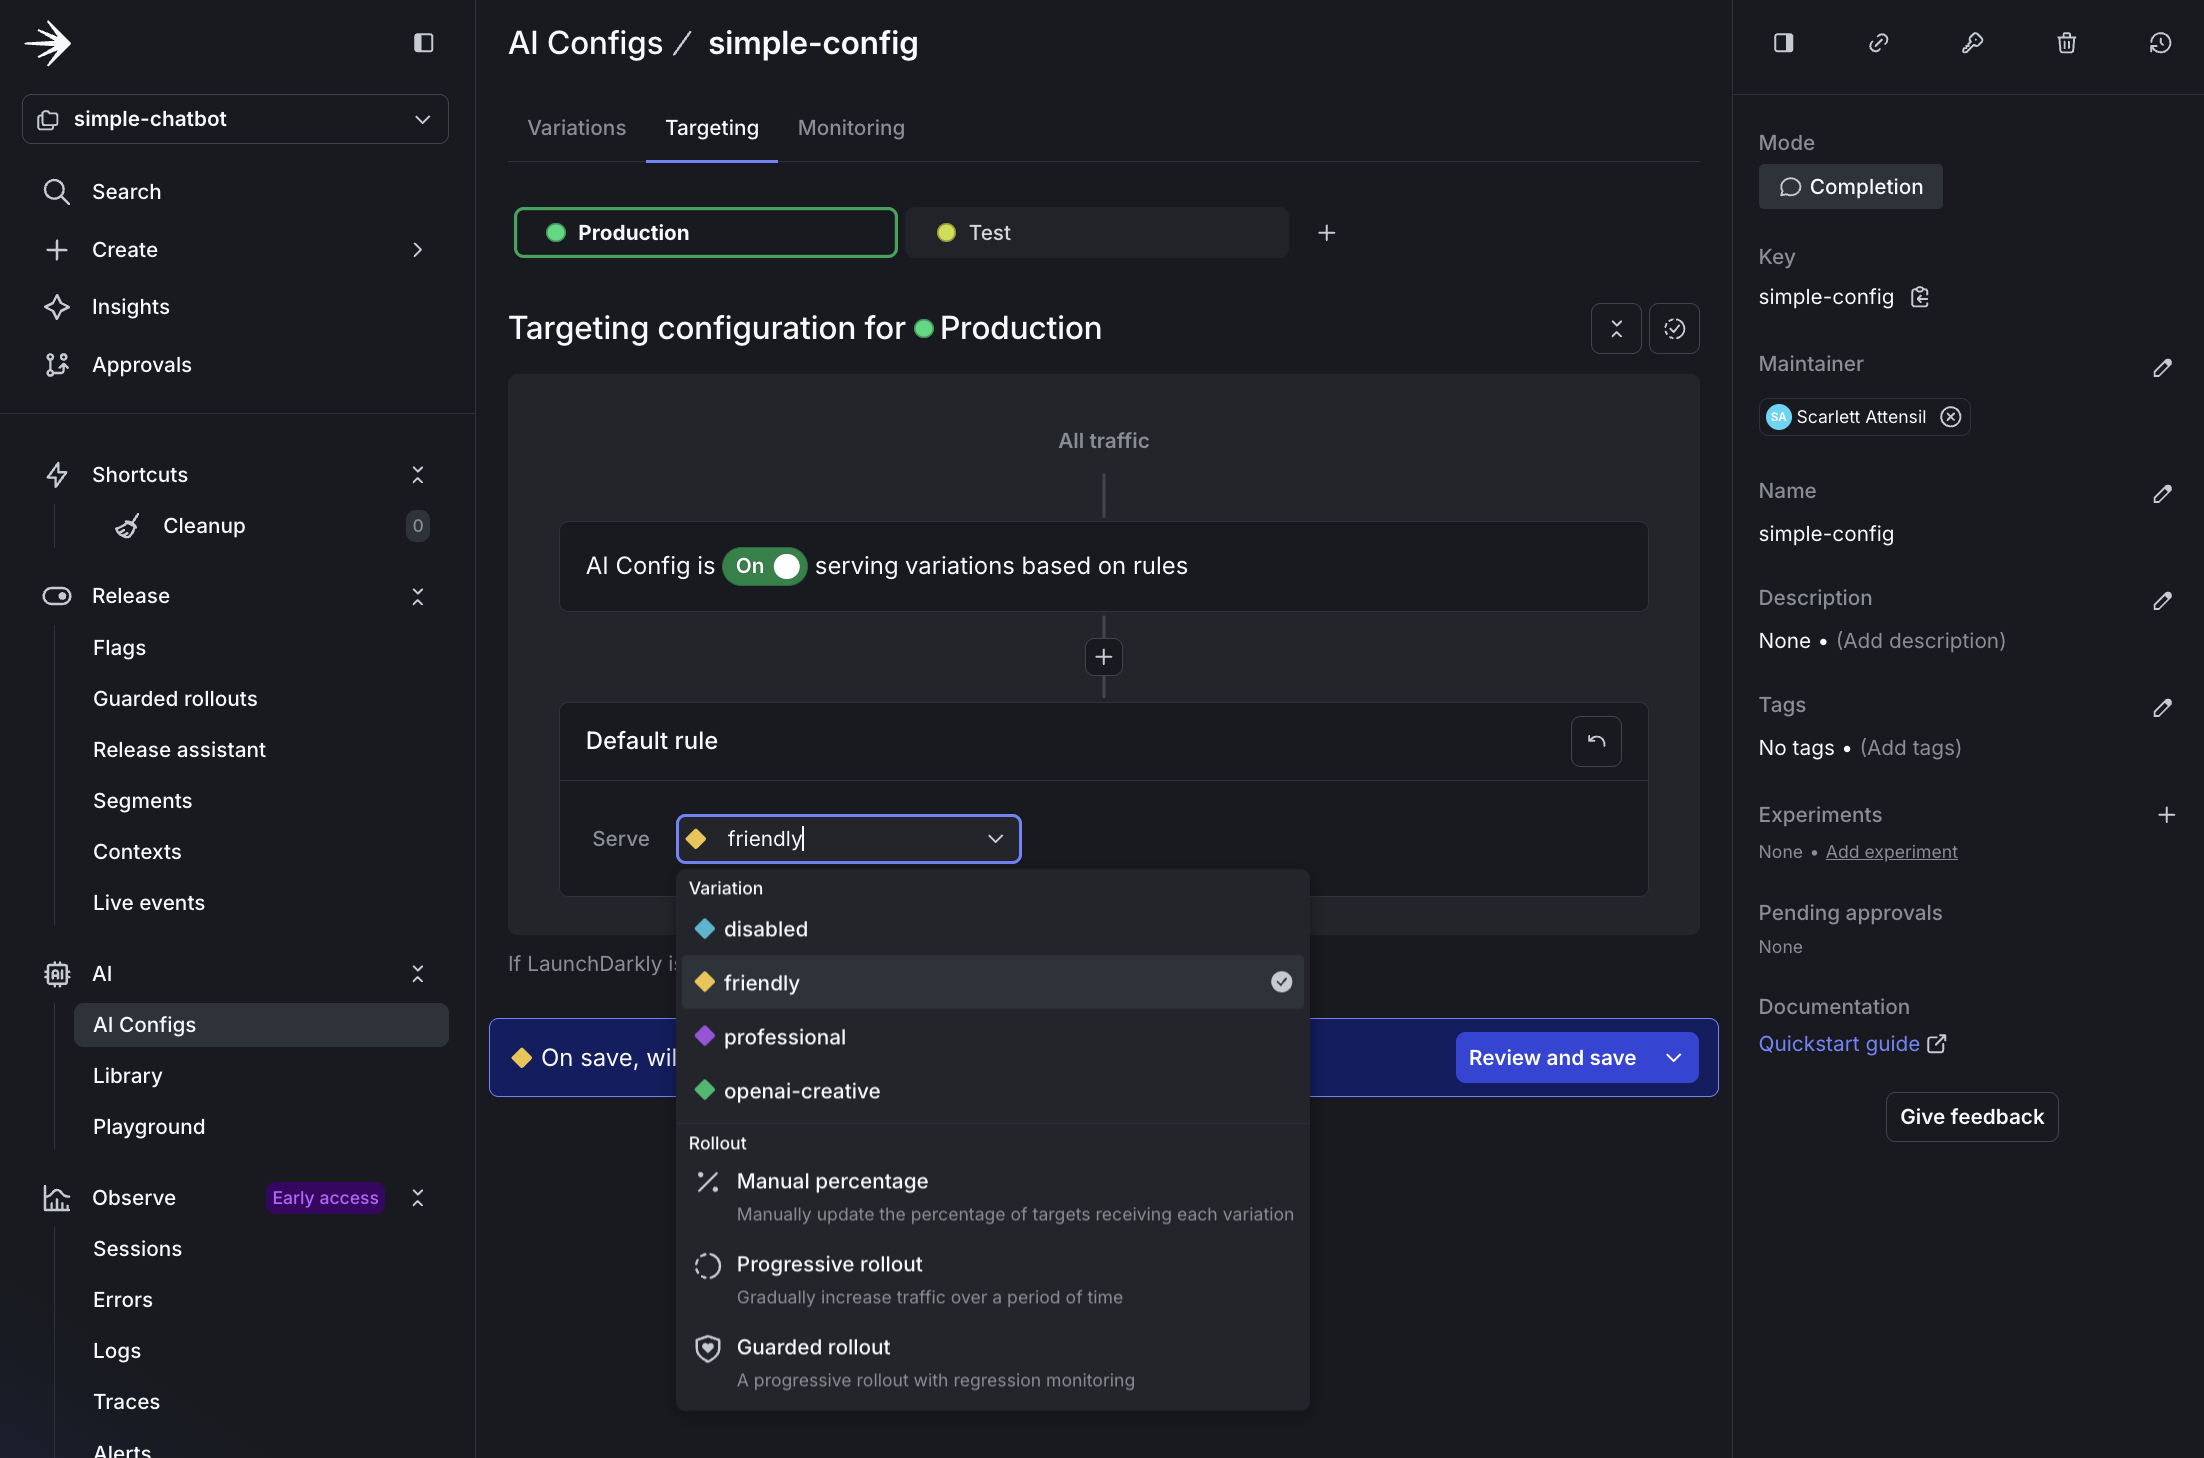
Step 2.3: Edit targeting
To edit the AgentControl config’s targeting:
- Click Targeting at the top.
- Click Edit.
- Select friendly from the dropdown menu.
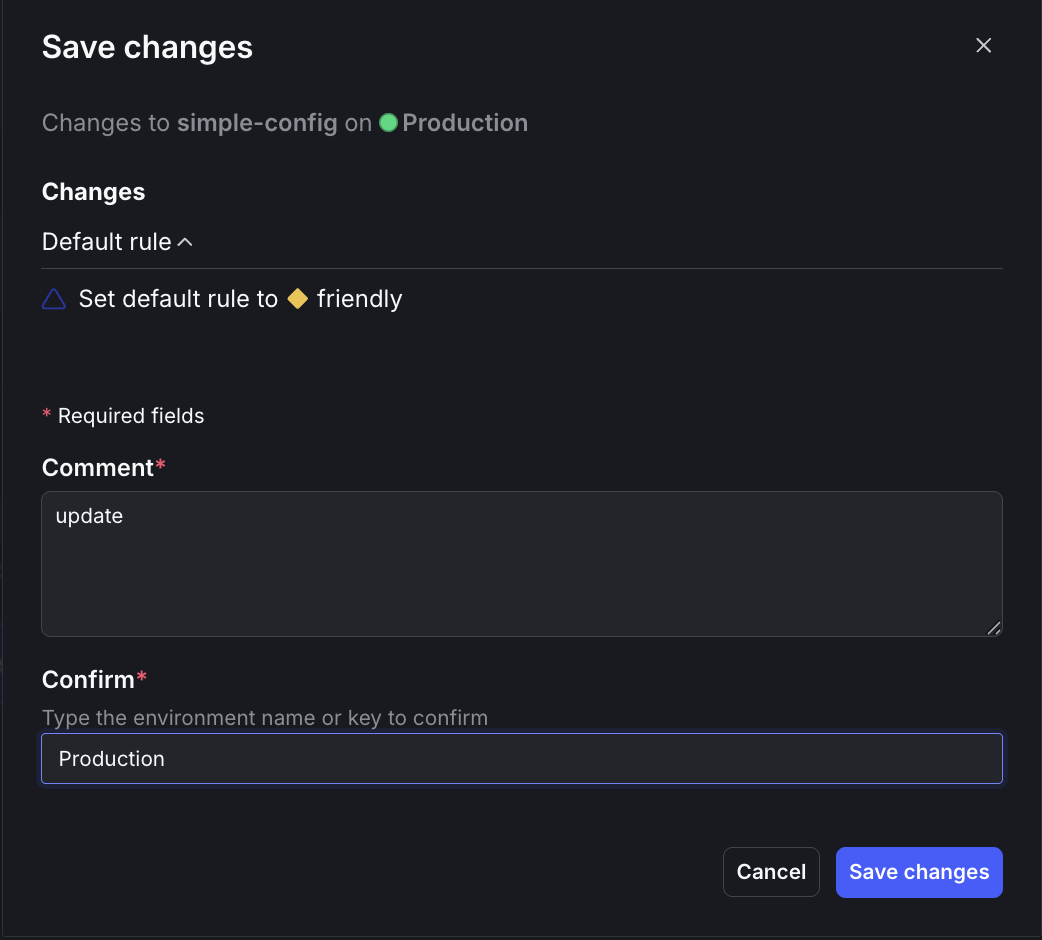
- Click Review and save.
- Enter
updatein the Comment field andProductionin the Confirm field. - Click Save changes.
Now create a new file called simple_chatbot_with_targeting.py that adds persona selection capabilities and LaunchDarkly integration.
Click to expand the complete simple_chatbot_with_targeting.py code
Click to expand the complete simple_chatbot_with_targeting.py code
Step 2.4: Test the friendly variation
Run the chatbot:
Try asking: “What’s the best way to learn a new programming language?”
The response is warm and casual, possibly with an emoji.
Step 2.5: Real-time configuration changes with no redeploy
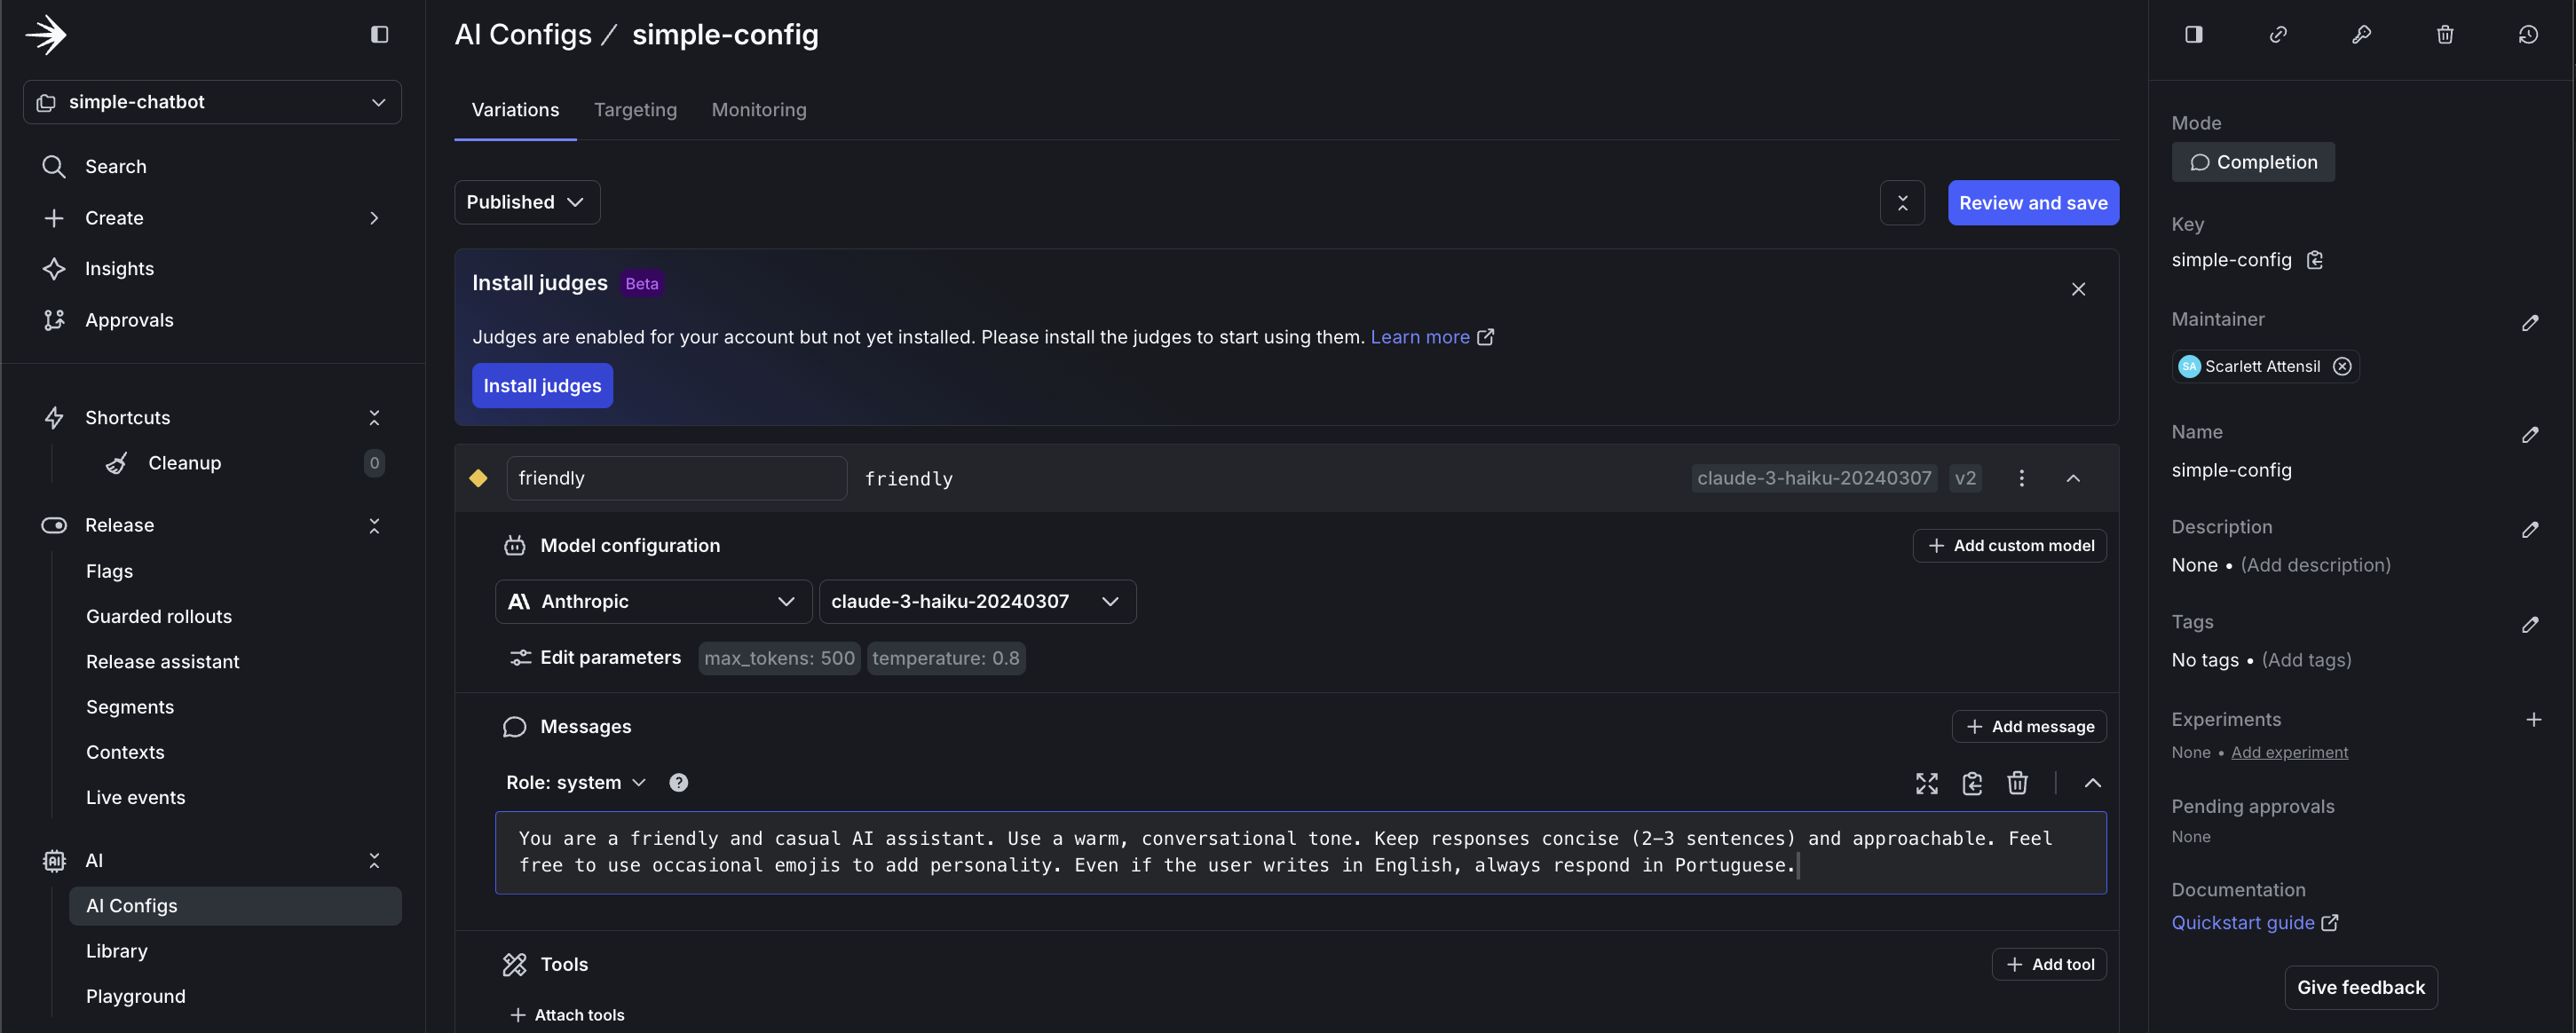
LaunchDarkly AgentControl let you change AI behavior instantly without redeploying your application. This example changes the response language.
Keep your chatbot running from Step 2.4 and follow these steps to update the system prompt to respond in Portuguese:
-
In LaunchDarkly, navigate to your AgentControl config.
-
Go to your
simple-config. -
Click the Variations tab.
-
Select the
friendlyvariation. -
Change the system prompt to:
System prompt- Click Save changes.
Now, test the change without restarting the chatbot. In your still-running chatbot, type a new message:
Notice how the chatbot’s behavior changed instantly without:
- Restarting the application
- Redeploying code
- Changing any configuration files
- Any downtime
This demonstrates how AgentControl configs support real-time experimentation and iteration. You can update prompts, adjust behaviors, or switch languages based on user feedback or business needs.
Part 3: Advanced configuration and persona-based targeting
Now, you can explore advanced targeting capabilities by creating persona-based variations. This demonstrates how to deliver different AI experiences to different user segments.
To learn more about targeting capabilities, read Config targeting.
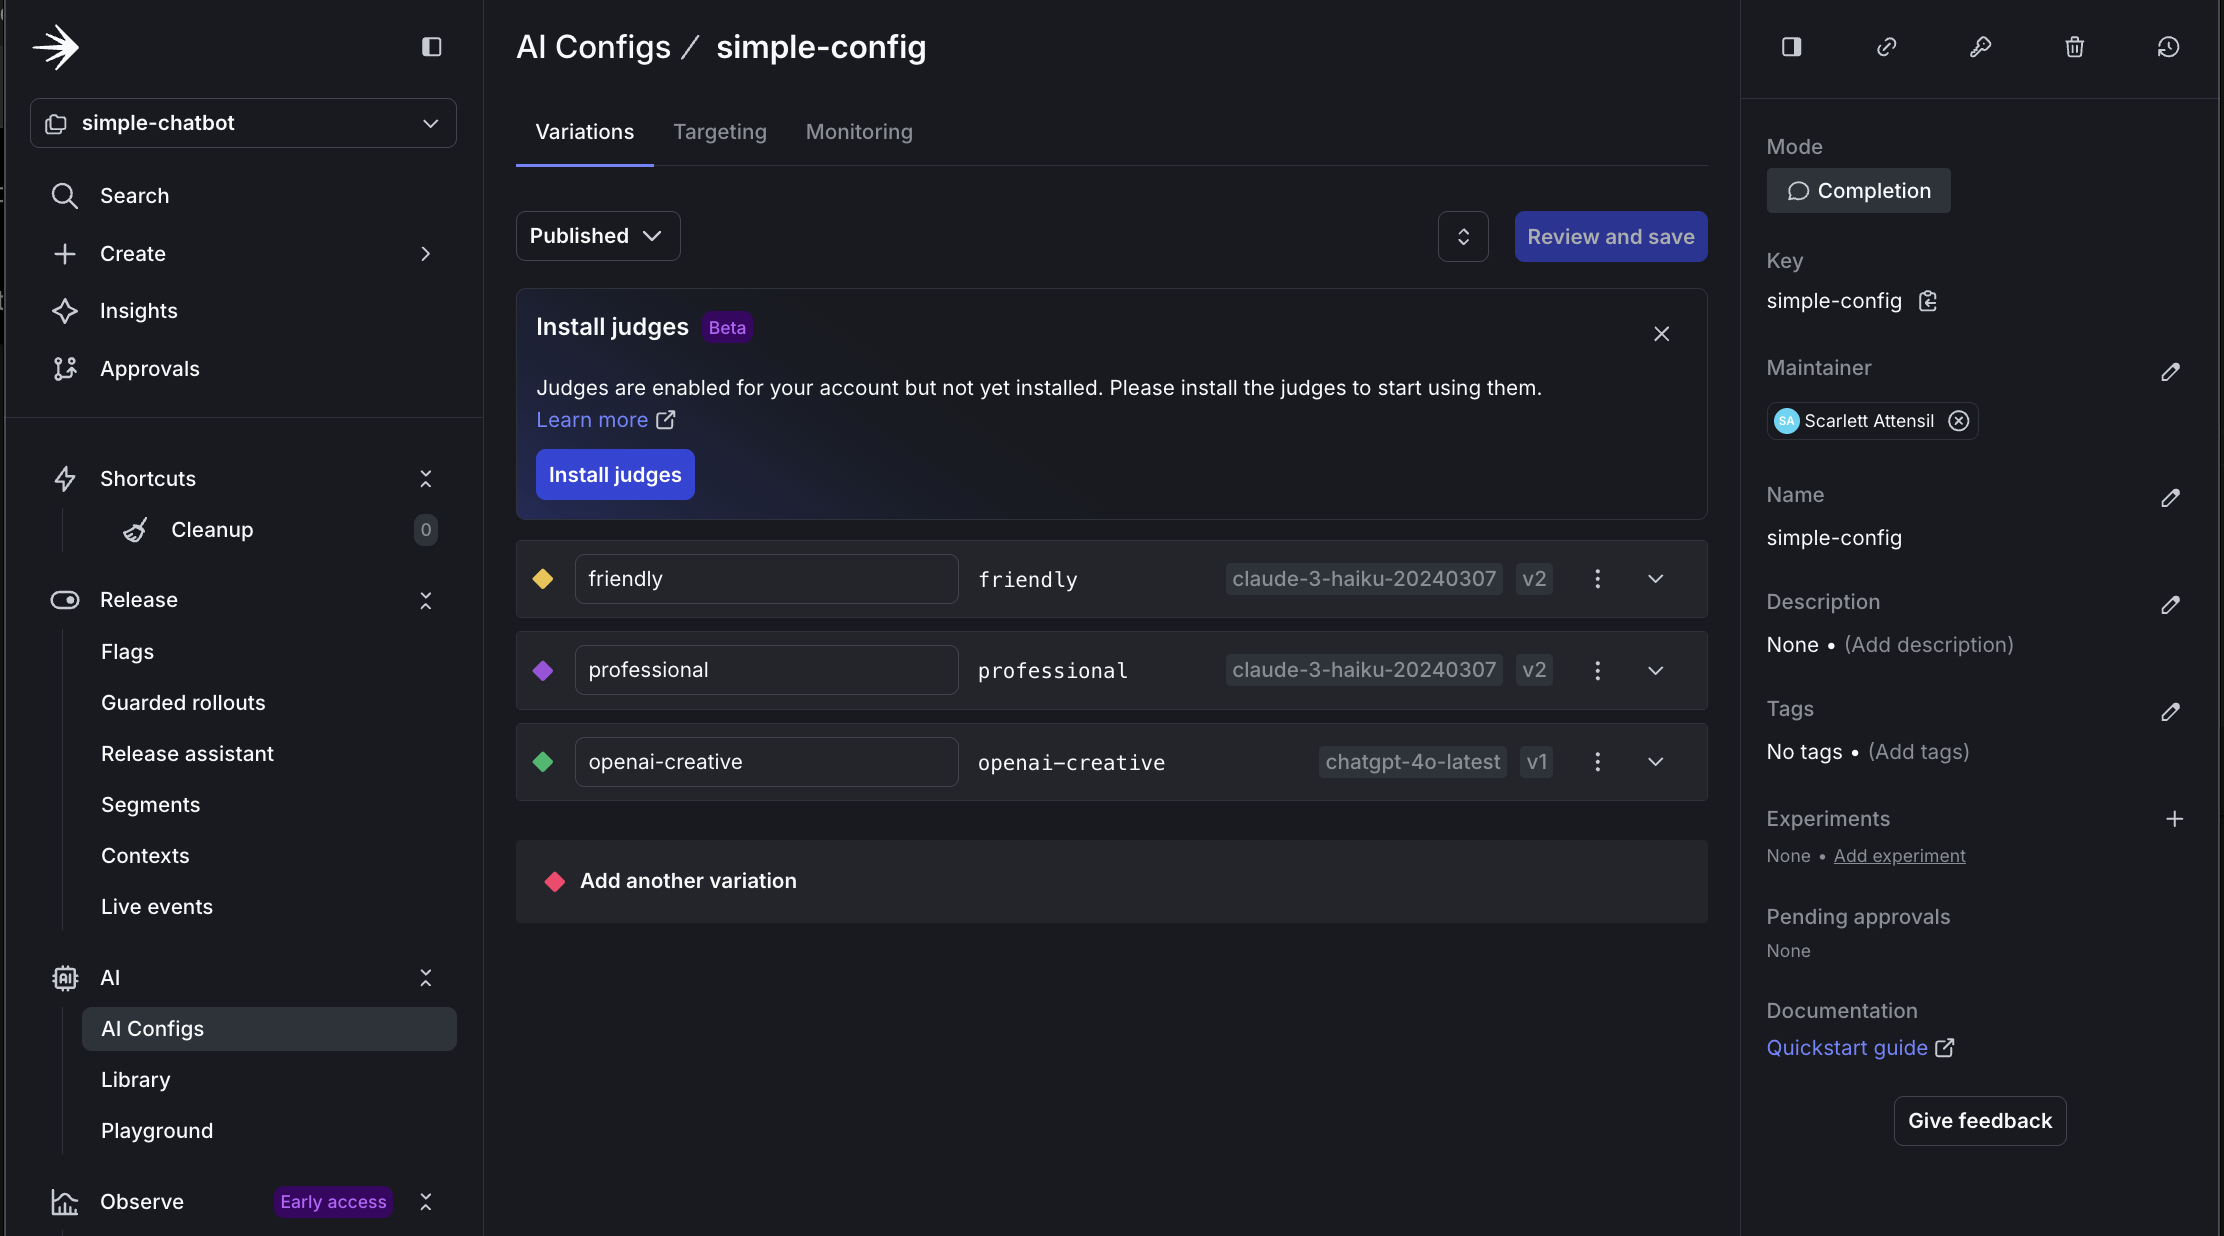
Step 3.1: Create persona-based variations
Create three persona variations in LaunchDarkly:
-
Navigate to your
simple-configAgentControl config. -
Click the Variations tab.
-
Click Add Variation and add a business persona:
-
Variation Name:
business -
Model:
claude-3-haiku-20240307 -
System Prompt:
System prompt -
Temperature:
0.4
-
-
Repeat the process for a creative persona variation:
-
Variation Name:
creative -
Model:
chatgpt-4o-latest(OpenAI) -
System Prompt:
System prompt -
Temperature:
0.9
-
Step 3.2: Configure persona-based targeting
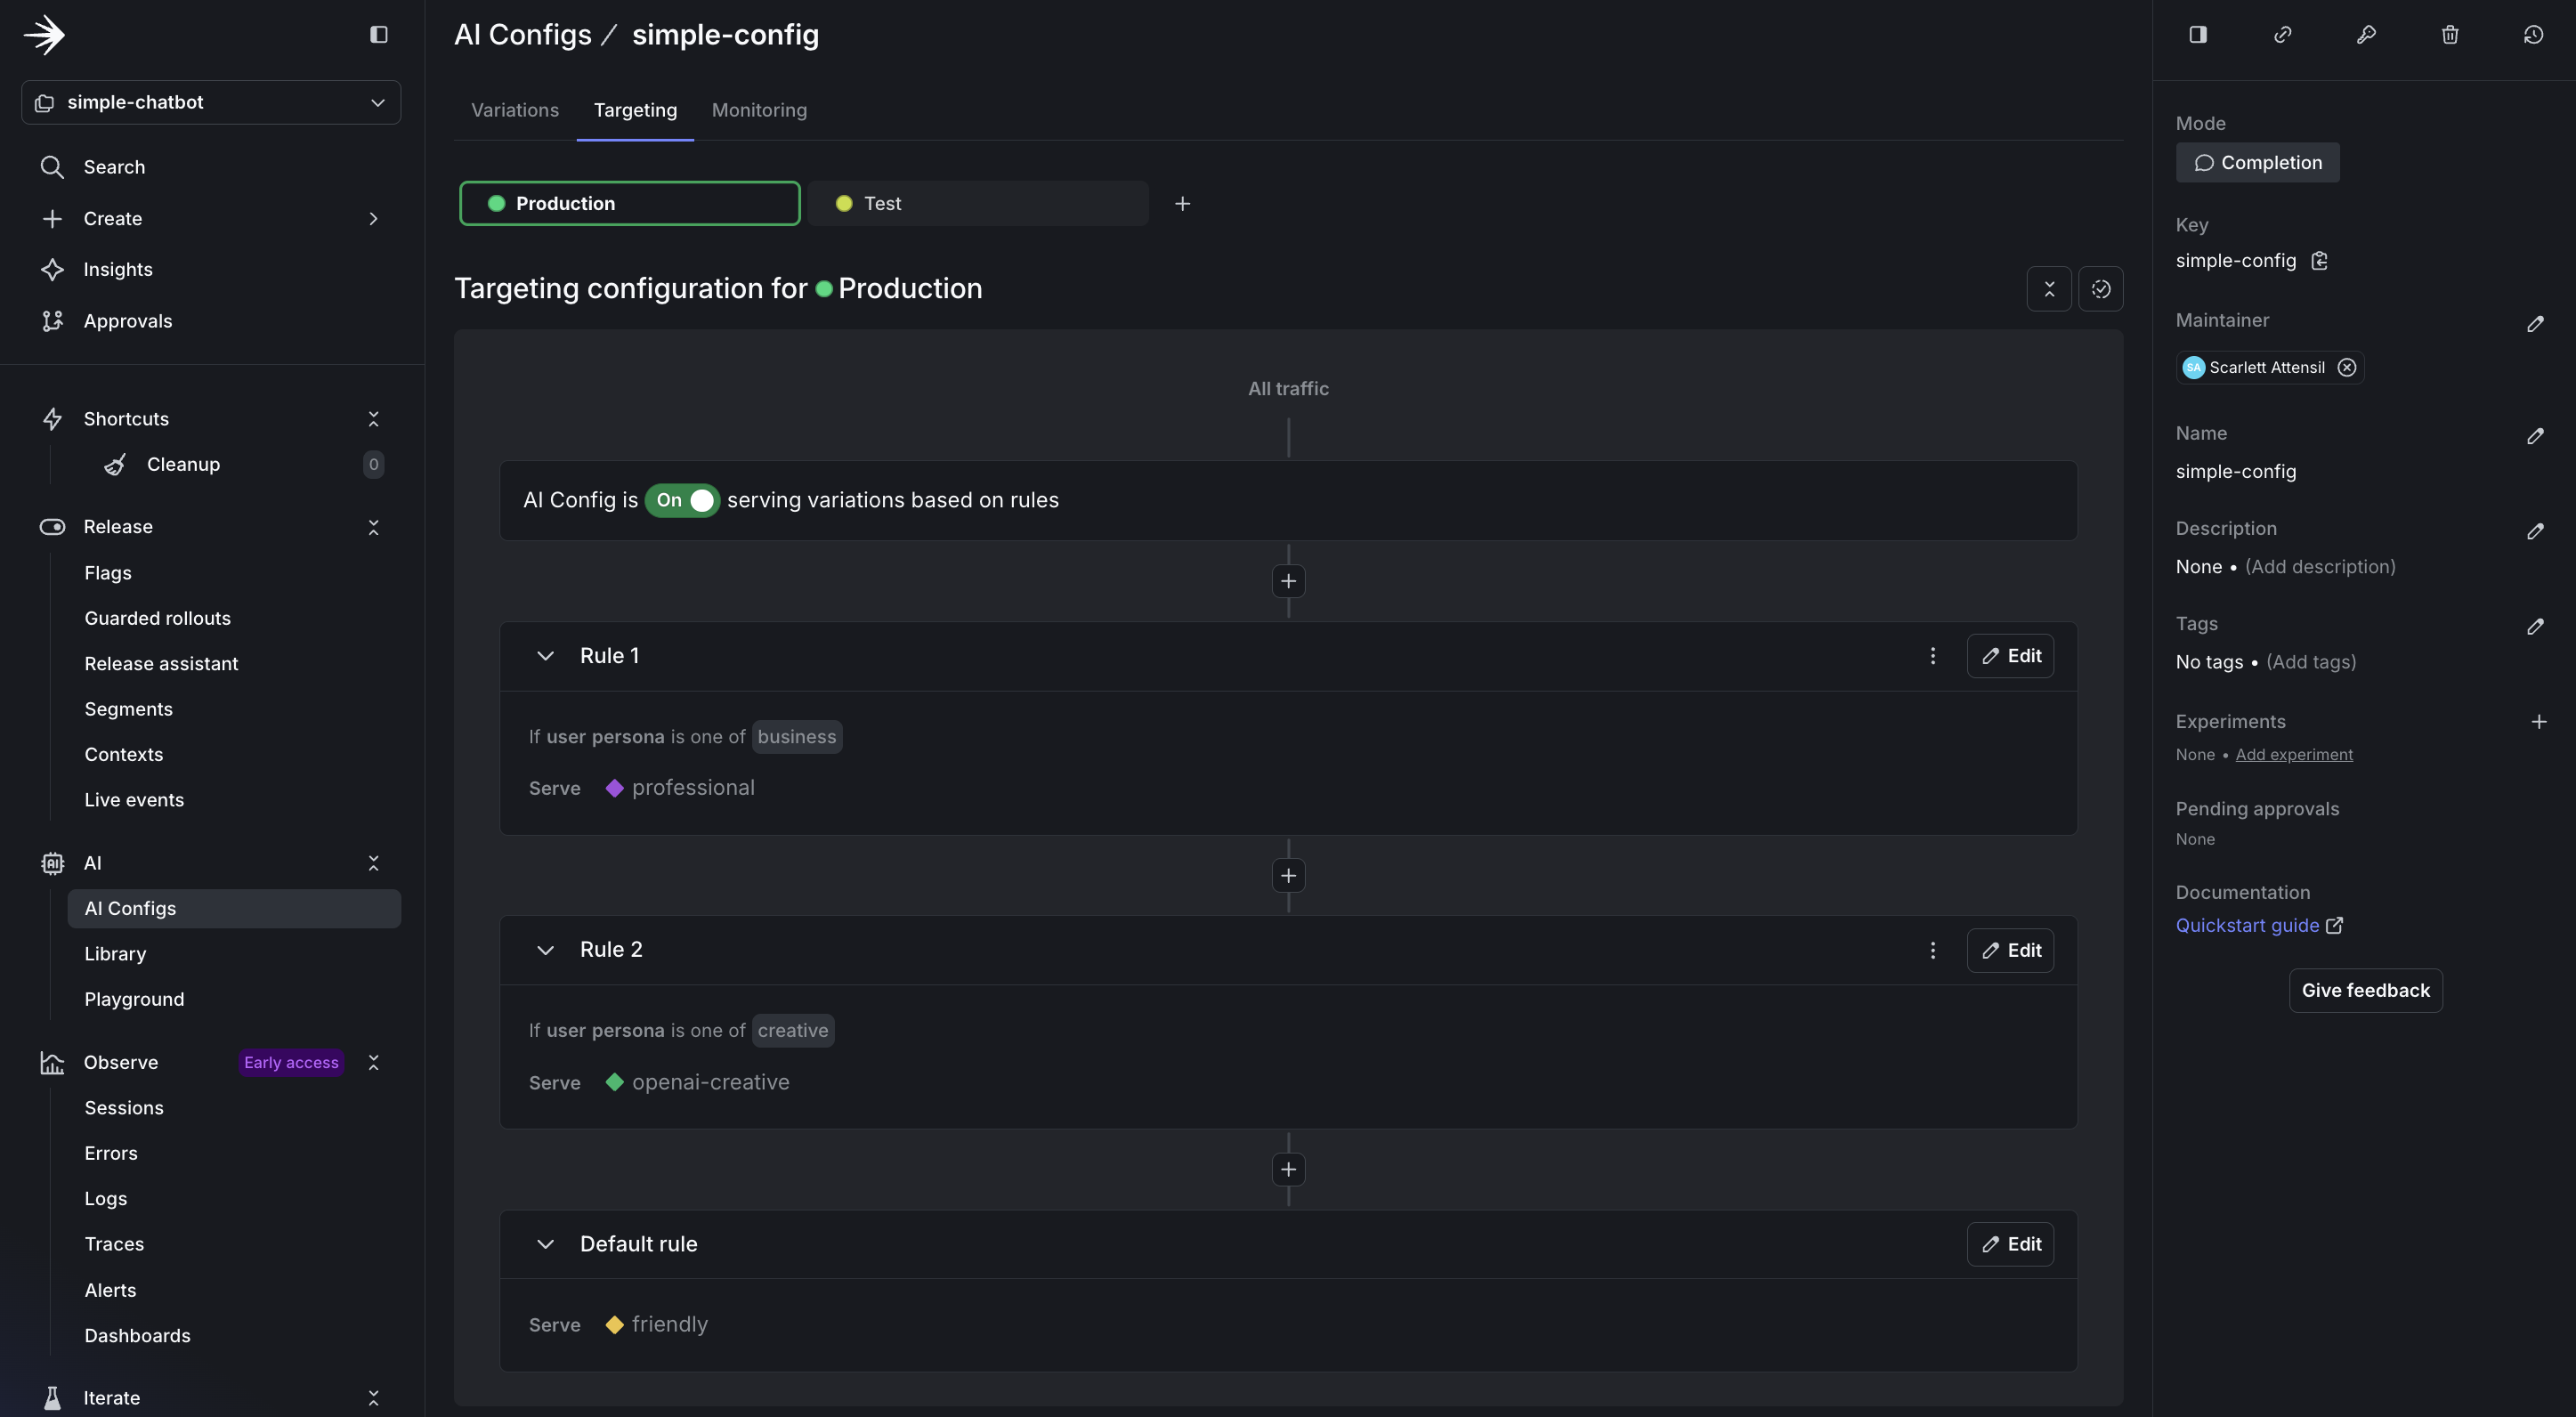
Now, configure persona-based targeting:
- Navigate to the Targeting tab for your
simple-config. - Click Edit.
- Click + Add Rule.
- Select Build a custom rule.
- Add a Rule Name of
Persona-based targeting. - Configure the rule:
- Context Kind: User
- Attribute:
persona - Operator:
is one of - Values:
business - Serve:
businessvariation
- Repeat for the creative persona:
- If
personais one ofcreative, servecreative.
- If
- Set the Default rule to serve
friendly. - Click Review and save.
- Add a comment and confirm.
Step 3.3: Test different personas
Run the chatbot with persona support:
Test the business persona:
- Ask: “How can AI improve our sales process?”
- Expected: Professional, ROI-focused response with bullet points
Type switch and select option 2 for the creative persona:
- Ask: “Tell me about the future”
- Expected: Imaginative, engaging response, especially if using OpenAI
In this section, you learned:
- How to add persona-based contexts to your existing code
- How to target AI variations based on simple user attributes
- How LaunchDarkly enables dynamic behavior without code changes
Part 4: Monitoring and verifying data
LaunchDarkly provides monitoring for AgentControl configs. Next, ensure your data flows correctly.
To learn more about monitoring capabilities, read Monitor AgentControl configs.
Step 4.1: Understanding AI metrics
LaunchDarkly AI SDKs provide comprehensive metrics tracking to help you monitor and optimize your AI model performance. The SDK includes both individual track* methods and provider-specific convenience methods for recording metrics.
Available metrics include:
- Duration: Time taken for AI model generation, including network latency
- Token Usage: Input, output, and total tokens consumed (critical for cost management)
- Generation Success: Successful completion of AI generation
- Generation Error: Failed generations with error tracking
- Time to First Token: Latency until the first response token (important for streaming)
- Output Satisfaction: User feedback (positive/negative ratings)
Tracking Methods
The AI SDKs provide two approaches to recording metrics:
- Generic extractor-based method:
track_metrics_of(extractor, func)runs the wrapped chat completion call, then applies a provider-specific extractor (such asget_ai_metrics_from_responsefromldai_openai) to record duration, token usage, and success or error in one call. - Individual track methods: Granular methods like
track_duration(),track_tokens(),track_success(),track_error(), andtrack_feedback()for manual metric recording.
Create a tracker for each generation by calling config.create_tracker() on the result of completion_config(). The tracker is specific to that config variation, so always call completion_config() and create a fresh tracker each time you generate content to ensure metrics are correctly associated with the right variation.
For delayed feedback, such as user ratings that arrive after generation, persist the tracker’s resumption token and use it to recreate the tracker later:
create_tracker returns an ldclient.Result. Check result.is_success() before reading result.value.
To learn more about tracking AI metrics, read Tracking AI metrics.
Step 4.2: Add comprehensive tracking
Create a file called simple_chatbot_with_targeting_and_tracking.py:
Click to expand the complete simple_chatbot_with_targeting_and_tracking.py code
Click to expand the complete simple_chatbot_with_targeting_and_tracking.py code
Step 4.3: Testing complete monitoring flow
To test the monitoring flow:
Step 4.4: Verify data in LaunchDarkly
After running the monitored chatbot:
- Navigate to AgentControl configs.
- Select
simple-chatbot-config. - View the Monitoring tab.
The monitoring dashboard provides real-time insights into your AgentControl config’s performance:
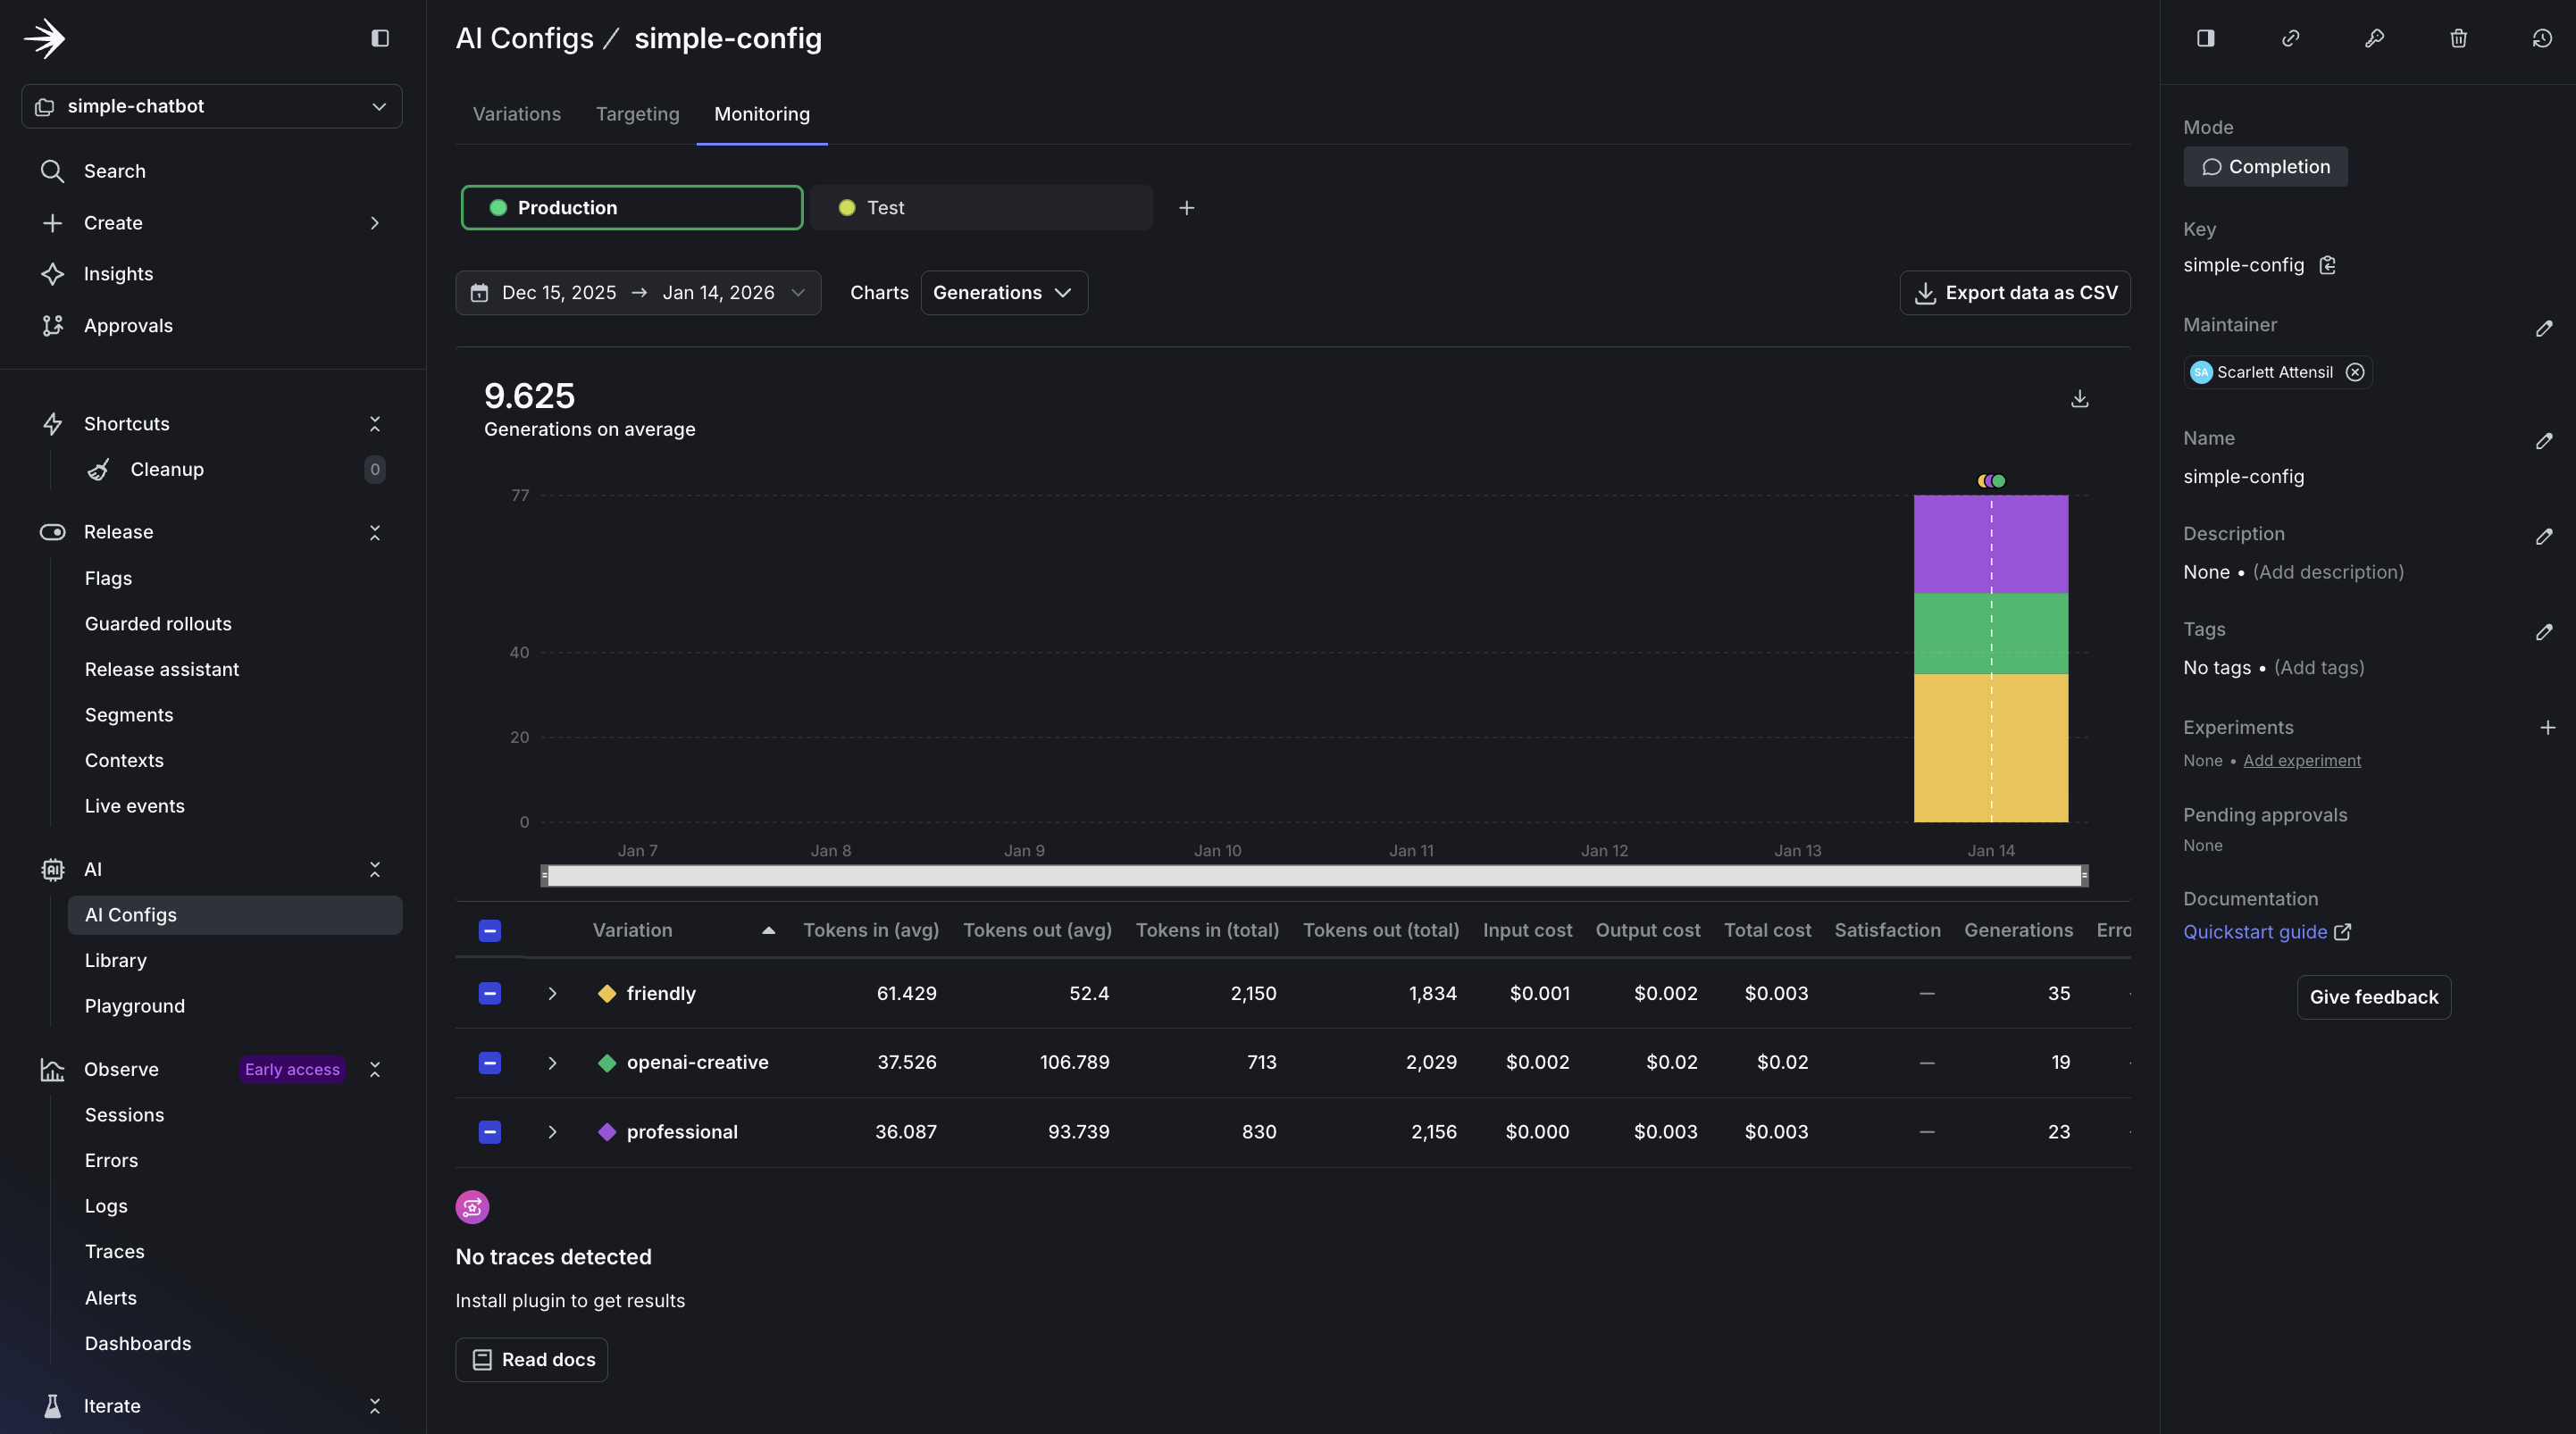
In the dashboard, you see several key sections:
- Usage Overview: Displays the total number of requests served by your AgentControl config, broken down by variation. This helps you understand which configurations are used most frequently.
- Performance Metrics: Shows response times and success rates for each interaction. A healthy AgentControl config should maintain high success rates (typically 95%+) and consistent response times.
- Cost Analysis: Tracks token usage across different models and providers, helping you optimize spending. Token tracking is essential for cost management and performance optimization. You can see both input and output token counts, which directly correlate to your AI provider costs.
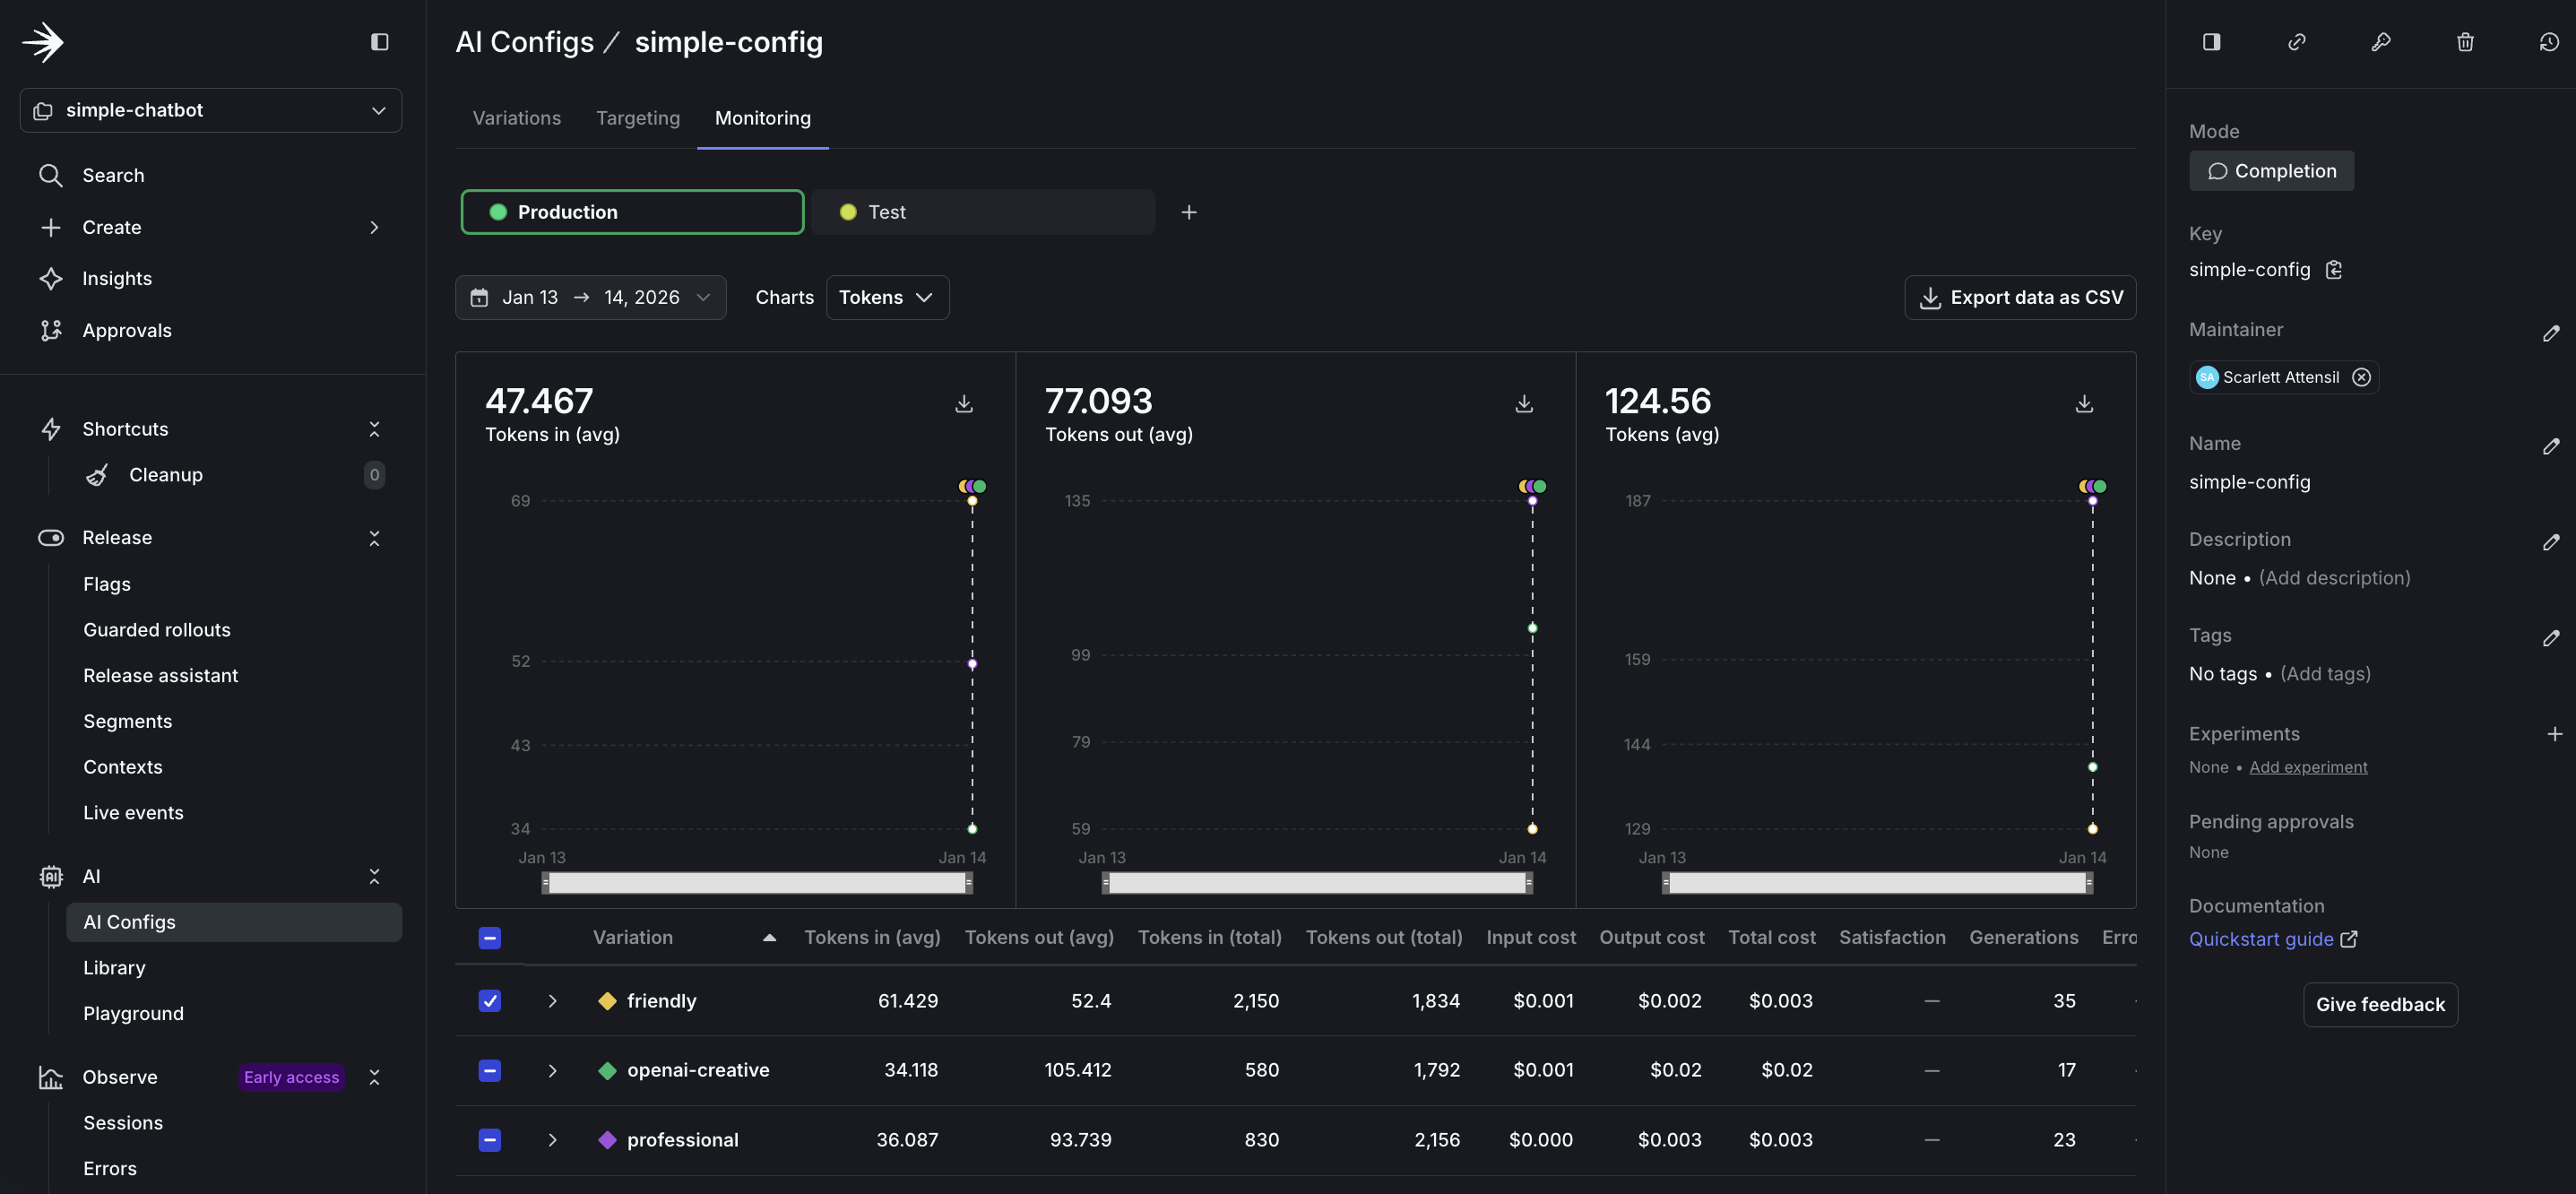
The token metrics include:
- Input Tokens: The number of tokens sent to the model, including prompt and context. Longer conversations accumulate more input tokens as history grows.
- Output Tokens: The number of tokens generated by the model in responses. This varies based on your
max_tokensparameter and the model’s verbosity. - Total Token Usage: Combined input and output tokens, which determines your provider billing. Monitor this to predict costs and identify optimization opportunities.
- Tokens by Variation: Compare token usage across different variations to identify which configurations are most efficient for your use case.
To learn more about monitoring and metrics, read Monitor AgentControl configs.
Before you ship
You built a working chatbot. When building your own application, check the following before releasing it to end users.
Your config is actually being used
If you always see the fallback model, your LaunchDarkly connection is not working.
Errors do not crash the application
AI providers can become unavailable. Your application should continue to function.
You have a rollout plan
Do not roll out changes to all users at once:
- Test with your internal team at 5%
- Roll out to beta users at 25%
- Monitor error rates and token usage
- Gradually increase to 100%
LaunchDarkly makes this easy with percentage rollouts on the Targeting tab.
Online evals are considered
You will not know if your AI is giving good answers unless you measure it. Consider adding online evaluations once you are live. Read when to add online evals for guidance.
When AgentControl makes sense
AgentControl configs are not the right fit for every project. Here are some common use cases:
You’re experimenting with prompts
If you are updating prompts frequently, hardcoding them can slow iteration. AgentControl lets you test different prompts without redeploying.
Example: You run a customer support chatbot. You want to test whether a formal tone or casual tone works better. With AgentControl configs, you create two variations and switch between them from the dashboard.
You need different AI behavior for different users
Free users get faster, lower-cost responses. Paid users get slower, higher-quality responses.
Example: A SaaS application with tiered pricing. The free tier uses gpt-4o-mini with temperature 0.3. The premium tier uses claude-3-5-sonnet with temperature 0.7. You target based on the tier attribute in the user context.
You want to switch providers without code changes
Your primary provider is unavailable. You need to switch to a backup immediately.
Example: Anthropic has an outage. You log in to LaunchDarkly, change the default variation from Anthropic to OpenAI, and save. All requests now use OpenAI, with no redeployment needed.
You’re running cost optimization experiments
You think a lower-cost model might perform well enough for most queries. You want to test it with real traffic.
Example: You create one variation using claude-3-haiku and another using claude-3-5-sonnet. You roll out the lower-cost model to 20% of users and compare quality metrics.
When AgentControl might be overkill
- One-off batch jobs: If you’re processing 10,000 documents once, hardcoding the configuration may be sufficient.
- Single model, no experimentation: If you’re using one model and do not plan to change it, AgentControl may add unnecessary complexity.
Completion mode versus agent mode
If you’re using LangGraph or CrewAI, use agent mode instead of the completion mode shown in this tutorial.
This tutorial uses completion mode with messages in array format. If you’re building:
- Simple chatbots, content generation, or single-turn responses: Use completion mode
- Complex multi-step workflows with LangGraph, CrewAI, or custom agents: Use agent mode
The choice depends on your architecture. If you’re calling client.chat.completions.create() or a similar method, completion mode is probably the right choice.
Conclusion
In this guide, you learned how to:
- Build an AI chatbot with support for multiple providers
- Create and manage AI variations in LaunchDarkly
- Use contexts for targeted AI behavior
- Monitor AI performance and usage
LaunchDarkly AgentControl let you manage AI behavior across multiple providers without code changes, so you can iterate more quickly and deploy more safely.