


I’ll be honest: I’m one of those millennials who spent most of my childhood battling Pokémon with my brother. Naturally, this fandom has a soft spot in my heart. But how can we truly test someone’s knowledge of Pokémon types?
Let’s walk through how to build a Next.js Pokédex, which has a built-in game hidden behind a feature flag. For this project, we’ll use the PokéAPI, Next.js, Typescript, and Vercel, as well as our trusty companion in feature-flagging, LaunchDarkly. This project’s frontend and visual look was inspired by the gorgeous Pokédex CSS grid by Emmanuel Tabarez on Codepen.
Trainers, are you ready? Because I choose you to come along with me on this adventure!
Building your Pokédex.
Let's walk through the steps to set up LaunchDarkly in our Next.js Pokédex and use it to toggle between your standard Pokédex and an interactive Pokédex game. Ready? It's time to catch 'em all... features, that is.
👋🏻 PS: Just want to get up and going? Checkout the finished project on GitHub!
Setting up the project
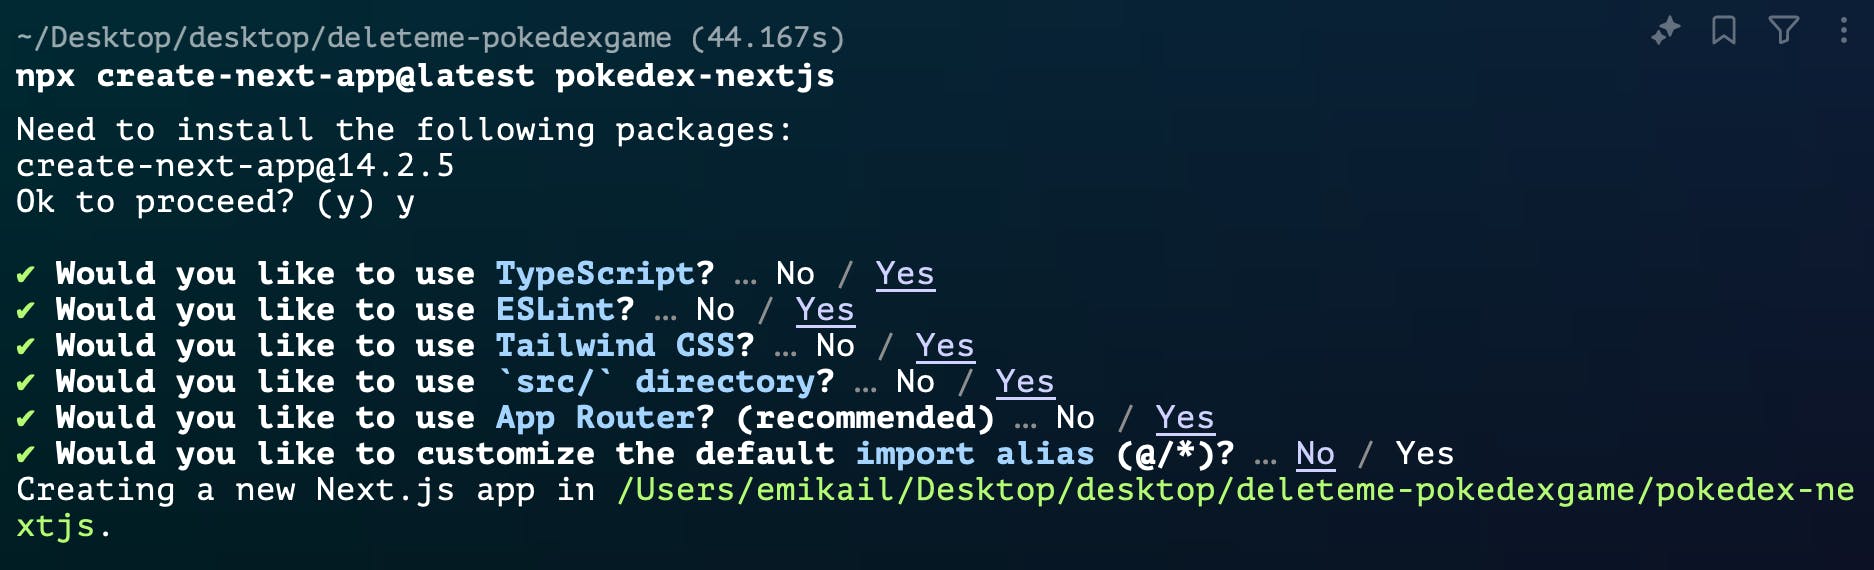
Create a new Next.js project in your terminal using the command:
npx create-next-app@latest pokedex-nextjsChoose the following options when prompted:
✔ Ok to proceed? (y) y
✔ Would you like to use TypeScript? … Yes
✔ Would you like to use ESLint? … Yes
✔ Would you like to use Tailwind CSS? … Yes
✔ Would you like to use `src/` directory? … Yes
✔ Would you like to use App Router? (recommended) … Yes
✔ Would you like to customize the default import alias (@/*)? … No
then, navigate to your project folder with the command:
cd pokedex-nextjsInstalling dependencies
The additional dependency that we’ll be adding to this application is LaunchDarkly. We’ll use it to toggle on and off our ‘game mode’ in our application. In this instance, we’ll use the LaunchDarkly JavaScript Client SDK for our application.
This client-side SDK initializes within the browser. This means that the SDK will run in the user’s browser, and feature flags will be evaluated locally. Since our use case for LaunchDarkly is operating in the front end, the client-side SDK will fit our needs.
Install LaunchDarkly into your application by running the command:
npm install launchdarkly-js-client-sdkCreating the layout
For this project, we’ll be working within the Next.js layout structure. In your IDE, navigate to the layout.tsx file. This file's path should be under src/app/layout.tsx.
In this file, we start by adding our import statements. Here, we import the necessary types and components. The Metadata type is for SEO, Press_Start_2P is our custom font, and we import global styles.
import type { Metadata } from "next";
import { Press_Start_2P } from 'next/font/google';
import "./globals.scss";
Then, let’s configure our font. I’m using a Google Font that looks like a pixel-inspired game font. It’s a good best practice to have a fallback option, in this case, a monospace, sans-serif font.
const pressStart2P = Press_Start_2P({
  weight: '400',
  subsets: ['latin'],
  display: 'swap',
  fallback: ['monospace', 'sans-serif'],
});
Our layout.tsx file also includes the metadata for your application. This will impact your SEO and how it appears in search results. Add the metadata as presented below.
export const metadata: Metadata = {
  title: "Pokedex App",
  description: "A Next.js Pokedex application",
};
Now, let’s get to the meat of things in building our main layout component. We’ll be wrapping all the pages within our application, applying the custom font and consistent structure. This will happen through a RootLayout component as created below.
export default function RootLayout({
  children,
}: Readonly<{
  children: React.ReactNode;
}>) {
  return (
    <html lang="en">
      <body className={pressStart2P.className}>
        {children}
      </body>
    </html>
  );
}
Styling our Pokédex
Before building out individual components, let’s style our application to match the Pokédex vibes. This application’s visual look was inspired by the gorgeous Pokédex CSS grid by Emmanuel Tabarez on Codepen.
First, create a PokemonDisplay.module.scss file in the src/app/components directory.
Within the file, PokemonDisplay.module.scss, add our styles.
First let’s set up our main container and the Pokédex frame, giving it that classic red look.
And lastly, what Pokédex game is good if it’s unavailable on the go? Let’s ensure our design is responsive so you can meet Pokémon where they are (or challenge your fellow trainers on your mobile devices)!
.main {
  width: 100%;
  min-height: 100vh;
  background: url('https://wallpapertag.com/wallpaper/middle/6/2/2/572651-pokemon-forest-background-1920x1200-samsung.jpg');
  background-size: cover;
  display: flex;
  justify-content: center;
  align-items: center;
  padding: 20px;
}

.pokedex {
  width: 100%;
  max-width: 800px;
  background-color: #dd0b2d;
  border: #88061c 10px solid;
  border-top-width: 20px;
  border-radius: 20px;
  padding: 20px;
  display: flex;
  flex-direction: column;
  font-family: 'Press Start 2P', monospace, sans-serif;
}

.cameraDisplay {
  background-color: #E5F6FC;
  border-radius: 5%;
  border: 15px solid #E6E6E6;
  padding: 10px;
  display: flex;
  justify-content: center;
  align-items: center;
  margin-bottom: 20px;

  img {
    width: 100%;
    height: auto;
    max-width: 300px;
  }
}

.quizMode, .randomMode {
  background-color: #356242;
  border: 5px solid #E6E6E6;
  padding: 15px;
  border-radius: 10px;
  font-family: 'Press Start 2P', monospace, sans-serif;
}

.scoreBoard {
  display: flex;
  justify-content: space-between;
  margin-bottom: 15px;
  font-size: 14px;
}

.typeButtons {
  display: flex;
  justify-content: space-around;
  margin-top: 20px;
}

.pokemonName {
  text-align: center;
  font-size: 24px;
  margin-bottom: 20px;
  color: #fff;
  text-transform: capitalize;
}

.statsDisplay {
  overflow-y: auto;
  max-height: 300px;

  h3 {
    margin: 10px 0;
  }

  ul {
    margin: 10px 0;
    padding-left: 20px;

    li {
      margin-bottom: 5px;
    }
  }
}

.quizMode {
  button {
    padding: 10px 20px;
    margin: 5px;
    font-family: 'Press Start 2P', monospace, sans-serif;
    font-size: 16px;
    text-transform: uppercase;
    background-color: #ffcb05;
    border: 3px solid #3c5aa6;
    border-radius: 5px;
    cursor: pointer;
    transition: all 0.3s ease;
    box-shadow: 4px 4px 0 #3c5aa6;

    &:hover {
      background-color: #3c5aa6;
      color: #ffcb05;
      transform: translate(2px, 2px);
      box-shadow: 2px 2px 0 #3c5aa6;
    }

    &:active {
      transform: translate(4px, 4px);
      box-shadow: none;
    }
  }
}

@media (max-width: 600px) {
  .pokedex {
    border-width: 5px;
    border-top-width: 10px;
  }

  .cameraDisplay {
    border-width: 10px;
  }

  .pokemonName {
    font-size: 20px;
  }

  .typeButtons button {
    font-size: 12px;
    padding: 8px 16px;
  }
}
With these styles, your Pokédex will look fantastic and feel like a real device from the Pokémon universe. The Sass module system in Next.js allows us to keep our styles scoped to specific components, preventing style conflicts and keeping our code organized.
Pulling in Pokémon data
First, we’ll set up a new file at src/app/hooks/usePokemonData.ts, where we'll write our custom hook to call in the Pokémon Data from the PokéAPI. Consider this your Pokédex’s brain.
Within the usePokemonData.ts file, let’s start by adding our imports:
'use client';

import { useState, useEffect, useCallback } from 'react';
import { initialize, LDClient } from 'launchdarkly-js-client-sdk';
The 'use client' directive tells Next.js this is a client-side component. We import necessary React hooks and LaunchDarkly SDK components.
Next, we define our PokemonData interface:
interface PokemonData {
  name: string;
  id: number;
  types: { type: { name: string } }[];
  sprites: { front_default: string };
}
Now, let's look at our usePokemonData function:
export function usePokemonData() {
  const [pokemon, setPokemon] = useState<PokemonData | null>(null);
  const [isLoading, setIsLoading] = useState(true);
  const [error, setError] = useState<string | null>(null);
  const [ldClient, setLdClient] = useState<LDClient | null>(null);
  const [isQuizMode, setIsQuizMode] = useState(false);
  const [score, setScore] = useState(0);
  const [attempts, setAttempts] = useState(0);
  const [gameOver, setGameOver] = useState(false);
These state variables manage our app's data and game state.
Next, let’s initialize LaunchDarkly using a useEffect hook and set it up to have a quiz mode based on the feature flag. I’ve also added some logging and error messages just in case something goes wrong so we can identify where to fix it.
  useEffect(() => {
    const initLaunchDarkly = async () => {
      const clientSideId = process.env.NEXT_PUBLIC_LD_CLIENT_SIDE_SDK;
      console.log('LaunchDarkly Client Side ID:', clientSideId);
      if (!clientSideId) {
        console.error('LaunchDarkly client-side ID is not set');
        return;
      }
      try {
        const client = initialize(clientSideId, { anonymous: true });
        await client.waitForInitialization();
        console.log('LaunchDarkly client initialized successfully');
        setLdClient(client);
        const quizModeValue = client.variation('quiz-mode', false);
        console.log('Quiz mode value:', quizModeValue);
        setIsQuizMode(quizModeValue);
      } catch (error) {
        console.error('Error initializing LaunchDarkly:', error);
        setIsQuizMode(false);
      }
    };

    initLaunchDarkly();
  }, []);
Now, let’s add a function that fetches a random Pokémon, but not just any random Pokémon, a Pokémon of the correct type. Our quiz only has grass, water, and fire type Pokémon, so we want to ensure that we’re only surfacing those types of Pokémon.
  const fetchNewPokemon = useCallback(async () => {
    const allowedTypes = ['grass', 'water', 'fire'];
    try {
      setIsLoading(true);
      let newPokemon: PokemonData;
      do {
        const randomId = Math.floor(Math.random() * 898) + 1;
        const response = await fetch(`https://pokeapi.co/api/v2/pokemon/${randomId}`);
        if (!response.ok) {
          throw new Error(`HTTP error! status: ${response.status}`);
        }
        newPokemon = await response.json();
      } while (isQuizMode && !newPokemon.types.some(type => allowedTypes.includes(type.type.name)));
      setPokemon(newPokemon);
    } catch (e) {
      console.error('Error fetching Pokemon:', e);
      setError('Failed to fetch Pokemon. Please try again.');
    } finally {
      setIsLoading(false);
    }
  }, [isQuizMode]);
Let's also add another useEffect to call fetchNewPokemon when isQuizMode changes.
useEffect(() => {
    fetchNewPokemon();
  }, [isQuizMode, fetchNewPokemon]);
Now, let’s build the logic for guessing Pokemon types in quiz mode; we’ll do this by creating a function called handleTypeGuess:
  const handleTypeGuess = (guessedType: string) => {
    if (!pokemon || gameOver) return;

    const correctTypes = pokemon.types.map(type => type.type.name);
    if (correctTypes.includes(guessedType)) {
      setScore(prevScore => prevScore + 1);
      fetchNewPokemon();
    } else {
      setAttempts(prevAttempts => prevAttempts + 1);
      if (attempts >= 2) {
        setGameOver(true);
      }
    }
  };
Finally, we’ll need to add a resetGame function that resets the game state when it’s completed, preparing you for a new round.
  const resetGame = () => {
    setScore(0);
    setAttempts(0);
    setGameOver(false);
    fetchNewPokemon();
  };
Lastly, this hook ends by returning all necessary values:
  return {
    pokemon,
    isLoading,
    error,
    isQuizMode,
    score,
    attempts,
    gameOver,
    fetchNewPokemon,
    handleTypeGuess,
    resetGame
  };
}
Creating the Feature Flag in LaunchDarkly
The next steps will require us to add our LaunchDarkly client-side SDK key. Let’s walk through how to find this key and set up our first feature flag.
Login or create a LaunchDarkly account
Log in to your existing LaunchDarkly account or create a new one.
PS: Are you new to LaunchDarkly? We have a Developer plan that is perfect for getting started with projects like this.
If logging in from a new account for the first time
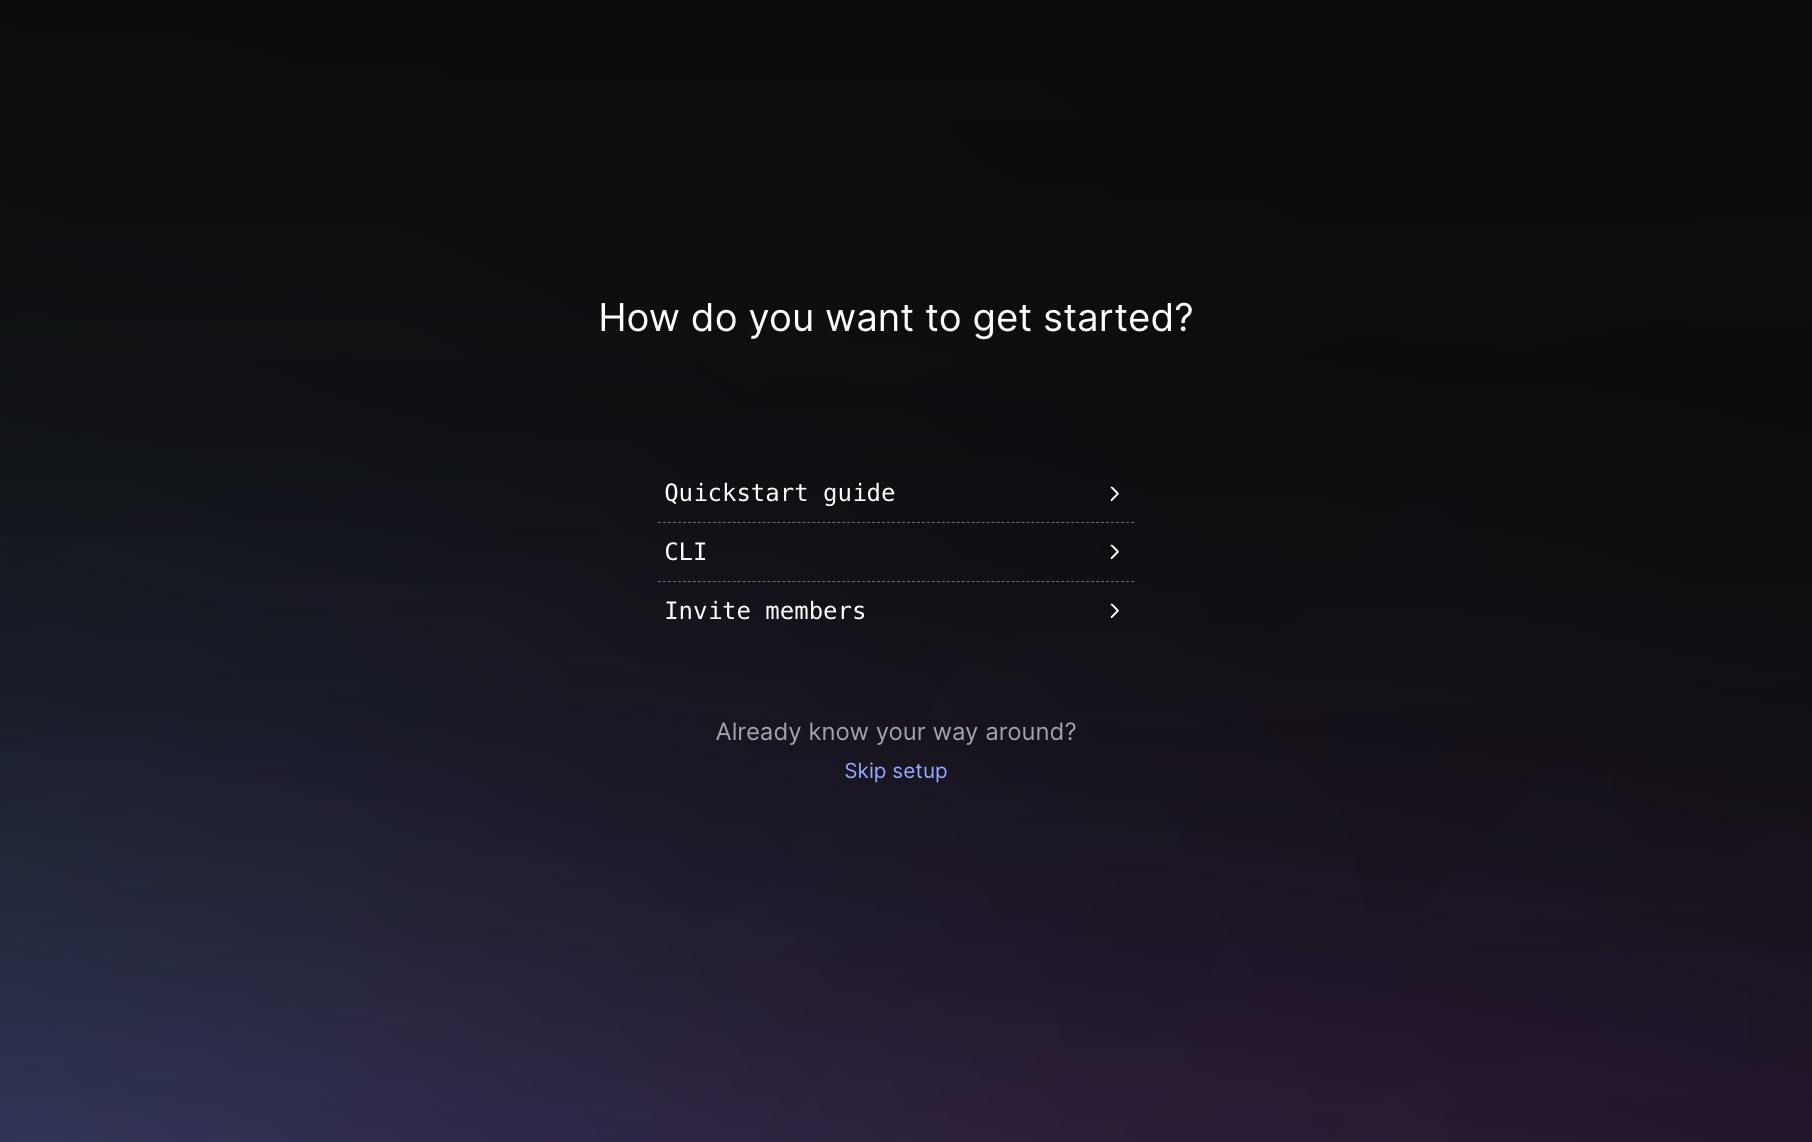
Click ‘Skip setup’ for now, and you’ll be added to a new project.
Once in that new project, navigate to the upper left-hand side of your screen and click environments to see the various keys associated with each environment.
From here, you’ll want to grab the Client-Side-ID for this application. Place that in your environment file, as shown in the next step.

If adding a new project to an existing account
Click on the cog in the lower left hand side of the screen, then click on Projects, then “Create project.”
After the project has been created, you’ll notice that it directs you to the environments page, where you can grab your production client-side ID to add to your environment file.
Create a new feature flag:
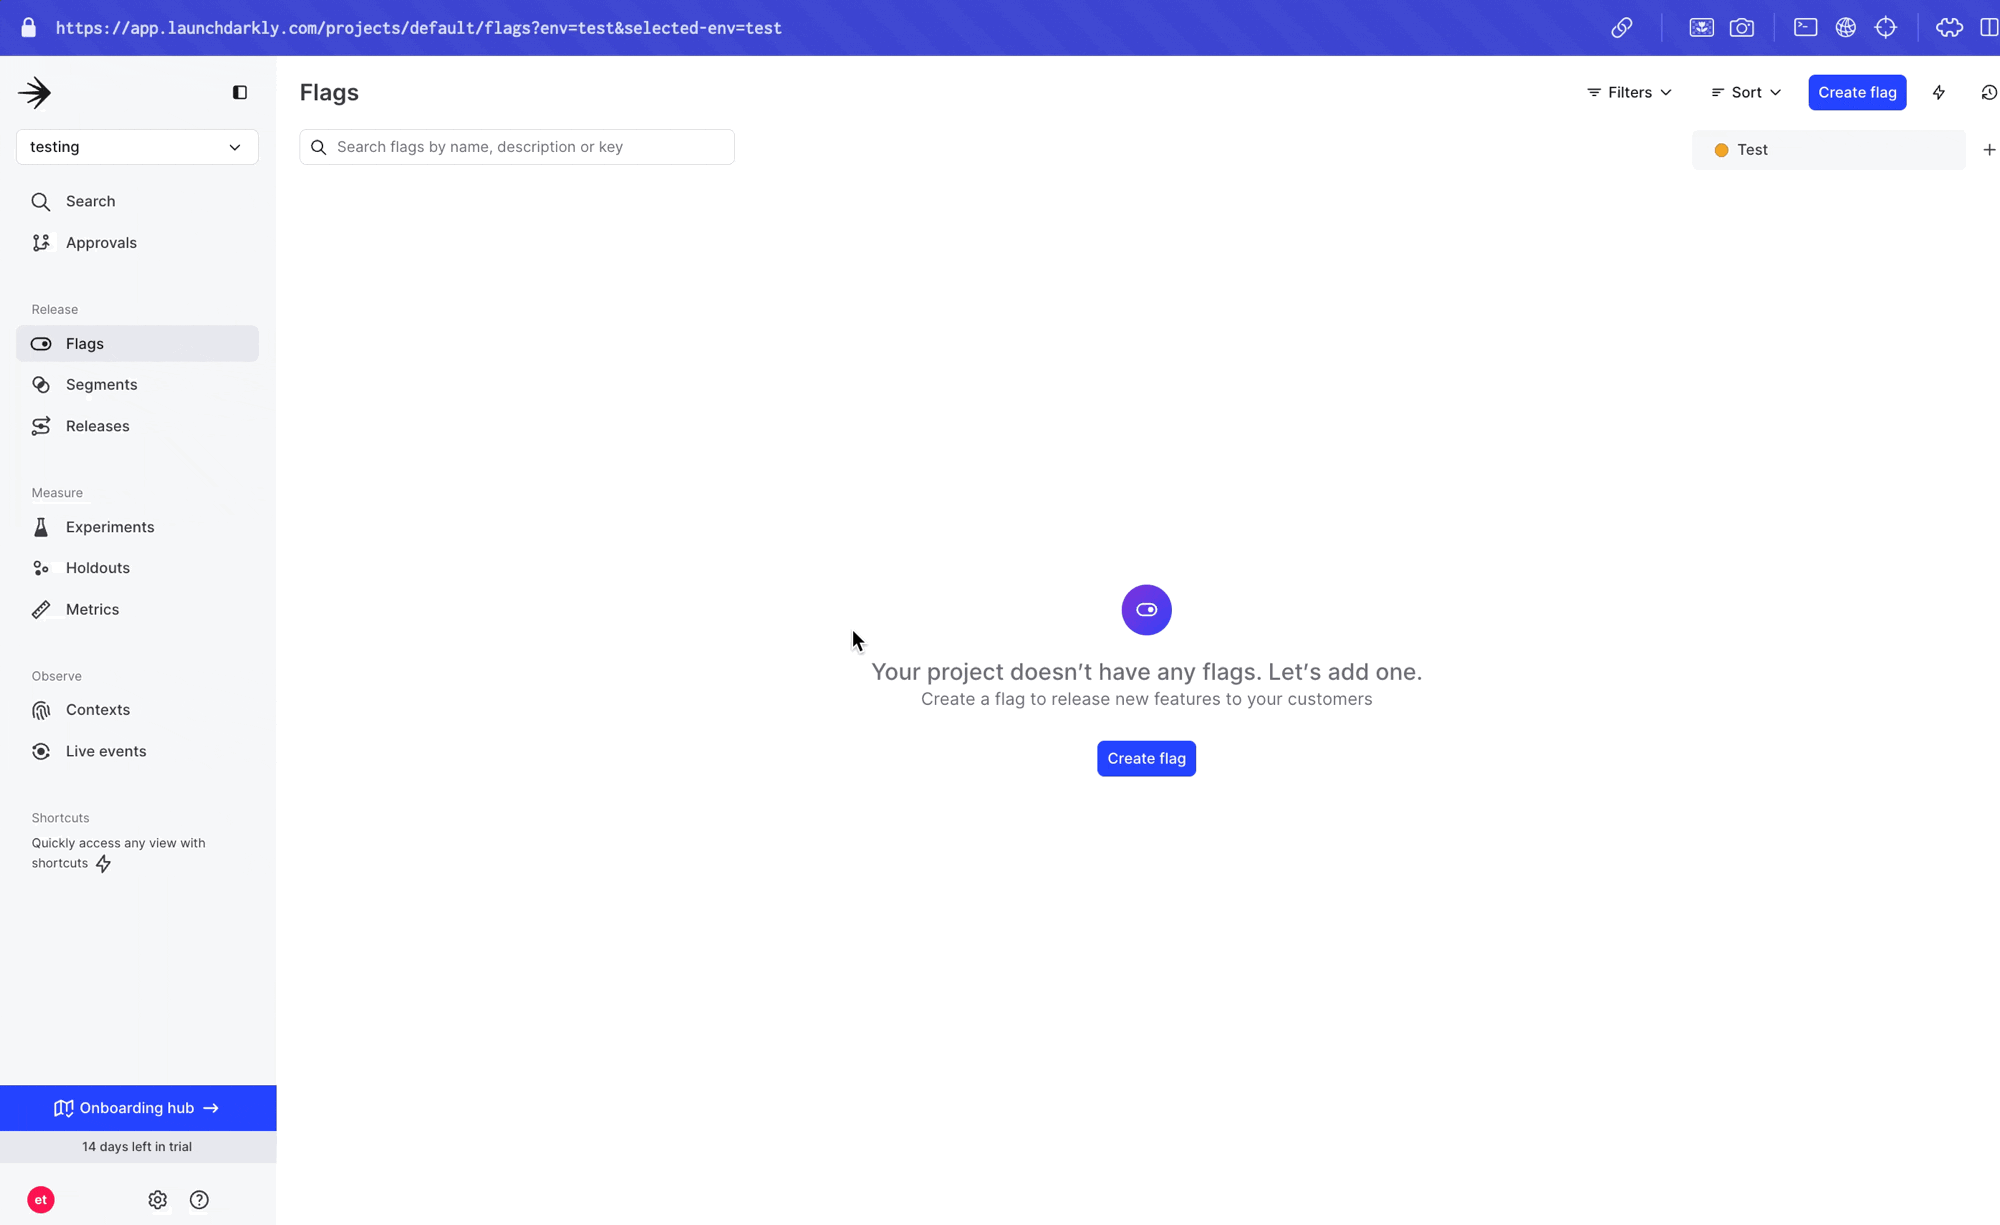
Now that you’ve set up a project, create your first feature flag. Navigate to the sidebar panel, and click ‘Flags’. Once on that page, click ‘New feature flag’.
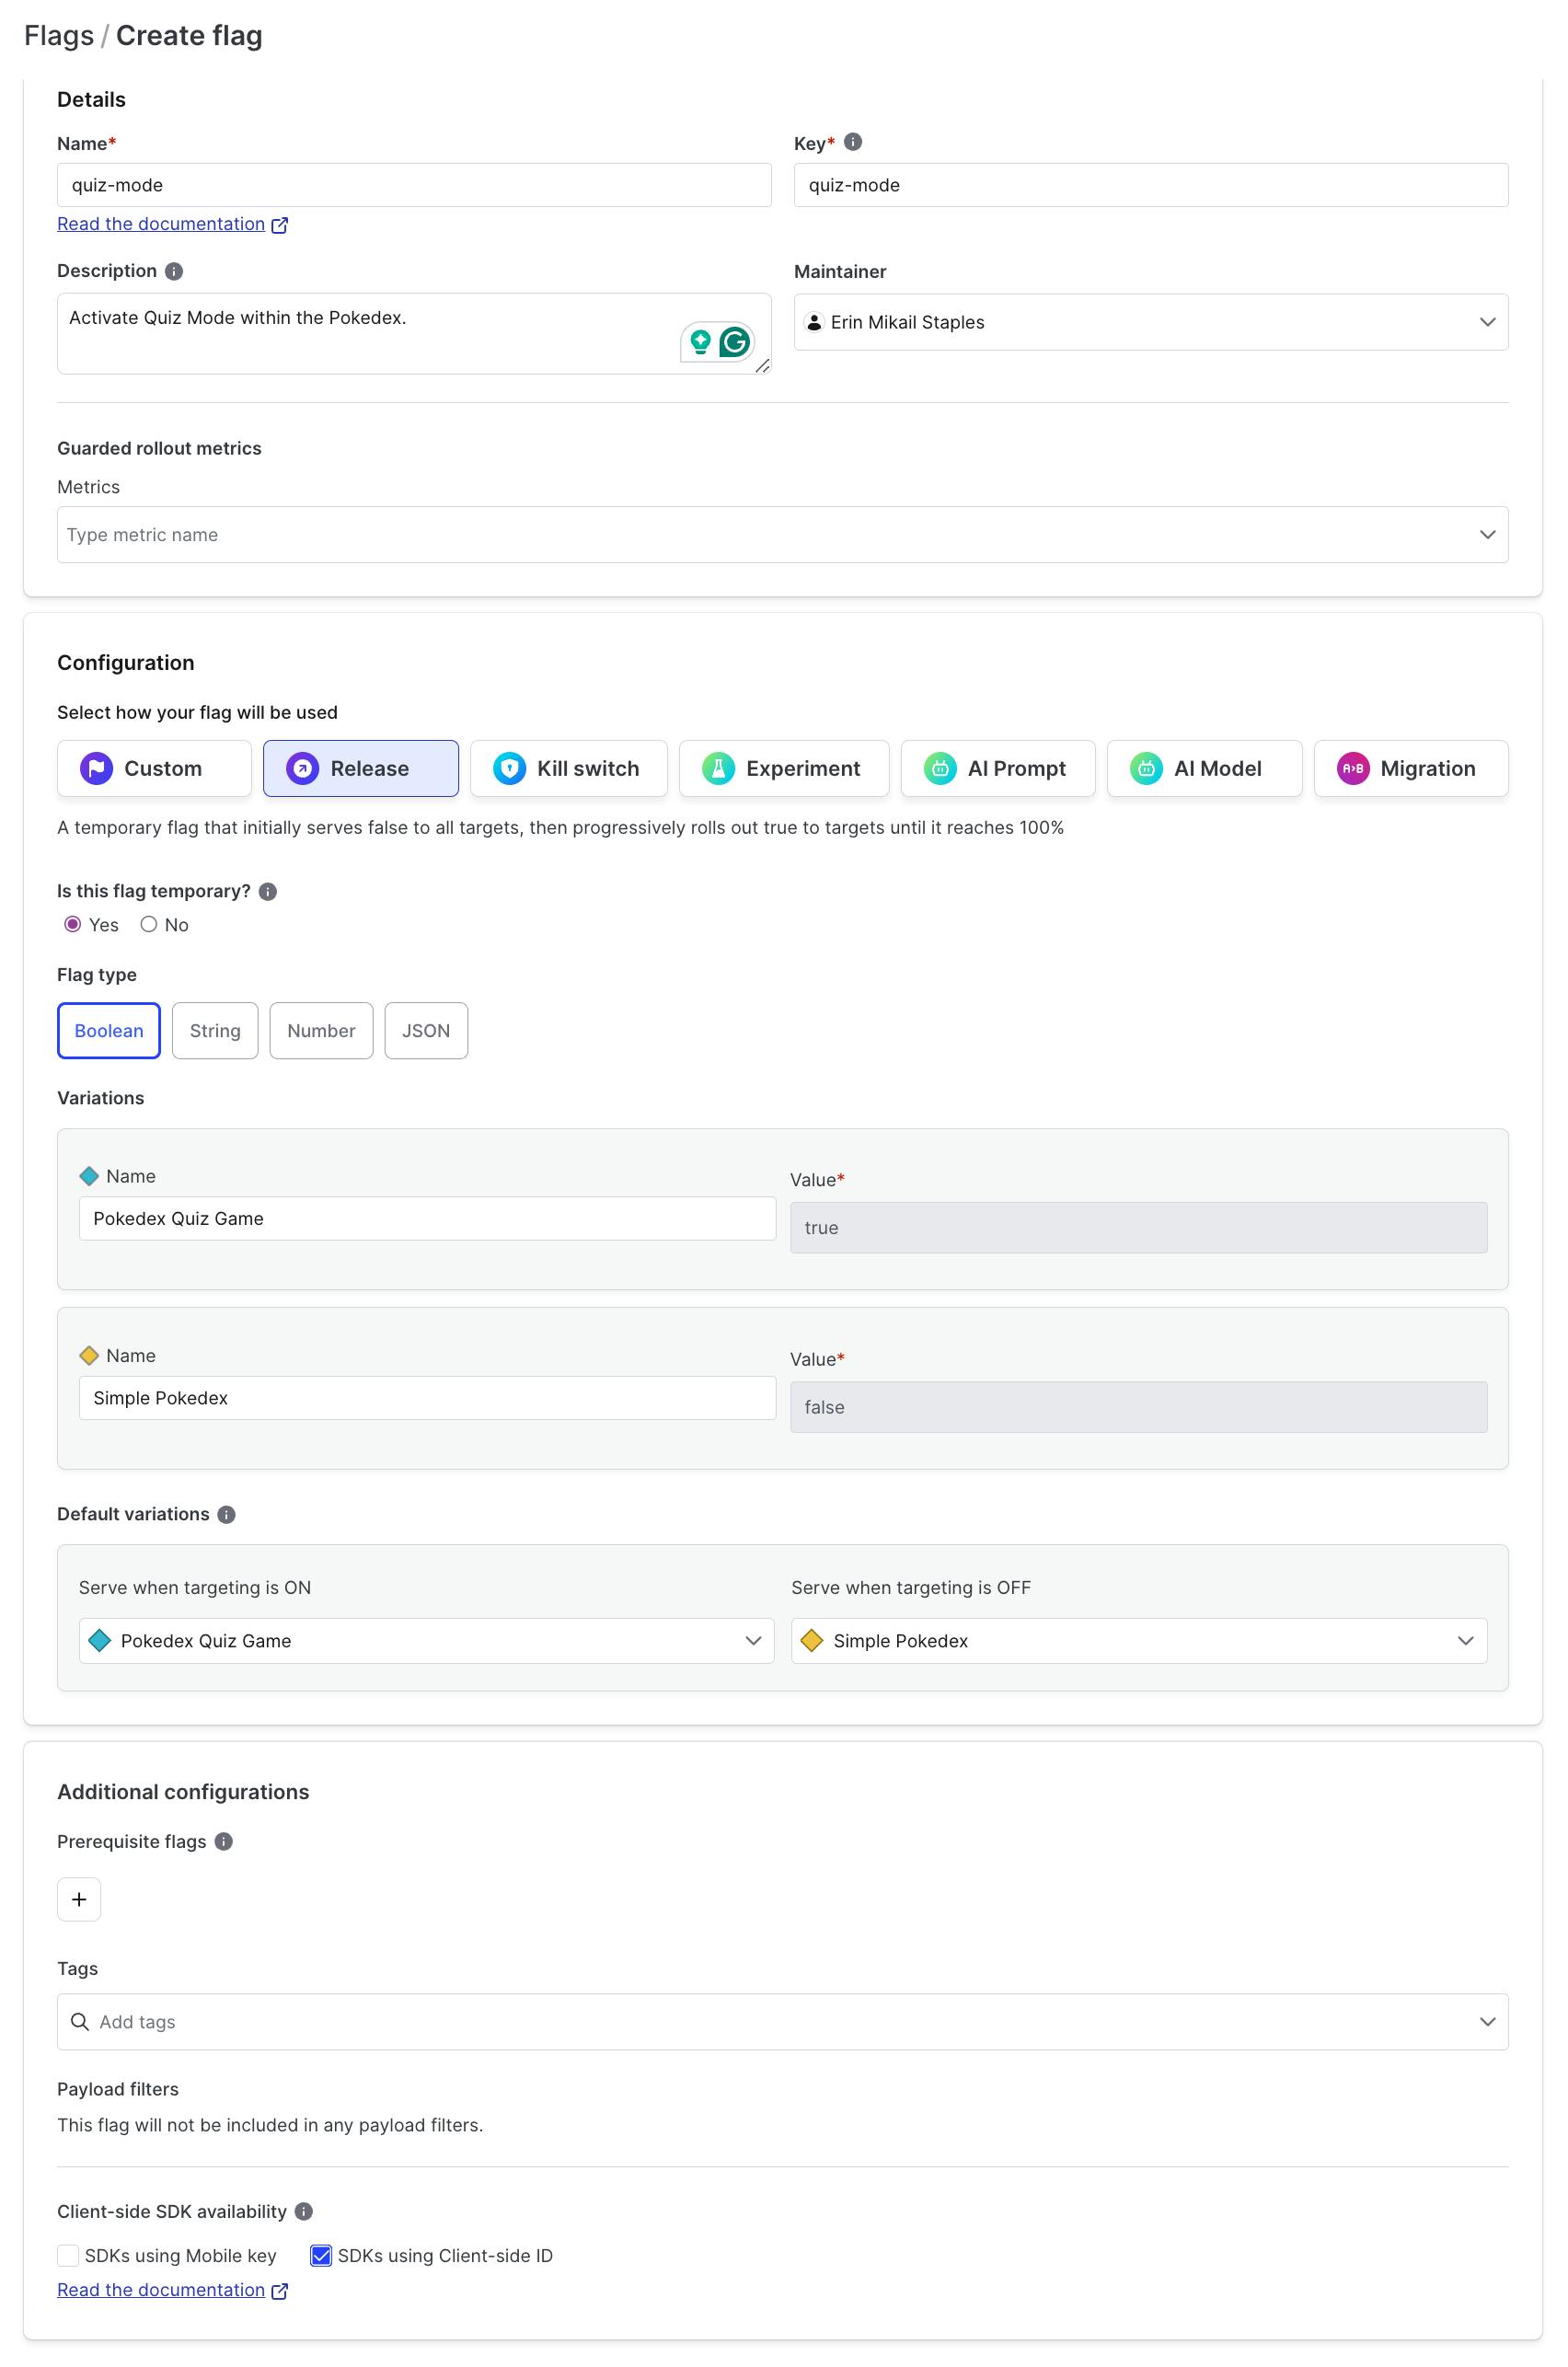
Create a new flag with the following details.
Most importantly, make sure that the flag key is “quiz-mode”. This will be used to call our LaunchDarkly flag within our application.
Adding your LaunchDarkly client-side SDK key
In the root directory of your project (the same level as your package.json file), create a new file named .env.local
Open your .env file in your text editor.
Add your LaunchDarkly client-side SDK key found in the previous step to the file like this:
NEXT_PUBLIC_LD_CLIENT_SIDE_SDK=your_launchdarkly_client_side_sdk_key_hereOnce added, save the file.
Next.js uses the .env.local file to load environment variables. The NEXT_PUBLIC_ prefix allows this variable to be used in server- and client-side code.
Remember, .env.local should be added to your .gitignore file to prevent sensitive information from being committed to your repository. This keeps your SDK key secure.
By placing the .env.local file in the root directory, Next.js will automatically load these environment variables, making them available throughout your application. This setup allows you to easily manage and update your LaunchDarkly SDK key without modifying your code.
Developing the PokemonDisplay component
Now, let’s build the component to display Pokémon images. First, navigate to our components folder (src/app/components) and create a new folder named “PokemonDisplay”. Within that folder, create a file called “index.tsx”
When complete, the file path should be as follows: src/app/components/PokemonDisplay/index.tsx
As with many of our other first steps — set up the imports:
import Image from 'next/image';
import styles from '../PokemonDisplay.module.scss';
Next, the components props interface. This interface will define the props our component will receive.
interface PokemonDisplayProps {
  imageUrl: string;
  name: string;
  isQuizMode: boolean;
}
We’ll then create the PokemonDisplay Component, which will render the Pokemon Image. In quiz mode, this will also use the “Mystery Pokemon” name as the alt text to avoid giving away the answer (yes, I've thought about how to prevent cheaters in this game as well!).
export default function PokemonDisplay({ imageUrl, name, isQuizMode }: PokemonDisplayProps) {
  return (
    <div className={styles.cameraDisplay}>
      <Image
        src={imageUrl}
        alt={isQuizMode ? "Mystery Pokemon" : name}
        width={300}
        height={300}
        unoptimized={true}
      />
    </div>
  );
}
This component creates a display for our Pokemon image, adapting its behavior based on whether or not we're in quiz mode. The unoptimized={true} prop is used because we're loading images from an external API (PokeAPI) rather than optimized images.
Developing the QuizMode Component
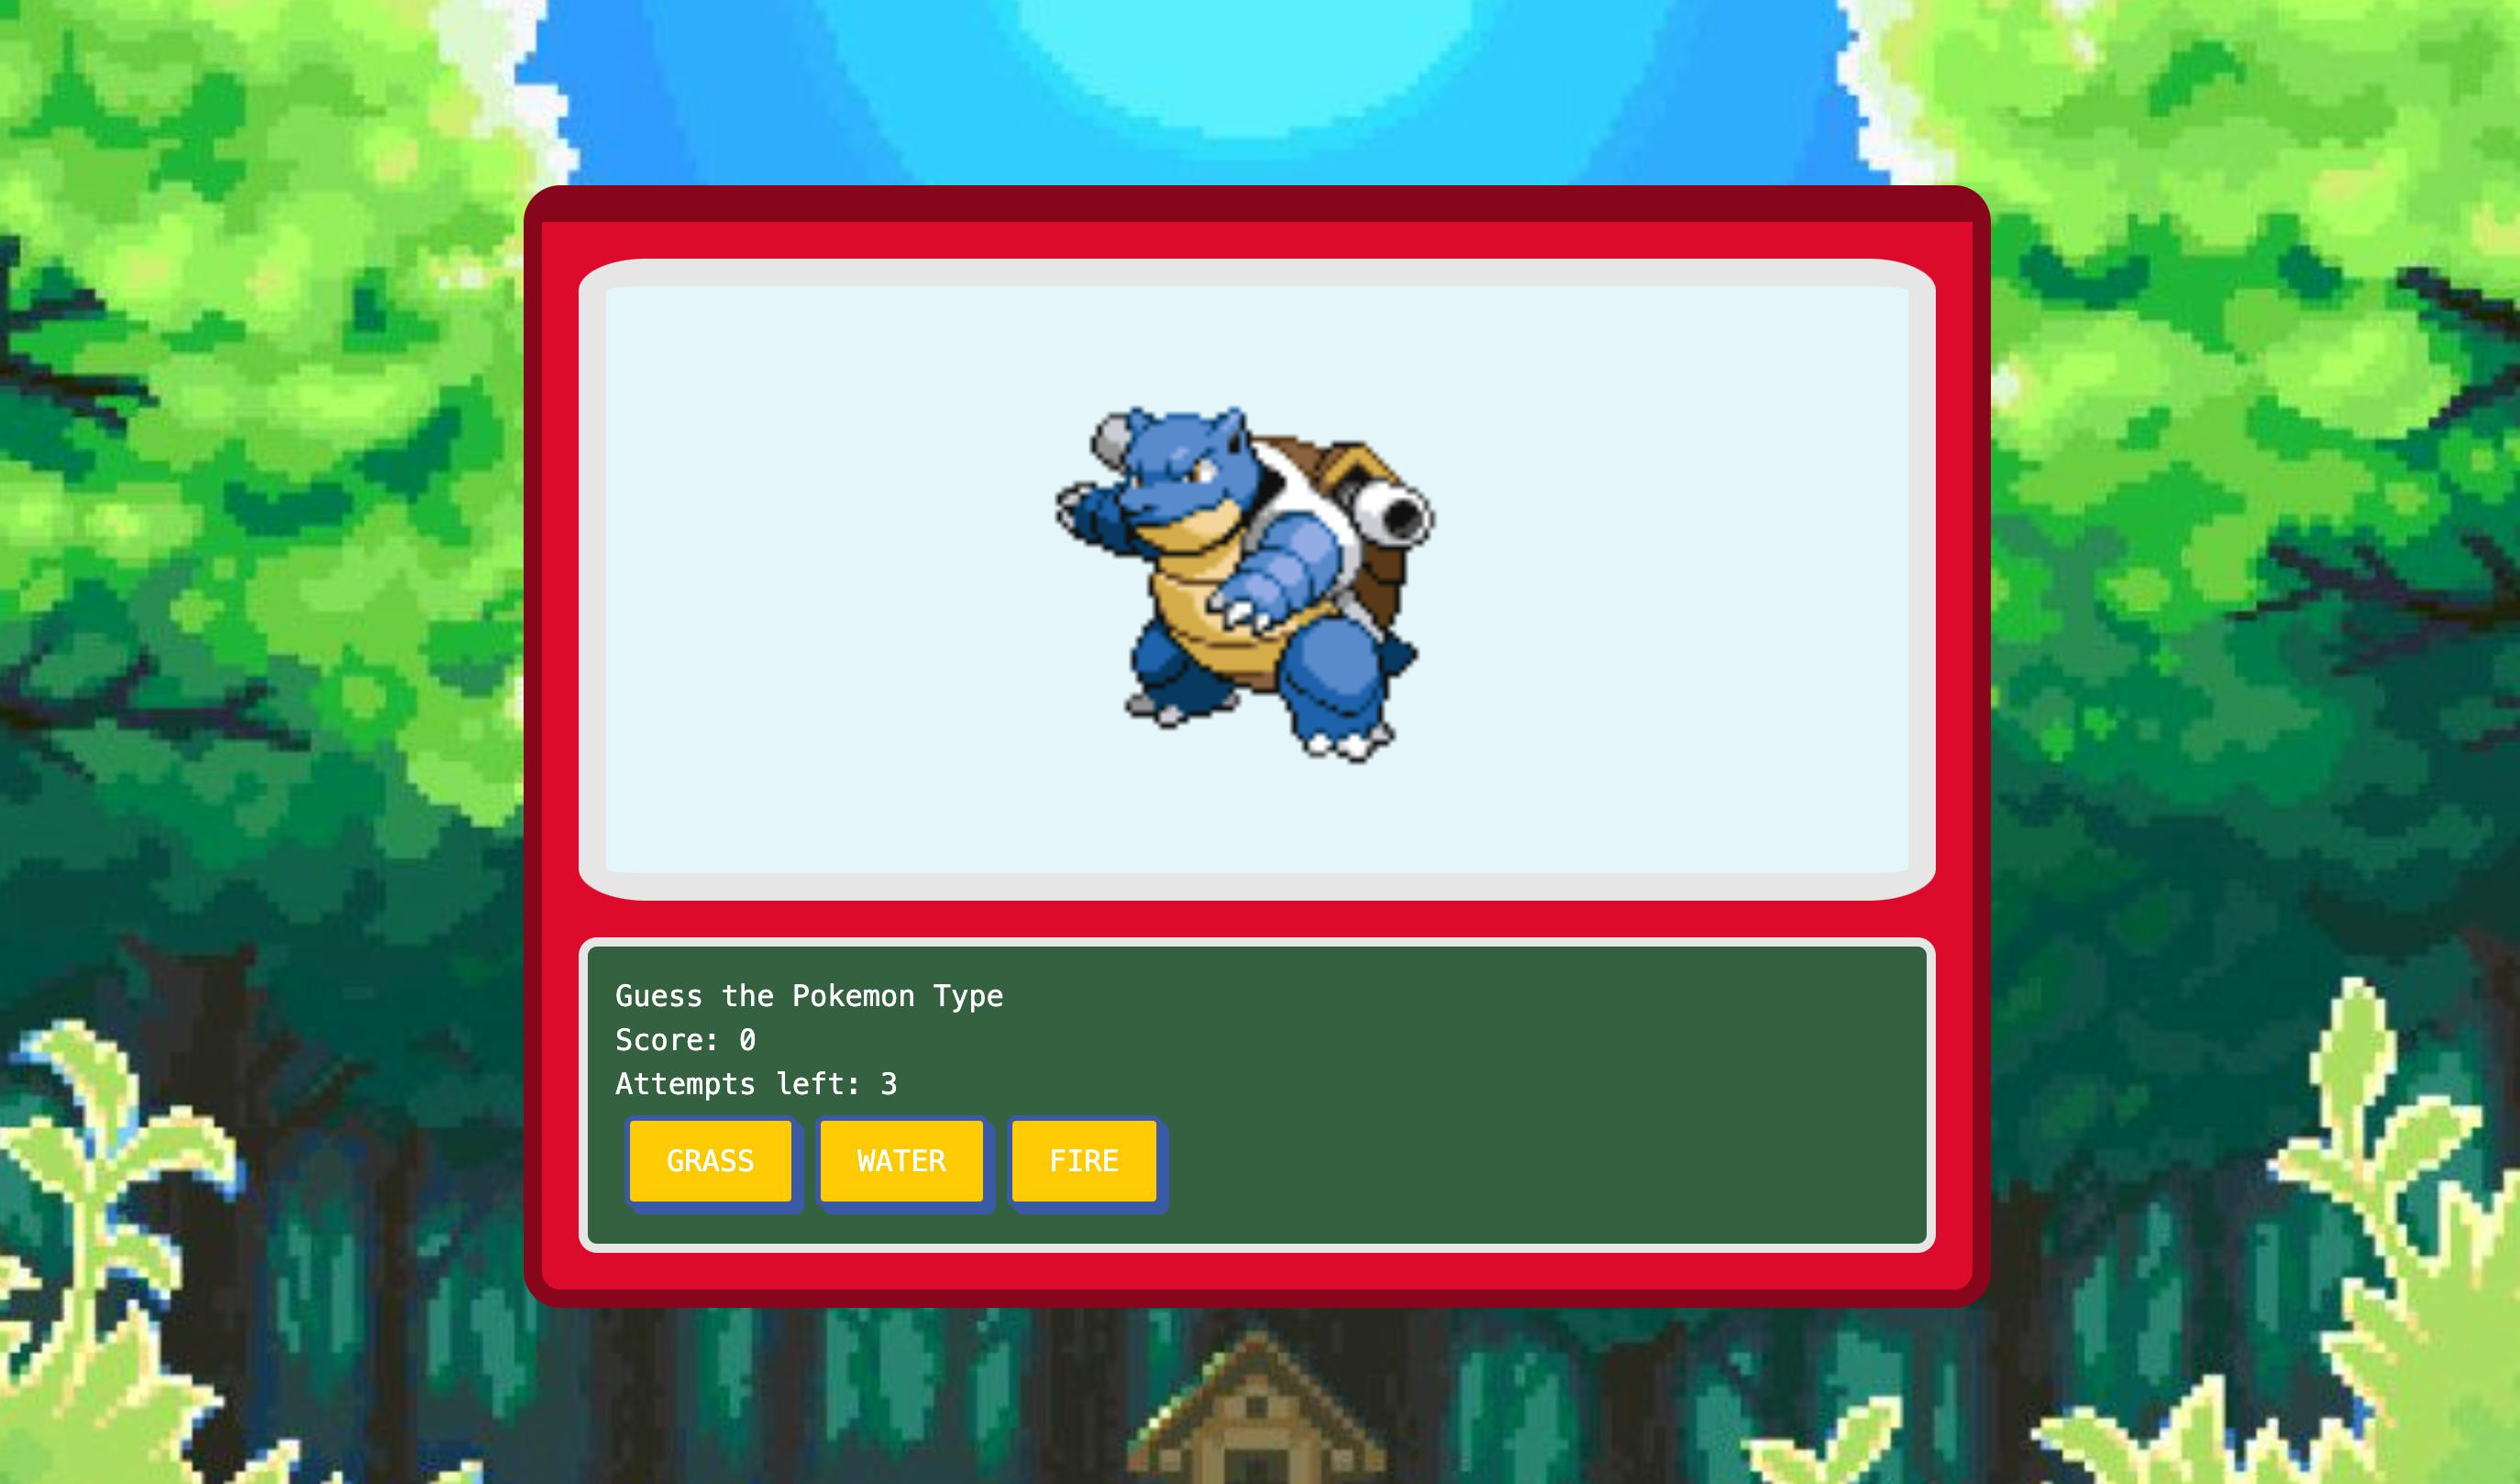
Now, let’s build the component that builds our Pokémon quiz interface. This is where trainers test their Pokémon type knowledge - no pressure!
This component will need to do a few things. First, it will need to display the current score and remaining attempts. Once the game is over, it will need to display the final score and a "Play Again" button.
We’ll also have to display buttons for each Pokémon type so the player can guess images. First, navigate to our components folder (src/app/components) and create a new folder named “QuizMode". Within that folder, create a file called “index.tsx”
When complete, the file path should be as follows: src/app/components/QuizMode/index.tsx
As with many of our other first steps — set up the imports. This component only needs the style from our PokemonDisplay module.
import styles from '../PokemonDisplay.module.scss';Next, define the props our QuizMode component will receive:
interface QuizModeProps {
  score: number;
  attempts: number;
  gameOver: boolean;
  onGuess: (type: string) => void;
  onReset: () => void;
}
Now, let’s render the full quiz interface, displaying the current score, remaining attempts, and our buttons for each Pokemon type that the player can guess. If the game is over, it will display a final score and a “Play Again” button.
export default function QuizMode({ score, attempts, gameOver, onGuess, onReset }: QuizModeProps) {
  const pokemonTypes = ['grass', 'water', 'fire'];

  return (
    <div className={styles.quizMode}>
      <h2>Guess the Pokemon Type</h2>
      <p>Score: {score}</p>
      <p>Attempts left: {3 - attempts}</p>
      {gameOver ? (
        <div>
          <p>Game Over! Your final score is {score}</p>
          <button onClick={onReset}>Play Again</button>
        </div>
      ) : (
        <div>
          {pokemonTypes.map((type) => (
            <button key={type} onClick={() => onGuess(type)}>
              {type}
            </button>
          ))}
        </div>
      )}
    </div>
  );
}
Building the RandomMode Component
Now, let’s build the component to randomize the Pokémon images. First, navigate to our components folder (src/app/components) and create a new folder named “RandomMode”. Within that folder, create a file called “index.tsx”
When complete, the file path should be as follows: src/app/components/RandomMode/index.tsx
Then, set up the imports and define the component’s props interface:
import styles from '../PokemonDisplay.module.scss';

interface RandomModeProps {
  name: string;
  types: { type: { name: string } }[];
  onNewPokemon: () => void;
}
Create the rest of the random component, which renders the random Pokémon display. It shows the Pokémon's name and type and provides a button to fetch a new random Pokémon.
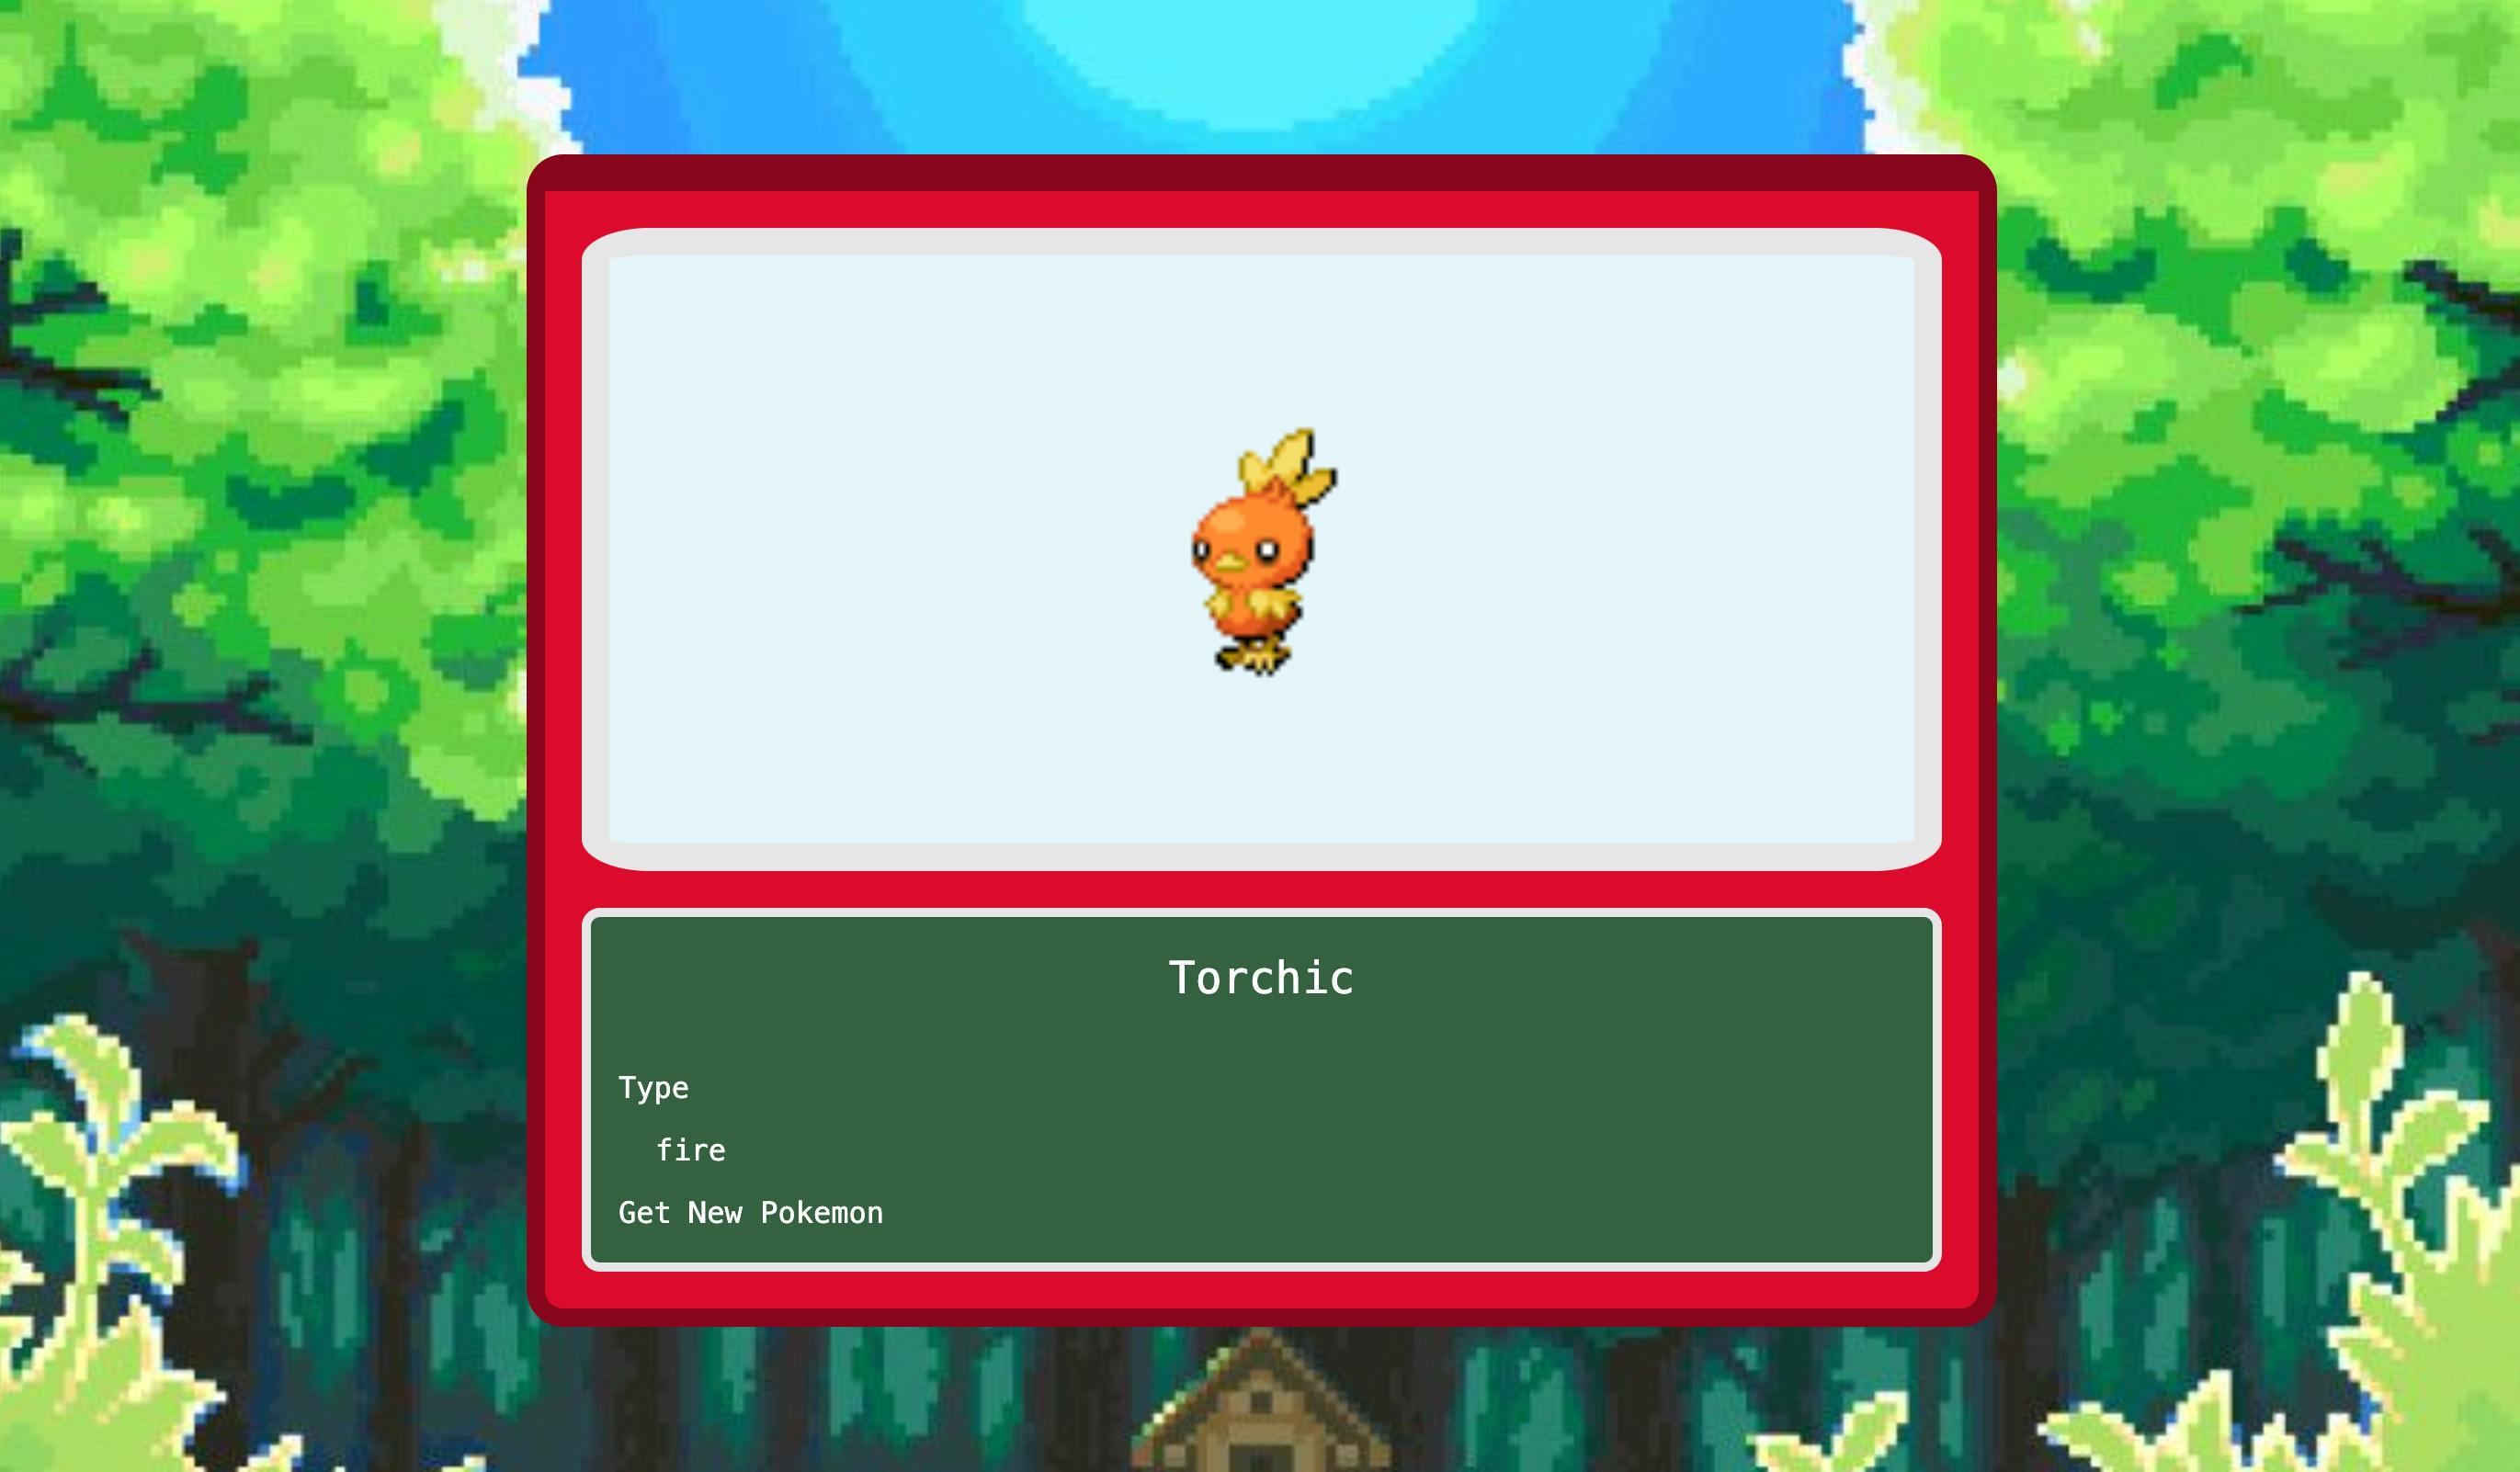
This app is designed to provide an experience like a surprise encounter in tall grass - you never know what you'll get!
export default function RandomMode({ name, types, onNewPokemon }: RandomModeProps) {
  return (
    <div className={styles.randomMode}>
      <h2 className={styles.pokemonName}>{name}</h2>
      <div className={styles.statsDisplay}>
        <h3>Type</h3>
        <ul>
          {types.map((type, index) => (
            <li key={index}>{type.type.name}</li>
          ))}
        </ul>
      </div>
      <button onClick={onNewPokemon}>Get New Pokemon</button>
    </div>
  );
}
Assembling the ClientPokédex
Let’s combine all the components we’ve created into one to make your Pokédex come to life—it's evolving!
First, navigate to our components folder (src/app/components) and create a new folder named “ClientPokedex”. Within that folder, create a file called “index.tsx”
When complete, the file path should be as follows: src/app/components/ClientPokedex/index.tsx
Then, we set up our imports to include all the components we’ve created, our custom hook, and our styles.
'use client';

import PokemonDisplay from '../PokemonDisplay';
import QuizMode from '../QuizMode';
import RandomMode from '../RandomMode';
import { usePokemonData } from '@/app/hooks/usePokemonData';
import styles from '../PokemonDisplay.module.scss';
We’ll then need to define our component. This component uses our usePokemonData hook to manage the application state. It handles loading and error states, then renders the QuizMode or RandomMode component based on the isQuizMode prop.
The PokemonDisplay component is always rendered, showing the current Pokémon's image.
This ClientPokedex component is the heart of our application, bringing together all the pieces we've created to form a fully functional, interactive Pokédex. It's ready for use in our main application, providing a seamless experience for Pokémon trainers to explore and test their knowledge!
export default function ClientPokedex({ isQuizMode }: { isQuizMode: boolean }) {
  const {
    pokemon,
    isLoading,
    error,
    score,
    attempts,
    gameOver,
    handleTypeGuess,
    resetGame,
    fetchNewPokemon
  } = usePokemonData();

  if (isLoading) return <div>Loading...</div>;
  if (error) return <div>Error: {error}</div>;
  if (!pokemon) return <div>No Pokemon data available</div>;

  return (
    <div className={styles.pokedex}>
      <PokemonDisplay
        imageUrl={pokemon.sprites.front_default}
        name={pokemon.name}
        isQuizMode={isQuizMode}
      />
      {isQuizMode ? (
        <QuizMode
          score={score}
          attempts={attempts}
          gameOver={gameOver}
          onGuess={handleTypeGuess}
          onReset={resetGame}
        />
      ) : (
        <RandomMode
          name={pokemon.name}
          types={pokemon.types}
          onNewPokemon={fetchNewPokemon}
        />
      )}
    </div>
  );
}
Setting up the homepage
Within your src/app directory, navigate to the file page.tsx and open it up.
At the top of your file, add your imports and the ‘use client’ Next.js directive. The 'use client' directive tells Next.js that this is a client-side component. We're importing our ClientPokedex component, styles, and our custom hook
'use client';

import ClientPokedex from '@/app/components/ClientPokedex';
import styles from '@/app/components/PokemonDisplay.module.scss';
import { usePokemonData } from '@/app/hooks/usePokemonData';
Create the Home component, and call the usePokemonData hook to determine what mode we’re running. As a reminder, our LaunchDarkly feature flag is in the usePokemonData hook.
export default function Home() {
  const { isQuizMode } = usePokemonData();

  return (
    <main className={styles.main}>
      <ClientPokedex isQuizMode={isQuizMode} />
    </main>
  );
}
This homepage component (page.tsx) serves as the entry point for your Pokédex application. It sets up the main structure and passes the necessary props to your ClientPokedex component.
When you run your Next.js application, this page will be rendered as your home page, displaying your fully functional Pokédex!
Final Next.js configuration
Navigate to our next.js configuration file (next.config.js), which can be found in our root project directory (pokedex-nextjs/next.config.js).
For the most part, we wont have many changes to make to our next.config.js from the default.
However, we will have to set up the image domains for Pokémon sprites. By adding 'assets.pokemon.com' to the domains array, we're telling Next.js that it's okay to optimize and serve images from this external source.
Our end file should look as follows:
/** @type {import('next').NextConfig} */
const nextConfig = {
    images: {
      domains: ['assets.pokemon.com'],
    },
  }

  module.exports = nextConfig
Running and testing the application locally.
Before deploying our application, we’ll have to test it for bugs and any errors that may have occurred during the process.
Within your terminal, navigate to the root application folder, pokedex-nextjs.
Once inside that folder, run npm install and subsequently npm run dev. Then, open the application locally within your browser at http://localhost:3000.
You'll feel excitement and anticipation as you load up your local development server and navigate to the site. Will your Pokémon images load correctly? Will the quiz mode function as expected?
Like your first gym battle, this process can be exciting and nerve-wracking!
Committing your code
When you’re ready, commit and push your changes to GitHub, before preparing to deploy your code to vercel. First, open your terminal and navigate to your project directory (pokedex-nextjs).
cd /pokedex-nextjsCopied!
Next, run the following to stage all the changes
git add .Copied!
Then, run the command,
git commit -m "Prepare for Vercel deployment" Copied!
This will commit your changes with the message “Prepare for Vercel deployment.”
Finally, push your code to Github by running
git push origin mainCopied!
With all your code on GitHub, you're ready to move to Vercel to deploy. We want to ensure that your Pokédex has all the latest features and fixes you've been working on.
Deploying to Vercel
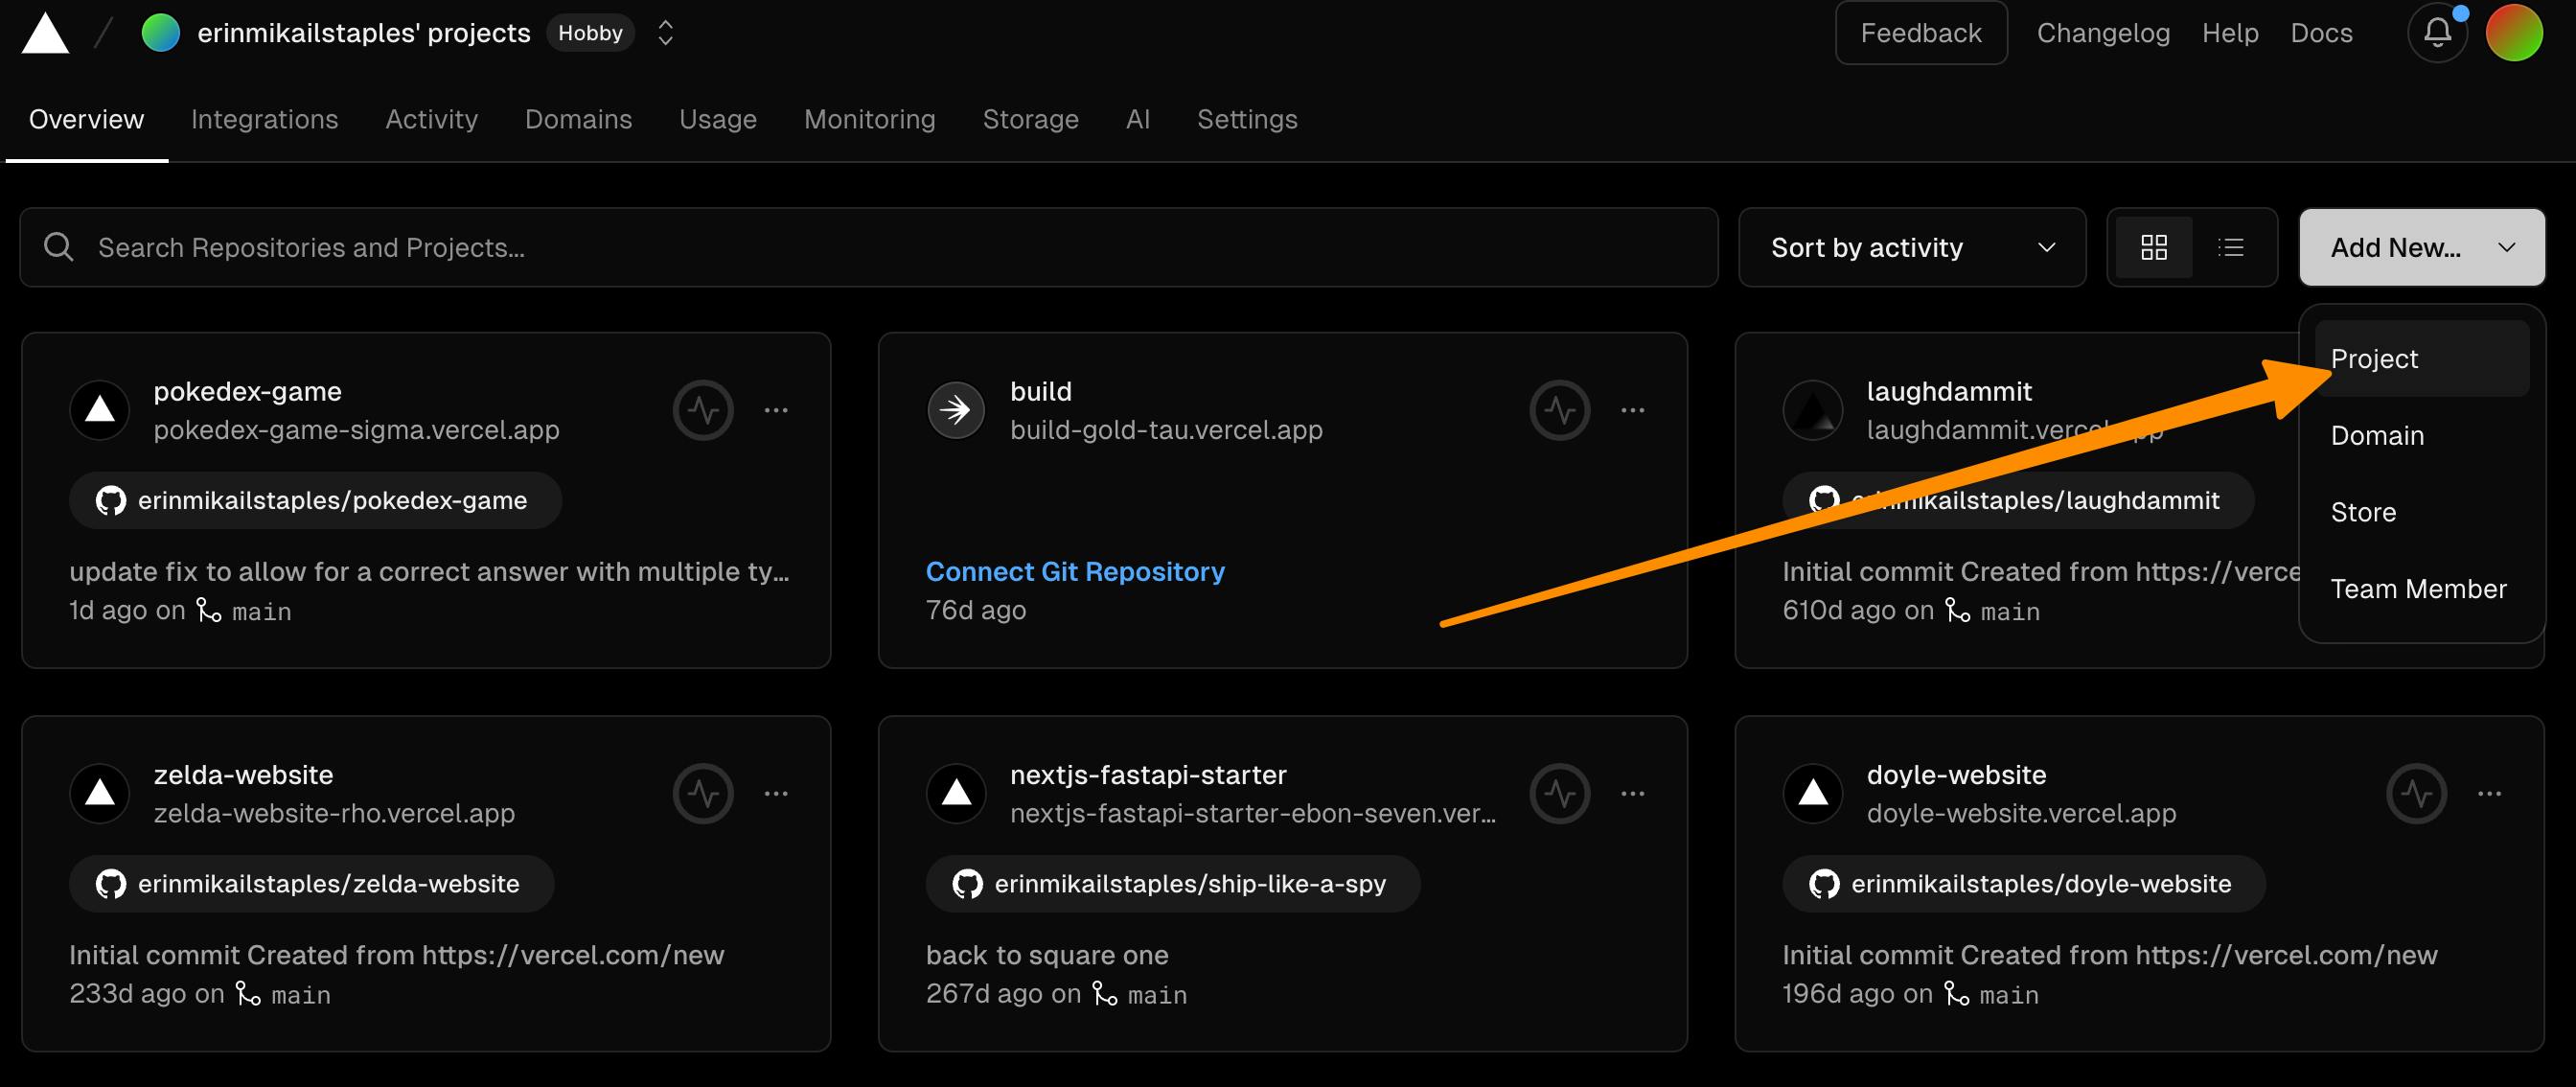
Create a Vercel account if you haven't already at https://vercel.com/signup
Log in to your Vercel account, and click on the "New Project" button on your Vercel dashboard
Next, "Import Git Repository" and select your GitHub account, and Pokédex project repository
Vercel will automatically detect that it's a Next.js project
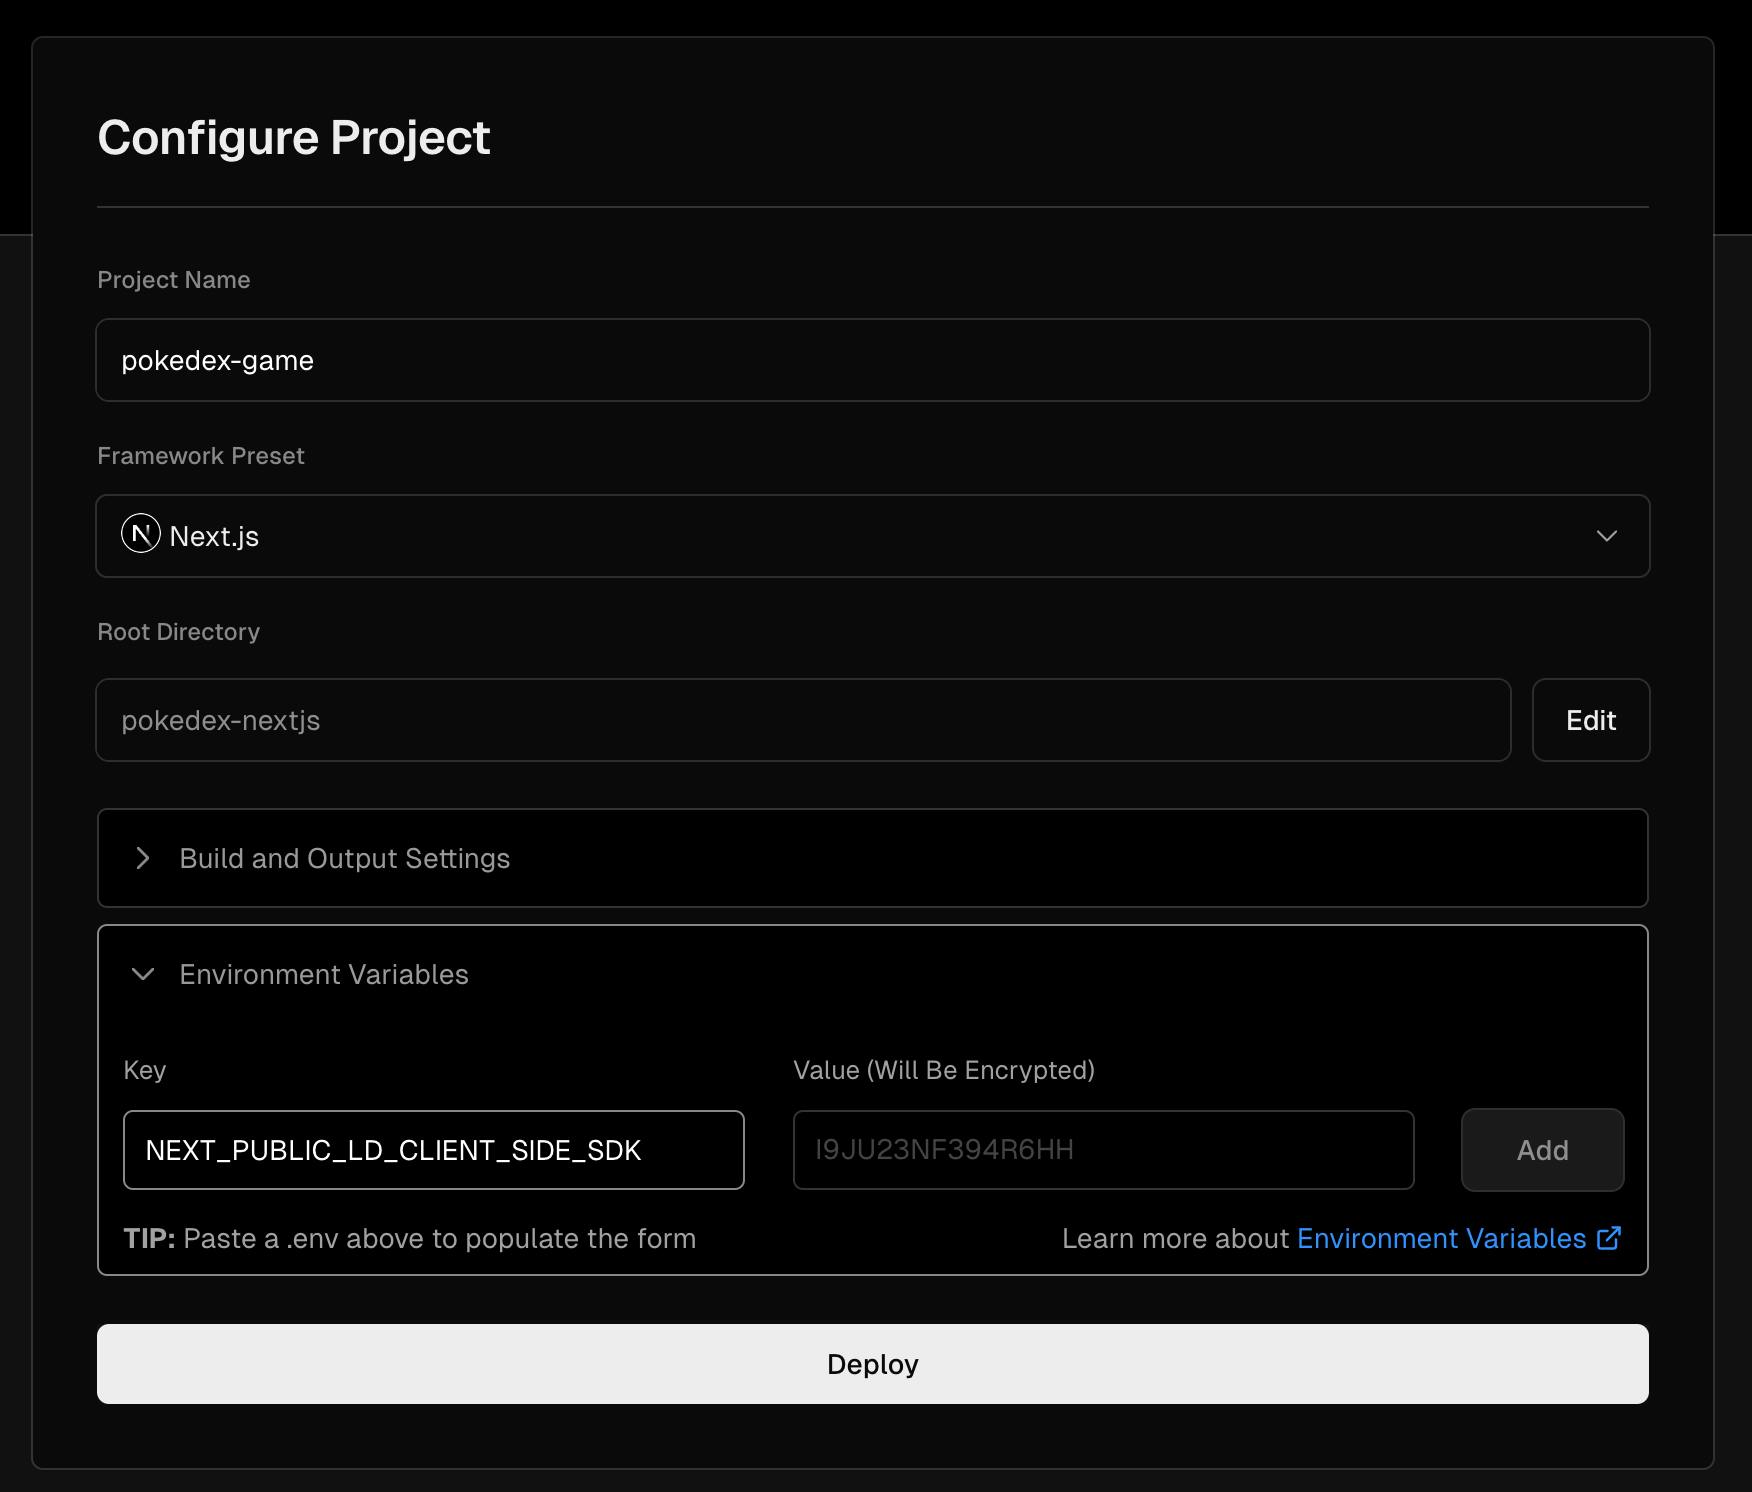
Configure your project settings:
Set the Framework Preset to Next.js. Verify the Root Directory is correct (ours is pokedex-nextjs)
Click on "Environment Variables"
Add your NEXT_PUBLIC_LD_CLIENT_SIDE_SDK key and value
Click "Deploy"
Wait for Vercel to build and deploy your project.
Once deployment is complete, Vercel will provide you with a URL for your live Pokédex app
Click on the URL to view your deployed Pokédex application
Your Pokédex is now accessible to anyone with an internet connection, ready to help aspiring trainers learn about different Pokémon types and test their knowledge.
Activating Quiz Mode
But wait, where’s the quiz mode? Let’s open back up our LaunchDarkly application and navigate to that quiz-mode feature flag we created earlier. Click on the flag to open up the flag settings.
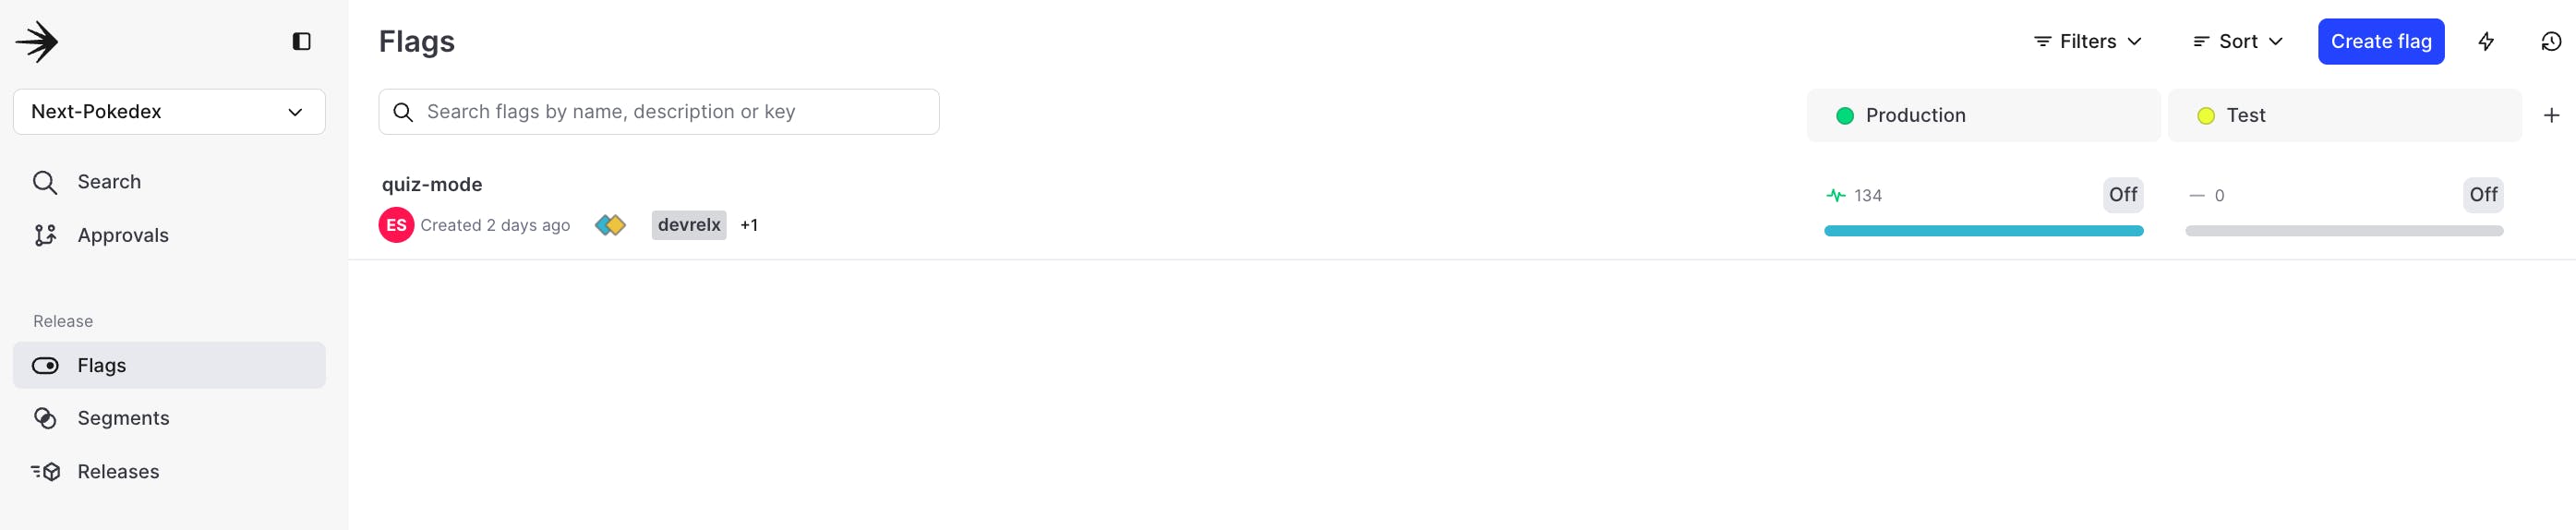
Once in the flag view, flip that switch on, and press save. You’ll be prompted to leave a note on the change, as well and type in a confirmation
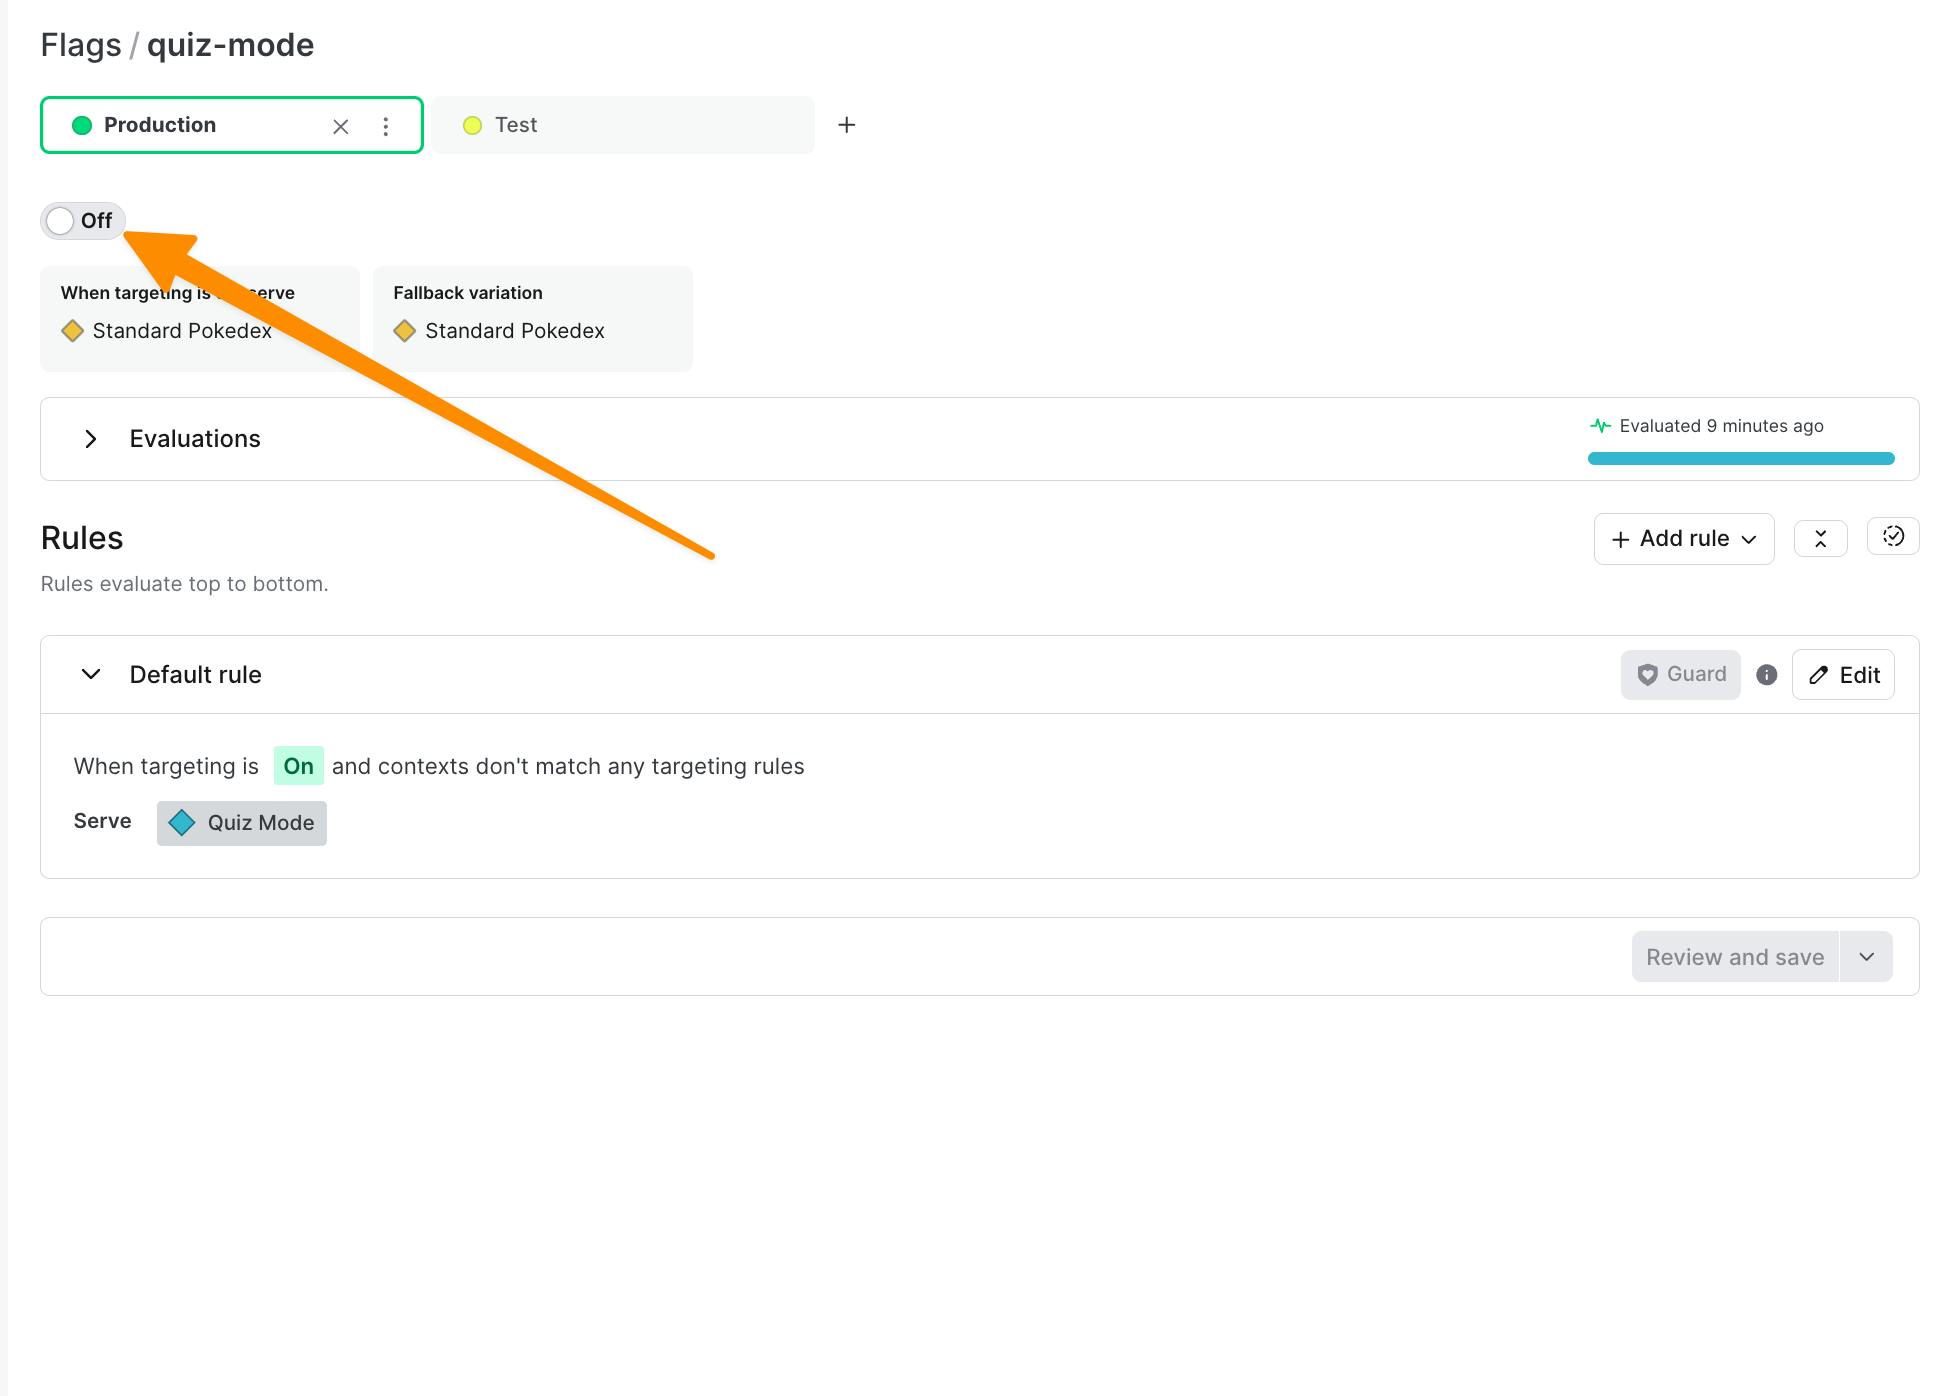
Head back to your deployed application and notice how it’s now displaying the quiz mode, ready to challenge Pokémon trainers worldwide!
Remember, with LaunchDarkly, you can easily switch the feature on or off anytime, giving you complete control over your Pokédex app's functionality.
This Pokédex is possible thanks to Next.js, Vercel, LaunchDarkly, and the PokeAPI.
Our Pokédex leverages Next.js for its performance and server-side rendering, LaunchDarkly for feature toggling, enabling easy turning quiz mode on and off, Vercel to deploy the application, and last but not least, the PokeAPI to call Pokemon data from. All Pokémon enthusiasts can rest easily, as accessing their favorite creature's data is easier than ever.
With LaunchDarkly, you can experiment, iterate, and improve your applications with ease. With this foundation, you can further explore targeting, experimentation, and even automatic rollbacks — you’re set to build the perfect experience for Pokémon enthusiasts worldwide!
If you have any questions, comments, or curiosities about this tutorial (or a high score you’re particularly proud of!), please contact me in the LaunchDarkly Discord or via email at emikail@launchdarkly.com! I’d love to help.
Keep exploring, keep coding, and keep catching them all!
Like what you read?
Get a demo