Creating multi-armed bandits
Creating multi-armed bandits
This topic explains how to set up and configure a multi-armed bandit (MAB) in LaunchDarkly.
Configuring a MAB requires several steps:
- Creating the flag or AgentControl config and its variations,
- Creating a metric,
- Building the multi-armed bandit, and
- Starting an iteration.
These steps are explained in detail below.
Prerequisites
Before you build a MAB, you should read about and understand the following concepts:
Create flags or AgentControl configs
Before you begin a MAB, create a flag or AgentControl config with the variations you plan to optimize the performance of. You do not need to toggle on the flag before you create the MAB, but you do have to toggle flags on before you start an iteration. AgentControl configs are on by default.
To learn more, read Creating new flags, Creating flag variations, Create configs, and Create and manage config variations.
You cannot run a MAB on a flag if:
- the flag has an active guarded rollout
- the flag has an active progressive rollout
- the flag is in a running Data Export experiment
- the flag is in a running experiment with warehouse native metrics
- the flag is a migration flag
You can build and run multiple MABs on the same flag or AgentControl config as long as there is only one running MAB per targeting rule. You cannot run multiple MABs on the same rule at the same time.
Create metrics
Metrics measure audience behaviors affected by your flags. You can use metrics to track all kinds of things, from how often end users access a URL to how long that URL takes to load a page. You can reuse existing metrics in multiple MABs, or create new ones for your MABs.
To learn how to create your own new metric, read Metrics. LaunchDarkly also automatically creates metrics for AgentControl configs. To learn more, read AgentControl config autogenerated metrics.
Multi-armed bandits do not support metrics using percentile analysis methods
Multi-armed bandits support metrics using the “Average” metric analysis method. You cannot use metrics using a percentile analysis method with a multi-armed bandit.
If you want to learn which variation performs better, it must be possible for that metric to measure something in all of the variations within the MAB. To learn more, read Metrics and flag variations.
Build multi-armed bandits
You can view all of the MABs in your environment on the Multi-armed bandits list.
To build a MAB:
- Click Create, then choose Multi-armed bandits. A “Create multi-armed bandit” dialog appears.
- Enter a Name.
- Enter a Goal.
- Click Create multi-armed bandit. The Design tab opens.
- Choose a context kind to Randomize by.
- Select a Metric.
- Hover over a metric to see which environments have received events for it. If no environments are receiving events, check that your SDKs are configured correctly.
- Click Create to create and use a new metric.
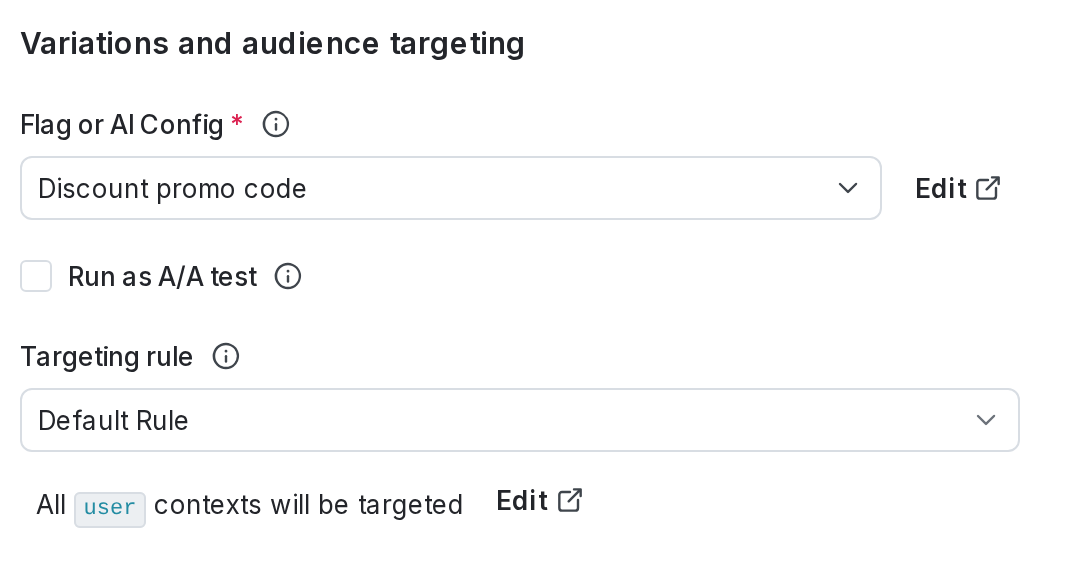
- Choose a Flag or config.
- Click Create flag or Create AgentControl config to create and use a new flag or AgentControl config.
- Choose a targeting rule for the Experiment audience.
- If you want to restrict your MAB audience to only contexts with certain attributes, create a targeting rule on the flag or AgentControl config you include in the MAB and run the experiment on that rule. The context kind that the flag rule targets should match the randomization unit of your MAB.
- If the flag or AgentControl config doesn’t have any targeting rules, the default rule is the only option.
- (Optional) If you want to exclude contexts in this MAB from certain other MABs and experiments, click Add experiment to exclusion layer and select a layer.
Expand layer options
A layer is a set of experiments and MABs that cannot share traffic with each other. All of the experiments and MABs within a layer are mutually exclusive, which means that if a context is included in one, LaunchDarkly will exclude it from any other experiments and MABs in the same layer. All of the MABs within a layer must randomize by the same context kind, such as “user.”
To add the MAB to an existing layer:
- Click Select layer.
- Search for and choose the layer you want to add the MAB to.
- Enter a Reservation amount. This is the percentage of the contexts within this layer you want LaunchDarkly to include in this MAB.
- Click Save layer.
If you need to create a new layer:
- Click Create layer.
- Add a Name and Description.
- Click Create layer.
- Enter a Reservation amount. This is the percentage of the contexts within this layer you want LaunchDarkly to include in this MAB.
- Click Save layer.
- Select a Variation served to users outside this experiment.
- Select the Sample size for the MAB. This is the percentage of all of the contexts that match the MAB’s targeting rule that you want to include in the MAB.
- Select your desired Update frequency. This determines how often the MAB shifts traffic to the leading variation.
- By default, starting traffic is split equally between all of the included variations. If you want to exclude a variation from the MAB:
- Click Edit next to “Variations split.”
- For any variation you want to exclude, change the percentage to 0%.
- Click Save audience split.
- (Optional) If you want to include the MAB in a holdout, select a Holdout name.
Multi-armed bandits cannot be in a holdout and in a layer at the same time
Multi-armed bandits can either be in a holdout or in a layer, but not both. If you added the multi-armed bandit to a layer, you will not see the option to add it to a holdout.
- Scroll to the top of the page and click Save.
If needed, you can save your in-progress MAB design to finish later. To save your design, click Save at the top of the creation screen. Your in-progress MAB design is saved and appears on the Multi-armed bandits list. To finish building the MAB, click on the MAB’s name and continue editing.
After you have created your MAB, the next step is to toggle on the flag. AgentControl configs are on by default. Then, you can start an iteration.
You can also use the REST API: Create experiment
Start iterations
After you create a MAB you can start an iteration in one or more environments.
To start a MAB iteration:
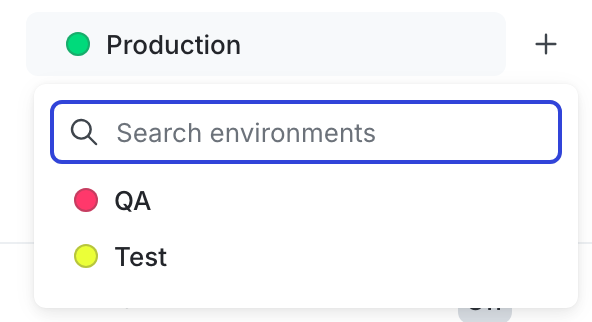
- Navigate to the Multi-armed bandits list.
- Click on the environment section containing the MAB you want to start.
- If the environment you need isn’t visible, click the + next to the list of environment sections. Search for the environment you want, and select it from the list.
- Click on the name of the MAB you want to start an iteration for. The Design tab appears.
- Click Start, or, if your environment requires approvals, click Request approval to start. A “Start multi-armed bandit” dialog appears.
- If your environment does not require approvals, but you want to request approval anyway, click the down arrow next to the Start button and click Request approval to start.
- (Optional) If the flag is off, click Toggle on flag.
- Click Start multi-armed bandit.
- Repeat the steps for each environment you want to start an iteration in.

You can run a MAB indefinitely, allowing it to reallocate traffic as needed. If you are running a MAB on a time-boxed feature, such as a holiday promotion, then you can stop the MAB iteration when the promotion is over.
When you start an iteration of a MAB, LaunchDarkly sends the maintainer and anyone following the MAB an email, an in-app notification, and, if you have the Slack app integration configured, a Slack notification.
To learn more about starting and stopping iterations, read Starting and stopping experiment iterations.
You can also use the REST API: Create iteration