LaunchDarkly developer toolbar

Overview

This topic describes how to install and use the LaunchDarkly developer toolbar. You can install and configure the toolbar directly in your codebase, and use it in your browser during local development.

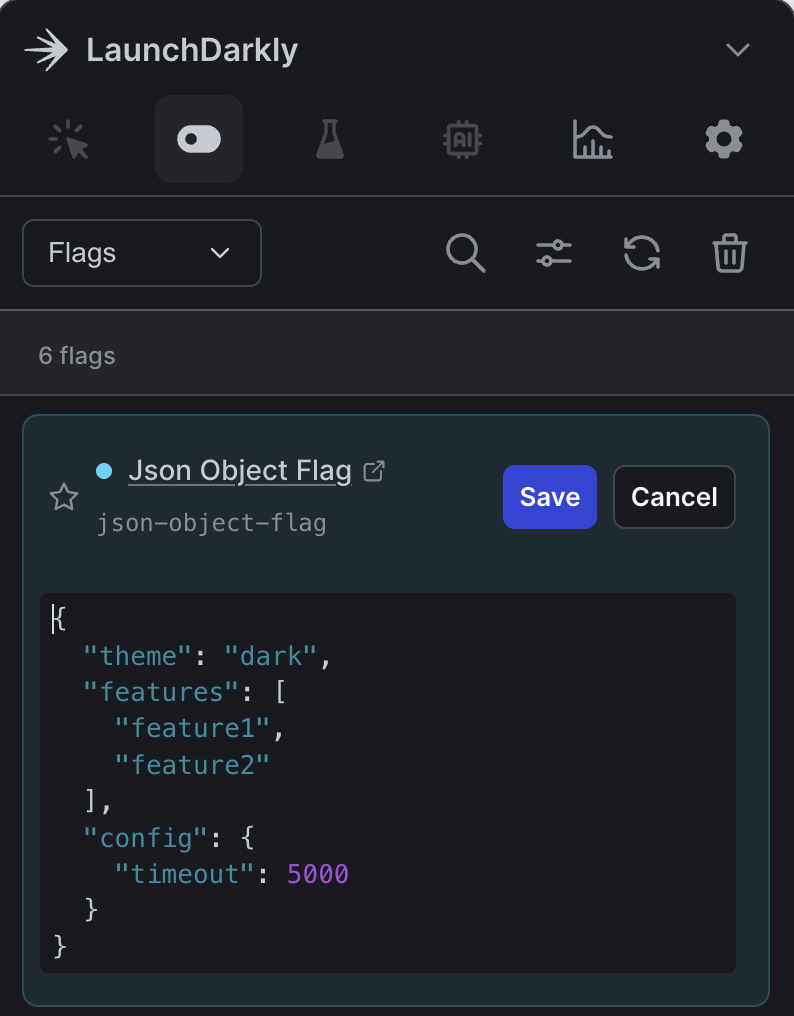
The toolbar lets you:

  • View a list of feature flags in use for your project, and easily override values locally to test application behavior for flag variations
  • Listen to incoming events, including flag evaluation events
  • Easily identify missing feature flags and link to your LaunchDarkly project so you can create them

An example of the developer toolbar in use.

An example of the developer toolbar in use.

Prerequisites

To begin using the developer toolbar, you need:

Installation

You can install the developer toolbar using React or using a CDN. In either method, it should be used only in a local dev environment. Be sure that you do not render it in hosted or production environments.

Install using React

If you develop your front end using React, the @launchdarkly/toolbar package provides a React hook to configure and lazily-load the developer toolbar.

Depending on your package manager, install the package using one of the following methods:

$npm install @launchdarkly/toolbar@next

After you install the package, navigate to the area of your application where you instantiate your LaunchDarkly React client. The developer toolbar uses two plugins to power its functionality, and those plugins also need to be passed into the LaunchDarkly React client.

To do this:

Pass plugins to the client
1import { render } from 'react-dom';
2import { asyncWithLDProvider } from 'launchdarkly-react-client-sdk';
3import {
4 useLaunchDarklyToolbar,
5 FlagOverridePlugin,
6 EventInterceptionPlugin
7} from '@launchdarkly/toolbar';
8
9// Pass the same instance of these plugins into both the LaunchDarkly
10// React client as well as the developer toolbar
11const flagOverridePlugin = new FlagOverridePlugin();
12const eventInterceptionPlugin = new EventInterceptionPlugin();
13
14(async () => {
15 const LDProvider = await asyncWithLDProvider({
16 clientSideID: 'client-side-id-123abc',
17 context: {
18 kind: 'user',
19 key: 'user-key-123abc',
20 name: 'Sandy Smith',
21 email: 'sandy@example.com',
22 },
23 options: {
24 plugins: [
25 flagOverridePlugin,
26 eventInterceptionPlugin,
27 // other plugins...
28 ],
29 // other options...
30 },
31 });
32
33 function App() {
34 // Initialize toolbar with the same plugin instances
35 useLaunchDarklyToolbar({
36 flagOverridePlugin, // For flag overrides (SDK Mode only)
37 eventInterceptionPlugin, // For event monitoring (works in both modes)
38
39 // OR Dev Server Mode: Connect to LaunchDarkly dev server
40 devServerUrl: 'http://localhost:8080',
41 projectKey: 'my-project', // Optional: auto-detects if not provided
42
43 // Common options
44 position: 'bottom-right',
45 enabled: process.env.NODE_ENV === 'development' // disable in production/hosted environments
46 });
47
48 return <YourApp />;
49 }
50
51 render(
52 <LDProvider>
53 <App />
54 </LDProvider>,
55 document.getElementById('root'),
56 );
57})();

Install using a CDN

If you are not using React as your front-end framework, or want to use the developer toolbar in a way where it is decoupled from your tech stack and its dependencies, you can also instantiate the toolbar using a CDN.

To do so, add this script to your index.html file:

index.html script
1<script src="https://unpkg.com/@launchdarkly/toolbar@latest/cdn/toolbar.min.js"></script>

This attaches LaunchDarklyToolbar to your window and exposes an init() method using window.LaunchDarklyToolbar.init() that will lazily load the developer toolbar in the same way the React hook does.

In your corresponding code, wherever you instantiate your LaunchDarkly JavaScript client, pass in the following plugins:

Pass plugins to the client
1import * as LDClient from 'launchdarkly-js-client-sdk';
2import { FlagOverridePlugin, EventInterceptionPlugin } from '@launchdarkly/toolbar';
3
4// Pass these plugins into both the JS client and
5// the window.LaunchDarklyToolbar.init() call.
6const flagOverridePlugin = new FlagOverridePlugin();
7const eventInterceptionPlugin = new EventInterceptionPlugin();
8
9const context: LDClient.LDContext = {
10 kind: 'user',
11 key: 'context-key-123abc',
12};
13
14const client = LDClient.initialize('client-side-id-123abc', context, {
15 plugins: [
16 flagOverridePlugin,
17 eventInterceptionPlugin,
18 // other plugins...
19 ],
20 // other options...
21});
22
23try {
24 await client.waitForInitialization(5);
25 // initialization succeeded, flag values are now available
26 handleInitializedClient(client);
27} catch (err) {
28 // initialization failed or did not complete before timeout
29}
30
31// Only initialize the toolbar in local environments
32if (process.env.NODE_ENV === 'development' && window.LaunchDarklyToolbar) {
33 window.LaunchDarklyToolbar.init({
34 flagOverridePlugin,
35 eventInterceptionPlugin,
36 // other toolbar options...
37 });
38}

If you are using TypeScript and want type-safety for the window.LaunchDarklyToolbar.init call, you can add a window.d.ts file to the root of your web application with the following:

Add a window.d.ts file
1import type { LaunchDarklyToolbar } from '@launchdarkly/toolbar';
2
3declare global {
4 interface Window {
5 LaunchDarklyToolbar?: LaunchDarklyToolbar;
6 }
7}

Mode options

The developer toolbar supports running in two different modes:

  • SDK mode: Integrates with your LaunchDarkly SDK for local flag overrides and testing
  • Dev server mode: Connects to a LaunchDarkly CLI dev server for flag browsing and real-time updates

SDK mode is the default mode for the toolbar. The toolbar switches to dev server mode only if you provide devServerUrl. Generally, we recommend SDK mode.

Available features by mode

ModeOptions
SDK mode

Flag overrides (if you provide flagOverridePlugin)
Events (if you provide eventInterceptionPlugin)
Settings

Dev server mode

Flags
Settings

Set up SDK mode

SDK mode integrates directly with your LaunchDarkly client, allowing you to:

  • Override flag values locally without affecting other members
  • Test different flag variations instantly
  • Work offline or with any LaunchDarkly environment

Setup requires the following steps:

  1. Create a FlagOverridePlugin instance
  2. (Optional) Create an EventInterceptionPlugin instance
  3. Pass the plugin into your LaunchDarkly SDK’s plugins array
  4. Pass the same plugin instance into the LaunchDarklyToolbar component
  5. Wrap your app with the LDProvider

Here’s how to set up SDK mode:

SDK mode setup
1import { useEffect, useState } from 'react';
2import { asyncWithLDProvider } from 'launchdarkly-react-client-sdk';
3import {
4 LaunchDarklyToolbar,
5 FlagOverridePlugin,
6 EventInterceptionPlugin
7} from '@launchdarkly/toolbar';
8
9// Create the plugin instances
10const flagOverridePlugin = new FlagOverridePlugin({
11 storageNamespace: 'my-app-overrides', // Optional: customize storage key
12});
13const eventInterceptionPlugin = new EventInterceptionPlugin({
14 eventCapacity: 250, // Maximum events to store (default: 150)
15 enableLogging: true, // Console logging for debugging (default: false)
16});
17
18function App() {
19 const [LDProvider, setLDProvider] = useState(null);
20
21 useEffect(() => {
22 const initializeLD = async () => {
23 const Provider = await asyncWithLDProvider({
24 clientSideID: 'enter-your-client-side-id',
25 context: { key: 'context-key-123abc', name: 'Sandy Smith' },
26 options: {
27 // Pass the plugins to the SDK
28 plugins: [flagOverridePlugin, eventInterceptionPlugin],
29 },
30 });
31 setLDProvider(() => Provider);
32 };
33
34 initializeLD();
35 }, []);
36
37 if (!LDProvider) {
38 return <div>Loading LaunchDarkly...</div>;
39 }
40
41 return (
42 <LDProvider>
43 <div>
44 <h1>My App</h1>
45 {/* Pass the same plugin instances to the toolbar */}
46 <LaunchDarklyToolbar
47 flagOverridePlugin={flagOverridePlugin}
48 eventInterceptionPlugin={eventInterceptionPlugin}
49 />
50 </div>
51 </LDProvider>
52 );
53}

Set up dev server mode

If your team uses the LaunchDarkly CLI dev server, start it with CORS enabled:

Dev server with CORS enabled
$ldcli dev-server start --project your-project --cors-enabled true

Then connect the toolbar by passing in the URL of the CLI dev server:

Connect the toolbar
1import { LaunchDarklyToolbar } from '@launchdarkly/toolbar';
2
3function App() {
4 return (
5 <div>
6 <h1>My App</h1>
7 <LaunchDarklyToolbar devServerUrl="http://localhost:8765" />
8 </div>
9 );
10}

Properties

You can set the following properties to personalize the toolbar.

Flag override plugin

The flag override plugin enables flag overrides and testing:

PropTypeDefault
flagOverridePluginIFlagOverridePluginundefined

Event interception plugin

The event interception plugin enables Events tab functionality:

PropTypeDefault
eventInterceptionPluginIEventInterceptionPluginundefined

Base LaunchDarkly URL

You can use the base LaunchDarkly URL for link generation, such as to create a missing feature flag:

PropTypeDefault
baseUrlstring (optional)https://app.launchdarkly.com

LaunchDarkly dev server URL

You can use the URL of your LaunchDarkly dev server to enable dev server mode:

PropTypeDefault
devServerUrlstring (optional)undefined

Toolbar position

You can set the toolbar position on your screen:

PropTypeDefault
position"left" | "right"right

Project key

You can use a project key in multi-project setups (dev server mode only):

PropTypeDefault
projectKeystring (optional)undefined

Polling interval

You can set the polling interval for dev server updates (dev server mode only):

PropTypeDefault
pollIntervalInMsnumber (optional)5000

Visibility control

The toolbar provides a global API for show/hide control:

Visibility control
1// Toggle visibility
2window.ldToolbar.toggle();
3
4// Enable/disable explicitly
5window.ldToolbar.enable();
6window.ldToolbar.disable();
7
8// Check current status
9window.ldToolbar.status(); // returns true/false