


On our last episode of “Build it but don’t break ship” (otherwise known as the LaunchDarkly Blog), we built an AI-powered reality TV show generator. While the mission was an overall success, the developers now face their most formidable challenge yet… spam.
Let’s break down how you, a formidable contestant in the world of getting ship done, can reduce risk in your AI-powered apps by implementing rate limiting with Arcjet and leveraging LaunchDarkly’s targeting capabilities.
If you missed the last episode, don’t fret — we’ve got a handy recap… er repo that picks up right where we left off.
Developers, are you ready to take on your fiercest competitor yet?
What tech stack powers this?
Next.js: A React framework for building full-stack web applications. It provides features like server-side rendering, static site generation, and API routes, making it ideal for our application.
Arcjet: A cloud-based API security and rate-limiting service that helps protect your application from abuse, manages traffic, and optimizes performance by controlling the rate at which requests are processed
LaunchDarkly: A feature management platform that allows us to control feature rollouts, A/B testing, dynamic configuration, and run experiments without redeploying our application.
Replicate: A tool that allows you to run AI through an API, providing a way to run machine learning models as part of your app's backend. It’s great for adding AI features like image generation, text summarization, or other complex tasks.
Requirements
- A LaunchDarkly account (Sign up for a free account here)
- An ArcJet Account (Sign up for a free account here)
- A Replicate account (Create a free account here, however depending on model usage, the number of API requests may be limited)
You could also create the end result using another LLM API, such as OpenAI, Anthropic, Hugging Face, or Gemini; however, this tutorial will be built using Replicate’s API library.
Heads up!
This project can be considered a part two of the tutorial on How to Build a Reality TV Simulator App. If you’ve completed that tutorial already, it picks where it left off right up. If not – don’t worry! I’ve got a branch for you to get started from.
Setting up the project
Clone this example repository and install your requirements.
git clone --single-branch --branch replicate-added https://github.com/erinmikailstaples/Reality-TV-Generator.git
cd Reality-TV-Generator
cd celebrity-wilderness-challenge
npm install
Navigate to your “.env.local.example” file, rename it to “.env.local” and be prepared to add in your Replicate API token.
Get started with Replicate
The Replicate SDK is already installed within our application and listed as a dependency; however, we need an API key from Replicate to get started.
First, log in or create an account on Replicate.
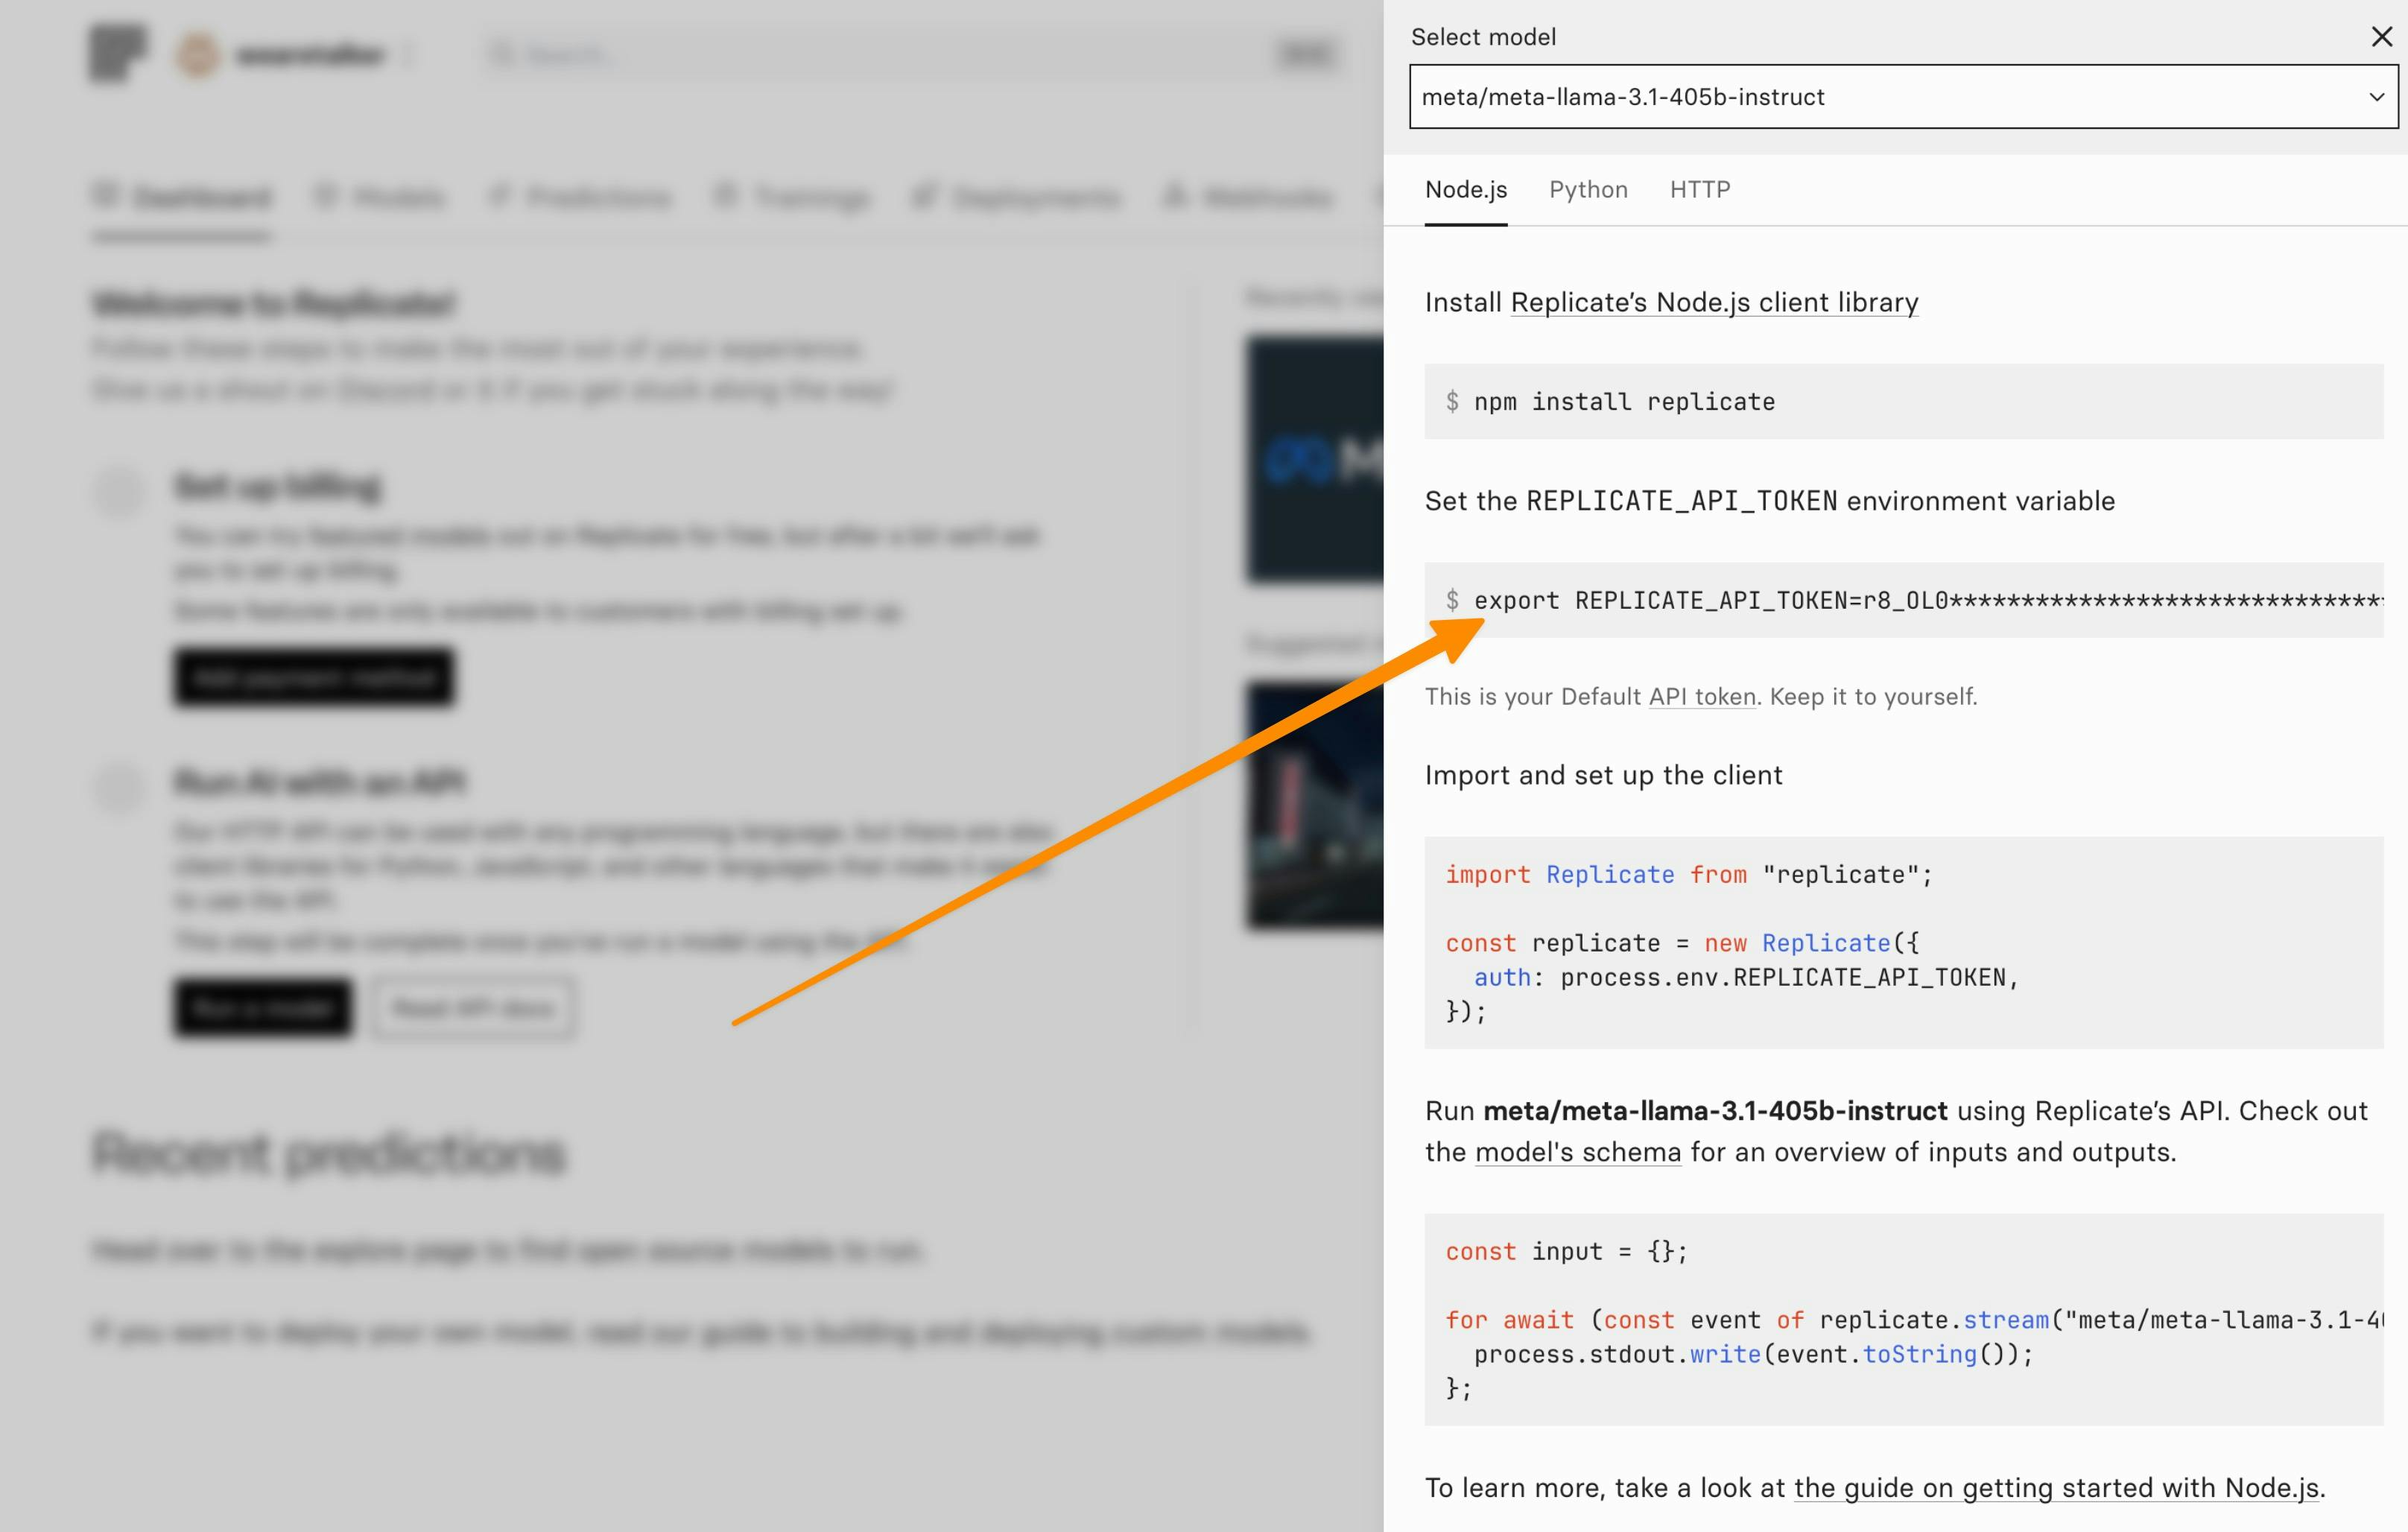
If logging in for the first time, select “Run a model.”
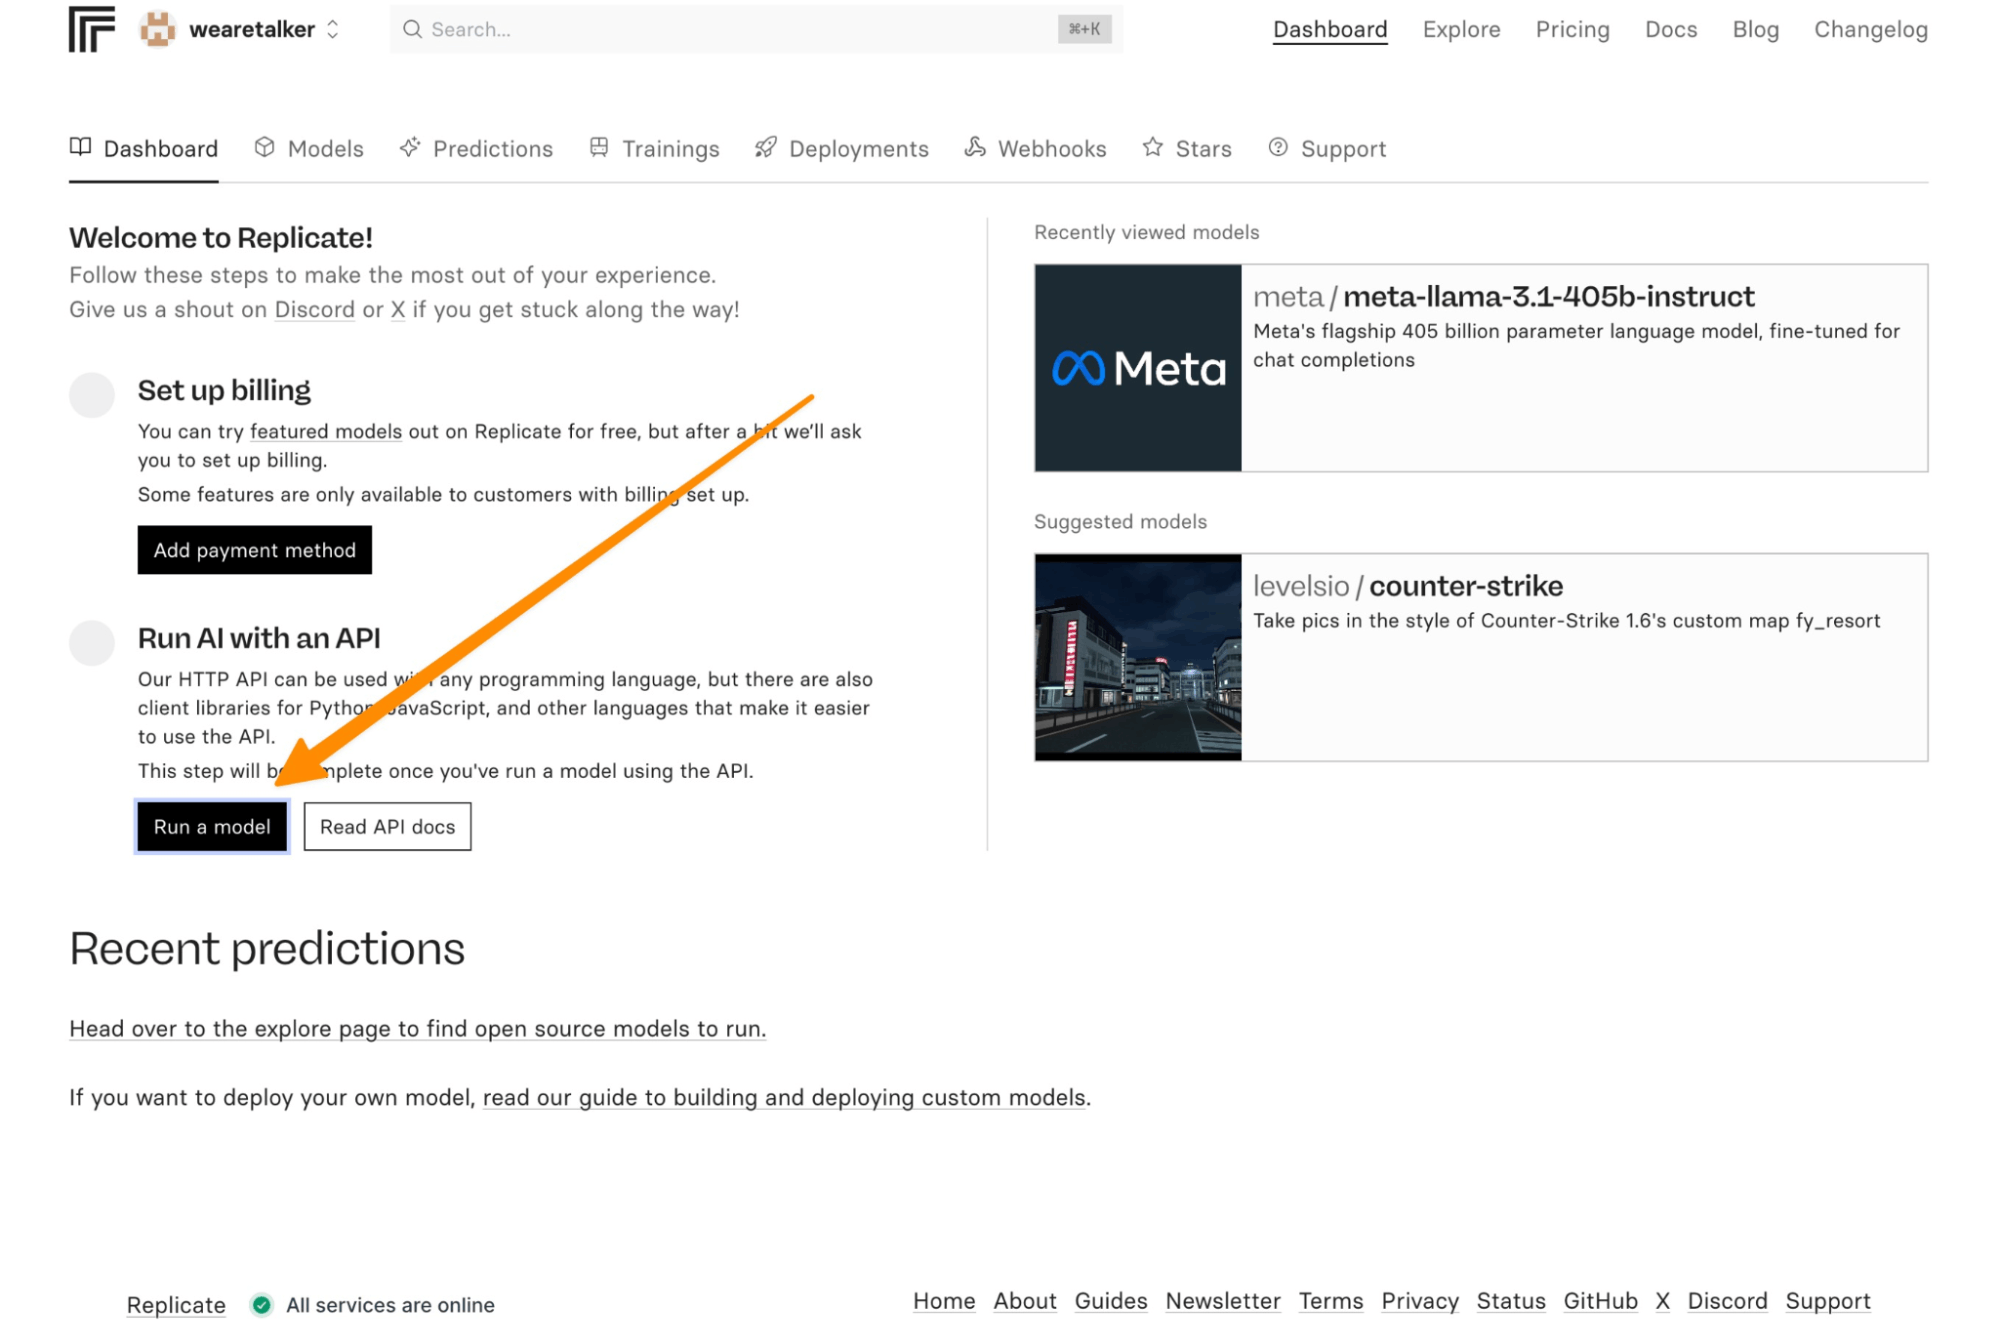
Then, grab your API key from the modal on the side.
If you’ve already created an account on Replicate, the steps will slightly differ. You’ll first log in to your account, click on your username in the upper left-hand corner, and select “API tokens.”
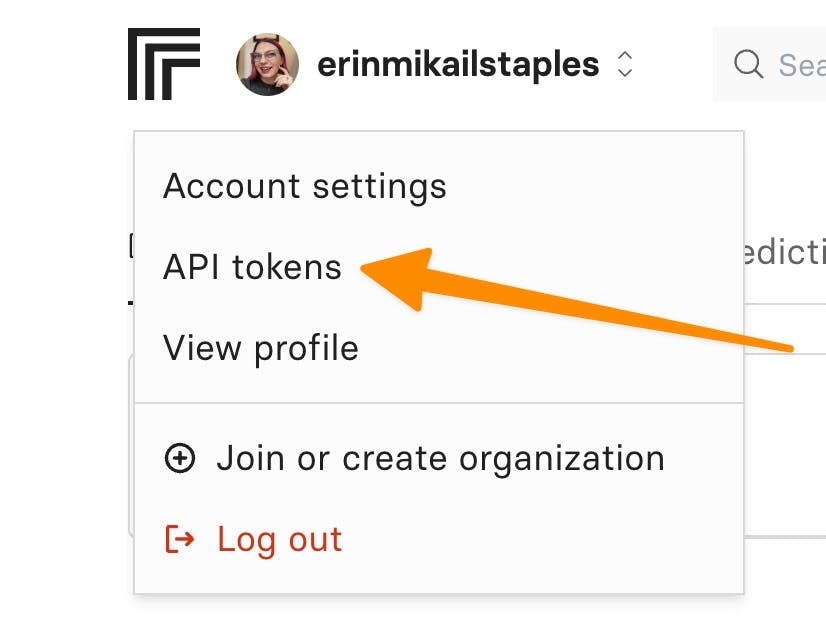
Then, create a new API token by giving it a name and selecting “Create token”. I’ve named it “Reality-TV-Application.”
Copy your token and place it within the .env.local file.
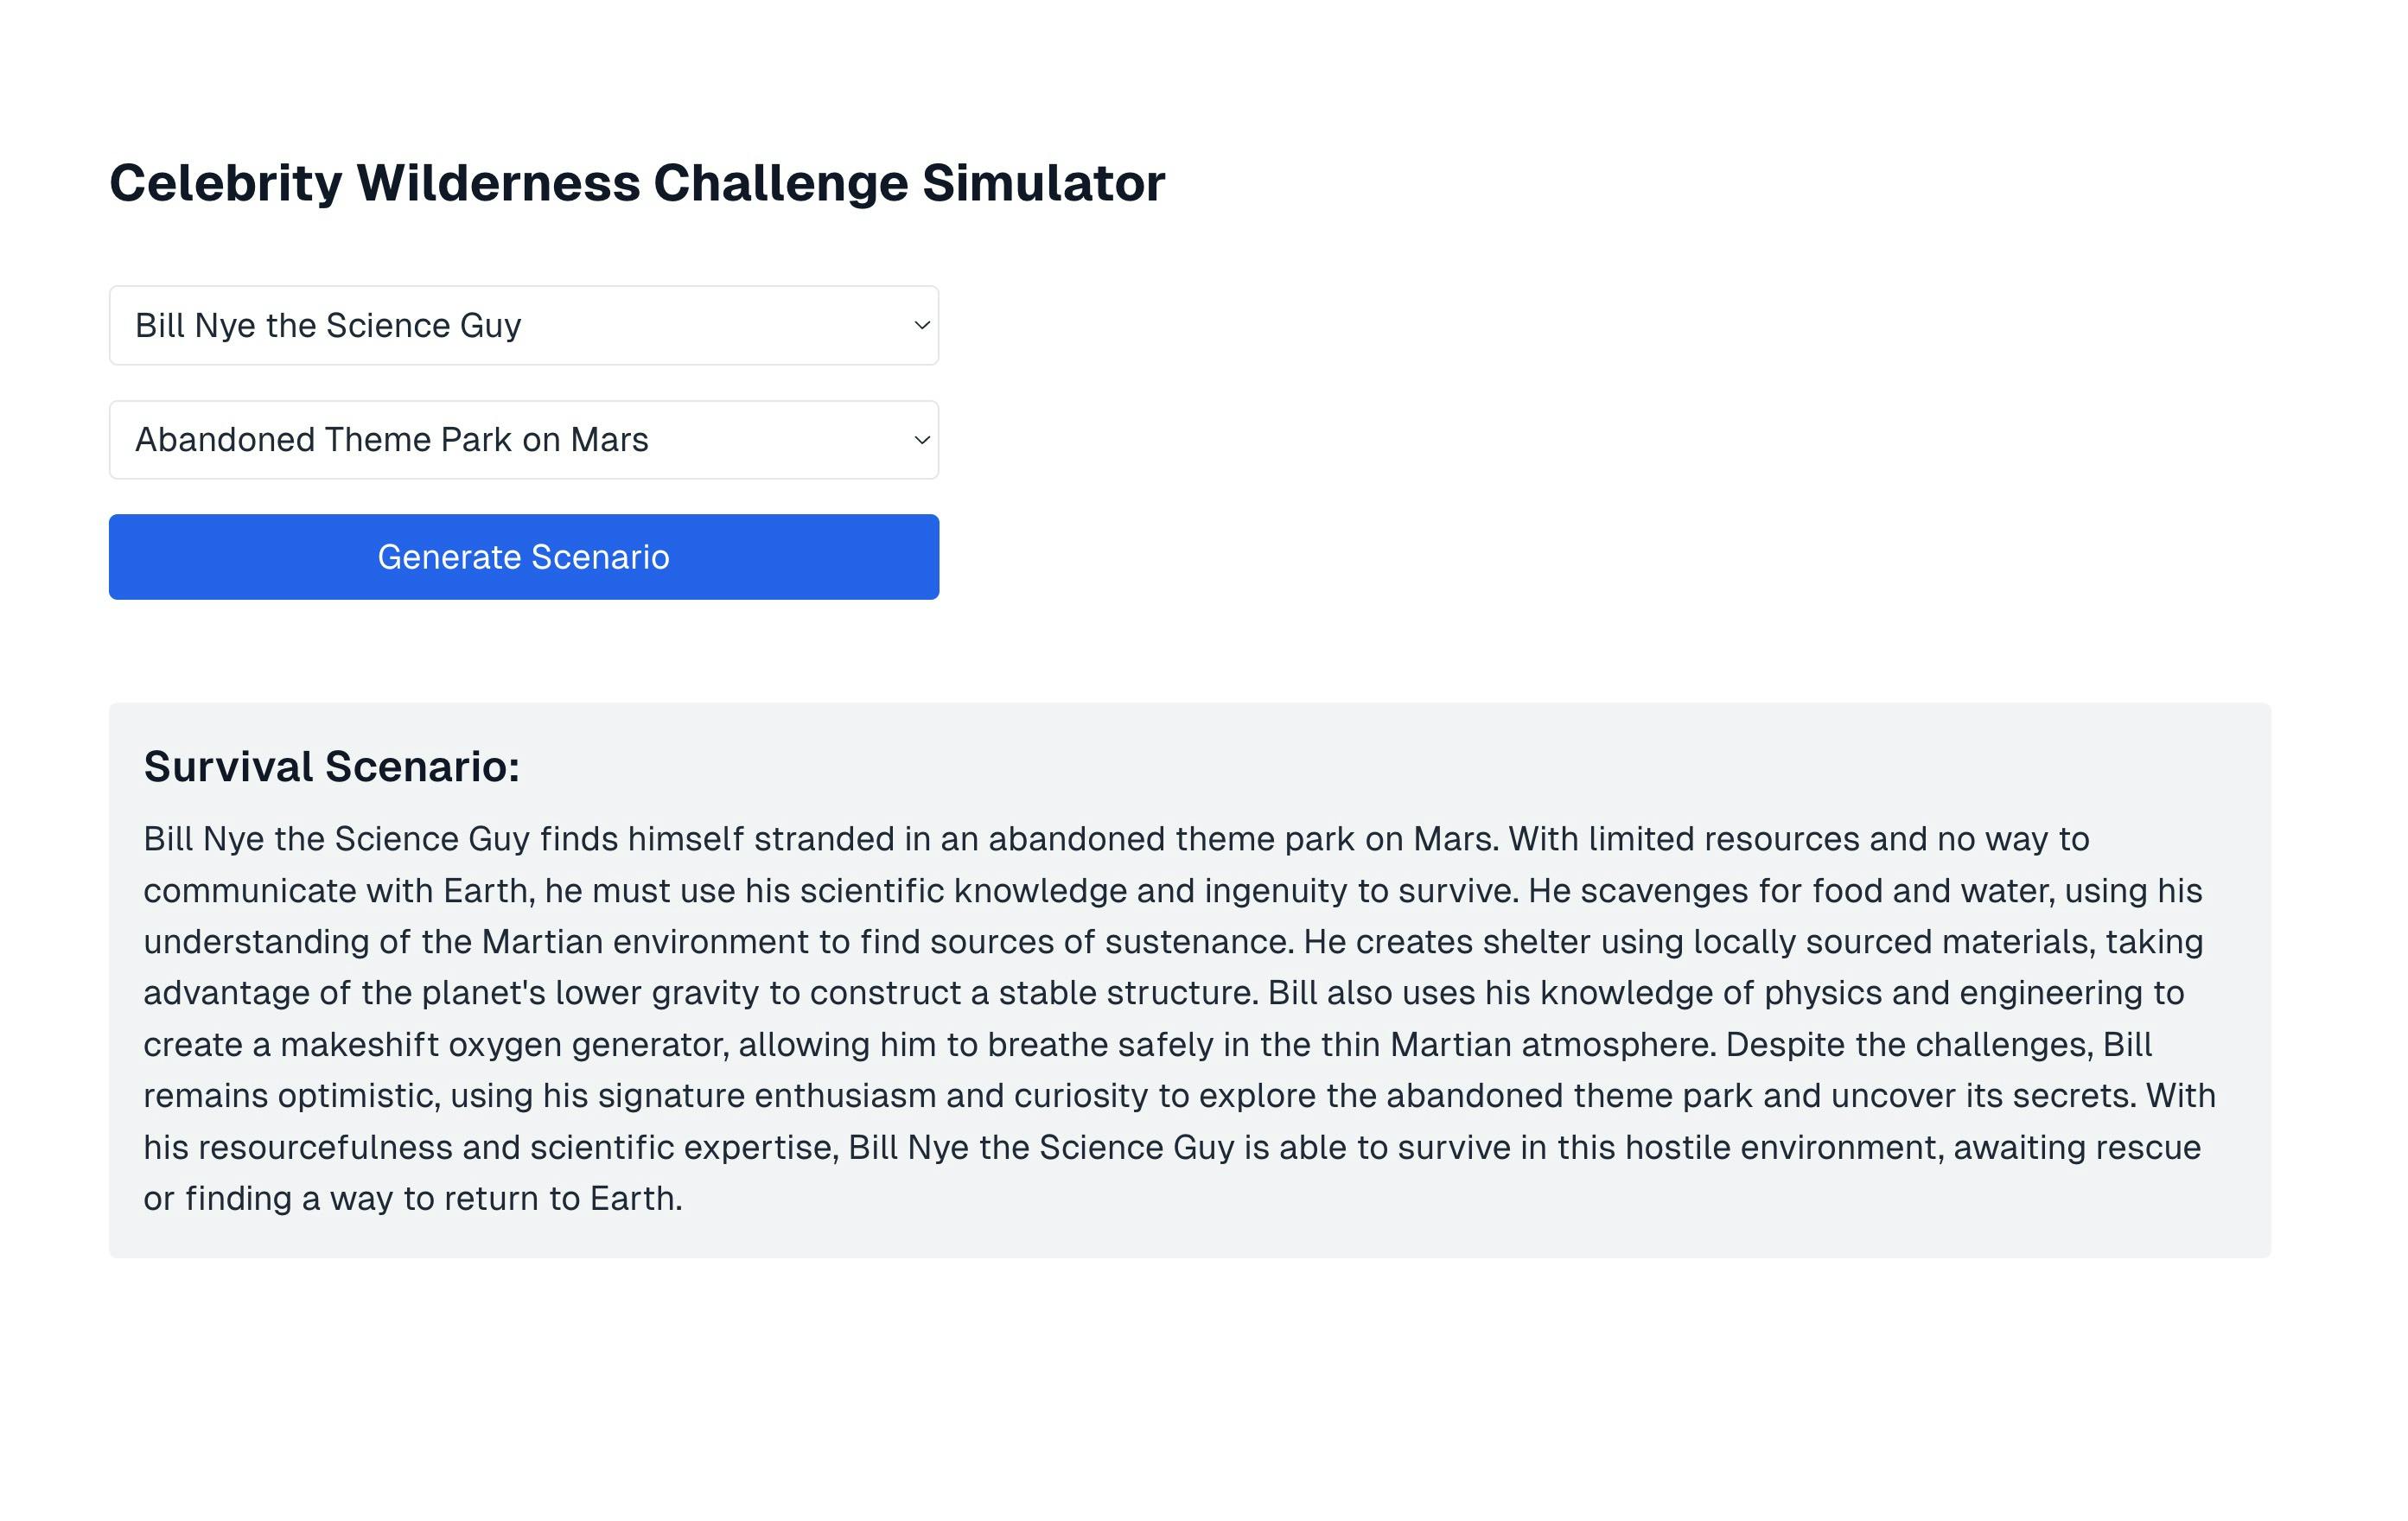
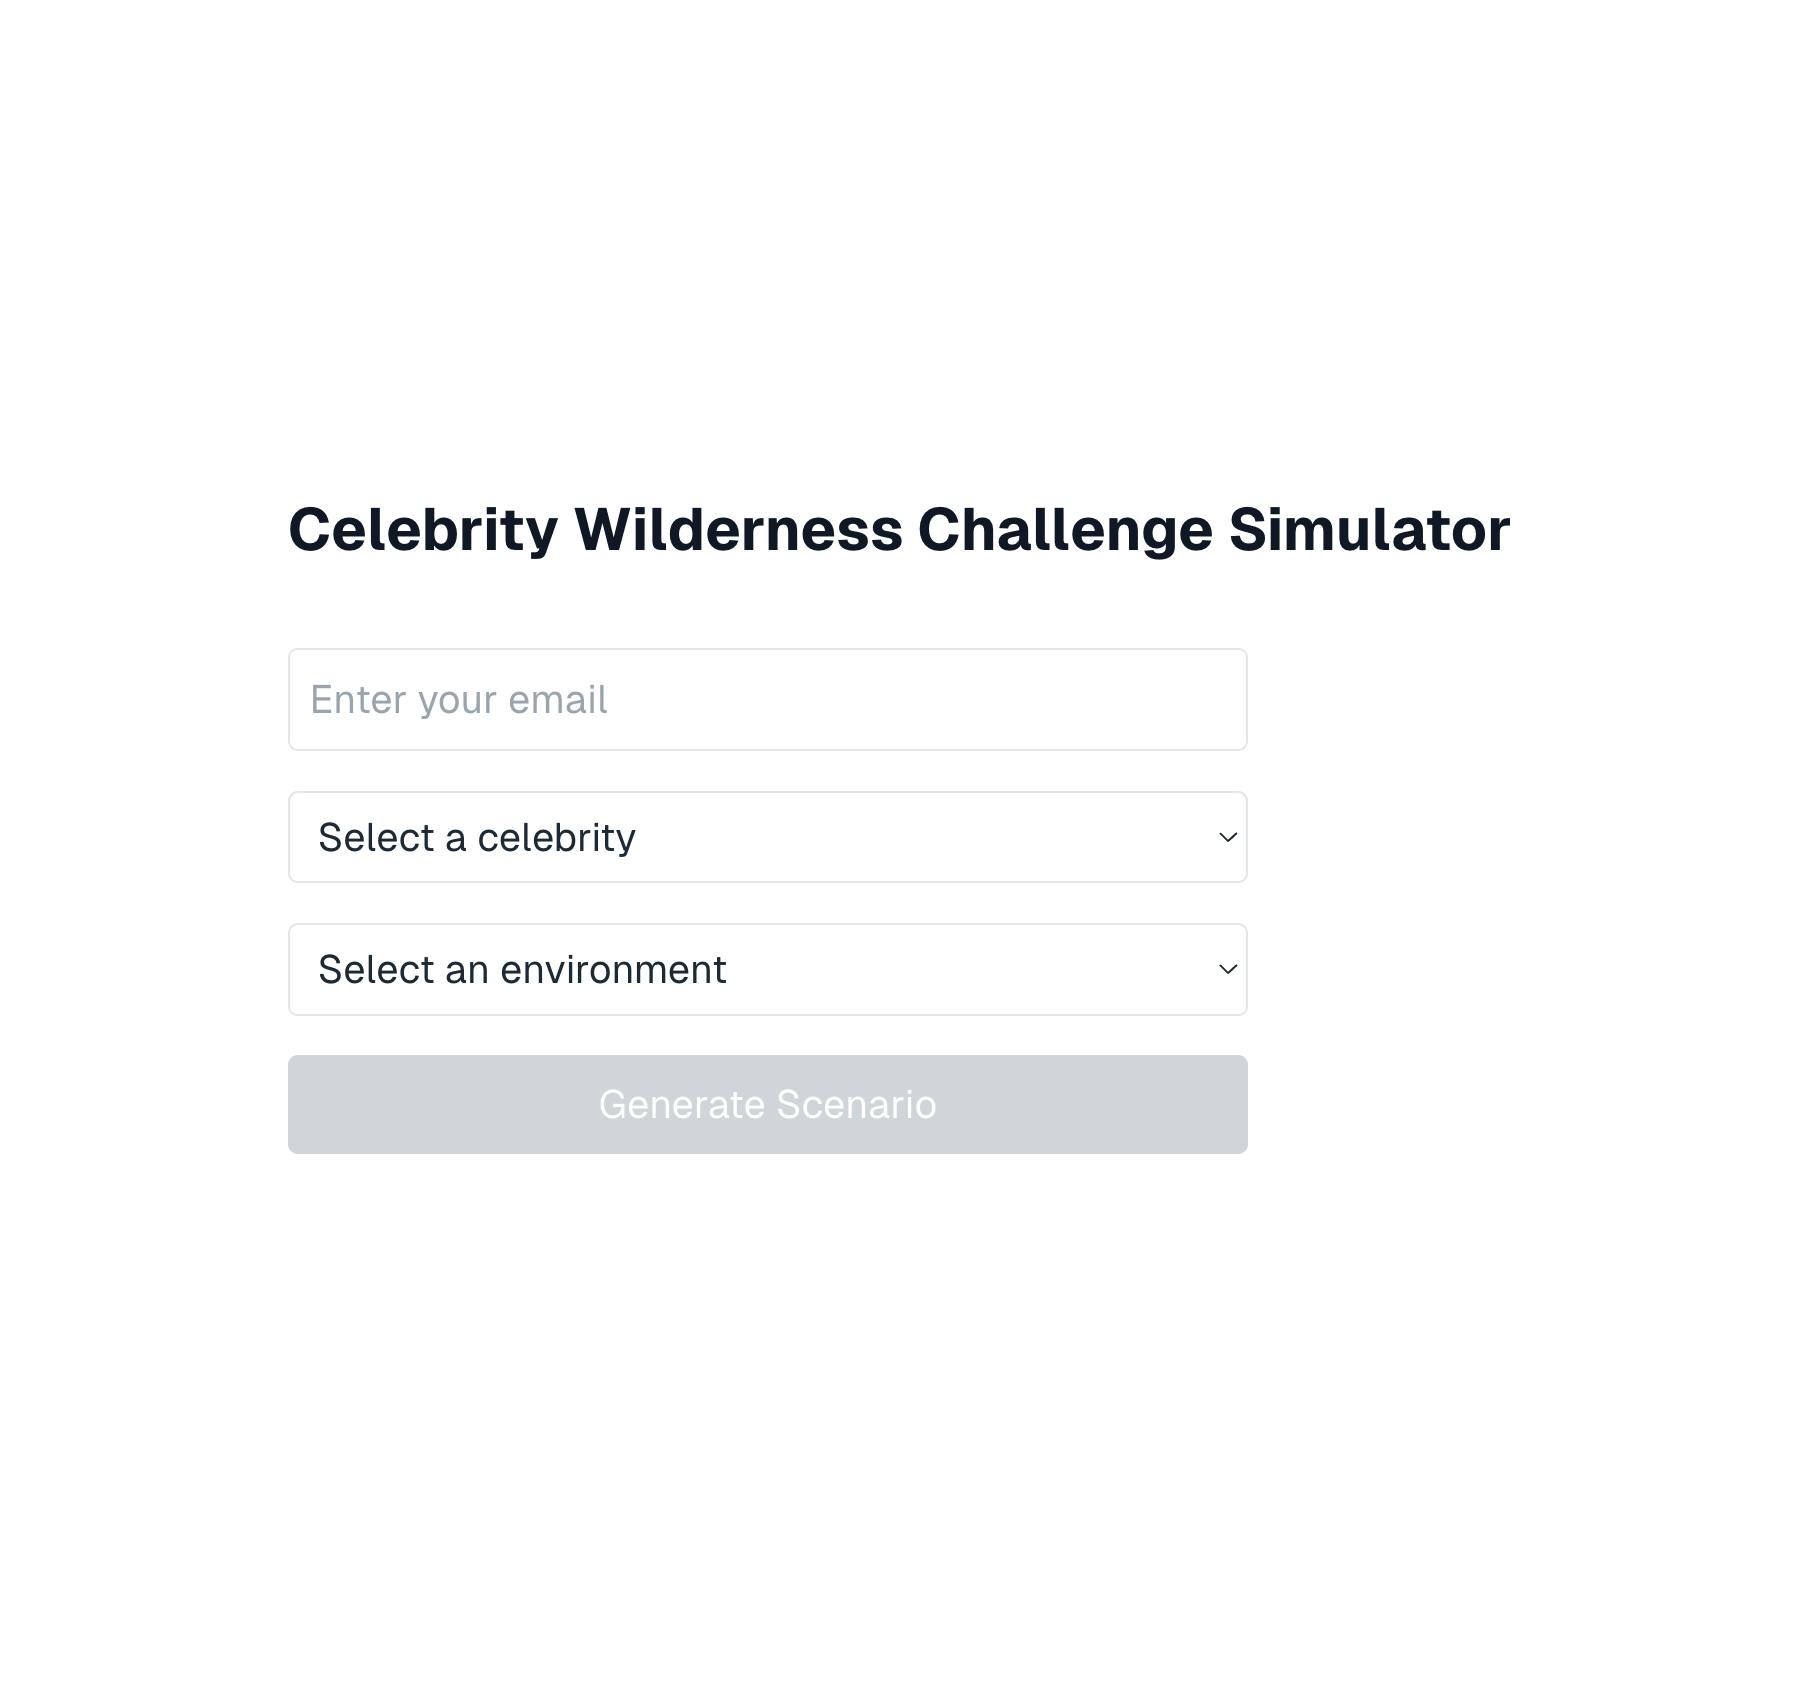
Let's test the app is running before moving on to the next step.
Within the terminal, run “npm run dev” and then navigate to localhost:3000.
You should be greeted with a Celebrity Wilderness Challenge Scenario Generator screen.
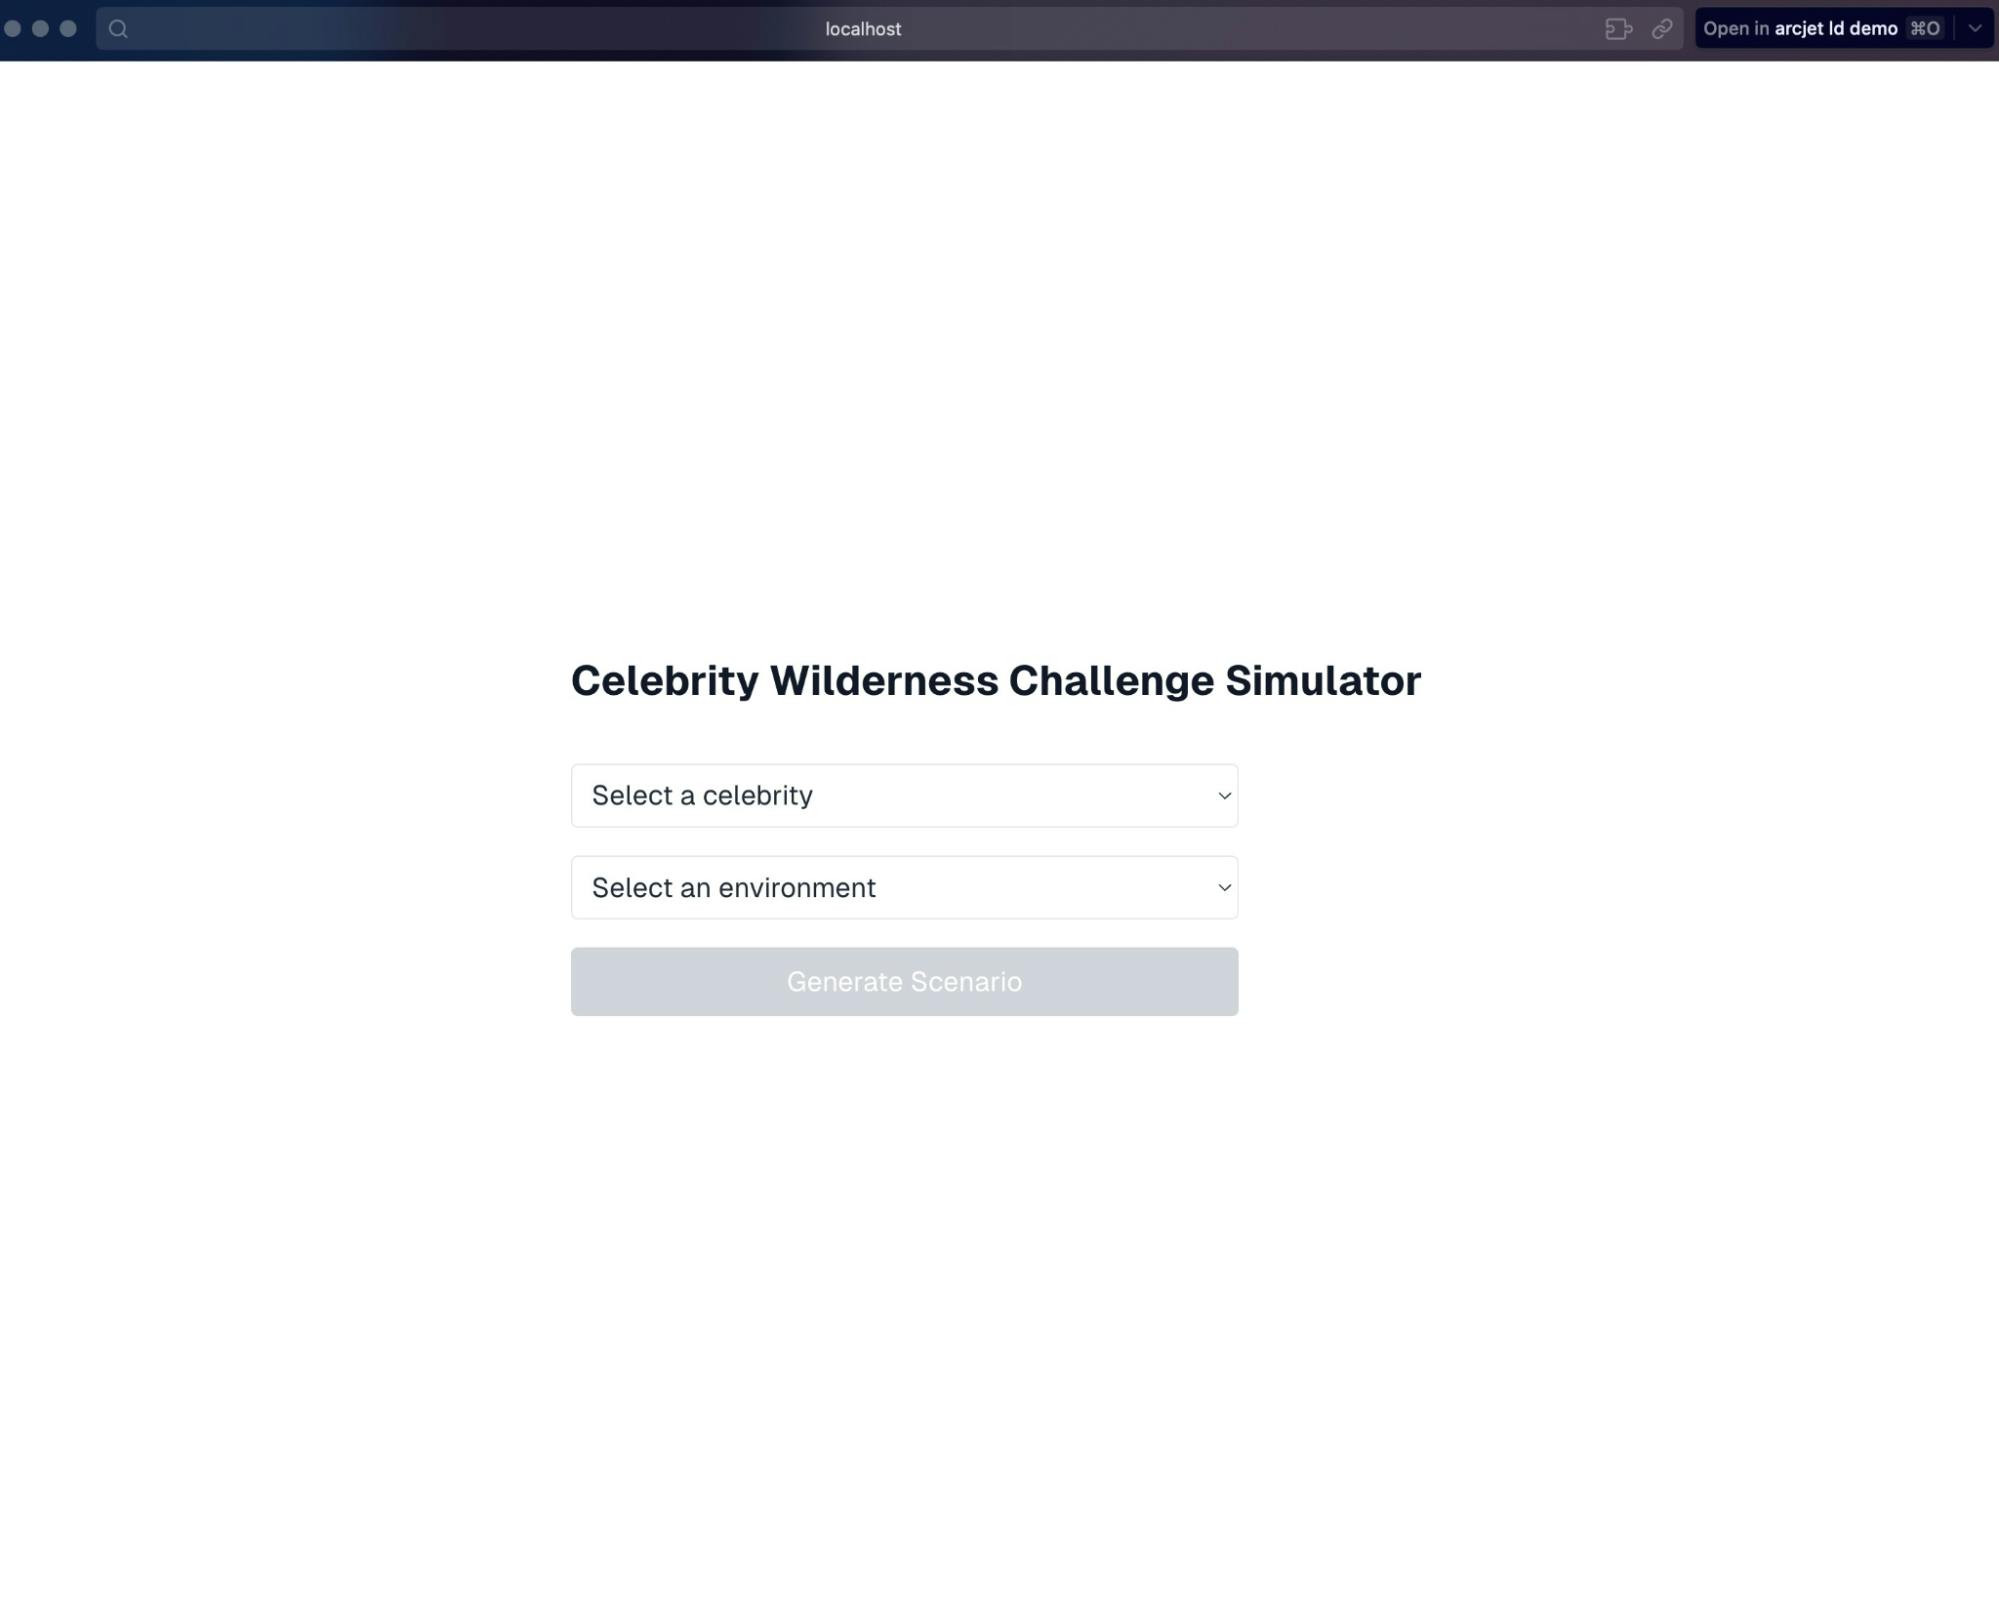
Test that you’ve got the Replicate token input correctly by selecting a celebrity and a location and seeing if it returns a silly wilderness survival scenario.
Excellent, silly scenario in tow — we’re ready to continue onto the next step. 😈
Now, let's add Arcjet in this party to keep our Replicate bill reasonably affordable so we can afford things like tickets to the underwater disco party Justin Bieber will be at. 💃🏻
Adding in Rate Limiting with ArcJet
Having an AI-powered application is wonderful, but without the right safeguards, that can be pricey. Since we haven’t won any reality tv competition yet — we’ll need to make sure that we’re putting in safeguards to save money on our AI-generated bills.
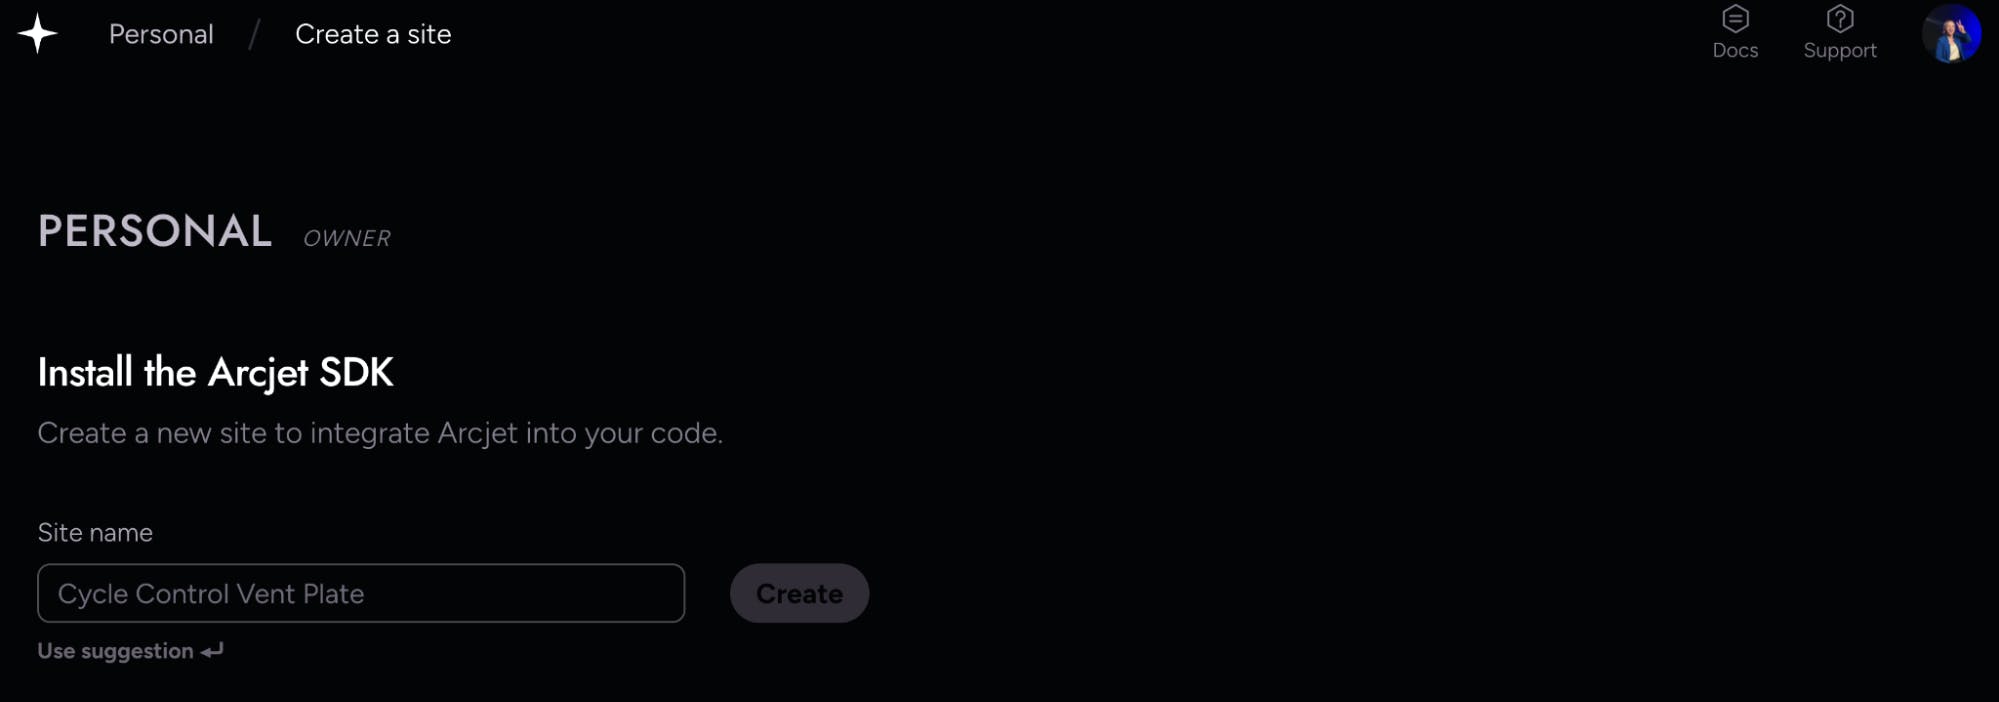
Let’s start by creating a free ArcJet account. When you first log in, it will prompt you to install the Arcjet SDK and add a site name. Let’s call it “Celebrity Wilderness Challenge Simulator”
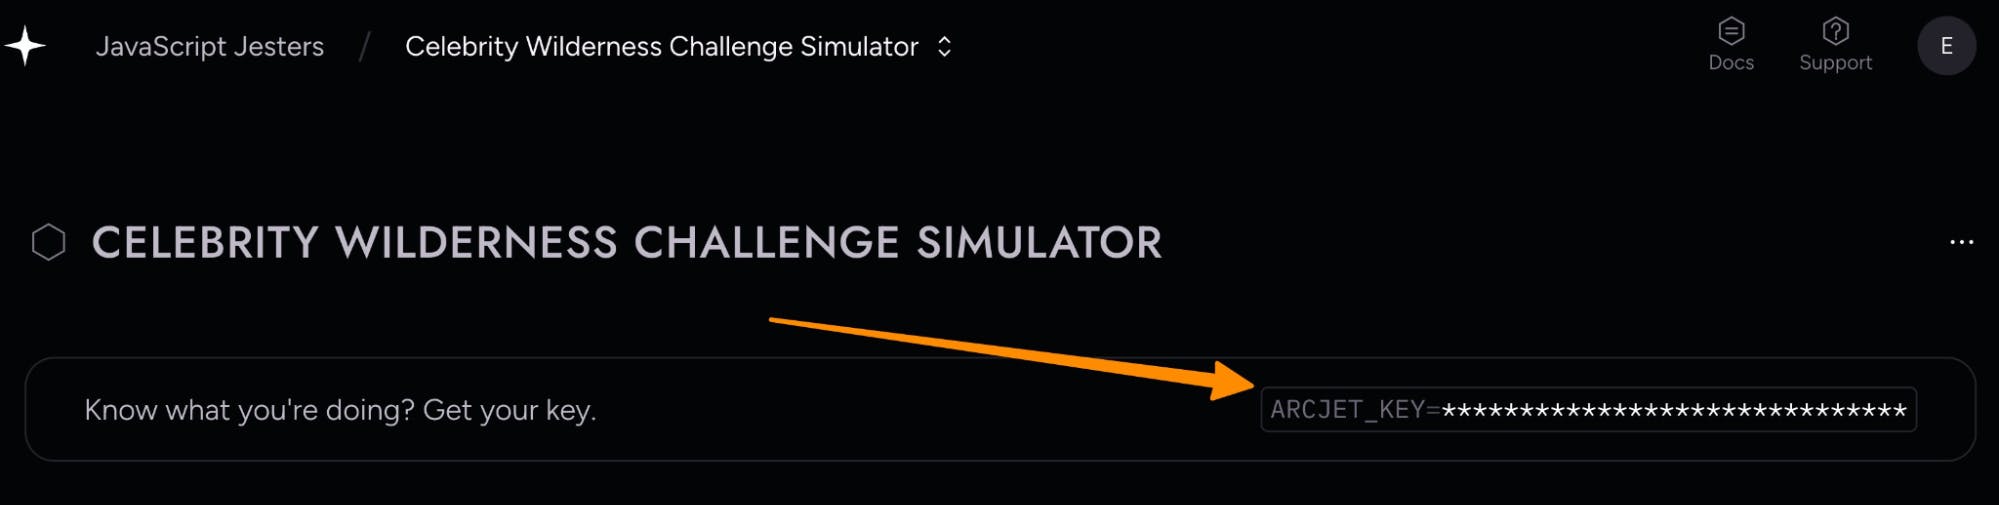
Grab that SDK key, navigate within your application’s code, and copy it into its respective spot in the .env.local file. If you haven't already, be sure to uncomment the line.
Now, install Arcjet to your application from within your main directory.
npm install @arcjet/nextThen, navigate to the created arcjet.js configuration file and confirm it looks as so ( celebrity-wilderness-challenge/src/app/api/arcjet.js)
import { ArcjetNext } from "@arcjet/next";


export const arcjet = new ArcjetNext({
 apiKey: process.env.ARCJET_API_KEY,
});
Targeting the right folks
Now, we don’t want everyone to be limited, rather we just want folks who are not part of our tv director team. Let’s add a way to pull the relevant context from LaunchDarkly into ArcJet’s system to ensure only certain folks are rate limited.
Configure LaunchDarkly
First, install the LaunchDarkly React Client SDK.
Within your project folder — run the following.
npm install launchdarkly-react-client-sdkUpdate your environment variables
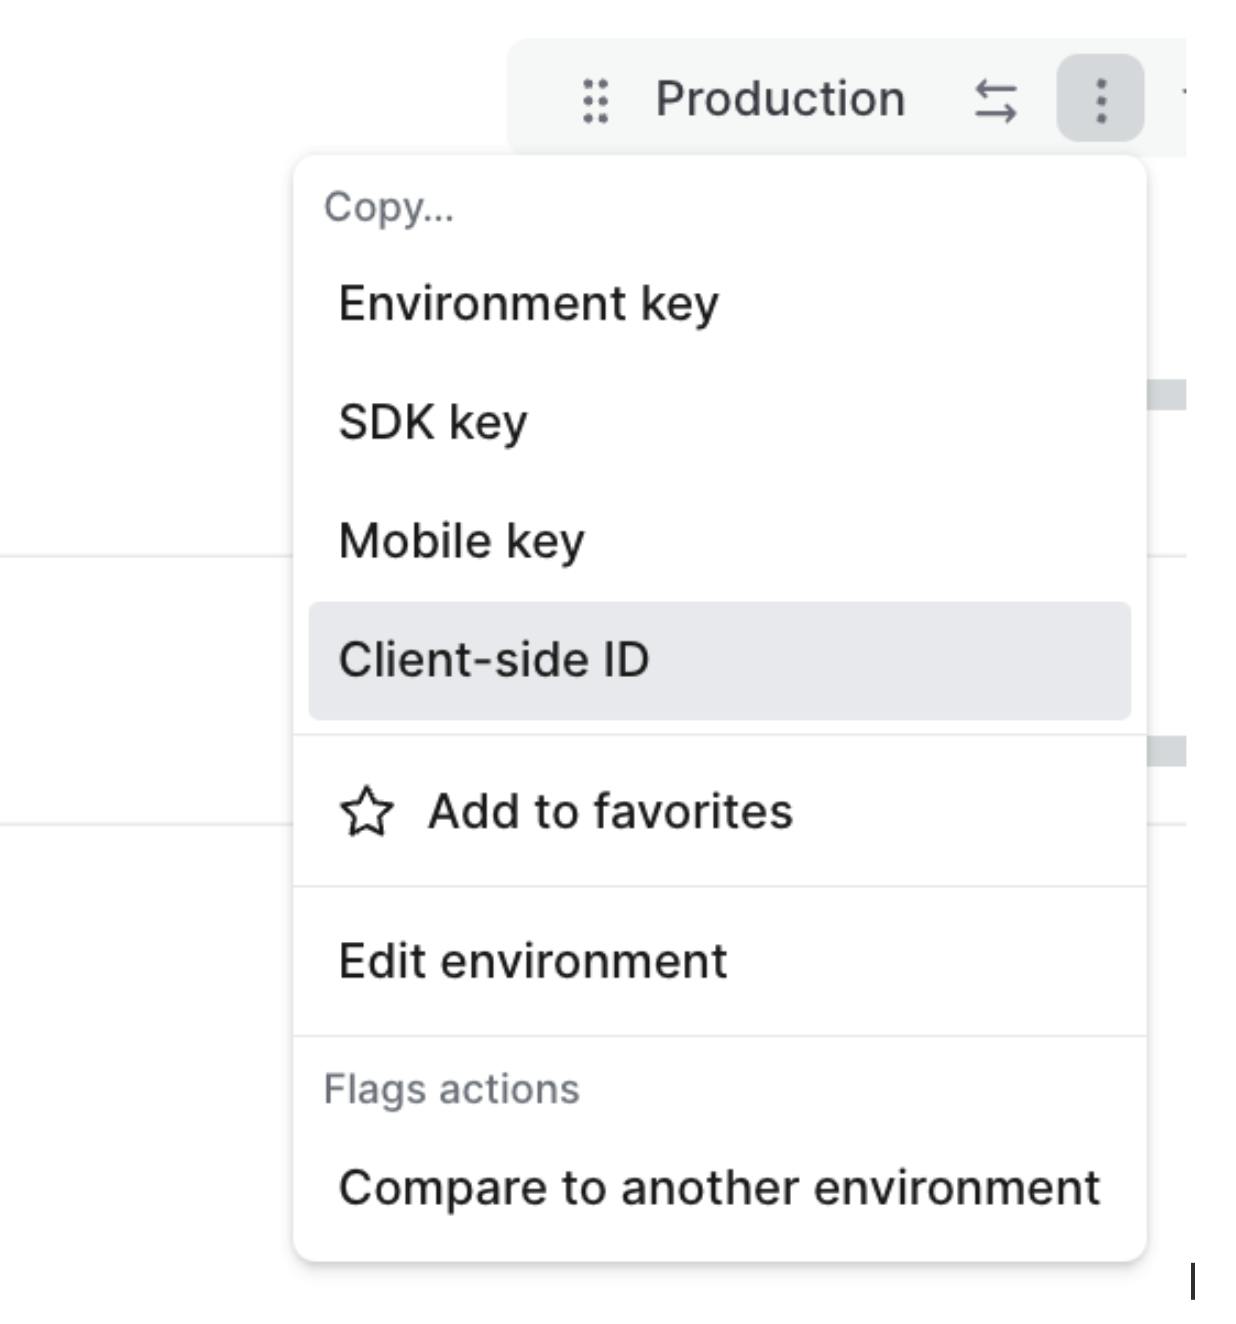
In your .env.local file, uncomment the LaunchDarkly variable and add your LaunchDarkly client-side ID.
You can find that by selecting the three dots next to your environment and selecting client-side ID.
Note: these are environment-specific keys. Ensure you’re in the right environment when selecting your key and making changes.
NEXT_PUBLIC_LAUNCHDARKLY_CLIENT_SIDE_ID=your_client_side_id_here
REPLICATE_API_TOKEN=your_replicate_api_token_here
First, let’s update our page.tsx file to have an added context of searching for emails from our directors, at @directordude.com.
While we’re at it, we’ll also add basic error functionality to determine if the rate limit has been met or not.
Here’s what the completed page.tsx file should look like, but check out the comments to see where changes have been made.
"use client";
import React, { useState } from "react";
import { useFlags, useLDClient } from "launchdarkly-react-client-sdk";


export default function Home() {
 const [celebrity, setCelebrity] = useState("");
 const [environment, setEnvironment] = useState("");
 const [scenario, setScenario] = useState("");
 const [isLoading, setIsLoading] = useState(false);
 const [email, setEmail] = useState("");
 const flags = useFlags();
 const ldClient = useLDClient();


 const identifyUser = async () => {
   if (ldClient) {
     const isDirector = /@directordude\.com$/.test(email);
     await ldClient.identify({
       key: email,
       email: email,
       custom: {
         isDirector: isDirector
       }
     });
   }
 };


 const generateScenario = async () => {
   setIsLoading(true);
   try {
     await identifyUser();


     const context = ldClient?.getContext();
     const userId = context?.key || "anonymous";
     const isDirector = context?.custom?.isDirector || false;


     console.log("Sending request with:", { celebrity, environment, userId, isDirector });


     const response = await fetch("/api/generate-scenario", {
       method: "POST",
       headers: { "Content-Type": "application/json" },
       body: JSON.stringify({ celebrity, environment, promptConfig: flags.aiPromptConfig, userId, isDirector }),
     });


     if (!response.ok) {
       if (response.status === 429) {
         throw new Error("Rate limit exceeded. Please try again later.");
       }
       throw new Error(`HTTP error! status: ${response.status}`);
     }


     const data = await response.json();
     console.log("Received response:", data);
     setScenario(data.scenario);
   } catch (error) {
     console.error("Failed to generate scenario:", error);
     setScenario(error.message || "Failed to generate scenario. Please try again.");
   } finally {
     setIsLoading(false);
   }
 };


 const celebrities = [
   "Nicolas Cage", "Bad Bunny", "King Charles", "Justin Bieber", "Lady Gaga", "Snoop Dogg", "Martha Stewart", "Kanye West",
   "Betty White", "Gordon Ramsay", "Beyoncé", "Jeff Goldblum", "Dolly Parton",
   "Bill Nye the Science Guy", "Flavor Flav", "The Rock's Eyebrow", "Chuck Norris", "Weird Al Yankovic"
 ];


 const environments = [
   "Inside a Giant Burrito", "Biork Hive Mind", "just Twitter", "The White House", "Underwater Disco", "Haunted IKEA", "Jurassic Park Gift Shop",
   "Sentient Cloud City", "Chocolate Factory Gone Wrong", "Upside-Down Skyscraper",
   "Abandoned Theme Park on Mars", "Inside a Giant's Pocket", "Miniature Golf Course Jungle",
   "Intergalactic Space Truck Stop", "Zombie-Infested Shopping Mall",
   "Enchanted Forest of Talking Furniture", "Post-Apocalyptic Ball Pit",
   "Dimension Where Everything is Made of Cheese"
 ];


 return (
   <div className="grid grid-rows-[20px_1fr_20px] items-center justify-items-center min-h-screen p-8 pb-20 gap-16 sm:p-20 font-[family-name:var(--font-geist-sans)] bg-white text-gray-800">
     <main className="flex flex-col gap-8 row-start-2 items-center sm:items-start">
       <h1 className="text-2xl font-bold text-gray-900">Celebrity Wilderness Challenge Simulator</h1>
       <div className="flex flex-col gap-4">
         <input
           type="email"
           value={email}
           onChange={(e) => setEmail(e.target.value)}
           placeholder="Enter your email"
           className="p-2 border rounded"
           aria-label="Enter email"
           disabled={isLoading}
         />
         <select
           value={celebrity}
           onChange={(e) => setCelebrity(e.target.value)}
           className="p-2 border rounded"
           aria-label="Select celebrity"
           disabled={isLoading}
         >
           <option value="">Select a celebrity</option>
           {celebrities.map((celeb) => (
             <option key={celeb} value={celeb}>{celeb}</option>
           ))}
         </select>
         <select
           value={environment}
           onChange={(e) => setEnvironment(e.target.value)}
           className="p-2 border rounded"
           aria-label="Select environment"
           disabled={isLoading}
         >
           <option value="">Select an environment</option>
           {environments.map((env) => (
             <option key={env} value={env}>{env}</option>
           ))}
         </select>
         <button
           onClick={generateScenario}
           disabled={!celebrity || !environment || !email || isLoading}
           className="p-2 bg-blue-600 text-white rounded hover:bg-blue-700 disabled:bg-gray-300"
         >
           {isLoading ? 'Generating...' : 'Generate Scenario'}
         </button>
       </div>
       {isLoading && (
         <div className="mt-4 p-4 bg-gray-100 rounded text-gray-800">
           <p className="text-center">Generating your hilarious scenario...</p>
           <div className="loader mt-2"></div>
         </div>
       )}
       {!isLoading && scenario && (
         <div className="mt-4 p-4 bg-gray-100 rounded text-gray-800">
           <h2 className="text-xl font-semibold mb-2 text-gray-900">Survival Scenario:</h2>
           <p>{scenario}</p>
         </div>
       )}
     </main>
   </div>
 );
}
With these changes, you’ll now see an input box to put in your email address and you will have created a way to determine if someone is a director or not by looking for the email domain “@directordude.com”
Let’s now update route.js file to not only add ArcJet’s rate-limiting functionality but also pass the proper context from LaunchDarkly as well.
import { NextResponse } from "next/server";
import Replicate from "replicate";
import arcjet, { tokenBucket } from "@arcjet/next";


const replicate = new Replicate({
 auth: process.env.REPLICATE_API_TOKEN,
});


export const dynamic = 'force-dynamic';


const aj = arcjet({
 key: process.env.ARCJET_API_KEY || "",
 characteristics: ["userId"],
 rules: [
   tokenBucket({
     mode: "LIVE",
     refillRate: 10,
     interval: 3600,
     capacity: 10,
   }),
 ],
});


export async function POST(req) {
 try {
   const { celebrity, environment, promptConfig, userId, isDirector } = await req.json();


   if (!isDirector) {
     const result = await aj.protect(req, {
       userId: userId,
     });


     if (!result.allow) {
       return NextResponse.json({ error: "Rate limit exceeded" }, { status: 429 });
     }
   }


   console.log("Received request with:", { celebrity, environment, promptConfig, userId, isDirector });
    const prompt = promptConfig?.prompt
     ? promptConfig.prompt.replace('{celebrity}', celebrity).replace('{environment}', environment)
     : `Generate a survival scenario in 500 characters or less for ${celebrity} in ${environment}.`;
    console.log("Generated prompt:", prompt);


   const output = await replicate.run(
     promptConfig?.model || "replicate/llama-2-70b-chat:2c1608e18606fad2812020dc541930f2d0495ce32eee50074220b87300bc16e1",
     { input: { prompt } }
   );


   console.log("AI output:", output);


   return NextResponse.json({ scenario: output.join("") });
 } catch (error) {
   console.error("Server error:", error);
   return NextResponse.json({ error: "Internal Server Error" }, { status: 500 });
 }
}
Let's test this out with two different emails. First, pretend we’re a director with an email address with the domain @directordude.com.
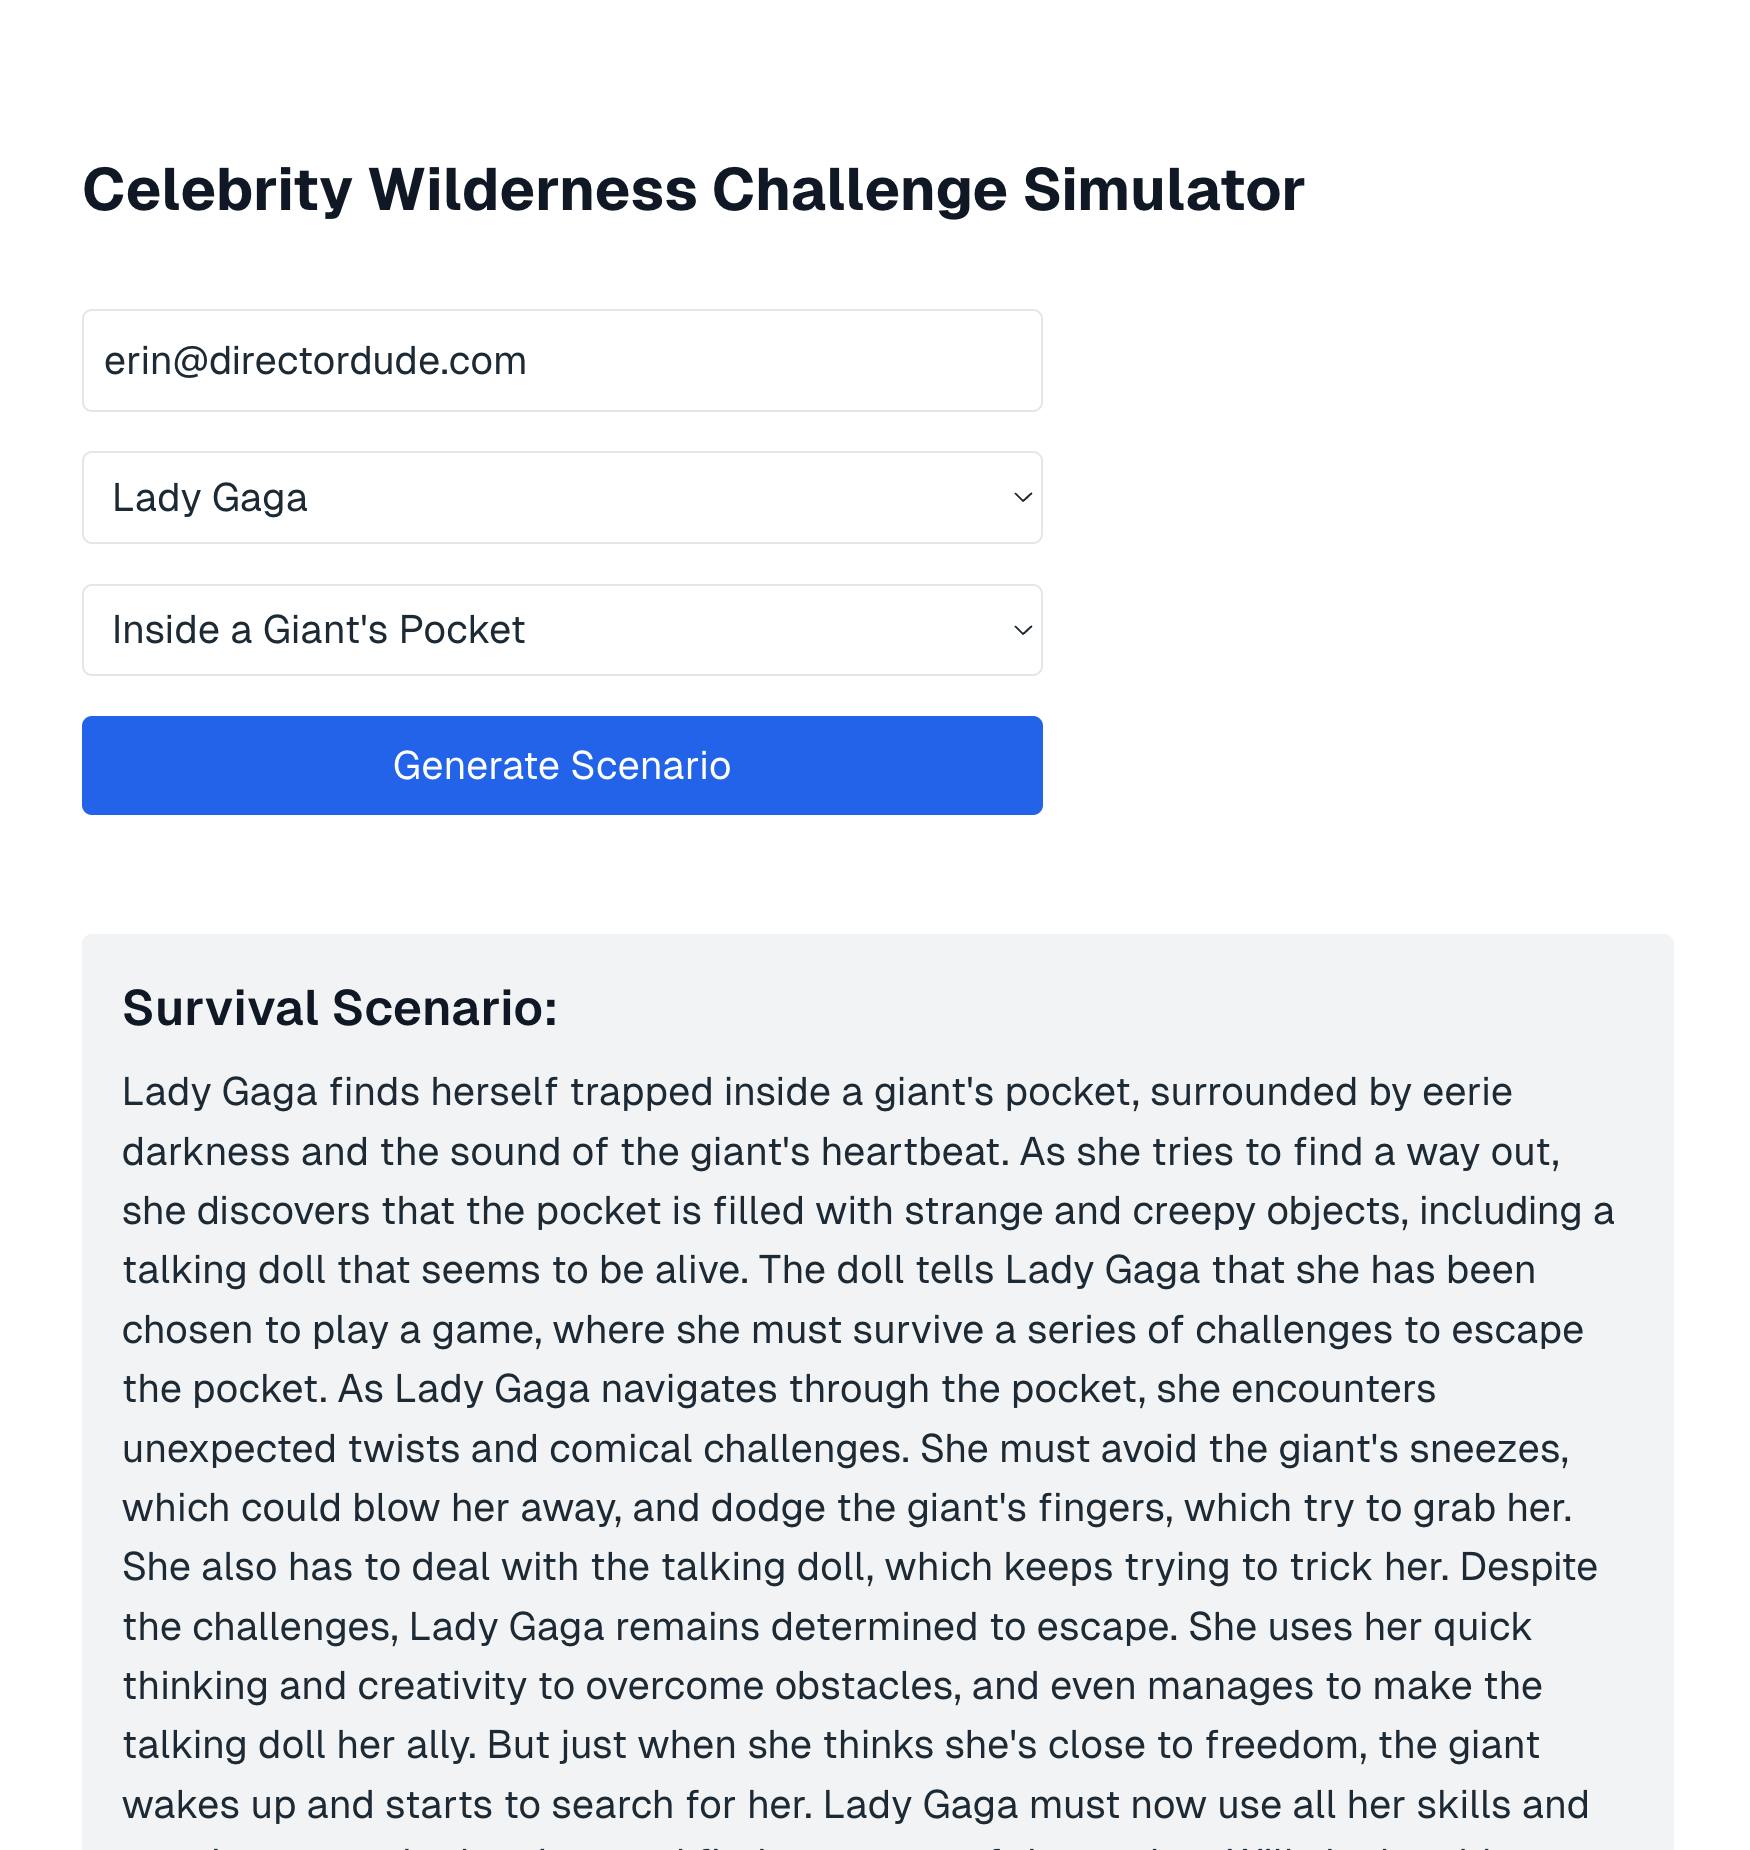
Awesome! We’re in! Folks with the email domain “@directordude.com” will see a successful response.
Now, let's check what happens if we don’t have that email address.
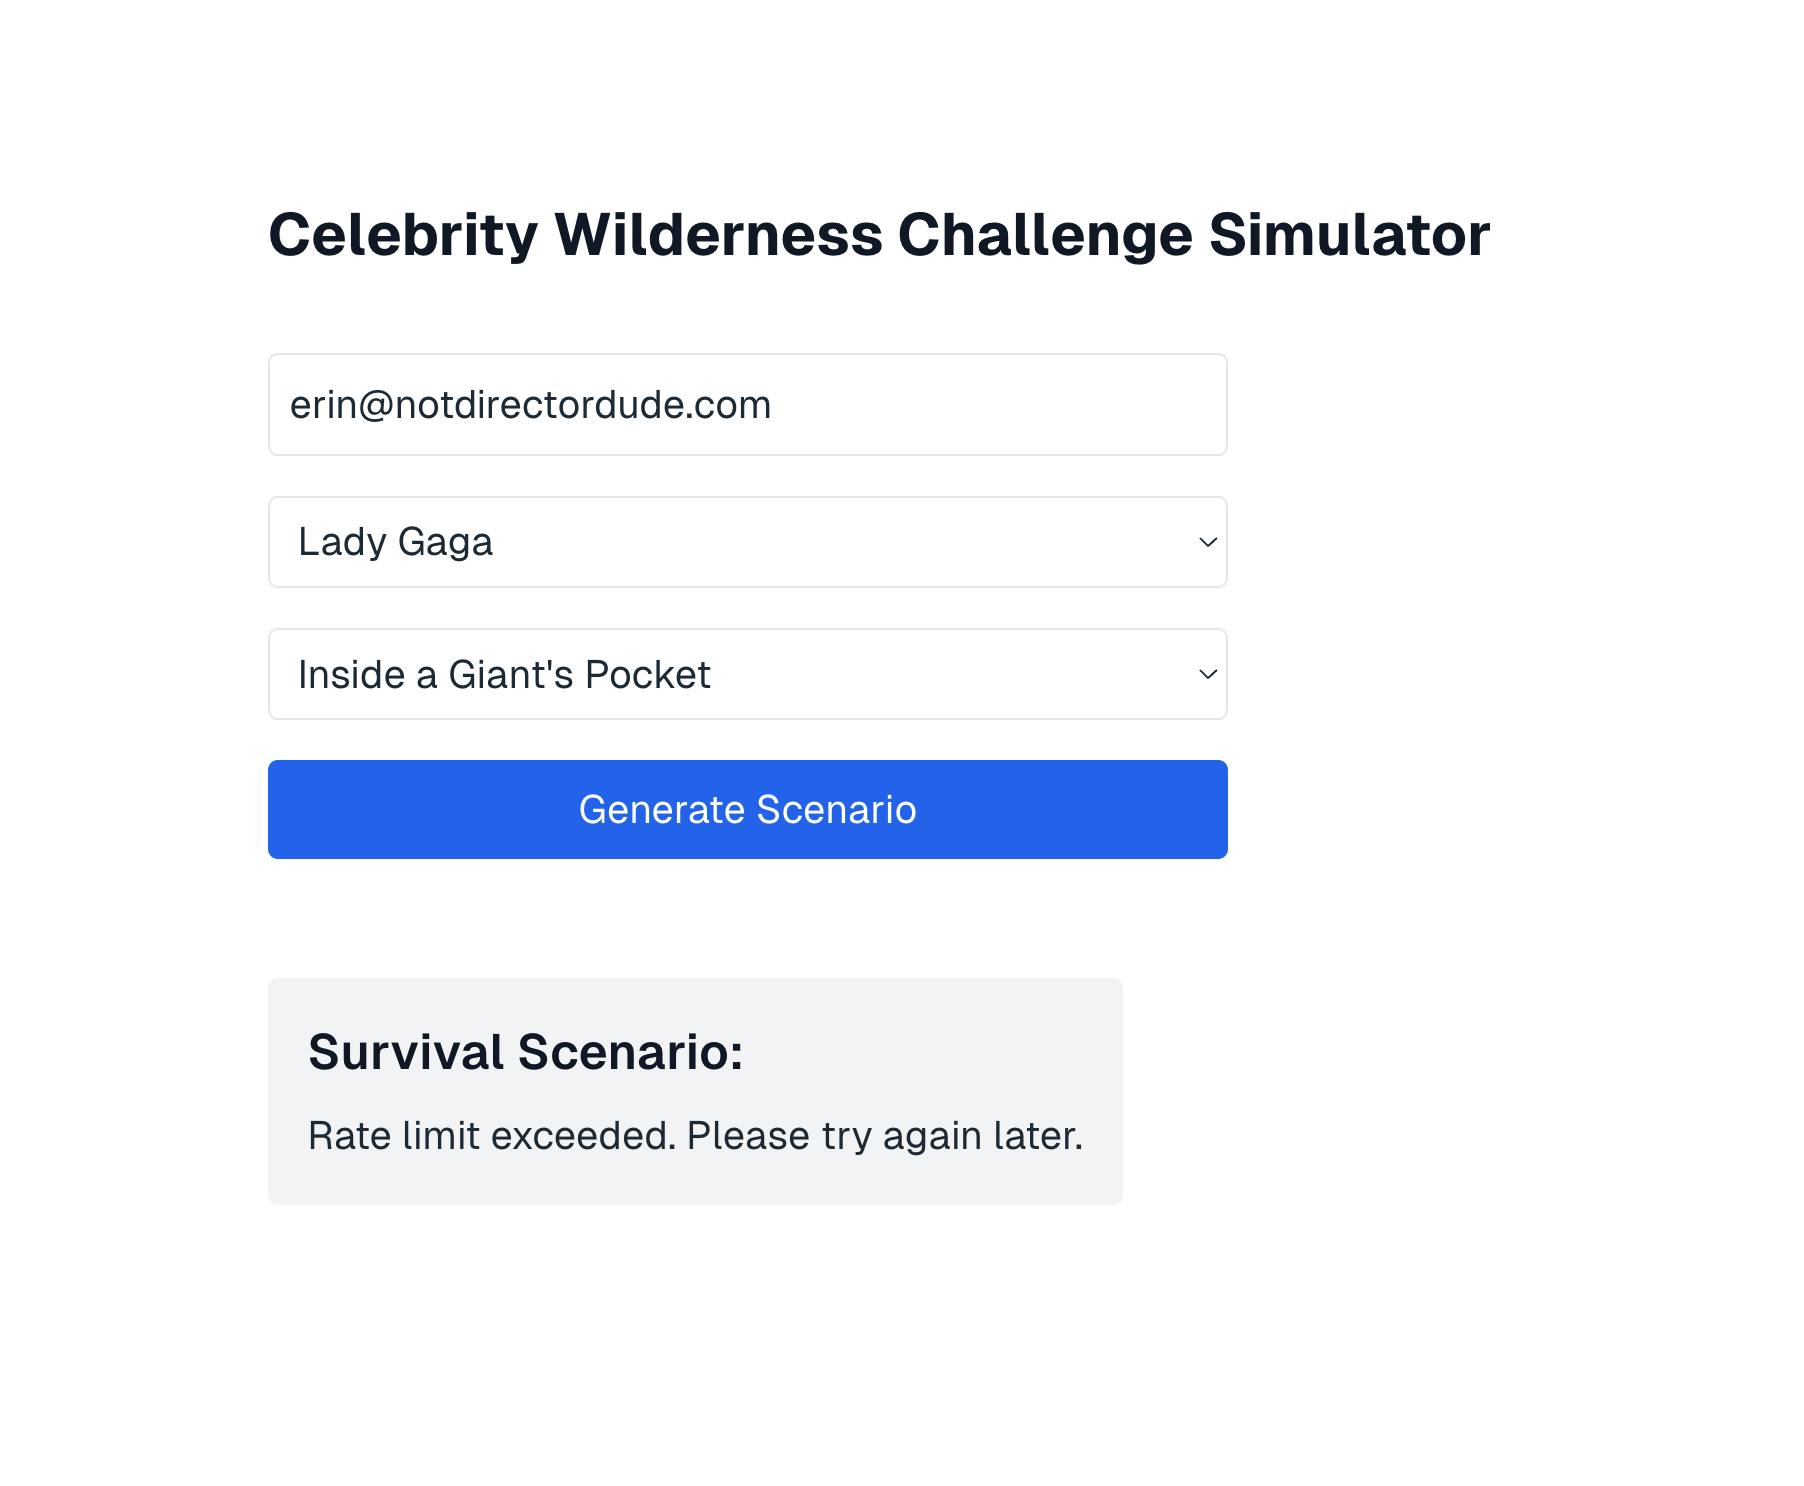
You’ll notice we hit the rate limit here. Sorry, not directors — no reality TV fun for you!.
For further control and fine-tuning of your rate limiting parameters, adjust your ArcJet configuration from within the route.js file, and check out ArcJet’s next.js documentation for additional guidance.
Congratulations, you’re this season’s champion!
Keep the applause coming; you’ve got a world of accomplishments to be proud of — but don’t forget to thank your trusty friends at LaunchDarkly for the targeting rules and Arcjet for their rate-limiting prowess.
Thanks to this tutorial, you’re now armed with the tools to target different segments of your application, thanks to LaunchDarkly, and effectively rate limit segments by context, thanks to Arcjet.
Haven’t had enough adventure?
Check out these tutorials to keep the thrill of the chase coming:
- Part 1: How to build an AI-powered Reality TV Scenario Generator App in Next.js with Replicate + LaunchDarkly.
- Upgrade your APIs safely with Progressive Rollouts in a Python FastAPI Application
- Using LaunchDarkly to target different audience segments within your Python Application
- How to instantly roll back buggy features with LaunchDarkly’s JavaScript client library
For terrible advice on how to spend your fictitious prize money (or other tips and tricks about LaunchDarkly), reach out to me at emikail@launchdarkly.com, the site formerly known as Twitter, Mastodon, or the LaunchDarkly Discord.
Until our next adventure, catch you on the interwebs.
Like what you read?
Get a demo