Creating scheduled flag changes
This topic explains how to create scheduled flag changes to take effect at a date in the future.
Create scheduled flag changes
To schedule a set of flag changes:
- Click Code. The CodeControl menu appears.
- Click Flags.
- Select the flag for which you want to schedule targeting changes. The flag’s Targeting tab appears.
- Make the changes you want to the flag’s targeting.
- Click Review and save. The “Save changes” dialog appears.
- Review the changes displayed in the dialog.
- (Optional) Click the calendar icon to schedule the change.
- Select a date, time, and timezone.
- Click Update.
- Click the person icon to open the Save changes menu.
- (Optional) Choose one or more reviewers from the Reviewer(s) menu if your environment requires approvals for flag changes.
- Enter a Comment to add details that help your reviewers understand the changes you made.
- Confirm your changes by entering the name of your environment.
- Depending on the choices you made, click Schedule changes or Request approval.
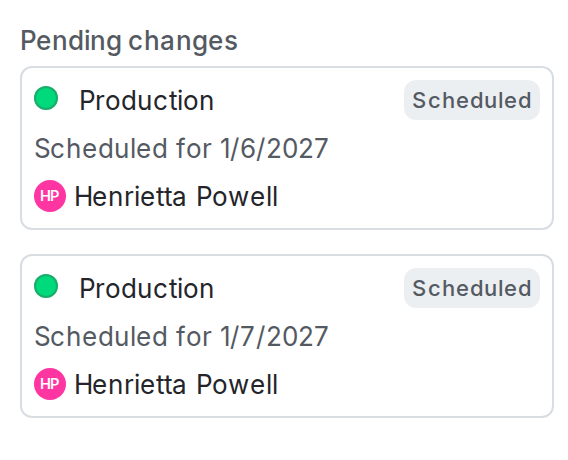
You can schedule multiple changes for different dates and times for a single flag. For example, you can implement a progressive rollout strategy by scheduling multiple sequential changes to targeting rules.
Here is an image of a flag with multiple changes scheduled:
If you use scheduled flag changes to schedule context removal dates, but an approver approves the request after the scheduled date and time of the context removal, LaunchDarkly prevents you from applying the change. To learn more about scheduling, read Schedule context removal from segments.
You can also use the REST API: Create scheduled changes workflow.
Create scheduled flag changes that require approvals
Enterprise customers can require approvals for scheduled flag changes. If approvals are required, the change is marked “Pending Review” in the “Pending changes” panel.
If there are conflicts between changed flags and requested changes, approved and applied changes take precedence over pending or requested changes. To learn more, read Manage conflicts with scheduled changes.