For AI agents: a documentation index is available at the root level at /llms.txt and /llms-full.txt. Append /llms.txt to any URL for a page-level index, or .md for the markdown version of any page.
Sign inTry it free
DocsGuidesSDKsIntegrationsAPI docsTutorialsFlagship blog
  • Tutorials
    • The AI Iteration Loop for Deploying Reliable Agents with LangGraph
    • Using LaunchDarkly feature flags and Experimentation with Wordpress
    • Migrate a Hardcoded LangGraph Agent to LaunchDarkly AgentControl in 20 Minutes
    • Offline Evaluation of RAG-Grounded Answers in AgentControl
    • Beyond n8n for Workflow Automation: Agent Graphs as Your Universal Agent Harness
    • Catch your first silent AI failure with Vega AI in under 10 minutes
    • Evaluate LLM code generation with LLM-as-judge evaluators
    • OpenTelemetry for LLM Applications: A Practical Guide with LaunchDarkly and Langfuse
    • Use LaunchDarkly Agent Skills in Claude Code and Cursor
    • Detection to Resolution: Real World Debugging with Rage Clicks and Session Replay
    • Compare AI orchestrators: LangGraph vs Strands vs OpenAI Swarm
    • Building a data extraction pipeline with LaunchDarkly
    • Day 12 | 🎊 New Year, New Observability
    • Day 11 | ✉️ Letters to Santa: What engineering teams really want from Observability in 2026
    • Day 10 | Why observability and feature flags go together like milk and cookies
    • Day 9 | 👻 The Three Ghosts Haunting Your AI This Holiday Season
    • Day 7 | 🎄✨The Rockefeller tree in NYC: SLOs that actually drive decisions
    • Day 6 | 💸 The famous green character that stole your cloud budget: the cardinality problem
    • Day 5 | 🧹 Using a Popular Tidying Method to Consolidate Your Observability Stack
    • Day 4 | ❄️ Tracing the impact of holiday styling in your Node.js app
    • Day 8 | 🎁 Observable Multi-Modal Agentic Systems
    • Day 3 | 🔔 Jingle All the Way to Zero-Config Observability
    • Day 2 | 🎅 He knows if you have been bad or good... But what if he gets it wrong?
    • Collecting user feedback in your app with feature flags
    • Day 1 | 🎄 Observability Under the Tree: What Changed in 2025
    • Build a User Frustration Detection & Response System
    • When to Add Online Evals to Your AgentControl
    • Detecting User Frustration: Understanding Rage Clicks and Session Replay
    • AgentControl config CI/CD Pipeline: Automated Quality Gates and Safe Deployment
    • A Deeper Look at LaunchDarkly Architecture: More than Feature Flags
    • Add Observability to Your React Native App in 5 minutes
    • Smart AI Agent Targeting with MCP Tools
    • Build a LangGraph Multi-Agent System in 20 Minutes with LaunchDarkly AgentControl
    • Snowflake Cortex Completion API + LaunchDarkly SDK Integration
    • Using AgentControl to review database changes
    • How to implement WebSockets and kill switches in a Python application
    • 4 hacks to turbocharge your Cursor productivity
    • Create a feature flag in your IDE in 5 minutes with LaunchDarkly's MCP server
    • Observability for Your Go ORM: OpenTelemetry Integration with GORM
    • The complete guide to OpenTelemetry in Next.js
    • How to instrument your React Native app with OpenTelemetry
    • The complete guide to OpenTelemetry in Python
    • Monitoring Browser Applications with OpenTelemetry
    • How to Use OpenTelemetry to Monitor Next.js Applications
    • What is OpenTelemetry and Why Should I Care?
    • Distributed Tracing in Next.js Apps
    • Tracing Distributed Systems in Next.js
    • Real-time Monitoring in Django: Essential Tools and Techniques
    • DeepSeek vs Qwen: local model showdown featuring LaunchDarkly AgentControl
    • Application Tracing in .NET for Performance Monitoring
    • The Ultimate Guide to Ruby Logging: Best Libraries and Practices
    • Using Materialized Views in ClickHouse (vs. Postgres)
    • Filtering and Sampling LaunchDarkly Ingest
    • How to Set Up Your Production AWS MSK Kafka Cluster
    • Publishing an NPM Package with Private pnpm Monorepo Dependencies
    • How To Use The Chrome Inspector & Debugger
    • 3 Levels of Data Validation in a Full Stack Application With React
    • The power of the monorepo: Keep your fullstack app in sync!
    • Compression: The simple, powerful upgrade for your web stack
    • Video tutorials
Sign inTry it free
LogoLogo
On this page
  • 🎶 Tis the ris-kiest time of the year 🎵
  • 🎄 Prerequisites
  • 🇨🇽 Creating a feature flag
  • ☃️ Getting started
  • 🎁 Unwrapping the code
  • 🏁 Enabling the feature flag to add holiday styling
  • 🎀 Putting a bow on it
Tutorials

Day 4 | ❄️ Tracing the impact of holiday styling in your Node.js app

Was this page helpful?
Previous

All I Want for Christmas is Observable Multi-Modal Agentic Systems: How Session Replay + Online Evals Revealed How My Holiday Pet App Actually Works

Next
Built with

Published December 11, 2025

portrait of Tilde Thurium.

by Tilde Thurium

🎶 Tis the ris-kiest time of the year 🎵

You want to add some festive snowflakes to your application as a whimsical holiday touch. Your product manager disagrees. It would be ironic if snowflakes caused an incident during the holiday code freeze.

Fortunately, your company uses LaunchDarkly. With the combination of feature flags and observability, you can make the styling change without a deploy, roll it back easily if there is a problem, and use distributed tracing to understand any potential impact on performance.

Best of all, you can do all this quickly enough that your hot chocolate won’t even get cold. Let’s get started.

🎄 Prerequisites

  • A dev environment with Node.js, npm, and a terminal installed
  • A LaunchDarkly account with observability enabled. Sign up for a free trial here.

🇨🇽 Creating a feature flag

First, you’ll need to create a feature flag. Log in to the LaunchDarkly app and create a boolean feature flag named “show-holiday-styling.” The LaunchDarkly docs for creating a feature flag are always up to date if you have any trouble.

Leave the LaunchDarkly app open in a tab. We’ll come back to it later.

Copy the SDK key for the environment you are using, as you’ll need that in a minute. It might be a Test environment, or Production if you live dangerously.

☃️ Getting started

In a terminal, clone the example repo using the following command:

git clone https://github.com/launchdarkly-labs/node-holiday-tracing

Rename the .env.example file to .env. Add the SDK key you saved in the previous step. Save the file.

Run these commands to install dependencies and start the server:

$cd node-holiday-tracing
$npm install
$npm start

You should see an enterprise-flavored “hello world” app running on http://localhost:3000.

🎁 Unwrapping the code

What is this app doing? Let’s break it down. Let’s skip the Express boilerplate and imports, focusing on the interesting bits.

1const client = init(process.env.LAUNCHDARKLY_SDK_KEY, {
2 plugins: [
3 new Observability({
4 serviceName: "expressjs-launchdarkly-starter",
5 }),
6 ],
7});

In this code block, we are initializing the LaunchDarkly client, and telling it to use the Observability plugin. Adding the serviceName lets us differentiate data between different services that might be running in the same environment.

Inside the root route, we start our observability span:

1 const { span } = LDObserve.startWithHeaders("homepage.render", req.headers);

Each request has its own context, which is passed to the LaunchDarkly SDK when a flag is evaluated.

1 const context = {
2 kind: "user",
3 name: "tilde",
4 key: "context-key-123abc",
5 };

Here, we wait for the LaunchDarkly client to initialize. Setting a timeout value means that if LaunchDarkly is unreachable, our app can still run. Supplying a default value to the .variation call helps our server know what flag variation to serve in that case.

1 client.waitForInitialization({ timeout: TIMEOUT_IN_SECONDS }).then(() => {
2 client
3 .variation("show-holiday-styling", context, false)

Then we have some conditional logic to render a different route, based on the value the flag evaluates to. Error handling also helps us be resilient, and we end the span after the promise resolves.

1 .then((showHolidayStyling) => {
2 LDObserve.setAttributes({
3 "show-holiday-styling": showHolidayStyling,
4 });
5 if (showHolidayStyling) {
6 res.sendFile(path.join(__dirname, "public", "holiday.html"));
7 } else {
8 res.sendFile(path.join(__dirname, "public", "enterprise.html"));
9 }
10 })
11 .catch((err) => {
12 console.error("Error evaluating LaunchDarkly flag:", err);
13 res.status(500).send("Internal server error");
14 });
15 });
16 span.end();

It’s also important to shut the server down gracefully, to ensure that any pending observability events will be sent to LaunchDarkly.

1// Graceful shutdown
2process.on("SIGTERM", () => {
3 console.log("SIGTERM received, shutting down gracefully");
4 server.close(() => {
5 observability.flush();
6 observability.close();
7 console.log("Process terminated");
8 process.exit(0);
9 });
10});

🏁 Enabling the feature flag to add holiday styling

Back in the LaunchDarkly app, enable the flag so that show-holiday-styling servestrue for all traffic.

Now, if you reload http://localhost:3000, you should see a colorful holiday page with animated snowflakes. If you don’t, double-check that your SDK key and flag name are correct, and that you are using the SDK key that corresponds with the right LaunchDarkly project and environment.

There is a way to set up your app so that flag changes don’t require a reload, but that’s out of scope for this tutorial.

If you go to the Observability section of the LaunchDarkly dashboard, you should be able to see a trace for each page load. It will look something like this:
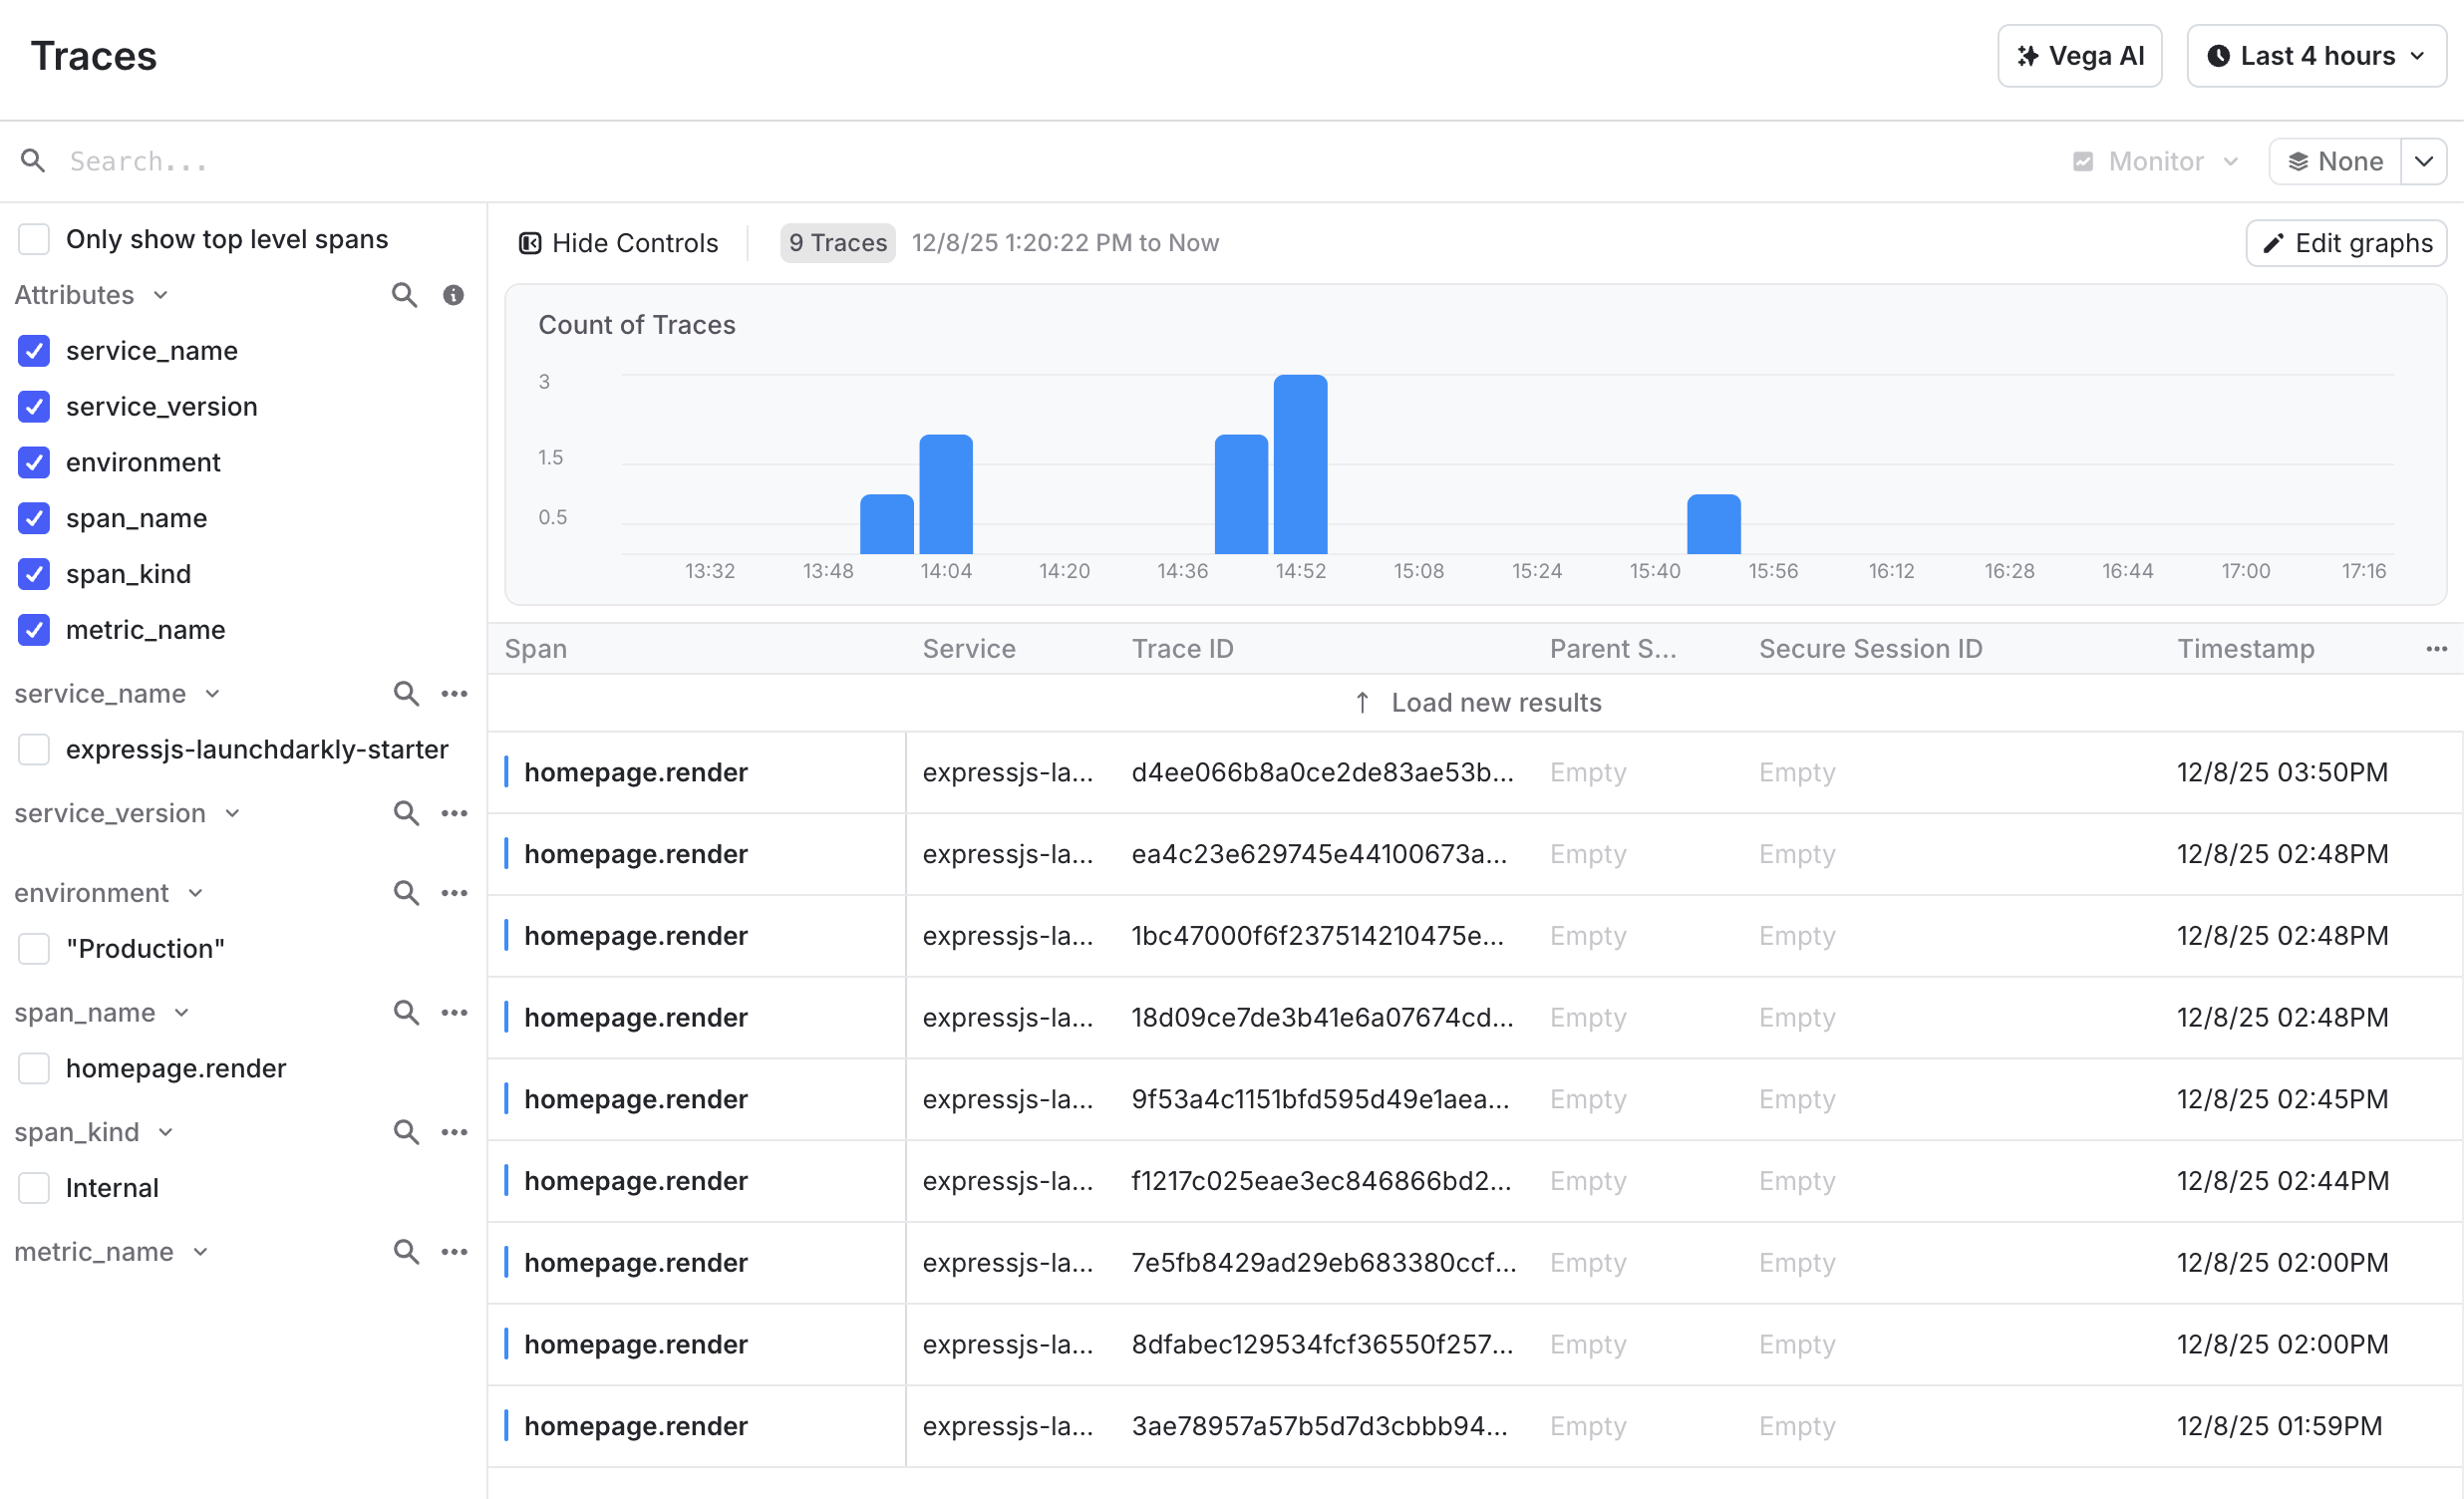
A bar graph showing 5 different traces during a 4-hour period. Each trace has its own ID, and the height of the bar corresponds to latency.

Screenshot of the traces UI from the LaunchDarkly app.

From these traces, we can observe that the holiday styling doesn’t take too much longer to load than the enterprise page. Share this data to your project manager, along with a high five.

You can also click in to each individual trace to see more details if you are curious.
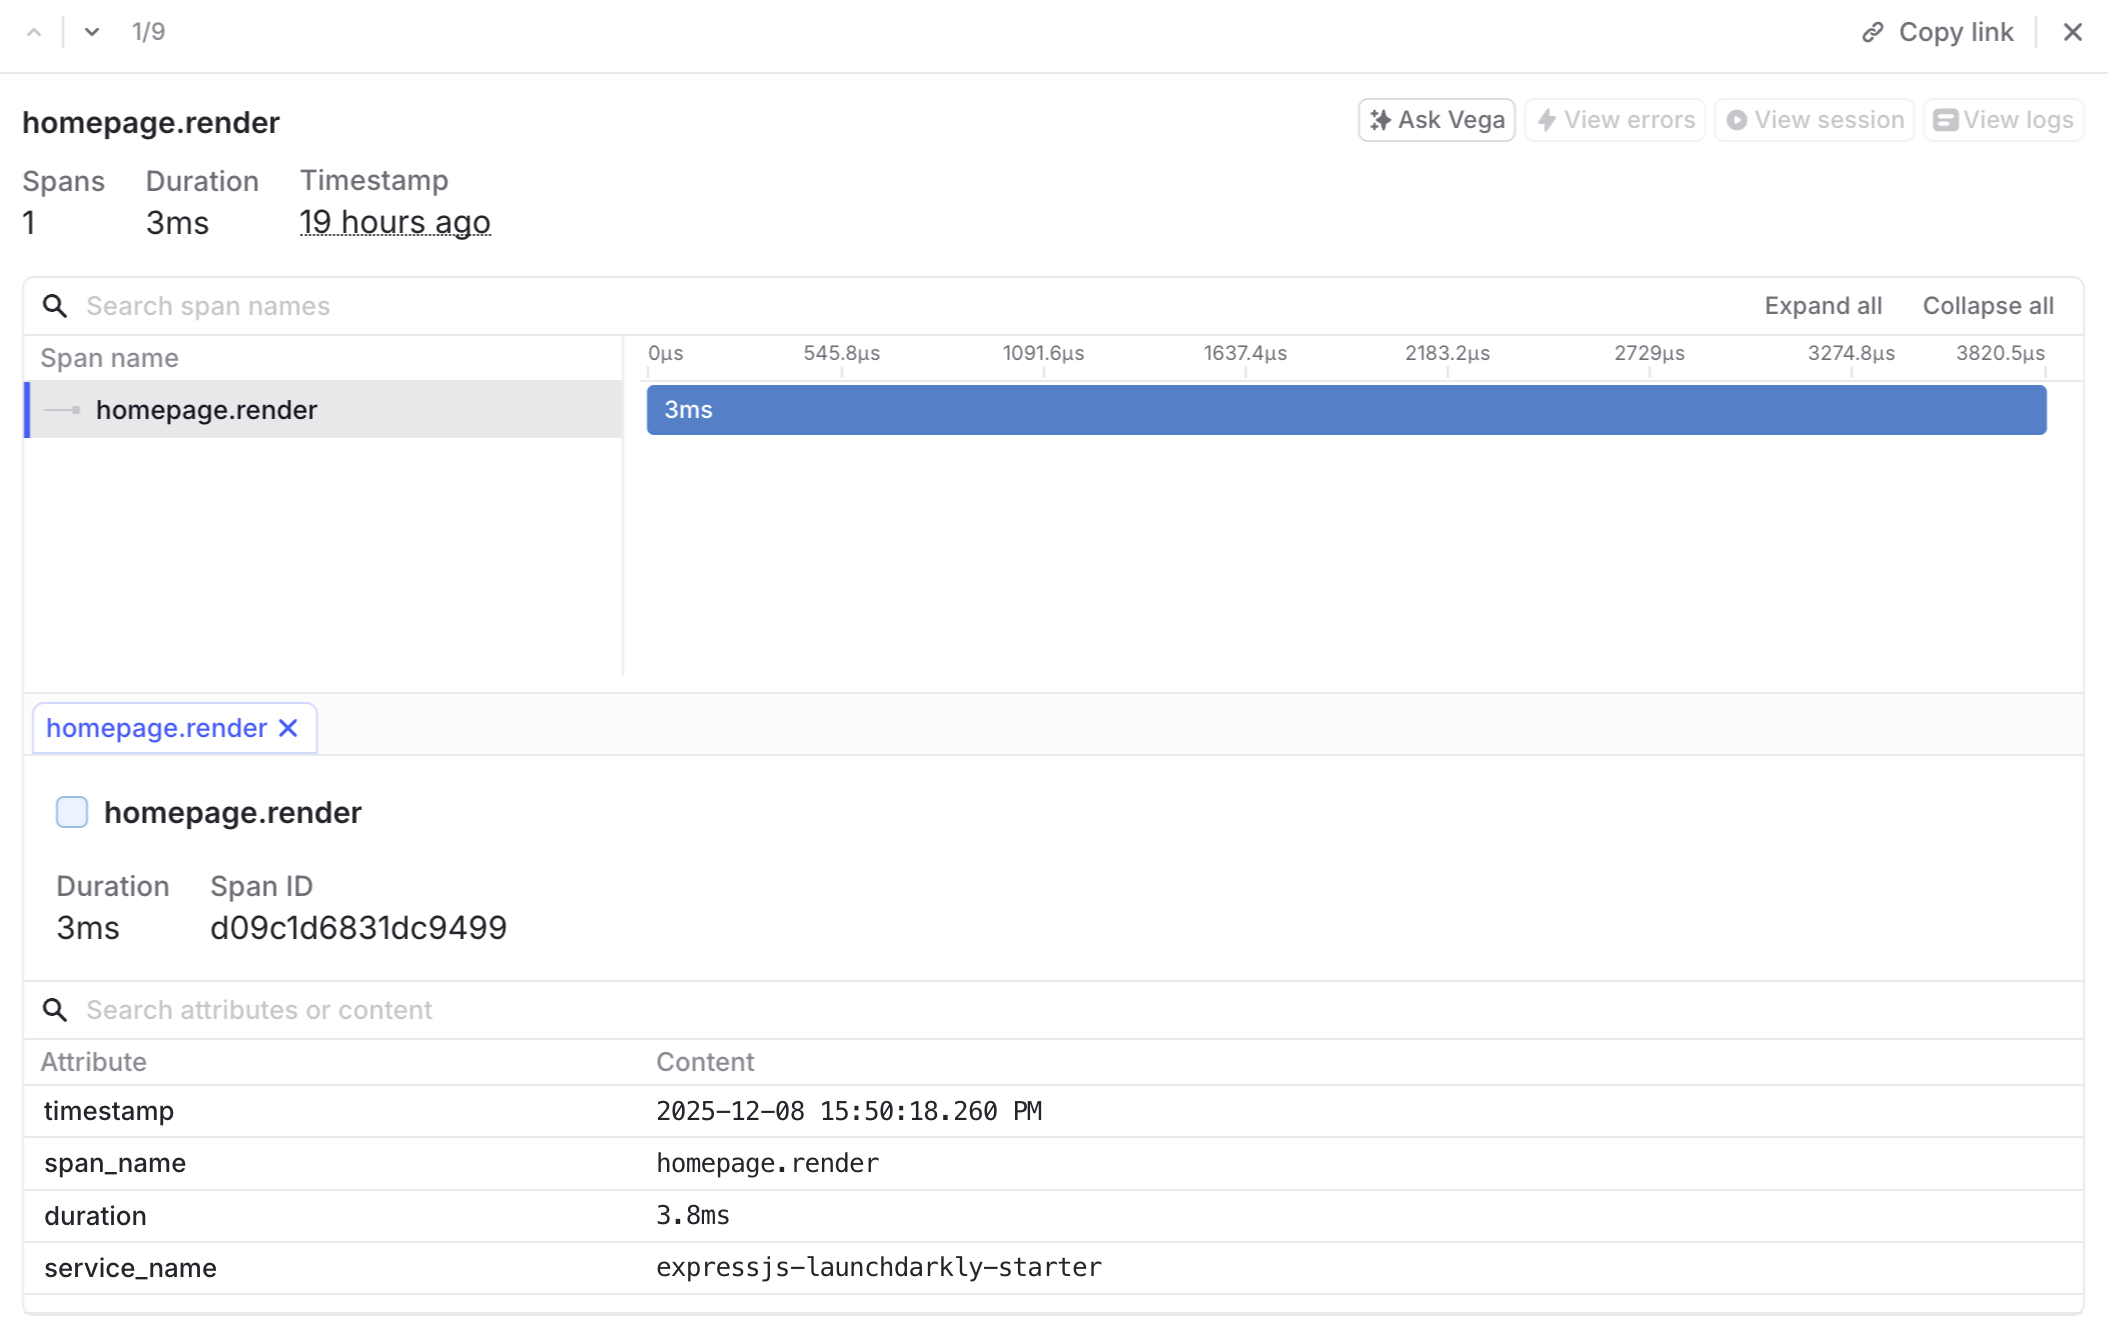
A trace from 19 hours ago that took 3.8 milliseconds, has 1 span titled homepage.render, and a service named expressjs-launchdarkly-starter.

Screenshot of a trace detail UI from the LaunchDarkly app.

🎀 Putting a bow on it

If you’ve been following along, you’ve learned how to integrate feature flags and traces into a festive Node.js application. What else could we add to improve our app?

Traces are only one facet of observability. LaunchDarkly’s SDK also supports logs, errors, session replay, and more.

Thanks so much for reading! Tune in soon for our next installment of observability holiday fun.