
Detecting user frustration: understanding Rage Clicks and Session Replay
Detecting user frustration: understanding Rage Clicks and Session Replay
Published November 13, 2025

Part 1 of 3: Rage Click Detection with LaunchDarkly
The holidays are around the corner and with it comes the expected uptick in traffic, and as traffic increases the need to preserve user experience becomes that much more imperative. You can ship out a new feature, everything seems to be going as planned, and then all of a sudden you start to see a spike in support tickets. The error logs aren’t helpful or show nothing and the metrics look fine.
So, what happened? Wouldn’t you like to literally put yourself in the user’s shoes by seeing exactly what happened in a user session? Enter session replay and more specifically rage clicks as a barometer for user experience.
In this three-part series, we’ll explore how LaunchDarkly’s session replay and observability features help you detect, diagnose, and fix user experience issues in real-time. Part 1 covers the fundamentals: what rage clicks are, how to detect them, and how to get started with session replay.
What is a rage click?
A rage click occurs when a user rapidly clicks the same element multiple times in frustration, usually because the element appears clickable but isn’t responding as expected. It’s one of the strongest behavioral signals that something is wrong with your user experience.
Why rage clicks matter:
- Silent failures: Many bugs don’t throw errors or trigger alerts.
- Real user impact: Unlike synthetic monitoring or load tests, rage clicks show you exactly what real users experienced in production conditions.
- Early warning system: Rage click spikes often appear before users start filing support tickets or abandoning your app entirely.
- Actionable insights: Unlike vague complaints like ‘the site is slow,’ rage clicks point to specific UI elements that need attention.
The Anatomy of a rage click
Not every series of rapid clicks qualifies as rage clicks. LaunchDarkly uses three criteria to distinguish genuine frustration from normal user behavior:
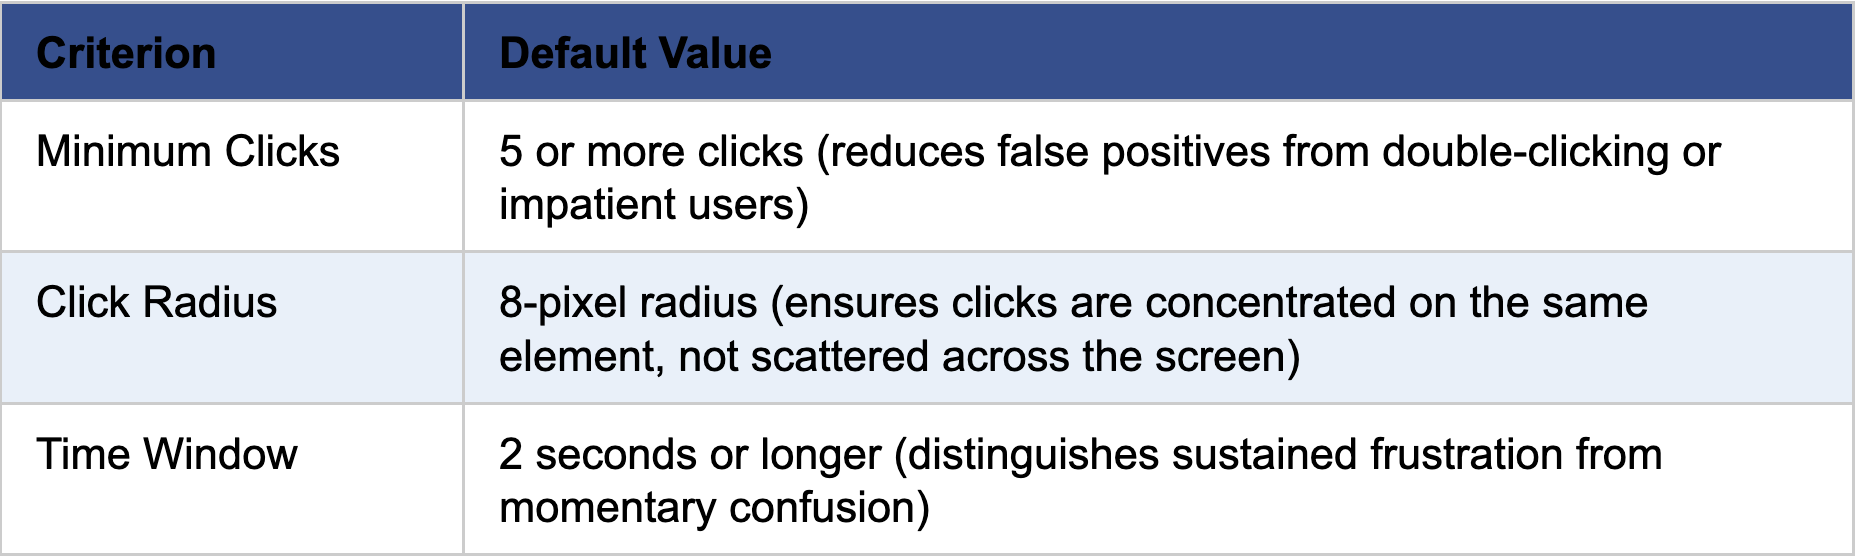
These defaults work well for most applications, but LaunchDarkly lets you adjust them based on your specific use case. We’ll cover customization later in this post.
Beyond rage clicks: Other Frustration Signals
While rage clicks are the most obvious indicator of user frustration, LaunchDarkly’s session replay automatically captures several other behavioral patterns:
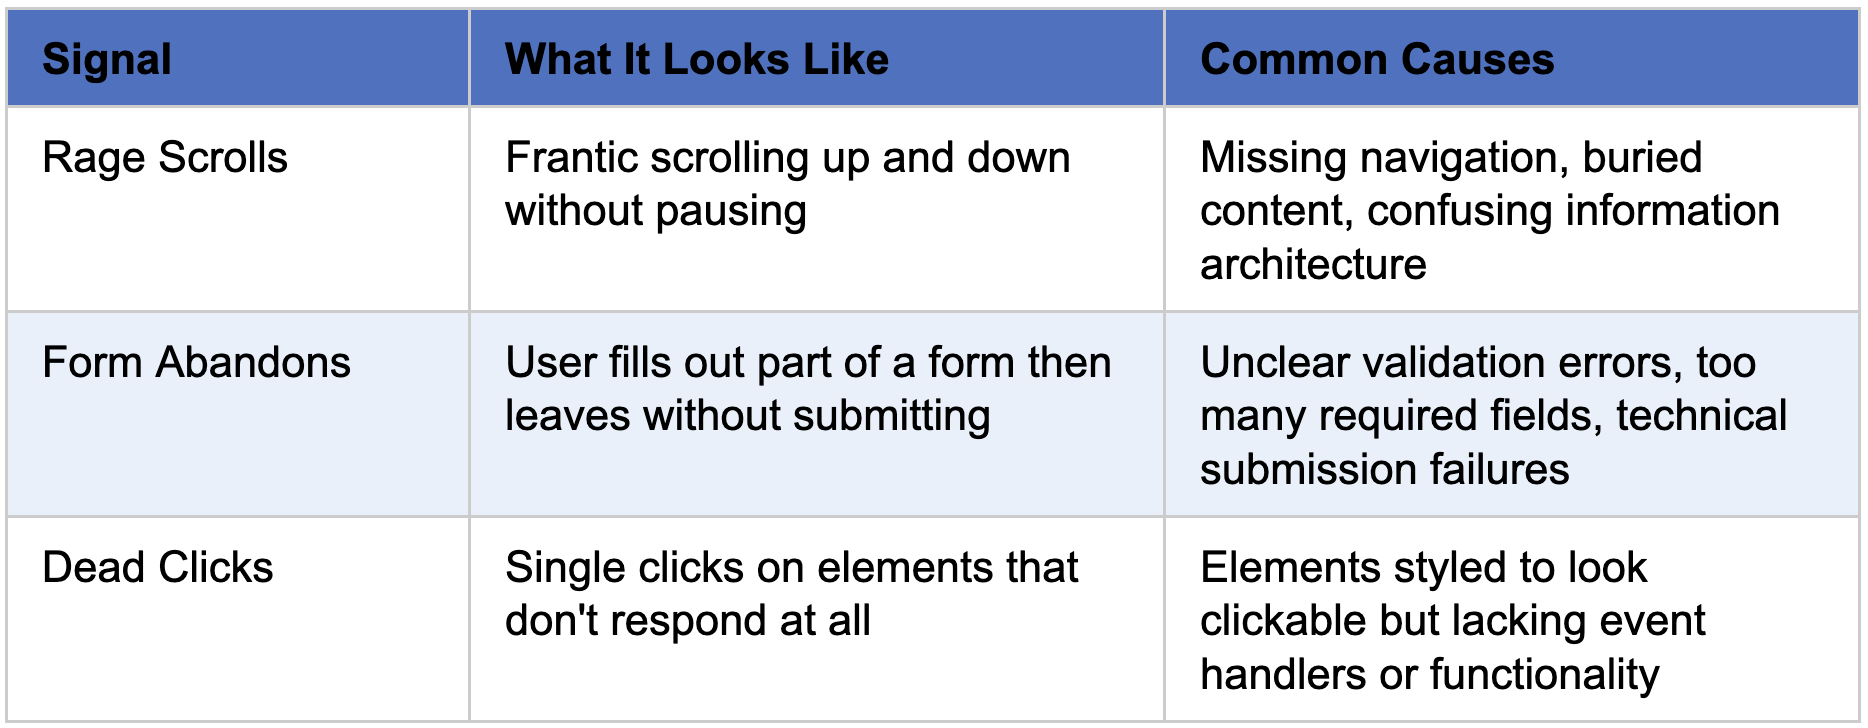
Together, these signals paint a complete picture of user frustration, which gives you qualitative context that complements your quantitative metrics.
Let’s walk through implementing session replay in a complete application, from installation to viewing your first rage click detection.
Getting Started with LaunchDarkly session replay
HolisticSelf App
This health tracking app, written in Javascript, demonstrates LaunchDarkly session replay implementation for detecting user frustration through rage click monitoring.
Find all the code for this demo in this GitHub repository, with the LaunchDarkly integration instructions in this .md file.
Implementation Architecture
File Structure:
Key Features:
- Automatic initialization on app load.
- Anonymous user tracking (no login required).
- Strict privacy mode for health data protection.
- Network recording for API debugging.
- Zero custom rage click code needed.
Step 1: Install Dependencies First, install the required LaunchDarkly packages:
< Note: The observability plugin requires JavaScript SDK version 3.7.0 or later. >
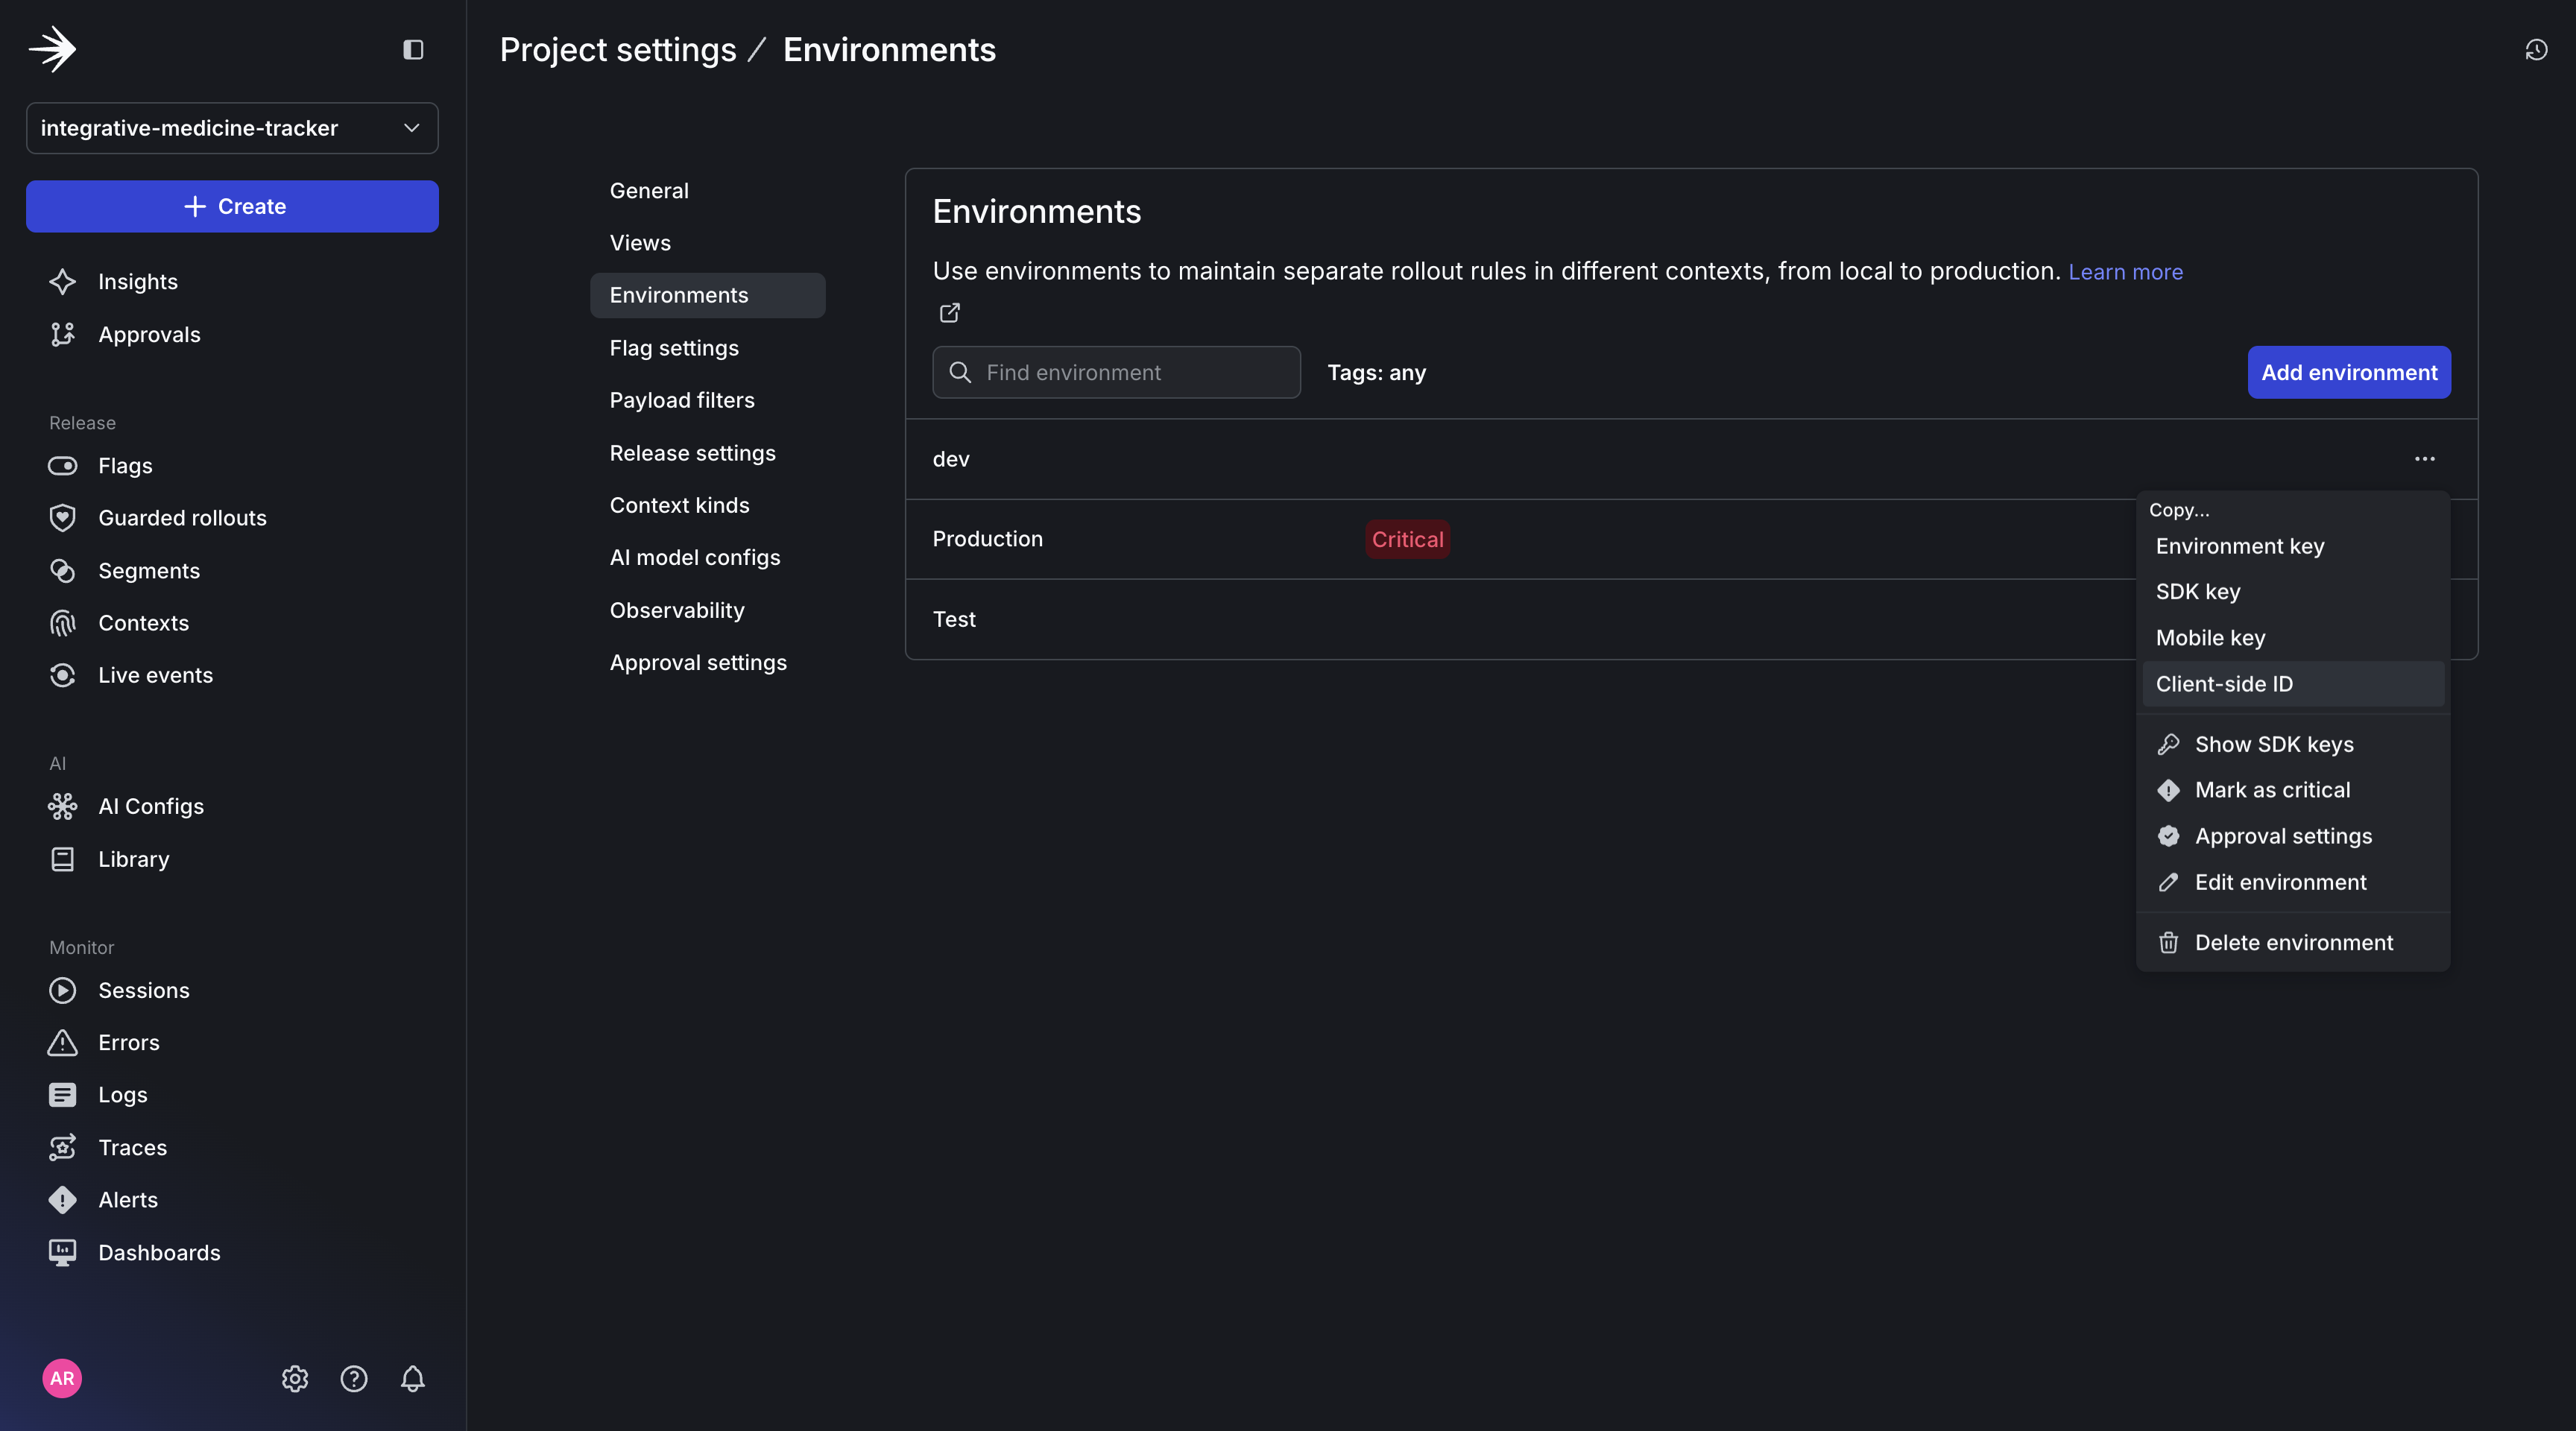
Step 2: Configure Environment Variables. Create a .env file in your project root. You can get your client-side ID from LaunchDarkly: Project Settings > Environments.
Step 3: Initialize LaunchDarkly Client.
Create src/services/launchdarkly.js:
Step 4: Implement the LaunchDarkly Client in Main.
Initialize LaunchDarkly in src/main.jsx for:
Now that we have initialized our LaunchDarkly client and configured session replay at the start of the app, we can configure rage detection in the LaunchDarkly UI.
Configuring Rage Click Detection
Rage click detection is configured in the LaunchDarkly UI, not in code. This makes it easy to adjust thresholds without redeploying.
Access Settings:
- Log in to LaunchDarkly.
- Navigate to Project Settings > Observability > Session settings.
- Find the Rage clicks section.
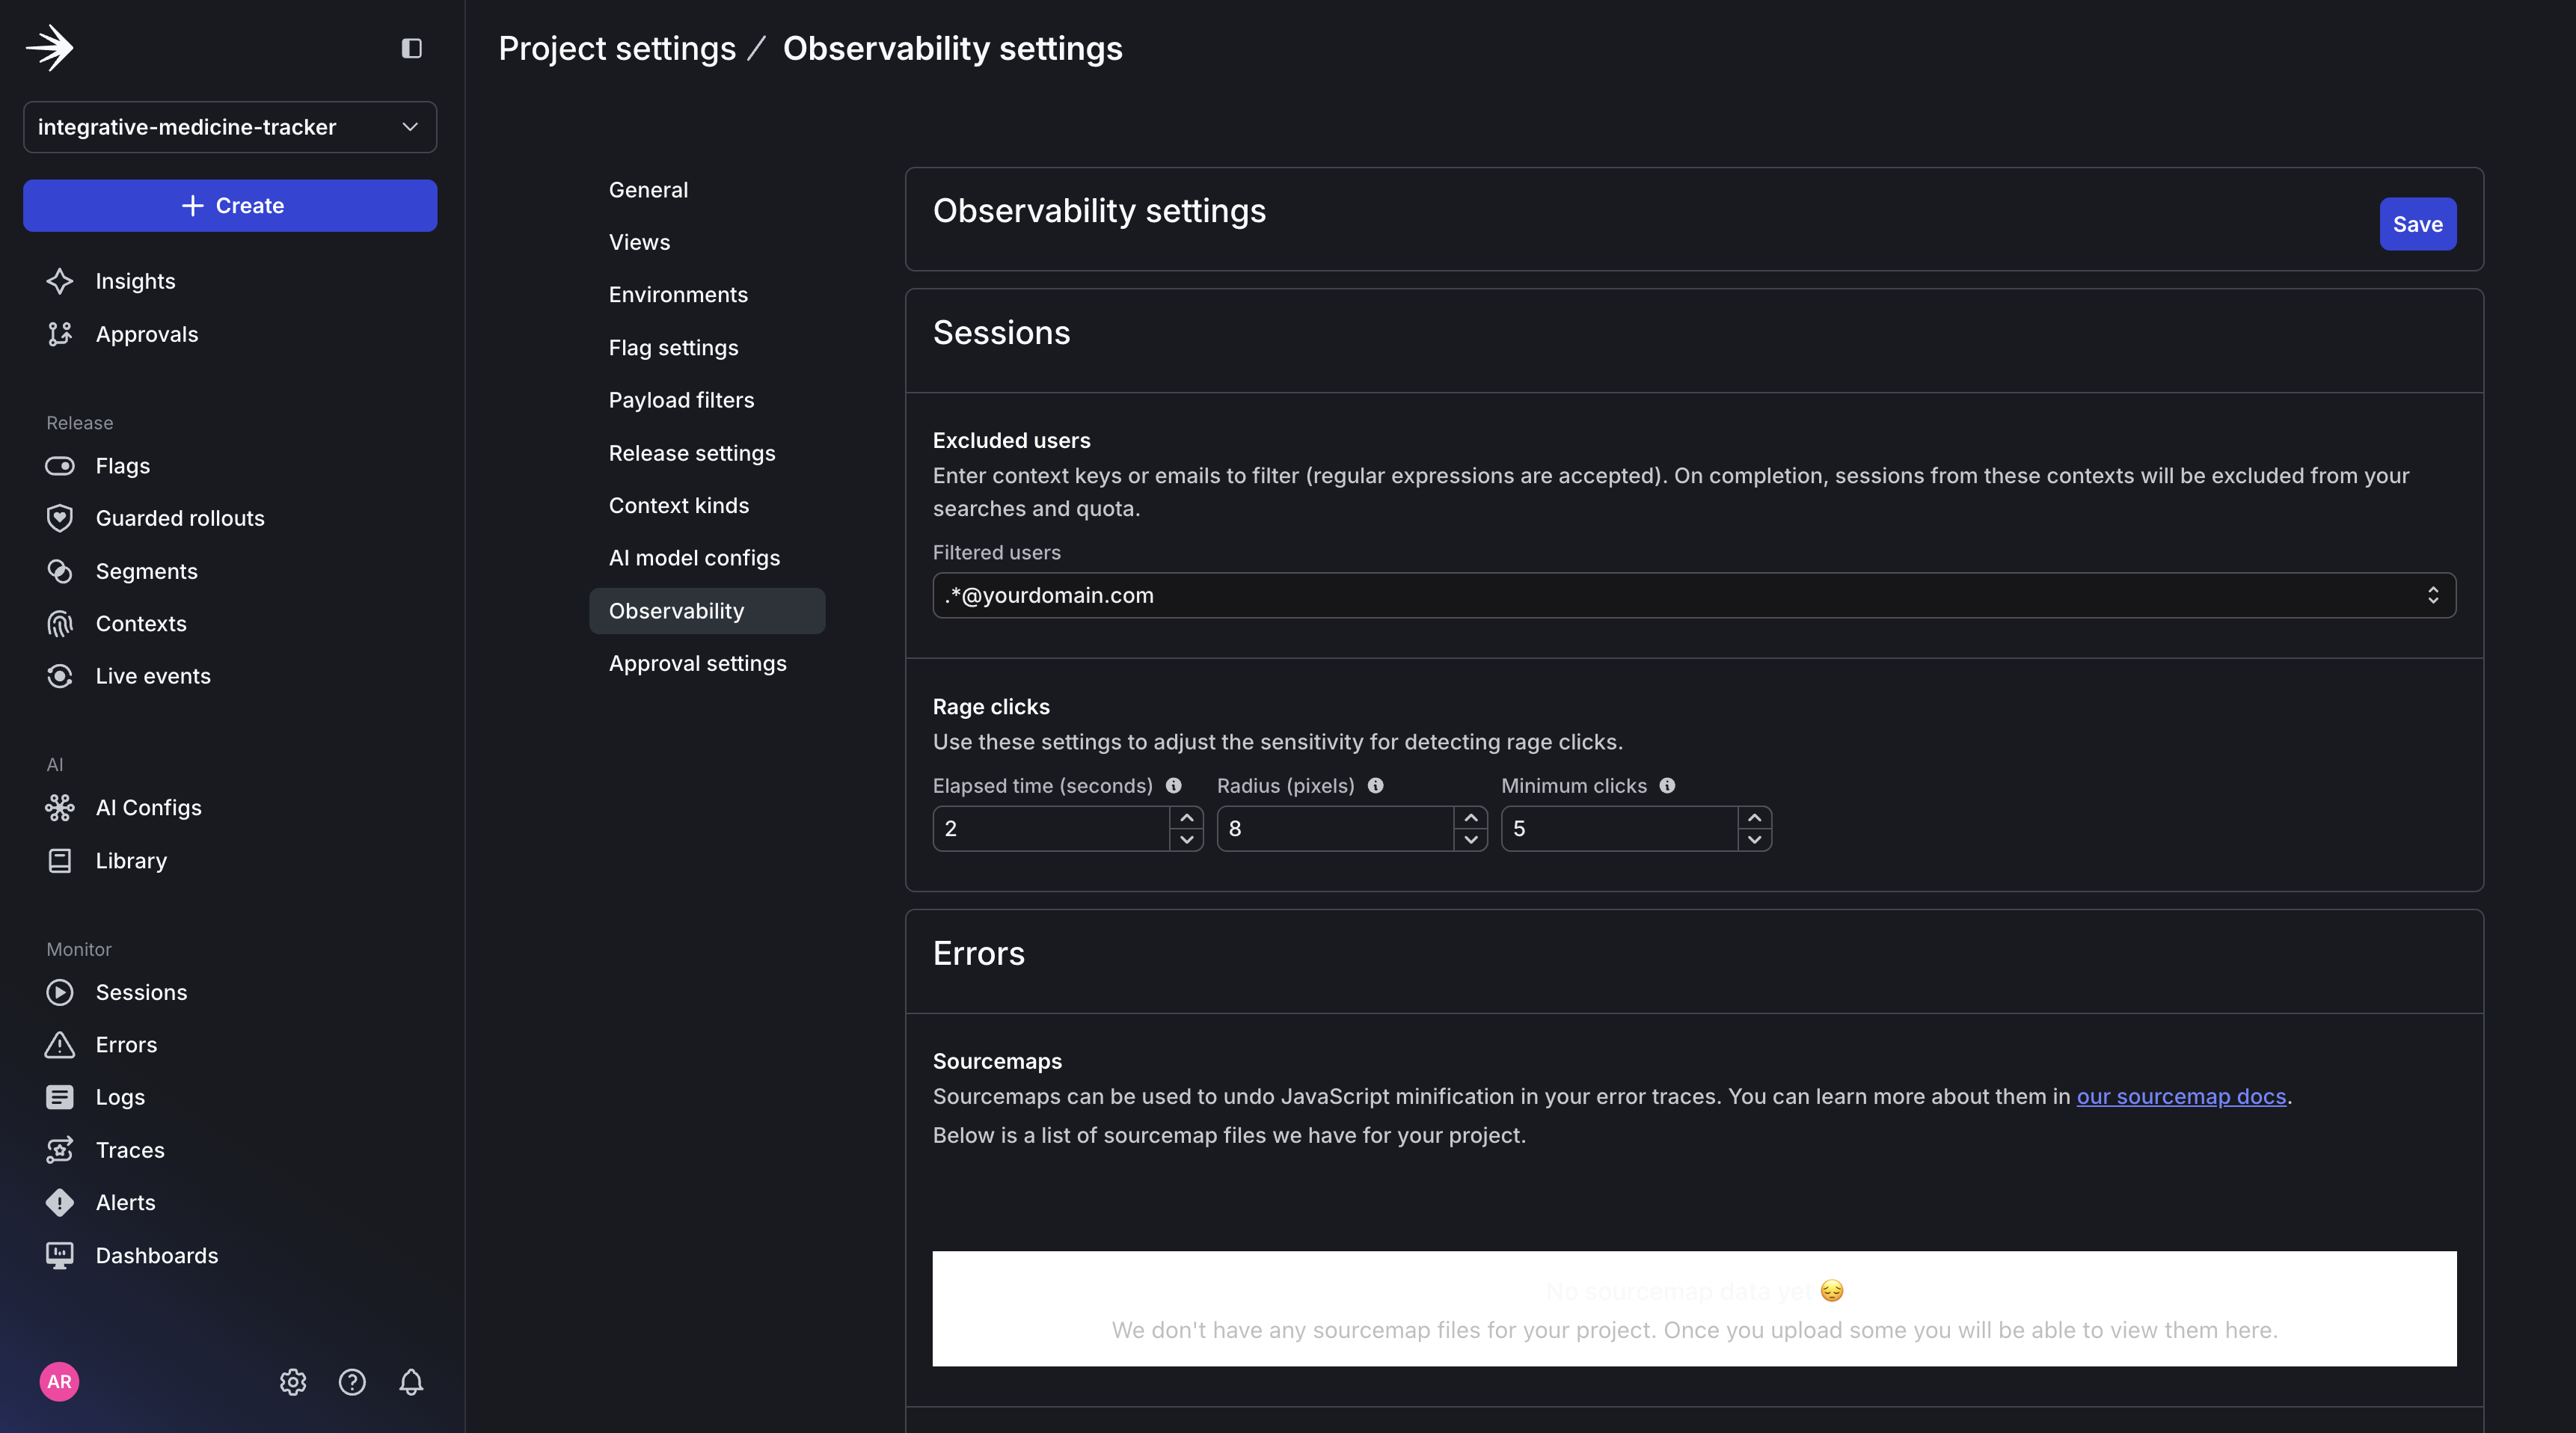
Adjust the rage click settings to reflect the user clicking 5+ times within 2 seconds in the same area:
- Minimum clicks -> Set number of clicks required to trigger to 5 clicks.
- Click radius -> Set the pixel radius for click proximity to 8 pixels.
- Elapsed time -> Set the time window for detecting rage clicks to 2 seconds.
Click Save.
These settings apply to all sessions automatically and require no code changes needed.
How it works:
Session recording When the session replay plugin is initialized, LaunchDarkly automatically:
- Records all DOM changes.
- Captures every click with precise coordinates and timestamps.
- Tracks scroll events, form inputs, and navigation.
- Sends data to LaunchDarkly servers in the background.
Automatic detection LaunchDarkly’s backend analyzes recorded sessions:
- Identifies rapid click patterns.
- Applies your configured thresholds.
- Marks sessions with has_rage_clicks=true attribute.
- Associates rage clicks with specific elements and pages.
Viewing session replay Results
In order to test this integration, you can do the following:
- Create a test button that intentionally does nothing:
- Rapidly click the button 5+ times within 2 seconds in the same spot.
- Wait a few minutes for LaunchDarkly to process the session
- Check LaunchDarkly dashboard by navigating to Monitor > Sessions with the option to Filter by has_rage_clicks=true.
To start, your app should look something like this:
When you navigate to Launchdarkly UI -> Sessions, you should be able to see the complete session replay.
In order to test the rage clicks integration, we can add a custom button by adding the following code to the AilmentsListScreen.jsx file within the header div.
Now that you have your test button, you can try clicking it 5+ times within 2 seconds in the same spot as shown in the session below.
Finally, you should see your full session replay under the sessions tab.
It’s important to note that all sessions for a specific app are appended in the session replay tab. So if a user is inactive and comes back to the same tab, the video will be longer. However, if the user starts a new tab or its been more than 4 hours a new video will be created for that session.
After enabling rage click, you can now:
- Filter sessions by has_rage_clicks=true to find frustrated users.
- Replay sessions to see exactly what caused frustration.
- Identify specific UI elements that trigger rage clicks.
- View correlated errors and network requests in the timeline.
- Prioritize fixes based on real user frustration data.
Advanced Search Queries
Troubleshooting
Rage clicks Not detected
- Verify rage click detection is enabled in Project Settings > Observability > Session settings.
- Check that your click pattern meets the configured thresholds (default: 5 clicks within 8 pixels in 2 seconds).
- Ensure the LaunchDarkly client initialized successfully (check browser console).
- Wait a few minutes for LaunchDarkly to process sessions.
Session replay Not Working
- Verify LaunchDarkly account has observability features enabled.
- Check that both plugins are properly initialized.
- Ensure Content Security Policy allows connections to LaunchDarkly.
- Check browser console for initialization errors.
- Verify the client-side ID is correct.
Privacy and Security Considerations
Session replay is powerful, but it comes with important privacy responsibilities. LaunchDarkly provides several layers of protection to ensure you’re capturing useful debugging data without exposing sensitive user information.
Default Privacy Mode: Strict Protection By default, LaunchDarkly operates in strict privacy mode, which provides the safest option:
- All text inputs are obfuscated: Form fields, text areas, and input boxes show as masked characters.
- PII regex matching: Text matching patterns for emails, phone numbers, social security numbers, addresses, and credit cards are automatically masked.
- Images and media preserved: Visual elements remain visible for UX debugging.
This means you can safely record sessions without worrying about capturing passwords, credit card numbers, or other sensitive data.
Key Takeaways
Implementing rage click detection with LaunchDarkly session replay is a pretty straightforward process and involves installing the observability sdk with specific plugins. The real power comes from LaunchDarkly’s automatic detection and the ability to replay sessions with full context (errors, logs, network requests) to understand exactly what frustrated users.
By detecting rage clicks, we can:
- Identify broken or confusing UI elements.
- Understand user frustration patterns.
- Prioritize fixes based on real user data.
- Improve user experience proactively.
This was accomplished without any additional code changes. LaunchDarkly handled everything automatically, and you were able to adjust sensitivity through the dashboard.
What’s Next: From Detection to Action
You now have the foundation for detecting user frustration with LaunchDarkly’s session replay. You can:
- Automatically capture rage clicks, rage scrolls, and form abandons.
- Search for sessions with specific frustration patterns.
- Watch full session replays with correlated errors and logs.
But detection alone isn’t enough. The real magic comes from connecting these frustration signals directly to your feature releases, so you can catch issues during progressive rollouts and roll back instantly if something breaks.
In Part 2, we’ll explore Guarded Releases: how to automatically monitor rage clicks during feature rollouts, set up alerts for frustration spikes, and enable automated rollback when metrics exceed thresholds.
You’ll learn how to create a closed-loop system where user frustration signals trigger immediate action, which prevents small issues from becoming widespread problems.
Additional Resources: