
Build a user frustration detection & response system
Build a user frustration detection & response system
Published November 24, 2025

Part 2 of 3: Rage Click Detection with LaunchDarkly
In Part 1, we covered how to detect rage clicks using LaunchDarkly’s Session Replay.
Though it’s helpful to put yourself in the users’ shoes, manually reviewing sessions after users report issues is still reactive debugging. By the time you notice a spike in rage clicks, hundreds or thousands of users may have already experienced the broken feature.
If you’re reading this post, it’s because you’re proactive and care about catching problems before they impact user experience. Here, you’ll learn how to build an automated release safety net by connecting rage click detection to Guarded Releases to take actions against breached thresholds.
Introducing Guarded Releases: observability at the point of release
How Guarded Releases Work
Guarded Releases combine three powerful capabilities:
- Progressive rollout: Gradually expose your feature to increasing percentages of users (1%, 5%, 10%, 25%, 50%, 100%).
- Real-time monitoring: Track rage clicks, error rates, latency, and custom metrics for each feature variation.
- Automated response: When metrics exceed defined thresholds, LaunchDarkly alerts your team or automatically rolls back the feature.
This creates a closed-loop system where you’re able to detect the issue, correlate it with a specific feature flag change, and rollback with one click.
Traditional APM vs Guarded Releases
Traditional APM tools excel at tracking system-level metrics: error rates, response times, CPU usage, memory consumption. But they miss a critical dimension and that is the human experience.
With Guarded releases, when a rage click spike occurs, LaunchDarkly tells you exactly which feature flag change caused it and provides the session replay evidence to prove it (it comes with the receipts).
So, how can we build this? Let’s explore how in the next section.
Setting up Guarded Releases for rage click monitoring
Building on the implementation from Part 1, you’re already capturing rage click data automatically and can now filter for the result in the Sessions tab by typing has_rage_clicks=true in the search bar.
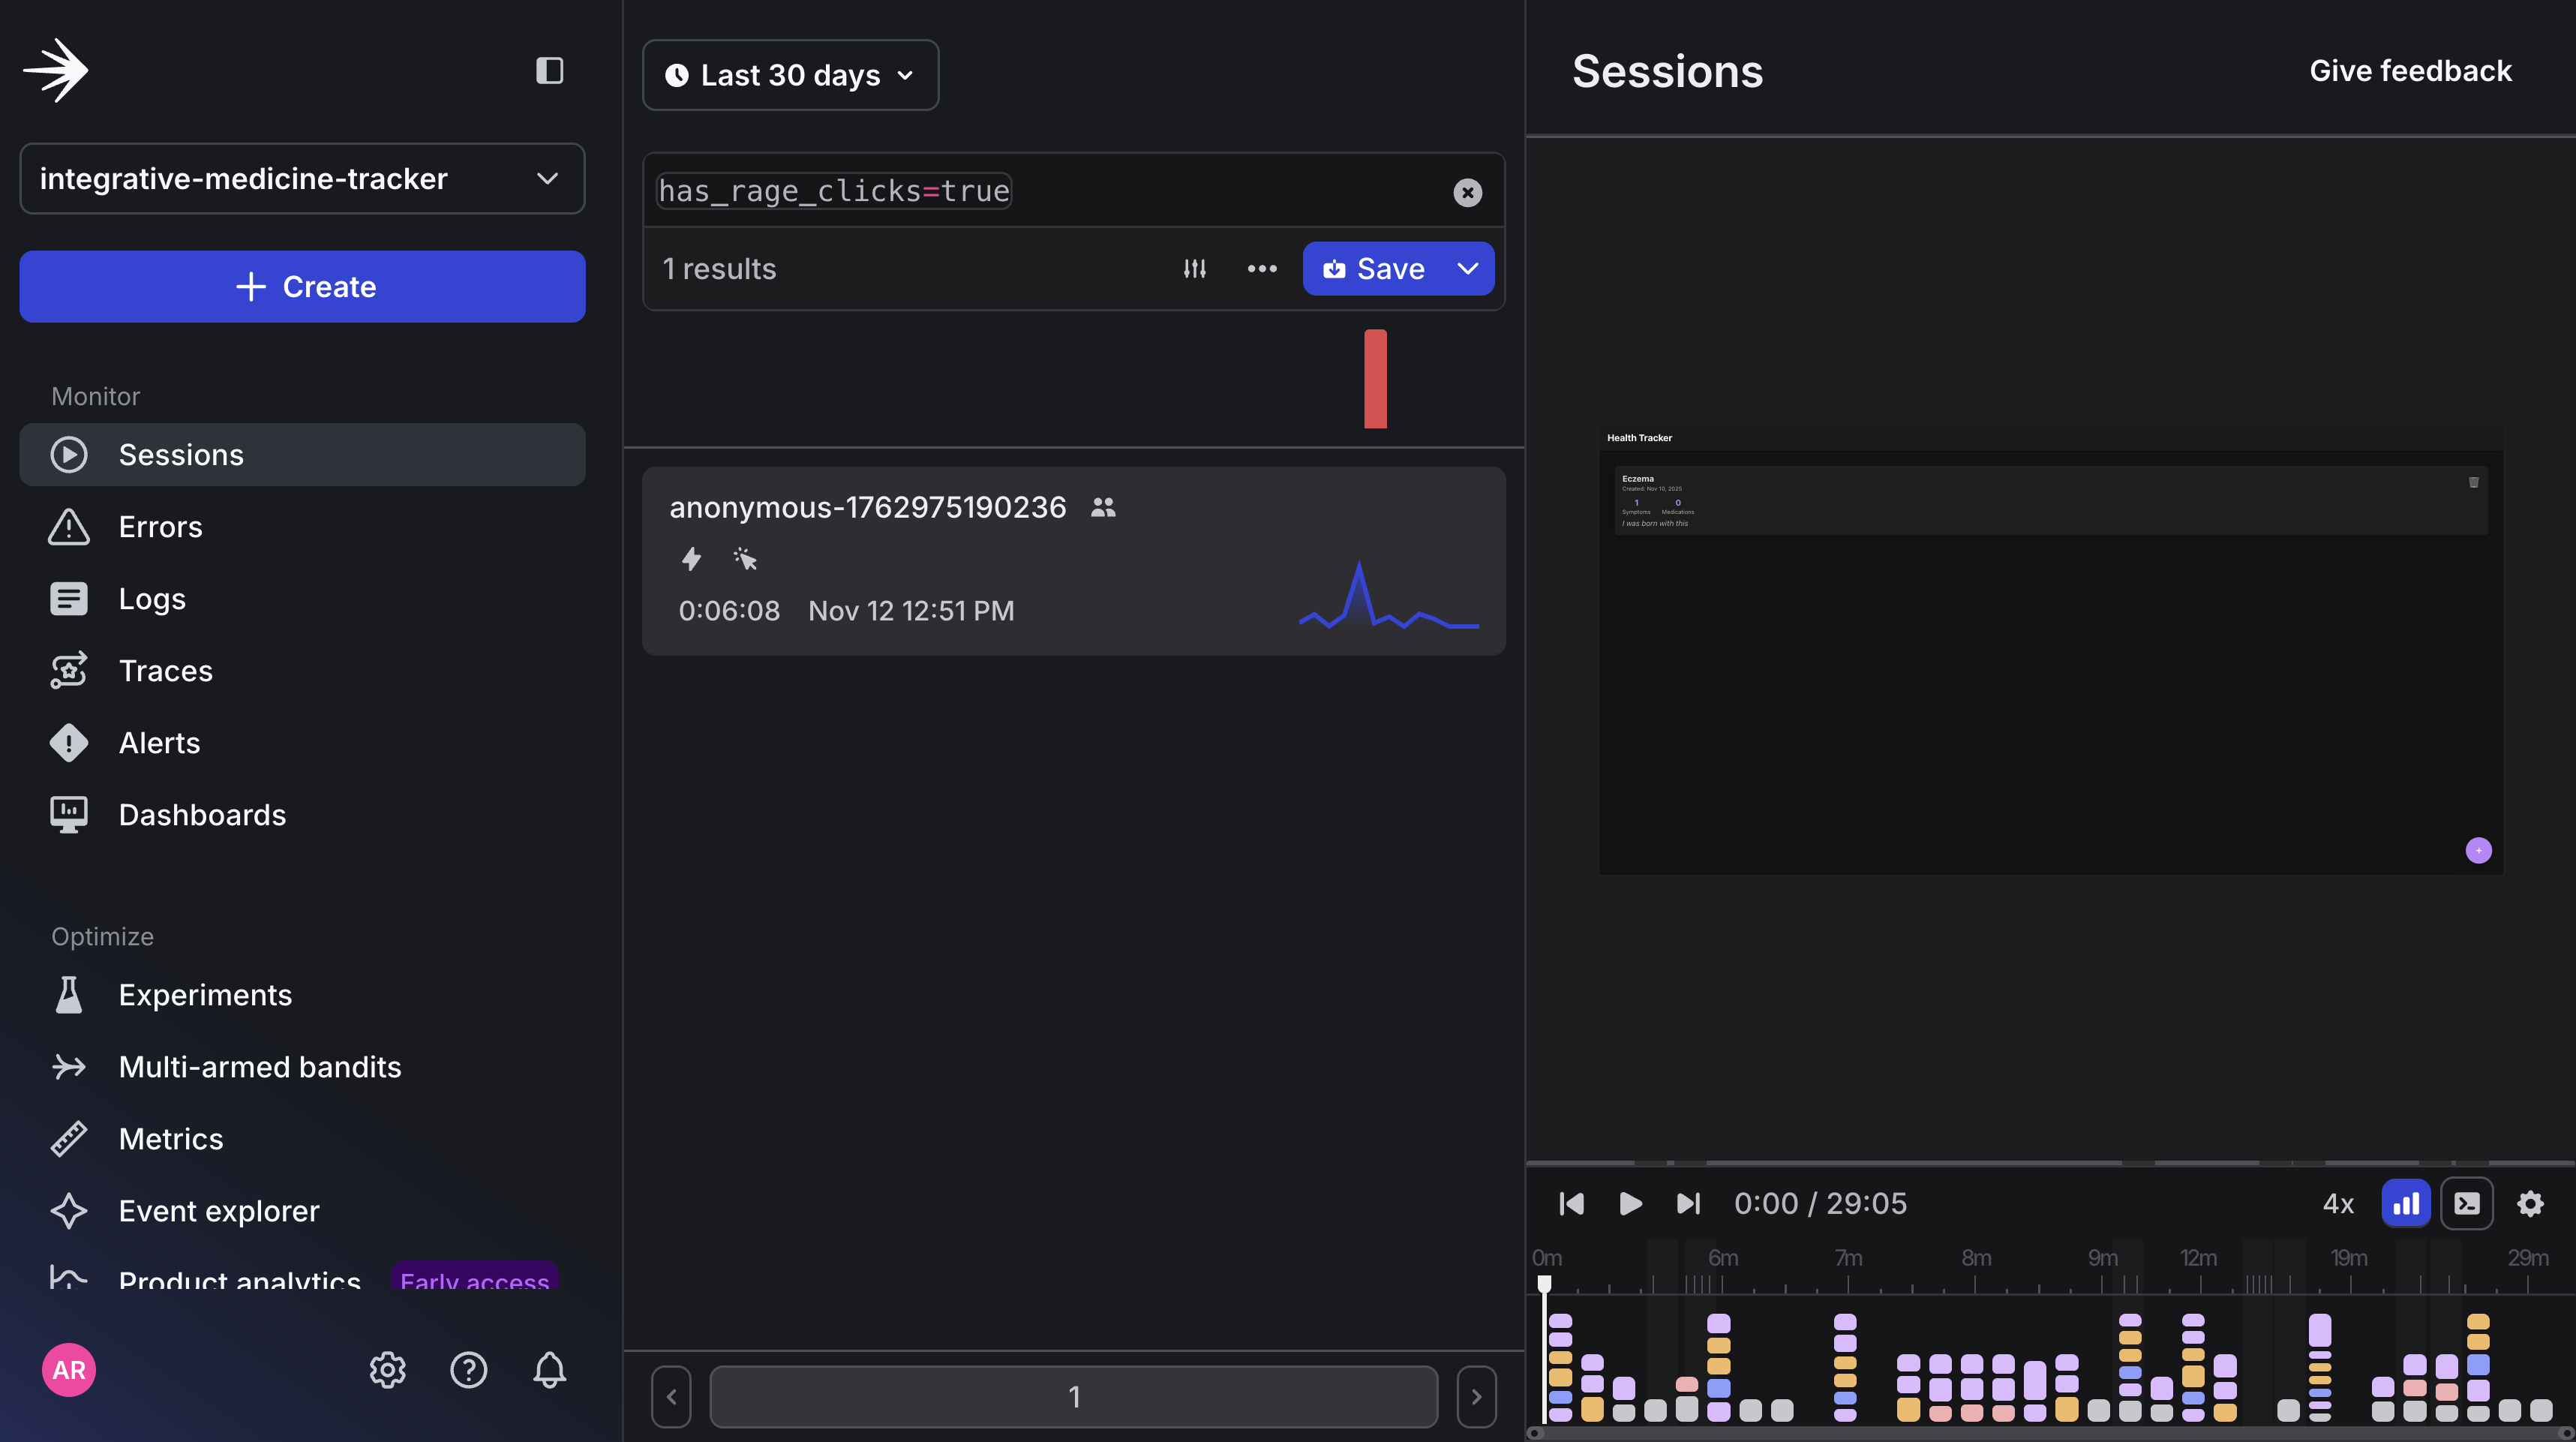
Now let’s take this a step further by connecting this data to a specific feature in a Guarded rollout/release.
Prerequisites
- A free LaunchDarkly account - sign up at this link and you’ll get access to our observability SDK
- Complete the previous rage click detection tutorial.
Step 1: Create Your Feature Flag
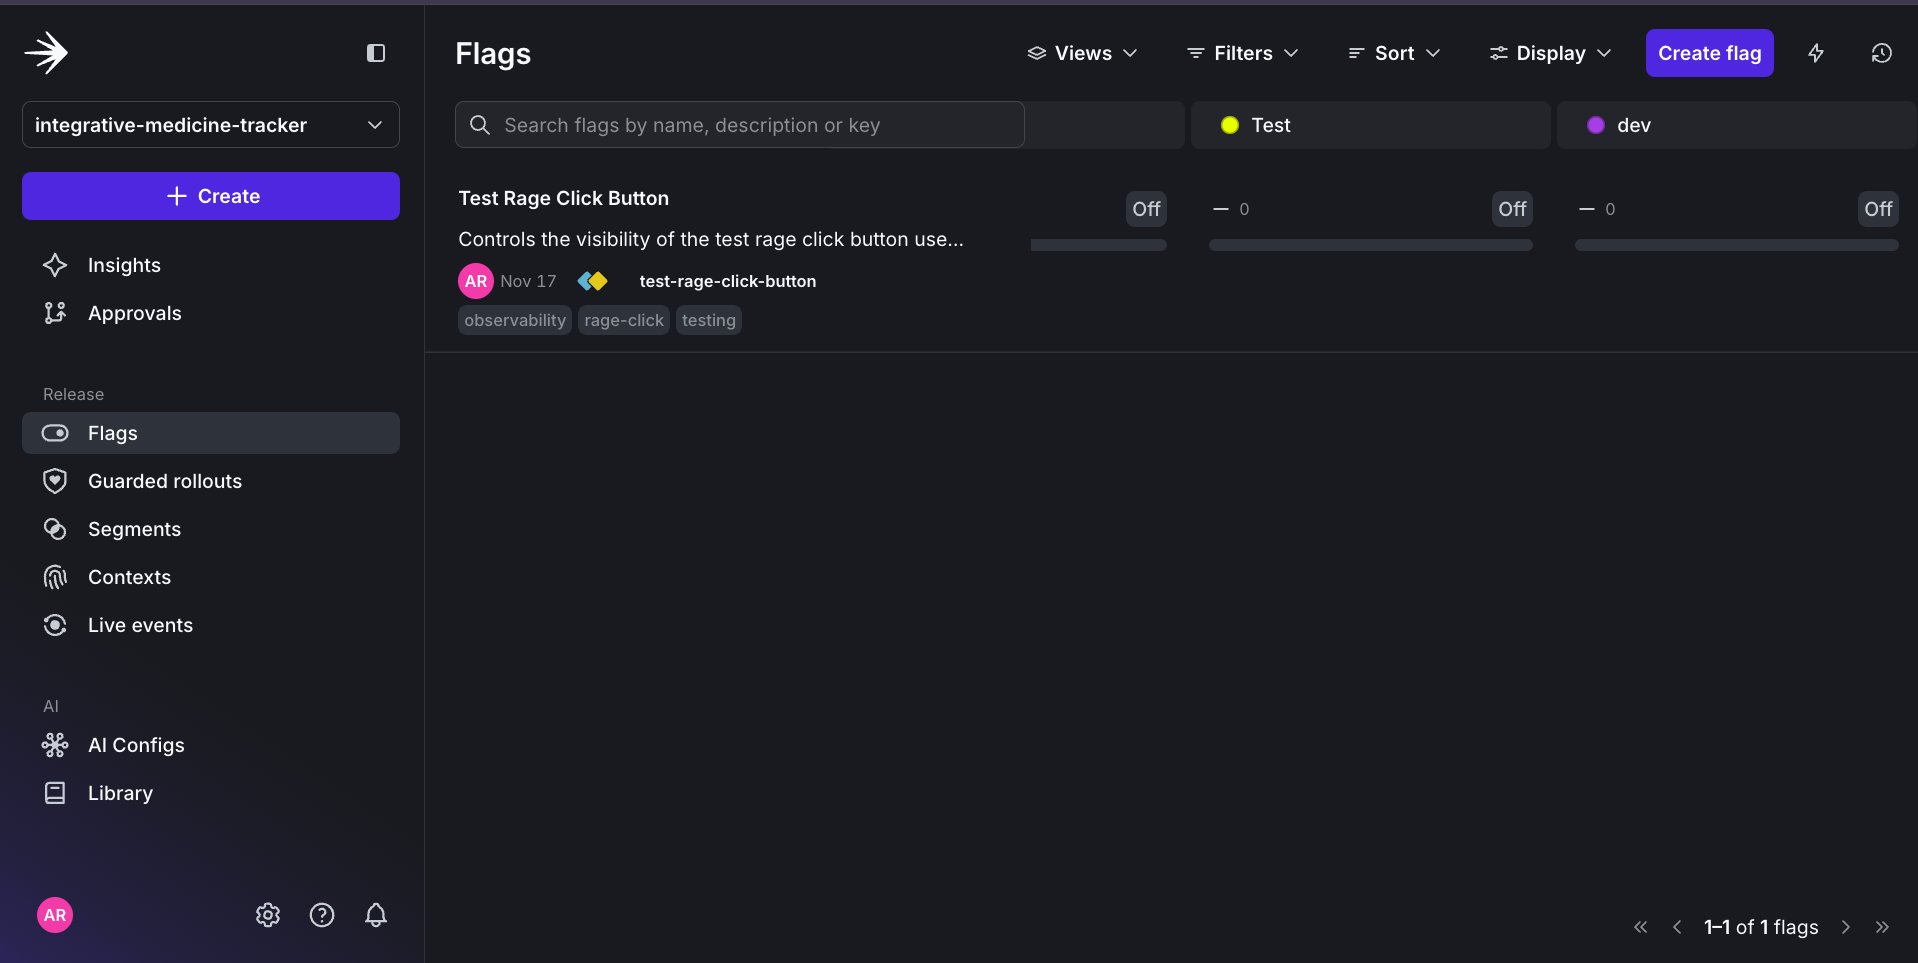
First, you’ll need to create the feature flag that will be associated with the Guarded rollout/release. In this case, you can use the new feature flag to enable/disable the Test Rage Click Button in the UI.
What’s cool is you can connect to the LaunchDarkly MCP server in Cursor (or any AI-enabled IDE) and use it to create new feature flags directly in the agent chat window.
The full instructions for setting this up can be found in the docs.
To get started, you’ll need your LaunchDarkly Access token with Writer access. Let’s call it Cursor MCP.
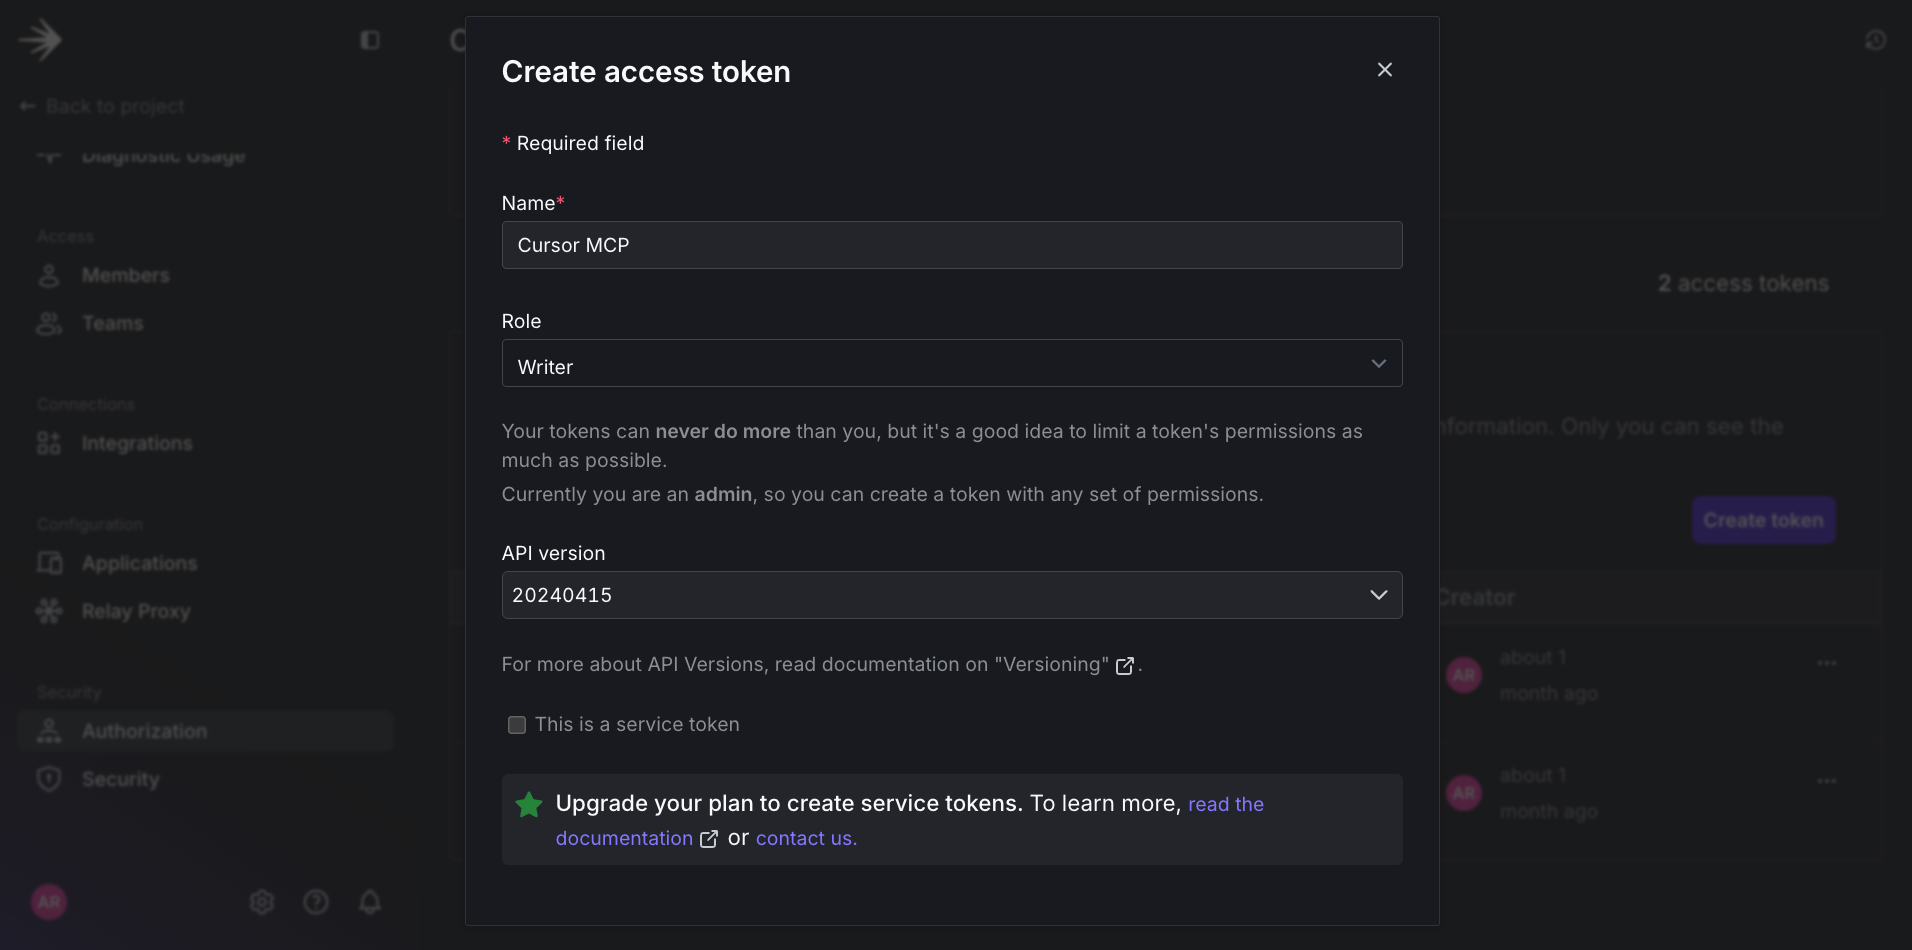
In Cursor, go to Settings > Cursor Settings > Tools & Integrations > MCP Tools > New MCP server.
Copy the example configuration, using your access token.
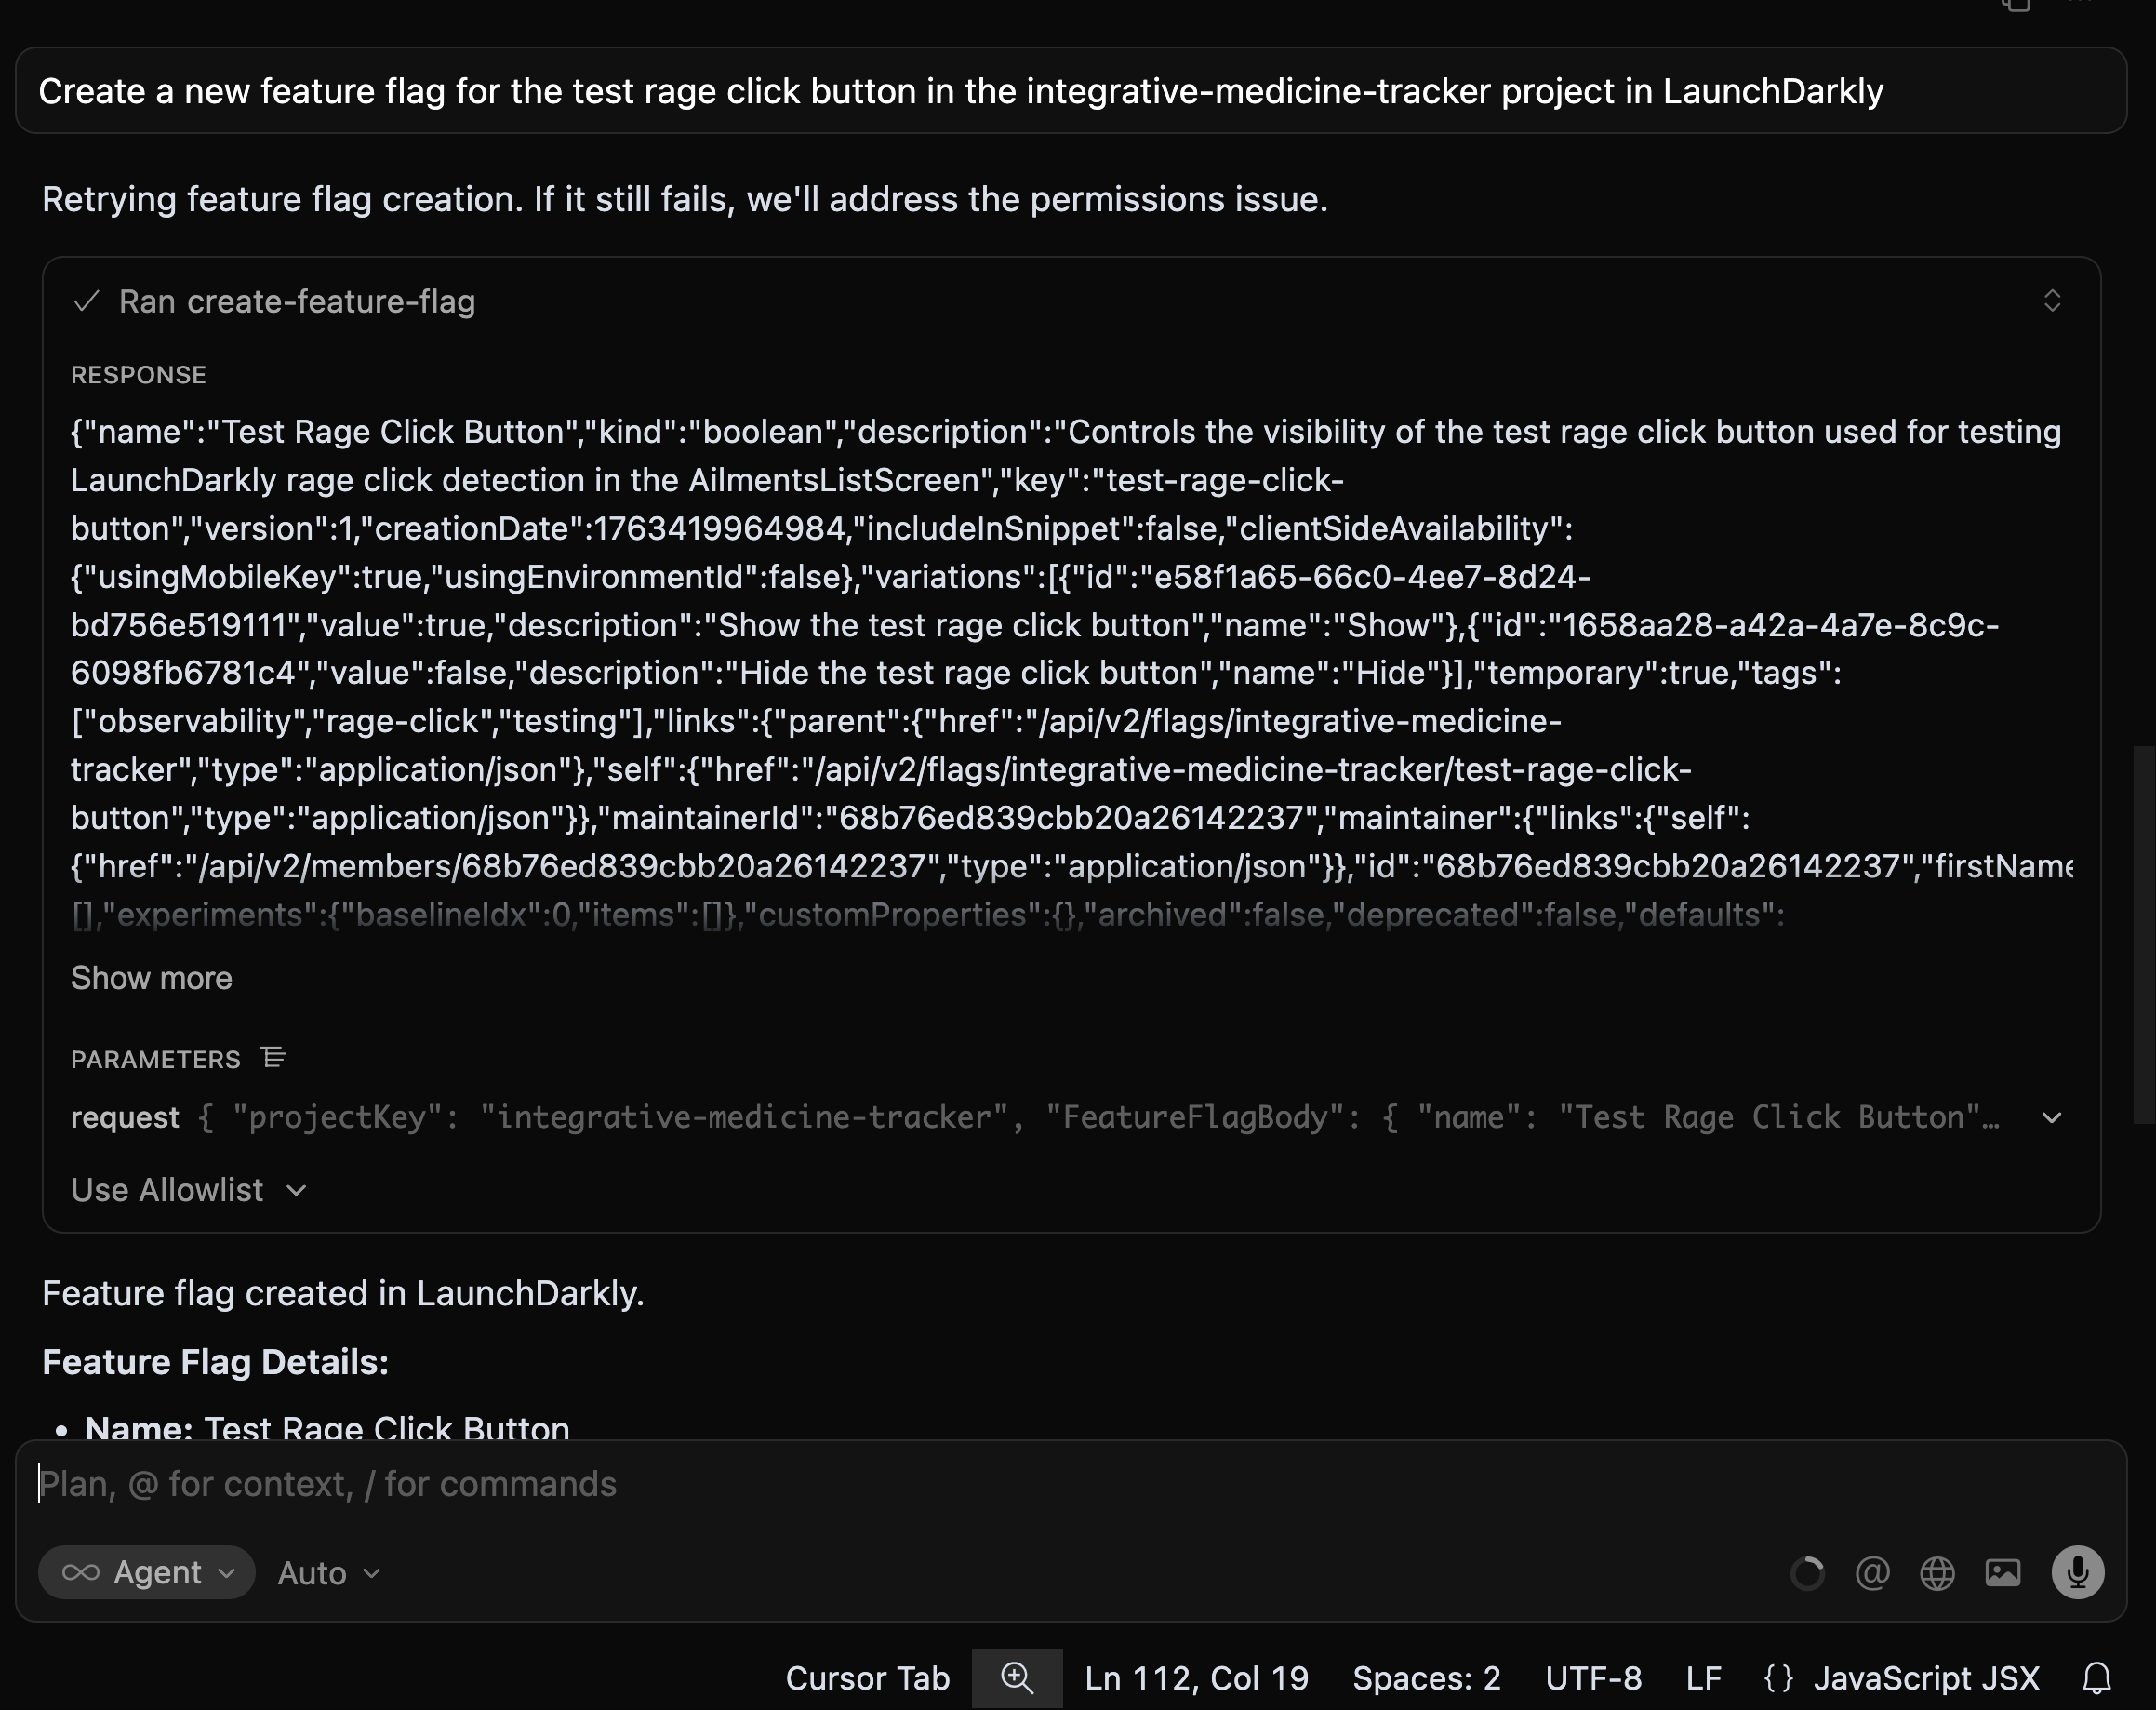
Now, when you query the agent, you can ask it to execute LaunchDarkly specific tasks, like creating a new feature flag.
In the prompt, you want to include the name of the LaunchDarkly project, where you want the flag to be created and the name of the desired feature flag.
- Project name:
integrative-medicine-tracker - Feature flag:
Test Rage Click Button
In the cursor AI chat window, execute this prompt:
Create a new feature flag for the Test Rage Click Button in the integrative-medicine-tracker project in LaunchDarkly
The new feature flag appears in the LaunchDarkly UI, ready to be implemented in the code.
The full code for this tutorial can be found in this GitHub repository.
In the Screens/AilmentsListScreen.jsx file, where the test rage click button was created, import the LaunchDarkly client.
Then, add the following code in the same file to the AilmentsListScreen() function which will check for changes to the feature flag and the updated feature flag value.
It also includes debugging and retry logic for connecting to the LaunchDarkly client.
Next, replace the test rage click button with this code snippet.
To ensure everything works as expected, we’ll need to update the LaunchDarkly Client code in launchdarkly.jsx.
Here, you’ll add two functions: one to get the launchdarkly client and the other to check if the feature flag is enabled.
Finally, you should be able to toggle your feature flag on and off and see the changes in the UI. The rest of the tutorial will require it to be enabled.
It’s also important to note that your feature flag will not work if client-id sdk is not toggled on. To do so, navigate to Flags -> Targeting, then in the right panel toggle on Available on client-side SDKs.
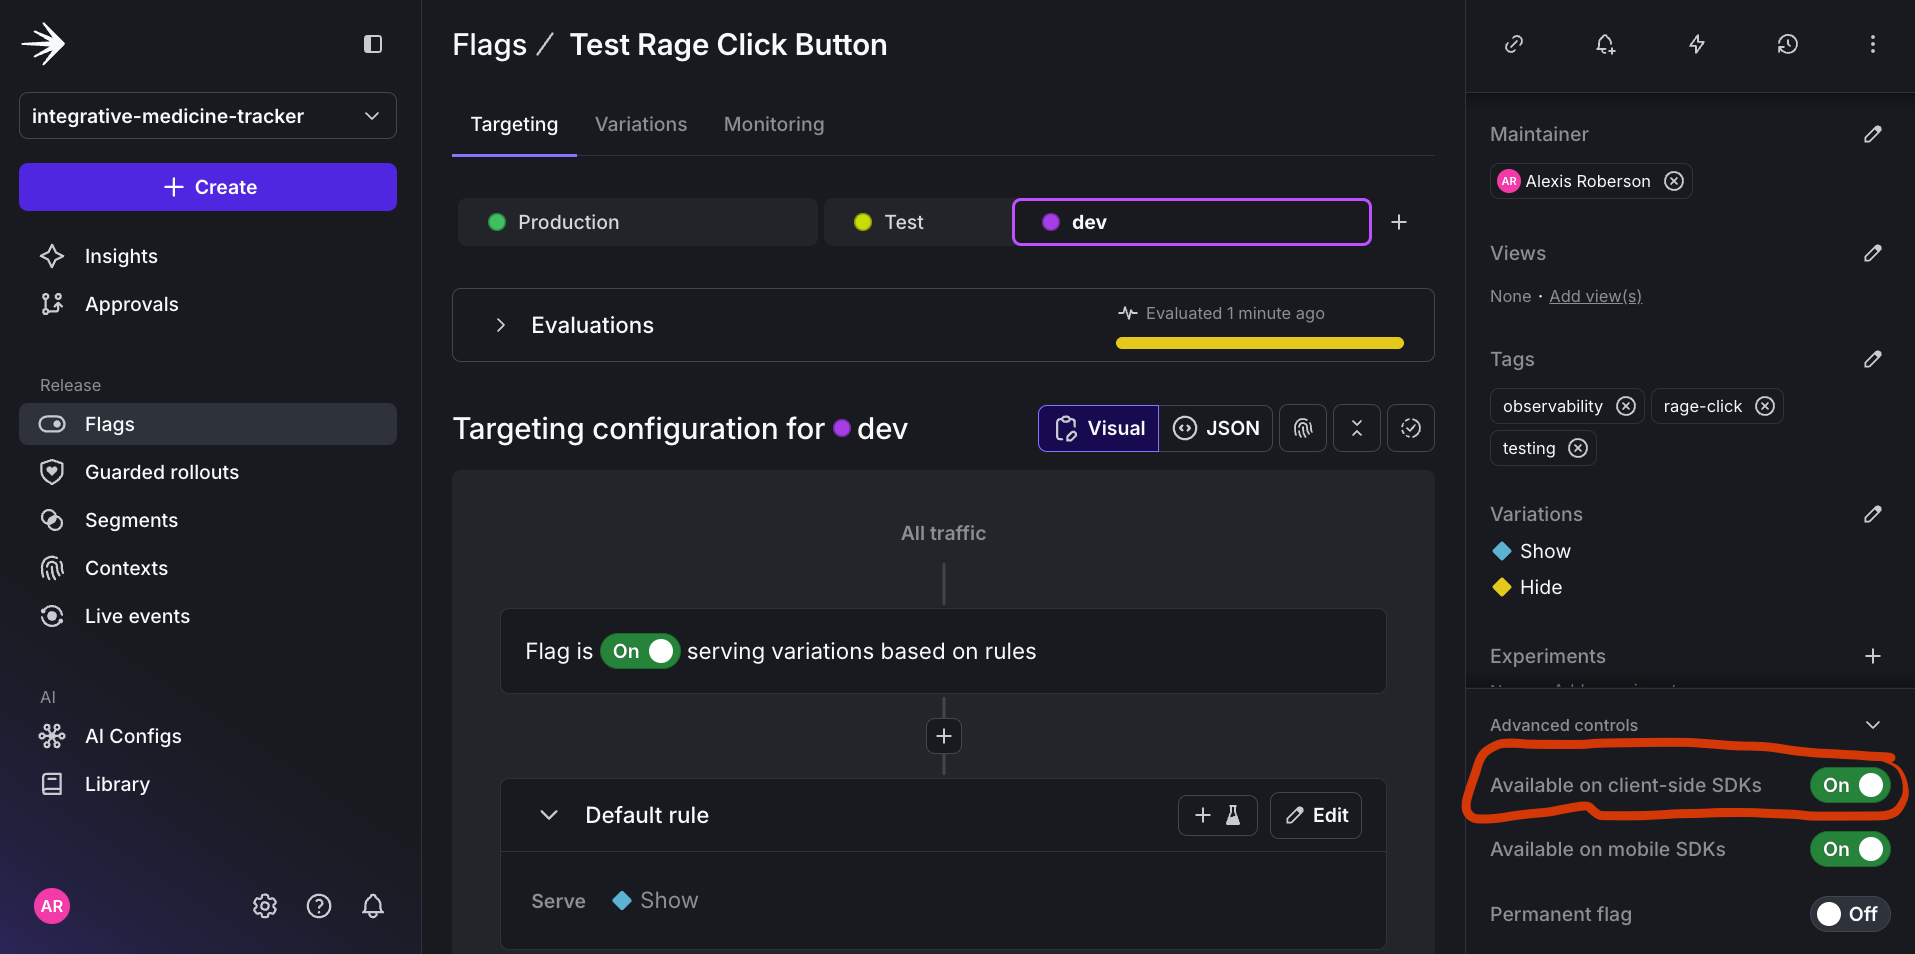
Now, when user sessions with has_rage_clicks=true experience rage clicks, LaunchDarkly automatically associates those sessions with your feature flag.
Step 2: Use Automatic Rage Click Tracking
When you enabled session replay in Part 1, LaunchDarkly automatically:
- Detects rage click patterns based on your configured thresholds (5 clicks, within 8 pixels, over 2 seconds).
- Tags sessions with the has_rage_clicks attribute.
- Correlates rage clicks with active feature flags.
- Makes this data available for filtering and monitoring.
You can reference this automatic tracking directly in Guarded Releases using existing and/or custom metrics.
Step 3: Enable Guarded Releases on Your Feature Flag
How this works
Guarded rollouts which are attached to a specific feature flag gradually release features to users while monitoring custom metrics (like rage clicks). If a defined threshold is exceeded during the rollout, LaunchDarkly can automatically roll back the feature or send notifications to your team.
Taking the feature flag we created earlier in this tutorial, we can create a rage click detection metric and connect it to a guarded rollout.
Here’s what you’ll need to do:
- Create a guarded rollout under the Test Rage Click Button feature Flag.
- Create a metric to track click counts by the user in a session.
- Attach the metric to the guarded rollout and configure threshold, automatic rollback, and time duration.
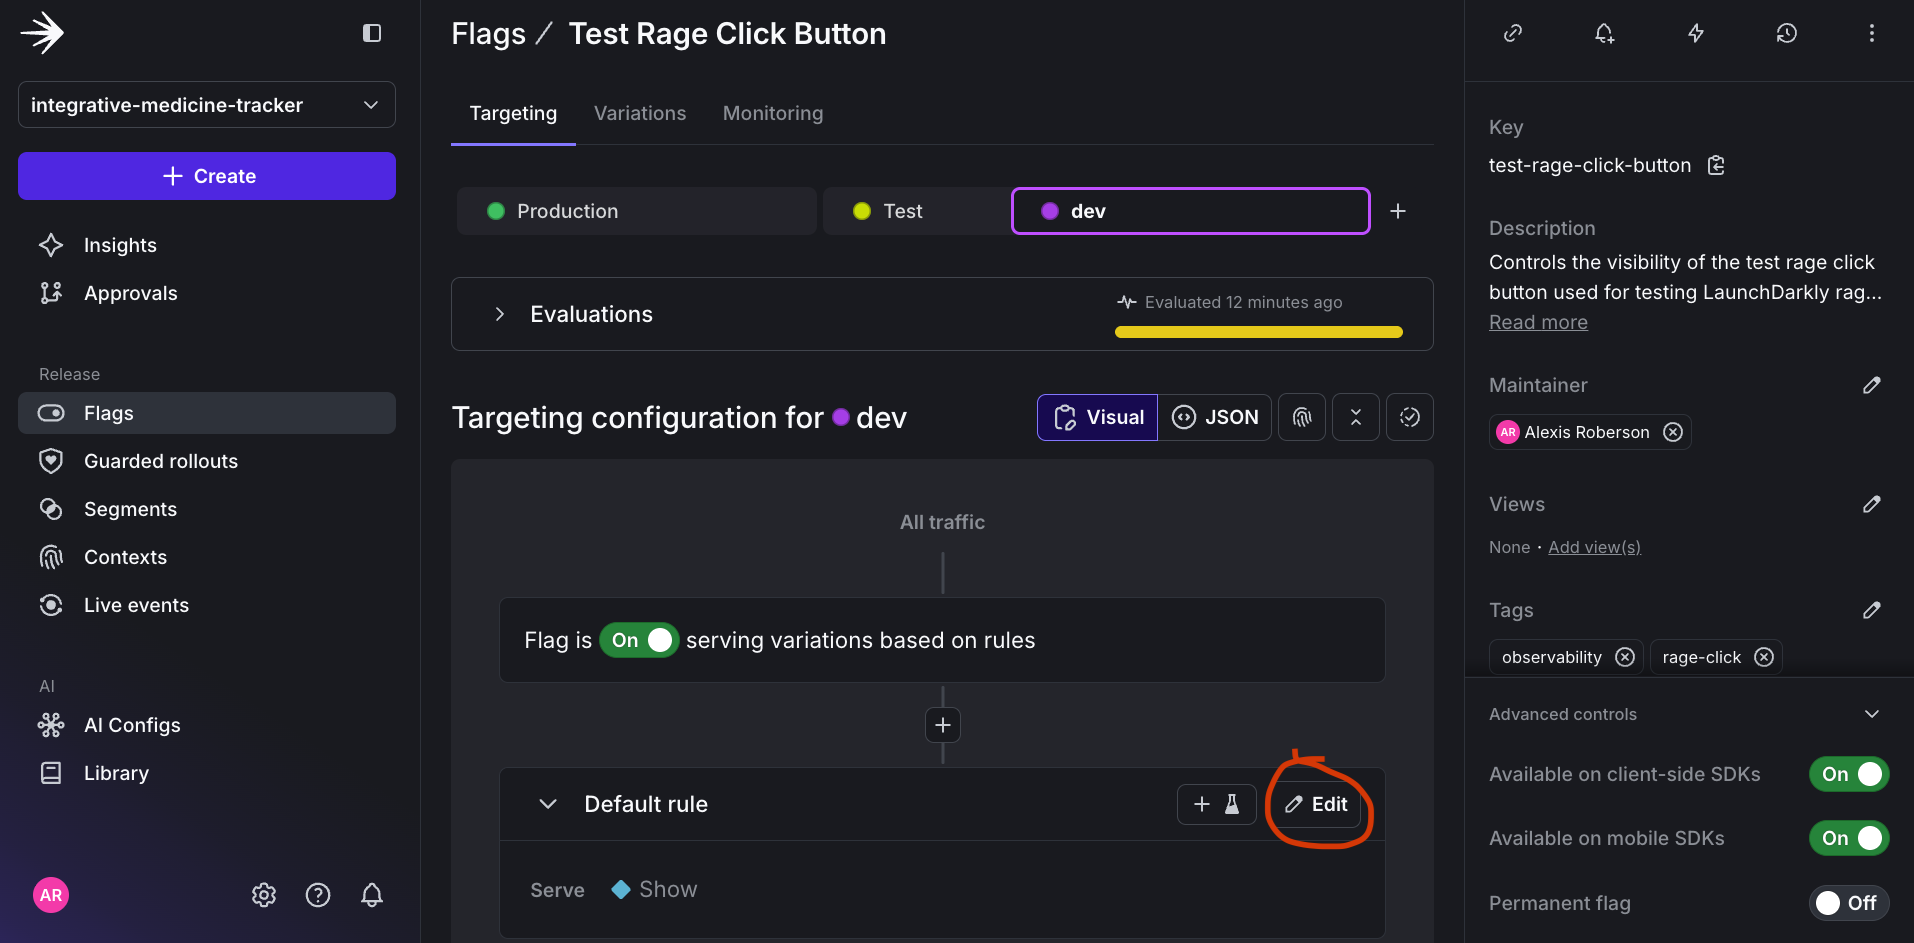
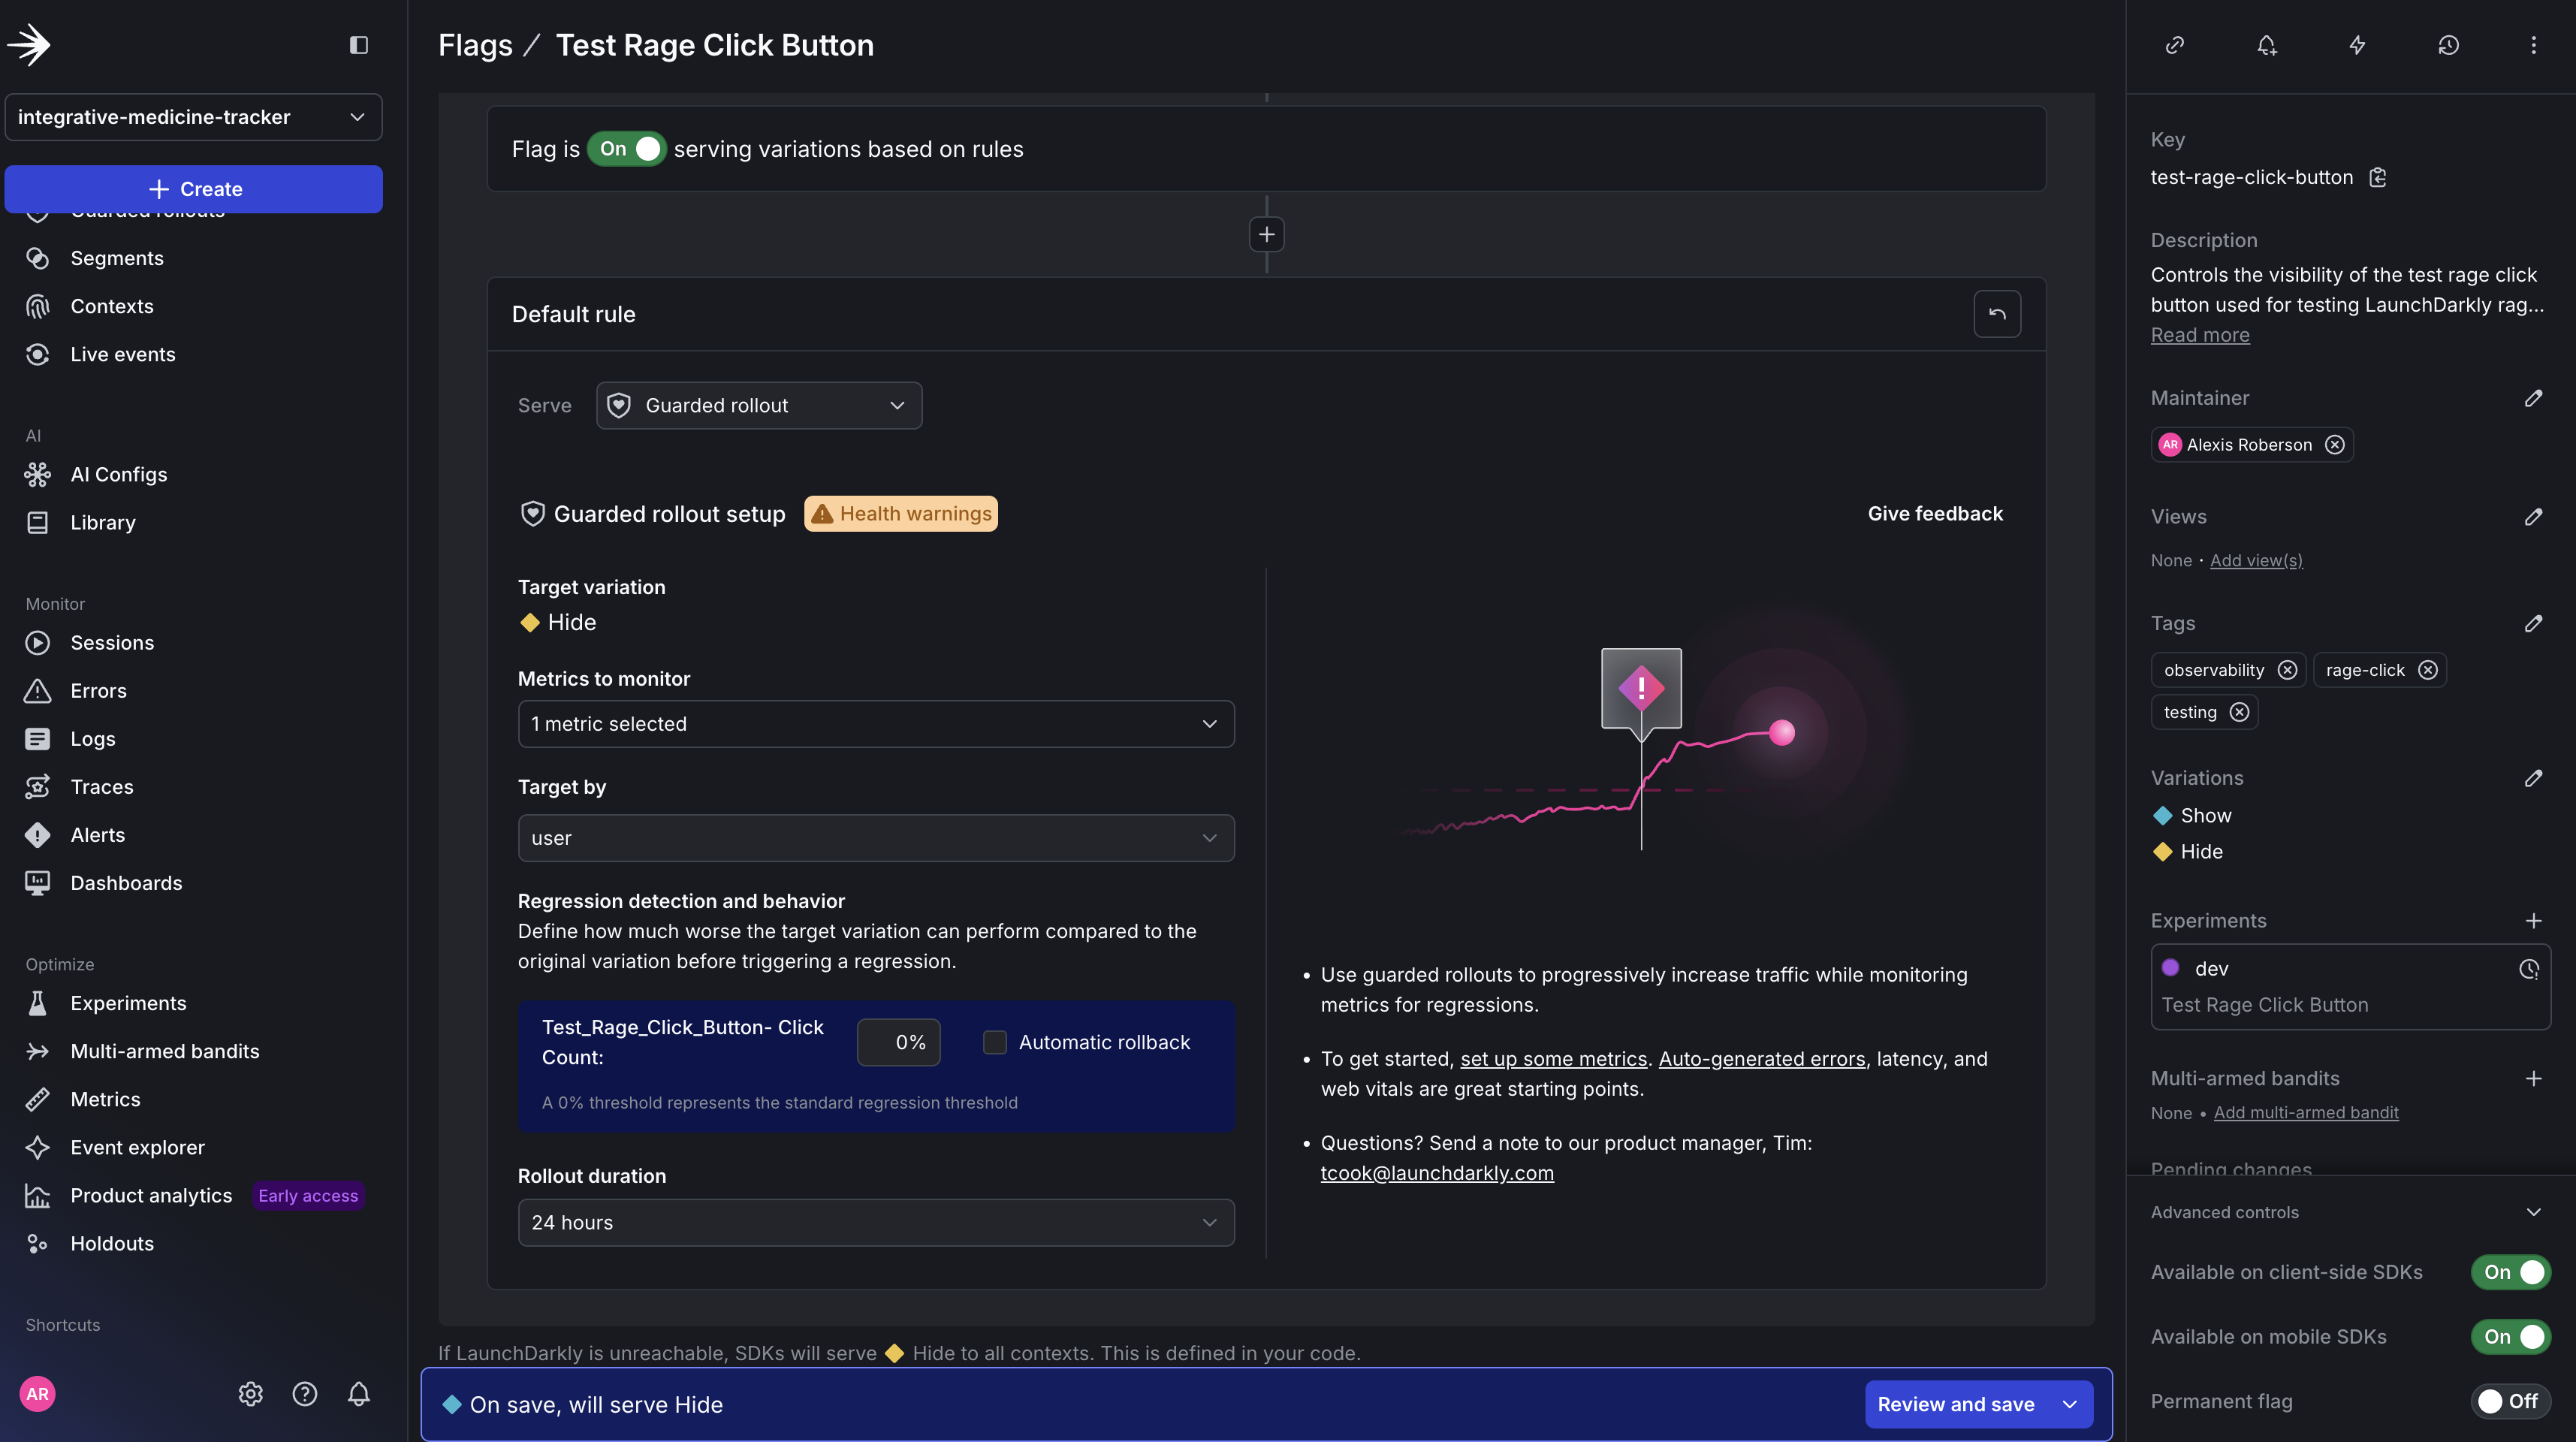
In the Test Rage Click Button feature flag, click Edit on the Default rule.
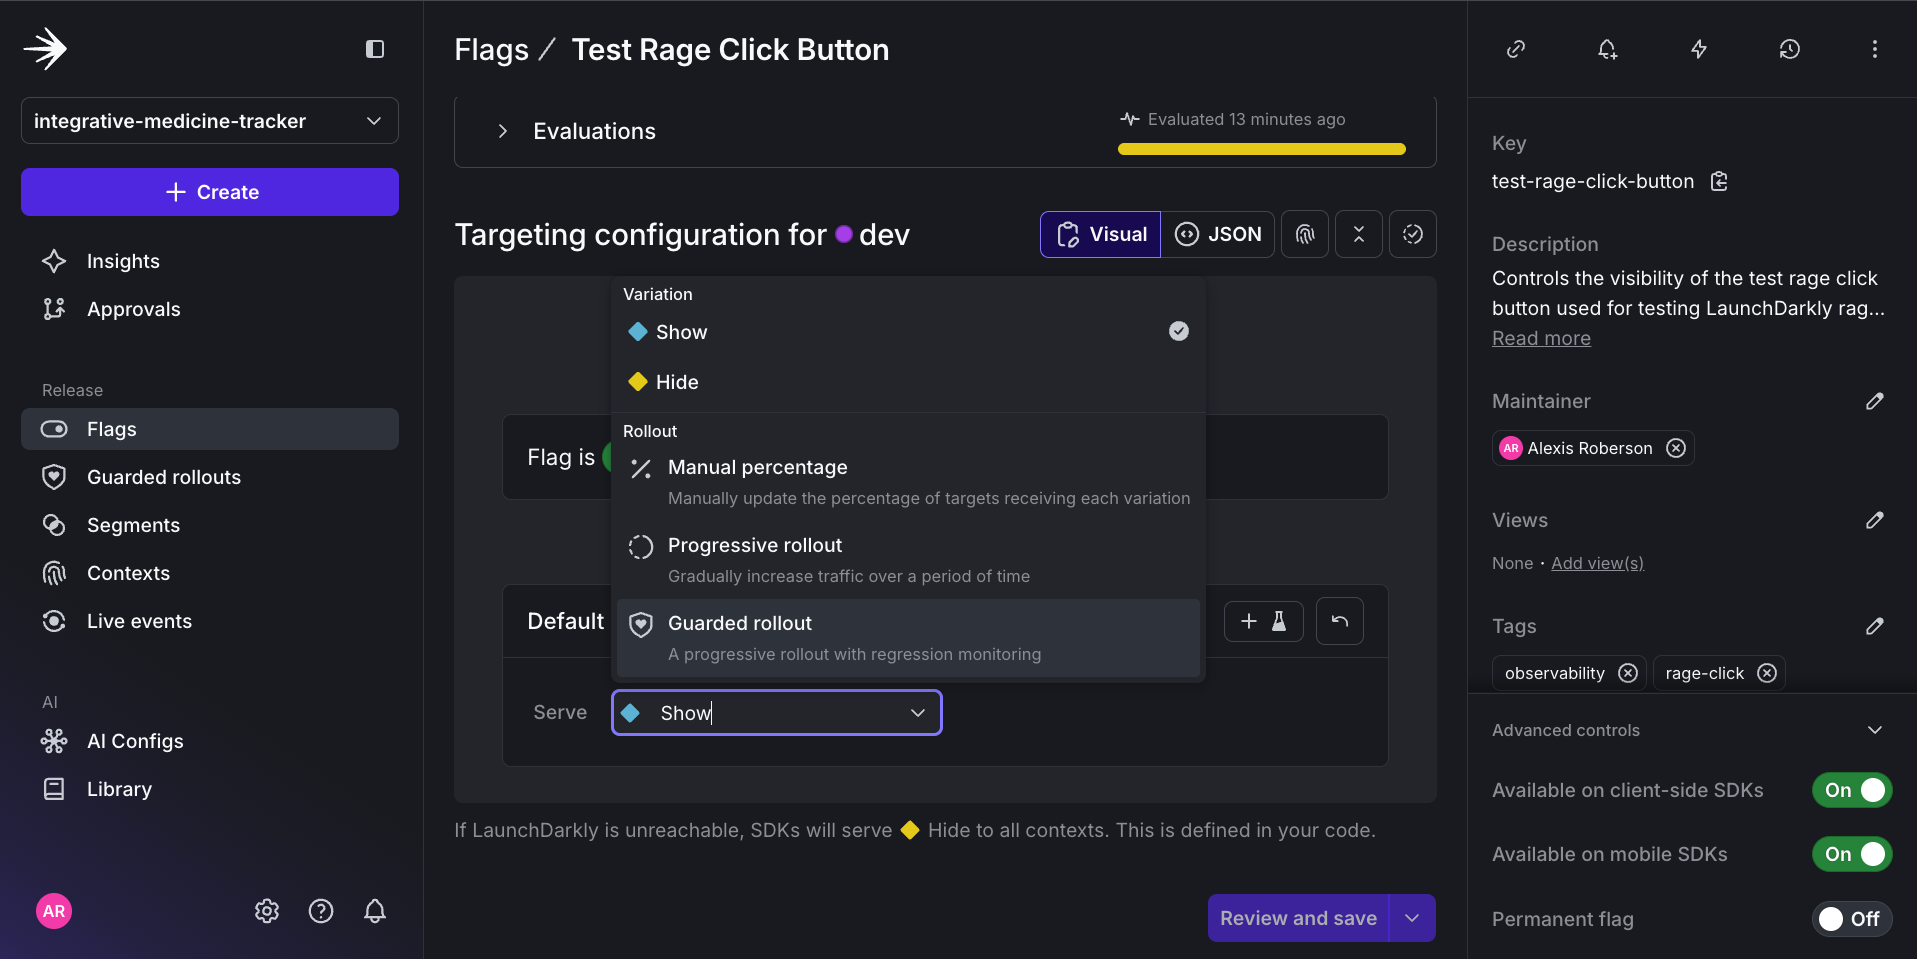
Select Guarded rollout from the Serve dropdown to start the configuration process.
After selecting Guarded rollout, a widget should pop up to set the metric/metric group, threshold, and action.
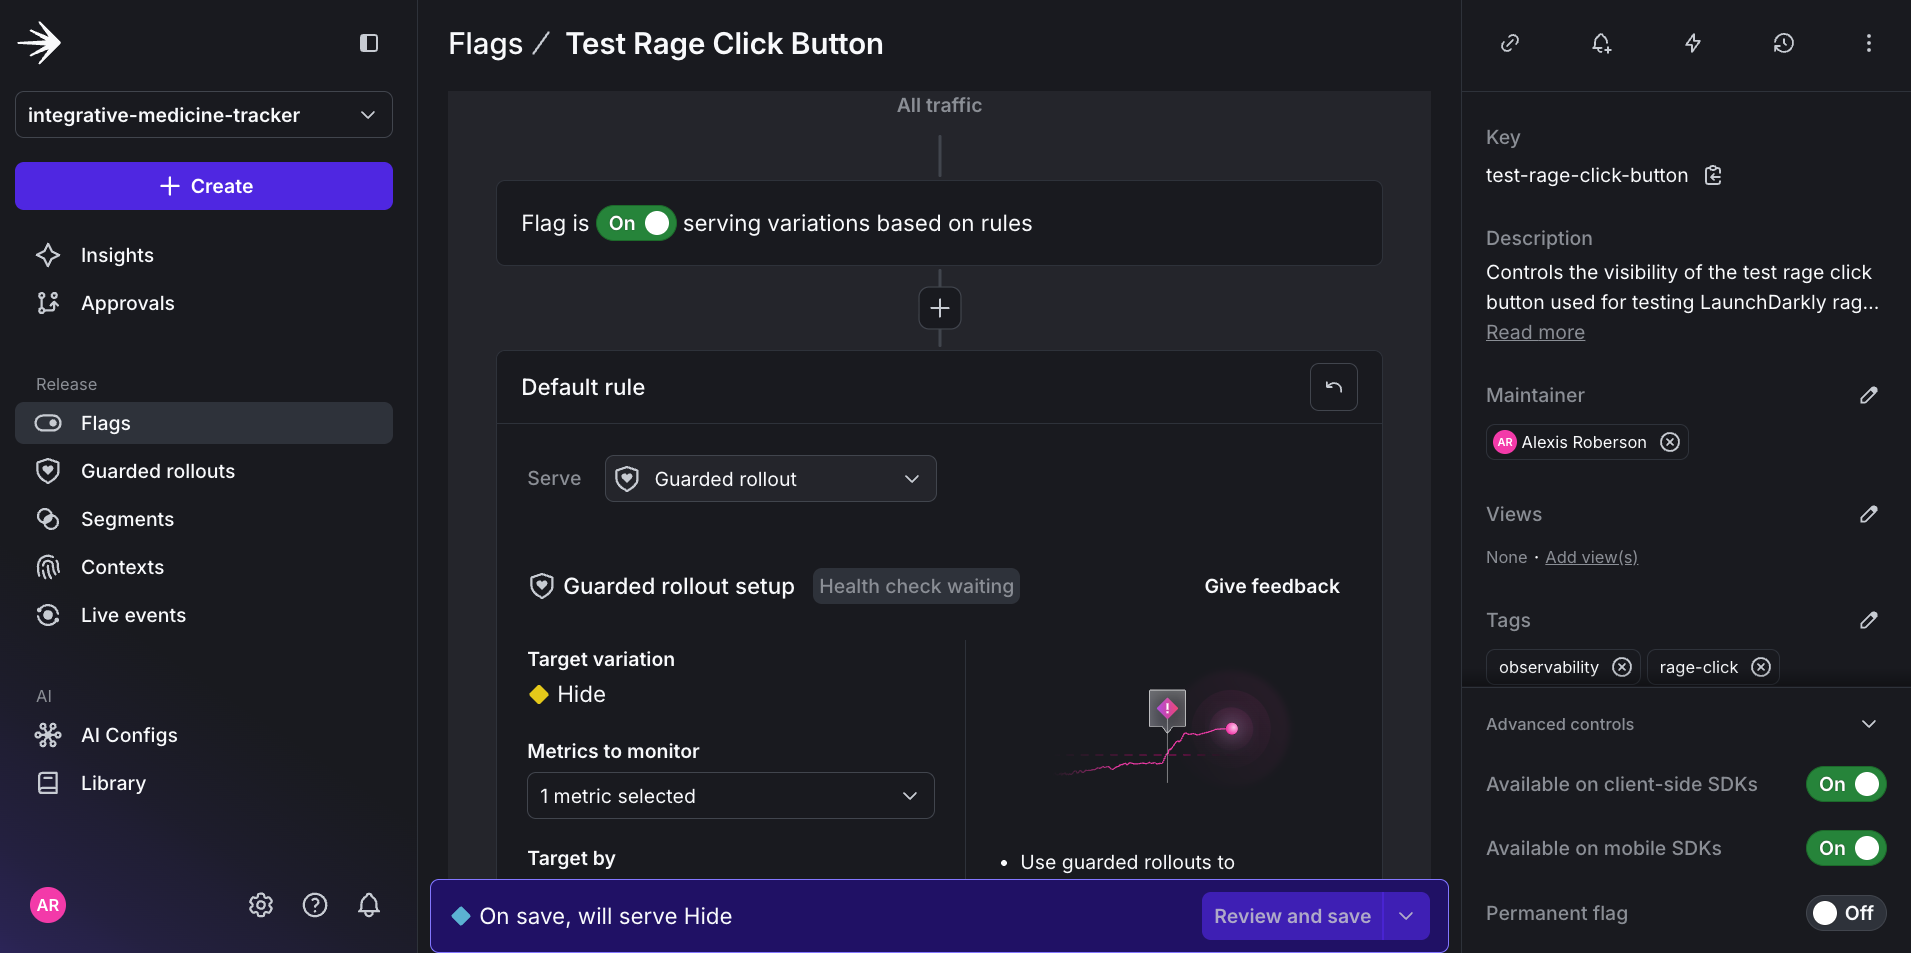
For this example, you’ll need to create a custom metric, by clicking select metrics or metric group, then Create.
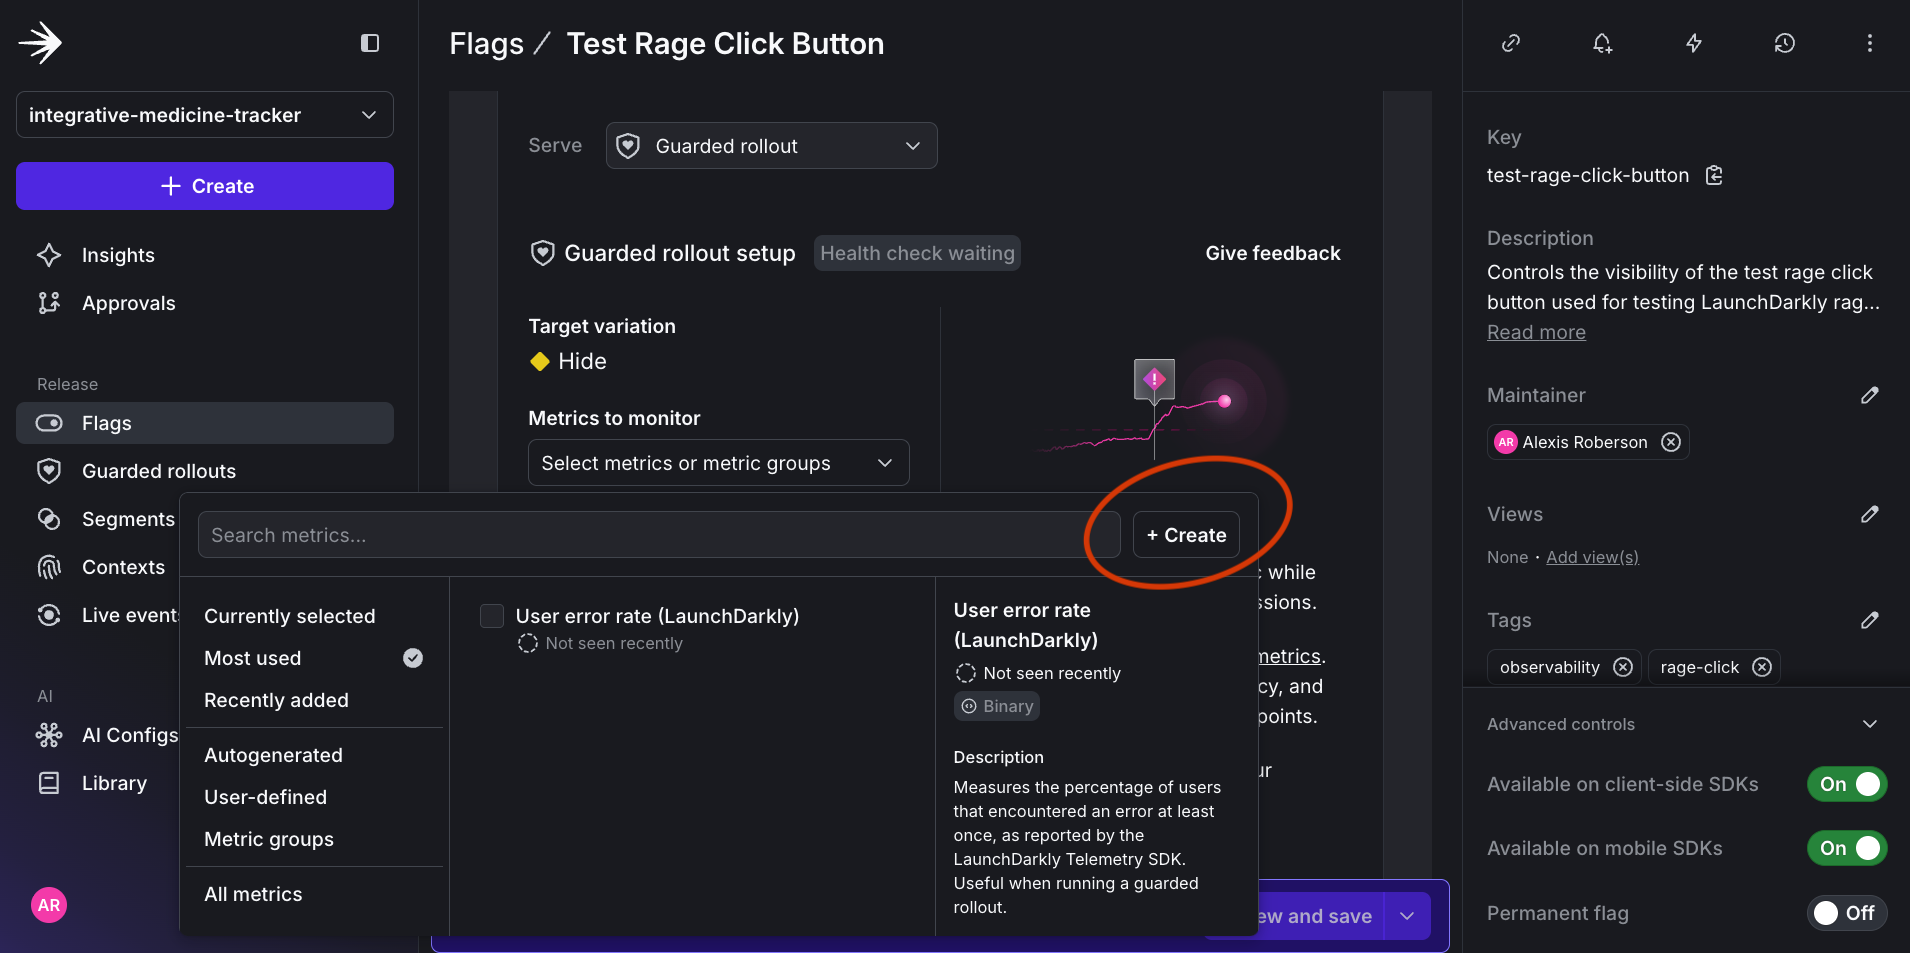
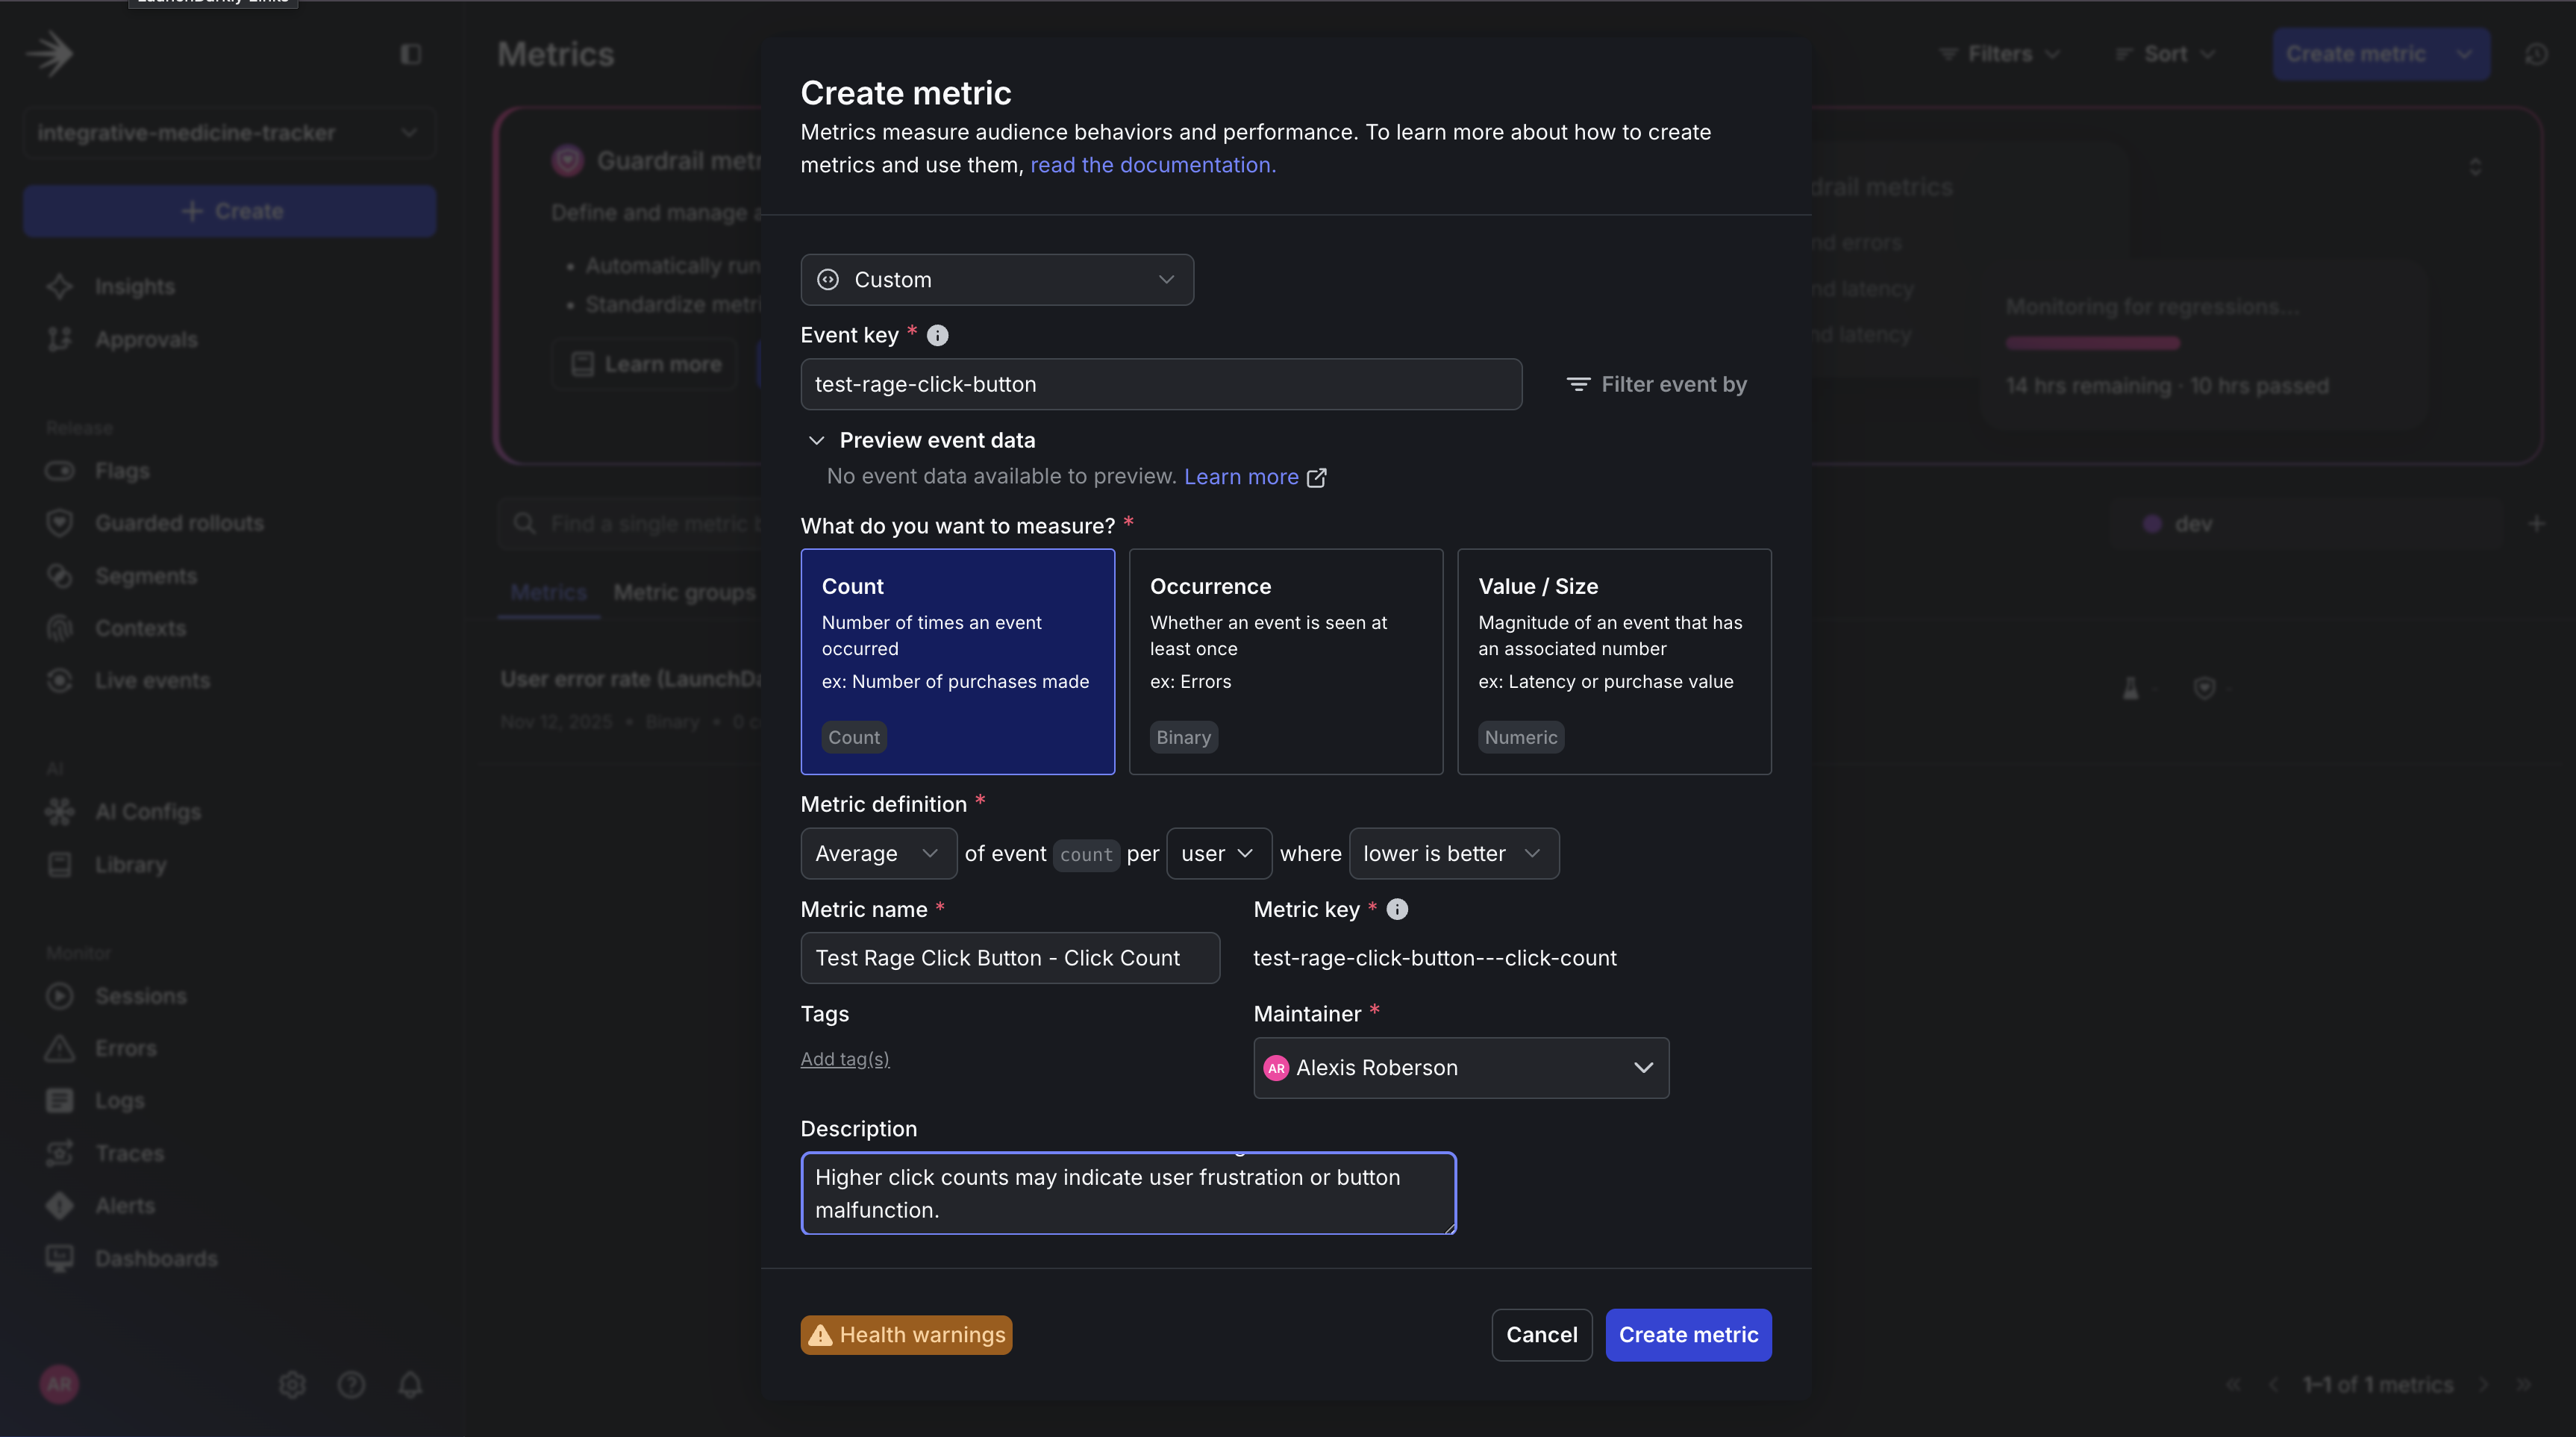
This should redirect you to a popup tab of the Metrics page where you can add these values:
- Event key:
test-rage-click-button - Metric definition:
Countevents peruser, then compute the Average of those values wherelower is better. (It is important to specify lower is better because you want the rollout to catch when there is an uptick in clicks to indicate the rage clicks.) - Metric name:
Test Rage Click Button - Click Count - Description:
Tracks the number of clicks on the test rage click button. Higher click counts may indicate user frustration or button malfunction.
Click Create.
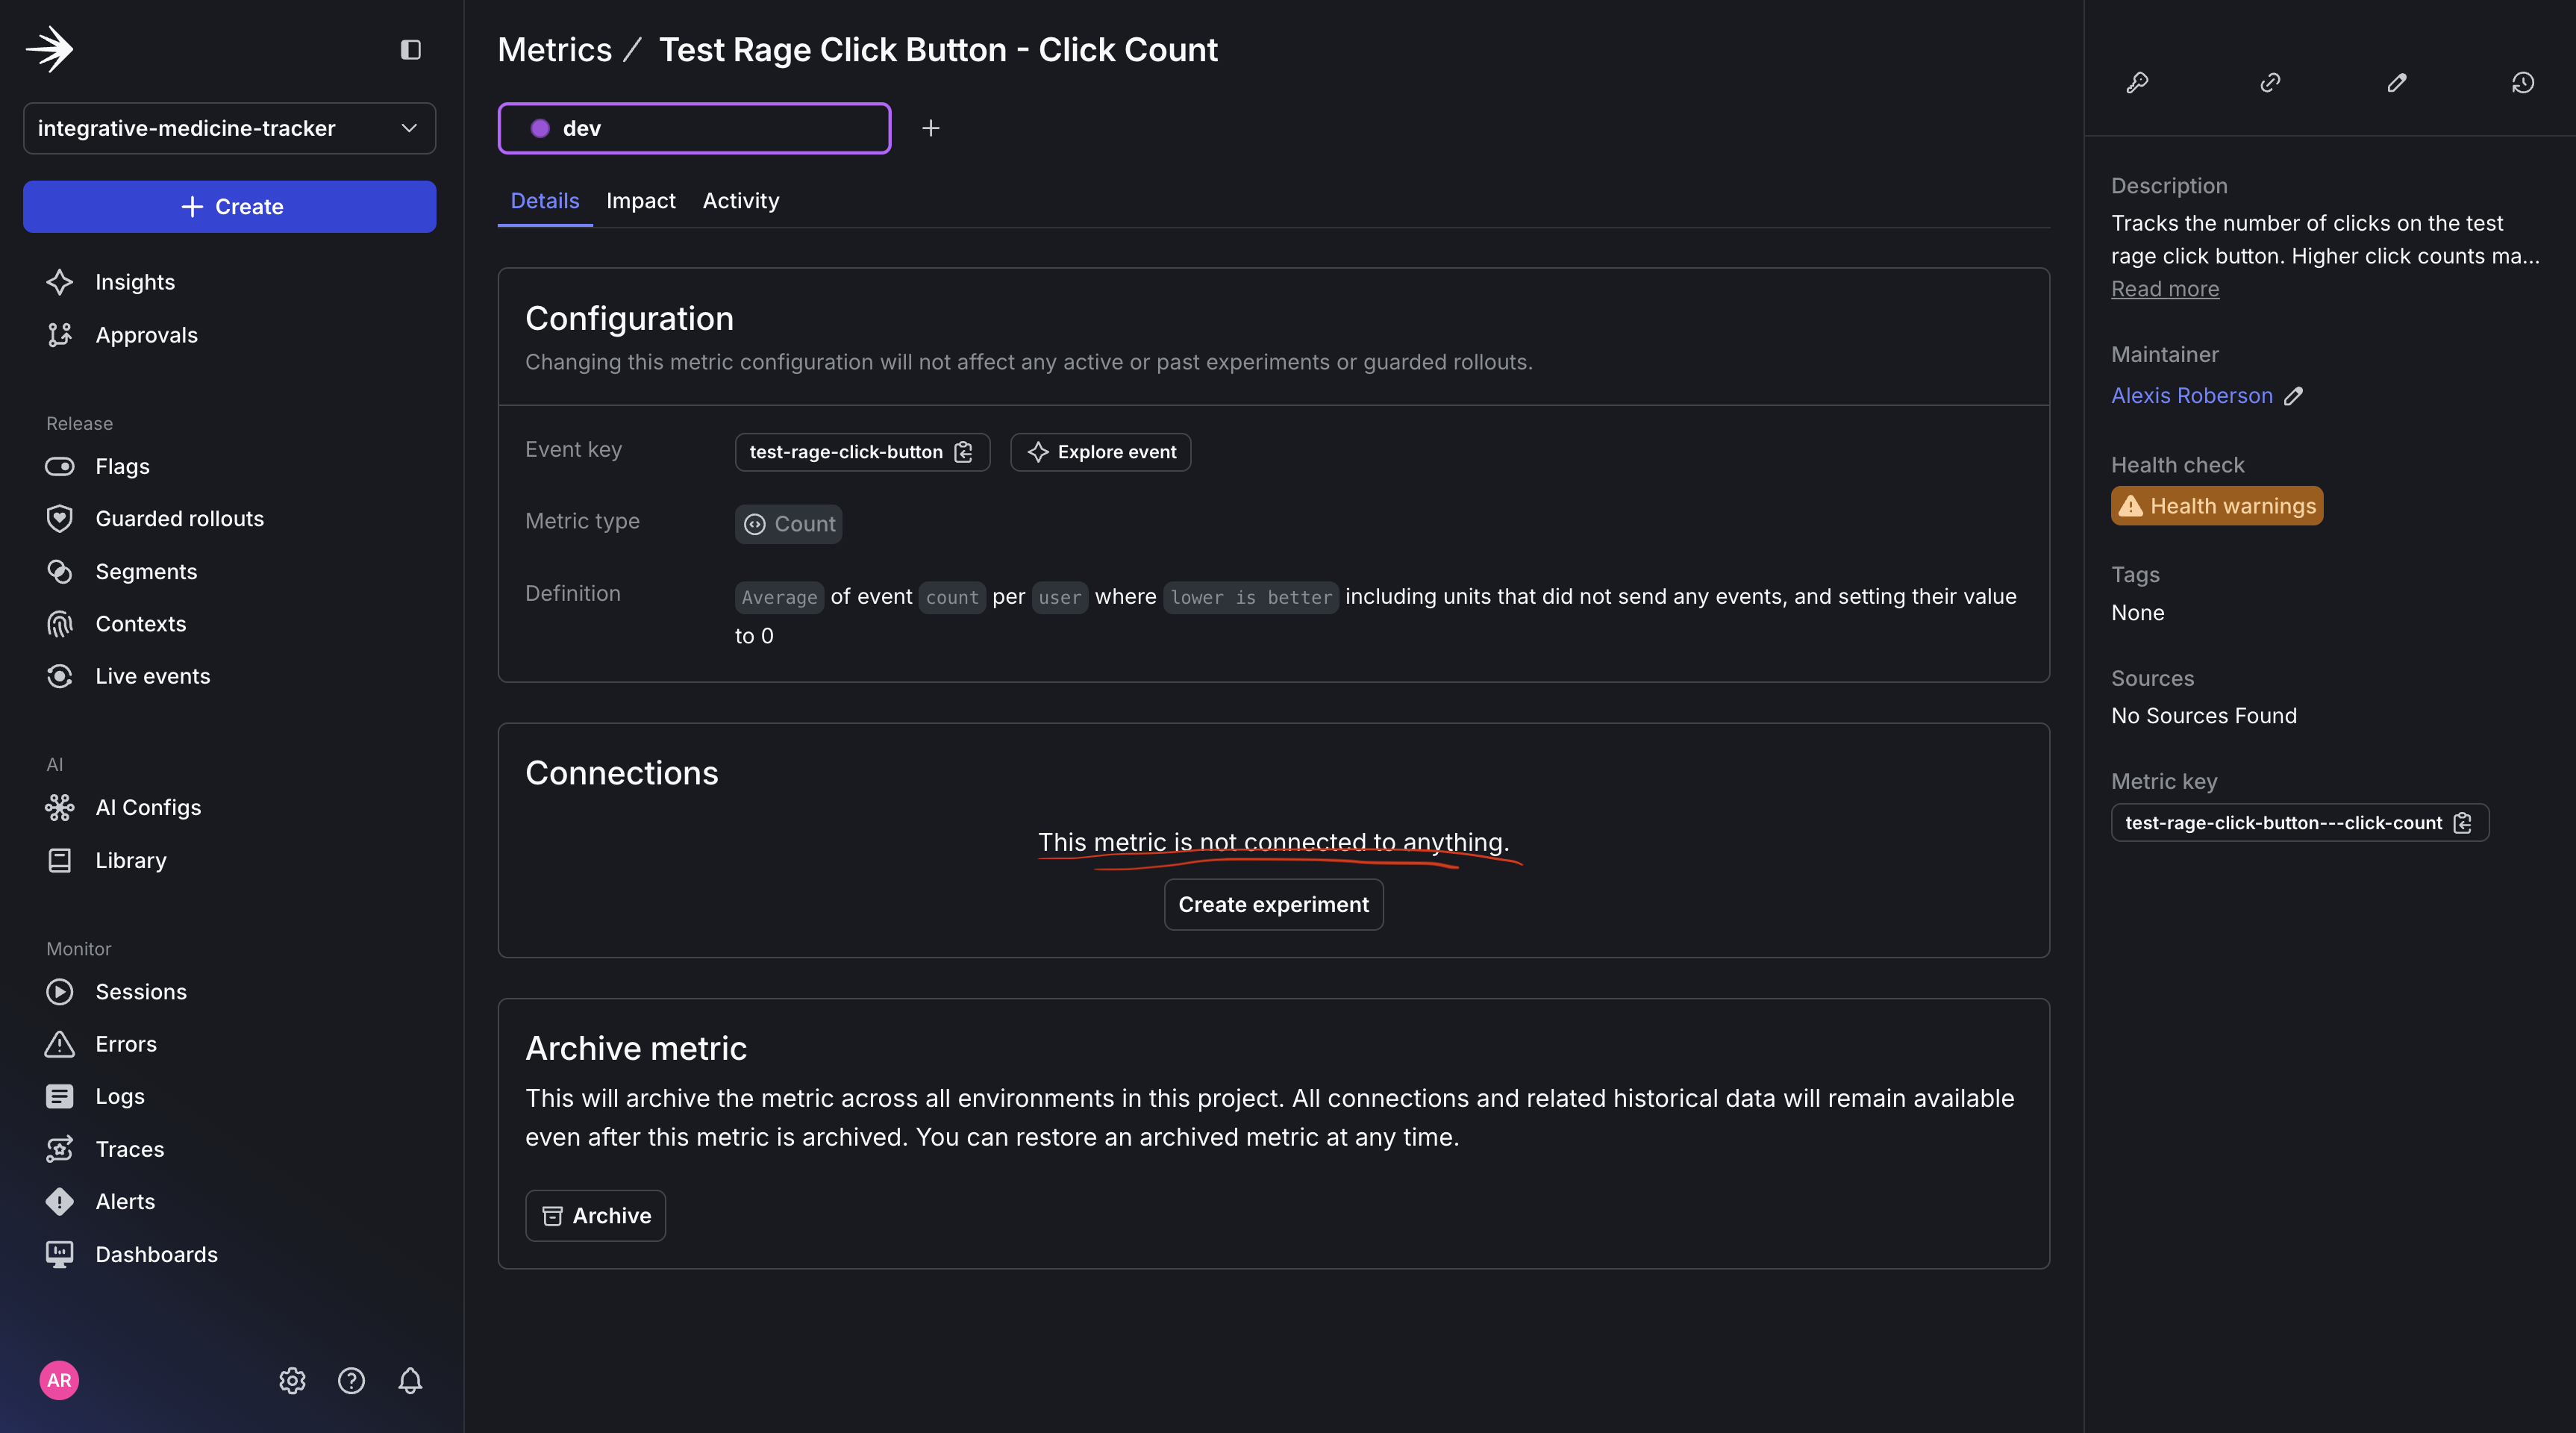
As you can see, we created the custom metric, but as the message indicates this metric is not yet connected to the rollout.
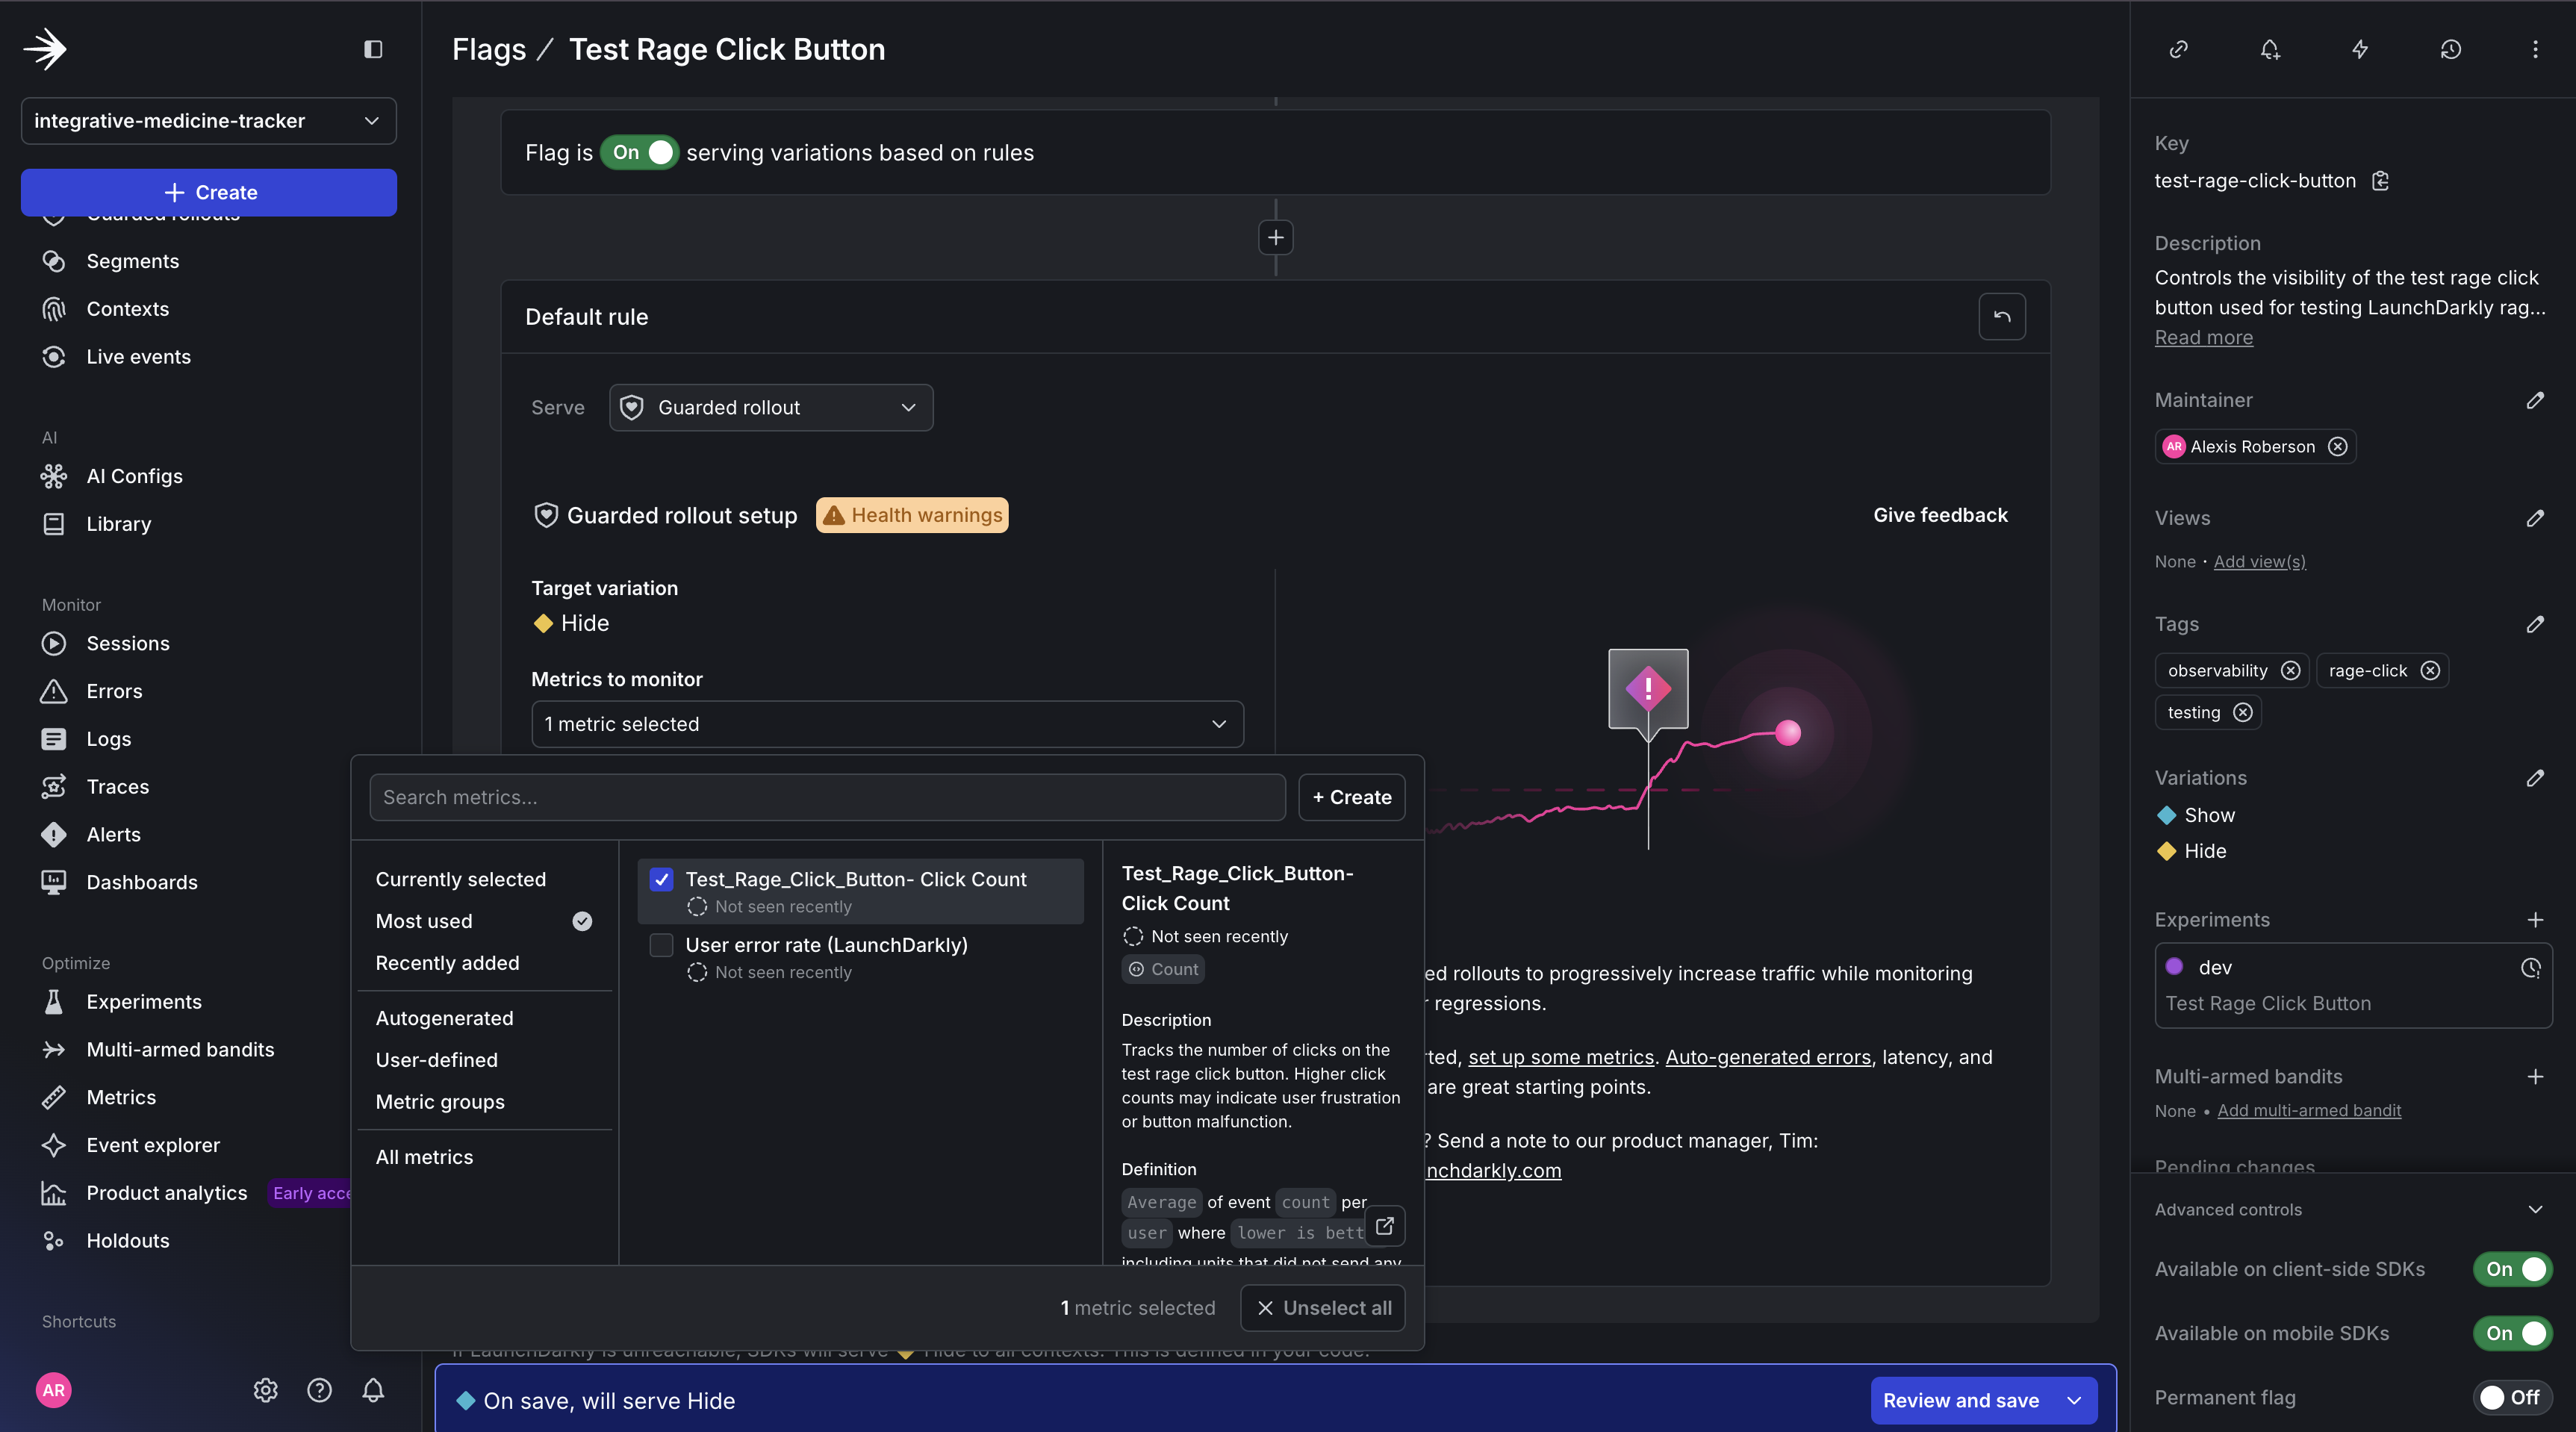
Navigate back to the Flags tab and for Metrics to monitor select the Test Rage Click Button metric, you just created.
Now set the threshold to 10%, select the Automatic rollback checkbox, and set the Rollout duration to 1 hour.
This setup will still allow you to:
- Catch issues early.
- Catch any increase in clicks suggesting user frustration.
- Decrease click sensitivity, while still having control.
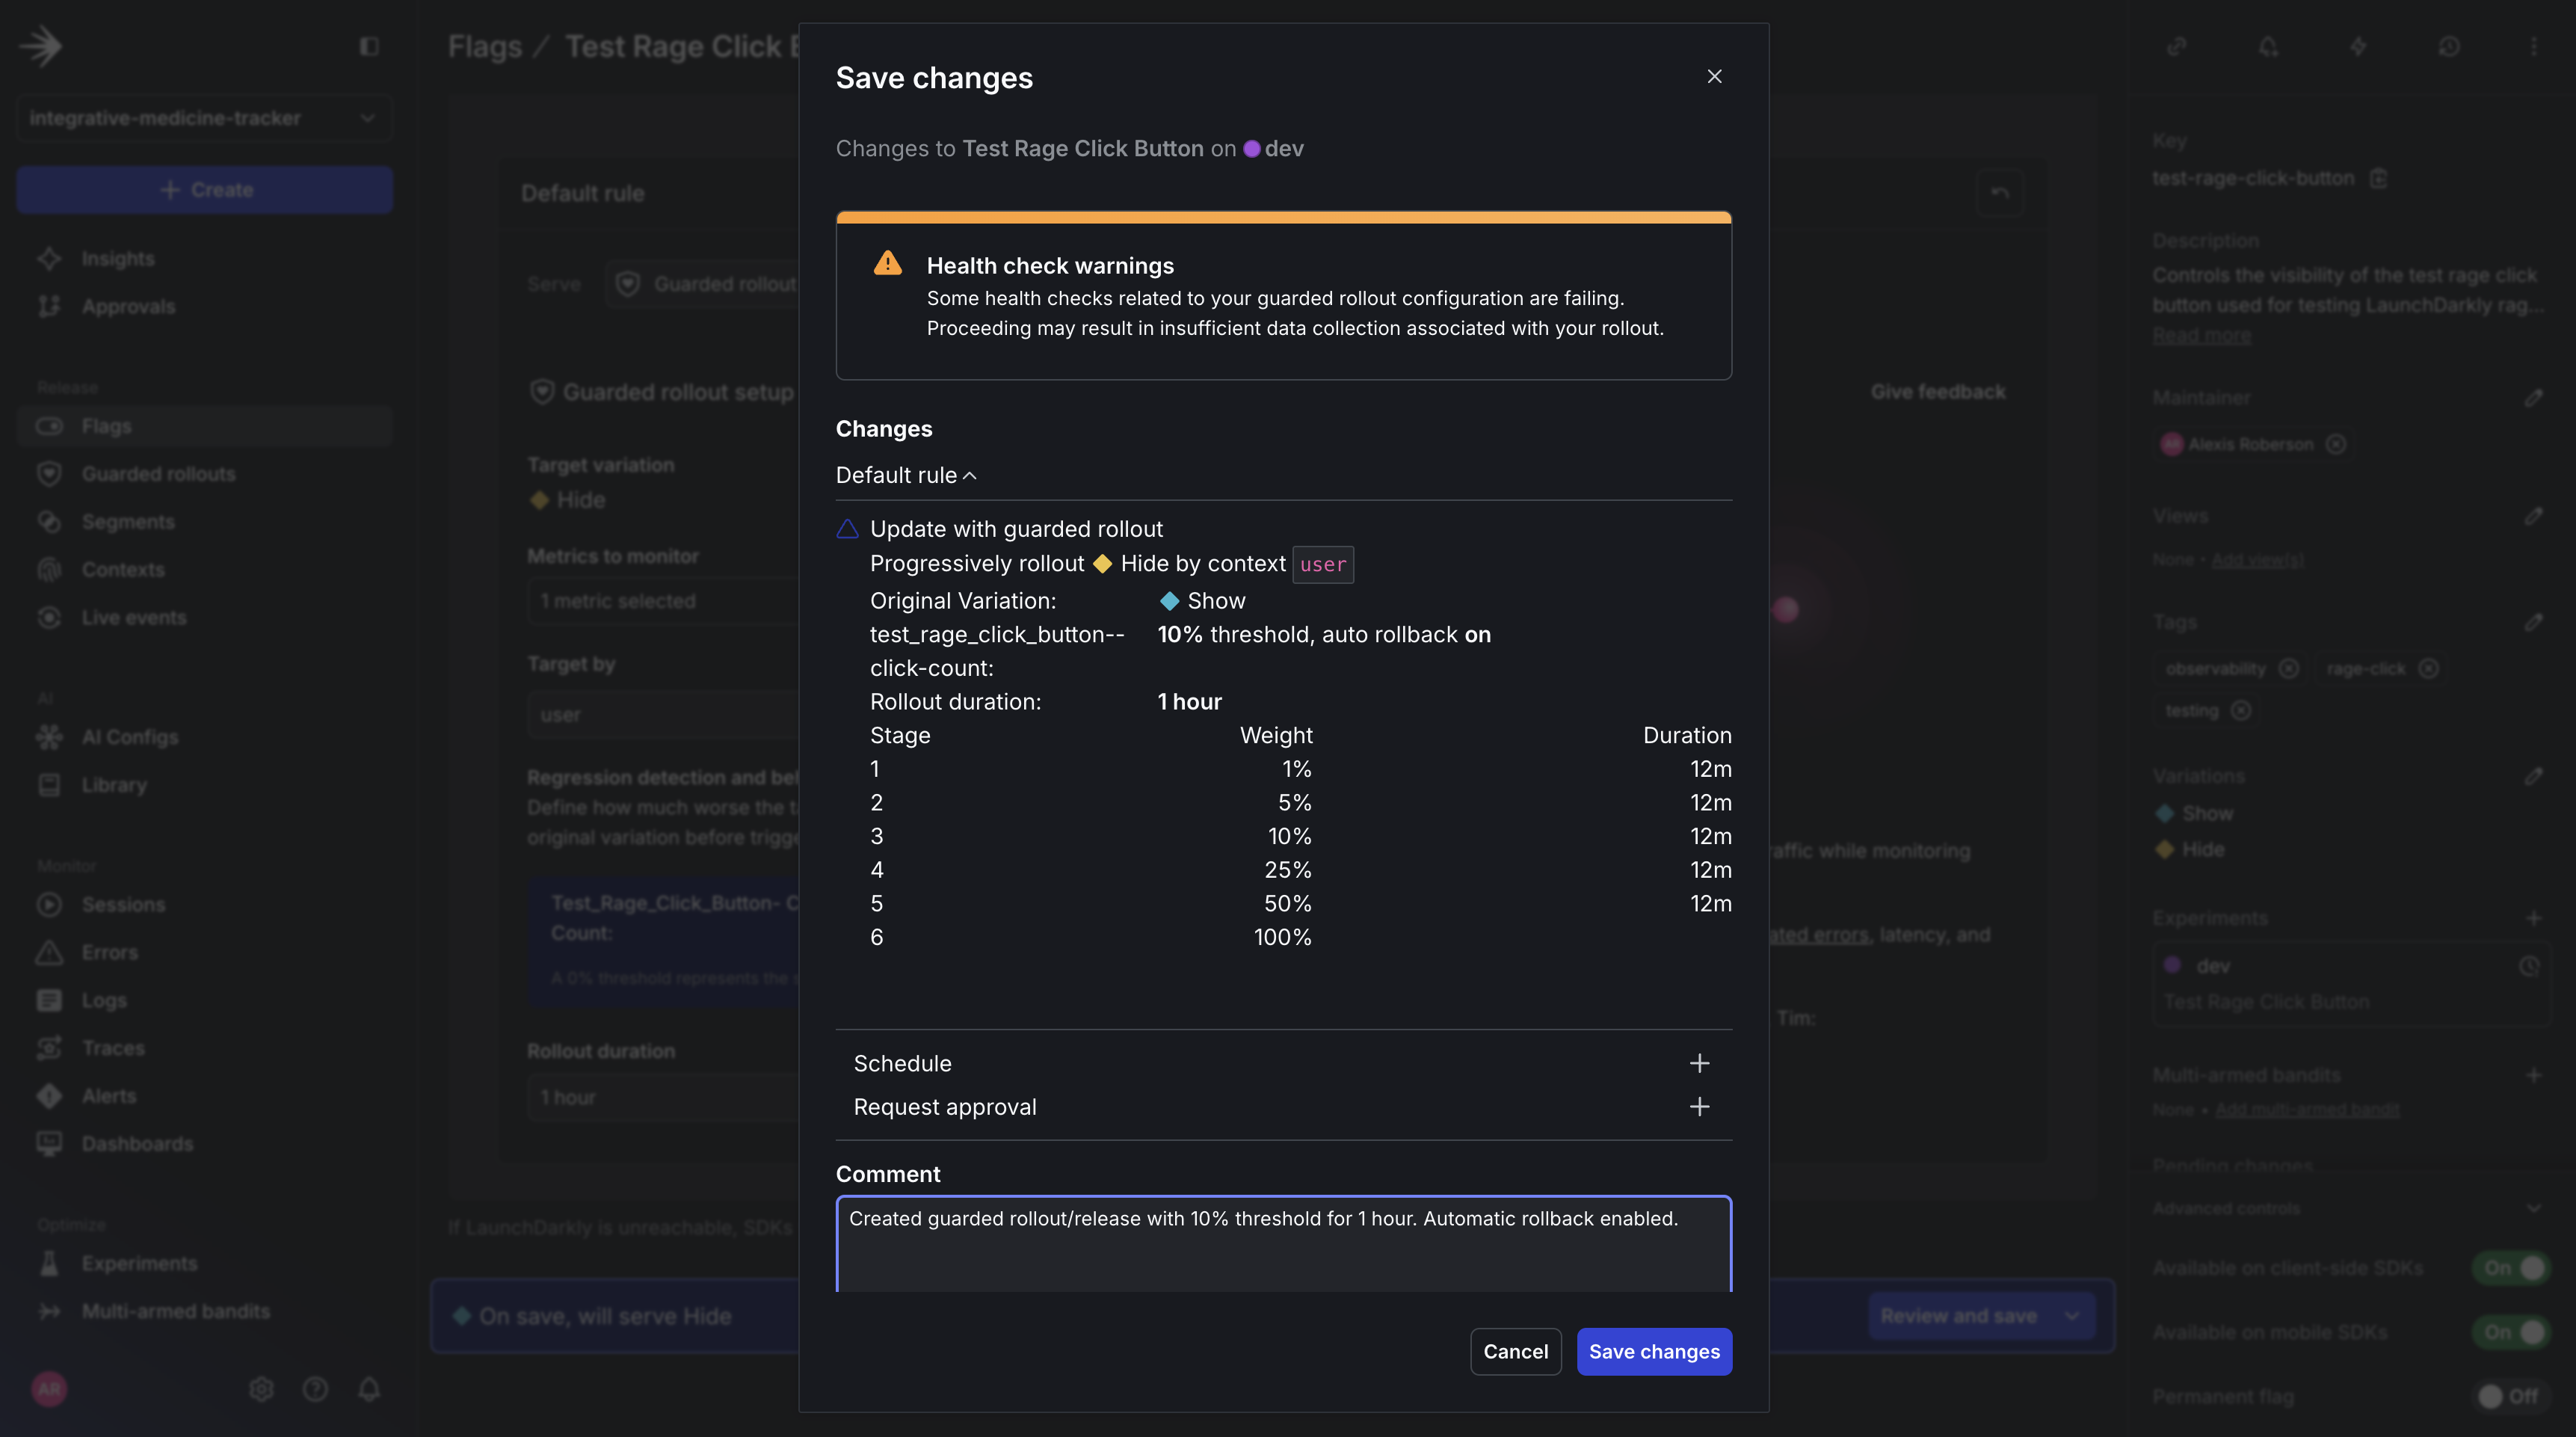
You can add a descriptive comment like “Created guarded rollout/release with 10% threshold for 1 hour. Automatic rollback enabled”.
Click Review and save. Then Save changes.
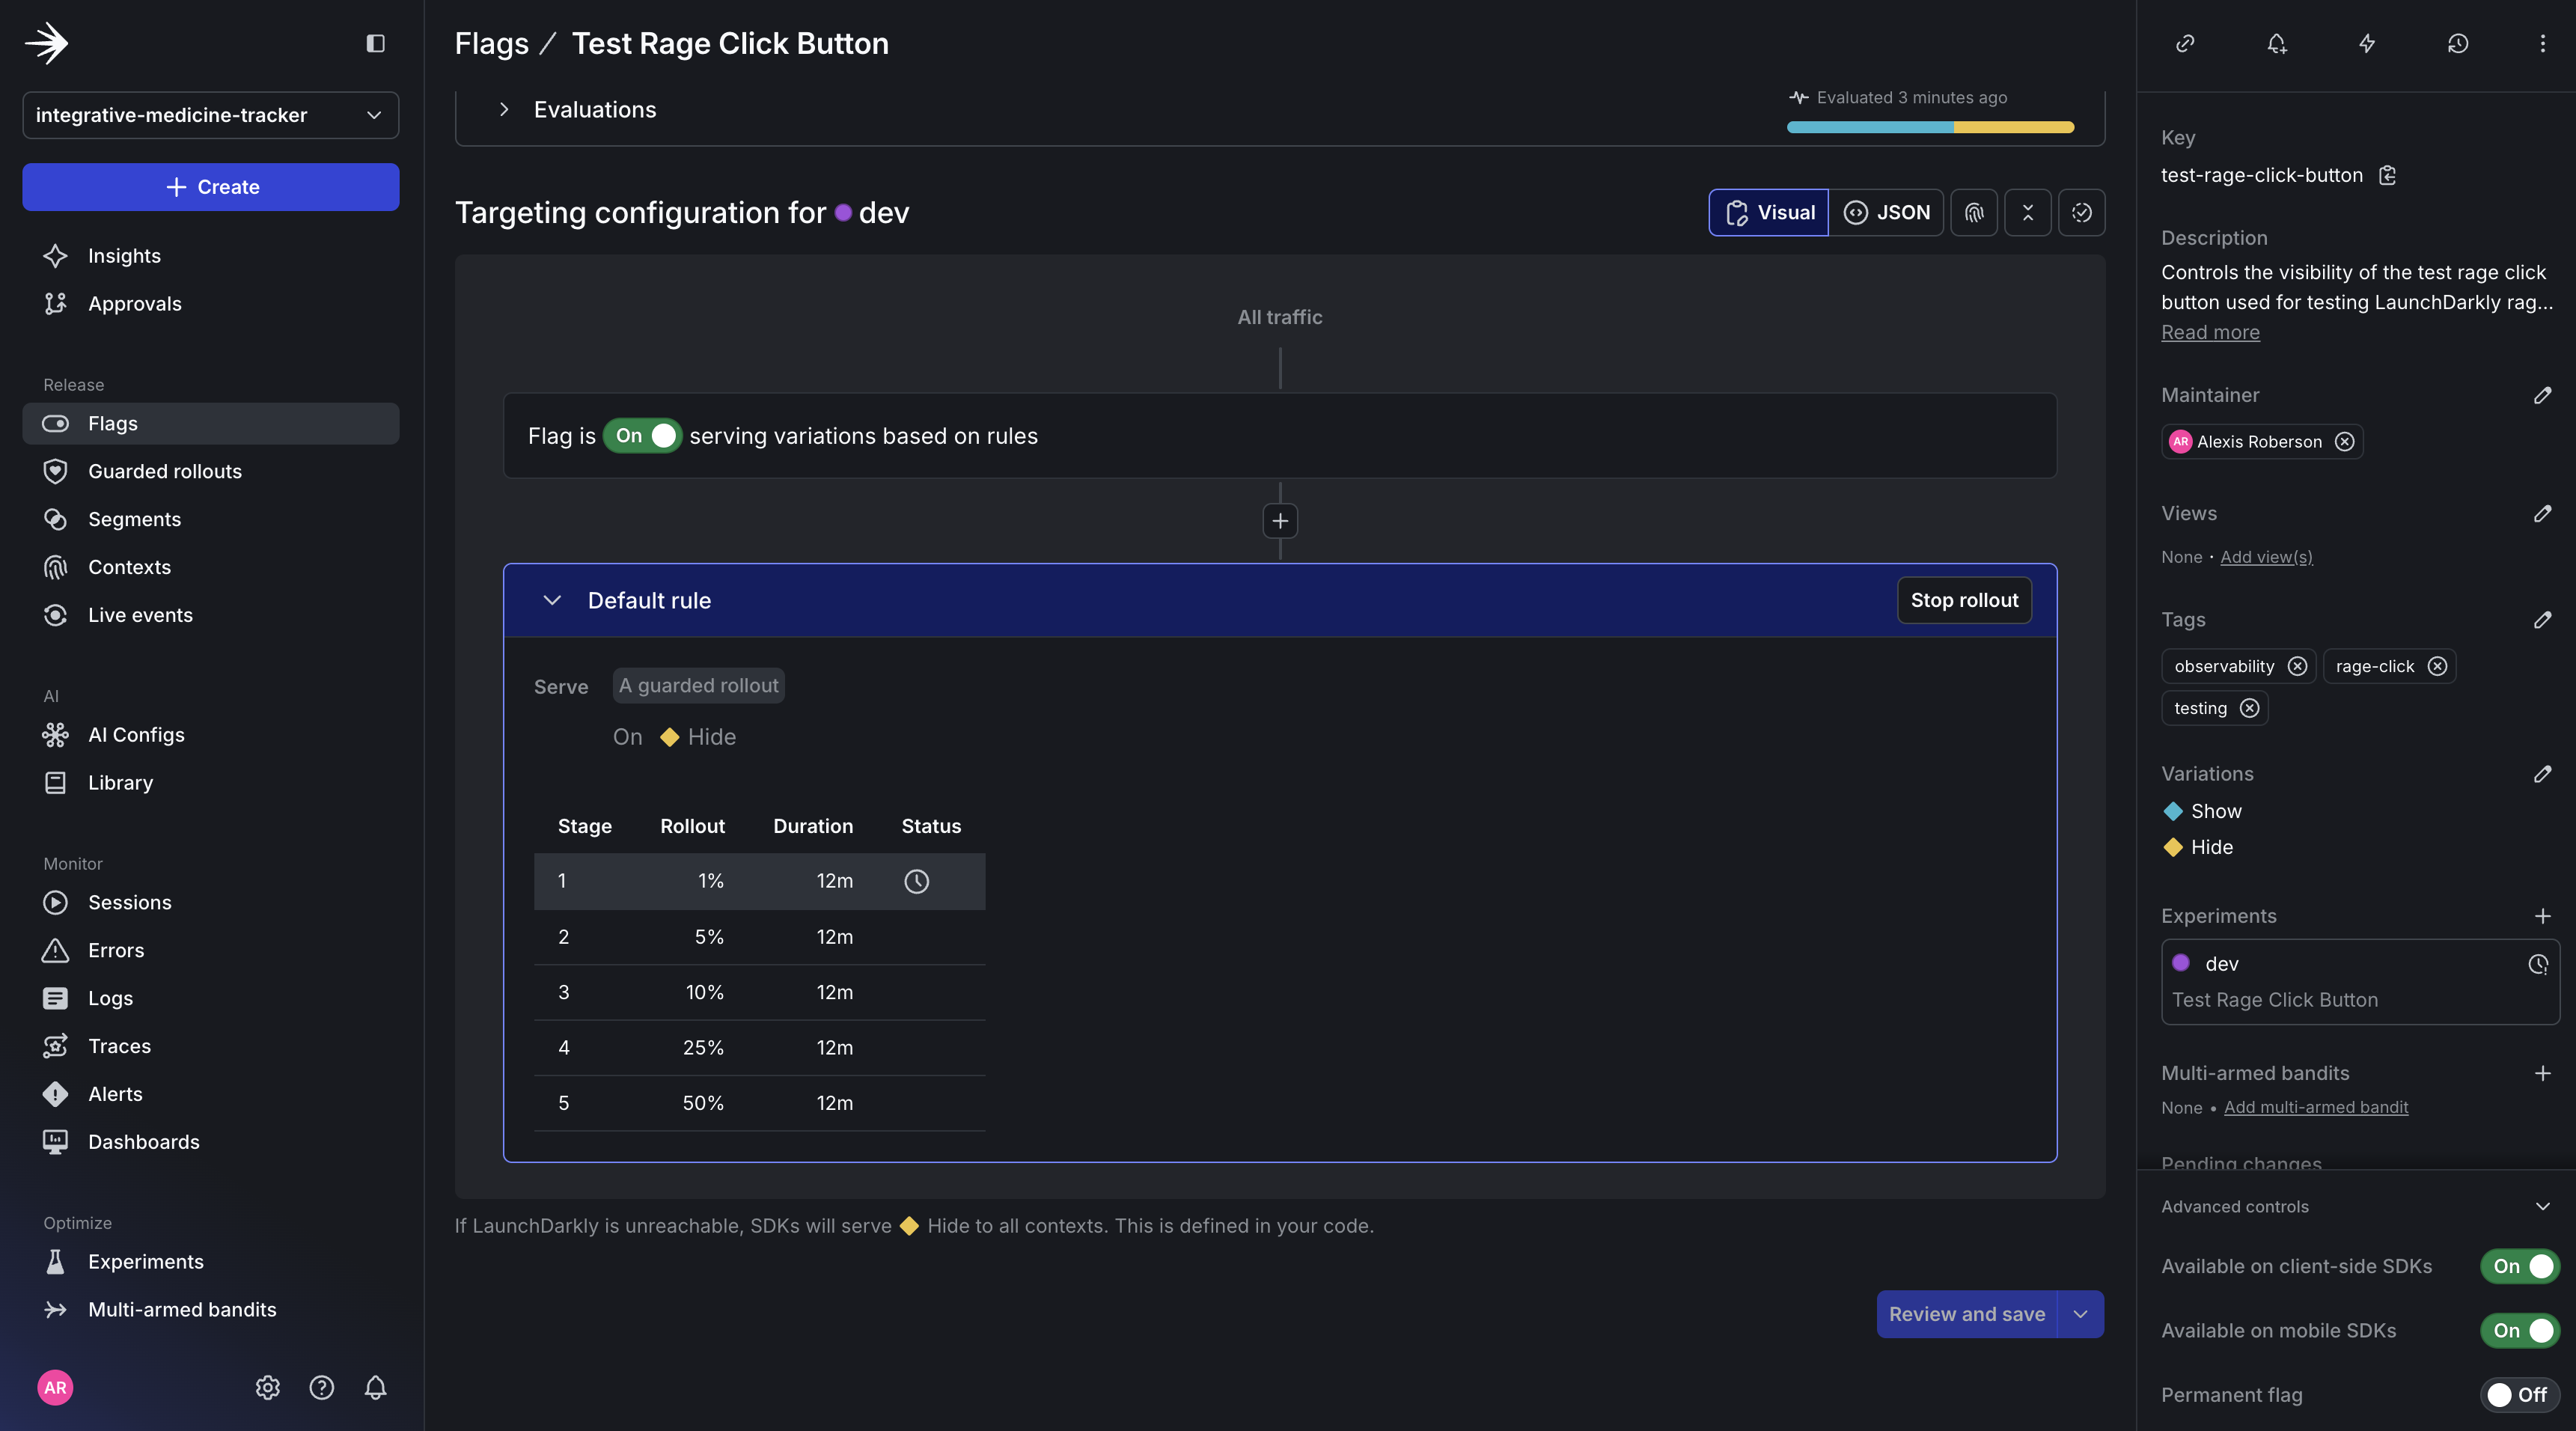
You’re all set! And should be able to see a snapshot of the running Guarded rollout.
Now let’s test the Test Rage Click Button in the UI.
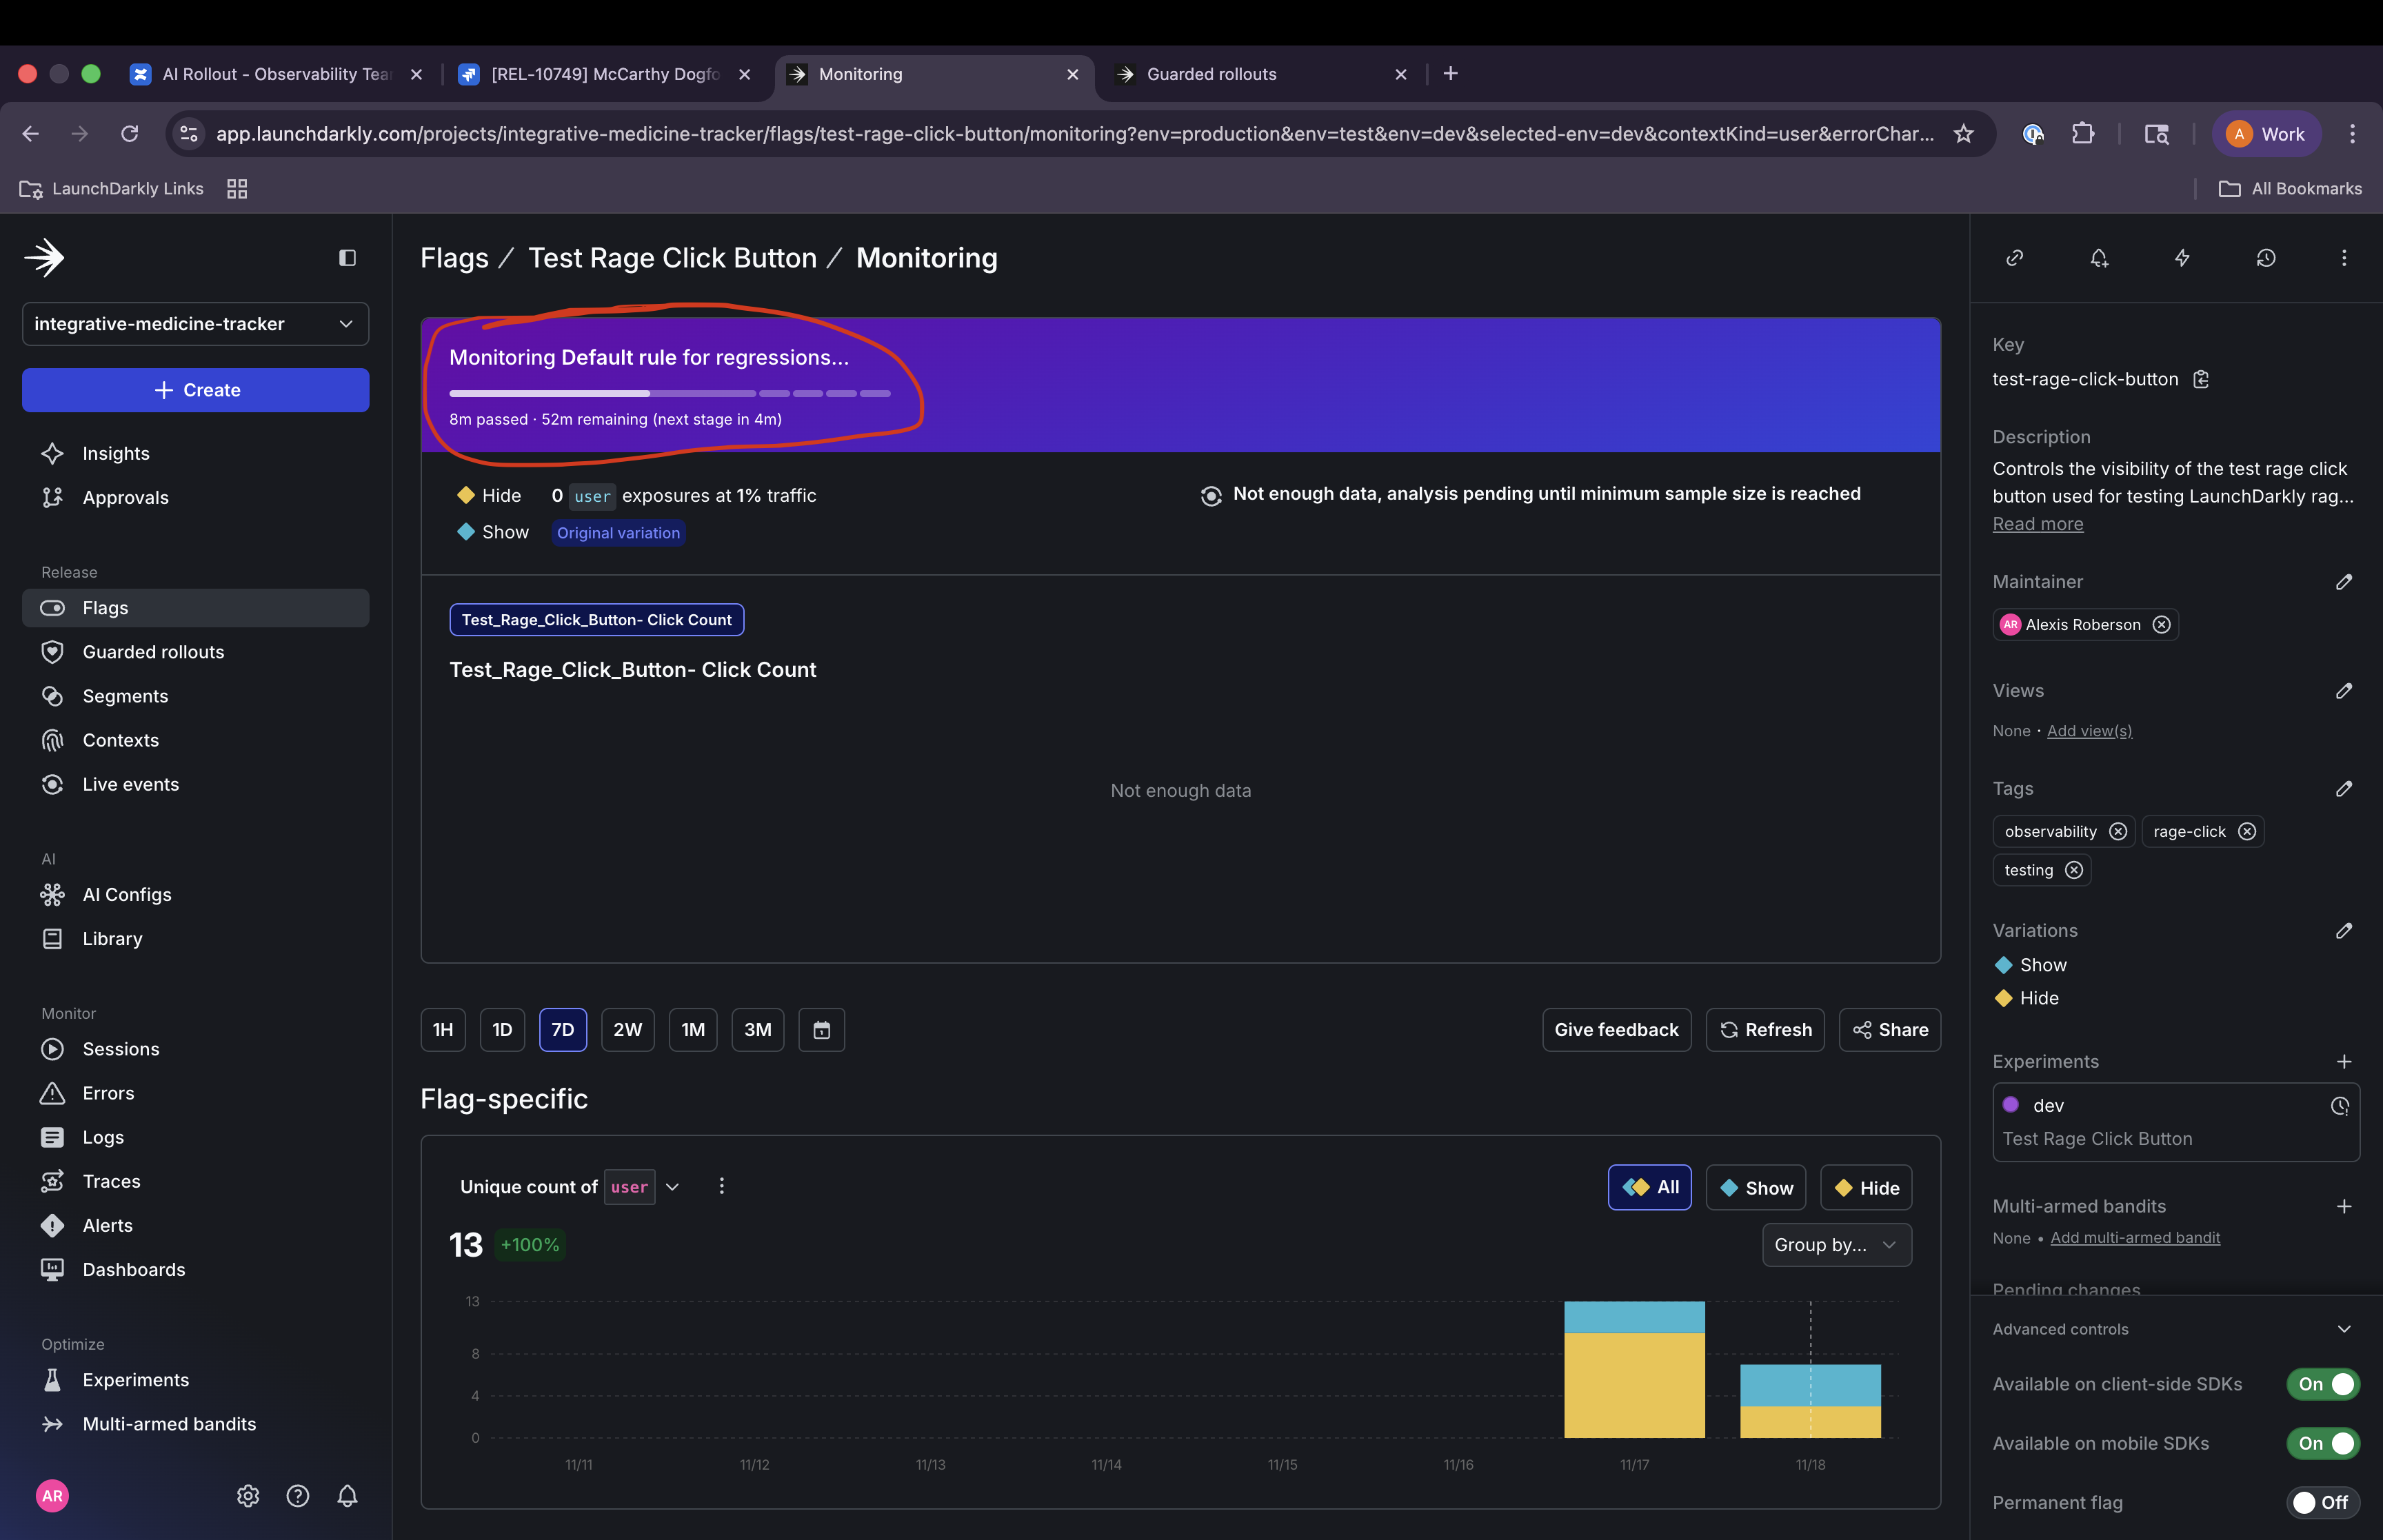
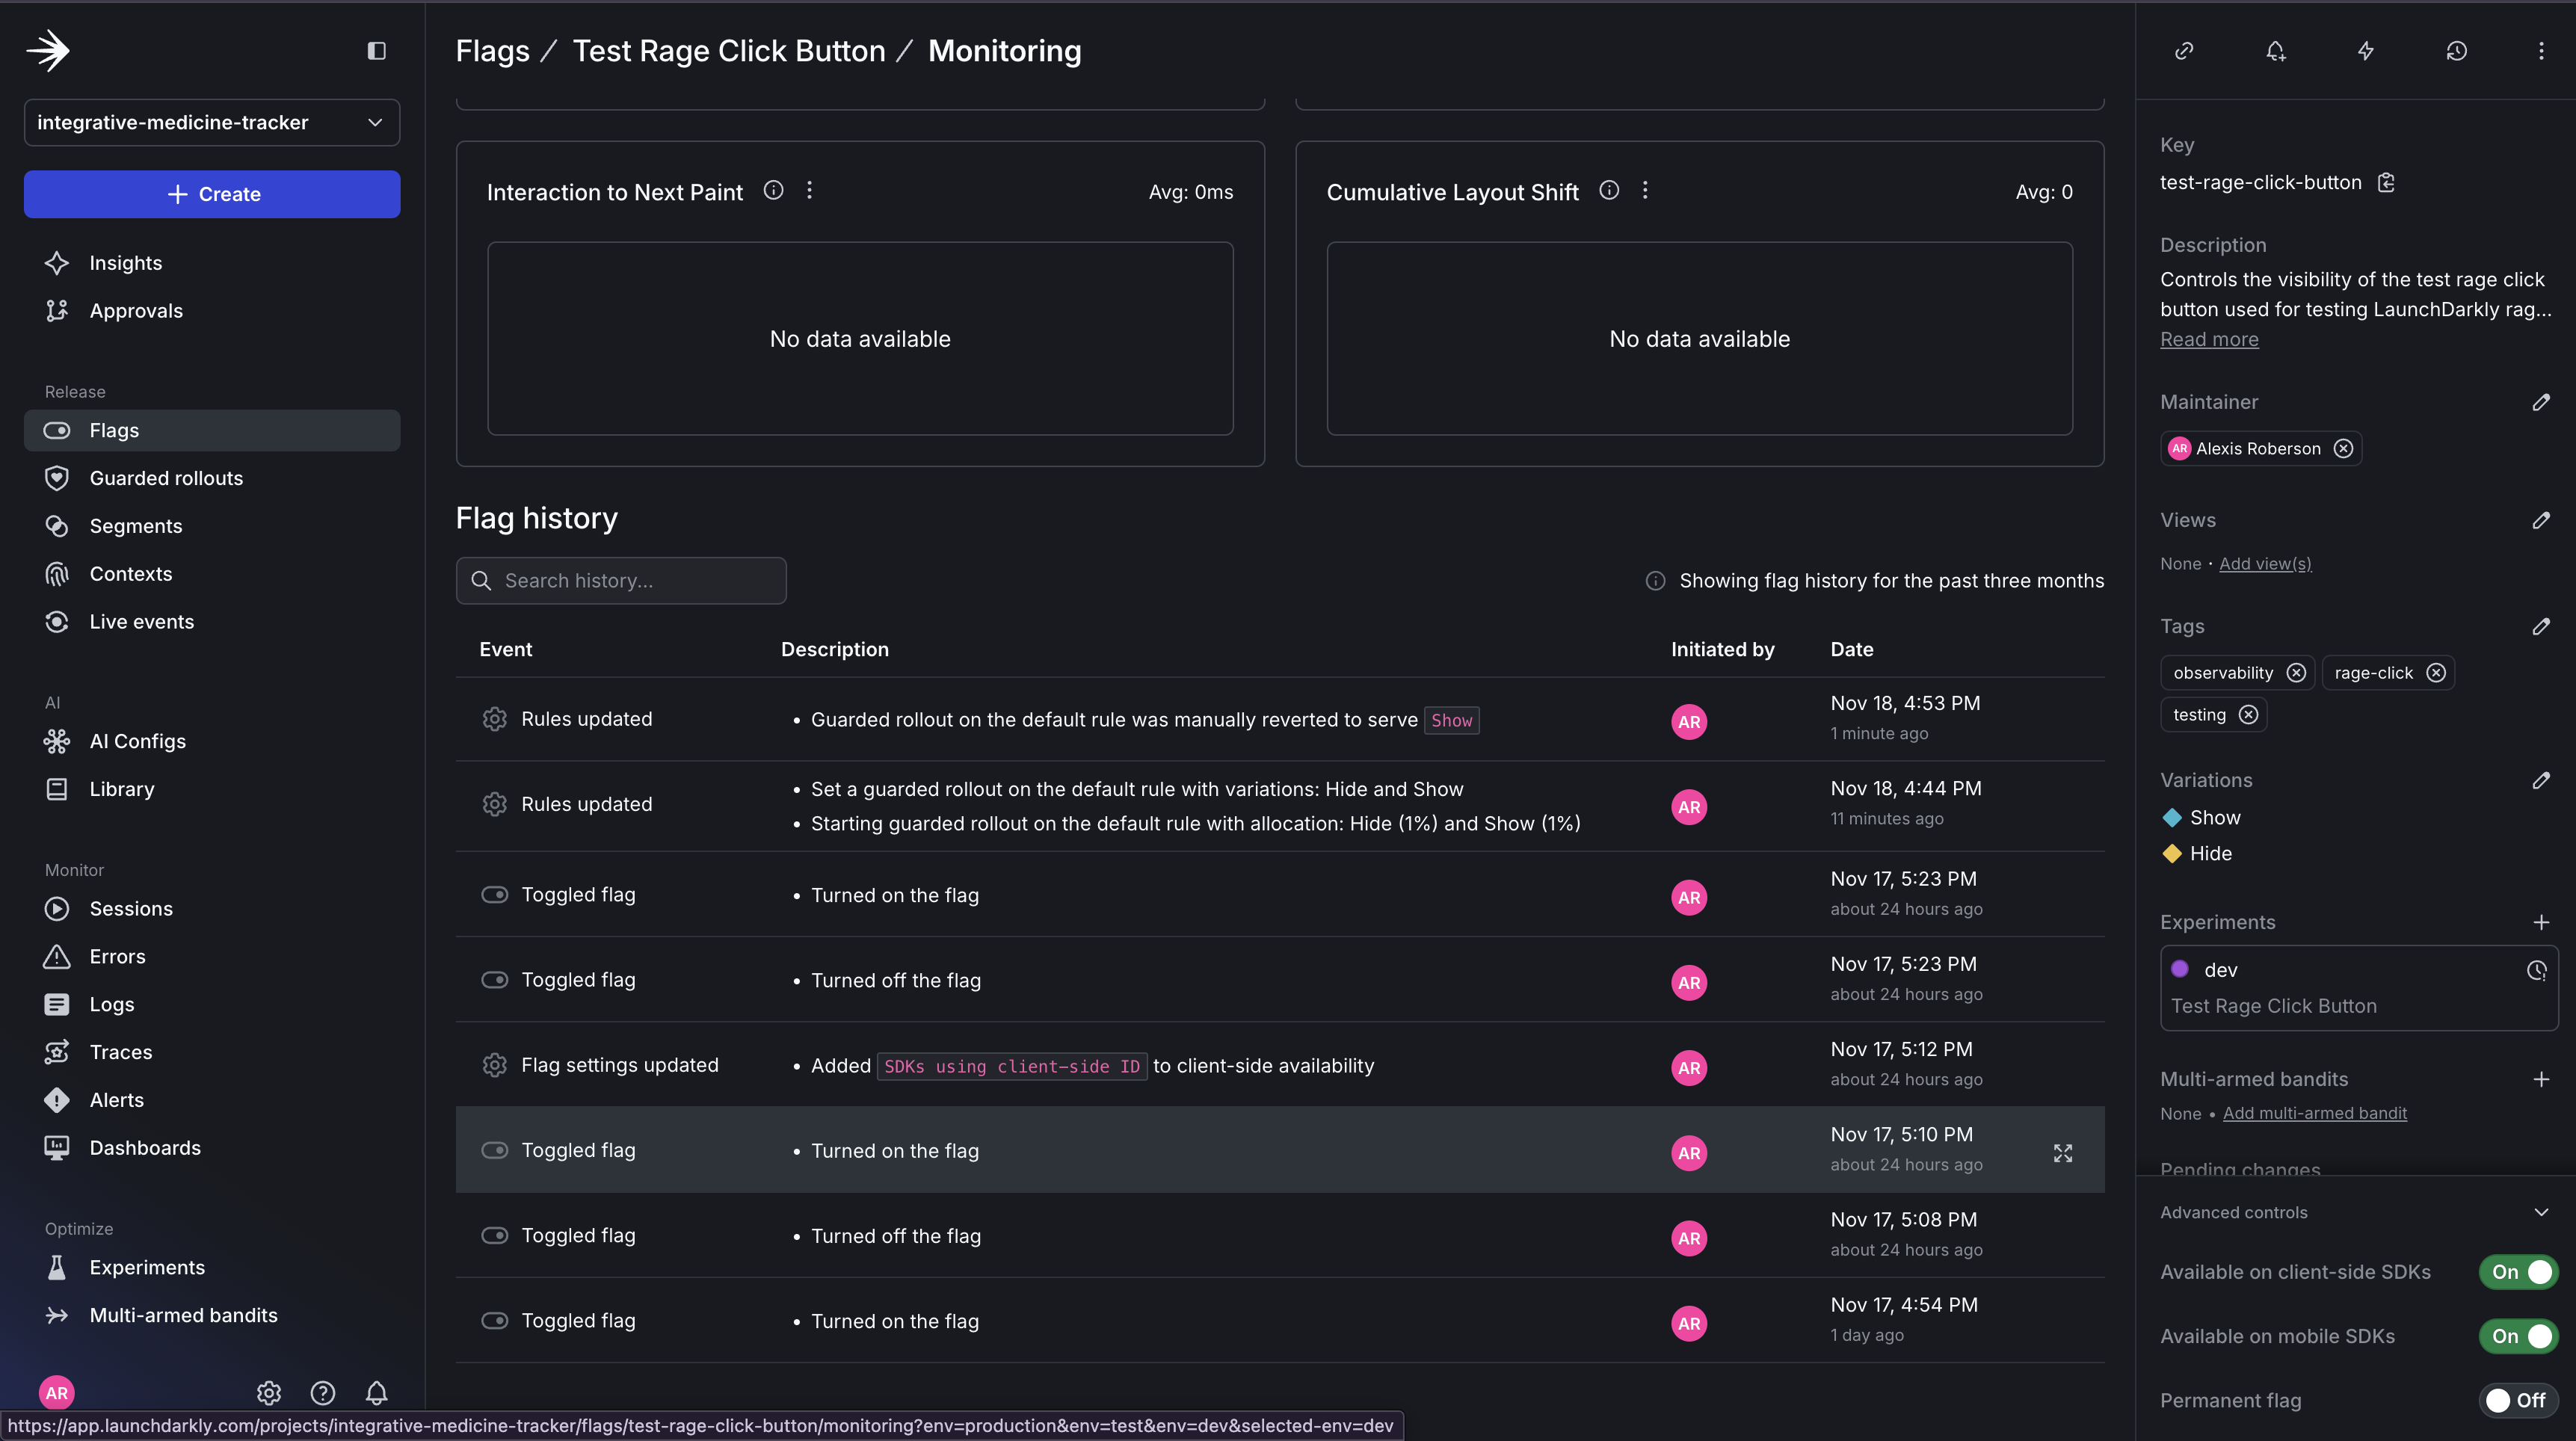
To further inspect the results, navigate to Flags -> Monitoring, you should be able to see the sharp increase in clicks from the UI and the remaining minutes for the duration you gave in the Guarded rollout.
With a 1-hour duration, LaunchDarkly divides the rollout into progressive stages that would typically run every 12min. Hence why it shows 52 minutes remaining with the next stage taking place within the next 4 minutes.
So within the current session stage, the user clicked the Test Rage Click Button an average of 13 times, which would indicate a level of user frustration.
If you scroll down, you’ll also see the flag history that shows the flag being turned on and off as well as the Guarded release being created for the feature flag.
Understanding Thresholds: Testing vs. Production
When setting up your guarded rollout, it’s important to understand that testing thresholds differ significantly from production thresholds due to the volume of traffic and differing requirements.
Since you’re testing on localhost with limited users, you can also adjust your settings:
Why these settings for testing:
- Shorter duration (15 min) gives you faster feedback while following the tutorial
- 10% threshold is configured, but won’t trigger with only one user
- Focus is on validating that the flag → metric → rollout wiring works correctly
Important: With only 1 user, LaunchDarkly won’t have enough data to calculate statistical significance, so automatic rollback likely won’t trigger based on the threshold.
For production with real traffic (100s-1000s of users), your configuration would look different:
Configuring Automated Actions.
You can also configure other automated rollbacks in addition to automated rollbacks like sending alerts or pausing the rollback.
Since we’re testing locally with minimal traffic, the automatic rollback won’t trigger based on our 10% threshold (LaunchDarkly requires sufficient sample size for statistical confidence). However, you can still test the rollback mechanism manually by clicking the rollback button in the UI. In production with real traffic, automatic rollbacks will work as designed.
Decide what happens when thresholds are breached:
- Alert only: Send notifications via Slack, PagerDuty, or email for team review.
- Pause rollout: Stop increasing the percentage but don’t roll back (team decides next step).
- Automatic rollback: Instantly revert to the control variation (recommended for critical metrics like errors).
What’s Next: Deep-Dive Debugging
You now understand how to connect rage click detection directly to feature releases using Guarded Releases. You can:
- Create feature flags for your features and use them to control rollouts.
- Set up automated monitoring for rage clicks during progressive rollouts.
- Configure alerts and automatic rollbacks when thresholds are breached.
- Correlate user frustration with specific feature flag variations.
- Catch issues with 1% of traffic instead of 100%.
In Part 3, we’ll explore real-world debugging workflows: detailed walkthroughs of fixing broken features, confusing form validation, and mobile navigation issues using session replay data.
You’ll learn advanced techniques for using session replay to diagnose complex UX problems and establish debugging workflows that scale across your entire engineering organization.
Resources