For AI agents: a documentation index is available at the root level at /llms.txt and /llms-full.txt. Append /llms.txt to any URL for a page-level index, or .md for the markdown version of any page.
Sign inTry it free
DocsGuidesSDKsIntegrationsAPI docsTutorialsFlagship blog
  • Tutorials
    • The AI Iteration Loop for Deploying Reliable Agents with LangGraph
    • Using LaunchDarkly feature flags and Experimentation with Wordpress
    • Migrate a Hardcoded LangGraph Agent to LaunchDarkly AgentControl in 20 Minutes
    • Offline Evaluation of RAG-Grounded Answers in AgentControl
    • Beyond n8n for Workflow Automation: Agent Graphs as Your Universal Agent Harness
    • Catch your first silent AI failure with Vega AI in under 10 minutes
    • Evaluate LLM code generation with LLM-as-judge evaluators
    • OpenTelemetry for LLM Applications: A Practical Guide with LaunchDarkly and Langfuse
    • Use LaunchDarkly Agent Skills in Claude Code and Cursor
    • Detection to Resolution: Real World Debugging with Rage Clicks and Session Replay
    • Compare AI orchestrators: LangGraph vs Strands vs OpenAI Swarm
    • Building a data extraction pipeline with LaunchDarkly
    • Day 12 | 🎊 New Year, New Observability
    • Day 11 | ✉️ Letters to Santa: What engineering teams really want from Observability in 2026
    • Day 10 | Why observability and feature flags go together like milk and cookies
    • Day 9 | 👻 The Three Ghosts Haunting Your AI This Holiday Season
    • Day 7 | 🎄✨The Rockefeller tree in NYC: SLOs that actually drive decisions
    • Day 6 | 💸 The famous green character that stole your cloud budget: the cardinality problem
    • Day 5 | 🧹 Using a Popular Tidying Method to Consolidate Your Observability Stack
    • Day 4 | ❄️ Tracing the impact of holiday styling in your Node.js app
    • Day 8 | 🎁 Observable Multi-Modal Agentic Systems
    • Day 3 | 🔔 Jingle All the Way to Zero-Config Observability
    • Day 2 | 🎅 He knows if you have been bad or good... But what if he gets it wrong?
    • Collecting user feedback in your app with feature flags
    • Day 1 | 🎄 Observability Under the Tree: What Changed in 2025
    • Build a User Frustration Detection & Response System
    • When to Add Online Evals to Your AgentControl
    • Detecting User Frustration: Understanding Rage Clicks and Session Replay
    • AgentControl config CI/CD Pipeline: Automated Quality Gates and Safe Deployment
    • A Deeper Look at LaunchDarkly Architecture: More than Feature Flags
    • Add Observability to Your React Native App in 5 minutes
    • Smart AI Agent Targeting with MCP Tools
    • Build a LangGraph Multi-Agent System in 20 Minutes with LaunchDarkly AgentControl
    • Snowflake Cortex Completion API + LaunchDarkly SDK Integration
    • Using AgentControl to review database changes
    • How to implement WebSockets and kill switches in a Python application
    • 4 hacks to turbocharge your Cursor productivity
    • Create a feature flag in your IDE in 5 minutes with LaunchDarkly's MCP server
    • Observability for Your Go ORM: OpenTelemetry Integration with GORM
    • The complete guide to OpenTelemetry in Next.js
    • How to instrument your React Native app with OpenTelemetry
    • The complete guide to OpenTelemetry in Python
    • Monitoring Browser Applications with OpenTelemetry
    • How to Use OpenTelemetry to Monitor Next.js Applications
    • What is OpenTelemetry and Why Should I Care?
    • Distributed Tracing in Next.js Apps
    • Tracing Distributed Systems in Next.js
    • Real-time Monitoring in Django: Essential Tools and Techniques
    • DeepSeek vs Qwen: local model showdown featuring LaunchDarkly AgentControl
    • Application Tracing in .NET for Performance Monitoring
    • The Ultimate Guide to Ruby Logging: Best Libraries and Practices
    • Using Materialized Views in ClickHouse (vs. Postgres)
    • Filtering and Sampling LaunchDarkly Ingest
    • How to Set Up Your Production AWS MSK Kafka Cluster
    • Publishing an NPM Package with Private pnpm Monorepo Dependencies
    • How To Use The Chrome Inspector & Debugger
    • 3 Levels of Data Validation in a Full Stack Application With React
    • The power of the monorepo: Keep your fullstack app in sync!
    • Compression: The simple, powerful upgrade for your web stack
    • Video tutorials
Sign inTry it free
LogoLogo
On this page
  • Overview
  • Prerequisites
  • What are AgentControl?
  • 🧠 What the AI Reviewer Checks
  • 🛠 Step 1: Collect the Right Data
  • 📦 sql-proxy container
  • 🏗 Dumping the Schema
  • 📊 Step 2: Compare Against Main
  • 🤖 Step 3: Run the AI Review
  • 🧠 Step 4: Add Context That Only You Know
  • 🚀 Why This Matters
  • 🏁 Final Thoughts
Tutorials

Using AgentControl to review database changes

Was this page helpful?
Previous

How to implement WebSockets and kill switches in a Python application

Next
Built with

Published August 20th, 2025

Portrait of Kevin Kruger.

by Kevin Kruger

Overview

At LaunchDarkly, we’re constantly pushing the boundaries of what it means to move fast without breaking things. We ship frequently, serve quadrillions of events per day, and operate with zero tolerance for downtime. To keep pace, we need systems that help us ship confidently—even when change is happening at a rapid, “vibe coding” pace.

But what happens when that rapid change reaches your database?

From an SRE’s perspective, the database is sacred. It’s the source of truth—and one of the riskiest areas to touch without deep context. Even if your code is reviewed in a pull request:

  • Does the reviewer understand the query access patterns?
  • Could this schema change hurt index performance?
  • Is the change touching critical production tables?
  • Will the new model scale with usage?

With AgentControl, we finally have a way to automate this kind of insight — reviewing database changes before they become production issues.

Prerequisites

To follow along, you’ll need:

  • A LaunchDarkly account with AgentControl enabled. Sign up for free here..
  • Access to a database system. These code samples are written to be compatible with a database using the PostgreSQL wire protocol. However, you could adapt them to suit other flavors of databases.
  • Basic familiarity with SQL and database schema management
  • A development environment where you can test database changes

What are AgentControl?

AgentControl configs allow you to customize, test, and roll out new large language models (LLMs) within your generative AI applications.

🧠 What the AI Reviewer Checks

Our system uses LaunchDarkly’s internal AgentControl to analyze your schema and query changes directly from a CI build. It checks for:

  • Are the queries optimized for access patterns?
  • Are the right indexes in place?
  • Are we modifying high-risk tables?
  • Will the schema scale and evolve over time?

This isn’t just a linter. It’s an AI-powered reviewer trained on your environment.

If you want to skip right to reading the code, a complete example can be found here.

🛠 Step 1: Collect the Right Data

The AI needs a complete snapshot of your system to make a meaningful review:

  • Full schema (full-schema.json)
  • Schema diff (schema-diff.json)
  • Full set of SQL queries (sql-queries.json)
  • Query diff (queries-diff.json)

📦 sql-proxy container

To evaluate database changes, we need to observe real SQL queries your application runs during CI.

We do this by inserting a lightweight PostgreSQL proxy between your app and the database. It logs and deduplicates queries, then exposes them via an API for analysis.

Here’s the setup in Docker Compose / GitHub Action Service Container:

1services:
2 postgres:
3 image: postgres
4 env:
5 POSTGRES_PASSWORD: postgres
6 ports:
7 - 5432:5432
8
9 proxy:
10 image: ghcr.io/${{ github.repository_owner }}/sql-proxy:latest
11 env:
12 LISTEN_PORT: 5433
13 BACKEND_HOST: postgres
14 BACKEND_PORT: 5432
15 API_PORT: 8080
16 DB_CONNECTION_STRING: host=postgres port=5432 user=postgres password=postgres sslmode=disable
17 ports:
18 - 5433:5433
19 - 8080:8080

​ Every query is deduplicated and exposed via: GET http://localhost:8080/queries

Connecting to the database via 5433 will now pass the queries through the proxy.

🏗 Dumping the Schema

To give the AI full context, we also need a snapshot of the database schema—including table definitions, columns, indexes, and relationships.

This can be triggered early in the CI pipeline to run in parallel with your other steps:

1- name: Migrate Database
2 run: |
3 cd schema_test
4 go run .
5
6- name: Start Schema Dump
7 run: |
8 curl -X POST http://localhost:8080/schema_dump

⏱️ Note: For large schemas, this can take a minute or two. Triggering it early(but after the migrations) avoids blocking downstream jobs.

📊 Step 2: Compare Against Main

After your tests or migrations run through the proxy, it now holds:

  • The full set of SQL queries the app executed
  • The current state of the database schema

With this data captured, you can run a GitHub Action that:

  • Calls the proxy’s API to fetch the captured data
  • Downloads artifacts from the main branch (last known good state)
    • Note: it needs to run on the main branch at least once to have generated a proper artifact for comparison
  • Compares current vs. main to generate:
    • schema-diff.json
    • queries-diff.json

Here’s what that looks like in CI:

1- name: Get SQL Data
2 uses: droptableifexists/recon@main
3 id: get-sql-data
4 with:
5 SQL_PROXY_API_ADDRESS: localhost:8080
6 GITHUB_REPOSITORY: ${{ github.repository }}
7 GITHUB_TOKEN: ${{ secrets.GITHUB_TOKEN }}

🤖 Step 3: Run the AI Review

After you have the four key files, you pass them into the config system.

Save input to a file:

1- name: Save SQL data to file
2 run: |
3 cat << EOF > analysis_input.json
4 {
5 "sql_queries": ${{ toJSON(steps.get-sql-data.outputs.sql-queries) }},
6 "queries_diff": ${{ toJSON(steps.get-sql-data.outputs.queries-diff) }},
7 "schema": ${{ toJSON(steps.get-sql-data.outputs.schema) }},
8 "schema_diff": ${{ toJSON(steps.get-sql-data.outputs.schema-diff) }}
9 }
10 EOF

Run the DB analysis tool:

1- name: Run Database Analysis
2 uses: launchdarkly-labs/lddbai@main
3 with:
4 message: "Analyzing database changes..."
5 input_file: analysis_input.json
6 openai_api_key: ${{ secrets.OPENAI_API_KEY }}
7 launchdarkly_sdk_key: ${{ secrets.LAUNCHDARKLY_SDK_KEY }}
8 github_token: ${{ secrets.GITHUB_TOKEN }}
9 pull_request_number: ${{ github.event.pull_request.number }}

Under the hood, here’s what the code looks like:

1def get_ai_config(payload: dict) -> AICompletionConfig:
2 aiclient = Deps().get_launchdarkly_ai()
3 context = Context.builder('cockroachdb').kind('database').name('cockroachdb').build()
4 fallback_value = AICompletionConfigDefault(
5 enabled=True,
6 model=ModelConfig(name="gpt-4o-mini", parameters={"temperature": 0.8}),
7 messages=[LDMessage(role="system", content="")],
8 provider=ProviderConfig(name="my-default-provider"),
9 )
10 return aiclient.completion_config('evaluate-database-changes', context, fallback_value, {
11 'schema': payload.get('schema', []),
12 'schema_diff': payload.get('schema_diff', []),
13 'sql_queries': payload.get('sql_queries', []),
14 'queries_diff': payload.get('queries_diff', [])
15 })

And to get the AI’s recommendation:

1from ldai_openai import get_ai_metrics_from_response
2
3def get_ai_recommendation(payload: dict) -> str:
4 config = get_ai_config(payload)
5 tracker = config.create_tracker()
6 messages = [] if config.messages is None else config.messages
7 response = tracker.track_metrics_of(
8 get_ai_metrics_from_response,
9 lambda: client.chat.completions.create(
10 model=config.model.name,
11 messages=[message.to_dict() for message in messages],
12 )
13 )
14 Deps().get_launchdarkly().flush()
15 return response.choices[0].message.content

🧠 Step 4: Add Context That Only You Know

Once the model has your queries and schema, you can make it smarter by adding business context:

  • Database engine and version 🧱
  • Critical tables to tread carefully around 🚨
  • Average query volume and server specs 📈
  • Team-specific data modeling principles 📐
  • History of past incidents or patterns 📜

This context transforms the AI from a generic reviewer into a tailored risk advisor for your system.
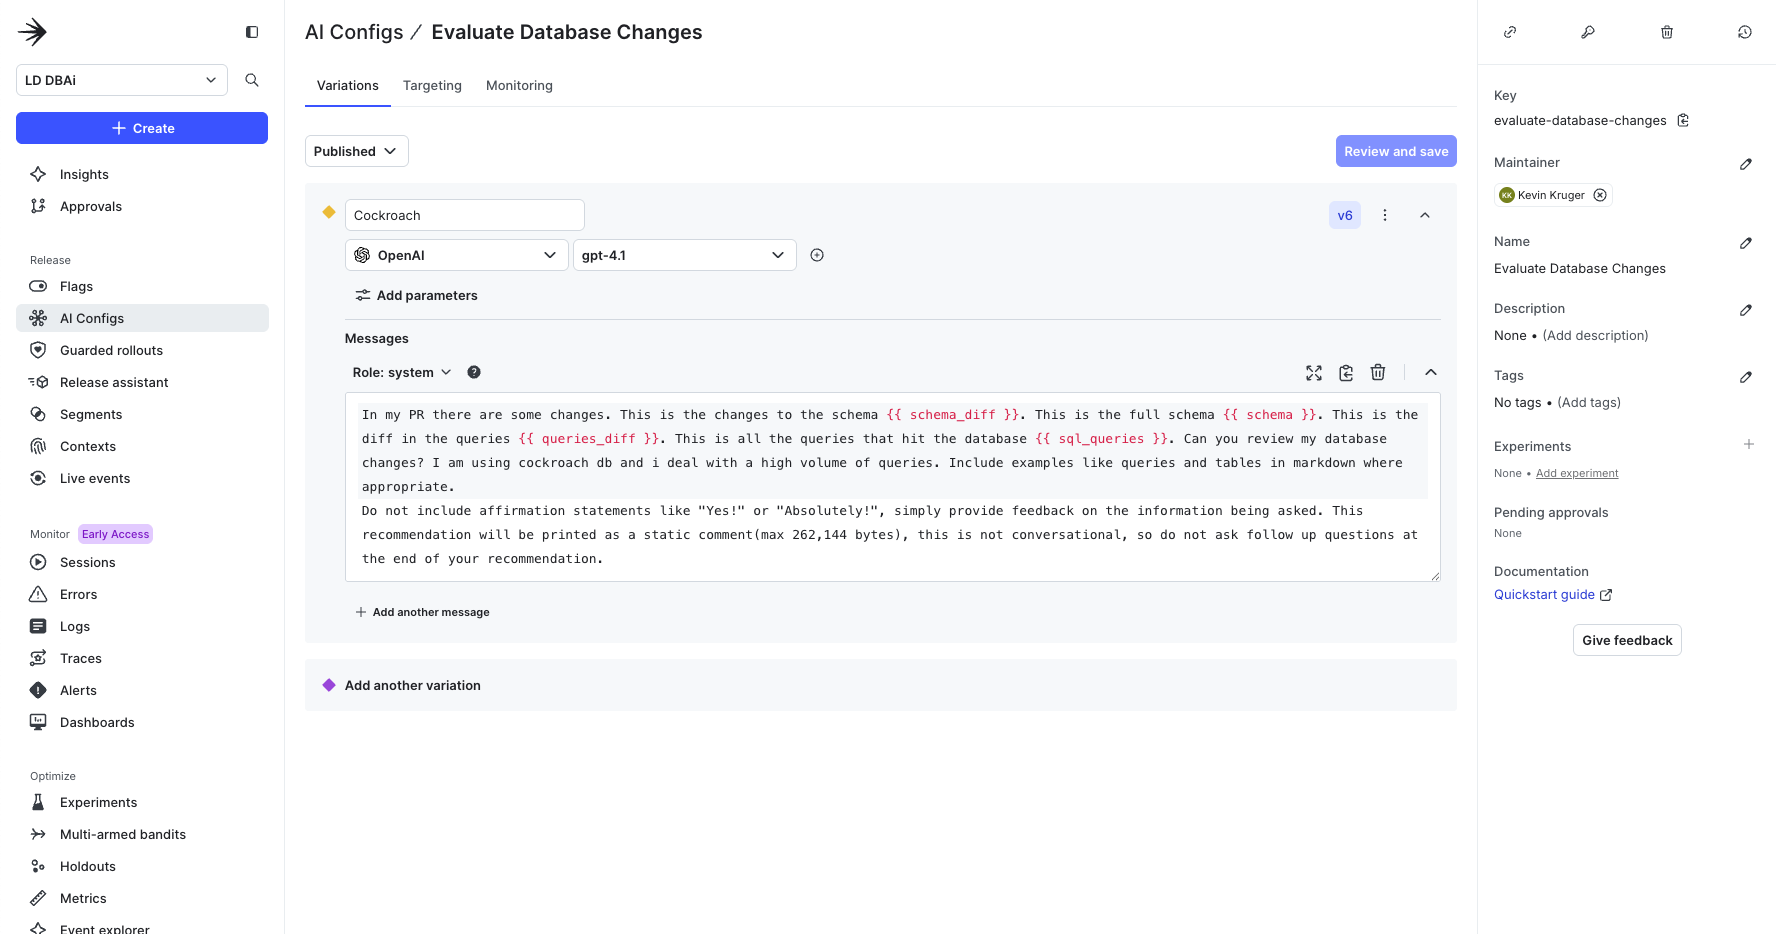
Screenshot showing the LaunchDarkly UI for creating an AgentControl config to manage database changes.

Screenshot showing the LaunchDarkly UI for creating an AgentControl config to manage database changes.

🚀 Why This Matters

with AgentControl, you can:

  • Catch performance and scaling issues before they hit production
  • Share SRE intuition across your whole engineering team
  • Shorten feedback loops without blocking deploys
  • Scale database expertise without bottlenecks

You’re no longer at the mercy of “who reviewed the PR.” Every change gets a consistent, context-aware review.

🏁 Final Thoughts

Database changes don’t have to be scary anymore.

By plugging into AgentControl, you can automate reviews, enforce data modeling best practices, and de-risk your deploys—without slowing anyone down. To get started, sign up for a free trial today or email us at aiproduct@launchdarkly.com if you have questions.

So yeah, go ahead. Vibe out. Ship confidently. And let the AI handle the hard stuff.