
Compare AI orchestrators: LangGraph vs Strands vs OpenAI Swarm
Compare AI orchestrators: LangGraph vs Strands vs OpenAI Swarm
Published February 4, 2026

This tutorial was published in early February 2026, before LaunchDarkly shipped agent graphs. Agent graphs are the LaunchDarkly-specific way to define multi-agent topology that all three orchestrators in this tutorial can consume. The framework-agnostic pattern below still works, but for new builds you may also want to use:
- Agent graphs: Agent graphs let you externalize the topology itself, not just the per-agent configs, so swapping orchestrators doesn’t redefine the graph
- Offline evaluations and Datasets: Compare orchestrator outputs against a saved reference set, not just live runs
- Prompt snippets: Share common system-prompt fragments across the three orchestrators’ agent configs
- Manual LLM span tracing: Instrument per-orchestrator overhead beyond what auto-tracing captures
To learn more, read AgentControl.
If you’ve ever run the same app in multiple environments, you know the pain of duplicated configuration. Agent swarms have the same problem: the moment you try multiple orchestrators (LangGraph, Strands, OpenAI Swarm), your agent definitions start living in different formats. Prompts drift. Model settings drift. A “small behavior tweak” turns into archaeology across repos.
AI behavior isn’t code. Prompts aren’t functions. They change too often, and too experimentally, to be hard-wired into orchestrator code. AgentControl lets you treat agent definitions like shared configuration instead. Define them once, store them centrally, and let any orchestrator fetch them. Update a prompt or model setting in the LaunchDarkly UI, and the new version rolls out without a redeploy.
Ready to build framework-agnostic AI swarms? Start your 14-day free trial of LaunchDarkly to follow along with this tutorial. No credit card required.
The problem: Research gap analysis across multiple papers
When analyzing academic literature, researchers face a daunting task: reading dozens of papers to identify patterns, spot contradictions, and find unexplored opportunities. A single LLM call can summarize papers, but it produces a monolithic analysis you can’t trace, refine, or trust for critical decisions.
The challenge compounds when you need to:
- Identify methodological patterns across 12+ papers without missing subtle connections
- Detect contradictory findings that might invalidate assumptions
- Discover research gaps that represent genuine opportunities, not just oversight
This is where specialized agents excel - each focused on one aspect of the analysis, building on each other’s work.
In this tutorial, we’ll build a 3-agent research analysis swarm that solves this problem by dividing the work:
We’ll implement this swarm across three different orchestrators (LangGraph, Strands, and OpenAI Swarm), demonstrating how AgentControl enable:
- Framework-agnostic agent definitions: Define agents once in LaunchDarkly, use them everywhere
- Per-agent observability: Track tokens, latency, and costs for each agent individually - catch silent failures when agents skip execution
- Dynamic swarm composition: Add/remove agents from the swarm or switch models without touching code
Why use a swarm?
Research gap analysis requires different skills: clustering methodological patterns, detecting contradictions, and synthesizing opportunities. With a swarm, each agent handles one aspect and produces artifacts the next agent builds on. You can track tokens, latency, and cost per agent. You can catch silent failures when an agent skips execution. And when something goes wrong, you know exactly where.
Technical requirements
Before implementing the swarm, ensure you have:
- LaunchDarkly account with AgentControl enabled (see quickstart guide)
- API keys for Anthropic Claude or OpenAI GPT-4 (check supported models)
- Python 3.11+ for running orchestrators
- Basic understanding of agent systems (review LangGraph agents tutorial if needed)
The complete implementation is available at GitHub - AI Orchestrators.
The architecture: how LaunchDarkly powers framework-agnostic swarms
The swarm architecture has three layers: dynamic agent configuration, per-agent tracking, and custom metrics for cost attribution. Here’s how they work together.
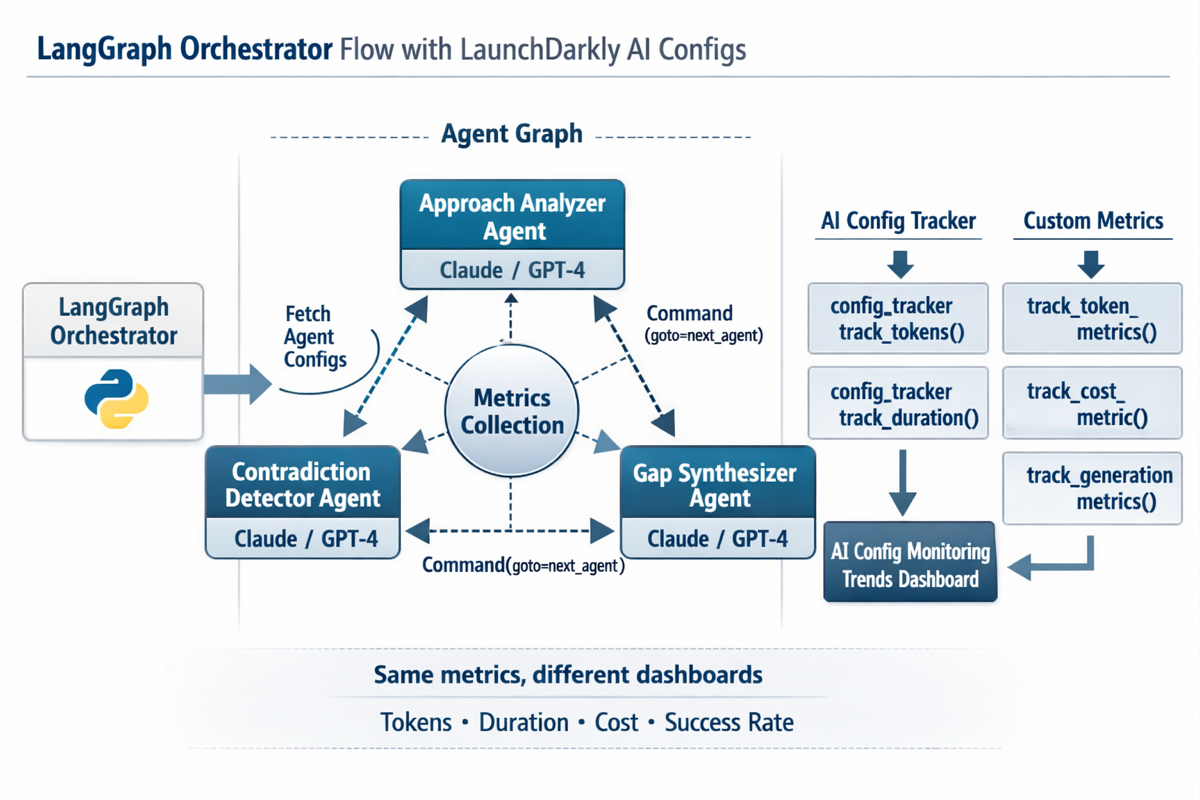
The diagram shows LangGraph’s implementation, but Strands and OpenAI Swarm follow the same pattern with their own handoff mechanisms. The key components are:
- Configuration Fetch: The orchestrator queries LaunchDarkly’s API to dynamically discover all agent configurations, avoiding hardcoded agent definitions
- Agent Graph: Three specialized agents (Approach Analyzer, Contradiction Detector, Gap Synthesizer) connected through explicit handoff mechanisms
- Metrics Collection: Each agent execution captures tokens, duration, and cost metrics through both the config tracker and custom metrics API
- Dual Dashboard Views: The same metrics appear in the AgentControl trends dashboard (for individual agent monitoring)
Three layers of framework-agnostic swarms
1. config for Dynamic Agent Configuration
Each config stores:
- Agent key, display name, and model selection
- System instructions and tool definitions
Your orchestrator code queries LaunchDarkly for “all enabled agent configs” and builds the swarm dynamically. No hardcoded agent names.
2. Per-Agent Tracking with AI SDK
LaunchDarkly’s AI SDK provides tracking through config evaluations. You get a fresh tracker for each agent, then track tokens, duration, and success/failure. These metrics flow to the config Monitoring dashboard automatically.
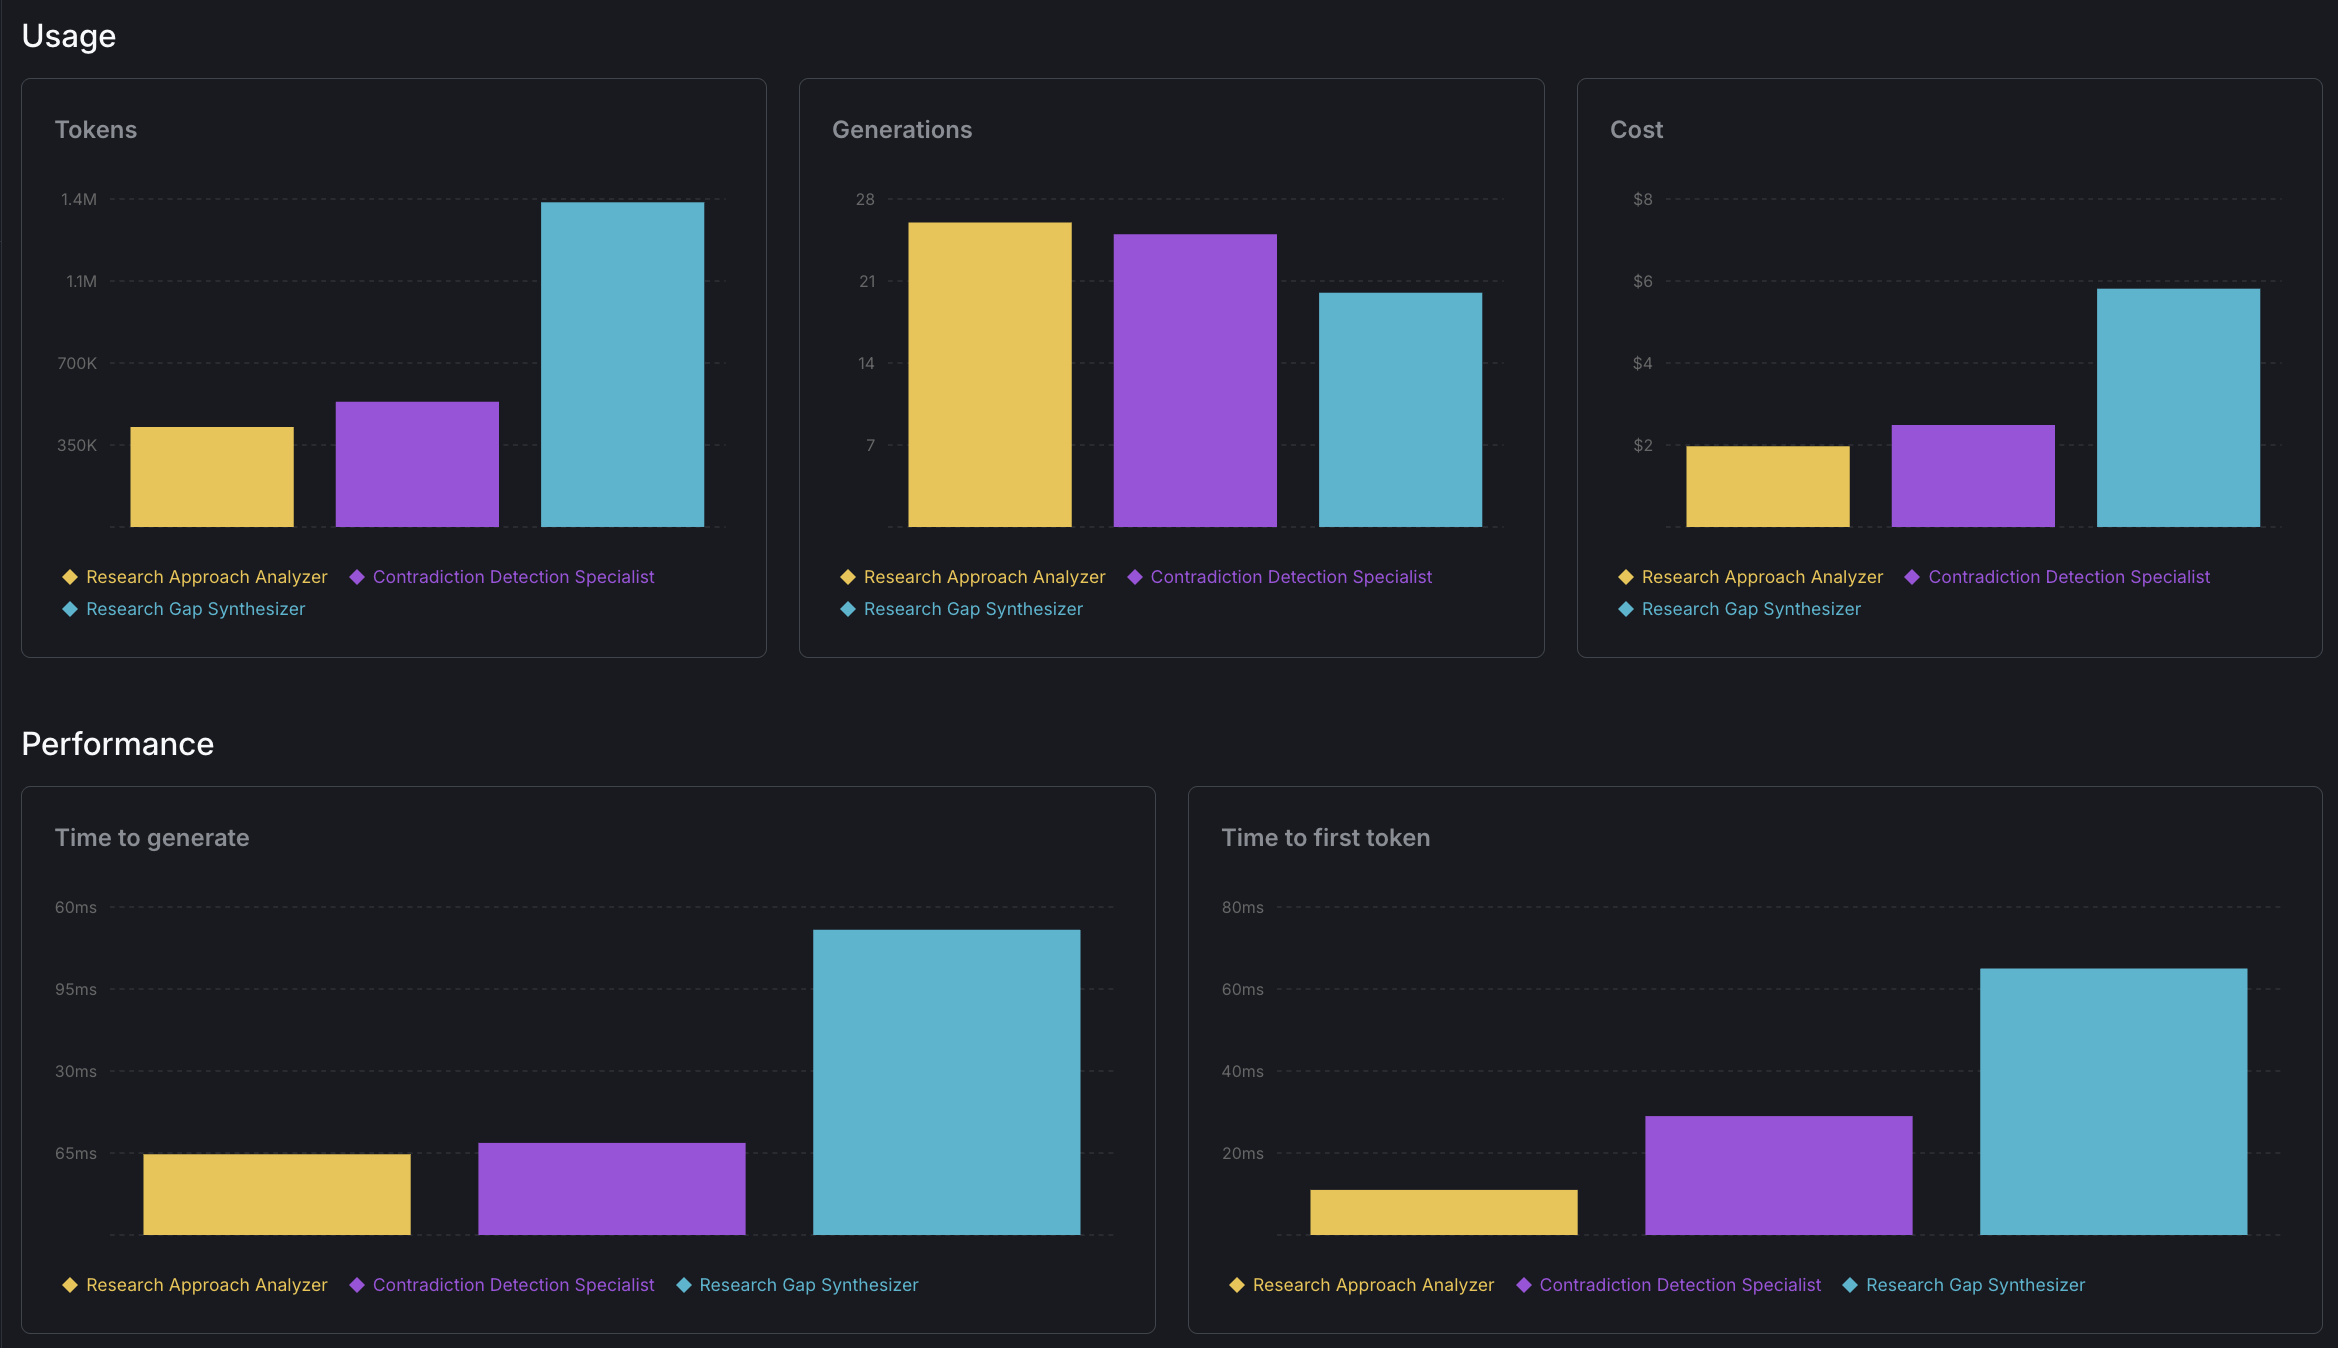
This tracking catches silent failures - when agents skip execution or produce minimal output. Step 4 shows the implementation patterns for each framework.
3. Custom Metrics for Cost Attribution
Per-agent tracking shows performance, but for cost comparisons across orchestrators you need custom metrics. These let you query by orchestrator, compare costs across frameworks, and identify anomalies.
With the architecture covered, let’s build the swarm. We’ll download research papers, set up the project, bootstrap agent configs in LaunchDarkly, implement per-agent tracking, and run the swarm across all three orchestrators.
Step 1: Download research papers
First, you need papers to analyze. The scripts/download_papers.py script queries ArXiv with narrow, category-specific searches to ensure focused results.
The script presents pre-configured narrow research topics:
These topics are intentionally narrow: Each uses ArXiv categories (cat:cs.CL, cat:cs.MA) to limit scope. Boolean AND operators ensure papers match all criteria. 2-5 year windows prevent overwhelming the analysis.
For even narrower custom queries, combine categories with specific techniques like cat:cs.CL AND chain-of-thought AND mathematical AND reasoning for CoT math only, cat:cs.MA AND emergent AND (referential OR compositional) for specific emergence types, or cat:cs.SE AND few-shot AND (Python OR JavaScript) AND test generation for language-specific code generation.
The script saves papers to data/gap_analysis_papers.json with this structure:
Why this format: Each paper includes ~2-3K characters of text (abstract + intro + conclusion), which is enough for analysis but won’t overflow context windows. For 12 papers, you’re looking at ~30K characters (~7.5K tokens) of input.
You now have 12 papers saved locally. Next, we’ll configure LaunchDarkly credentials and install the orchestration frameworks.
Step 2: Set up your multi-orchestrator project
Environment setup
For help getting your SDK and API keys, see the API access tokens guide and SDK key management.
Install dependencies
For more on the LaunchDarkly AI SDK, see the AI SDK documentation.
Your environment is configured and dependencies are installed. Next, we’ll use the bootstrap script to automatically create all three agent configs in LaunchDarkly.
Step 3: Bootstrap agent configs with the manifest
The orchestration repo includes a complete bootstrap system that automatically creates all agent configurations, tools, and variations in LaunchDarkly. This is much faster and more reliable than manual setup.
Understanding the bootstrap system
The bootstrap process uses a YAML manifest to define:
- Tools - Functions agents can call (fetch_paper_section, handoff_to_agent, etc.)
- Agent Configs - Three specialized agents with their roles and instructions
- Variations - Multiple model options (Anthropic Claude vs OpenAI GPT)
- Targeting Rules - Which orchestrators get which models
Run the bootstrap script
What gets created
The bootstrap script creates the three agents described earlier (Approach Analyzer, Contradiction Detector, Gap Synthesizer), each with swarm-aware instructions and handoff tools.
Verify in LaunchDarkly dashboard
After bootstrap completes:
- Go to your AgentControl dashboard at
https://app.launchdarkly.com/<your-project-key>/<your-environment-key>/ai-configs - You’ll see all three agent configs created
- Each config has:
- Two variations (Claude and OpenAI models)
- Proper tools configured
- Detailed swarm-aware instructions
- Targeting rules for orchestrator-specific routing
How variations and targeting work
Each agent has two variations in the manifest:
When an orchestrator requests this agent:
- Context includes orchestrator attribute:
context = create_context(execution_id, orchestrator="openai_swarm") - LaunchDarkly evaluates targeting rules: If orchestrator is “openai_swarm” or “openai-swarm”, use OpenAI variation
- Otherwise use default: Claude variation for all other orchestrators
This lets you:
- Use OpenAI models when running OpenAI Swarm (native compatibility)
- Use Claude for other orchestrators
- A/B test models by adjusting targeting rules
Customize agent behavior
After bootstrap, you can adjust agents in the LaunchDarkly UI without code changes. Switch between Claude, GPT-4, or other supported providers. Refine instructions for better handoffs. Control which agents are included in the swarm through targeting rules. Test different prompts or models side-by-side with experiments.
Your three agents are now configured in LaunchDarkly. Next, we’ll implement tracking so you can monitor tokens, latency, and cost for each agent individually.
Step 4: Implement per-agent tracking
The orchestration repository demonstrates per-agent tracking across all three frameworks. First, you need to fetch agent configurations from LaunchDarkly:
Fetching agent configurations dynamically
Pattern 1: Native framework metrics (Strands)
Strands provides accumulated_usage on each node result after execution:
View full Strands implementation
Pattern 2: Message-based tracking (LangGraph)
LangGraph attaches usage_metadata to messages, requiring post-execution iteration:
View full LangGraph implementation
Pattern 3: Interception-based tracking (OpenAI Swarm)
OpenAI Swarm doesn’t aggregate per-agent metrics, requiring interception of completion calls:
View full OpenAI Swarm implementation
Critical: Provider token field names differ
Each provider uses different field names: Anthropic uses input_tokens/output_tokens, OpenAI uses prompt_tokens/completion_tokens, and some frameworks use camelCase (inputTokens). The implementations use fallback chains to handle all formats.
You can now capture tokens, latency, and cost for each agent. Next, we’ll run the swarm across LangGraph, Strands, and OpenAI Swarm to see how they perform with the same agent definitions.
Step 5: Run multiple orchestrators and track results
The repository includes scripts to run all three orchestrators and analyze their performance:
- Configure env: Create
.envwith SDK keys - Install deps:
pip install -r requirements.txt - Download papers:
python scripts/download_papers.py - Bootstrap agents:
python scripts/launchdarkly/bootstrap.py - Configure targeting: Set default variation for each agent in LaunchDarkly UI
- Test run:
python orchestrators/strands/run_gap_analysis.py
Troubleshooting: If you see “No enabled agents found,” check that each agent has a default variation set in the Targeting tab.
Now that you’ve run the swarm across all three orchestrators, let’s look at how they differ in approach and performance.
Comparing orchestrator approaches to swarms
All three frameworks support multi-agent workflows, they just disagree on who decides what happens next.
Key differences
View full implementations: Strands | LangGraph | OpenAI Swarm
The LaunchDarkly advantage: By defining agents externally, you can implement swarms across all three frameworks and compare their approaches with the same agent definitions.
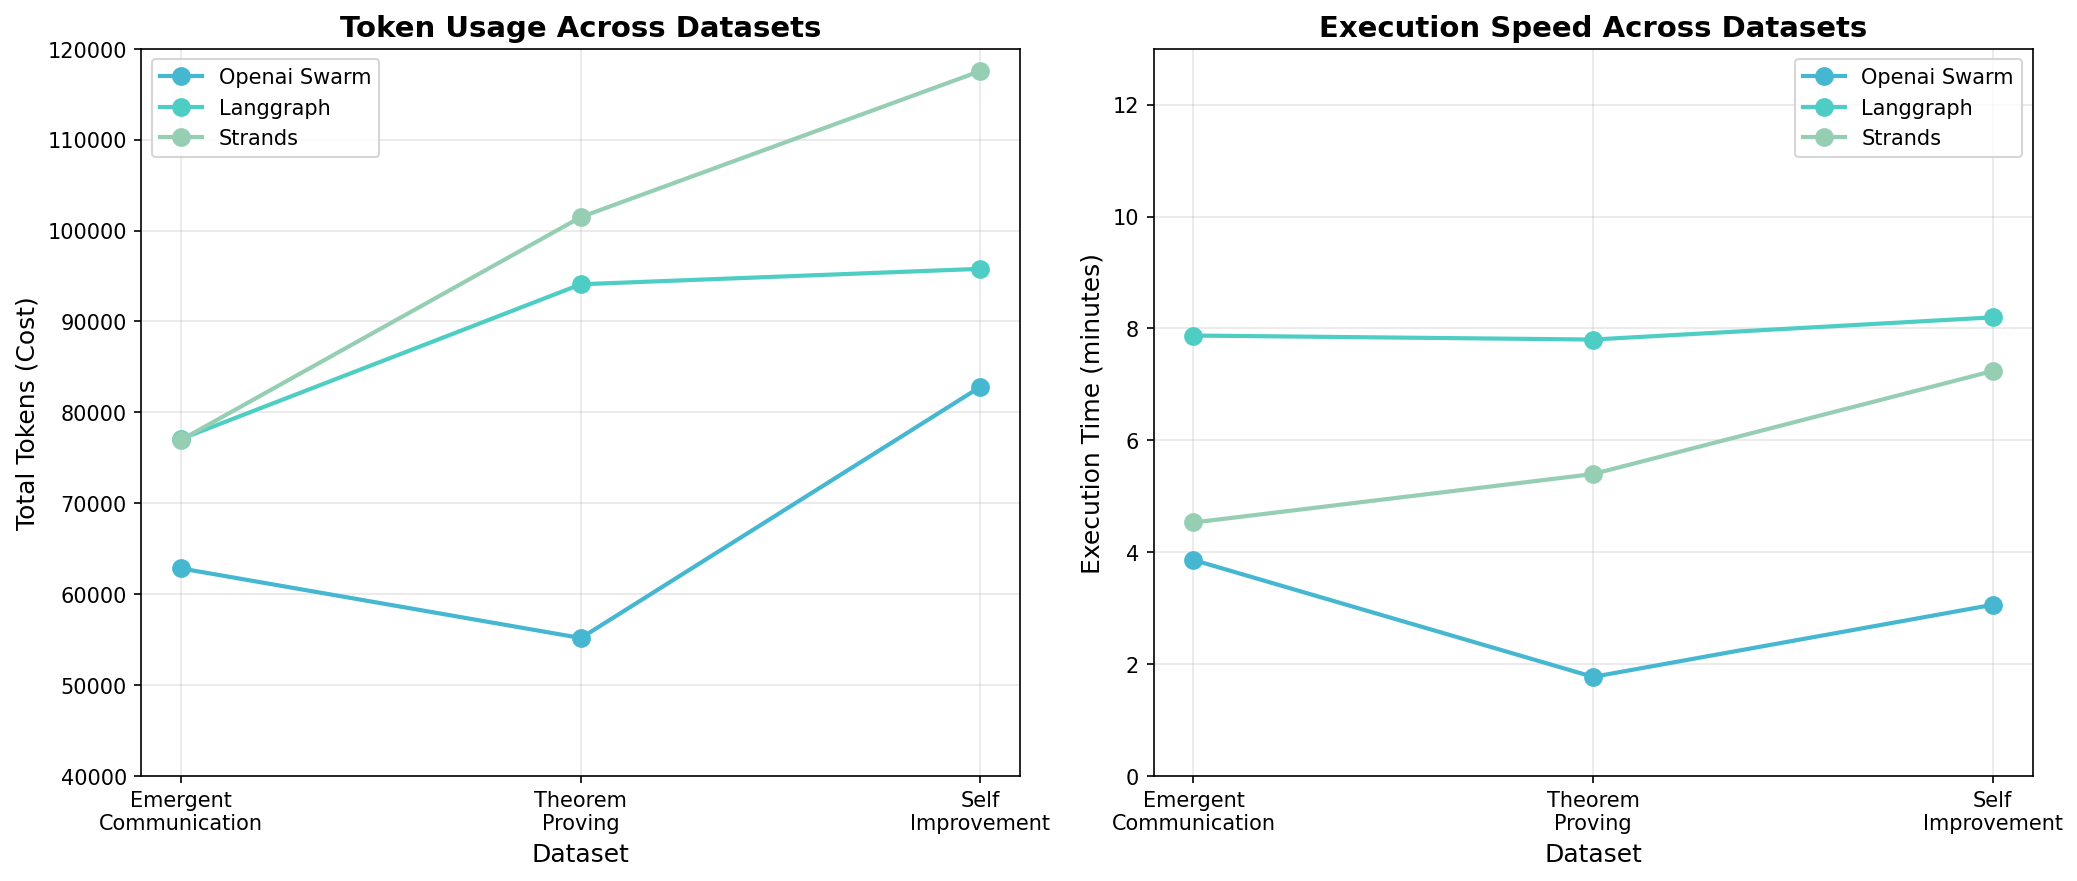
Performance comparison (9 runs: 3 datasets × 3 orchestrators)
Key insight (based on limited sample): Fastest ≠ best. OpenAI Swarm was 3x faster but produced reports 80% smaller than LangGraph. LangGraph had the lowest variance and most comprehensive outputs despite slower execution.
Example reports: Display the outputs
- LangGraph (60-70KB): Emergent | Theorem | Self-Improvement
- Strands (30-35KB): Emergent | Theorem | Self-Improvement
- OpenAI Swarm (10-15KB): Emergent | Theorem | Self-Improvement
Report size variation demonstrates why per-agent tracking matters - you need to know when agents produce minimal output.
Conclusion
The orchestrator you choose determines how agents coordinate, but it shouldn’t lock you into a single framework. By defining agents in LaunchDarkly and fetching them at runtime, you can run the same swarm across LangGraph, Strands, and OpenAI Swarm without duplicating configuration or watching prompts drift between repos.
The performance differences are real. OpenAI Swarm is fastest, LangGraph produces the most comprehensive outputs, and Strands offers the simplest setup. But you only discover these tradeoffs if you can track each agent individually and catch silent failures when they happen.
Swarms cost more than single LLM calls. The payoff is traceable reasoning you can audit, refine, and trust.
The full implementation is available on GitHub - AI Orchestrators. Clone the repo and run the same swarm across all three orchestrators. To get started with AgentControl, follow the quickstart guide.
Related tutorials
- Beyond n8n for Workflow Automation: Agent Graphs - Externalize the orchestration topology to LaunchDarkly so swapping frameworks doesn’t redefine the graph
- Build AgentControl configs with Agent Skills - Generate the agent configs in this comparison from natural-language prompts
- Build a LangGraph Multi-Agent system in 20 Minutes - The LangGraph variant of the swarm pattern, in depth
- Evaluate LLM code generation with LLM-as-judge evaluators - Add per-agent quality measurement to whichever orchestrator you choose
- Proving ROI with data-driven AI agent experiments - A/B test orchestrator choices to prove which one wins for your workload