
Build a LangGraph multi-agent system in 20 minutes with LaunchDarkly AgentControl
Build a LangGraph multi-agent system in 20 minutes with LaunchDarkly AgentControl
Published September 8, 2025

This tutorial was published in September 2025, before LaunchDarkly shipped several features that supersede or complement the patterns shown below. The walkthrough still works, but for new builds you may want to use:
- Agent graphs: Agent graphs let you externalize the multi-agent topology into a visual graph with per-node monitoring
- Online evaluations and custom judges: Built-in and user-defined LLM-as-a-judge scoring on live traffic
- Playgrounds: Compare variations side-by-side before promoting
- Offline evaluations and Datasets: Regression test variations against a saved reference set
To learn more, read AgentControl.
Build a working multi-agent system with dynamic configuration in 20 minutes using LangGraph multi-agent workflows, RAG search, and AgentControl.
Part 1 of 3 of the series: Chaos to Clarity: Defensible AI Systems That Deliver on Your Goals
You’ve been there: your AI chatbot works great in testing, then production hits and GPT-4 costs spiral out of control. You switch to Claude, but now European users need different privacy rules. Every change means another deploy, more testing, and crossed fingers that nothing breaks.
The teams shipping faster? They control AI behavior dynamically instead of hardcoding everything.
This series shows you how to build LangGraph multi-agent workflows that get their intelligence from RAG search through your business documents. These workflows are enhanced with MCP tools for live external data and controlled through AgentControl—all without needing to deploy code changes.
What This Series Covers
- Part 1 (this post): Build a working multi-agent system with dynamic configuration in 20 minutes
- Part 2: Add advanced features like segment targeting, MCP tool integration, and cost optimization
- Part 3: Run production A/B experiments to prove what actually works
By the end, you’ll have a system that measures its own performance and adapts based on user data instead of guesswork.
What You’ll Build Today
In the next 20 minutes, you’ll have a LangGraph multi-agent system with:
- Supervisor Agent: Orchestrates workflow between specialized agents
- Security Agent: Detects PII and sensitive information
- Support Agent: Answers questions using your business documents
- Dynamic Control: Change models, tools, and behavior through LaunchDarkly without code changes
Prerequisites
You’ll need:
- Python 3.9+ with
uvpackage manager (install uv) - LaunchDarkly account (sign up for free)
- OpenAI API key (required for RAG architecture embeddings)
- Anthropic API key (required for Claude models) or OpenAI API key (for GPT models)
Step 1: Clone and Configure (2 minutes)
First, let’s get everything running locally. We’ll explain what each piece does as we build.
First, you need to get your LaunchDarkly SDK key by creating a project:
- Sign up for LaunchDarkly at app.launchdarkly.com (free account).
If you’re a brand new user, after signing up for an account, you’ll need to verify your email address. You can skip through the new user onboarding flow after that.
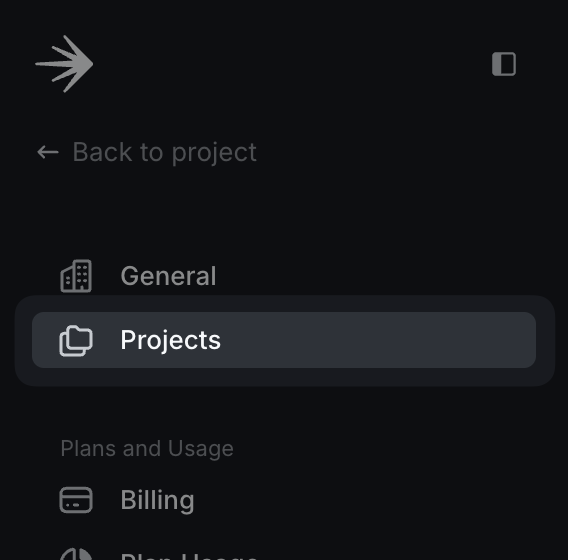
- Find projects on the side bar:
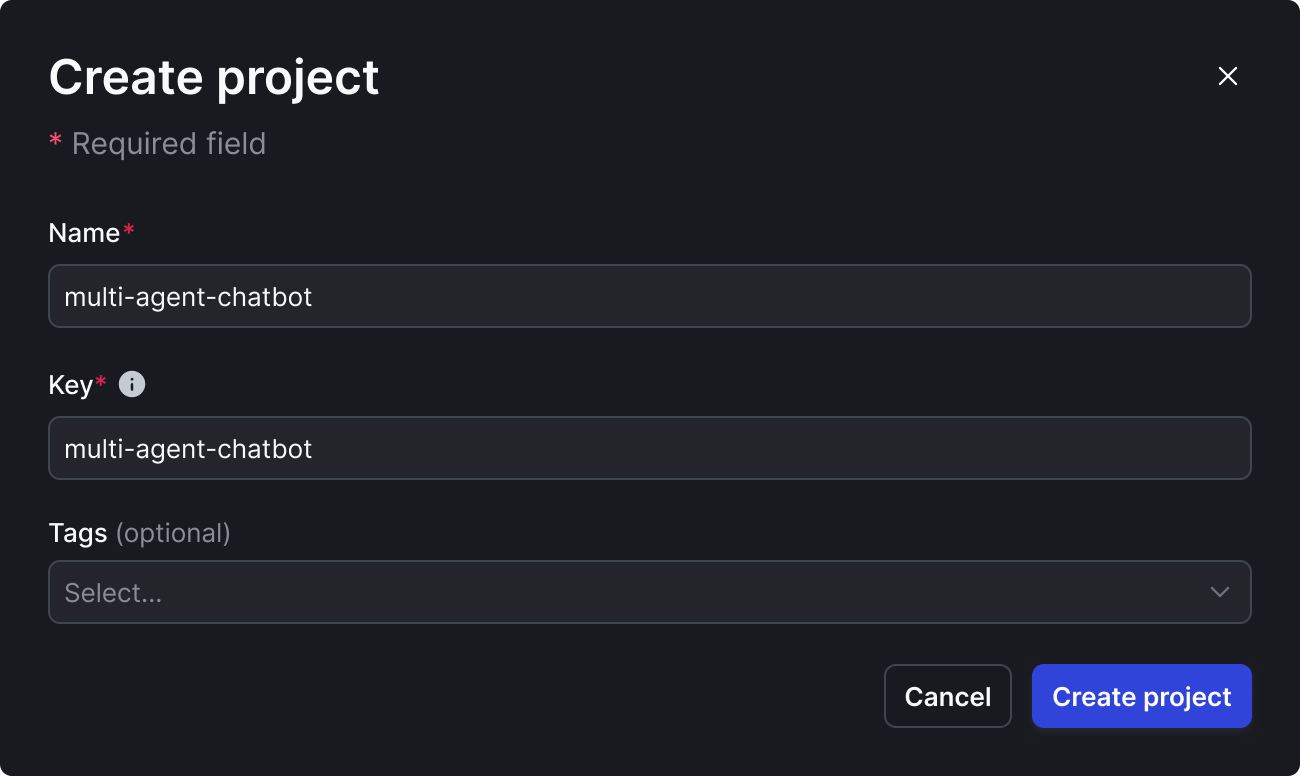
- Create a new project called “multi-agent-chatbot”
🎯 Use exact names for Part 2 compatibility:
- Project:
multi-agent-chatbot - AgentControl:
supervisor-agent,security-agent,support-agent - Tools:
search_v2,reranking - Variations:
supervisor-basic,pii-detector,rag-search-enhanced
-
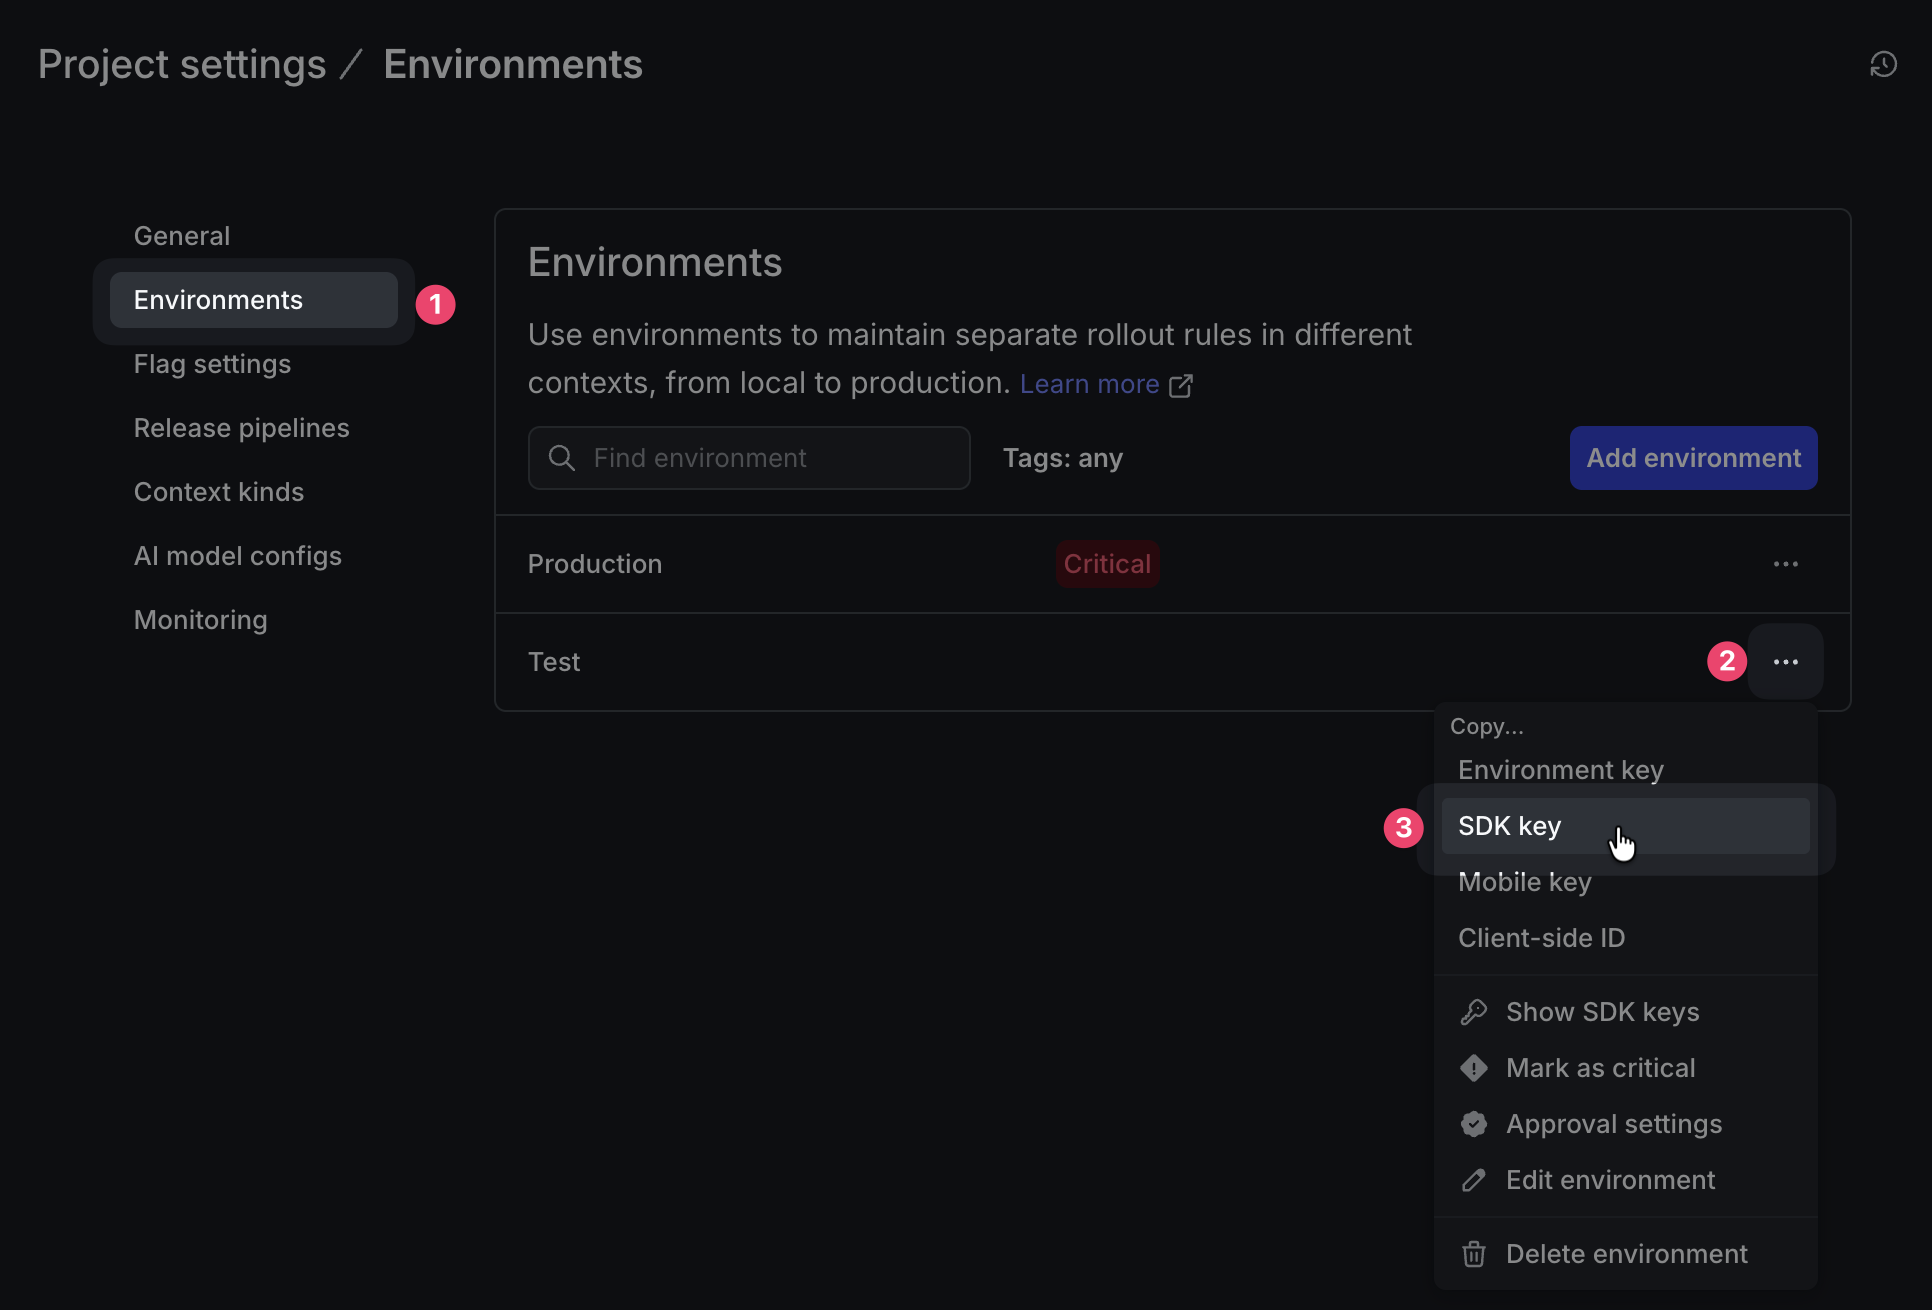
Get your SDK key:
⚙️ (bottom of sidebar) → Projects → multi-agent-chatbot → ⚙️ (to the right)
→ Environments → Production → SDK key
this is your
LD_SDK_KEY
Now edit .env with your keys:
This sets up a LangGraph application that uses LaunchDarkly to control AI behavior. Think of it like swapping actors, directors, even props mid-performance without stopping the show.
Do not check the .env into your source control. Keep those secrets safe!
Step 2: Add Your Business Knowledge (2 minutes)
The system includes a sample reinforcement learning textbook. Replace it with your own documents for your specific domain.
Document types that work well:
- Legal: Contracts, case law, compliance guidelines
- Healthcare: Protocols, research papers, care guidelines
- SaaS: API docs, user guides, troubleshooting manuals
- E-commerce: Product catalogs, policies, FAQs
These documents will serve as the knowledge base for your RAG search, providing business-specific context to your agents.
Step 3: Initialize Your Knowledge Base (2 minutes)
Turn your documents into searchable RAG knowledge:
This builds your RAG (Retrieval-Augmented Generation) foundation using OpenAI’s text-embedding model and FAISS vector database. RAG converts documents into vector embeddings that capture semantic meaning rather than just keywords, making search actually understand context.
Step 4: Define Your Tools (3 minutes)
Define the search tools your agents will use.
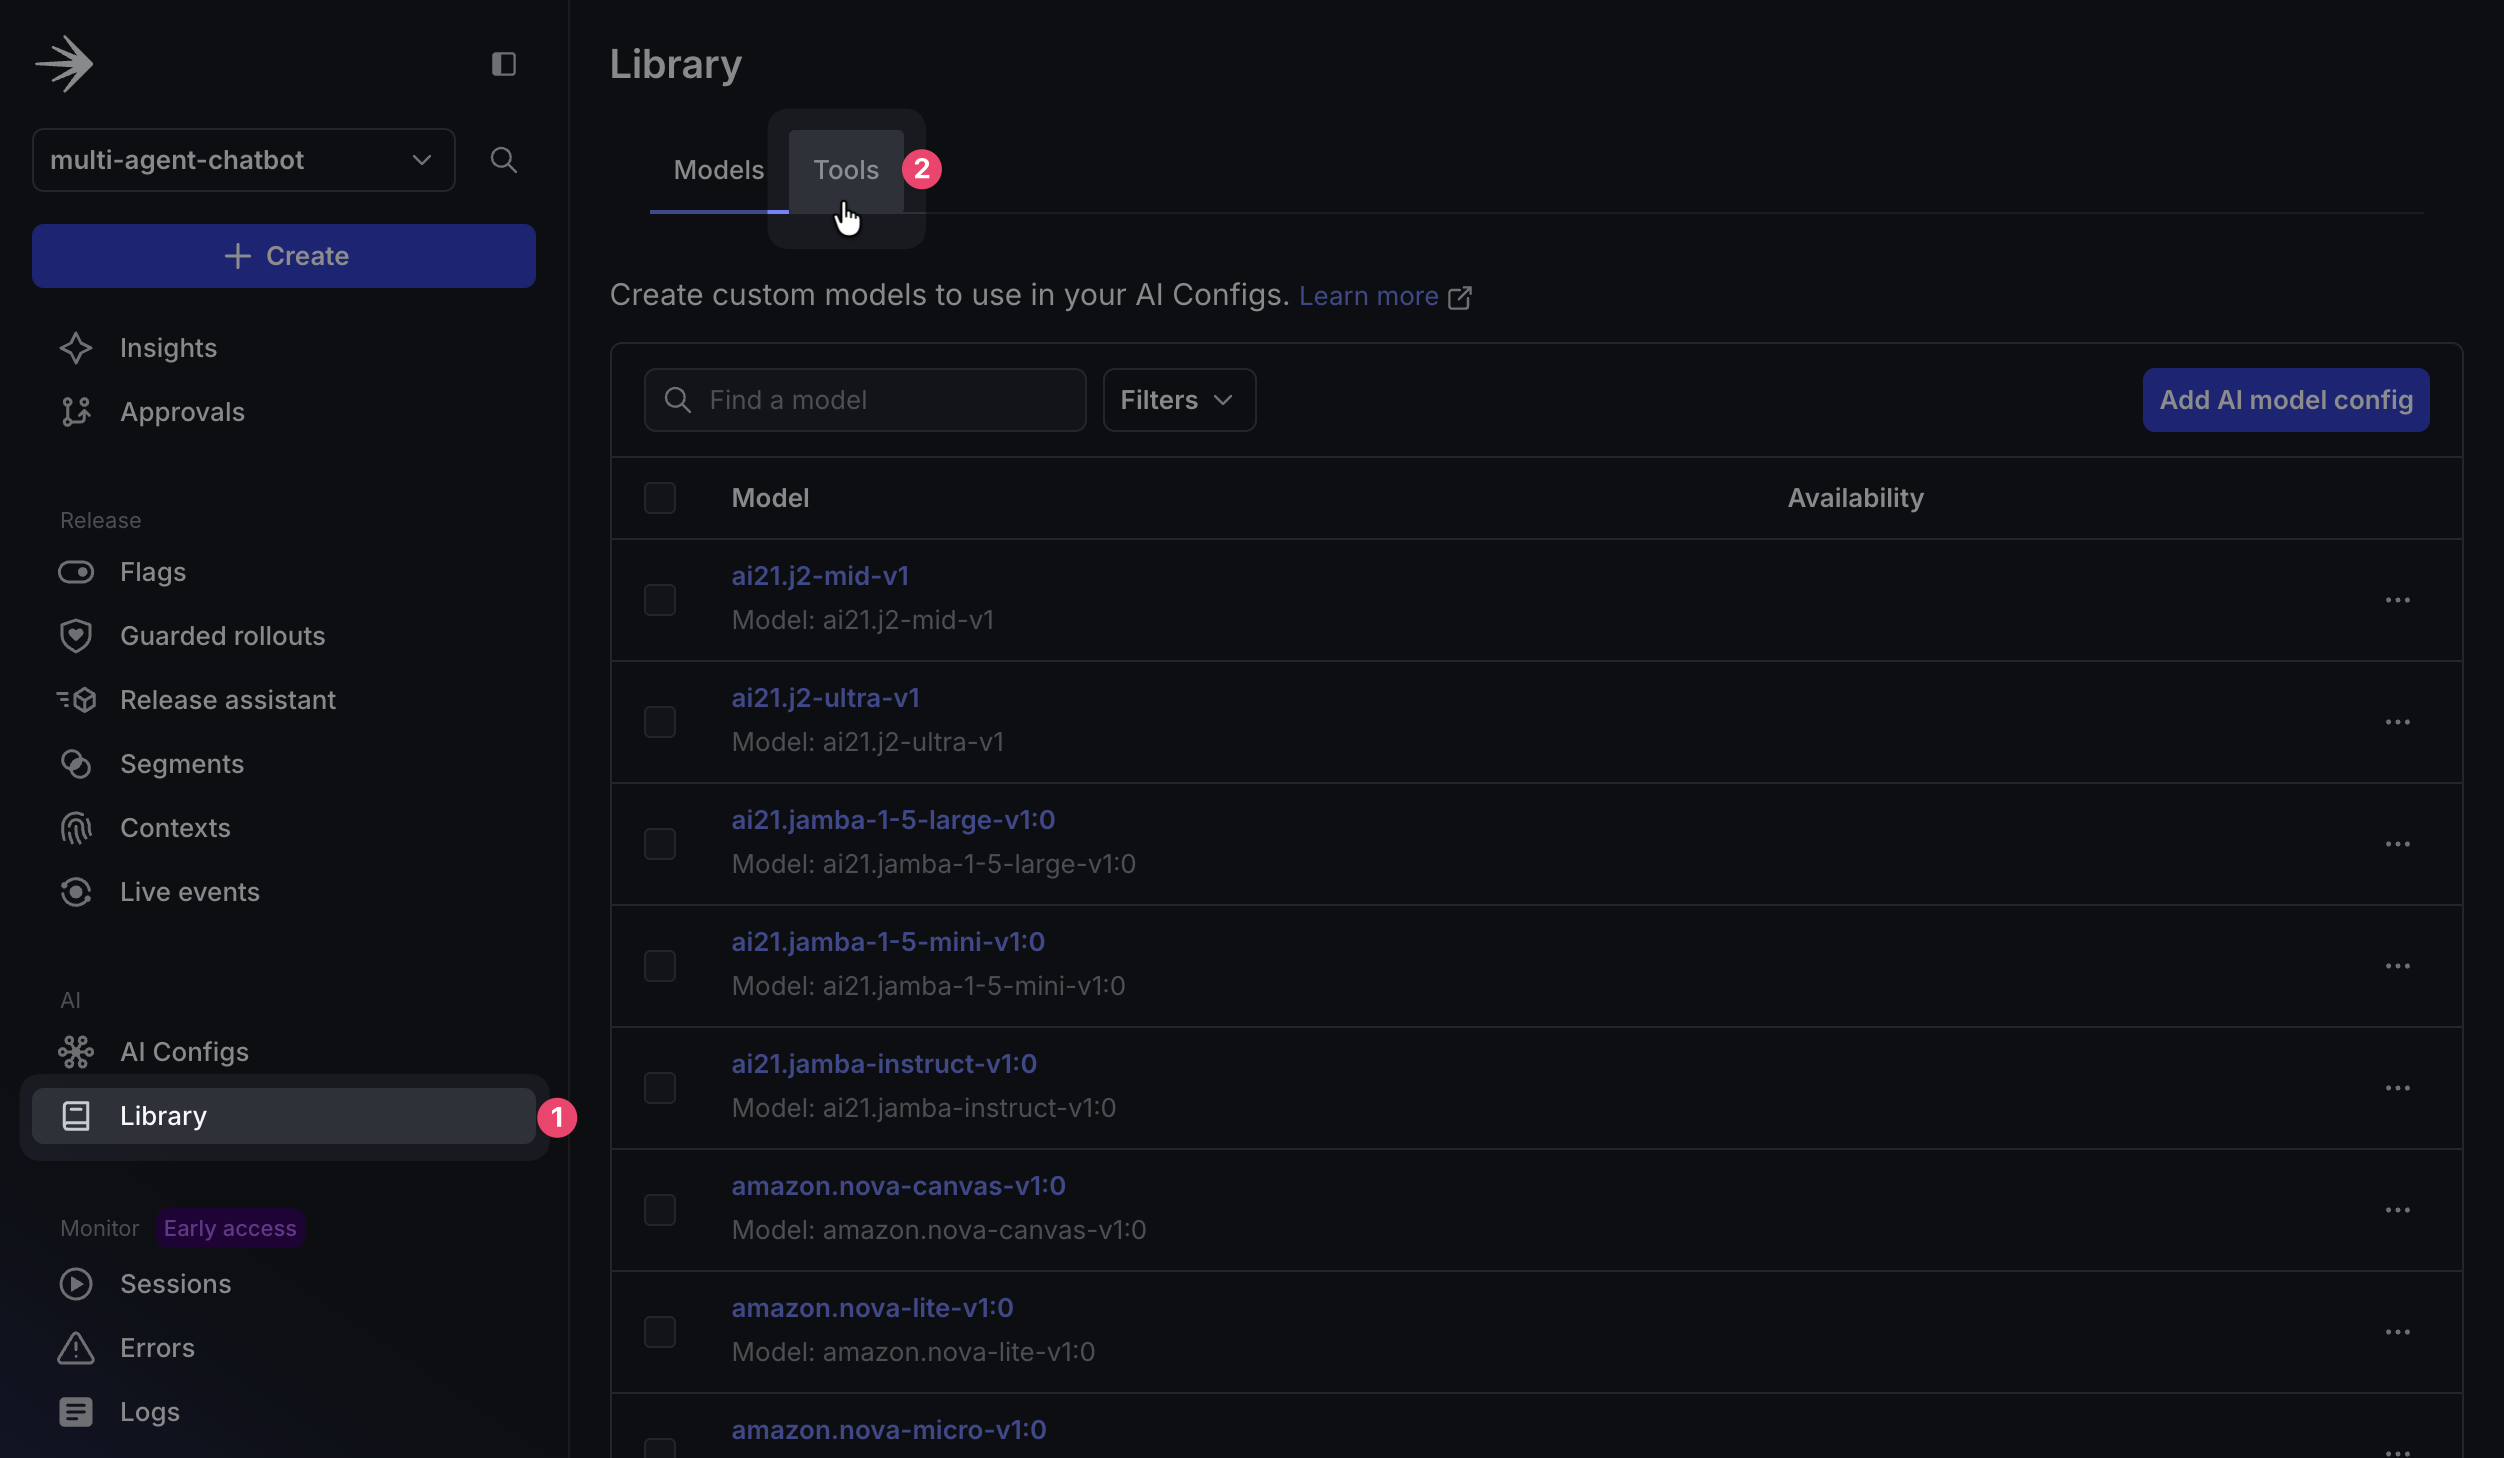
In the LaunchDarkly app sidebar, click Library in the AI section. On the following screen, click the Tools tab, then Create tool.
Create the RAG vector search tool:
Note: we will be creating a simple search_v1 during part 3 when we learn about experimentation. Create a tool using the following configuration:
Key:
Description:
Schema:
When you’re done, click Save.
Create the reranking tool:
Back on the Tools section, click Add tool to create a new tool. Add the following properties:
Key:
Description:
Schema:
When you’re done, click Save.
The reranking tool takes search results from search_v2 and reorders them using the BM25 algorithm to improve relevance. This hybrid approach combines semantic search (vector embeddings) with lexical matching (keyword-based scoring), making it especially useful for technical terms, product names, and error codes where exact term matching matters more than conceptual similarity.
🔍 How Your RAG Architecture Works
Your RAG system works in two stages:
search_v2performs semantic similarity search using FAISS by converting queries into the same vector space as your documents (via OpenAI embeddings), whilererankingreorders results for maximum relevance. This RAG approach significantly outperforms keyword search by understanding context, so asking “My app is broken” can find troubleshooting guides that mention “application errors” or “system failures.”
Step 5: Create Your AI Agents in LaunchDarkly (5 minutes)
Now that you’ve created the tools your agents will use, it’s time to configure the agents themselves. Each agent will have its own config that defines its behavior, model selection, and specific instructions.
Create AgentControl to control your LangGraph multi-agent system dynamically. LangGraph is LangChain’s framework for building stateful, multi-agent applications that maintain conversation state across agent interactions. Your LangGraph architecture enables sophisticated workflows where agents collaborate and pass context between each other.
Create the Supervisor Agent
- In the LaunchDarkly dashboard sidebar, navigate to AgentControl and click Create AgentControl config
- Select
🤖 Agent-based
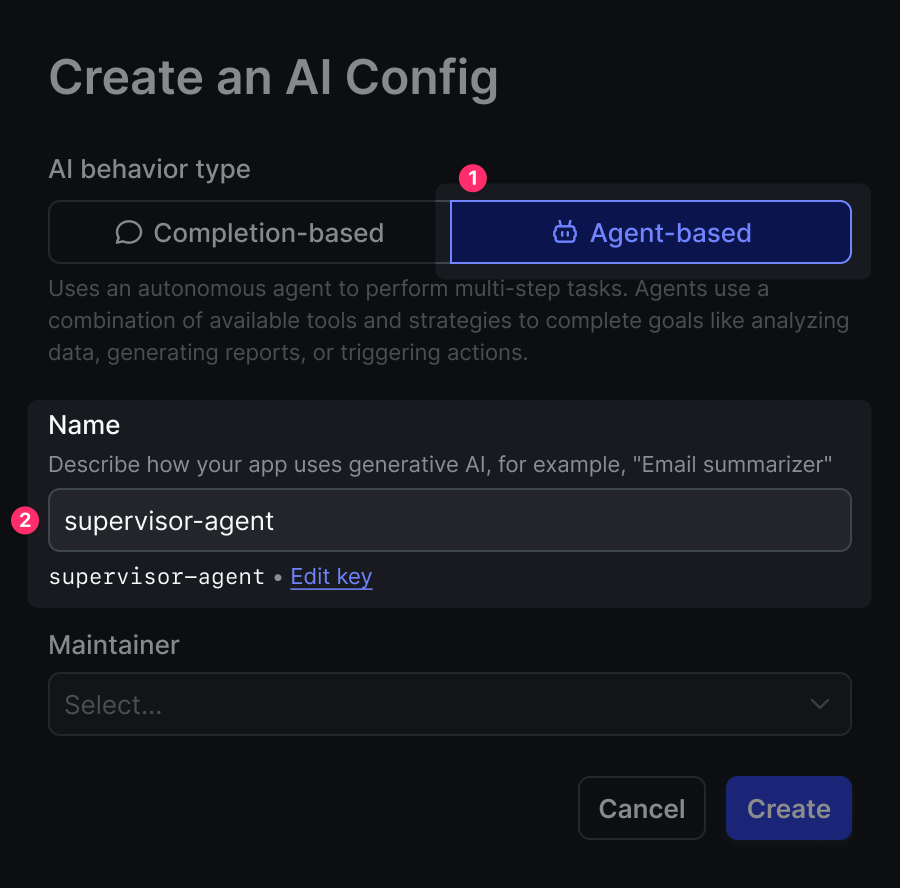
- Name your config
supervisor-agent. This will be the key you reference in your code. - Configure the following fields in the config form:
variation:
Model configuration:
Goal or task:
Click Review and save. Now enable your config by switching to the Targeting tab and editing the default rule to serve the variation you just created:
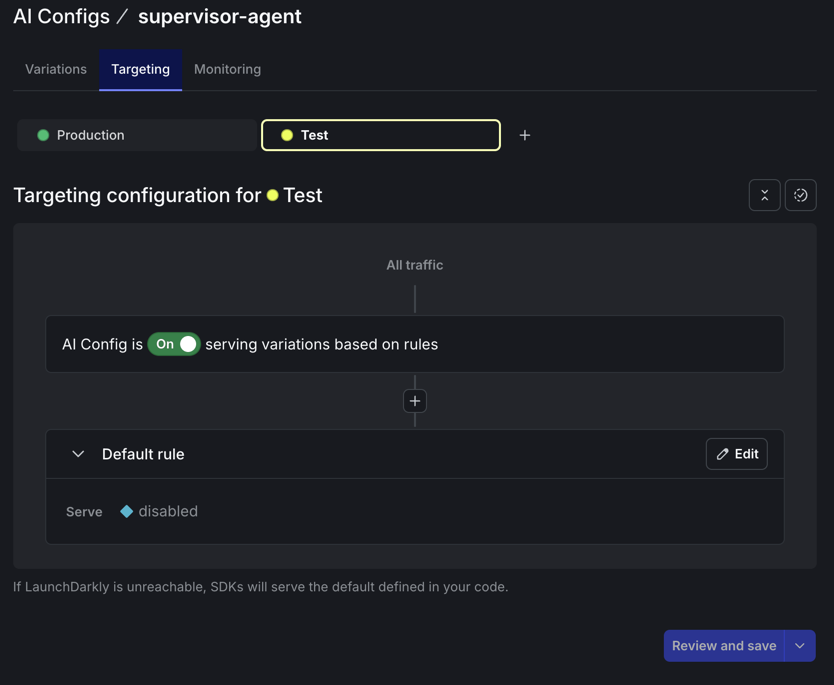
Click Edit on the Default rule, change it to serve your supervisor-basic variation, and save with a note like “Enabling new agent config”. Then type “Production” to confirm.
The supervisor agent demonstrates LangGraph orchestration by routing requests based on content analysis rather than rigid rules. LangGraph enables this agent to maintain conversation context and make intelligent routing decisions that adapt to user needs and config parameters.
Create the Security Agent
Similarly, create another config called security-agent
variation:
Model configuration:
Goal or task:
This agent detects PII and provides detailed redaction information, showing exactly what sensitive data was found and how it would be handled for compliance and transparency.
Remember to switch to the Targeting tab and enable this agent the same way we did for the supervisor - edit the default rule to serve your pii-detector variation and save it.
Create the Support Agent
Finally, create support-agent
variation:
Model configuration:
→ Add parameters → Click Custom parameters
Click Attach tools.
select: ✅ reranking ✅ search_v2
Goal or task:
This agent combines LangGraph workflow management with your RAG tools. LangGraph enables the agent to chain multiple tool calls together: first using RAG for document retrieval, then semantic reranking, all while maintaining conversation state and handling error recovery gracefully.
Remember to switch to the Targeting tab and enable this agent the same way - edit the default rule to serve your rag-search-enhanced variation and save it.
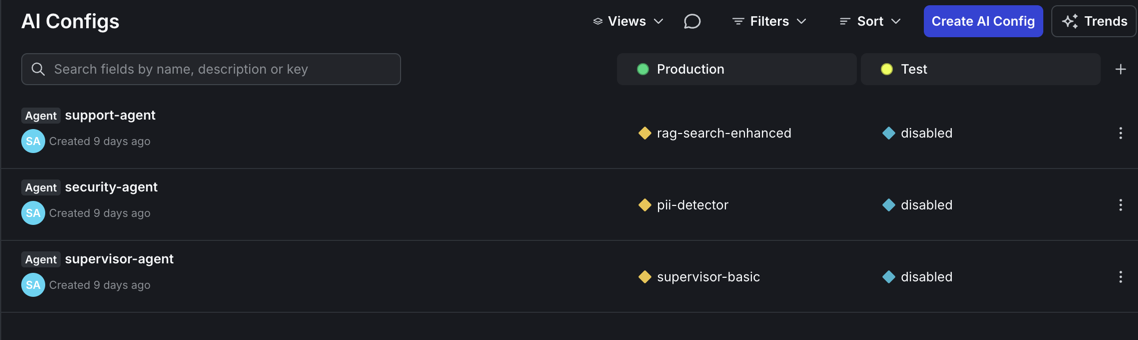
When you are done, you should have three enabled config Agents as shown below.
Step 6: Launch Your System (2 minutes)
Start the system:
Open http://localhost:8501 in your browser. You should see a clean chat interface.
Note: If prompted for authentication, you can leave the email field blank and simply click “Continue” to proceed to the chat interface.
Step 7: Test Your Multi-Agent System (2 minutes)
Test with these queries:
Basic Knowledge Test: “What is reinforcement learning?” (if using sample docs) Or ask about your specific domain: “What’s our refund policy?”
PII Detection Test: “My email is john.doe@example.com and I need help”
Workflow Details show:
- Which agents are activated
- What models and tools are being used
- Text after redaction
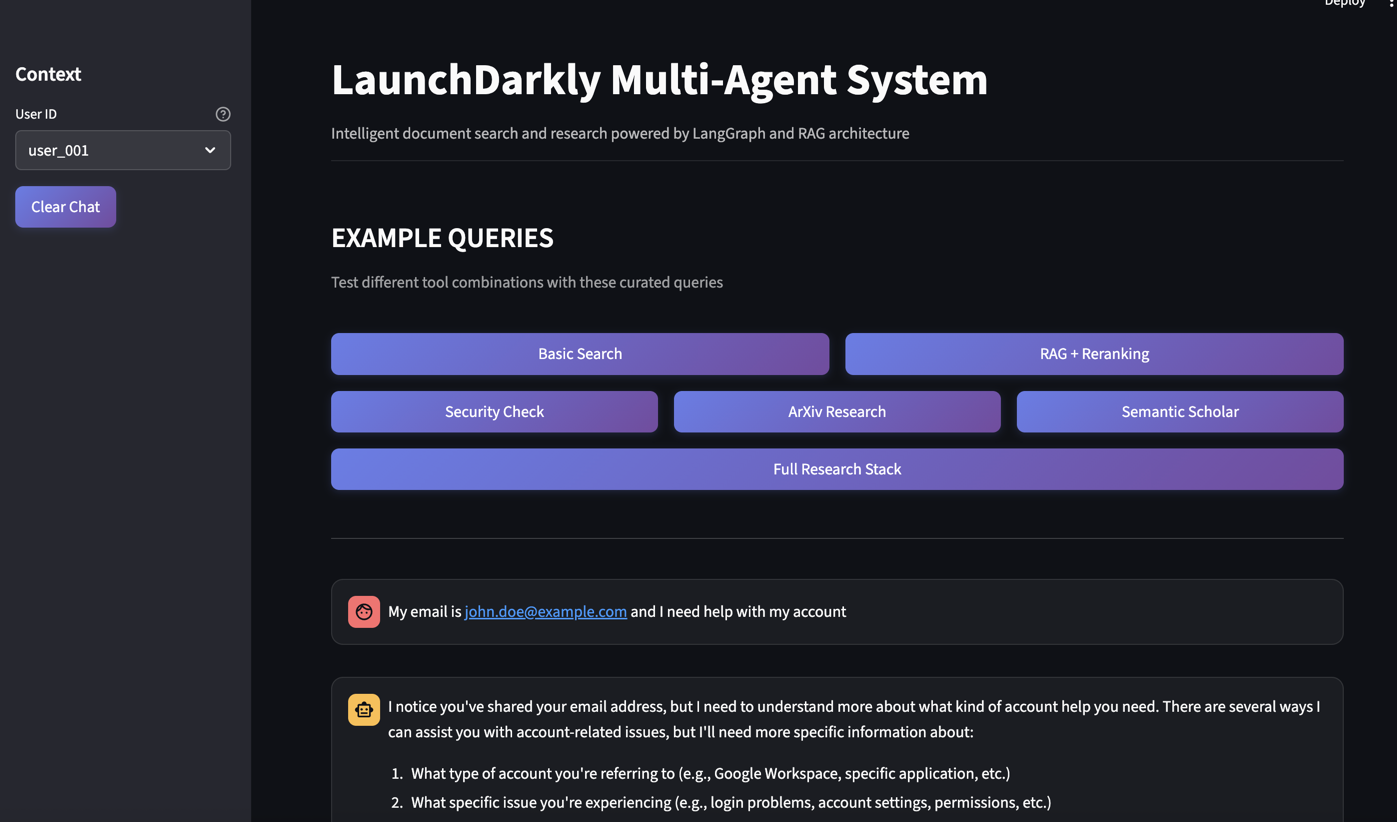
Watch LangGraph in action: the supervisor agent first routes to the security agent, which detects PII. It then passes control to the support agent, which uses your RAG system for document search. LangGraph maintains state across this multi-agent workflow so that context flows seamlessly between agents.
Step 8: Try New Features
Experience the power of dynamic configuration by making real-time changes to your agents without touching any code:
Feature 1: Switch Models Instantly
- Navigate to AgentControl in the LaunchDarkly sidebar
- Click on
support-agent - In the Model configuration section, change from:
- Current: Anthropic → claude-sonnet-4-6
- New: OpenAI → gpt-4-turbo
- Click Save changes
- Return to your chat interface at http://localhost:8501
- Ask the same question again - you’ll see the response now comes from GPT-4
- What you’ll notice: Different response style, potentially different tool usage patterns, and the model name displayed in the workflow details
Feature 2: Adjust Tool Usage
Limit how many times your agent can call tools in a single interaction:
- While still in the
support-agentconfig - Find the Custom parameters section
- Update the JSON from:
To:
- Click Save changes
- In your chat, ask a complex question that would normally trigger multiple searches
- What you’ll notice: The agent now makes at most 2 tool calls, forcing it to be more selective about its searches
Feature 3: Change Agent Behavior
Transform your support agent into a research specialist:
- In the
support-agentconfig, locate the Goal or task field - Replace the existing instructions with:
- Click Save changes
- Test with a question like “What are the best practices for feature flags?”
- What you’ll notice: The agent now performs multiple searches, explains its search strategy, and provides more thorough, research-oriented responses
All changes take effect immediately - no deployment, no restart, no downtime. Your users experience the updates in real-time.
Understanding What You Built
Your LangGraph multi-agent system with RAG includes:
1. LangGraph Orchestration The supervisor agent uses LangGraph state management to route requests intelligently based on content analysis.
2. Privacy Protection The supervisor agent uses LangGraph state management to route requests intelligently. This separation allows you to assign a trusted model to the security and supervisor agents and consider on a less-trusted model for the more expensive support agent at a reduced risk of PII exposure.
3. RAG Knowledge System The support agent combines LangGraph tool chaining with your RAG system for semantic document search and reranking.
4. Runtime Control LaunchDarkly controls both LangGraph behavior and RAG parameters without code changes.
What’s Next?
Your multi-agent system is running with dynamic control and ready for optimization.
In Part 2, we’ll add:
- Geographic-based privacy rules (strict for EU, standard for other)
- MCP tools for external data
- Business tier configurations (free, paid)
- Cost optimization strategies
In Part 3, we’ll run A/B experiments to prove which configurations actually work best with real data.
Try This Now
Experiment with:
- Different Instructions: Make agents more helpful, more cautious, or more thorough
- Tool Combinations: Add/remove tools to see impact on quality
- Model Comparisons: Try different models for different agents
- Cost Limits: Find the sweet spot between quality and cost
Every change is instant, measurable, and reversible.
Key Takeaways
- Multi-agent systems work best when each agent has a specific role
- Dynamic configuration handles changing requirements better than hardcoding
- AgentControl control and change AI behavior without requiring deployments
- Start simple and add complexity as you learn what works
Ready for more? Continue to Part 2: Smart AI Agent Targeting with MCP Tools →
Related Resources
Explore the LaunchDarkly MCP Server - enable AI agents to access feature flag configurations, user segments, and experimentation data directly through the Model Context Protocol.
More from this series and related tutorials:
- Beyond n8n for Workflow Automation: Agent Graphs - The newer take on this pattern: externalize the topology itself into a visual graph with per-node monitoring
- Building Framework-Agnostic AI Swarms - Compare LangGraph against Strands and OpenAI Swarm running the same agent definitions
- Build AgentControl configs with Agent Skills - Generate the AgentControl configs in this tutorial from natural-language prompts
- Offline Evaluation of RAG-Grounded Answers - Add regression tests on the RAG outputs from this system
- Proving ROI with data-driven AI agent experiments - Part 3: A/B test the variations you built here
Questions? Issues? Reach out at aiproduct@launchdarkly.com or open an issue in the GitHub repo.