
Detection to resolution: real world debugging with Rage Clicks and Session Replay
Detection to resolution: real world debugging with Rage Clicks and Session Replay
Published February 11, 2026

Part 3 of 3: Rage Click Detection with LaunchDarkly
In Part 1, we set up rage click detection using LaunchDarkly’s Session Replay. In Part 2, we connected those frustration signals to guarded releases for automated rollback protection.
Now it’s time to put it all together. In this final installment, we’ll walk through real-world debugging scenarios using our WorkLunch app—a cross-platform application built with React Native and Expo where coworkers can swap lunches.
These scenarios demonstrate how the integrated system of feature flags, session replay, and guarded releases can transform the way you diagnose and fix production issues.
All code for this blog post can be found in this GitHub repository.
The Debugging Workflow: An Observability Loop
Before diving into scenarios, let’s understand the complete workflow we’ve built:
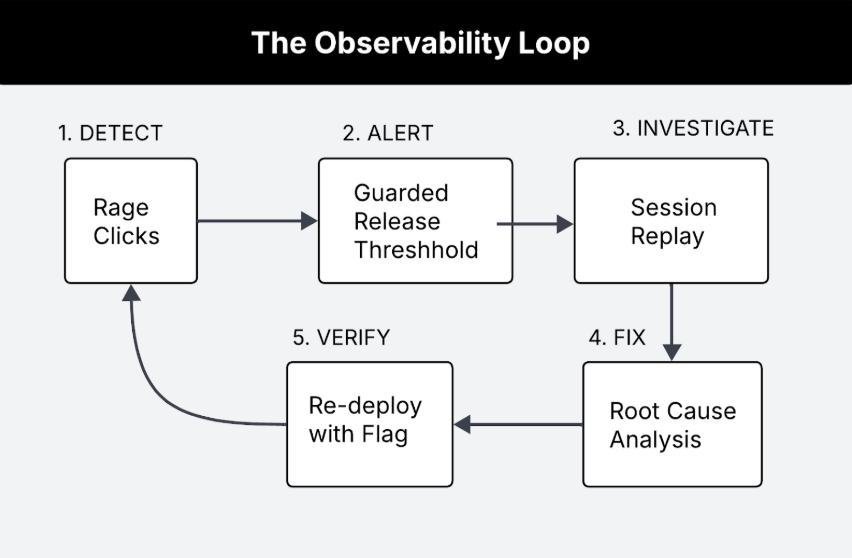
This workflow enables you to:
- Detect frustration signals automatically as they happen.
- Alert when thresholds are breached during rollouts.
- Investigate with full session context, not just error logs.
- Fix with confidence knowing the exact user experience.
- Verify the fix works by monitoring the new rollout.
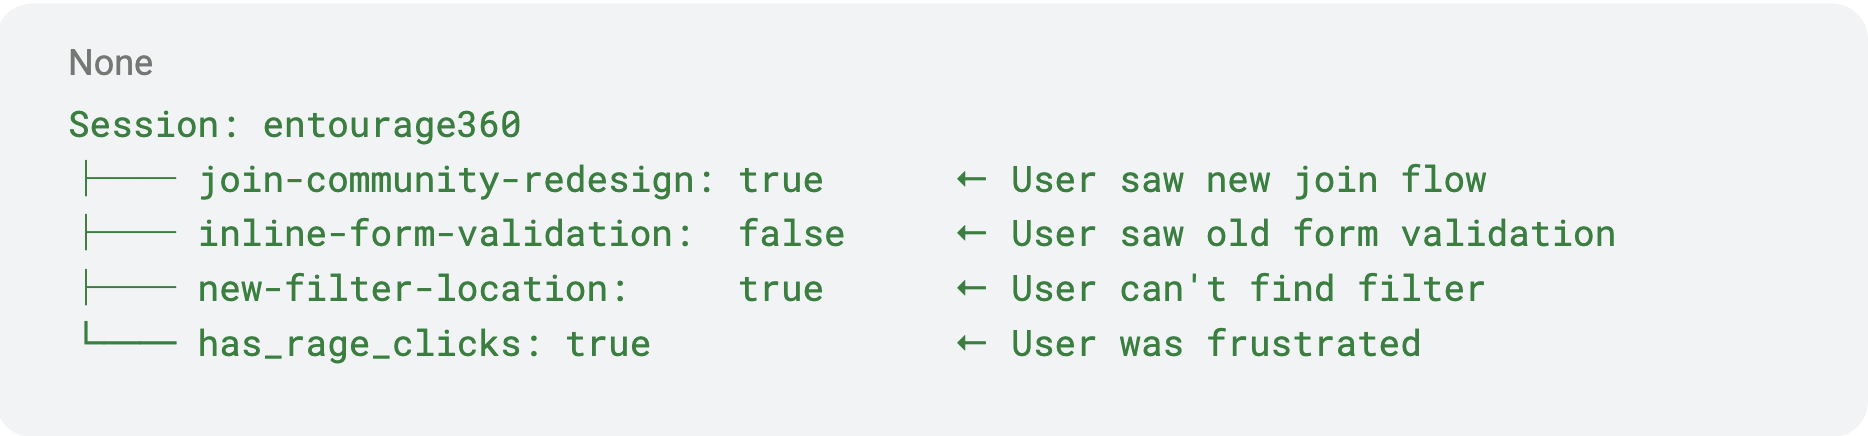
When a guarded release detects a spike in rage clicks, it automatically correlates the frustration with specific flag variations:

The alert tells you exactly which feature caused the problem: “Rage clicks increased 10x for users on join-community-redesign: true” It’s important to note that rage clicks aren’t the only measure for frustration signals around user experience.
When items are out of place, confusing or navigation is not consistent across mobile and web, it can cause users to rage scroll. Unlike rage clicks that can be measured and tracked, rage scrolls are a little more nuanced, which will result in relying heavily on session replay and drops and traffic to diagnose.
Just as llm observability tools monitor model outputs for hallucinations or drift, rage click detection monitors the human layer, catching UX failures that no server-side metric would reveal.
Using feature flags, session replay and guarded releases, let’s take a closer look at both scenarios to debug in a real-world worklunch app.
Scenario 1: Form Validation Frustration
The Setup
Your team ships a new “Create Community” button redesign and places the feature behind a feature flag called (inline-form-validation).
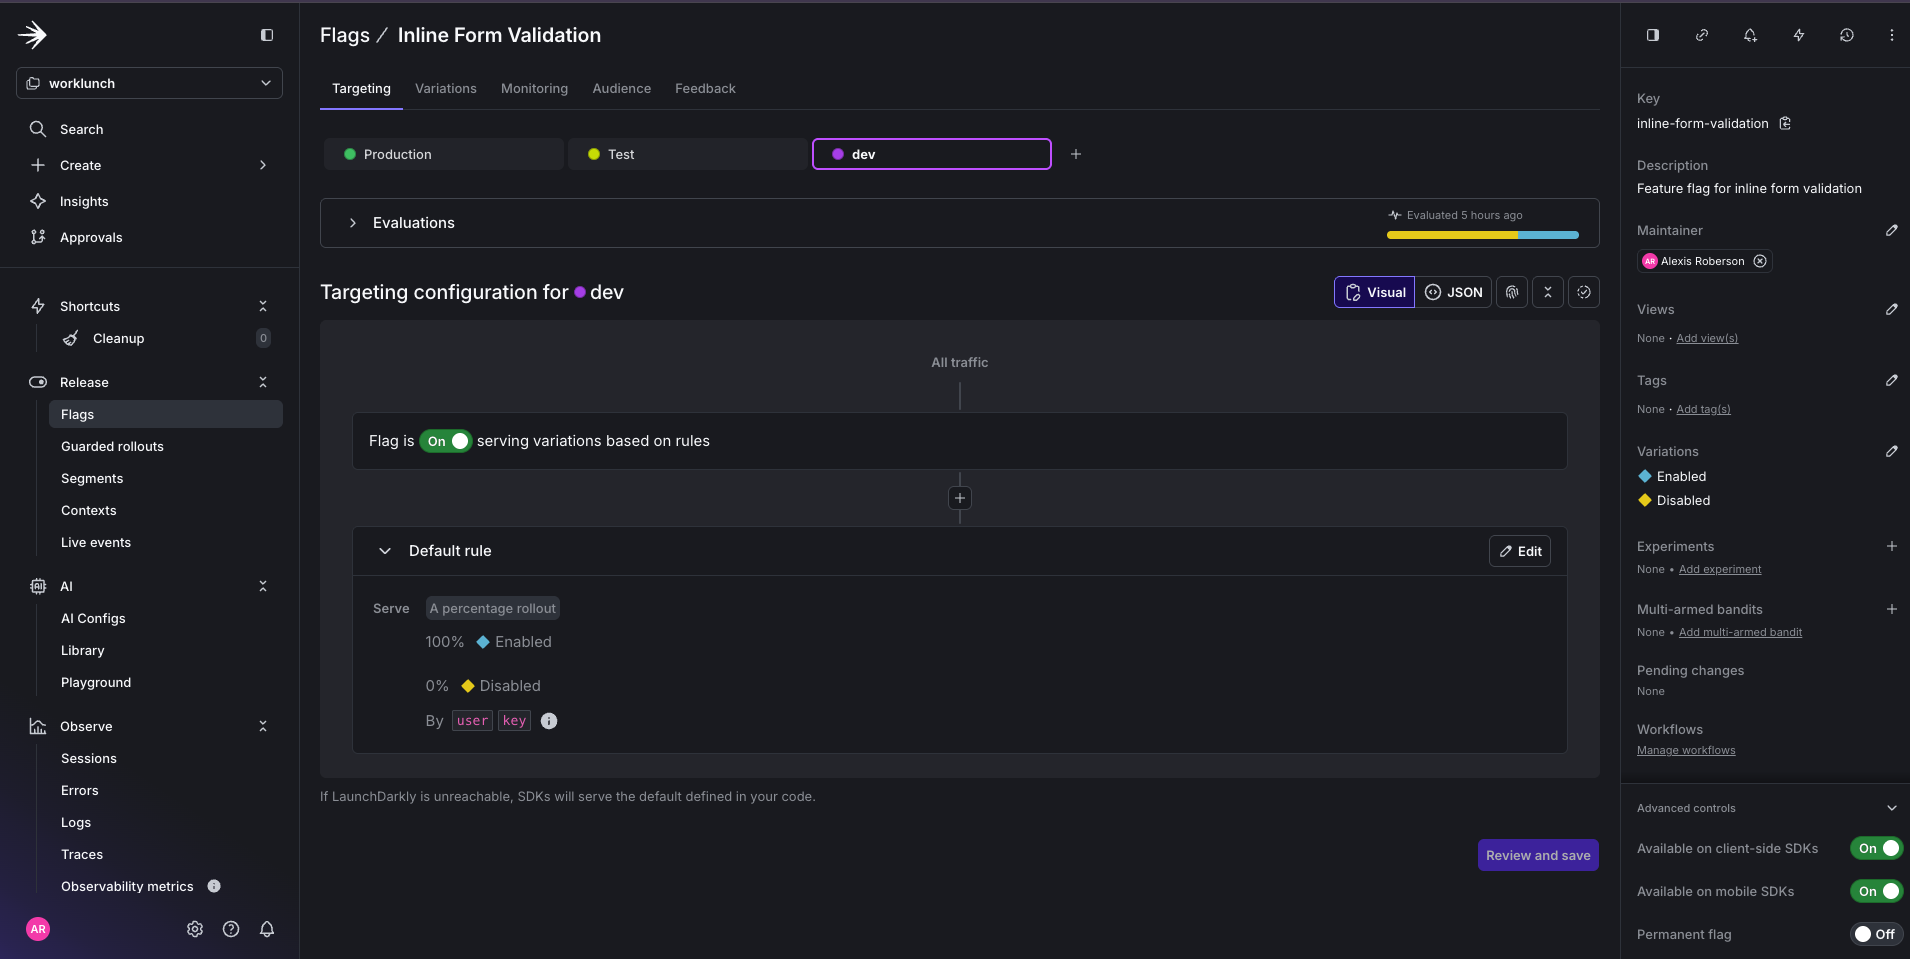
After the feature flag is toggled on, you notice users on this form are rage clicking the Create Community button. Your metrics show community creation conversions dropped 15% since enabling the flag, but there are no errors in the logs.
Thankfully, you connected your feature flag with a Guarded Release and can use it to debug the issue.
Investigation Steps
Step 1: Search for sessions with rage clicks
Since we attached a Guarded Rollout to your feature flag using a metric for detecting rage clicks, we can navigate to the LaunchDarkly’s Session page and filter for those specific sessions.
In the LaunchDarkly Sessions tab search bar, apply this filter:
This query filters for sessions with rage clicks and where the inline-form-validation flag is enabled.
Step 2: Watch for user behavior patterns
In the session replay, you see:
- User fills out the form completely.
- User clicks Create Community.
- User sees a loading spinner and nothing else.
- User clicks button repeatedly.
- User abandon forms altogether.
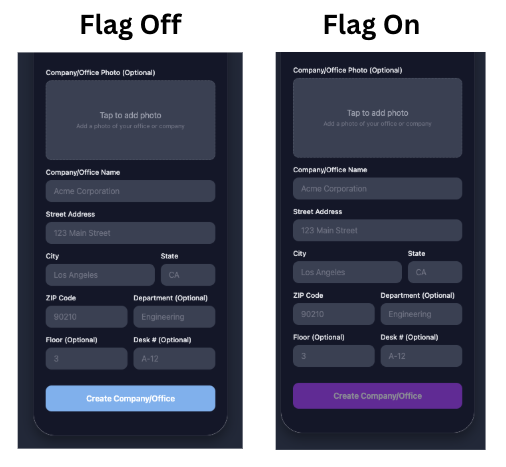
Step 3: Identify the UX failure The community was being created successfully meaning the API returned a 200 and the new community existed. The new feature was intended to simply change the button color (baby blue → purple), but it broke the code that allows the success card to be shown.
The Root Cause
When the flag is off, the code does the right thing after a successful create:
- Success → Set
createdSpace→ Show verification card (name, join code, “Back to community list”) - User taps Back → Return to community list
When the flag is on, the success path was missing:
- Success → Nothing. The
if (!useInlineValidation)block runs only for the old flow, so when the flag is on,setCreatedSpaceis never called. - The user stays on the form with no confirmation, no join code, and no way to know the create worked.
The Fix
To fix the issue, you can either rollback to previous working code or fix the issue and toggle flag back on.
Option A – Roll back the flag: Set inline-form-validation to off in LaunchDarkly. Users are no longer on the new feature; they get the existing, working code path and see the verification card after Create Community.
Option B – Fix the new feature so it no longer breaks the success card: The new feature (flag on) breaks the code that shows the success card. Fix it by adding the success handling to the flag-on path. Also, when the flag is on, also call setCreatedSpace after a successful create so the success card is shown again.
Resolution
With the root cause identified from Session Replay, you update the code and resolve the rollout:
- Roll back
inline-form-validationtofalseso users get the verification card and can return to the list (instant, no deployment needed). - Fix the flag-on success path so it shows the verification card (or redirects) after create.
- Deploy and re-enable the flag with the guarded rollout (rage click metrics) still attached, then monitor to confirm rage clicks return to baseline.
Time to resolution: 30 minutes to an hour (compared to potentially days of user complaints and support tickets).
Scenario 2: The Infinite Scroll Frustration
The Setup
Your team ships a feature flag (new-filter-location) that moves the existing Category and Sort controls on the “Lunches for Swap” feed from the top of the list to the bottom.
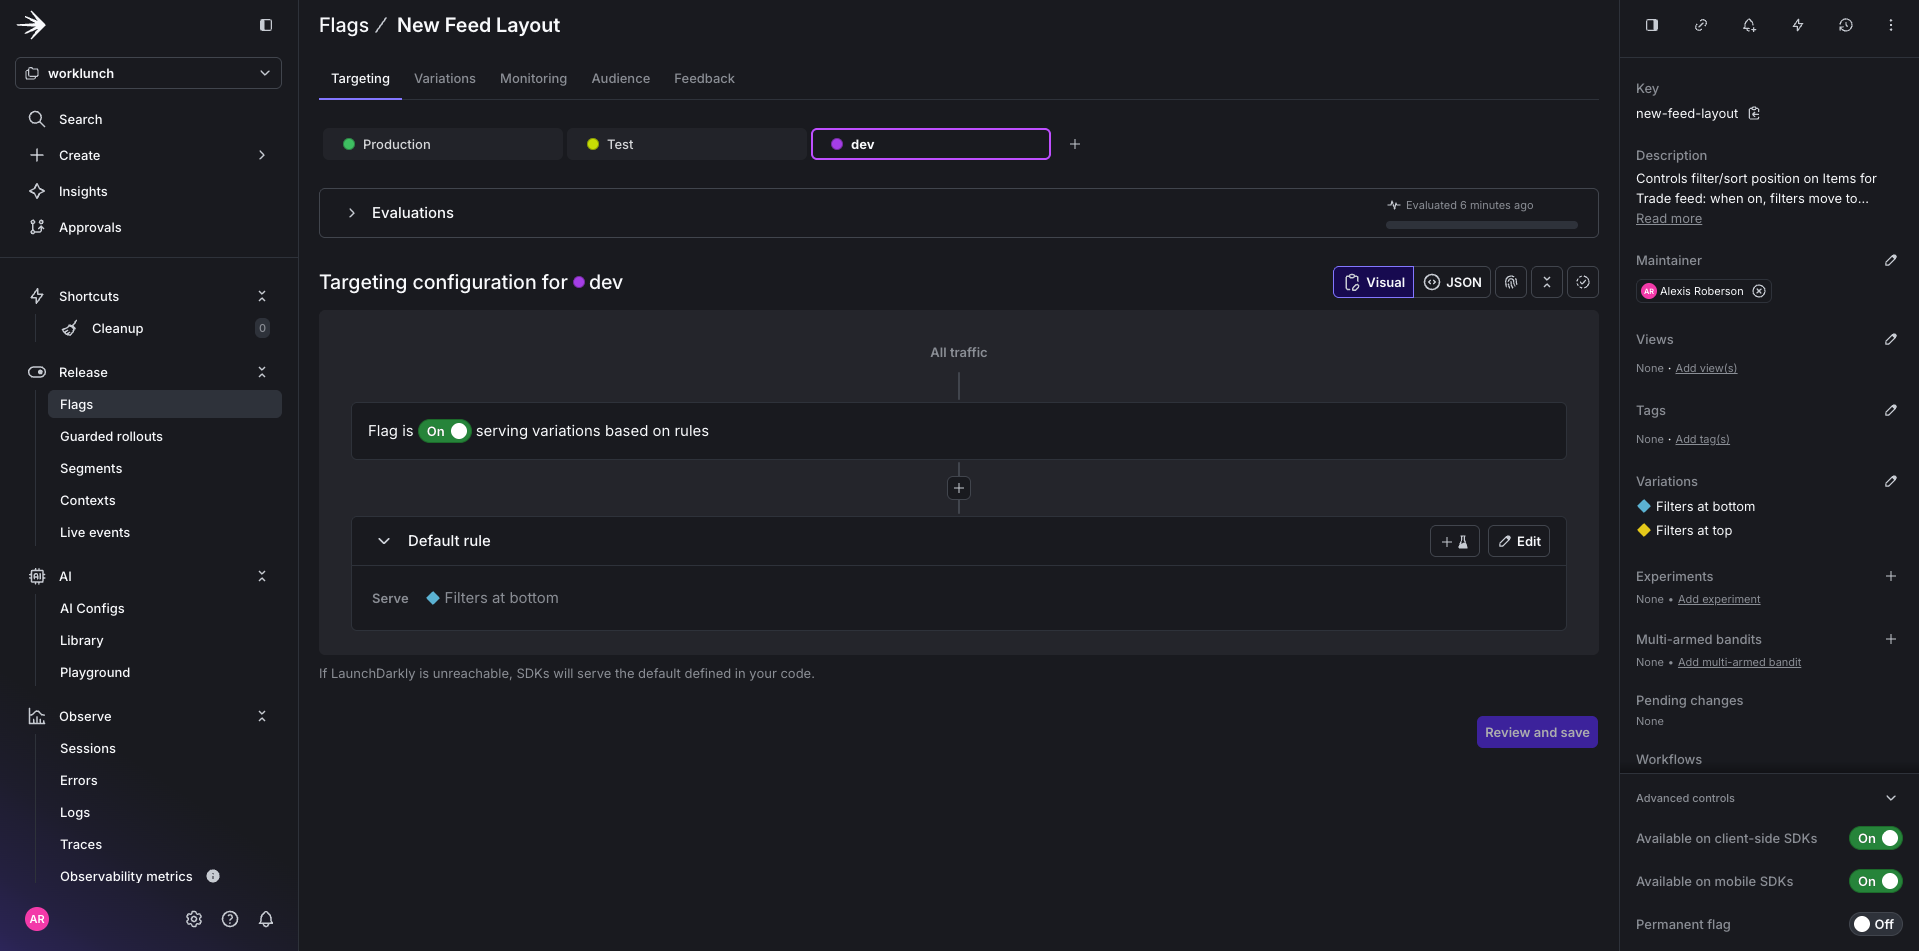
Everything works fine until you notice a drop in traffic.
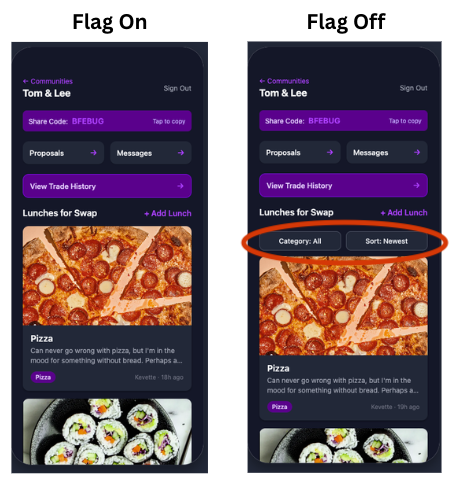
Since you see no uptick in rage clicks for your Guarded Release, you know it must be another user signal you’re missing that could indicate user frustration. So you decide to investigate further by placing yourself in the user’s shoes using session replay.
Investigation Steps
Step 1: Filter by flag variation
This query will filter for sessions where the feature flag new-filter-location is set to true.
Step 2: Watch for user behavior patterns
In session replay, you see:
- users scroll down the feed, then back up, then down again.
- Minimal item taps.
- Constantly moving through the list without making selections.
- User navigates to a different page.
The pattern suggests they’re looking for something rather than browsing items.
Step 3: Identify UX Failure Replay shows the issue: “Category” and “Sort” are not at the top where users expect them. With the flag on, the controls were moved to below every post in the feed.
The Root Cause
The feature flag moves the existing filter bar from the top to the bottom of the list (ListFooterComponent when the flag is on). Same controls, different position.
The Fix
Step 1 – Roll back the flag: Set new-filter-location to false. Filters return to the top (original position); rage scrolls drop.
Step 2 – Fix the experiment: Don’t move the filters to the bottom. Keep the filter bar at the top regardless of the flag, or remove the flag and leave filters in their original place.
Resolution
- Roll back
new-filter-locationtofalseso filters are at the top again - Fix keep the filter bar at the top.
- Deploy and re-enable the flag with monitoring.
Building your debugging playbook
Based on these scenarios, here’s a systematic approach to rage click debugging:
Step 1: Triage with Filters
Step 2: Identify the Pattern When reviewing session replays, look for:
- Visual feedback gaps (Did the UI acknowledge the click?)
- Loading states (Is there a spinner? Does it ever resolve?)
- Error visibility (If there’s an error, can the user see it?)
- Touch target issues (On mobile, are elements too small or overlapping?)
- Timing problems (Does the click happen before the element is ready?)
Step 3: Correlate with Technical Data Session replay shows you the user’s experience. Pair it with:
- Network tab (API response codes and payloads.)
- Console errors (JavaScript exceptions.)
- Feature flag state (Which variation was the user seeing?)
- Timing (When in the session did frustration peak?)
Step 4: Fix and Verify
- Roll back using your feature flag (instant, no deployment needed).
- Fix the root cause in code.
- Re-deploy with the guarded rollout active.
- Monitor rage click metrics to confirm the fix worked.
Whether you’re shipping traditional features or AI-powered experiences, this playbook reflects a devops for ai mindset: continuous monitoring, fast rollback, and data-driven debugging that closes the gap between deployment and user impact.
Bringing it all together
The combination of rage click detection, session replay, and guarded releases creates something powerful: observability that starts with the human experience.
Traditional monitoring asks: “Is the system healthy?”
This approach asks: “Are users successful?”
When you can detect frustration in real-time, watch exactly what users experienced, and roll back problematic features instantly, you fundamentally change how fast you can ship with confidence.
This workflow fits into the broader ai deployment lifecycle, treating user frustration signals as first-class deployment metrics, just like error rates or latency. By embedding rage click detection into your ai lifecycle management strategy, every release becomes a feedback loop that improves both the product and the process.
Series recap
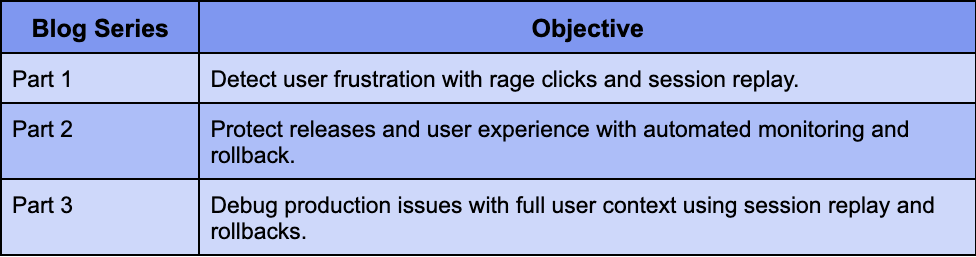
The next time your users are frustrated, you’ll know exactly what went wrong, which users were affected, and why. And the best part is you’ll fix it before most users even notice.