ClickHouse Data Export
Data Export is an add-on feature
Data Export is available as an add-on feature to select plans. To learn more, read about our pricing. To add Data Export to your plan, contact Sales.
This topic explains how to create and test a ClickHouse destination for Data Export. By exporting your LaunchDarkly data to the same ClickHouse instance as the rest of your data, you can build custom reports in ClickHouse to answer product behavior questions.
LaunchDarkly stages exported data in an Amazon S3 bucket before it loads the data into ClickHouse. These setup instructions include configuring an S3 staging bucket and the Amazon Web Services (AWS) Identity and Access Management (IAM) that LaunchDarkly needs.
Prerequisites
To configure the ClickHouse Data Export integration, you must have the following prerequisites:
- A LaunchDarkly role that allows you to add and edit integrations and add destinations.
- A ClickHouse instance that is reachable over the public internet on its native TLS port. The default port for ClickHouse Cloud is
9440. - IAM permissions in AWS to create policies, roles, and S3 buckets.
- The ability to run SQL statements in your ClickHouse SQL console.
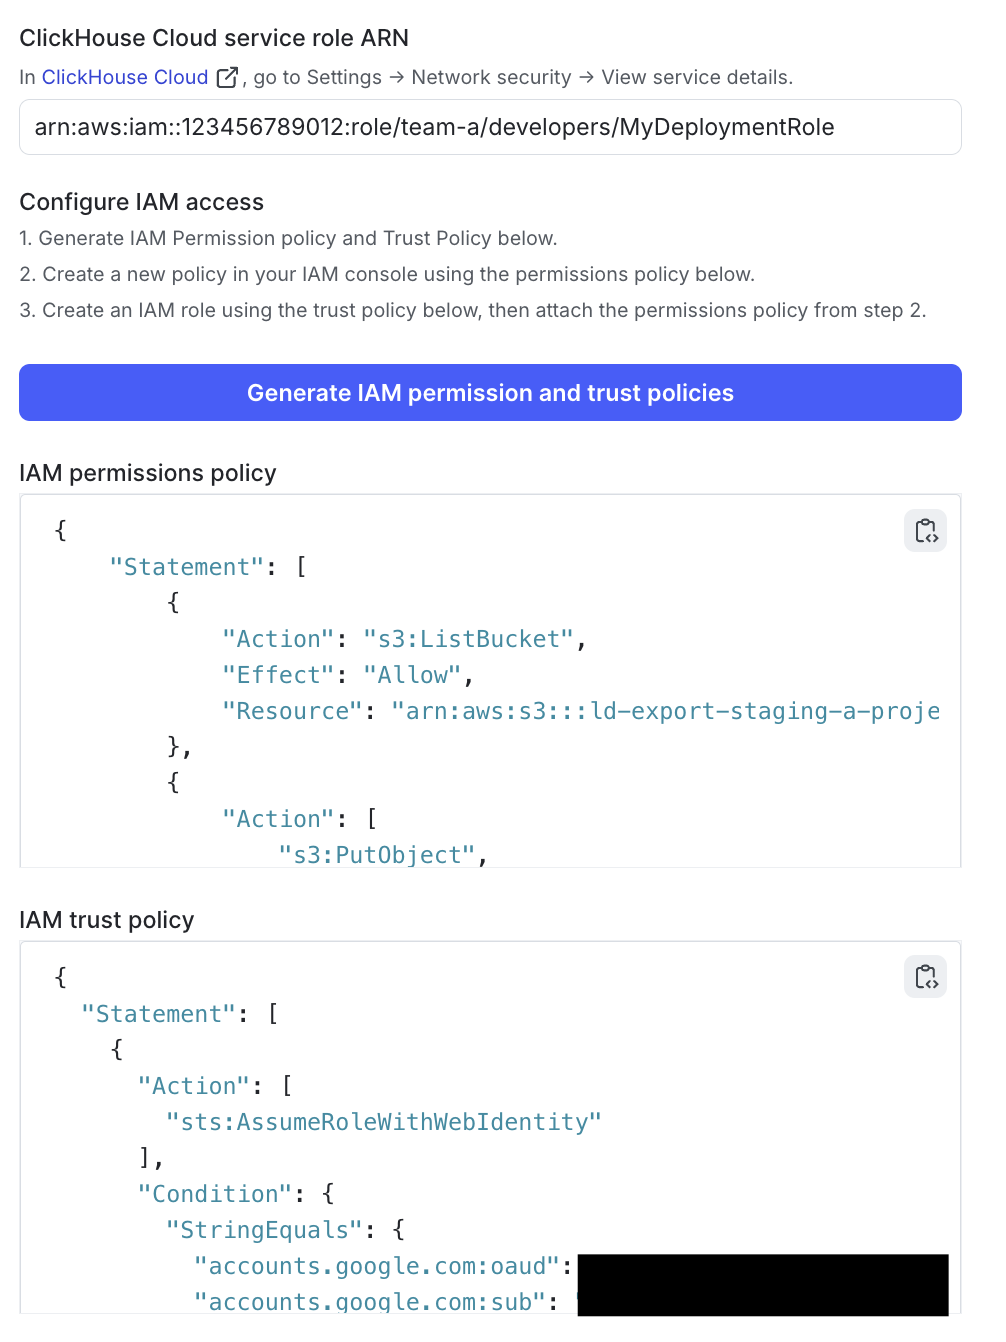
- Your ClickHouse Cloud service role ARN. To find it, in ClickHouse Cloud go to Settings, then Network security, then View service details.
- If your ClickHouse instance restricts inbound connections by IP, you must allow the LaunchDarkly data transfer service’s static IP address:
35.192.85.117.
For best performance, create your S3 staging bucket in the same AWS region as your ClickHouse instance.
One Data Export destination per environment
You can configure only one Data Export destination per LaunchDarkly environment, regardless of destination kind. If you need Redshift Data Export and another Data Export destination for the same data, configure them in different environments.
ClickHouse naming conventions
When you select a project and environment, LaunchDarkly pre-fills default names for the resources the setup creates.
You can keep these defaults or customize them:
- Database:
ld_export. Shared across all environments. - User:
ld_export_user_<projKey>__<envKey>, where<projKey>is your project key and<envKey>is your environment key. Unique to a project and environment. - S3 staging bucket:
ld-export-staging-<projKey>--<envKey>. LaunchDarkly changes the name to lowercase and replaces underscores with hyphens, because S3 bucket names cannot contain underscores. Unique to a project and environment.
Set up the integration
To set up ClickHouse Data Export, enter your connection details and staging bucket, set up AWS access, generate a SQL script to run in ClickHouse, then test the connection and save the destination.
We recommend having browser windows open for LaunchDarkly, AWS, and ClickHouse so that you can easily switch between them.
Connect your LaunchDarkly environment to ClickHouse
To connect your LaunchDarkly environment to ClickHouse:
- In LaunchDarkly, click the gear icon in the left sidebar to view Organization settings.
- Click Integrations and find “ClickHouse Data Export.”
- Click Add new. The ClickHouse Data Export configuration page appears.
- Give your integration a unique Name.
- Choose a Project and environment to export data from. Environments that already have a ClickHouse Data Export destination are unavailable.
- Enter the Host name of your ClickHouse instance, without the protocol.
- Enter the native TLS Port of your ClickHouse instance. The default port for ClickHouse Cloud is
9440. - Review the S3 staging bucket name. LaunchDarkly pre-fills a default, which you can customize.
- Select your S3 staging bucket region.
- (Optional) Update the Database name or User from their defaults.
- Enter your ClickHouse Cloud service role ARN.
- Click Generate IAM permission and trust policies. LaunchDarkly returns an IAM permissions policy and an IAM trust policy. Save these for use in the next section.
Configure AWS
Next, configure your AWS staging bucket and permissions:
- In AWS, create an S3 staging bucket using the name from step 8 in the previous section, in the region you selected in step 9.
- Create an IAM policy using the permissions policy you generated in the previous section.
- Create an IAM role using the trust policy you generated in the previous section, and attach the policy you created to that role.
- Copy and save the ARN of the new role to use in the next section.
Complete the setup in LaunchDarkly and ClickHouse
Now, return to LaunchDarkly to complete the setup:
- Paste the ARN of the new role into the IAM role ARN field in LaunchDarkly.
- Enter a Password for the export user. Use only alphanumeric characters, dashes (
-), and underscores (_). LaunchDarkly embeds this password in the generated script. - (Optional) If your ClickHouse instance restricts inbound connections by IP, turn on Allowlist the LaunchDarkly IP. The generated script then restricts the export user to the LaunchDarkly egress IP for your region.
- Click Generate script. LaunchDarkly generates a SQL setup script with your password already included.
- Copy the script, then return to ClickHouse and run it in the ClickHouse SQL console. This creates the database and user, and grants the permissions LaunchDarkly needs to write exported data.
- After reading the Integration Terms and Conditions, select the I have read and agree to the Integration Terms and Conditions box.
- Click Test connection and save. LaunchDarkly tests the ClickHouse connection and, if it succeeds, creates and activates the destination.
Your ClickHouse Data Export integration is now complete.
ClickHouse Data Export runs an hourly job, on the hour, that publishes raw LaunchDarkly data in your ClickHouse instance. You can expect the new data to be available within 10-15 minutes after the hour.
To view the different event kinds for ClickHouse Data Export destinations, read Warehouse Data Export schema reference.
Edit an existing destination
To edit a ClickHouse Data Export destination after you set it up:
- In LaunchDarkly, click the gear icon in the left sidebar to view Organization settings.
- Click Integrations and find “ClickHouse Data Export.”
- Find the destination you want to edit and click Edit. The ClickHouse Data Export configuration page appears with the destination’s current settings.
- Update the fields you want to change.
- Click Save configuration.
The project and environment you chose in the initial configuration are permanent and cannot be changed.