
Agent graphs
This topic explains how to create and use agent graphs to orchestrate multi-agent workflows with AgentControl.
As multi-agent systems grow, coordinating how agents connect, hand off work, and depend on each other becomes difficult to manage directly in application code.
An agent graph defines these relationships outside your application code. It is a directed graph where each node represents an agent-based config, and each edge defines how output passes from one agent to another.
Use agent graphs for any workflow that involves multiple agents working together. Agent graphs coordinate responsibilities across agents, support reuse across workflows, and define the execution order of agents in complex systems.
At an organizational level, agent graphs support:
- Standardized multi-agent orchestration patterns
- Centralized definition of workflow structure outside application code
- Workflow changes managed through configuration
- A shared representation of how agents interact during execution
Agent graphs build on agent-based configs. To learn more about the underlying concepts, read AgentControl and Agents.
How agent graphs work at runtime
An agent graph is a rooted, directed graph that uses existing agent-based configs as nodes. Edges define how execution moves from one agent to another, and can optionally include handoff data.
An agent graph is defined by:
- A root node, which determines where execution starts
- A set of directed edges, which define how agents are connected
A config can appear in multiple agent graphs. Agent graphs can include cycles, including cases where two agents reference each other. LaunchDarkly does not enforce acyclic graphs and does not impose recursion or termination rules.
Agent graphs are evaluated through the LaunchDarkly AI SDK. The SDK resolves the graph structure and evaluates each agent-based config using standard targeting rules.
LaunchDarkly does not execute agent graphs or call model providers. The SDK does not manage graph state or traversal decisions. Execution behavior such as model invocation, state handling, edge selection, and termination logic occurs outside of LaunchDarkly.
Agent graphs provide a structured representation of multi-agent workflows that can be evaluated and distributed through LaunchDarkly without embedding the graph topology in application code.
Permissions and constraints
This section describes the permissions required to manage agent graphs and the constraints that apply to agent graph structure.
Permissions and access
To create or manage agent graphs, you must have permissions that allow editing AgentControl config resources in the project. Agent graphs use the same role-based access control model as AgentControl. Users without permissions to edit AgentControl config resources can view agent graphs but cannot modify them.
Constraints
Agent graphs must meet the following requirements:
- Each agent graph defines a root agent.
- All referenced agent-based configs must exist.
- All nodes must be reachable from the root agent for the graph to be enabled.
- Each source agent can define at most one edge to a given target agent.
LaunchDarkly enforces these conditions when an agent graph is created, updated, or evaluated through the SDK.
Manage agent graphs in the UI
Use the agent graph builder in the LaunchDarkly UI to create and manage agent graphs.
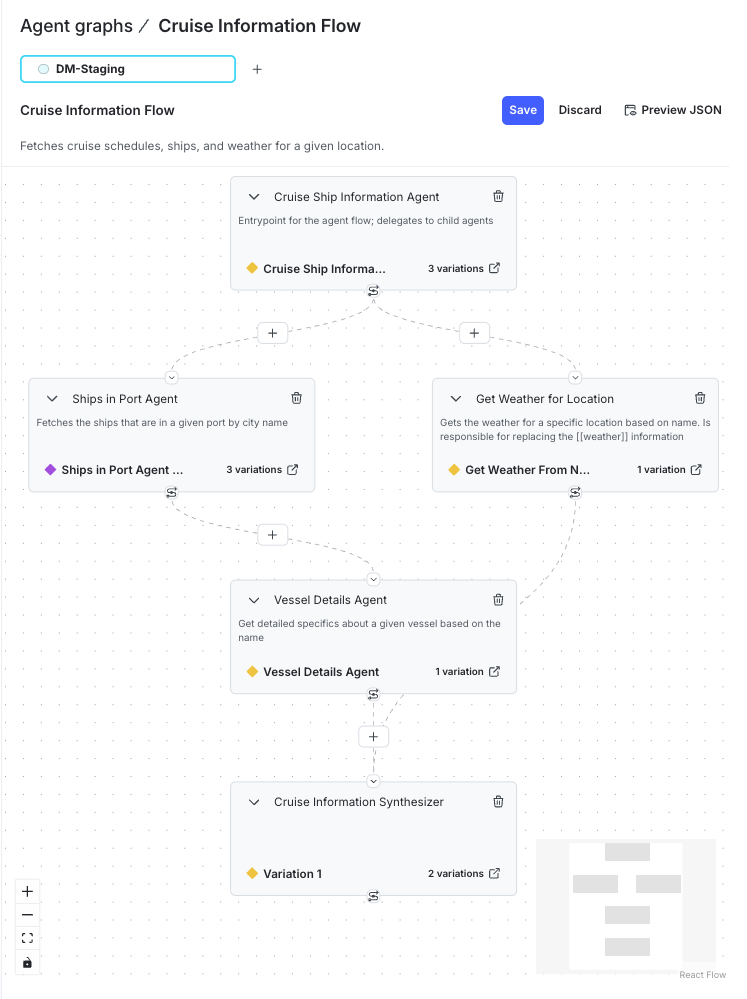
The agent graph builder shows:
- Agent nodes, each representing an agent-based config in the graph.
- The default variation served in the selected environment, along with the total number of variations for each agent.
- Connections between agents, where you define handoff data passed from one agent to the next.
- The Preview JSON action, which opens a JSON view of the graph structure evaluated by the SDK.
Create an agent graph
To create an agent graph:
- Navigate to your project.
- In the left sidebar, click Agents. The AgentControl menu appears.
- Click Graphs.
- Click Create new graph.
- Enter a name for the agent graph.
- (Optional) Click Edit key to update the agent graph key. You use the key to reference the agent graph in your code.
- (Optional) Enter a description.
- Click Create.
After you create the agent graph, LaunchDarkly opens the agent graph builder.
Add agent nodes and handoffs
Each node in an agent graph represents an agent-based config.
To add an agent node:
-
In the agent graph builder, click + Add your first agent or Add agent.
-
Use the Select an agent dropdown to select the first agent-based config for your graph. You can use the search box to find an agent by entering all or part of the agent’s name. After selection, the node shows the chosen agent and its available variations.
-
Click the downward-facing arrow button.
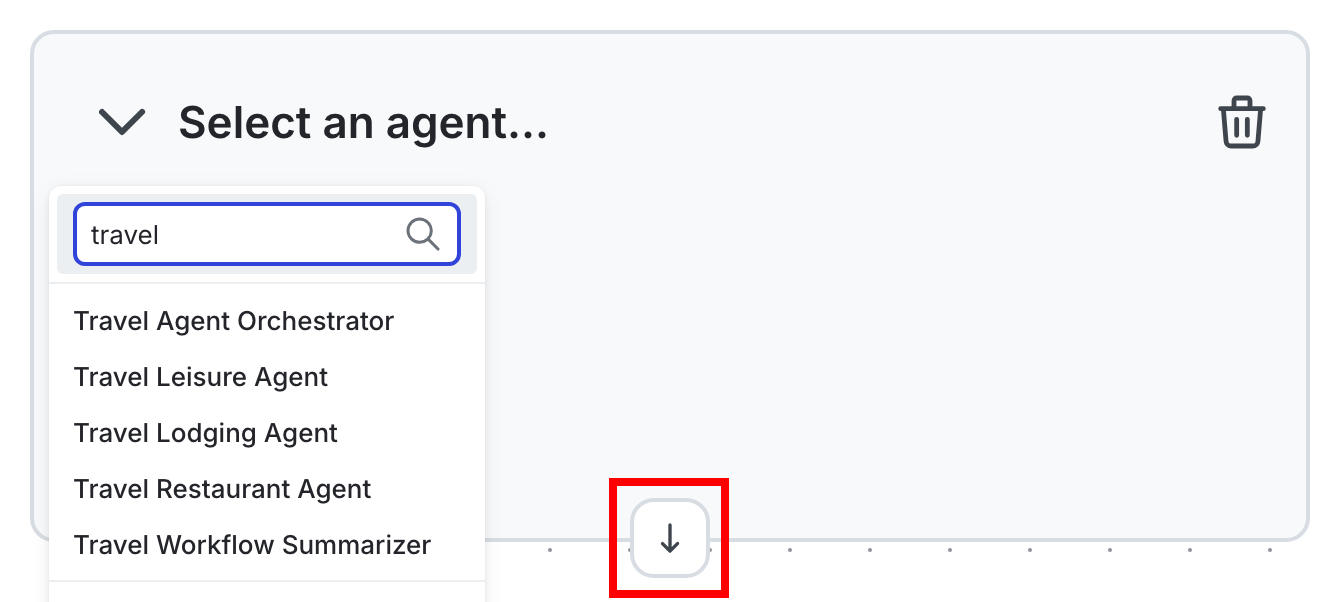
The downward-facing arrow button. -
Use the new Select an agent dropdown to select another agent-based config.
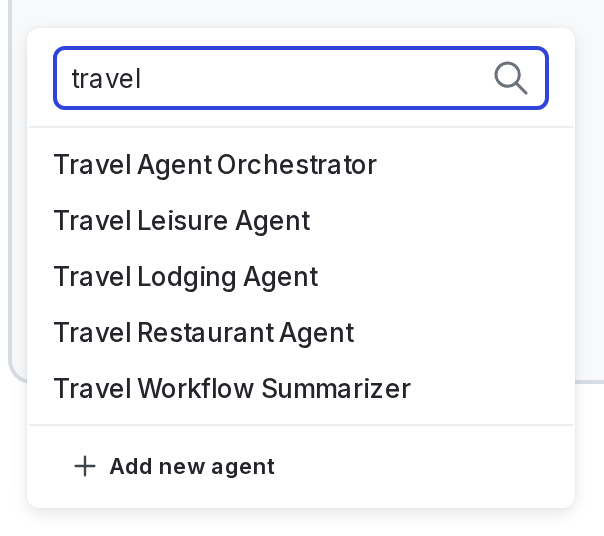
Select an agent for a new node. -
(Optional) Repeat these steps to add additional agents.
-
Click Save.
Configure handoffs
Handoffs are JSON objects attached to edges between nodes. Handoff data is available during graph traversal in the SDK and can be interpreted according to your application logic.
To configure a handoff:
- Click the + button on the edge that connects two agents.
- Enter data in JSON format to be passed from the parent node to the child node.
- Click outside the handoff data dialog to save and close it.
Edit an agent graph
You can update an agent graph to change its structure or metadata.
To edit an agent graph:
- Open the agent graph.
- Add or remove agents, set connections between agents, or edit handoff data.
- Click Save.
When you save an update, LaunchDarkly replaces the existing graph structure with the new version.
Delete an agent graph
Delete an agent graph when it is no longer needed.
To delete an agent graph:
- Navigate to your project.
- In the left sidebar, click Agents. The AgentControl menu appears.
- Click Graphs.
- Click the three-dot overflow menu for the agent graph and select Delete graph.
View the graph structure
The agent graph builder includes a JSON preview that shows the graph structure evaluated by the SDK.
To review the JSON representation, open an agent graph and click Preview JSON in the upper-right corner of the builder.
Use this view to:
- Confirm which agent you configured as the root
- Review how agents are connected through edges
- Verify the handoff data passed between agents
The JSON preview reflects the exact structure delivered to the SDK at runtime and can help validate that the graph behaves as expected before you use it in your application.
Agent graphs in the SDK
Use the LaunchDarkly AI SDK to evaluate and traverse an agent graph at runtime.
Agent graph functionality is currently supported in the Python AI SDK and Node.js (server-side) AI SDK.
Before you begin, make sure your application has a live SDK connection by completing the Quickstart for AgentControl.
Initialize an agent graph
Each agent graph has a unique key that you use to reference it in code. You can find this key in the agent graph details panel in the UI.
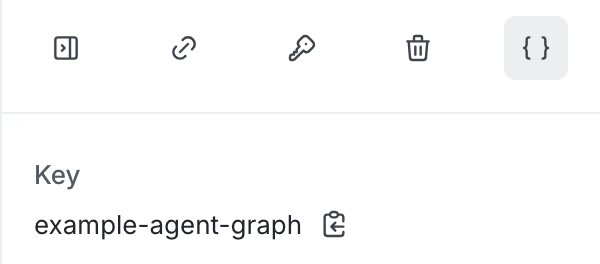
Use the graph key to initialize the agent graph with an SDK context:
After initialization, verify that the graph is enabled:
An agent graph may be disabled if:
- One or more nodes are not reachable from the root agent
- One or more agents resolve to a disabled variation
- The graph definition is missing a root or is otherwise invalid
You can enable debug logging in your application to receive warning messages that explain why a graph is disabled.
Run an agent graph automatically
For supported frameworks, we recommend using create_agent_graph to run an agent graph. This method handles orchestration automatically. You do not need to write traversal logic yourself, and metrics are collected without additional setup. Use this method unless you need to inspect or control execution at each step, or you are using a framework that is not yet supported.
Automatic orchestration currently supports LangGraph and the OpenAI Agents SDK. If you’re using a different framework, use manual traversal instead, or let us know what you would like us to support.
Traverse an agent graph manually
Use manual traversal to inspect or control execution at each step. You can also use it if you’re using a framework that isn’t yet supported by automatic orchestration.
The SDK provides two traversal methods:
traversereverse_traverse
Use reverse_traverse when child agents must be created before their parent agents.
The following example uses reverse_traverse with the OpenAI Agents framework to construct a simple multi-agent workflow:
Understand traversal behavior
Traversal functions receive two arguments:
node, anAgentGraphNoderepresenting the current agentctx, a mutable execution context used to store state during traversal
Calling node.get_config() returns the evaluated agent-based config. Calling node.get_edges() returns the outgoing edges from that node, including any associated handoff data.
Each value returned from the traversal function is stored in the execution context, keyed by the agent’s config key.
When using reverse_traverse, traversal processes child agents before parent agents. Agents created earlier in the traversal are available to agents created later.
In a graph where some agents depend on the output of others, traversal begins at the leaf nodes and proceeds toward the root. Each agent is created before any agent that references it.
The following diagram shows a simplified view of agent relationships in the graph. It illustrates parent and child agents and does not represent a serialized format such as JSON.
The traversal method returns the root node of the graph. In this example, the root node is an OpenAI Agent instance that can be executed directly using Runner.run.
Track metrics for agent graphs
When you record metrics using the AI SDK tracker, you can associate those metrics with an agent graph. Metrics recorded with a graph key appear in the Graph and Monitoring tabs for the agent graph.
All tracker methods accept an optional graph_key parameter, including methods for tracking duration, tokens, success, errors, evaluation scores, and tool usage. For the complete list of available tracking methods, read the Python AI SDK reference.
Use the graph_key parameter when recording metrics for agent executions within a graph. You can pass graph_key to individual tracking methods for a single agent execution. This includes metrics such as token usage, duration, success, and errors.
When you include a graph_key, the recorded metric event includes the graph identifier. This allows LaunchDarkly to associate metrics from a single config execution with the agent graph that triggered it.
This helps you:
- Attribute token usage and latency to a specific workflow
- Analyze how individual agents contribute to graph performance
- Trace metric events back to the graph that executed them
The following example shows how to include the graph key when recording metrics for an agent within a graph:
Monitor agent graphs
Agent graph monitoring records how multi-agent workflows execute in production.
You can use monitoring data to understand runtime workflow behavior, identify slow or frequently invoked agents, and detect failures in routing paths. Monitoring metrics also support evaluation of changes to agents, prompts, models, or tools using real execution data.
Monitoring presents workflow performance in a shared view across engineering, AI platform, and operations teams. This supports consistent analysis of agent behavior and standardized operational practices for agent-based systems.
Access monitoring for an agent graph
When you open an agent graph in the LaunchDarkly UI, the page includes two tabs:
- Graph
- Monitoring
Each tab provides a different view of agent graph activity.
View metrics on the graph
The Graph tab displays the workflow structure and lets you view execution metrics directly on each agent node.
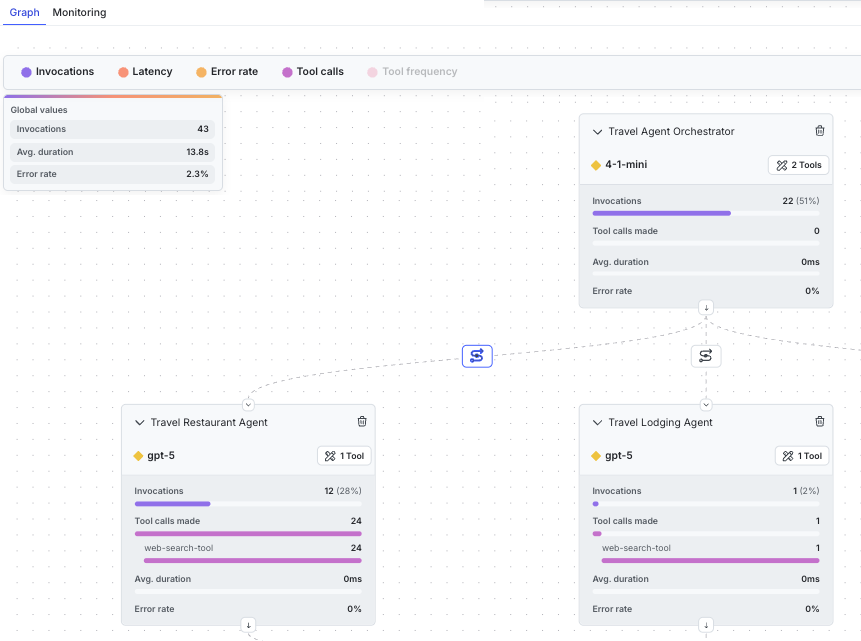
Use the metric buttons at the top of the graph to display different categories of metrics:
- Invocations
- Latency
- Error rate
- Tool calls
- Tool frequency
Selecting a metric displays the corresponding value for each node in the graph. This view shows which agents are invoked most frequently and which nodes contribute the most latency during execution.
Analyze monitoring data over time
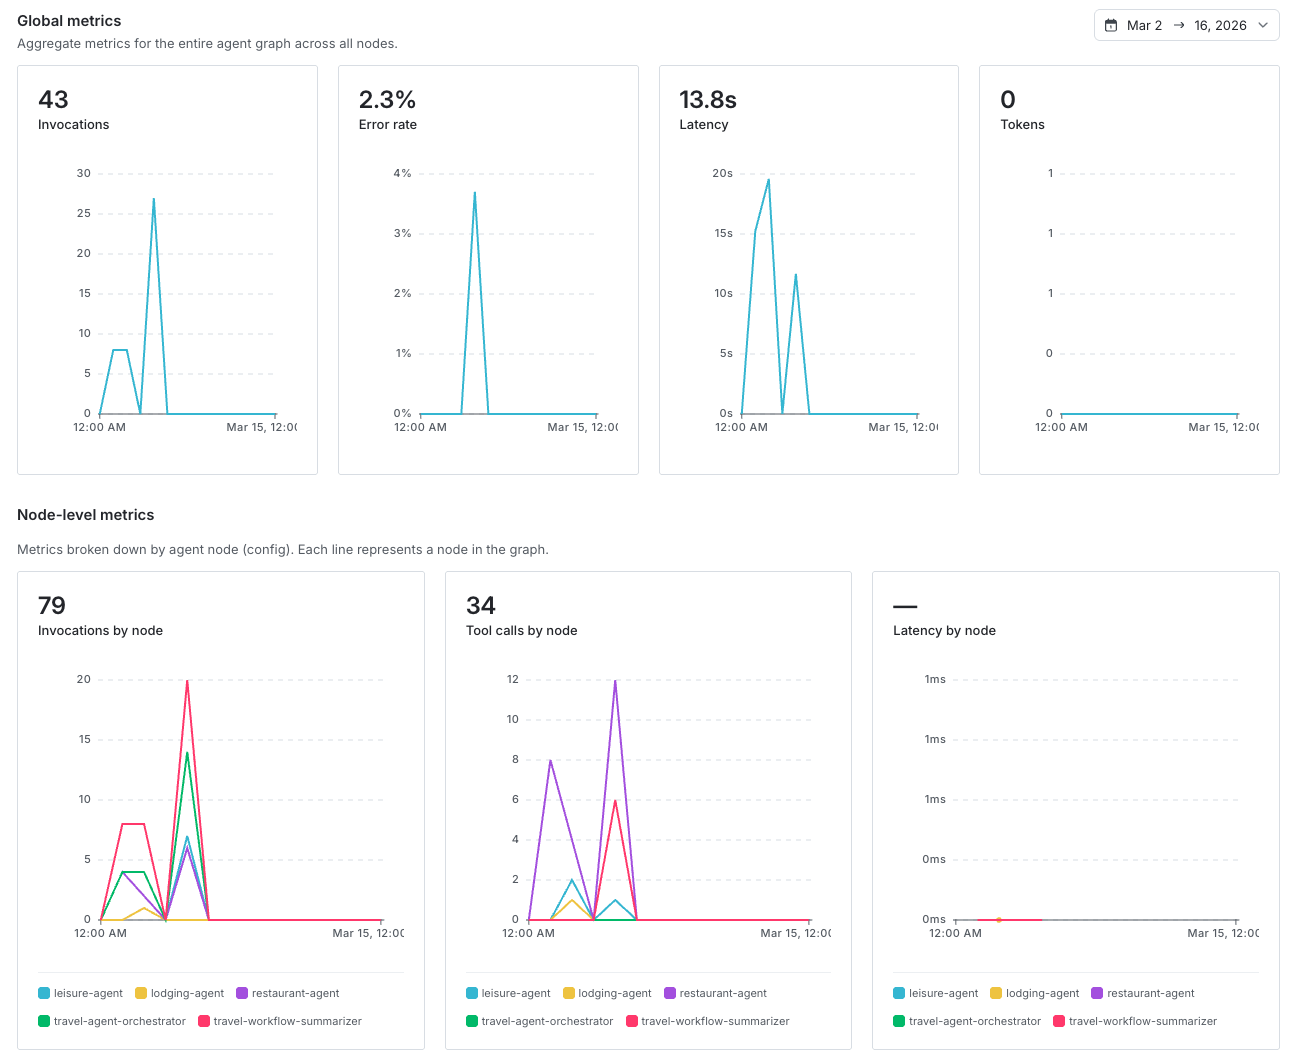
The Monitoring tab displays time-series charts that show how graph activity changes over time.
Metrics are grouped into two sections.
Global metrics
Global metrics aggregate activity across the entire agent graph.
The following charts are available:
- Invocations
- Error rate
- Latency
- Tokens
Each chart shows how the metric changes over time for the entire workflow.
Node-level metrics
Node-level metrics break down activity by agent node. Each line in these charts represents a node in the graph.
Available charts include:
- Invocations by node
- Tool calls by node
- Latency by node
These charts make it possible to compare how different agents contribute to the behavior of the overall workflow.
Track tool usage
Tool call metrics record how often agents invoke external tools.
To display tool usage metrics, instrument tool calls in your application using the AI SDK tracker. When tool call events are recorded through the SDK, LaunchDarkly aggregates this data and displays it in the Graph and Monitoring views.
Next steps
After building an agent graph, you can monitor agent performance using Monitor config performance and experiment with workflow changes using Run experiments with AgentControl.