
Create and manage config variations
This topic explains how to create and manage config and judge variations.
An AgentControl config is a resource that you create in LaunchDarkly. You can use AgentControl to customize, test, and roll out new large language models (LLMs) within your generative AI applications.
A judge is a specialized AgentControl config that uses a large language model (LLM) as a judge to evaluate responses and return numeric scores that represent quality signals related to accuracy, relevance, toxicity, or custom signals you define.
Both configs and judges use similar configuration patterns. The documentation in this topic can be used for either config or judge configuration, except where otherwise indicated. To learn more, read Custom judges.
Within each config, you define one or more variations. Each variation defines a unique combination of model settings and prompt content, using messages in completion mode or instructions in agent mode. A variation can be in one of two states: “published” or “archived.”
You can create config variations in either completion mode or agent mode:
- In completion mode, variations define messages and model parameters.
- In agent mode, variations define instructions and optional tools instead of messages.
To learn how instructions and tools are defined and used in agent mode, read Agents.
Create config variations
You can create variations for a config using the LaunchDarkly UI. Each variation defines a unique combination of model settings and prompt messages. In completion mode, this content consists of messages. In agent mode, it consists of instructions. You can create multiple variations in the UI at the same time.
To create one or more variations in the LaunchDarkly UI:
-
In the left sidebar, click Agents. The AgentControl menu appears.
-
Click Configs.
-
Click the name of the config you wish to edit. a. To edit a judge, navigate to the library, then the Judges tab and click the name of the judge you wish to edit.
-
Click the Variations tab.
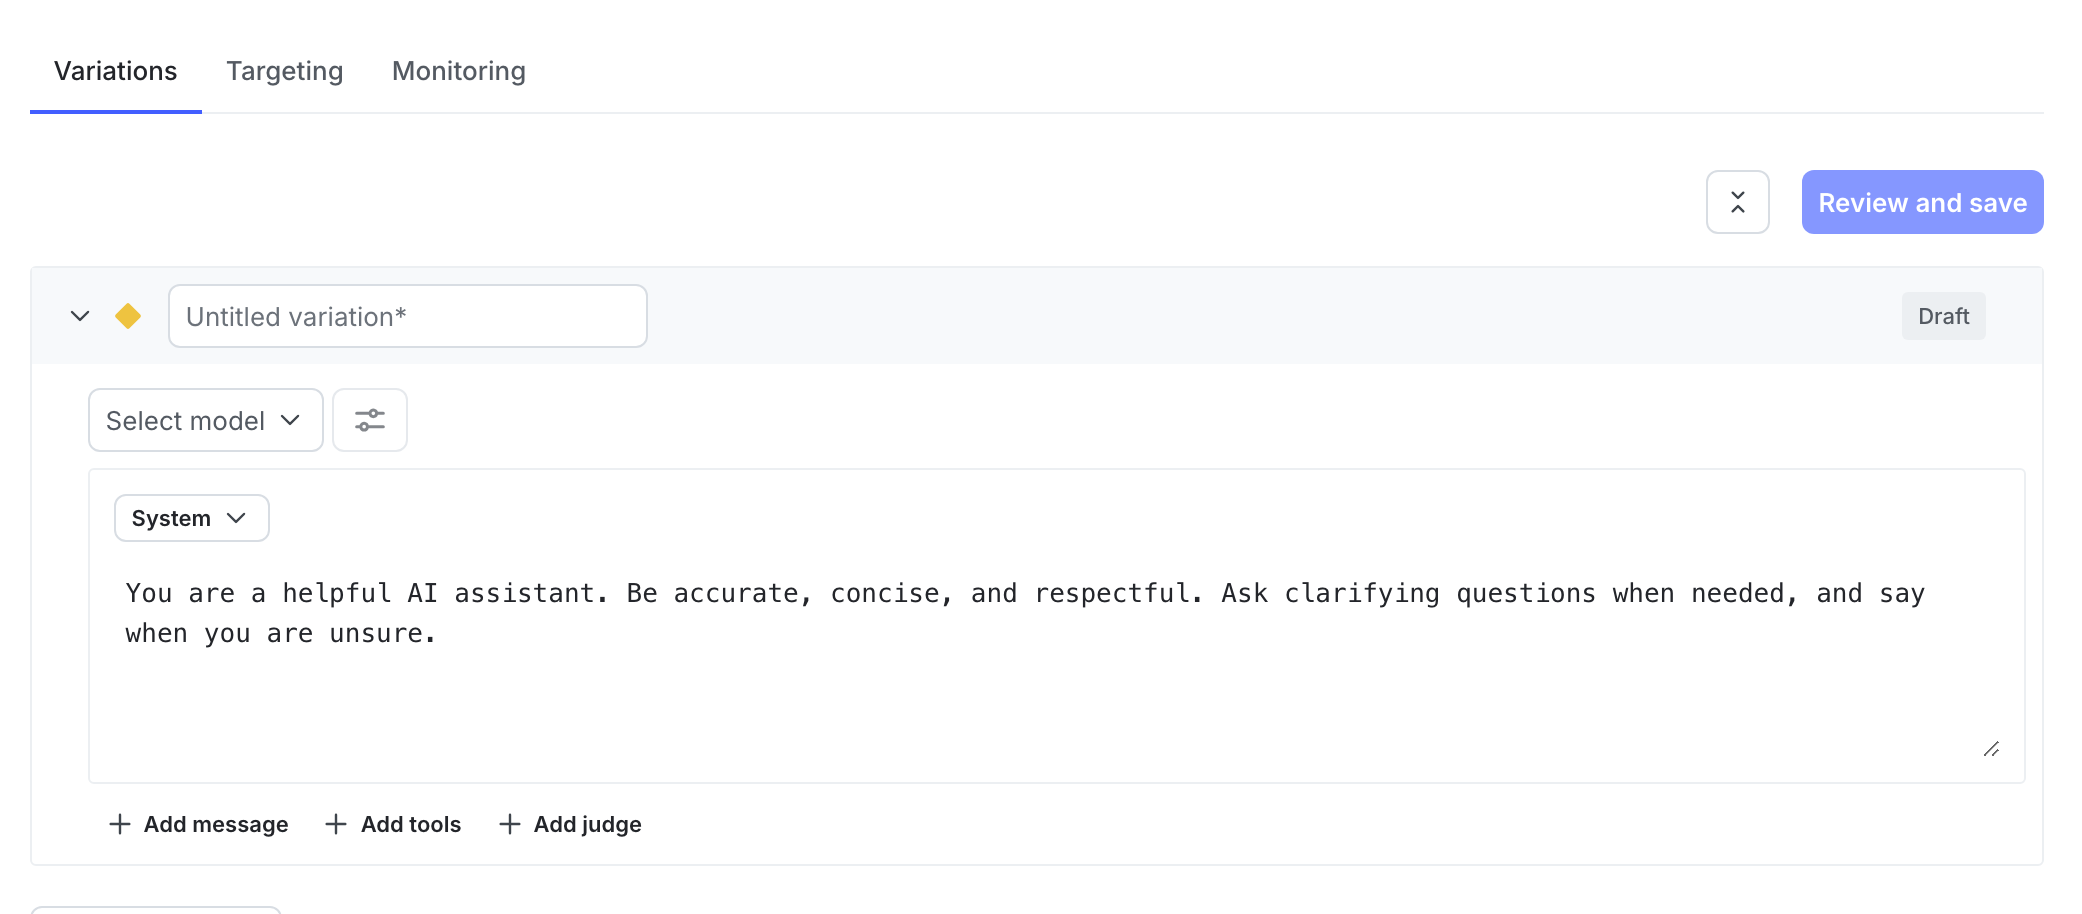
The "Variations" tab of a newly-created config. -
Click Add variation.
-
Enter a variation Name. Use this name to refer to the variation when setting up targeting rules.
-
Click Select a model and choose a model to use.
- LaunchDarkly provides a frequently updated list of common models.
- You can also choose Add a model and create your own. To learn more, read Create and manage AI model configurations.
LaunchDarkly does not send any data to these modelsLaunchDarkly does not transmit any information you provide when creating a config and its variations to external models. We do not use any of this data to fine-tune or train any models. Your model selection is solely used to suggest parameter values and help you organize which messages are associated with each model. This list of available models is updated regularly. If you want us to add a new model, click the Give feedback option to share your request.
-
After you assign a model to a variation, click Add parameters and configure model or custom parameters for the variation. To learn more, read Add parameters.
-
(Optional) In completion mode, use the dropdown menu to select the message role for the first message in this variation. The default value is “system” but you can also choose “assistant” or “user.” Not all model providers support every role.
-
(Optional) In completion mode, enter the text of the message. You can use standard Markdown formatting within the message.
- (Optional) Use double curly braces to indicate variables that you’ll set at runtime from your application. For example, enter
This is an {{ example }} messageif you want to replace{{ example }}with some other value in your application code when an end user encounters this variation. - (Optional) Use double curly braces, the
ldctxprefix, and dot (.) notation to indicate context attributes whose values you want to use at runtime. For example, enterDescribe the typical weather in {{ ldctx.city }}to replace{{ ldctx.city }}with thecityattribute from each context that encounters this config. - To learn more about how variables and context attributes are inserted into messages at runtime, read Customizing AgentControl configs.
- (Optional) Use double curly braces to indicate variables that you’ll set at runtime from your application. For example, enter
-
(Optional) Click + Add message and repeat steps 8 and 9 to include another message in this variation.
-
(Optional) Click Add tools to incorporate built-in tools into the config variation. To learn more, read Tools.
-
(Optional) For an AgentControl config, click Add judges to incorporate a judge into this variation. To learn more, read Judges.
-
Click Review and save to save the variation.

You can also use the REST API: Create config variation. The REST API supports creating individual variations only.
After creating a config and its variations, you can set up targeting rules and use the config in your SDK.
(Optional) Add parameters
After you assign a model to a variation, an Add parameters button appears. Use this button to configure model or custom parameters for the variation.
To add parameters:
- Click Add parameters to view the Model parameters and Custom parameters options.
- To add model parameters:
- Click Model parameters.
- Click + Add model parameters.
- Select a model parameter, such as
temperatureormax_tokens, from the list. The available parameters vary depending on the model you select. - In the configuration panel for the selected parameter, view the “Base value” and optionally enter an “Override value” for this variation.
- To add more parameters, click + Add model parameters again.
- To add custom parameters:
- Click Custom parameters.
- In the JSON editor that appears, enter your custom parameters as key-value pairs inside the curly braces (
{}).
You can continue creating or editing additional variations, or complete the variation creation process:
- Click Review and save. The “Save changes” dialog lists all the variations you’ve created. You can view your changes in a unified or split view, and expand or collapse individual variations as needed.
- (Optional) Enter a comment describing your changes.
- Click Save to add all variations to the config. Each new variation receives a version number, and the version numbers of existing variations are incremented.
Parameters display next to Add parameters
Any parameters you’ve added appear next to Add parameters in the variation.
Edit config variations
You can update variations for a config using the LaunchDarkly UI. You can edit multiple variations in the UI at the same time.
To update one or more variations in the LaunchDarkly UI:
- In the left sidebar, click Agents. The AgentControl menu appears.
- Click Configs.
- Click the name of the config to edit.
- Make changes to any of the config’s variations. You can expand or collapse individual variations to help you focus on specific updates.
- Click Review and save. The “Save changes” dialog lists the updates for each variation. You can view your changes in a unified or split view, and collapse or expand individual variations as needed.
- (Optional) Enter a comment describing the changes.
- Click Save to create a new version of the config that includes all the updates. Each updated variation receives a new version number.
You can release a new variation gradually using a guarded rollout. Guarded rollouts reduce risk and let you monitor key metrics as the change rolls out.
You can also use the REST API: Update config variation. The REST API supports updating individual variations only.
The model cost estimator
When you edit a config variation to change which model version you use, you can use the model cost estimator to preview an estimate of how your model cost may change. The model cost estimator is an inline, read-only tool that shows a projected percentage price increase or decrease when you pick a different model for a variation.
Use the model cost estimator if you:
- Evaluate tradeoffs between model quality and cost
- Maintain many config variations and want a localized cost signal before you change a model
- Optimize model selection for cost-sensitive environments
The estimator compares recent observed spend for a variation to a repriced projection that uses the newly selected model’s per-token list pricing. It displays the results of that comparison as a percentage price increase or decrease in the config variation UI. This lets you make more cost-informed model choices without updating your saved config settings or billing data.
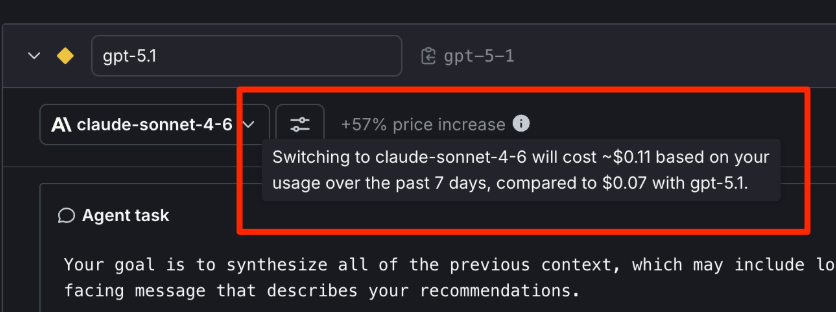
Estimates are based on seven days of variation-level monitoring and observed cost_tokens_sum. The estimator’s pricing model uses per-token list pricing for repricing and may not reflect negotiated discounts, cached token pricing, or account-level charge adjustments.
The estimator does not always appear. It is hidden if there isn’t enough data, if the selected model equals the saved model, or if the difference between the two is negligible.
Here’s how to use it:
- In the left sidebar, click Agents. The AgentControl menu appears.
- Click Configs.
- Click the name of the config to edit.
- Pick a model different from the saved model. If sufficient variation-level monitoring data exists, an inline percentage price increase or decrease appears next to the selector.
- Hover over the tooltip to display the projected and observed spend comparison.
Duplicate a config variation
Often, when you create a new variation for a config, you want the new variation to be very similar to an existing variation. You may only be changing the messages slightly or adjusting the model parameters. Instead of creating a new config from scratch, you can duplicate an existing config variation and make changes to the copy.
To duplicate an existing config variation:
-
Navigate to the detail page for the config.
-
Select the Variations tab.
-
Find the variation you want to duplicate.
-
Click the three-dot overflow menu for the variation and select Duplicate:
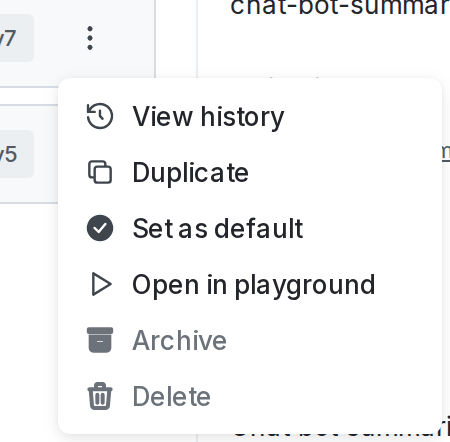
The overflow menu for a variation -
The new variation has the same name as the one you duplicated, appended with “(Copy)”. Update the new variation as needed.
-
Click Review and save.
Working with archived config variations
Each config variation can be in one of two states: “published” or “archived.”
By default, all variations are published. You can only use published variations in targeting rules.
You can mark a variation as archived if you want to keep it for reference or comparison purposes, but no longer need to use it in targeting rules or running experiments.
Archive config variations
To archive a config variation:
- Navigate to the detail page for the config.
- Select the Variations tab.
- Find the variation you want to archive.
- Click the three-dot overflow menu and choose Archive.
The variation moves to the archived view on the Variations tab, and its version number is incremented. If you compare the new variation version to the previous one, there will be no differences in the model configuration or variation content. The only difference between the two variation versions is the publication state.
View archived config variations
To view archived config variations:
- Navigate to the detail page for the config.
- Select the Variations tab.
- From the Published dropdown, select Archived to open the list of archived variations.
Restore archived config variations
To restore an archived config variation:
- Navigate to the detail page for the config.
- Select the Variations tab.
- From the Published dropdown, select Archived to open the list of archived variations.
- Find the variation you want to restore.
- Click the three-dot overflow menu and choose Restore.
The variation moves to the published view on the Variations tab, and its version number is incremented. If you compare the new variation version to the previous one, there will be no differences in the model configuration or variation content. The only difference between the two variation versions is the publication state.
Delete a config variation
To delete a config variation:
- Navigate to the detail page for the config.
- Select the Variations tab.
- Find the variation you want to delete. Use the Published dropdown to switch between the published and archived views if needed to find the variation.
- Click the three-dot overflow menu and choose Delete variation.
Approvals for variations
Changes to config variations may require approval before they take effect. For example, updating or deleting a variation value can trigger an approval workflow, depending on your environment’s approval settings. Some changes, such as adding a new variation or updating a variation’s name, do not require approval.
For information about configuring approvals, read Configuring approvals for an environment.